1
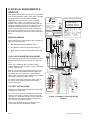
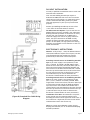
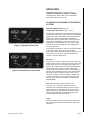
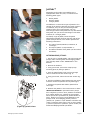
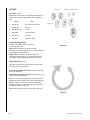
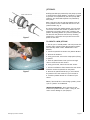
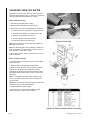
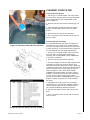
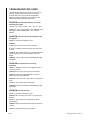
TABLE OF CONTENTS
IMPORTANT SAFETY INSTRUCTIONS
U.L. Safety Instructions ........................................ P. 02
Additional Safety Instructions .............................. P. 03
UPGRADES & ACCESSORIES ..................... P. 06
Owner’s
Manual
For all 2000 Bullfrog Portable Spas
(Multiple Patents with Other Patents Pending)
INSTALLATION & SET-UP
Selecting a Site for your Spa ................................ P. 06
Electrical Requirements & Hook-Up ..................... P. 08
Checklist Before Filling Your Spa ......................... P. 11
Initial Start-Up ....................................................... P. 12
OPERATION
Control Systems ................................................... P. 13
JetPaks .................................................................. P. 23
Jetting ................................................................... P. 24
JetZones ................................................................ P. 25
MAINTENANCE
Water Chemistry ................................................... P. 26
Changing Your Spa Water .................................... P. 30
Cleaning Your Filter .............................................. P. 31
Light Bulb Replacement........................................ P. 32
Ozone Sterilizer Replacement .............................. P. 32
Spa Shell Care ....................................................... P. 33
Spa Cabinet Care .................................................. P. 33
Spa Cover Care ..................................................... P. 34
Miscellaneous Care............................................... P. 34
LOW-USE OR NO-USE PERIODS ............... P. 35
SERVICE ............................................................. P. 36
TROUBLESHOOTING GUIDE ..................... P. 38
MISCELLANEOUS
Parts Identification Diagram ................................ P. 40
Notes..................................................................... P. 41
Bullfrog Spas Owner’s Manual
(Revised: January 1, 2000)
Page 1
IMPORTANT SAFETY
INSTRUCTIONS
When installing and using this electrical
equipment, basic safety precautions should
always be followed, including the following:
U.L. SAFETY INSTRUCTIONS:
1. READ AND FOLLOW
ALL INSTRUCTIONS.
2. WARNING - To reduce the risk of injury, do
not permit children to use this product unless
they are closely supervised at all times.
3. A wire connector is provided on this unit to
connect a minimum No. 8 AWG (8.4 mm²) solid
copper conductor between this unit and any
metal equipment, metal enclosures of electrical
equipment, metal water pipe, or conduit within 5
feet (1.5 m) of the unit.
4. DANGER - Risk of Accidental Drowning.
Extreme caution must be exercised to prevent
unauthorized access by children. To avoid
accidents, ensure that children cannot use this
spa unless they are supervised at all times.
5. DANGER - Risk of Injury. The suction fittings
in this spa are sized to match the specific water
flow created by the pump. Should the need arise
to replace the suction fittings or the pump, be
sure that the flow rates are compatible.
Never operate the spa if the suction fittings are
broken or missing. Never replace a suction
fitting with one rated less than the flow rate
marked on the original suction fitting.
6. DANGER - Risk of Electric Shock. Install at
least 5 feet (1.5 m) from all metal surfaces. As
an alternative, a spa may be installed within 5
feet of metal surfaces if each metal surface is
permanently connected by a minimum No. 8
AWG (8.4 mm²) solid copper conductor to the
wire connector on the terminal box that is
provided for this purpose.
7. DANGER - Risk of Electric Shock. Do not
permit any electric appliance, such as a light,
telephone, radio, or television, within 5 feet (1.5
m) of a spa. (These units DO NOT have an
integral ground fault circuit interrupter. The
installation of a integral ground fault circuit
interrupter MUST be done by a qualified
Page 2
Bullfrog Spas Owner’s Manual
Electrician and must meet all local and national
codes.)
8. WARNING - To reduce the risk of injury:
a) The water in a spa should never exceed 40°
C (104°F). Water temperatures between 38°C
(100°F) and 40°C are considered safe for a
healthy adult. Lower water temperatures are
recommended for young children and when
spa use exceeds 10 minutes. (Before entering
the spa or hot tub measure the temperature
with an accurate thermometer.)
b) Since excessive water temperatures have a
high potential for causing fetal damage
during the early months of pregnancy,
pregnant or possibly pregnant women should
limit spa water temperatures to 38°C (100°F).
c) Before entering a spa, the user should
measure the water temperature with an
accurate thermometer since the tolerance of
water temperature-regulating devices varies.
d) The use of alcohol, drugs, or medication
before or during spa use may lead to
unconsciousness with the possibility of
drowning.
e) Persons suffering from obesity or with a
medical history of heart disease, low or high
blood pressure, circulatory system problems,
or diabetes should consult a physician before
using a spa.
f) Persons using medication should consult a
physician before using a spa since some
medication may induce drowsiness while
other medication may affect heart rate, blood
pressure and circulation.
SAVE THESE
INSTRUCTIONS.
WARNING SIGN
Included with this spa is a warning sign (Fig. A)
to inform occasional users and guests of the risk
of using the spa. This warning sign is suitable
for indoor or outdoor use. Place this warning
sign in a conspicuous place adjacent to the spa.
For free extra copies call Bullfrog International,
L.C. at (801) 565-8111.
(Figure A) Warning Sign
ADDITIONAL SAFETY
INSTRUCTIONS:
1. WARNING - Risk of Fatal Hyperthermia.
Bullfrog Spas Owner’s Manual
Page 3
a) The use of alcohol, drugs, or medication
can greatly increase the risk of fatal
Hyperthermia in spas and hot tubs.
b) The causes, symptoms, and effects of
Hyperthermia may be described as follows:
Hyperthermia occurs when the internal
temperature of the body reaches a level
several degrees above the normal body
temperature of 37°C (98.6°F). The symptoms
of Hyperthermia include an increase in the
internal temperature of the body, dizziness,
lethargy, drowsiness, and fainting. The effects
of Hyperthermia include:
•
•
•
•
•
•
Unawareness of impending hazard;
Failure to perceive heat;
Failure to recognize the need to exit the spa
or hot tub;
Physical inability to exit the spa or hot tub;
Fetal damage in pregnant women; and
Unconsciousness and danger of drowning.
2. WARNING - Risk to Infants, the Elderly, and
Women Planning or Experiencing Pregnancy.
Please consult your physician if the above
applies to you or anyone using your spa.
3. WARNING - Risk of Children Drowning.
Although your spa cover is not rated as a safety
cover, it is wise to always keep the spa cover
securely fastened when not in use. This will help
discourage children from attempting to enter the
spa while not supervised by an adult.
4. WARNING - Risk of Drowning. Use caution
when bathing alone. Overexposure to hot water
may cause nausea, dizziness, and fainting.
5. WARNING - Risk of Injury. Always use
extreme caution while entering or exiting the
spa. Surfaces can be very slippery when wet. Do
not step or sit on HeadRests. Also, keep all
breakable objects out of the spa area.
6. WARNING - Risk of Injury. Never use the spa
immediately after strenuous exercise.
7. WARNING - Risk of Injury. Prolonged use of
the spa may be injurious to your health.
8. WARNING - Risk of Injury. Individuals with
infectious diseases should not use the spa.
9. WARNING - Risk of Injury. Short term
inhalation of high concentrations of ozone and
long term inhalations of low concentrations of
ozone can cause serious physiological effects.
Do not inhale ozone gas produced by your spa's
Ozone Sterilizer.
10. WARNING - Risk of Injury. Maintain water
Page 4
Bullfrog Spas Owner’s Manual
chemistry in accordance with chemical
manufacturer’s instructions.
11. WARNING - Risk of Shock. Spa shall not be
operated in severe weather conditions, i.e.
electrical storms, tornadoes, etc.
12. CAUTION - Unauthorized Access. Secure
the spa area against unauthorized access. Make
sure all barriers meet both state and local codes.
Keep spa cover on spa when spa is not being
used.
13. CAUTION - Risk of Damage to Spa or
Equipment. By performing maintenance as
described later in this Owner's Manual, the
chance of damage to your spa and it's
equipment will be greatly reduced. Never block
the air vents that lead to the spa equipment
compartment. Doing so may cause the spa
equipment to overheat.
14. CAUTION - Non-Approved Accessories.
Using accessories not approved by Bullfrog
International, L.C. could void your warranty or
cause other problems. Please consult with your
authorized Bullfrog Portable Spa Dealer.
15. CAUTION - Location of Your Spa. Locate
your spa on a surface that can withstand the
weight bearing requirements of the spa (see
"Selecting a Site for your Spa" in this Manual).
Also, locate your spa in an environment that can
withstand repeated exposure to water and the
possibility of a major spill.
Bullfrog Spas Owner’s Manual
Page 5
UPGRADING YOUR BULLFROG
SPA
The following are possible upgrades for your Bullfrog
Spa:
New JetPak™ designs: As new jet types and styles
become available so will new innovative JetPak
modules (Fig. B). Check will your authorized Bullfrog
Spa Dealer on a yearly basis to see what's available.
PowerPlus™: When you're ready for more horsepower
and more jets, just call your authorized Bullfrog Spa
Dealer and ask for PowerPlus.
WellSpring™ Ozone Sterilizer: For cleaner spa water,
we use the most simple, reliable, user-friendly,
affordable ozone system on the market. If your spa
did not come with one, its well worth the investment
IMPORTANT: Your spa was designed, tested, and UL
Listed with a Bullfrog CDS-16 Ozone Sterilizer. No
other Ozone Sterilizer is recommended for your
Bullfrog Portable Spa.
Miscellaneous Upgrades: For upgrades as they
become available, keep in touch with your authorized
Bullfrog Spa Dealer.
INSTALLATION & SET-UP
Before attempting to install or use your spa, please
read the U.L. Safety Instructions, the Additional Safety
Instructions, as well as all of the Installation
Instructions that follow:
(Figure B) Several JetPak™ Variations
SELECTING A SITE FOR YOUR SPA:
Your Bullfrog Spa was designed for either indoor or
outdoor use. Whether indoors or outdoors, please
adhere to the following guidelines:
1. Select a site that is stable and capable of
supporting the weight of your spa, its water, and the
people using it (refer to the “Model Brochure” or
contact an authorized Bullfrog Spa Dealer for the
Filled Weight of your spa). If installed on a suspended
floor/deck, the floor/deck should be capable of
supporting your spa. If you have concerns on this
matter, please contact a qualified Licensed Contractor.
2. Select a surface that is flat and reasonably level.
This surface must provide continuous support for the
entire bottom of the spa. Do not shim or block up the
spa creating voids below the spa.
3. Avoid installing the spa in a pit or low area where
water may accumulate and damage the spa or its
equipment. Choose a site where water will drain away
from the spa and not towards it.
4. Important: With all installations, the spa must be
located at least 5 feet from all electrical outlets,
switches, and other permanently installed electrical
devices.
Page 6
Bullfrog Spas Owner’s Manual
Indoor Considerations: There are several
considerations when installing your spa indoors: First,
the environment both around and below the spa
should be water resistant. It must be capable of
handling water splashed out from the spa as well as
the possibility of a leak from the spa (Your Bullfrog
portable spa is the most leak-free spa in the industry,
but there is still the possibility of a leak from the spa.
A catch basin equivalent to the volume of your spa is
recommended); Second, it is recommended that the
room you install the spa in has proper ventilation.
Proper ventilation can usually be achieved by an
exhaust fan or an open window.
Note: Typical indoor surfaces include, but are not
limited to: concrete, wood, non-slip tile, or linoleum.
Outdoor Considerations: When selecting an outdoor
site, several things should be considered: First, Avoid
selecting a site where excessive water may contact the
spa, such as from sprinklers or a roof edge without
rain gutters; Second, and if possible, avoid areas of
direct, prolonged sunlight. The ultraviolet rays of
sunlight will tend to fade and damage your spa cover
and cabinet; Third, Check your local codes on possible
restrictions that require fencing or childproof gates
around your spa; Last, avoid locating your spa in an
area where debris will be tracked into the spa.
Note: Typical outdoor surfaces include, but are not
limited to: concrete, brick, non-slip tile, wood-decking,
peagravel or sand.
Bullfrog Spas Owner’s Manual
Page 7
ELECTRICAL REQUIREMENTS &
HOOK-UP
All Bullfrog Portable Spas must be wired in accordance
with all local & national electric codes. Have a licensed
electrician perform the electrical installation.
Important: All metal enclosures, pipe or conduit
located within 5 feet (1.5m) of the spa must be
bonded to the Control Center Box located inside the
equipment compartment of the spa. The wire used to
complete this bonding must be a minimum No. 8
(8.4mm²) solid copper wire. It is to be connected to
the ground lug connector on the exterior surface of
the Control Center Box and all metal items described
above.
GRN
5
RED
WHT
TRA NSFORM ER
BRANC H CIRCUIT
PROTECTION ONLY
F1, 20A
J27
J3
F4
J26
J7
P.E.
J25
J9 J20
J8 J5 J13 J4
J23
30A/20A J21
J17
C O N TRO L PAN EL
CO NVERSIO N INSTRUCTIO NS:
1. CO N VERSIO N M UST BE PERFO RM ED BY A Q UAL IFIED,
LICEN S ED ELEC TRICIAN . H A RD W IRE O N LY.
2. DISC O N NECT FRO M PO W ER & REM O VE CO RD.
3. MO VE RED W IRE FRO M (TB1-1) TO (TB1-4) A S
IND ICA TED BY D A SH ED L IN ES. (D O N O T REM O VE W H T
WIRE FRO M TB1 -4).
4. MO VE THE H EATER M O D E SELEC TO R (J8) O N
THE C O NTRO L BO A RD FRO M 20A TO 50A PO SITIO N .
TB1
C O NVERSIO N DIAG RAM 120V TO 240V
1
TO J5
Neutral
120V/240V
16A/32A 60Hz
RED 4
3
BLK
2
W HT
1
W HT
20A FUSE
240V PUM P
RED P-H I
BLK P-LO W
WHT P-C O M
H TR
2
WHT
Your 120 Volt spa requires a dedicated GFCI 20 AMP
electrical circuit and a minimum supply wire size of
12 gauge. It is important that this circuit is dedicated
(not being used by any other electrical appliance) or
your spa may not function properly.
WHT TO J8
WHT
Use only a qualified Licensed Electrician to make 120
Volt electrical installations.
2 SP EED PUM P
3
BLK
BLK TO J3
FUSE
TO CO NTRO L BOARD
RED TO RL5
CONTACTOR
BLK TO RL1
FRAME
4
RED
PO WER INP UTS
GRN
RED TO
RL5 CONTACT
Hot
W
H
T
GRN
4 Kw M AX.
5
GRN
EARTH
GN D
With the 120 Volt Standard Control System, you can
take advantage of the Bullfrog PowerPlus feature by
upgrading your 120V system to a more powerful
240V system. The 240V system allows you to increase
horsepower as well as heating capacity.
120 VOLT INSTALLATION
Hot
B
L
K
USE COPPER
WIRE MIN. 8 AWG
WHT
If your spa is equipped with a Standard Control
System (BULF20), it can be wired as either a dedicated
120V or 240V system.
For specific conversion instructions, please refer to
the system wiring diagram locating inside of the
control system box.
Ground
GRN
BRN
BLU
3A FUSE
Unless you special ordered 120 Volt equipment, your
Bullfrog Portable Spa comes standard as a 240 Volt
spa.
OZON EGRN
G EN ERATO R
TEMPERATURE
120V/240V CONVERTIBLE EQUIPMENT
SENSO R
WHT
PRESSURE
SW ITC H HI-LIMIT/FREEZE
SENSOR
Deluxe/Premium Control System/BULF50/60 (Fig.
E)
R
E
D
AC INPUTS
NO
•
G
R
N
R
B0593926630
MADE IN USA
BLK
Standard Plus Control System/BULF40 (Fig. D)
PAT. NO. 4618797
K1
•
LISTED
60 HZ
COM
Standard Control System/BULF20 (Fig. C)
240V, 4Kw
HEATER, MAX.
R
MODEL: WH-BULF20-CCAJ
SPA
LIG HT
•
BALBOA INSTRUMENTS INC.
COSTA MESA, CA.
Certified to comply with
the limits for a class B
computing device pursuant
to subpart J of part 15
of the FCC rules
2 4 0 V TO 1 2 0 V P U M P C O N V E R SIO N
Please reference the wiring diagram that is specific to
your spa’s Control System:
BULF20 SYSTEM WIRING DIAGRAM
Incorporated
W H EN CO N VERTING PUM P FRO M 240V TO
120V, M O VE (W H T) W IRE FRO M 20A FUSE
H O LDER TO J7, A LSO M OVE (BLU) W IRE
FRO M N /O O N K1 TO J13. D ISCO N N ECT (W HT)
W IRE FRO M CO IL O F K 1 AN D INSUL ATE
EN D O F W IRE USING ELECTRICA L TA PE.
WIRING DIAGRAMS
Balboa
Instruments
(Figure C) Standard 120V/240V Wiring
Diagram
Position your Bullfrog Portable Spa at least 5 feet
(1.5m) from all electrical outlets or devices.
Page 8
Bullfrog Spas Owner’s Manual
240 VOLT INSTALLATION
Use only a qualified Licensed Electrician to make 240
Volt electrical installations.
Your 240 Volt Bullfrog Portable Spa requires a
dedicated 50 AMP electrical circuit and a minimum
supply wire size of 6 gauge. It is important that this
circuit is dedicated (not being used by any other
electrical appliance) or your spa may not function
properly.
Position your Bullfrog Portable Spa at least 5 feet
(1.5m) from all electrical outlets or devices.
30 AMP Conversion Option: If you do not have 50
AMPS of electrical service available, your authorized
Bullfrog Portable Spa Dealer or electrician can easily
convert your spa to operate on 30 AMPS with a
minimum supply wire size of 10 gauge. Please be
aware, that spas converted to 30 AMPS are only
capable of heating the water when the circulation
pump is in low-speed, not high-speed. This heating
limitation is acceptable in most climates as well as in
indoor installations.
ELECTRICIAN'S INSTRUCTIONS:
NOTICE: As of January 1, 1994, the National Electric
Code (Article 680-42) requires that all spas, hot tubs,
and associated electrical components shall be
protected by Ground Fault Circuit Interrupters.
Providing 120 Volt Service to the Bullfrog Portable
Spa: As per code, supply a GFCI protected, 3-wire
(Line 1, Neutral & Ground), 20-AMP, 60HZ, SinglePhase service to the front, left corner (when you are
facing the control pad) of the Bullfrog Portable Spa.
This service must include a disconnect that is visible
from the spa and located not less than five feet from
the spa and not more than 50 feet from the spa (a
GFCI Sub-Panel may be used to substitute the
disconnect if located within the same parameters).
Providing 240 Volt Service to the Bullfrog Portable
Spa: As per code, supply a GFCI protected, 4-wire
(Line 1, Line 2, Neutral & Ground), 50-AMP, 60HZ,
Single-Phase service to the front, left corner (when you
are facing the control pad) of the Bullfrog Portable
Spa. This service must include a disconnect that is
visible from the spa and located not less than five feet
from the spa and not more than 50 feet from the spa
(a GFCI Sub-Panel may be used to substitute the
disconnect if located within the same parameters).
(Figure D) Standard Plus 240V Wiring
Diagram
Installation of the GFCI: All conductors except the
green ground must be routed through the GFCI,
including the neutral. Never bypass the neutral line. If
the neutral line is bypassed, then the current will be
imbalanced and cause the GFCI to trip.
Note: For a GFCI wiring diagram, please contact
Bullfrog International, L.C. or an authorized Bullfrog
Portable Spa Dealer.
Bullfrog Spas Owner’s Manual
Page 9
Connecting the Spa:
1. Remove the equipment compartment door.
2. Remove the face-plate to the Control Center by
removing the four screws located in the front.
3. Connect a 1" non-metallic coupling and conduit to
the 1" male CPVC pipe found at the base of the spa
cabinet (see “Parts Identification Diagram” in this
manual).
4. Run the required wires through the conduit and to
the Control Center.
5. Connect the 3 wires (120V systems)/4 wires (240V
systems) to the terminal block located in the Control
Center (see appropriate “Wiring Diagram”).
6. Replace the Control Center face-plate and the
equipment compartment door.
7. The electrical hook-up is complete.
Important: Do not fill or start-up the spa until you
have completed the following section.
(Figure E) Deluxe/Premium 240V Wiring
Diagram
Page 10
Bullfrog Spas Owner’s Manual
CHECKLIST BEFORE FILLING
YOUR SPA
Important: The equipment should never be operated
without water in the spa. Serious damage to the pump
and/or heater may occur.
(Figure F) Drain Cap
1. Installing Your Cover: Your spa cover comes
with tie-down straps and locking hardware to attach
the cover to the spa or decking. If your Dealer did not
install your cover, then refer to Cover Installation
Instructions that come in the cover cardboard
packaging.
2. Check Drain-Cap: At the end of the drain hose
(located in the Equipment Compartment) is the DrainCap (Fig. F) Make sure it is securely fastened to the
end of the drain hose.
3. Tighten Equipment Fittings: In the equipment
compartment, hand-tighten all PVC Pipe Unions and
Pump Drain Plugs (Fig. G) to prevent the possibility of
leakage (sometimes these fittings loosen during
shipment).
4. Check Valve Keepers: Verify that a Valve
Keeper (Fig. H) is installed on each slice valve. Valve
keepers prevent the valve from vibrating shut during
shipment or operation. A slice valve that closes will
result in a noisy pump due to a lack of water flow to
the pump.
5. Fill the Spa: Fill the spa to approximately the
Water Level mark (Fig. I) on the back wall of the filter/
skimmer cavity (See Note 1).
(Figure G) Spa Fittings
Note 1: The higher the water level, the less spa users
it will take to cause the water to overflow the top of
the spa.
Note 2: Do not fill the spa with soft water unless the
mineral content is raised immediately (see your
Dealer).
(Figure H) Valve Keeper
5. Check for Leaks: After the spa is full, but
before turning the power on, check all the fittings and
equipment in the equipment compartment for signs of
leakage. If a leak is detected, except from fittings that
can be hand-tightened, call your authorized Bullfrog
Spa Dealer.
(Figure I) Fill Level Indication Mark
Bullfrog Spas Owner’s Manual
Page 11
INITIAL START-UP
Important: Bullfrog Spas come with either an
Standard, Standard Plus, Deluxe or Premium
Control System. Refer only to the Control System that
applies to your spa.
STANDARD & STANDARD PLUS CONTROL SYSTEMS:
Turn on the circuit breaker. Your spa will start up
automatically and will heat to 100°F (38°C) if no other
temperature is set. Depending on the outside ambient
temperature, your spa will heat at the rate of .5-1° per
hour for 120 Volt systems and between 5-10° per hour
for 240 Volt systems.
One minute after start-up, the spa will begin a 4-hour
filter cycle to clean the water. To select a different
duration, see "Preset Filter cycles" under “Operation”.
DELUXE CONTROL SYSTEM:
Turn on the circuit breaker. Your spa will start up
automatically and will heat to 100°F (38°C) if no other
temperature is set. When your spa is first actuated it
will start up in the Economy Mode and the LCD will
alternately flash “Econ”, the current spa temperature,
and “COOL” until the spa water is less than 15°F cooler
than the set temperature. During each filter cycle, the
spa will heat to the set temperature. Depending on the
outside ambient temperature, your 240 Volt spa will
heat at the rate of 5-10° per hour.
One minute after start-up, the spa will begin a four
hour filter cycle to clean the water. To select a
different duration, see " Preset Filter cycles" under
“Operation”.
PREMIUM CONTROL SYSTEM:
Turn on the circuit breaker. Your spa will start up
automatically and will be in the Economy Mode. Simply
press the “#” button to switch the spa to the Standard
Mode and begin heating. The spa will heat to 100°F
(38°C) if no other temperature is set. Depending on
the outside ambient temperature, your 240 Volt spa
will heat at the rate of 5-10° per hour.
Time of Day: You will see the words “set time”
flashing on the display. To set the time, press the
“Time” button then the “*” button then the “Warmer” or
“Cooler” button. After either button is pressed once,
the time will begin changing in one-minute
increments. Press either button to stop the time from
changing. Press the “#” button to enter your correct
time into the system. Now that the time has been set
correctly, your spa will automatically filter itself for a
2-hour period every 12 hours. For average use, a 4hour filter cycle is recommended. To select a different
duration, see “Filter Cycles” under “Operation”.
Note: If the spa does not activate after turning on the
circuit breaker, it may be necessary to press the
"Reset Button" on the GFCI breaker.
Page 12
Bullfrog Spas Owner’s Manual
OPERATION
Important: Bullfrog Spas come with either an
Standard, Standard Plus, Deluxe or Premium
Control System. Please refer only to the Control
System that applies to your spa.
STANDARD & STANDARD PLUS CONTROL
SYSTEMS
MASTER CONTROL PAD (Fig. J/K)
Temperature Adjustment (80°F - 104°F)
Temperature adjustment is controlled by pushing the
“Temp Set” button. The display shows the actual water
temperature unless the button is pressed. When the
button is pressed, the display will show the set
temperature. Pressing the button a second time will
cause the set temperature to increase or decrease
depending on what direction was last chosen. Each
successive press will change the set temperature in
the same direction.
(Figure J) Standard Control Pad
If the opposite direction is desired, release the button
and let the display revert to the actual water
temperature again. Press the button to display the set
temperature, and again to make the temperature
change in the desired direction.
2
1
(Figure K) Standard Plus Control Pad
Jets/Jets 1
Press the "Jets" button to operate the pump. Press the
button once to turn on the low-speed pump. Press the
button again to turn on the high-speed pump, and
again to turn off the pump. The low-speed pump will
automatically turn off after 2 hours and the highspeed pump after 30 minutes. Due to Automatic Spa
Control, the low-speed pump will start automatically
when the heater is turned on, when a filter cycle is
activated, or when a freeze condition is detected. If
the low-speed pump is on under the Automatic Spa
Control, it can only be deactivated by entering the
Standby Mode.
Jets 2 (Standard Plus Control System Only)
Press the "Jets 2" button to operate pump 2 (if
installed). Press the button once to turn on the lowspeed pump. Press the button again to turn on the
high-speed pump, and again to turn off the pump.
The low-speed pump & the high-speed pump will
automatically turn off in 30 minutes.
Light
Press the "Light" button to turn the spa light on and
off. The spa light will turn itself off after 4 hours of
operation.
Bullfrog Spas Owner’s Manual
Page 13
Standard and Economy Mode
The Standard Mode is the default operation mode for
the spa. When in Standard mode, the spa maintains
the desired temperature at all times. In Economy
mode, the spa only heats water during filter cycles
and has a fixed temperature setting of 100°F. To
activate the Economy Mode, change the temperature
setting on the Master Control Pad down to 80°F by
pressing the “Temp Set” button. Press the button
again and your spa will enter into the Economy Mode.
Standby Mode
(Use when removing JetPaks or cleaning the filter)
Press the “Temp Set” temperature button and then the
"Light" button. The display will show "Sb" and all
functions will be disabled except for freeze control.
Press any button to reset the system.
Preset Filter Cycles: Your spa will automatically filter
itself twice each day. The first filter cycle will begin
one minute after the spa is energized. The second
filter cycle will begin twelve hours after the start of
the first filter cycle. Filtration duration is
programmable at the Master Control Pad. Press the
"Temp Set" button, then the "Jets" button, and "F4" will
be displayed on the panel. F4 is the default filter time
and indicates a 4 hour cycle. Continue pressing the
“Temp Set” button to cycle through the rest of the
filter time options; "F2" = 2 hours, "F4" = 4 hours, and
"F6" = 6 hours. Press the "Jets/Jets 1" button to exit
filter programming. During filtration, the low-speed
pump and ozone sterilizer (if installed) will run.
Ozone Sterilizer (optional): For safety purposes, your
Ozone Sterilizer is disabled for a 30 minute period
whenever a “Jets” button is pressed.
SAFETY/FEATURE MESSAGES:
Overheat Protection (Spa is Deactivated.)
DO NOT ENTER THE WATER. If a malfunction occurs
and the spa water has reached 112°F, the display will
flash “OH” (meaning over-heat) and the system will
completely shut down. Remove the cover to cool the
water. Overheating may also occur if the filter
duration is set too long. At 110°F, the spa should
reset itself. If the high-limit sensor detects 118°F at
the heater, the spa will shut down. When the heater
cools to 110°F, press any button to reset the spa. If
the spa will not reset, then shut off power to the spa
and contact your authorized Bullfrog Spa Dealer.
Flow Switch Detection
If the panel display is flashing “FL” (meaning flow)
alternately with Temperature, one of the following
may have occurred:
1- The filter may be plugged. Remove the filter and
Page 14
Bullfrog Spas Owner’s Manual
clean.
2- The amount of water flow may be inadequate. Make
sure the spa is filled correctly.
3- A pressure switch may have malfunctioned. The spa
will continue to operate, but the heater will not
activate. Contact your authorized Bullfrog Spa Dealer.
Open Sensor (Spa is deactivated)
If the Control Pad display shows “Sn” (meaning
sensor), then either the high-limit or water
temperature sensor has malfunctioned. This must be
repaired only by an authorized Bullfrog Portable Spa
Dealer.
Standby Mode (Spa is deactivated.)
When “Sb” appears on the panel display, all spa
functions have been disabled except for freeze
control. Press any button on the control pad to reset
the system. The "Standby Mode" is primarily used to
prevent the pumps from being activated while
changing JetPaks, cleaning the filter or cleaning the
skimmer basket.
Warning! Shock Hazard! No User Serviceable Parts.
Do not attempt service of this control. Contact you
authorized Bullfrog Spa Dealer. Follow all Owner’s
Manual power connection instructions. Installation
must be performed by a licensed electrician, and all
grounding connections must be properly installed.
DELUXE CONTROL SYSTEM
MASTER CONTROL PAD (Fig. L:)
Temperature Adjustment (80°F - 104°F)
(Figure L) Deluxe Control Pad
The current temperature is constantly displayed on
the LCD. Press either the "Warmer" or "Cooler" button
once to display the set temperature. (The set
temperature is designated by a triangle in the upper
left corner.) Each time either button is pressed again,
the set temperature will increase or decrease
depending upon which button is pressed. After three
seconds, the LCD will automatically display the
current spa temperature.
Jets 1
Press the "Jets 1" button to operate pump 1. Press the
button once to turn on the low-speed pump. Press the
button again to turn on the high-speed pump, and
again to turn off the pump. The low-speed pump will
automatically turn off after 2 hours and the highspeed pump after 30 minutes. Due to Automatic Spa
Control, the low-speed pump will start automatically
when the heater is turned on, when a filter cycle is
activated, or when a freeze condition is detected. If
the low-speed pump is on under the Automatic Spa
Bullfrog Spas Owner’s Manual
Page 15
Control, it can only be deactivated by entering the
Standby Mode.
Jets 2
Press the "Jets 2" button to operate pump 2 (if
installed). Press the button once to turn on the lowspeed pump. Press the button again to turn on the
high-speed pump, and again to turn off the pump.
The low-speed pump & the high-speed pump will
automatically turn off in 30 minutes.
Light
The spa light has 3 settings. Pressing the "Light"
button changes the intensity from the brightest
setting to the dimmest setting, then turns it off. The
spa light will turn itself off after 4 hours of operation.
Standard and Economy Mode
Press the "Mode" button to switch between Economy
and Standard modes. When in Economy mode, the spa
only heats water during filter cycles. In Standard
mode, the spa maintains the desired temperature at
all times.
Standby Mode
(Use when removing JetPaks or cleaning the filter)
Press either the "Warmer" or "Cooler" button and then
the "Light" button. The display will show "Stby" and all
functions will be disabled except for freeze control.
Press any button to reset the system.
Auxiliary Control Pads (See Fig. M)
Pump 1: Press the "Jets 1" button to operate pump 1.
Press the button once to turn on the low-speed pump.
Press the button again to turn on the high-speed
pump, and again to turn off the pump. The low-speed
pump will automatically turn off after 2 hours and the
high-speed pump after 30 minutes.
Pump 2: Press the "Jets 2" button to operate pump 2.
Press the button once to turn on the low-speed pump.
Press the button again to turn on the high-speed
pump, and again to turn off the pump. The low-speed
pump and the high-speed pump will automatically
turn off after 30 minutes.
(Figure M) Auxiliary Control Pad
Preset Filter Cycles: Your spa will automatically filter
itself twice each day. The first filter cycle will begin
one minute after the spa is energized. The second
filter cycle will begin twelve hours after the start of
the first filter cycle. Filtration duration is
programmable at the Master Control Pad. Press the
"Warm" or "Cool" button, then the "Mode" button, and
"FIL4" will be displayed on the panel. FIL4 is the
default filter time and indicates a 4 hour cycle. To
increase or decrease the filter times, press the "Warm"
Page 16
Bullfrog Spas Owner’s Manual
or "Cool" button respectively. "FIL2" =2 hours, "FIL4" =
4 hours, and "FIL6" = 6 hours. Press the "Mode" button
to exit filter programming. During filtration, the lowspeed pump and ozone sterilizer (if installed) will run.
The low speed of pump 2 purges for 5 minutes at the
beginning of each filter cycle.
Ozone Sterilizer (optional): For safety purposes, your
Ozone Sterilizer is disabled for a 30 minute period
whenever a “Jets” button is pressed.
SAFETY/FEATURE MESSAGES:
Economy Mode
The spa is in economy mode. "Econ" is flashed
alternately with the current temperature and "COOL"
until the spa water is less that 15°F cooler than the set
temperature.
Overheat Protection (Spa is Deactivated.)
DO NOT ENTER THE WATER. If a malfunction occurs
and the spa water has reached 112°F, the display will
flash “OH” (meaning over-heat) and the system will
completely shut down. Remove the cover to cool the
water. Overheating may also occur if the filter
duration is set too long. At 110°F, the spa should
reset itself. If the high-limit sensor detects 118°F at
the heater, the spa will shut down. When the heater
cools to 110°F, press any button to reset the spa. If
the spa will not reset, then shut off power to the spa
and contact your authorized Bullfrog Spa Dealer.
Flow Switch Detection
If the panel display is flashing “FLO” (meaning flow)
alternately with Temperature, one of the following
may have occurred:
1- The filter may be plugged. Remove the filter and
clean.
2- The amount of water flow may be inadequate. Make
sure the spa is filled correctly.
3- A pressure switch may have malfunctioned. The spa
will continue to operate, but the heater will not
activate. Contact your authorized Bullfrog Spa Dealer.
Flow Switch Failure
If the panel display shows a constant “FLO”, a
pressure switch has malfunctioned. Contact your
authorized Bullfrog Spa Dealer.
Temperature Set Back
When the display shows “COOL”, the spa water is
more than 20°F cooler than the set temperature. The
heater will automatically activate to provide freeze
protection. This is a normal spa function; no
corrective action is necessary.
Bullfrog Spas Owner’s Manual
Page 17
Freeze Protection
If a freeze condition is detected “ICE” will be
displayed on the panel. The pump(s) will be
automatically activated. This is a normal spa
function; no corrective action is necessary. Freeze
protection is enabled regardless of the spa's status.
High-Limit Sensor Failure (Spa is deactivated)
When the panel display shows “Sn1” the high-limit
temperature sensor is non-functional. This must be
repaired only by an authorized Bullfrog Spa Dealer.
Main Sensor Failure (Spa is deactivated)
If “Sn3”appears on the display, the main sensor is
non-functional. This must be repaired only by an
authorized Bullfrog Spa Dealer.
Standby Mode (Spa is deactivated.)
When “Stby” appears on the panel display, all spa
functions have been disabled except for freeze
control. Press any button on the control pad to reset
the system. The "Standby Mode" is primarily used to
prevent the pumps from being activated while
changing JetPaks, cleaning the filter or cleaning the
skimmer basket.
Warning! Shock Hazard! No User Serviceable
Parts.
Do not attempt service of this control. Contact you
authorized Bullfrog Spa Dealer. Follow all Owner’s
Manual power connection instructions. Installation
must be performed by a licensed electrician, and all
grounding connections must be properly installed.
PREMIUM CONTROL SYSTEM
MASTER CONTROL PAD (Fig. N:)
Liquid Crystal Display
This feature constantly displays the spa
temperature, as well as the various monitoring
functions.
Program
Program Buttons
The “*” button initiates time setting, filter
programming, and panel lock routines.
The “#” button is used to switch between Economy
and Standard operation modes and also serves as
an “enter” button to initiate various programming
features.
(Figure N) Premium Control Pad
Time
Press the “Time” button to view the time of day.
Page 18
Bullfrog Spas Owner’s Manual
Press again to view the temperature of the spa water.
To change the time of day, see “Time of Day” in the
“Initial Startup” section of this Owner’s Manual.
Temperature Adjustment (80°F - 104°F)
The current temperature is constantly displayed on
the LCD. Press either the "Warmer" or "Cooler" button
once to display the set temperature and the words
“set heat”. Each time either of these buttons is
pressed again, the set temperature will increase or
decrease depending upon which button is pressed.
After three seconds, the LCD will automatically display
the current spa temperature.
Jets 1
Press the "Jets 1" button to operate pump 1. Press the
button once to turn on the low-speed pump. Press the
button again to turn on the high-speed pump, and
again to turn off the pump. The low-speed pump will
automatically turn off after 2 hours and the highspeed pump after 30 minutes. Due to Automatic Spa
Control, the low-speed pump will start automatically
when the heater is turned on, when a filter cycle is
activated, or when a freeze condition is detected. If
ac
the low-speed pump is on under the Automatic Spa
Control, it can only be deactivated by entering the
Standby Mode.
Jets 2
Press the "Jets 2" button to operate pump 2 (if
installed). Press the button once to turn on the lowspeed pump. Press the button again to turn on the
high-speed pump, and again to turn off the pump.
The low-speed pump & the high-speed pump will
automatically turn off in 30 minutes.
Light
The spa light has 3 settings. Pressing the "Light"
button changes the intensity from the brightest
setting to the dimmest setting, then turns it off. The
spa light will turn itself off after 4 hours of operation.
Standard and Economy Mode
Press the "#" button to switch between Economy and
Standard modes. When in Economy mode, the spa
only heats water during filter cycles. In Standard
mode, the spa maintains the desired temperature at
all times.
Standby Mode
(Use when removing JetPaks or cleaning the filter)
Press either the "Warmer" or "Cooler" button and then
the "Light" button. The display will show "Stby" and all
functions will be disabled except for freeze control.
Press any button to reset the system.
Bullfrog Spas Owner’s Manual
Page 19
Locking the Control Pad
To lock the entire control pad, press the “*” button
then the “#” button then the “Warmer” button all
within 3 seconds. When locked, the display will show
the spa temperature along with the lock symbol. All
buttons will be frozen except the “*” button which is
used to initiate the unlock sequence.
Locking the Temperature Only
To lock the temperature, press either the “Warmer” or
“Cooler” button to initiate the “set heat” mode. Next,
and within a 3 second time span, press the “*” button
then the “#” button then the “”Warmer” button. When
locked, the display will show the spa temperature, the
“set heat” statement, and the lock symbol. All buttons
will be frozen except the “*” button which is used to
initiate the unlock sequence.
Unlocking the Control Pad
By pressing the “*” button then the “#” button then the
“Cooler” button within 2 seconds, the lock symbol will
disppear and the control pad buttons will work again.
Auxiliary Control Pads (See Fig. O)
Pump 1: Press the "Jets 1" button to operate pump 1.
Press the button once to turn on the low-speed pump.
Press the button again to turn on the high-speed
pump, and again to turn off the pump. The low-speed
pump will automatically turn off after 2 hours and the
high-speed pump after 30 minutes.
Pump 2: Press the "Jets 2" button to operate pump 2.
Press the button once to turn on the low-speed pump.
Press the button again to turn on the high-speed
pump, and again to turn off the pump. The low-speed
pump and the high-speed pump will automatically
turn off after 30 minutes.
(Figure O) Auxiliary Control Pad
FILTER CYCLES:
Preset Filter Cycles: Your spa will automatically filter
itself for a 2-hour period every 12 hours. The first
filter cycle will begin at 2:00 AM and will continue
until 4:00 AM. The second filter cycle will begin at
2:00 PM and will continue until 4:00 PM. When a filter
cycle is active, it will be indicated on the display with a
message stating “Filter 1” for the first (AM) cycle or
“Filter 2” for the second (PM) cycle. During filtration,
the low-speed pump and ozone sterilizer (if installed)
will run. The low speed of pump 2 purges for 5
minutes at the beginning of each filter cycle.
Custom Filter Cycles: While you are not required to
set filter cycles, if you want to change them, press the
“Time” button and the time of day will be shown.
Then press the “*” button and “set time” will appear
on the display. Then press the “*” button within 3
Page 20
Bullfrog Spas Owner’s Manual
seconds and “SET START FILTER 1” (AM cycle) will
appear on the display.
Press the “Warmer” or “Cooler” button to reset the
filter start time.
Next, press the “*” button and when “SET HEAT” is on
the display, press the “Warmer” (on) button to heat the
water during filtering, or press the “Cooler” (off)
button to disable the heater during filtering.
Press the “*” to see “STOP FILTER 1” and then adjust
the stop time with the “Warmer” or “Cooler” buttons as
done above.
Press the “*” button to see “START FILTER 2” (PM cycle)
and proceed as above.
Pressing the “#” button will enter the new filter cycle
times into the system and complete the filter
programming.
Ozone Sterilizer (optional): For safety purposes, your
Ozone Sterilizer is disabled for a 30 minute period
whenever a “Jets” button is pressed.
SAFETY/FEATURE MESSAGES:
Battery Backup (no message on display)
When power has been cut off from the spa, the Master
Control Pad will use its 30-day battery backup to
preserve its settings. When this occurs, the Control
Pad will be disabled until power is restored to the spa.
Economy Mode
The spa is in economy mode. "Econ" is flashed
alternately with the current temperature and "COOL"
until the spa water is less that 15°F cooler than the set
temperature.
Overheat Protection (Spa is Deactivated.)
DO NOT ENTER THE WATER. If a malfunction occurs
and the spa water has reached 112°F, the display will
flash “OH” (meaning over-heat) and the system will
completely shut down. Remove the cover to cool the
water. Overheating may also occur if the filter
duration is set too long. At 110°F, the spa should
reset itself. If the high-limit sensor detects 118°F at
the heater, the spa will shut down. When the heater
cools to 110°F, press any button to reset the spa. If
the spa will not reset, then shut off power to the spa
and contact your authorized Bullfrog Spa Dealer.
Flow Switch Detection
If the panel display is flashing “FLO” (meaning flow)
alternately with Temperature, one of the following
may have occurred:
1- The filter may be plugged. Remove the filter and
clean.
Bullfrog Spas Owner’s Manual
Page 21
2- The amount of water flow may be inadequate. Make
sure the spa is filled correctly.
3- A pressure switch may have malfunctioned. The spa
will continue to operate, but the heater will not
activate. Contact your authorized Bullfrog Spa Dealer.
Flow Switch Failure
If the panel display shows a constant “FLO”, a pressure
switch has malfunctioned. Contact your authorized
Bullfrog Spa Dealer.
Temperature Set Back
When the display shows “COOL”, the spa water is more
than 20°F cooler than the set temperature. The heater
will automatically activate to provide freeze
protection. This is a normal spa function; no
corrective action is necessary.
Freeze Protection
If a freeze condition is detected “ICE” will be displayed
on the panel. The pump(s) will be automatically
activated. This is a normal spa function; no corrective
action is necessary. Freeze protection is enabled
regardless of the spa's status.
High-Limit Sensor Failure (Spa is deactivated.)
When the panel display shows “Sn1” the high-limit
temperature sensor is non-functional. This must be r
epaired only by an authorized Bullfrog Spa Dealer.
Main Sensor Failure (Spa is deactivated.)
If “Sn3”appears on the display, the main sensor is
non-functional. This must be repaired only by an
authorized Bullfrog Spa Dealer.
Standby Mode (Spa is deactivated.)
When “Stby” appears on the panel display, all spa
functions have been disabled except for freeze
control. Press any button on the control pad to reset
the system. The "Standby Mode" is primarily used to
prevent the pumps from being activated while
changing JetPaks, cleaning the filter or cleaning the
skimmer basket.
Warning! Shock Hazard! No User Serviceable Parts.
Do not attempt service of this control. Contact you
authorized Bullfrog Spa Dealer. Follow all Owner’s
Manual power connection instructions. Installation
must be performed by a licensed electrician, and all
grounding connections must be properly installed.
Page 22
Bullfrog Spas Owner’s Manual
JetPaks™
Depending on the model, your Bullfrog Spa is
equipped with either one, two, or all three of the
following JetPak types:
•
•
•
Bucket JetPaks
Recliner JetPaks
Lounger JetPaks
The difference in these three types of JetPaks is the
contour of the backrest. Because the Jet-Pak contours
are different, they can only be interchanged with
JetPaks of their same type (Example: You can
interchange a Bucket Seat JetPak with any other Bucket
Seat JetPak, but you cannot interchange it with either
a Recliner or a Lounger JetPak.
To identify a type of JetPak, locate the JetPak
Identification Number found on the back side of the
JetPak (example: B4-62). This number provides the
following information:
•
•
•
The Type of JetPak (B=Bucket, R=Recliner, &
L=Lounger)
The Style of JetPak (2=Style Number 2)
The Water Flow-Rate of the JetPak (62=62 Gallons
Per Minute)
INTERCHANGING JETPAKS:
1. Put the spa in "Standby Mode". This will prevent the
pump(s) from activating while interchanging JetPaks.
(See "Standby Mode" under "OPERATION" in this
Manual.)
2. Remove the headrest.
3. Using your hands, remove the SnapCap (top
mounting plate) by lifting it upward.
4. Push the JetPak forward until you have enough
room to reach the two PVC unions (Fig. P).
(Figure P) Removing a JetPak
5. Using your hands, loosen the two PVC unions (Fig.
Q).
6. Pull the manifold out from between the two unions
and then remove the JetPak from the JetPod (Fig P).
7. Exchange the JetPak with another JetPak of the
same type.
8. Reattach the JetPaks in the same manner as above.
(Figure Q) JetPak Unions
Bullfrog Spas Owner’s Manual
IMPORTANT WARNING: Spa models with 2 pumps
have 2 different jet zones. These JetZones are divided
by a JetZone Divider (see “JetZones in this manual).
Never operate the spa without the JetZone Divider in
place. Doing so, will cause serious damage to your
pump(s). Also, interchanging JetPaks from one
JetZone (see “JetZones” in this manual) to another may
result in improper water flows to one or more JetPaks.
If you have questions or problems, please consult your
authorized Bullfrog Portable Spa Dealer.
Page 23
JETTING:
Micro Jets
Ozone Jet
Cluster/Duo Jet
JET TYPES (Fig. R)
Depending on the model, your Bullfrog Portable Spa
comes with a unique combination of the following
jets:
Name
Size
•
Ozone Jet
(for ozone system only)
•
Cluster Jets
(small)
•
Duo-Blaster Jets
(small)
•
Micro Jets
(small-medium)
•
Magna Jets
(medium)
•
VSR Jets
(medium-large)
Magna Jets
VSR Jet
INTERCHANGEABLE JETS
The Micro and Magna jets are the only
interchangeable jets.
Figure R
Micro Jets: Each Micro Jet comes in either a
Directional, or Single-Spinner version, each of which is
interchangeable with the other.
Magna Jets: Each Magna Jet comes in either a
Directional, Single-Spinner, or Dual-Spinner version,
all of which are interchangeable with one another.
ADJUSTABLE JETS (Fig. S)
To adjust the water pressure on any jet, simply turn
the outer ring of the jet itself.
To Increase Jet Water Pressure: Turn the outer ring
of the jet clockwise.
To Decrease Jet Water Pressure: Turn the outer ring
of the jet counter-clockwise.
Note 1: On VSR jets, the speed the jet rotates can be
adjusted by simply moving the center adjusting knob.
Note 2: Always contact your authorized Bullfrog
Portable Spa Dealer before attempting to add jets or
pump horsepower to your spa.
Note 3: Never shut all the jets off at the same time.
Figure S
Page 24
Bullfrog Spas Owner’s Manual
JETZONES:
JetPak manifold union
Bullfrog Portable Spas powered by two pumps provide
a unique feature called JetZones. A JetZone is a region
of jets that are all powered by the same pump. With
JetZones, you decide which JetPaks are powered by
each pump.
With a two-pump spa you get two JetZones. Each of
these JetZones can be customized with the use of a
JetZone Divider (Fig. T).
JetZone Divider
Figure T
By simply moving the JetZone Divider, you can either
increase or decrease the number of JetPaks that are
powered by a particular pump, thus creating a new
JetZone. By adding JetPaks to a particular JetZone you
will decrease the power to that zone. By removing
JetPaks from a particular zone you will increase the
power to that zone.
TO CREATE A NEW JETZONE:
1. Put the spa in "Standby Mode". This will prevent the
pump(s) from activating while disconnecting JetPaks.
(See "Standby Mode" under "OPERATION" in this
Manual.)
2. Locate the JetPak that contains the JetZone Divider.
3. Remove the headrest.
4. Using your hands, remove the SnapCap™ by lifting
it upward.
5. Push the JetPak forward until you have enough
room to reach the two PVC unions.
6. Using your hands, loosen the two PVC unions.
7. Pull the manifold out from between the two unions
and then remove the JetPak from the JetPod.
Figure T
8. Remove the JetZone Divider (Fig. T) and reattach
the JetPak in the same manner as you removed it.
9. Install the JetZone Divider in a location of your
choice.
Note: If you would like to interchange JetPaks, please
refer to “JetPaks” in this Manual.
IMPORTANT WARNING: Never operate the spa
without the JetZone Divider in place. Doing so, will
cause serious damage to your pump(s).
Bullfrog Spas Owner’s Manual
Page 25
MAINTENANCE
WATER CHEMISTRY
Tap water that is safe to drink is not always right for
your spa. Normal tap water is usually filled with
minerals and micro-contaminants that are not visible
to the naked eye.
Properly testing and treating your spa water is
essential for the health of your spa as well as the
people that use it.
Proper chemical maintenance can control and help
prevent the following: 1. Bacteria, algae and fungi,
which can spread disease and infection to humans;
and, 2. Staining and scale build-up on your spa shell,
equipment, and piping; and, 3. Clogged filters.
Note 1: When using chemicals, always follow the
instructions provided on the manufacturer's labels.
Note 2: Use an accurate test kit to perform all
chemistry tests.
Note 3: Never mix chemicals.
Note 4: With the exception of Chlorine or Bromine
Tablets, always add chemicals directly to the spa,
evenly spreading the chemicals over the surface of the
water. Run the Filter Pump at high-speed for 15 or
more minutes after applying any chemical.
OVERVIEW OF WATER CHEMISTRY:
1. Sanitation: Sanitizers kill bacteria and keep the
water clean. Effective and safe sanitizers include any
of the following: GRANULAR CHLORINE (Dichlor),
GRANULAR BROMINE, CHLORINE TABLETS (TriChlor)
OR BROMINE TABLETS.
Note: Non-trichlor chlorine tablets and/or nondichlor granular chlorines must not be used in your
spa, they may damage the spa, voiding your
warranty.
2. Super-Sanitation: As your spa is used, nonfilterable wastes, including perspiration, oils, hair
sprays, etc, will build up in the spa water. These
substances make the water unattractive in appearance
and odor, and can also interfere with sanitizer
effectiveness. Normal sanitation does not eliminate
these waste substances, but Super-Sanitation does.
Super-Sanitation is achieved by "shocking" the spa
water with a NON-CHLORINE SHOCK (Potassium
Peroxymonosulfate), GRANULAR CHLORINE (Dichlor)
or GRANULAR BROMINE.
Note: Non-Chlorine Shock is the preferred shocking
chemical because it will shock the water without
raising the sanitizer level.
3. pH Control: Proper pH balance is extremely
important in controlling bacteria, providing water
that's comfortable for the user, and in preventing
damage to the spa and its equipment. Using the scale
Page 26
Bullfrog Spas Owner’s Manual
of 0-14, pH is the measure of acidity and basicity in
the water. pH levels under 7.0 are acidic while pH
levels over 7.0 are basic. The proper pH range for a
spa is 7.4 to 7.6.
High pH levels (over 7.6) can cause the following:
Scale build-up on the spa and its equipment, cloudy
water, a prematurely dirty filter, and less effective
chlorine sanitation. To correct high pH levels, add a
pH DECREASER.
Low pH levels (under 7.4) can cause the following:
Discomfort to the spa user and corrosion to the spa
and its equipment. To correct low pH levels, add a pH
INCREASER.
Note: Never use muriatic or hydrochloric acid to
adjust pH as it can damage your spa shell and
surroundings.
4. Total Alkalinity (TA): Total Alkalinity (TA) is the
measure of carbonates and bicarbonates in the water.
Low TA can cause pH to be unstable, bouncing from
one level to another, causing the water to be corrosive
or scale forming to the spa and its equipment. To
correct low TA, add a TOTAL ALKALINITY INCREASER.
High TA can cause scale build-up, cloudy water, as
well as other pH problems.To correct high TA, contact
your authorized Bullfrog Portable Spa Dealer.
5. Calcium Hardness (CH): Calcium Hardness (CH) is
the measure of dissolved calcium in the water. Low CH
(soft water) can result in staining to the spa's surface
as well as corrosion to the spa and its equipment. To
correct low CH, add a CALCIUM HARDNESS
INCREASER. High CH (hard water) can cause cloudy
water as well as rough scale build-up on the spa's
surface and equipment. To correct or manage high
CH, contact your authorized Bullfrog Portable Spa
Dealer.
6. Stain & Scale Control: Stain and scale problems are
common in hot water environments. To help prevent
and control staining and scaling, add a STAIN & SCALE
INHIBITOR.
7. Foam Control: Spa water that's polluted with body
oils and lotions, combined with high water
temperatures, can cause excessive surface foaming.
To prevent and control foam on the surface of the spa
water, add a FOAM REMOVER.
8. Clearing Cloudy Water: There are two basic
reasons that spa water becomes cloudy. First, nonfilterable liquid wastes (perspiration, etc.) have
contaminated the water. To remove these waste
substances, Super-Sanitize the water (as described
above). Second, non-filterable micro-particulate
wastes (dust, etc.) have contaminated the water. To
remove these wastes substances, use a WATER
CLARIFIER.
Note: Names of spa chemicals will vary from one
manufacturer to another. Please consult your
authorized Bullfrog Portable Spa Dealer if you have
questions.
Bullfrog Spas Owner’s Manual
Page 27
STARTING YOUR SPA WITH NEW WATER:
1. As your spa fills with tap water , add the prescribed
dose of a STAIN & SCALE INHIBITOR. This will provide
the initial protection against staining and scaling.
Note: Do not use soft water unless the mineral content
is raised immediately.
2. When your spa is completely filled with water, add
the prescribed dose of a WATER CLARIFIER. This will
clear the water of any micro-particulates that came
with the new water.
3. If possible, have your authorized Bullfrog Spa
Dealer test the Calcium Hardness (CH) of your spa
water and adjust as per your dealer's recommendation
(the correct level of CH depends on your overall water
conditions).
4. Test and adjust the Total Alkalinity (TA) to the
range of 125-150 PPM (parts per million).
5. Test and adjust the pH to the range of 7.4-7.6.
6. After the spa water has circulated for
approximately one hour, add 1/2 teaspoon of
GRANULAR CHLORINE or 1 teaspoon of GRANULAR
BROMINE per each 200 gallons of spa water. After
several hours, check sanitizer level and, if necessary,
adjust to the following:
Without Ozone
With Ozone
Chlorine Level:
2.0 PPM
1.0 PPM
Bromine Level:
3.0 PPM
2.0 PPM
Important: Unless you have ozone, do not use the spa
if the sanitizer level is below 1.0.
Start-up water chemistry is now complete. However, it
may take several days for the filter to completely clear
the water.
MAINTAINING SPA WATER
Sanitizer and pH Levels:
It is important to test and adjust the sanitizer and pH
levels of your spa on a frequent basis. If your spa is
used 0-3 times weekly, then we recommend that you
test your spa water a minimum of 2-3 times that
week. For each additional use you should test your
spa water one additional time.
Always test the pH level before you test the sanitizer
level. If the pH level is not in the range of 7.4-7.6,
then make the necessary adjustment. Use the dosage
prescribed on the label.
With each sanitizer test, use either GRANULAR
BROMINE or GRANULAR CHLORINE to maintain the
following levels:
Without Ozone
With Ozone
Chlorine Level:
2.0 PPM
1.0 PPM
Bromine Level:
3.0 PPM
2.0 PPM
Page 28
Bullfrog Spas Owner’s Manual
To maintain the above sanitizer level with CHLORINE
or BROMINE TABLETS, please refer to your
authorized Bullfrog Portable Spa Dealer for
assistance.
Super-Sanitation:
Once per week, and when the spa is not in use,
Super-Sanitize the spa water by adding one of the
following:
•
Two teaspoons of GRANULAR CHLORINE per 200
gallons of spa water.
•
Four teaspoons of GRANULAR BROMINE per 200
gallons of spa water.
•
Five teaspoons of a NON-CHLORINE SHOCK per
200 gallons of spa water.
Note 1: With above-average use, Super-Sanitation
may be required more than once per week.
Note 2: With ozone, it may not be necessary to
shock on a weekly basis (see your dealer).
Stain & Scale Control: Use a STAIN & SCALE
INHIBITOR as per the instructions on the
manufacturer's label. Do not add this chemical until
3-4 days after Super-Sanitation.
Foam Control: As needed, use a FOAM REMOVER as
per the instructions on the manufacturer's label.
Cloudy Water Prevention & Control: Use a WATER
CLARIFIER as per the instructions on the
manufacturer's label. Do not add this chemical until
3-4 days after Super-Sanitation.
WATER CHEMISTRY TROUBLESHOOTING
Prior to each spa use, check the spa water. If the
water appears cloudy or off-color, has significant
surface foam or smells of chlorine/bromine, then
there is a problem with the water and it needs to be
treated or drained. Using the spa in these
conditions could result in a skin rash or other
irritation.
For assistance in handling spa water chemistry
problems, consult your authorized Bullfrog Portable
Spa Dealer or another service center capable of
performing a Computerized Water Analysis.
Bullfrog Spas Owner’s Manual
Page 29
CHANGING YOUR SPA WATER
Depending on usage, your spa water will need to be
changed approximately every 2-4 months or whenever
your spa water becomes difficult to manage.
Steps to Drain Your Spa:
1. Disconnect electrical power supply.
2. Remove door to Equipment Compartment.
3. Drain water from spa by completing the following:
a. Locate Drain Hose in Equipment Compartment.
b. Lift Drain Hose higher than water level in spa.
c. Remove cap on Drain Hose (Fig. U).
d. Connect garden hose to Drain Hose.
e. Lower Drain Hose to ground level.
(Figure U) Drain Cap
Note 1: Drain water to an area that can handle the
gallonage of your spa.
Note 2: If draining water onto vegetation, make sure
that the sanitizer level (bromine or chlorine level) of
your spa water is less than .5 PPM.
4. Clean the spa shell (refer to "Spa Shell Care" in this
Owner's Manual).
Steps To Refill Your Spa:
1. Remove garden hose from Drain Hose and replace
Drain Hose Cap.
2. Reattach door to Equipment Compartment.
3. Refill spa with tap water. Fill the spa to any point
between the two Water Level Indentation marks
located on the back wall of the filter/skimmer cavity.
The depth range of these marks is 6-7½” down from
top of spa.
Note 1: The higher the water level, the fewer spa
users it will take to cause the water to overflow the
top of the spa.
Note 2: Do not fill your spa with soft water unless the
mineral content is raised immediately.
4. Restore electrical power supply.
5. See "Starting Your Spa with New Water" under
"Water Chemistry" in this Owner's Manual.
(Figure W) Skimmer, Basket & Filter Assembly
Page 30
Bullfrog Spas Owner’s Manual
CLEANING YOUR FILTER
Cleaning the Filter Basket:
1. Put the spa in "Standby Mode". This will prevent
the pump from activating while cleaning the basket.
(See "Standby Mode" under "OPERATION" in this
Owner's Manual.)
2. Remove skimmer face-plate and basket (Fig. V &
W).
3. Clean the basket. Avoid hitting basket against
objects to knock debris loose as this can break
basket.
4. Reinstall skimmer face-plate and basket.
5. Press any button on the control pad to reset the
control system.
Cleaning the Filter Cartridge:
(Figure V) Skimmer, Basket & Filter Location
It is recommended that your Filter Cartridge(s) be
cleaned every 3 to 6 weeks or as needed. Replace
the Filter Cartridge(s) approximately every two years
or when necessary. To maintain warranty protection,
use only Bullfrog Filter Cartridge replacements.
1. Put the spa in "Standby Mode". This will prevent
the pump from activating while cleaning the
cartridge. (See “Standby Mode” under "OPERATION"
in this Owner's Manual.)
2. Remove skimmer face-plate and basket.
3. Grasp cartridge(s) and lift out. With a garden hose
and nozzle or other high pressure device, hose
cartridge(s) clean with jet stream of water. Work top
to bottom on each pleat. To remove collected suntan
lotions and body oils that hosing will not remove;
soak cartridge(s) in warm water with a FILTER
CLEANER or detergent added. To remove calcium
deposits (a white chalky material) soak cartridge(s)
in a one part muriatic acid to ten parts water
solution. USE A PLASTIC CONTAINER ONLY. Calcium
deposits indicate a high spa pH, which should be
corrected.
5. CAUTION: Using a brush to clean a cartridge
could damage it. Commercially available cartridge
cleaners may be used and can be obtained from
your authorized Bullfrog Portable Spa Dealer.
6. Reinstall cartridge(s), basket and skimmer faceplate.
7. Press any button on the control pad to reset the
control system.
(Figure W) Skimmer, Basket & Filter Assembly
Bullfrog Spas Owner’s Manual
Page 31
LIGHT BULB REPLACEMENT
To replace a burned out or defective light bulb,
complete the following steps:
1. Disconnect electrical power supply.
2. Remove the door to the Equipment Compartment.
3. Locate the back of the Spa Light Fixture (Fig. X).
4. Grasp the light bulb holder located on the back of
the Spa Light Fixture. Twist counter-clockwise to
release it from Spa Light Fixture. Pull light bulb holder
out of Spa Light Fixture.
5. Replace light bulb and reinstall light bulb holder
into Spa Light Fixture.
6. Replace door to Equipment Compartment.
(Figure X) Light Bulb Location
7. Restore electrical power supply.
OZONE STERILIZER
REPLACEMENT
On the front of your Bullfrog Ozone Sterilizer
(optional) is an ozone indicator light (the Ozone
Sterilzer is located in the equipment compartment).
This indicator light will glow whenever ozone is being
produced.
To verify that your Ozone Sterilizer is working
properly, check the indicator light when the filter
pump is running and only during a preprogrammed
filter cycle, making sure that the indicator light glows
(do not check the indicator light if you have activated
the jets within the previous 30 minutes - as a safety
device, your Ozone Sterilizer shuts down for 30
minutes after the “Jets” button has been pressed).
If the indicator light does not glow when the filter
pump is running then your Sterilizer is not working
properly. When this occurs, take the following steps:
1. Disconnect electrical power supply.
2. Locate the Ozone Sterilizer (Fig. Y).
3. Unplug the Ozone Sterilizer's power supply cord
from your spa's Control Center.
(Figure Y) Ozone Sterilizer Location
4. Disconnect the output tubing from the Ozone
Sterilizer.
5. Remove the mounting screws that hold the Ozone
Sterilizer in place.
6.Take the entire Ozone Sterilizer to your authorized
Bullfrog Portable Spa Dealer. Your Ozone Sterilizer will
be checked to verify that it is defective. If defective,
then replace the entire Ozone Sterilizer with a new
one.
Note: If your Ozone Sterilizer is found to be working
properly, then you may have a problem with your
spa's Control Center or Control Pad. Consult your
dealer and request a service call.
7. Reinstall the Ozone Sterilizer by reversing the
above procedure.
Page 32
Bullfrog Spas Owner’s Manual
SPA SHELL CARE
Your Bullfrog spa surface is durable and easy to clean:
Quarite Plus® Spa Surface:
For normal cleaning, use Ivory® Liquid dishwashing
detergent or its equivalent. For stubborn stains, use
Spic & Span® in powder form or its equivalent. To
apply these cleaners, use a soft, damp cloth or
sponge. Rinse well and dry with a clean cloth.
Centrex® Spa Surface:
For normal cleaning, use a mild soap solution (5%
Ivory® Flakes in water), a mild detergent solution (3%
Tide® in water), Household Ammonia, or Mineral
Spirits. For surface mars, use Baking Soda. To apply
these cleaners, use a soft, damp cloth or sponge.
Rinse well and dry with a clean cloth.
General Cleaning:
With normal use of your spa, oils, lotions and
hairsprays will build up on the surface of the water,
sometimes leaving a scum line around the perimeter
of your spa shell. This scum line can easily be
removed with a spa SURFACE CLEANER or its
equivalent.
To remove grease, oil, paint and ink stains, use 25%
isopropyl (rubbing) alcohol in water.
For hard water stains consult your authorized Bullfrog
Portable Spa Dealer for acceptable cleaning agents.
To remove light scratches and/or to protect your
spa’s shell, see your Bullfrog Dealer for an acceptable
spa wax.
Note 1: Never allow your spa surface to come in
contact with acetone (nail polish remover), nail polish,
dry cleaning solution, lacquer thinners, gasoline, pine
oil, abrasive cleaners, or any other harsh chemical.
These chemicals can damage your spa shell and void
your warranty.
Note 2: Avoid using cleaning agents that will leave
suds in your spa water.
Note 3: Be sure to clean the JetPaks and the JetPods
(the area behind the JetPaks) approximately twice
each year.
SPA CABINET CARE
EternaWood & EternaStone Cabinets: Your
EternaWood and EternaStone cabinet components are
made to provide many years of maintenance free
service. For normal cleaning, use Ivory® Liquid
dishwashing detergent or its equivalent. For stubborn
stains, contact your authorized Bullfrog Portable Spa
Dealer.
Cedar Wood Cabinet: Depending on exposure to
sunlight, water, and spa chemicals, your spa cabinet
will require staining every 3-9 months. Use an oilbased stain that absorbs into the wood. See your
Bullfrog Spas Owner’s Manual
Page 33
authorized Bullfrog Portable Spa Dealer for the right
stain.
Note 1: Avoid sealers that cover only the outside of
the wood, causing the inside to dry out and crack or
even warp.
Note 2: To prevent stain from getting on other
surfaces, use drop cloths at the base of the spa and
use painter's tap around the top lip of the spa.
SPA COVER CARE
Your spa cover is warranted by its manufacturer,
Sunstar Enterprises, 127 N. Las Posas, San Marcos, CA
92069 (Phone 619-744-2172). Although basic
instructions are provided below, it is important that
you refer to the Sunstar information that came with
your cover. Sunstar provides detailed information on
caring for your spa cover and what to do to protect its
warranty.
Cleaning & Conditioning Your Spa Cover:
On a monthly basis, complete the following:
1. Remove the spa cover and lay it down on a flat,
clean surface near a garden hose.
2. Rinse the cover to remove any loose debris.
3. Using a soft bristle brush, clean the top (vinyl
portion) of the cover with a mild solution of
dishwashing liquid soap-about one teaspoon of soap
to two gallons of water. Scrub the cover, using a
gentle circular motion, being careful not to let any
areas of the cover dry before rinsing with water.
4. Rinse the cover thoroughly and then dry with a
clean cloth.
5. Use saddle soap (never use Armorall) to condition
the cover. Follow directions on the container.
6. Wipe and/or rinse any dirt from the bottom side of
the cover.
7. Replace the cover and secure with cover locks.
Note: To remove tree sap, use lighter fluid (not
charcoal lighter, but the type used in cigarette
lighters). Use sparingly. Immediately apply saddle
soap to that area.
MISCELLANEOUS CARE
Cleaning & Protecting the Headrests: Clean on a
regular basis with soap, water and a clean cloth. Use
Armorall® Protectant or its equivalent once per month.
This will maintain water resistance and luster of the
product.
Vacuuming the Spa: Debris from wind, trees, and spa
users will occasionally accumulate on the bottom of
your spa. Your spa's filtration system will remove the
Page 34
Bullfrog Spas Owner’s Manual
smaller debris. Debris that is too large or too heavy
for the filtration system will have to be removed by
the use of a spa vacuum. If you do not have a spa
vacuum, please contact your authorized Bullfrog
Portable Spa Dealer.
Cleaning the Scum Line: With normal use of your spa,
oils, lotions and hairsprays will build up on the
surface of the water, sometimes leaving a scum line
around the perimeter of your spa shell. This scum line
can easily be removed with a spa SURFACE CLEANER
or its equivalent. See your authorized Bullfrog Portable
Spa Dealer for this product.
Note: Avoid using cleaning agents that will leave suds
in your spa water.
LOW-USE OR NO-USE PERIODS
At certain times of the year you may not use your spa
as often as expected. For these low-use or no-use
periods, we recommend the following:
Low-Use: If your spa is being used less than once per
month, then you may wish to lower the temperature
setting by approximately 5-10°F or put the spa in the
"Economy Mode". Lowering the temperature on your
spa will cut your cost of operation if you are not using
the spa for extended periods, however, you will need
to adjust the temperature setting approximately 15
minutes before each use to heat the spa to the
desired level.
No Use for 1-2 Weeks: If you plan to not use your spa
for one-two weeks, then we suggest that you not
make any changes in operating your spa. Substantially
reducing the water temperature (in well insulated
spas) for short periods of time has proven to increase
heating costs.
No Use for 2-6 Weeks: If you plan to not use your spa
for two-six weeks, then you may wish to lower the
temperature setting to approximately 80°F during the
No-Use period.
No Use for Over 6 Weeks: If you plan to not use your
spa for over six weeks, then it is suggested that you
winterize your spa by taking the following steps:
SPA WINTERIZATION:
1. Drain the water from the spa (see "Steps to Drain
Your Spa" under "Changing Your Spa Water" in this
Owner's Manual).
2. Drain the spa equipment. This is done by removing
the drain plug from the pump(s) and loosening all PVC
pipe unions and pump air bleed valves in the
equipment compartment.
3. Clean the spa shell (see "Spa Shell Care" in this
Owner's Manual).
4. Remove filter cartridge(s), clean filter (see "Cleaning
Your Filter" in this Owner's Manual), allow to dry, and
Bullfrog Spas Owner’s Manual
Page 35
then store inside your garage or home.
5. Reattach and secure cover to the spa.
SPA DE-WINTERIZATION:
De-Winterization is completed by reversing the above
procedure and then refilling the spa (see "Steps to
Refill Your Spa" under "Changing Your Spa Water" in
this Owner's Manual).
Note: During periods of No-Use, you should test and
chemically treat the water approximately once per
week. Not doing so may lead to corrosion, staining
and/or scaling to your spa and its equipment. If there
is no one available to take care of the spa on a weekly
basis, then it is recommended that you winterize your
spa as described above.
SERVICE
Before requesting service from your dealer, refer to
the Trouble Shooting Guide in this Owner's Manual to
determine the necessary coarse of action. If you are
not able to solve the problem using the Trouble
Shooting Guide, please contact your authorized
Bullfrog Portable Spa Dealer.
WARRANTY SERVICE
If your Bullfrog Portable Spa fails within the warranty
period and within the scope of its warranty, contact
your authorized dealer and schedule a service call.
You will be required to show proof of purchase by
provided your dealer with a copy of your original
sales receipt.
Note : Damage caused by repairs made by someone
other than an authorized Bullfrog Portable Spa
technician will not be covered by your warranty.
NON-WARRANTY SERVICE
We recommend having an authorized Bullfrog Portable
Spa technician perform all repairs on spas that fail
outside of warranty coverage or beyond the warranty
period. If you are not able to use an authorized
Bullfrog Spa technician, we encourage you to request
and use genuine Bullfrog replacement parts.
If you are not able to obtain service in your area, call
Bullfrog International, L.C. at:
Phone: 801-565-8111
E-Mail: [email protected]
Page 36
Bullfrog Spas Owner’s Manual
Purchase Information
____________________________________________________
YOUR SPA'S SERIAL NUMBER
____________________________________________________
DATE YOU PURCHASED YOUR SPA
Dealer Information
____________________________________________________
Dealer Name
____________________________________________________
Street Address
____________________________________________________
City, State, & Zip Code
____________________________________________________
Phone Number
Bullfrog Spas Owner’s Manual
Page 37
TROUBLESHOOTING GUIDE
The following guide was prepared to assist you in
solving simple problems with your spa. If the
problem with your spa cannot be solved after
following these procedures, please contact your
authorized Bullfrog Portable Spa Dealer.
PROBLEM: Control Panel displays one of the
following messages:
"ECON", "OH", "FLO", "COOL", "ICE", "Sn1" or "Sn3".
Cause: For causes and solutions, see “Safety/Feature
Messages" under "OPERATION" in this Owner's
Manual.
PROBLEM: Control Pad and spa equipment do
not operate.
Cause: 1. No electrical power to spa.
Solution:
A. Reset or turn on the GFCI circuit breaker.
B. Have a qualified electrician check your electrical
service.
Cause: 2. The 30-Amp (20-Amp on Standard Control
System/BULF20) fuse in the Control System has
blown.
Solution: Contact your authorized Bullfrog Portable
Spa Dealer.
PROBLEM: Spa pump turns off during
operation.
Cause: 1. Automatic timer has completed its 30 or
120 minute cycle.
Solution: Turn on the pump at the Control Pad.
Cause: 2. Pump has overheated due to vents in
equipment door being blocked.
Solution: Clear items away from vents in equipment
door.
Cause: 3. The pump motor is defective.
Solution: Contact your authorized Bullfrog Portable
Spa Dealer.
PROBLEM: Spa will not heat.
Cause: 1. Spa filter cartridge is dirty.
Solution: See "Cleaning Your Filter" in this Owner's
Manual.
Cause: 2. Thermostat on Control Pad has been
turned down.
Solution: Adjust thermostat to desired temperature
setting.
Cause: 3. High Limit sensor has tripped.
Page 38
Bullfrog Spas Owner’s Manual
Solution: Touch any button on the Control Pad to
reset High Limit.
Cause: 4. Heating System is defective.
Solution: Contact your authorized Bullfrog Portable
Spa Dealer.
PROBLEM: Spa Light does not work.
Cause: 1. Light bulb has burned out.
Solution: See "Light Bulb Replacement" in this
Owner's Manual.
Cause: 2. Lighting System is defective.
Solution: Contact your authorized Bullfrog Portable
Spa Dealer.
PROBLEM: Spa pump will not turn on, creates
burning smell when running, or makes excessive
noise when running.
Cause: Pump motor is defective.
Solution: Contact your authorized Bullfrog Portable
Spa Dealer.
PROBLEM: Jets surge on and off.
Cause: Water level in spa is too low.
Solution: Adjust water level to any point between
the two water level indentation marks on the back
wall of the filter/skimmer cavity.
PROBLEM: Jets are weaker than normal or do
not work at all, but in both cases the pump is
running.
Cause: 1. Spa filter cartridge is dirty.
Solution: See "Cleaning Your Filter" in this Owner's
Manual.
Cause: 2. There is air trapped in the spa equipment
or its face piping.
Solution: Open the air-bleed valve on each pump
housing and allow air to bleed out of system. Be
sure to tighten each air-bleed valve as soon as water
starts to flow out.
Cause: 3. The Suction Fitting(s) are blocked.
Solution: Remove any item or debris that is blocking
each Suction Fitting.
Cause: 4. The JetZone Divider is not installed (This
only applies to spas that have two pumps).
Solution: Re-install in the appropriate JetPak
position. (Warning: Running your spa without a
JetZone Divider can cause serious damage to your
pump.)
Cause: 5. Slice Valve is closed.
Solution: Open Valve and secure with Valve Keeper.
Bullfrog Spas Owner’s Manual
Page 39
PARTS IDENTIFICATION
Inside Equipment Compartment
Underwater Light
(back side)
Control Center
Union
Slice Valve
Pump #1
Pump #2
Heater
Top View of Spa (C Class Model 672 Shown)
SnapCap
TM
Headrest
JetPak
TM
Suction Fittings
Ozone Jet
Floor Drain
Lights
Auxiliary Control Pad
(“C” Series only)
Water Level
Indicator Mark
Foot Jet
Skimmer
Skimmer Basket
Filter
Page 40
Thermostat Sensor
Master Control Pad
Equipment Compartment:
Drain Hose (inside)
Product Specifications Label (inside)
Bullfrog Spas Owner’s Manual
NOTES:
Bullfrog Spas Owner’s Manual
Page 41
Bullfrog International, L.C.
9479 South 500 West • Sandy, Utah 84070
801 565-8111 • Fax 801 565-8333
www.bullfrogspas.com
E-mail: [email protected]
Page 42
Bullfrog Spas Owner’s Manual