1
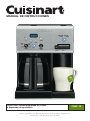
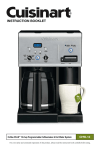
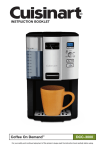
INSTRUCTION BOOKLET
Coffee PLUS® 12-Cup Programmable Coffeemaker & Hot Water System
CHW-12
For your safety and continued enjoyment of this product, always read the instruction book carefully before using.
Important
Safeguards
19. WARNING: TO REDUCE THE
RISK OF FIRE OR ELECTRIC SHOCK, DO
NOT REMOVE THE BASE PANEL. NO USERSERVICEABLE PARTS ARE INSIDE. REPAIR
SHOULD BE DONE ONLY BY AUTHORIZED
PERSONNEL.
When using electrical appliances, basic safety
precautions should always be followed to
reduce the risk of fire, electric shock and/or
injury to persons, including the following:
1. READ ALL INSTRUCTIONS.
20. Do not place cloth or otherwise restrict
airflow beneath Coffeemaker.
21. Use only the Cuisinart® Gold Tone Commercial
Style Filter or standard basket paper filter with
this unit. OTHER GOLD TONE PERMANENT
FILTERS MAY CAUSE THE COFFEEMAKER
TO OVERFLOW.
2. Do not touch hot surfaces. Use handles
and knobs.
3. To protect against electric shock, do not place cord, plug, or base unit in water or
other liquids.
SAVE THESE
INSTRUCTIONS
4. This appliance should not be used by or near
children or individuals with certain disabilities.
5. Always unplug from outlet when not in use and
before cleaning. Allow to cool before putting on
or taking off parts and before cleaning the
appliance.
FOR HOUSEHOLD
USE ONLY
6. Do not operate any appliance with a
damaged cord or plug or after the appliance
malfunctions or has been dropped or damaged
in any manner. Return appliance to the nearest
Cuisinart Repair Center for examination, repair,
and electrical or mechanical adjustment.
7. The use of accessory attachments
not recommended by Cuisinart may
cause injuries.
8. Do not use outdoors.
9. Do not let cord hang over edge of table or
counter, or touch hot surfaces.
10. Do not place on or near a hot gas or
electric burner, or in a heated oven.
11. Always fill water reservoir first, then plug cord
into the wall outlet. To disconnect, push the Off
button, then remove plug from wall outlet.
12. Do not use appliance for other than
intended use.
13. Snap lid securely onto carafe before
serving any beverages.
14. Scalding may occur if the lid is removed
during the brewing cycle.
15. The glass carafe is designed for use with this
appliance only. It must never be used on the
range top.
16. Do not set a hot carafe on a wet or
cold surface.
17. Do not use a cracked carafe or a carafe
having a loose or weakened handle.
18. Do not clean carafe or heating plate
with cleansers, steel wool pads, or other
abrasive materials.
2
WARNING: RISK Of FIRE
OR ELECTRIC SHOCK
NOTICE
This appliance has a polarized plug (one
blade is wider than the other). To reduce
the risk of electric shock, this plug will fit into
a polarized outlet only one way. If the plug
does not fit fully into the outlet, reverse the
plug. If it still does not fit, contact a qualified
electrician. Do not modify the plug in any way.
The lightning flash with arrowhead
symbol within an equilateral triangle
is intended to alert the user to the
presence of uninsulated dangerous
voltage within the product’s
enclosure that may be of sufficient
magnitude to constitute a risk of fire
or electric shock to persons.
OPERATING NOTICE
Clogging and backing up of water and/or
coffee in the filter basket can occur under
any or a combination of any of the following
conditions: The use of too finely ground
coffee, using two or more paper filters, using
the gold tone filter in conjunction with a paper
filter, not properly cleaning coffee grounds
from the gold tone filter, or allowing coffee
grounds to spill over the filter.
Caution: Never open the filter basket during
the brewing cycle, even if no water is draining
from the filter basket, since extremely hot
water/coffee can spill out from the filter basket
and cause injury. If water/coffee is not draining
from the filter basket during the brewing cycle,
unplug the unit and wait 10 minutes before
opening and checking the filter basket.
The exclamation point within an
equilateral triangle is intended to
alert the user to the presence of
important operating and
maintenance (servicing) instructions
in the literature accompanying the
appliance.
SPECIAL CORD SET
INSTRUCTIONS
A short power-supply cord is provided to
reduce the risks resulting from becoming
entangled in or tripping over a longer cord.
Longer extension cords may be used
if care is exercised.
If a long extension cord is used, the marked
electrical rating of the extension cord must be
at least as great as the electrical rating of the
appliance, and the longer cord should be
arranged so that it will not drape over the
countertop or tabletop, where it can be pulled
on by children or tripped over.
WARNING
RISK OF FIRE OR ELECTRIC SHOCK
DO NOT OPEN
WARNING: TO REDUCE THE RISK OF FIRE OR ELECTRIC SHOCK,
DO NOT REMOVE COVER (OR BACK)
NO USER-SERVICEABLE PARTS INSIDE
REPAIR SHOULD BE DONE BY AUTHORIZED SERVICE PERSONNEL ONLY
3
CONTENTS
THE QUEST
FOR THE PERFECT
CUP OF COFFEE
Important Safeguards . . . . . . . . . . . . . . . . . . . 2
Unpacking Instructions . . . . . . . . . . . . . . . . . . 4
The Quest for the Perfect Cup of Coffee . . . . 4
Element 1: Water
Features and Benefits . . . . . . . . . . . . . . . . . . . 5
Coffee is 98% water. The quality of that
water is as important as the quality of your
coffee. If water doesn’t taste good from
the tap, it won’t taste good in your coffee.
Cuisinart includes a charcoal water filter to
remove chlorine, bad tastes and odors, for
the purest coffee flavor, every time you
brew.
Control Panel . . . . . . . . . . . . . . . . . . . . . . . . . . 6
Before First Use . . . . . . . . . . . . . . . . . . . . . . . 7
Programming Your Coffeemaker . . . . . . . . . . . 7
Charcoal Water Filter . . . . . . . . . . . . . . . . . . . . 7
Brewing Coffee . . . . . . . . . . . . . . . . . . . . . . . . 8
Brew Pause™ Feature . . . . . . . . . . . . . . . . . . . 8
Using Hot Water System . . . . . . . . . . . . . . . . . 8
Element 2: Coffee
Cleaning and Maintenance . . . . . . . . . . . . . . . 9
While coffee is 98% water, all of the flavor
comes from the beans. To achieve the
same great taste you enjoy at a coffee bar,
you need to use the same quality of
coffee. If you choose to grind your own
beans, buy them fresh and whole. Buy
only about a two-week supply at a time,
because once the bean is broken, its
flavor degrades quickly.
Warranty . . . . . . . . . . . . . . . . . . . . . . . . . . . . 10
UNPACKING
INSTRUCTIONS
1. Place the box on a large, sturdy, flat surface.
2. Remove the instruction book and any other
literature.
Element 3: Grind
3. Turn the box so that the back side of the
Coffeemaker is down and slide the
Coffeemaker from the box.
The grind is critical for proper
flavor extraction. If the grind is too fine,
over-extraction and bitterness will result.
Too fine a grind may also clog the filter. If
grind is too coarse, the water will pass
through too quickly and the maximum
flavor will not be extracted. When grinding
your own beans, we recommend a
medium-fine grind.
4. After the Coffeemaker has been removed,
place the box out of the way and lift off the
packing material.
5. Grasp the carafe by its handle, remove it from
the heating plate, and remove the polybag.
6. Remove the polybag covering the Coffeemaker.
Save all packing materials in case you have to
ship the machine in the future.
KEEP ALL PLASTIC BAGS AWAY FROM
CHILDREN.
Element 4: Proportion
Coffee that is too strong or too weak is
always a disappointment. Follow the
recommended portions of ground coffee
in the instructions under Brewing Coffee,
and later adjust the amount to suit your
taste.
4
Coffeemaker FEATURES AND BENEFITS
1. Coffeemaker Reservoir Cover
9.Cord Storage (not shown)
10. Brew Pause™
Flips back for easy filling.
2.Coffeemaker Water
Reservoir (not shown)
With water level indicator window.
3.Showerhead (not shown)
Stops flow of coffee from basket when
carafe is removed from the heater plate,
so a cup can be poured in mid-brew.
11. Carafe
Distributes water evenly over coffee,
reducing temperature loss as water
passes through grounds.
The easy-pour, no-drip 12-cup carafe
has an ergonomic handle and brewed
coffee markings.
4.Coffeemaker Charcoal
Water Filter Holder
12.Adjustable Heater Plate
5.Charcoal Water Filter
13.Ready Tone (not shown)
6.Filter Basket (not shown)
14.Power Loss Back-up System
(not shown)
Keeps brewed coffee at desired temperature.
Scratch-resistant with nonstick coating.
Holds filter firmly in place.
Eliminates chlorine, calcium and bad tastes
and odors from tap water.
Signals the end of the brew cycle with five
beeps.
Holds a #4 paper filter or a permanent filter.
One-minute protection if a breaker trips, unit
is unplugged, or power fails. Holds all
programmed information, including time of
day, Auto On time and Auto Off time.
7. Filter Basket Holder (not shown)
8. Coffeemaker Control Panel
See detailed illustration, page 6.
HOT WATER system FEATURES AND BENEFITS
15.
Hot Water Reservoir Cover
19.Dispensing Lever
16.Hot Water Charcoal
Water Filter Holder
20.Safety Lock
17.Charcoal Water Filter
21.Drip Tray
Flips back for easy filling.
For dispensing hot water.
Prevents hot water from being
dispensed when in the locked position.
Holds filter firmly in place.
Eliminates chlorine, calcium and bad tastes
and odors from tap water.
Removable tray with grate.
22.Hot Water Release Tab (not shown)
18.Hot Water Reservoir (not shown)
With Max fill line
Located underneath the unit.
15
1
8
19
20
10
11
4
16
12
21
5
17
*All materials that come in contact with coffee or water are BPA free.
5
Getting to know your Control Panel
Detailed programming and use instructions are on pages 7 and 8.
Coffeemaker Controls
1. On/Off Button
7. Function Knob
a. PROG
Use to turn your Coffeemaker on and off.
Works in tandem with the Function knob.
Select to program Auto On time.
Coffeemaker can be programmed to
automatically start brewing up to 24 hours
in advance.
2. Clock Display
Displays time of day, Auto On, and Auto Off
times.
3. Hour and Minute Buttons
4. 1–4 Cup Setting with Indicator
c. AUTO OFF
Use to set hours and minutes for time
of day, Auto On, and Auto Off times.
Improves extraction, flavor and temperature
when brewing fewer than 5 cups.
d. BREW
Indicates time to clean Coffeemaker
to remove calcium buildup.
Select to begin brew cycle when On button
is pressed.
6. Carafe Temperature Knob
e. CLOCK
Set the heater plate to Low (L), Medium (M),
or High (H) to keep coffee in the carafe at
the temperature you prefer.
3
2
7
Select to program time of day.
5
1
Select to automatically start brewing coffee
at the time you’ve programmed.
Select to program your Coffeemaker to
automatically shut off up to 4 hours after
brewing.
5. Clean Indicator
4
b. AUTO ON
8
9
6
10
11
HOT WATER System Controls
8. On/Off Button
10. Add Water Indicator
9. Water Ready Indicator
11. Safety Feature
Use to turn your Hot Water System on and off.
Indicates when water should be added.
Indicates when water is heated.
(Shown in the locked position)
6
Enjoy the 2-in-1 coffee PLUS®
Both lights will turn off when the Keep Warm
cycle ends.
Your Coffee PLUS® system is designed to
let you use the Coffeemaker and Hot Water
System separately, or at the same time.
Perfect for every occasion.
OTE: To start brew time at the same time
N
the next day, simply make sure the Function
knob is on AUTO ON and press and release
On/Off button once more. The blue Auto On
light will turn on.
BEFORE FIRST use
We recommend flushing out both the
Coffeemaker and Hot Water System before
first use.
SETTING THE AUTO OFF TIME
urn the Function knob to AUTO OFF
T
Use the Hour and Minute buttons as above to
program your Coffeemaker to shut off from 0 to
4 hours after brew cycle is finished.
Coffeemaker: Fill the reservoir with cold
water and follow the directions for Brewing
Coffee. Do not add coffee!
Hot Water System: Fill the reservoir to the
Max fill line and follow directions for Using
the Hot Water System.
CHARCOAL WATER FILTER
Your Coffeemaker comes with two charcoal
water filters that eliminates chlorine, bad tastes
and odors from tap water.
Once the system flush is complete, your
Coffee PLUS® system is ready to brew and
heat water so you can enjoy Cuisinart at
its best!
Inserting the Water Filter
•Remove the filters from the polybag and
soak them, fully immersed, in cold tap water
for 15 minutes.
•Lift the water filter holder out of the water
reservoirs from both the Coffeemaker side and
Hot Water System side (see diagram, page 5).
•Press down on the filter compartment and pull
toward you to open.
•Place filter into the holder and snap
it closed. Be careful – improper placement can
tear the filter skin.
•Flush filter by running cold tap water through
holes in bottom of compartment for 10
seconds.
•Allow the filter to drain completely.
•Slide the water filter holder back into the
channel in the water reservoir, pushing it
down to the base of the unit.
NOTE: We recommend changing the water filter
every 60 days or after 60 uses, and more
often if you have hard water.
Replacement filters can be purchased
in stores, by calling Cuisinart
Customer Service, or at www.
cuisinart.com.
PROGRAMMING YOUR
CoffeeMaker
Setting the Clock
When the Coffeemaker is plugged in,
12:00 will appear.
Turn the Function knob to CLOCK
Hold down the Hour or Minute button until the
clock begins flashing. Press either button to
select the desired time. Hold buttons down to
scroll through the digits, or press and release to
advance one digit at a time. When scrolling, the
numbers will advance slowly and then speed
up. When the number displayed approaches
the desired time, press and release to advance
one digit at a time. Be sure the PM indicator is
on if a PM time is desired.
To finish setting the clock, turn the Function
knob to any other setting or simply wait until
the numbers stop blinking.
SETTING THE AUTO ON TIME
When you turn the Function knob to PROG,
it displays a previously selected Auto On time,
or the default time (12:00pm).
1. Turn the Function knob to PROG
Use the Hour and Minute buttons as above
to program your start-brew time.
2. Turn the Function knob to AUTO ON
LCD will display the current time.
3. Press and release On/Off button
A blue light indicates that the Coffeemaker is
in AUTO ON mode. The blue light around On/
Off will come on when brew cycle begins.
Hot Water Charcoal
Water Filter
7
Coffeemaker Charcoal
Water Filter
Brewing COFFEE
Brew Pause™ Feature
Follow instructions in Before First Use
on previous page.
This feature interrupts the flow of coffee
from the basket to let you pour that first
cup mid-brew. Because the flavor profile of
coffee brewed at the start of a cycle differs
from that brewed towards the end, be
aware that using this feature will weaken
the flavor strength of the finished pot.
1. Insert charcoal water filter
Follow directions for the preparation and
insertion of the filter on page 7.
2. Fill the water reservoir
Open the Coffeemaker reservoir cover by lifting
it up. Pour in the desired amount of water using
the water level indicator located at the side of
the coffeemaker.
NOTE: Removing carafe for more than 20
seconds may cause filter basket to
overflow.
3. Set preferences
a. Push the 1–4 cup button if you are brewing
fewer than 5 cups.
b. Turn the Carafe Temperature dial to Low (L),
Medium (M), or High (H) and heater plate will
keep coffee at the temperature you select.
using the hot
water system
4. Add the ground coffee
Follow instructions in Before First Use
on previous page.
Remove the filter basket by grasping the handle
and lifting straight up. Insert a #4 paper filter or
permanent filter. Be sure that a paper filter is
completely open and fully inserted in the
basket. It may help to fold and flatten the seams
of a paper filter beforehand. Add 1 level scoop
of ground coffee per cup. Adjust the amount
according to taste.
1. Insert charcoal water filter
Follow directions for the preparation and
insertion of the filter on page 7.
2. Fill the water reservoir
Open the Hot Water reservoir cover by lifting
it up. Fill the reservoir with water, making sure
not to fill above the Max fill line.
NOTE: The maximum capacity for ground
coffee is 15 tablespoons for this
coffeemaker. Exceeding this amount may
cause overflow if the coffee is too finely
ground.
3. Heating
Press the On/Off button on the Hot Water side
of your unit. The blue On indicator around the
On/Off button will light. The Water Ready
indicator will flash while the unit is heating.
Once the unit has heated, the Water Ready
indicator will become solid.
Replace the filter basket in the filter basket
holder and press firmly on cover to be sure it
closes securely.
4. Dispensing water
5. Before brewing coffee
To dispense water, be sure the safety switch,
which is located below the lever, is in the
unlocked position. Simply slide the safety
switch to the left to unlock. Then place a cup
on the drip tray and press the lever down –
the unit dispenses up to 13 ounces of hot
water at a time. If desired, return the safety
lock to the locked position (to the right) after
dispensing water.
Make sure the glass carafe is in position on the
heater plate and the top cover is closed. Plug
the cord into an electrical outlet.
6. Power unit
Turn the Function knob to brew, press the
On/Off button, and the blue indicator light will
turn on. Or, set the Auto On function (see
page 7) and the Auto On indicator will light.
7. After brewing
NOTE: You can remove the drip tray to
accommodate tall mugs.
When the brewing cycle has been completed,
five beeps will sound. Coffee will continue to
stream from the filter for several seconds.
5. After dispensing
The heater will immediately begin heating more
water. The Water Ready indicator will again flash
until water reaches serving temperature.
Note: Reservoir cover may be hot during
and directly after brewing. Wait at least 10
minutes before opening.
NOTE: The red Add Water indicator will
light if more water is needed.
6. Turning off Hot Water System
To turn off your Hot Water System at any time,
press the On/Off button. The On indicator will
turn off, but the Water Ready indicator will
remain lit until water has cooled below serving
temperature.
8
CLEANING AND
If the Clean light begins to flash when the
Coffeemaker is turned on, it is telling you that
the calcium buildup is interfering with the
functioning of your Coffeemaker and the flavor
of your coffee. To clean, fill the water reservoir
to capacity with a mixture of ¹⁄³ white vinegar
and ²⁄³ water. Press the Clean button. When the
Clean light glows, turn the Coffeemaker on by
pressing the On/Off button. The Clean light will
shine steadily. The Coffeemaker is now in
clean mode. One cycle should be sufficient
to adequately clean the Coffeemaker. When the
cycle is completed and the five beeps sound,
the Coffeemaker will shut off. Turn the
Coffeemaker on to see if the Clean light
continues to flash. If it does, turn it off and
then repeat the cleaning procedure with a
fresh solution of vinegar and water.
If the Clean light no longer flashes, turn the
Coffeemaker off and then run one cycle of fresh
cold water through the unit before using the
unit again to brew coffee.
Notes on the Clean Function
Pressing the Clean button cancels all other
settings. If it is pressed accidentally, press it
again to return the Coffeemaker to all its
previous settings. Pressing On/Off will also exit
the clean mode and turn the Coffeemaker off.
MAINTENANCE
Always turn unit off and remove the plug
from the electrical outlet before cleaning.
Lift up the Coffeemaker reservoir cover.
Remove and discard the paper filter and
ground coffee. The filter basket can be washed
in warm, soapy water and rinsed thoroughly, or
cleaned in the upper rack of the dishwasher.
Dry all parts after use.
Do not put any water in the unit once the filter
basket has been removed. Wipe the area under
the filter basket with a damp cloth.
Remove the carafe from the heating plate.
Discard any remaining coffee. The carafe and
lid can be washed in warm, soapy water and
rinsed thoroughly, or placed in a dishwasher.
The carafe and carafe lid should be placed on
the upper rack only.
Do not use any scouring agents or harsh
cleansers on any part of the Coffeemaker.
Never immerse base unit in water or other
liquids. To clean base, simply wipe with a clean,
damp cloth and dry before storing. Fingerprints
and other blemishes on the housing can be
washed off with soap and water or a
nonabrasive cleaning solution. Wipe heater
plate with a clean, damp cloth. Never use
rough, abrasive materials or cleansers to clean
the heater plate. Do not dry the inside of the
water reservoir with a cloth, as lint may remain.
Any other servicing should be performed by an
authorizedservice representative.
To Decalcify Your Hot Water System
We recommend you clean your Hot Water
System twice a year to remove any calcium
scale residue from the heating element.
1. Dispense and dispose of any water in the
reservoir until the Add Water light flashes.
2. Add 32 oz. of white vinegar to the Hot Water
reservoir. Turn the unit on to heat the vinegar.
EMPTYING THE HOT
WATER RESERVOIR
3. Dispense 16 oz. of vinegar and dispose. This
will fill the inner tank.
If your Hot Water System has not been used for
more than one week, or if you plan to store
your Coffee PLUS® unit, we suggest emptying
the reservoir completely. Place it over the sink,
and pull the water release tab from the bottom
of the unit to drain the Hot Water System
reservoir. Once empty, replace the release tab.
4. Let the vinegar solution sit in the unit for 20
minutes. Do not dispense during this time.
5. After 20 minutes, turn the unit off and allow hot
vinegar to cool. Then drain the internal reservoir
over a sink by removing the water release tab
from the bottom of unit.
NOTE: Hot water reservoir should be
emptied only when the unit is cool. To
avoid injury, do not empty the reservoir
when there is hot water in the unit.
6. When vinegar has completely drained,
replace tab.
7. Refill reservoir with water and drain the internal
reservoir again (by removing tab at the bottom
of the unit) to flush thoroughly. Replace tab.
decalcification
Decalcification refers to the removal of calcium
deposits that form over time on the metal parts
of the coffeemaker.
NOTE: If water has a vinegar taste or smell,
continue to dispense water until taste or smell is
gone.
To Decalcify Your Coffeemaker
For best performance from your Coffeemaker,
decalcify the unit from time to time. The
frequency depends upon the hardness of your
tap water and how often you use the
Coffeemaker. The flashing Clean light will
indicate when unit should be cleaned.
9
LIMITED THREE-YEAR
WARRANTY
CALIFORNIA RESIDENTS ONLY:
California law provides that for In-Warranty Service,
California residents have the option of returning a
nonconforming product (A) to the store where it
was purchased or (B) to another retail store that
sells Cuisinart products of the same type.
The retail store shall then, at its discretion, either
repair the product, refer the consumer to an
independent repair facility, replace the product, or
refund the purchase price less the amount directly
attributable to the consumer’s prior usage of the
product. If the above two options do not result in
the appropriate relief to the consumer, the
consumer may then take the product to an
independent repair facility, if service or repair can
be economically accomplished. Cuisinart and not
the consumer will be responsible for the
reasonable cost of such service, repair,
replacement, or refund for nonconforming products
under warranty.
California residents may also, according to their
preference, return nonconforming products directly
to Cuisinart for repair, or if necessary, replacement,
by calling our Customer Service Center toll-free at
1-800-726-0190.
Cuisinart will be responsible for the cost of the
repair, replacement, and shipping and handling for
such products under warranty.
BEFORE RETURNING YOUR CUISINART
PRODUCT
If you are experiencing problems with your
Cuisinart product, we suggest that you call our
Cuisinart Customer Service Center at 1-800-7260190 before returning the product to be serviced. If
servicing is needed, a representative can confirm
whether the product is under warranty and direct
you to the nearest service location.
Important: If the nonconforming product is to be
serviced by someone other than Cuisinart’s
Authorized Service Center, please remind the
servicer to call our Customer Service Center at
1-800-726-0190 to ensure that the problem is
properly diagnosed, the product serviced with
the correct parts, and the product is still under
warranty.
We warrant that your Cuisinart® Coffee PLUS®
12-Cup Programmable Coffeemaker and Hot Water
System will be free of defects in materials and
workmanship under normal home use for 3 years
from the date of original purchase.
We recommend that you visit our website, www.
cuisinart.com for the fastest, most efficient way to
complete your product registration. However,
product registration online does not eliminate the
need for the consumer to maintain the original
proof of purchase in order to obtain the warranty
benefits. In the event that you do not have proof of
purchase date, the purchase date for purposes of
this warranty will be the date of manufacture.
If your Cuisinart® Coffee PLUS® unit should prove
to be defective within the warranty period, we will
repair it, or if we think necessary, replace it. To
obtain warranty service, simply call our toll-free
number, 1-800-726-0190, for additional information
from our Customer Service Representatives, or
send the defective product to Customer Service at
Cuisinart, 7811 North Glend Harbor Blvd.,
Glendale, AZ 58307.
To facilitate the speed and accuracy of your return,
please enclose $10.00 for shipping and handling of
the product.
Please pay by check or money order (California
residents need only supply proof of purchase and
should call 1-800-726-0190 for shipping
instructions).
NOTE: For added protection and secure handling
of any Cuisinart product that is being returned, we
recommend you use a traceable, insured delivery
service. Cuisinart cannot be held responsible for
in-transit damage or for packages that are not
delivered to us. Lost and/or damaged products are
not covered under warranty. Please be sure to
include your return address, daytime phone
number, description of the product defect, product
model number (located on bottom of product),
original date of purchase, and any other
information pertinent to the product’s return.
This Cuisinart® Coffee PLUS® unit has been
manufactured to the strictest specifications and
has been designed for use with the authorized
accessories and replacement parts.
This warranty expressly excludes any defects or
damages caused by accessories, replacement
parts, or repair service other than those that have
been authorized by Cuisinart.
This warranty does not cover any damage caused
by accident, misuse, shipment or other than
ordinary household use.
This warranty excludes all incidental or
consequential damages. Some states do not allow
the exclusion or limitation of these damages, so
these exclusions may not apply to you.
10
NOTES
11
Coffeemakers
Food
Processors
Rotisserie
Blenders
Cookware
Slow
Cookers
Cuisinart offers an extensive assortment of top quality products to make life in the
kitchen easier than ever. Try some of our other countertop appliances and
cookware, and Savor the Good Life .
®
www.cuisinart.com
©2011 Cuisinart
150 Milford Road
East Windsor, NJ 08520
Printed in China
11CE111916
A IB-9496A-ESP-A
MANUAL DE INSTRUCCIONES
Coffee PLUS® Cafetera programable de 12 tazas
& dispensador de agua caliente
Para su seguridad y para disfrutar plenamente de este producto, siempre lea las
instrucciones cuidadosamente antes de usarlo.
CHW-12
MEDIDAS DE
SEGURIDAD
IMPORTANTES
18. No limpie la jarra o la placa calentadora con
limpiadores abrasivos, lana de acero u otros
materiales abrasivos.
19. ADVERTENCIA: PARA REDUCIR EL RIESGO
DE INCENDIO O ELECTROCUCIÓN, NO
DESARME EL CUERPO DEL APARATO.
ESTE APARATO NO CONTIENE PIEZAS QUE
PUEDAN SER REPARADAS POR EL
USUARIO. LAS REPARACIONES DEBEN
SER REALIZADAS POR UN TÉCNICO
AUTORIZADO.
Siempre que use aparatos eléctricos, debe
tomar precauciones básicas de seguridad para
reducir el riesgo de incendio, electrocución o
heridas, entre las cuales las siguientes:
1. LEA TODAS LAS INSTRUCCIONES.
20. No coloque la cafetera encima de un paño/
trapo ni obstruya el flujo de aire debajo de ésta.
2. No toque las superficies calientes. Utilice el
mango y los botones o perillas.
21. Solamente use un filtro dorado permanente
Cuisinart® o filtros de papel no. 4 con este
aparato. OTROS FILTROS PERMANENTES
PODRÍAN PROVOCAR UN DERRAME.
3. Para reducir el riesgo de electrocución, no
sumerja el cordón, la clavija o el cuerpo del
aparato en el agua u otro líquido.
4. Este aparato no debería ser usado por o cerca
de niños o personas con alguna discapacidad.
GUARDE ESTAS
INSTRUCCIONES
5. Siempre desconecte el aparato cuando no esté
en uso y antes de limpiarlo. Permita que enfríe
antes de instalar o remover piezas y antes de
limpiarlo.
6. No opere este aparato si el cordón o la clavija
estuviesen dañados, después de que hubiese
funcionado mal o que se hubiese caído o si
estuviese dañado. Regrese el aparato a un
centro de servicio autorizado para su revisión,
reparación o ajuste.
PARA USO
DOMÉSTICO
SOLAMENTE
7. El uso de accesorios no recomendados o
vendidos por el fabricante para uso con este
modelo puede provocar heridas.
8. No lo utilice en exteriores.
9. No permita que el cordón cuelgue del borde de
la encimera o de la mesa, ni que haga contacto
con superficies calientes.
10. No coloque el aparato sobre o cerca de un
quemador a gas o una hornilla eléctrica
caliente, ni en un horno caliente.
11. Siempre llene el depósito de agua antes de
conectar el aparato al tomacorriente. Siempre
apague el aparato antes de desconectarlo.
12. No utilice el aparato para ningún otro fin que
no sea el indicado.
13. Asegúrese que la tapa de la jarra esté
debidamente cerrada antes de servir café.
14. Para evitar las quemaduras, no retire la tapa
durante la preparación.
15. La jarra proveída con esta cafetera ha sido
diseñada para ser usada con ésta únicamente.
No la ponga sobre una hornilla caliente.
16. No ponga la jarra caliente sobre una superficie
húmeda o fría.
17. No utilice la jarra si el cristal estuviese rajado o
si el asa estuviese floja.
2
AVISO
ADVERTENCIA: RIESGO
DE INCENDIO O
ELECTROCUCIÓN
El cable de este aparato está dotado de una
clavija polarizada (una pata es más ancha que
otra). Como medida de seguridad, se podrá
enchufar de una sola manera en el
tomacorriente polarizado. Si no entrara en el
tomacorriente, inviértela. Si aún no entrara
completamente, comuníquese con un
electricista. No intente modificarla.
El símbolo representado por un
relámpago con punta de flecha
dentro de un triángulo equilátero
tiene como fin alertar al usuario de la
presencia de voltajes peligrosos no
aislados en el interior del aparato, los
cuales pueden ser de suficiente
magnitud para constituir un riesgo
de incendio o electrocución.
IMPORTANTE
Ciertas condiciones pueden producir un
atascamiento del agua y/o del café en el
portafiltros y provocar un derrame. Para evitar
que esto ocurra, no muela el café demasiado
fino, no utilice más de un filtro de papel, o un
filtro permanente al mismo tiempo que un filtro
de papel, o bien un filtro permanente sucio, y
no sobrellene el filtro.
Precaución: Nunca abra la tapa durante la
preparación, aunque líquido no esté bajando.
Agua o café muy caliente podría salir del pico
y causar quemaduras. Si el café no escurriera
debidamente durante la preparación,
desenchufe el aparato y espere 10 minutos
antes de abrir la tapa y examinar el
portafiltros.
El signo de exclamación dentro de
un triángulo equilátero tiene como fin
alertar al usuario de la presencia de
instrucciones importantes de
operación y mantenimiento (servicio)
en la documentación que acompaña
al equipo.
INSTRUCCIONES
ESPECIALES RELATIVAS
AL USO DE EXTENSIONES
El cable proveído con este aparato es corto,
para reducir el peligro de que alguien se
enganche o tropiece con un cable más largo.
Se podrá usar una extensión eléctrica,
siempre que respete las precauciones
siguientes.
La clasificación nominal de la extensión debe
ser por lo menos igual a la del aparato. Es
importante colocar la extensión sobre la
encimera o la mesa de tal forma que niños no
puedan jalarla o tropezar con ella.
ADVERTENCIA
RIESGO DE INCENDIO O ELECTROCUCIÓN
NO LO ABRA
ADVERTENCIA: PARA REDUCIR EL RIESGO DE INCENDIO O
ELECTROCUCIÓN, NO DESARME EL CUERPO DEL APARATO. ESTE
APARATO NO CONTIENE PIEZAS QUE PUEDAN SER REPARADAS POR
EL USUARIO. LAS REPARACIONES DEBEN SER EFECTUADAS POR
TÉCNICOS AUTORIZADOS SOLAMENTE.
3
ÍNDICE
SUGERENCIAS PARA
LA PREPARACIÓN DE
UN BUEN CAFÉ
Medidas de seguridad importantes . . . . . . . . 2
Instrucciones de desempacado . . . . . . . . . . . 4
Sugerencias para las
preparación de un buen café . . . . . . . . . . . . . 4
Elemento 1: EL AGUA
Piezas y características . . . . . . . . . . . . . . . . . . 5
El café está constituido por un 98% de
agua. Por lo tanto, la calidad del agua es
tan importante como la del café. Si el
agua tiene mal sabor, el café tendrá mal
sabor. Por eso Cuisinart equipó su
cafetera con un filtro de carbón que
remueve el cloro y el mal sabor y olor,
para preparar café puro, taza tras taza.
Panel de control . . . . . . . . . . . . . . . . . . . . . . . 6
Antes del primer uso . . . . . . . . . . . . . . . . . . . . 7
Programación . . . . . . . . . . . . . . . . . . . . . . . . . 7
Filtro de carbón . . . . . . . . . . . . . . . . . . . . . . . . 7
Preparación . . . . . . . . . . . . . . . . . . . . . . . . . . . 8
Función Brew Pause™ . . . . . . . . . . . . . . . . . . . 8
Elemento 2: EL CAFÉ
Operación del dispensador
de agua caliente . . . . . . . . . . . . . . . . . . . . . . . 8
Aunque la mayor parte del brebaje es
agua, el sabor proviene del café. Para
preparar un brebaje de calidad, debe usar
ingredientes de calidad. Elija café fresco,
en granos enteros. Compre café
aproximadamente dos veces por mes.
Una vez que se rompen los granos, el
sabor intenso y rico del café comienza a
deteriorarse.
Limpieza y mantenimiento . . . . . . . . . . . . . . . 9
Garantía . . . . . . . . . . . . . . . . . . . . . . . . . . . . . 10
DESEMPACADO
1. Ponga la caja sobre una superficie espaciosa,
llana y segura.
2. Retire el manual de instrucciones y otros
folletos de la caja.
Elemento 3: EL GRADO
DE MOLIENDA
3. Voltee la caja para que repose en su lado y
retire la cafetera.
La molienda es primordial para preservar
el sabor del café. Café molido muy fino
producirá un café amargo. Esto también
puede trabar el filtro. Café molido muy
grueso dejará pasar el agua demasiado
rápidamente, lo cual producirá un café
acuoso. Le aconsejamos que utilice un
grado de molienda medio-fino.
4. Aleje la caja y alce el material de embalaje.
5. Agarre la jarra por el asa, y retírela de la placa y
de la bolsa protectora.
6. Remueva la bolsa protectora que envuelve
la cafetera.
Le aconsejamos que guarde el material de
embalaje.
MANTENGA LAS BOLSAS DE PLÁSTICO
FUERA DEL ALCANCE DE LOS NIÑOS.
Elemento 4: LAS
PROPORCIONES
Para que el café sea perfecto, ni muy
débil ni muy fuerte, se debe usar la
proporción apropiada de café y agua. Siga
las pautas en la sección “Preparación” y
ajuste las proporciones al gusto.
4
PIEZAS CARACTERÍSTICAS DE LA CAFETERA
1. Tapa del depósito de agua
10. Función Brew Pause™
2.Depósito de agua de la
cafetera (no enseñado)
Con indicador del nivel de agua.
3.Rociador de agua (no enseñado)
11. Jarra
Articulada, para facilitar el llenado.
Detiene el flujo de café al retirar la jarra de la
placa, lo cual permite servir una taza de café
antes del final de la preparación.
Jarra de 12 tazas, con cómoda asa
ergonómica, pico a prueba de goteo
y marcaciones.
Distribuye el agua uniformemente sobre el
café, reduciendo la pérdida de temperatura
durante la infusión.
12.Placa calentadora con
temperatura variable
4.Soporte del filtro de la cafetera
Mantiene el café a la temperatura deseada.
Antiadherente y a prueba de rayas.
Sujeta firmemente el filtro.
5.Filtro de carbón
13.Señal de listo (no enseñado)
Elimina el cloro, el mal olor y sabor
del agua corriente.
Indica el final de la preparación con 5
pitidos.
6.Portafiltros (no enseñado)
14.Sistema de protección contra falla
eléctrica (no enseñado)
Para filtro permanente o filtro de papel no. 4.
7. Compartimiento del portafiltros
(no enseñado)
8. Panel de control de la cafetera
Provee una protección de un minuto en caso
de interrupción del suministro eléctrico.
guardando la información programada,
incluso la hora del día y la hora de
encendido/apagado automático.
Detalles en la página 6.
9.Espacio para guardar el cordón
(no enseñado)
PIEZAS Y CARACTERÍSTICAS DEL
DISPENSADOR DE AGUA CALIENTE
15.
Tapa del depósito de agua
19.Botón de agua caliente
16.Soporte del filtro del dispensador
de agua caliente
20.Sistema de bloqueo
Articulada, para facilitar el llenado.
Para servir agua caliente.
Evita servir agua caliente accidentalmente.
Sujeta firmemente el filtro.
21.Bandeja de goteo
17.Filtro de carbón
Bandeja amovible con rejilla.
Elimina el cloro, el mal olor y sabor
del agua corriente.
22.Tapón del depósito de agua
(no enseñado)
18.Depósito de agua (no enseñado)
con línea de llenado máximo “MAX”
Ubicado debajo de la unidad.
15
1
8
19
20
10
11
4
16
12
21
5
17
*Las partes que tienen contacto con el café o el agua no contienen bisfenol A (BPA).
5
PANEL DE CONTROL
Véase las instrucciones detalladas de programación en las páginas siguientes.
CONTROLES DE LA CAFETERA
1. Botón de encendido/apagado
6. Control de temperatura
Permite encender y apagar el aparato. Trabaja
junto con el selector de función.
Permite ajustar la temperatura de la placa
calentadora para que su café siempre esté a la
temperatura perfecta. Elija entre L (baja),
M (media) o H (alta).
2. Pantalla digital
Indica la hora del día y la hora de encendido/
apagado automático.
7. Selector de función
a. PROG
3. Botones de las horas (HR)
y de los minutos (MIN)
Permite programar el encendido automático,
hasta 24 horas por adelantado.
Permiten fijar la hora y la hora de encendido/
apagado automático.
4. Botón 1–4 (preparación 1–4 tazas)
Optimiza el sabor y la temperatura del café
cuando se prepara menos de 5 tazas.
b. AUTO ON
Activa el encendido automático.
c. AUTO OFF
Permite programar el apagado automático,
hasta 4 horas después de la preparación.
5. Indicador de limpieza
Indica cuando es necesario eliminar los
depósitos de sarro.
d. BREW
Empieza la preparación al oprimir el botón
de encendido.
e. CLOCK
Permite programar la hora.
4
7
3
2
5
1
8
9
6
10
11
CONTROLES DEL DISPENSADOR DE
AGUA CALIENTE
8. B
otón de encendido/apagado
Permite encender y apagar el aparato.
9. Luz de listo
Indica cuando el agua está caliente.
10. Luz de nivel bajo
Indica cuando es necesario añadir agua.
11. Botón de bloqueo
(mostrado en la posición bloqueada)
6
DISFRUTE DE SU SISTEMA
2-EN-1 COFFEE PLUS®
3. Oprima el botón de encendido/apagado
El indicador luminoso azul se encenderá para
indicar que el encendido automático está
activado. La luz azul alrededor del botón de
encendido/apagado se encenderá cuando
empiece el ciclo de preparación. Ambas luces
se apagarán cuando se apague la cafetera.
Su sistema Coffee PLUS® ha sido diseñado
para preparar café y servir agua caliente, por
separado o al mismo tiempo. Es perfecto para
cada ocasión.
OTA: Si desea que la cafetera se ponga en
N
marcha automáticamente a la misma hora al
día siguiente, deje el selector de función en
AUTO ON y oprima el botón de encendido/
apagado. El indicador luminoso azul se
encenderá.
ANTES DEL PRIMER USO
Le recomendamos que limpie el sistema
interno de la cafetera y del dispensador de
agua caliente antes del primer uso.
Cafetera: Llene el depósito de agua con
agua fría y siga las instrucciones de la
sección “Cómo preparar café”, pero
omitiendo el café.
Dispensador de agua caliente: Llene el
depósito de agua hasta la línea “MAX” y siga
las instrucciones de la sección “Cómo
conseguir agua caliente”.
¡Ahora, puede disfrutar de una sabrosa taza
de café, té o chocolate 100% Cuisinart!
CÓMO FIJAR LA HORA DE
APAGADO AUTOMÁTICO
onga el selector de función en AUTO OFF
P
Utilice los botones “HR” y “MIN” para
programar la hora de apagado automático,
desde 0 hasta 4 horas después del final del
ciclo de preparación.
FILTRO DE CARBÓN
PROGRAMACIÓN
Su cafetera está equipada con dos filtros de
carbón que eliminan el cloro y el mal olor y
sabor del agua corriente.
CÓMO FIJAR LA HORA
12:00 aparecerá en la pantalla al
enchufar la cafetera.
Ponga el selector de función en CLOCK
Mantenga el botón “HR” o “MIN” oprimido
hasta que la hora empiece a parpadear. Oprima
el botón “HR” para fijar la hora y el botón
“MIN” para fijar los minutos. Mantenga el botón
oprimido para incrementar las horas o los
minutos más rápidamente u oprima el botón
repetidamente para avanzar en incremento de
una hora o un minuto. La hora avanzará muy
rápidamente al mantener el botón oprimido.
Cuando llegue cerca del número deseado,
afloje el botón y avance un número a la vez.
NOTA: Cuando la hora pase 12:00 del día, el
indicador PM aparecerá en la pantalla.
Para confirmar la hora programada, ponga el
selector de función en otra posición o
simplemente espere hasta que los números
dejen de parpadear.
Instalación del filtro:
•Retire los filtros de su envoltorio y remójelos
en agua fría durante 15 minutos.
•Retire los soportes de filtro ubicados en los
depósito de agua de la cafetera y del
dispensador de agua caliente (véase el
diagrama en la página 5).
•Abra el soporte.
•Instale el filtro en el soporte y ciérrelo. Haga
esto con mucho con cuidado. Si no instalara
el filtro de manera correcta, la membrana del
filtro podría romperse.
•Enjuague el filtro en agua fría durante 10
segundos para limpiarlo, las aberturas
directamente bajo el flujo de agua.
•Permita que el filtro seque completamente.
•Regrese el soporte del filtro en el depósito,
empujándolo hasta el fondo.
NOTA: Le aconsejamos que cambie el filtro de
agua cada 60 días o 60 usos, o más
frecuentemente si el agua es dura.
Los filtros están disponibles en las
tiendas especializadas, en nuestro
sitio Web www.cuisinart.com, o
llamando a nuestro servicio
postventa al 1-800-726-0190.
CÓMO FIJAR LA HORA DE
ENCENDIDO AUTOMÁTICO
12:00 o la hora de encendido automático
previamente fijada aparecerá en la pantalla al
poner el selector de función en la posición
PROG.
1. Ponga el selector de función en PROG
Utilice los botones “HR” y “MIN” para
programar la hora de encendido automático.
2. Ponga el selector de función en AUTO ON
La pantalla mostrará la hora actual.
Filtro de carbón para
el dispensador de
agua caliente
7
Filtro de carbón para
la cafetera
PREPARACIÓN
Función Brew Pause™
Siga las instrucciones detalladas en la
sección “Antes del primer uso” en la página
anterior.
La función Brew Pause™ (pausa al servir)
permite retirar la jarra de la placa antes del
fin del ciclo de preparación. Aunque
ofrecemos esta opción, le recomendamos
que espere hasta el final de la preparación
para servir el café, porque el sabor del café
cambia durante el ciclo.
1. Instale el filtro de carbón
Siga las instrucciones de preparación e
instalación en la página 7.
2. Llene el depósito de agua
Abra la tapa del depósito. Agregue agua hasta
el nivel deseado.
NOTA: La función Brew Pause™ detiene el
flujo de café durante solamente 20
segundos. No deje la jarra fuera de la placa
durante más tiempo.
3. Establezca sus preferencias
a. Si desea preparar menos de 5 tazas de café,
oprima el botón “1-4”.
b. Ponga el control de temperatura de la placa
calentadora en el nivel deseado: L (bajo), M
(medio) o H (alto).
OPERACIÓN DEL
DISPENSADOR DE AGUA
CALIENTE
4. Agregue café molido
Agarre el portafiltros por el asa y álcelo. Instale
un filtro de papel no. 4 o un filtro permanente.
Asegúrese que el filtro esté completamente
abierto y debidamente instalado. Puede ayudar
doblar y aplanar las costuras del filtro de papel
de antemano. Agregue 1 cucharada de café
molido por taza. Ajuste la cantidad de café al
gusto.
Siga las instrucciones detalladas en la
sección “Antes del primer uso” en la página
anterior.
1. Instale el filtro de carbón
Siga las instrucciones de preparación e
instalación en la página 7.
2. Llene el depósito de agua
IMPORTANTE: Esta cafetera tiene una
capacidad máxima de 15 cucharadas de
café molido. No exceda esta cantidad. Esto
podría provocar un derrame, especialmente si el café ha sido molido muy fino.
Abra la tapa del depósito. Agregue agua hasta
el nivel deseado, sin pasar la línea “MAX”.
3. Caliente el agua
Oprima el botón de encendido/apagado del
dispensador de agua. La luz azul alrededor del
botón ON/OFF se encenderá. La luz de listo
(WATER READY) empezará a parpadear. Una
vez el agua caliente, permanecerá encendida.
Regrese el portafiltros en su lugar y presione
firmemente la tapa para asegurarse que esté
debidamente cerrada.
5. Antes de preparar café
4. Sirva agua
Asegúrese que la jarra esté debidamente
posicionada y que tenga puesta la tapa.
Enchufe el cable en un tomacorriente
Para servir agua, asegúrese que el botón de
bloqueo esté en la posición UNLOCK. Si no es
así, deslícelo hacia la izquierda. Ponga una
taza debajo del pico y baje la palanca – la
unidad sirve hasta 13 onzas de agua caliente a
la vez. Si desea, deslice el botón de bloqueo
hacia la derecha.
6. Encienda el aparato
Ponga el selector de función en BREW, y luego
oprima el botón ON/OFF. El indicador luminoso
azul se encenderá. O: programe la hora de
encendido automático, según se indicó en la
página 7. El indicador luminoso azul al lado
AUTO ON se encenderá.
NOTA: La rejilla de la bandeja de goteo
puede removerse para acomodar tazas
grandes.
7. Después del ciclo de preparación
5. Después de servir agua
El aparato emitirá 5 pitidos al final del ciclo de
La resistencia empezará inmediatamente a
calentar más agua. La luz de listo (WATER
READY) empezará a parpadear y permanecerá
encendida una vez caliente el agua caliente.
preparación. El café seguirá bajando durante
varios segundos.
Nota: La tapa del depósito de agua puede
estar caliente. Permita que enfríe durante 10
minutos antes de abrirla.
NOTA: Si la luz de nivel bajo (ADD WATER)
se enciende, agregue más agua.
6. Cómo apagar el dispensador
de agua caliente
Simplemente oprima el botón ON/OFF. La luz
alrededor del botón ON/OFF se apagará, pero
el indicador WATER READY permanecerá
encendida hasta que el agua se hay enfriado.
8
LIMPIEZA Y
cal.
El sarro afecta el desempeño de la cafetera y el
sabor del café. Para limpiar la cafetera, llene el
depósito de agua hasta la capacidad máxima
con ⅔ de agua y ⅓ de vinagre. Oprima el botón
CLEAN. Cuando el indicador luminoso se
encienda, oprima el botón ON/OFF. El indicador
luminoso permanecerá encendido hasta el final
del ciclo de limpieza. Un ciclo debería ser
suficiente para eliminar la cal. Al final del ciclo
de limpieza (indicado por 5 pitidos), la cafetera
se apagará. Encienda la cafetera. Si el
indicador luminoso sigue parpadeando, haga
un segundo ciclo de limpieza con una nueva
solución de agua con vinagre.
Si está apagado, repita estos pasos con un
tanque de agua fresca para eliminar el olor a
vinagre.
Nota:
Oprimir el botón de limpieza automática
cancelará la programación de la cafetera. Si lo
oprima accidentalmente, oprímalo otra vez o
bien apague la cafetera.
MANTENIMIENTO
Siempre apague y desconecte el aparato
antes de limpiarlo.
Abra el depósito de agua. Retire y tire el filtro
de papel. El portafiltros puede lavarse a mano,
con detergente y agua tibia, o en la bandeja
superior del lavavajillas. Permite que todas las
piezas sequen.
No ponga agua en la unidad después de retirar
el portafiltros. Limpie el área bajo el
portafiltros con un paño húmedo.
Retire la jarra de la placa calentadora. Bote el
café remanente. Lave la jarra y la tapa de la
jarra a mano, con agua tibia y detergente, o en
la bandeja superior del lavavajillas.
No utilice productos o materiales abrasivos
para limpiar el aparato.
No sumerja el aparato en agua u otro líquido.
Limpie el cuerpo del aparato con un paño
húmedo y séquela antes de guardar el aparato.
Las huellas de dedos y otras manchas podrán
eliminarse con agua y detergente, o con una
solución limpiadora no abrasiva. Limpie la
placa calentadora con un paño húmedo. Nunca
utilice materiales ásperos o limpiadores
abrasivos para limpiar la placa. No seque el
interior del depósito con un paño, porque
pelusas pueden quedarse adentro del mismo.
Cualquier otro servicio debe ser realizado por
un técnico autorizado.
Eliminación del sarro en el
dispensador de agua caliente
Le recomendamos que limpie su dispensador
de agua caliente dos veces por año.
1. Vacíe el depósito de agua o sirva agua hasta
que el indicador ADD WATER empiece a
parpadear.
2. Vierta 32 onzas de vinagre blanco en el
depósito de agua. Encienda la unidad.
CÓMO VACIAR EL DEPÓSITO
DE AGUA CALIENTE
3. Sirva 16 onzas de vinagre en un vaso. Esto
llenará el depósito interno.
4. Deje el vinagre actuar durante 20 minutos. No
sirva durante este tiempo.
Le aconsejamos que vacíe el depósito de agua
caliente antes de guardar la unidad o si el
dispensador de agua caliente no ha sido usado
durante más de una semana. Coloque el
aparato encima del fregadero y abra el tapón
del depósito de agua caliente ubicado debajo
de la unidad. Una vez vacío el depósito, cierre
el tapón.
5. Después de 20 minutos, apague el aparato y
permita que enfríe. Vacíe entonces el depósito,
quitando el tapón ubicado debajo de la unidad.
6. Una vez vacío el depósito, cierre el tapón.
7. Llene el depósito con agua, y luego vacíelo otra
vez, quitando el tapón ubicado debajo de la
unidad. Vuelva a cerrar el tapón.
NOTA: Permita que el aparato enfríe antes
de vaciar el depósito de agua caliente.
Para evitar quemaduras, no vacíe el
depósito cuando hay agua caliente en la
unidad.
NOTA: Si el agua tiene olor o sabor a vinagre,
sirva agua hasta que el olor o el sabor haya
desaparecido.
ELIMINACIÓN DEL SARRO
Decalcification refers to the removal of calcium
deposits that form over time on the metal parts
of the coffeemaker.
Eliminación del sarro en la cafetera
Para lograr un desempeño óptimo, deberá
limpiar el sarro regularmente. La frecuencia de
la limpieza dependerá de la dureza del agua y
de la frecuencia de uso de la cafetera. Si la luz
al lado del botón de limpieza CLEAN empieza a
parpadear, esto significa que hay que limpiar la
9
GARANTÍA LIMITADA
DE TRES AÑOS
estado de California pueden (A) regresar el
producto defectuoso a la tienda donde lo
compraron o (B) a otra tienda que venda productos
Cuisinart® de este tipo.
La tienda, a su opción, reparará el producto,
referirá el consumidor a un centro de servicio
independiente, cambiará el producto o
reembolsará el consumidor por el precio original
del producto, menos la cantidad imputable al uso
del producto por el consumidor hasta que éste se
dañe. Si estas dos opciones no satisfacen al
consumidor, podrá llevar el producto a un centro
de servicio independiente, siempre en cuando se
pueda ajustar o reparar el producto de manera
económica. Cuisinart será responsable por los
gastos de servicio, reparación, reemplazo o
reembolso de los aparatos defectuosos durante el
período de garantía.
Los residentes de California también pueden, si lo
desean, mandar el producto defectuoso
directamente a Cuisinart para que lo reparen o lo
cambien. Para esto, se debe llamar a nuestro
servicio posventa al 1-800-726-0190.
Cuisinart será responsable por los gastos de
reparación, reemplazo, manejo y envío de los
productos defectuosos durante el período de
garantía.
ANTES DE HACER REPARAR SU APARATO
Si su aparato tiene algún problema, le
recomendamos que llame a nuestro servicio
posventa al 1-800-726-0190 antes de regresar el
aparato a Cuisinart. Un representante le confirmará
si su aparato sigue bajo garantía y le indicará la
dirección del centro de servicio más cercano.
Importante: Si debe llevar el aparato defectuoso a
un centro de servicio no autorizado, por favor
informe al personal del centro de servicio que
deberían llamar al servicio posventa de Cuisinart al
1-800-726-0190 a fin de diagnosticar el problema
correctamente, usar las partes correctas para
repararlo y asegurarse que el producto esté bajo
garantía.
Cuisinart garantiza este aparato contra todo
defecto de materiales o fabricación durante 3 años
después de la fecha de compra original, siempre
en cuando el aparato haya sido utilizado para uso
doméstico y según las instrucciones.
Le aconsejamos que llene el formulario de registro
disponible en www.cuisinart.com a fin de facilitar
la verificación de la fecha de compra original. Sin
embargo, registrar el producto no es necesario
para recibir servicio bajo esta garantía. En ausencia
del recibo de compra, el período de garantía será
de 36 meses a partir de la fecha de fabricación.
Si este aparato presentara algún defecto de
materiales o fabricación durante el período de
garantía, la reparemos o reemplazaremos (a
nuestra opción). Para obtener servicio bajo esta
garantía, llame a nuestra línea directa gratuita al
1-800-726-0190 o regrese el aparato defectuoso
a: Cuisinart, Service Department, 7475 North Glen
Harbor Blvd.
Regrese el aparato defectuoso, junto con su recibo
de compra y un cheque o giro postal de US$10.00
por gastos de manejo y envío.
Los residentes de California sólo necesitan dar una
prueba de compra y deben llamar al 1-800-7260190 para recibir instrucciones de envío.
NOTA: Para mayor seguridad, le aconsejamos que
mande su paquete por un método de entrega con
seguro y seguimiento. Cuisinart no será
responsable por los daños ocurridos durante el
transporte o por los paquetes mandados a una
dirección equivocada. Los aparatos perdidos y/o
lastimados durante el envío no serán cubiertos
bajo esta garantía. Recuerde incluir su nombre,
dirección y teléfono, la descripción del problema,
así como cualquier información pertinente.
Este aparato satisface las más altas exigencias de
fabricación y ha sido diseñado para uso con
accesorios y partes de repuesto autorizados
solamente.
Esta garantía excluye expresamente los daños
causados por accesorios, partes o reparaciones no
autorizados por Cuisinart.
Esta garantía no cubre el uso institucional o
comercial del producto, y no es válida en caso de
daños causados por mal uso, negligencia o
accidente.
Esta garantía excluye expresamente todos los
daños incidentales o consecuentes. Algunos
Estados no permiten la exclusión o limitación de
daños incidentales o consecuentes, de modo que
las limitaciones mencionadas pueden no regir para
usted.
RESIDENTES DE CALIFORNIA SOLAMENTE
La ley del estado de California ofrece dos opciones
bajo el período de garantía. Los residentes del
10
NOTAS
11
Cafeteras
Procesadoras
de alimentos
Asador
giratorio
Licuadoras
Utensilios de
cocina
Ollas de cocción
lenta
Cuisinart ofrece un extenso surtido de productos de calidad superior, para hacer la vida en la
cocina más fácil que nunca. Pruebe algunos de nuestros electrodomésticos y utensilios de
cocina y saboree la buena vida.
www.cuisinart.com
©2011 Cuisinar
150 Milford Road
East Windsor, NJ 08520
Impreso en la China
11CE111916
A IB-9496A-ESP-A