1
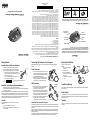
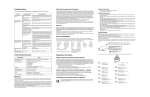
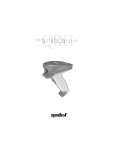
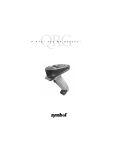
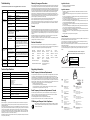
Troubleshooting
Warranty Coverage and Procedure
This section describes possible errors and suggested solutions to fix the errors.
Hardware failure.
Call Symbol Technical Support. See Service Information.
The bar code may be damaged.
Try a different bar code.
You are too far from or too
close to the bar code.
Move the scanner closer to or farther from the bar code.
You are scanning at an incorrect angle.
Change the angle until the scanner reads the bar code.
General
You are scanning an unsupported or disabled bar code
type or that bar code type may
be disabled in the software.
Try a different bar code. Make sure the correct bar code
support is enabled.
The scanner is connected to
the PC and communication
has been established.
Scanner will not scan when the communication cable is
connected to the scanner and a host communications session has been started. Disconnect the cable and try again.
Memory is full.
This situation is indicated by the red indicator steadily lit
and the scanner emitting a series of continuous long
beeps. Upload the scanner data to your application or
press and hold the Delete Button for 6 seconds to clear the
scanner's memory. Caution: all data will be lost by performing this function.
Problem
The scanner is not
working.
The scanner is not
scanning or deleting
items.
Possible Cause
Possible Solution
Batteries are loaded incorrectly.
Reload batteries. Make sure the (+) and (-) signs on the
batteries line up with the signs inside of the battery cover.
Batteries are dead.
Insert new batteries.
Stored bar code infor- The communication cable is
mation is not transfer- not connected properly.
ring to the PC.
The communication software
is not properly loaded or is
corrupt.
Check that the cable is properly connected to the scanner
and the PC.
Check that the communication software is loaded properly
on your PC. Consult your software application guide. If
necessary, reload the communication software on the PC.
The PC serial port is not prop- Consult your hardware and operating system user docuerly configured.
mentation.
LED indicator blinks
red.
Applicable Directives
During the warranty period, Symbol will repair or replace defective products returned to Symbol’s manufacturing plant
in the US. For warranty service in North America, call the Symbol Support Center at 1-800-653-5350. International
customers should contact the local Symbol office or support center. If warranty service is required, Symbol will issue
a Return Material Authorization Number. Products must be shipped in the original or comparable packaging, shipping
and insurance charges prepaid. Symbol will ship the repaired or replacement product freight and insurance prepaid
in North America. Shipments from the US or other locations will be made F.O.B. Symbol’s manufacturing plant.
Symbol will use new or refurbished parts at its discretion and will own all parts removed from repaired products.
Customer will pay for the replacement product in case it does not return the replaced product to Symbol within 3 days
of receipt of the replacement product. The process for return and customer’s charges will be in accordance with
Symbol’s Exchange Policy in effect at the time of the exchange.
Customer accepts full responsibility for its software and data including the appropriate backup thereof.
Repair or replacement of a product during warranty will not extend the original warranty term.
Symbol’s Customer Service organization offers an array of service plans, such as on-site, depot, or phone support,
that can be implemented to meet customer’s special operational requirements and are available at a substantial
discount during warranty period.
Low battery
Replace batteries.
LED indicator flashes Hardware failure.
red, green and amber
Call the Support Center or your reseller.
Technical Specifications
Specification
Value
UPC/EAN, Code 3 of 9, Code 128, I 2 of 5, D 2 of 5, Coupon Code
Storage Capability
Approximately 150 30-character bar codes
Power Requirements
4 batteries. Recommended type:
• *Energizer EPX 76
• *Energizer 357
• Maxell SR 44W
• Rayovac 357
* For best results use ENERGIZER brand batteries.
5,000 scans with new batteries.
Operating Temperature
5 °C to 40 °C (41 °F to 104 °F)
Operating Humidity
0 to 95% (non-condensing)
Service Information
Before you use the unit, it must be configured to operate in your facility’s network and run your applications.
If you have a problem running your unit or using your equipment, contact your facility’s Technical or Systems Support.
If there is a problem with the equipment, they will contact the Symbol Support Center:
Weight
Approximately 1.8 oz. (without batteries)
Approximately 2.7 oz. (with batteries)
Storage Temperature
-20 °C to 60 °C (-4 °F to 140 °F) (without batteries)
Warranty
Symbol Technologies, Inc. (“Symbol”) manufactures its hardware products in accordance with industry-standard
practices. Symbol warrants that for a period of 90 days from date of shipment, products will be free from defects in
materials and workmanship.
This warranty is provided to the original owner only and is not transferable to any third party. It shall not apply to any
product (i) which has been repaired or altered unless done or approved by Symbol, (ii) which has not been maintained
in accordance with any operating or handling instructions supplied by Symbol, (iii) which has been subjected to
unusual physical or electrical stress, misuse, abuse, power shortage, negligence or accident or (iv) which has been
used other than in accordance with the product operating and handling instructions. Preventive maintenance is the
responsibility of customer and is not covered under this warranty.
Wear items and accessories having a Symbol serial number, will carry a 90-day limited warranty. Non-serialized items
will carry a 30-day limited warranty.
• EN 55022:1998, Limits and Methods of Measurement of Radio Disturbance Characteristics of Information
Technology Equipment
• EN 55024:1998; Information Technology equipment - Immunity characteristics - Limits and methods of measurement
• IEC 1000-4-2:1995; Electromagnetic compatibility (EMC); Part 4:Testing and measurement techniques; Section 4.2:Electrostatic discharge immunity test
• IEC 1000-4-3:1997; Electromagnetic Compatibility (EMC); Part 4:Testing and measurement techniques; Section 3. Radiated, radio frequency, electromagnetic field immunity test.
• IEC 1000-4-4:1995; Electromagnetic compatibility (EMC); Part 4: Testing and measurement techniques; Section 4:Testing electrical fast transient,/Burst immunity.
• IEC1000-4-5:1995; Electromagnetic compatibility (EMC), Part 4: Testing and measurement techniques; Section 5: Surge Immunity
• IEC 1000-4-6:1996; Electromagnetic compatibility (EMC), Part 4:Testing and measurement techniques; Section 6: Immunity to conducted disturbances, induced by radio frequency fields.
• IEC 1000-4-11:1994; Electromagnetic compatibility (EMC), Part 4: Testing and measurement techniques; Section 11: Voltage Dips, Short Interruptions, and Voltage Variations.
• EN 60 950 + A1+ A2 + A3 + A4 + A11 - Safety of Information Technology Equipment Including Electrical Business Equipment
• EN 60 825-1 (EN 60 825) - Safety of Devices Containing Lasers
Laser Devices
Symbol products using lasers comply with US 21CFR1040.10, and IEC825-1:1993, EN60825-1:1994+A11:1996. The
laser classification is marked on one of the labels on the product.
Class 1 Laser devices are not considered to be hazardous when used for their intended purpose. The following
statement is required to comply with US and international regulations:
Caution: Use of controls, adjustments or performance of procedures other than those specified herein may result in
hazardous laser light exposure.
Class 2 laser scanners use a low power, visible light diode. As with any very bright light source, such as the sun, the
user should avoid staring directly into the light beam. Momentary exposure to a Class 2 laser is not known to be
harmful.
1-800-653-5350
Canada
905-629-7226
Italy
United Kingdom
0800 328 2424
Asia/Pacific
337-6588
Mexico
5-520-1835
AVOID EXPOSURE-laser light is emitted from this aperture
Australia
1-800-672-906
Austria
1-505-5794
Netherlands
315-271700
EVITER TOUTE EXPOSITION-Lumiere laser emis par cette
Denmark
7020-1718
Finland
9 5407 580
Norway
66810600
France
01-40-96-52-21
Germany
6074-49020
South Africa
11-4405668
Sweden
84452900
Spain
+913244000
Latin America Sales Support
1-800-347-0178 Inside US
+1-561-483-1275 Outside US
Europe/Mid-East Distributor Operations
Contact local distributor or call
+44 208 945 7360
2-484441
Applicable Standards
United States
Regulatory Information
Supported Symbologies
Battery Life
Except for the warranties stated above, Symbol disclaims all warranties, express or implied, on products furnished
hereunder, including without limitation implied warranties of merchantability and fitness for a particular purpose. The
stated express warranties are in lieu of all obligations or liabilities on part of Symbol for damages, including without
limitation, special, indirect, or consequential damages arising out of or in connection with the use or performance of
the product.
Seller’s liability for damages to buyer or others resulting from the use of any product, shall in no way exceed the
purchase price of said product, except in instances of injury to persons or property.
Some states (or jurisdictions) do not allow the exclusion or limitation of incidental or consequential damages, so the
proceeding exclusion or limitation may not apply to you.
• Electromagnetic Compatibility Directive 89/336/EEC
• Low Voltage Directive 73/23/EEC
IEC CLASS 1 LASER PRODUCT
LASER KLASSE 1
APPAREIL A LASER DE CLASSE 1
C A U T I O N
LASER LIGHT- DO NOT STARE INTO BEAM
630-680nm LASER 1.0 MILLIWATT MAXIMUM OUTPUT
CLASS II LASER PRODUCT
In accordance with Clause 5, IEC 0825 and EN60825, the following information is provided to the user:
Radio Frequency Interference Requirements
This equipment has been tested and found to comply with the limits for a Class B digital device, pursuant to Part 15
of the FCC rules. These limits are designed to provide reasonable protection against harmful interference in a
residential installation. This equipment generates, uses, and can radiate radio frequency energy and, if not installed
and used in accordance with the instructions, may cause harmful interference to radio communications. However
there is no guarantee that interference will not occur in a particular installation. If this equipment does cause harmful
interference to radio or television reception, which can be determined by turning the equipment off and on, the user
is encouraged to try to correct the interference by one or more of the following measures:
• Reorient or relocate the receiving antenna
• Increase the separation between the equipment and receiver
• Connect the equipment into an outlet on a circuit different from that to which the receiver is connected
• Consult the dealer or an experienced radio/TV technician for help.
Radio Frequency Interference Requirements - Canada
This device complies with RSS 210 of Industry & Science Canada. Operation is subject to the following two
conditions: (1) this device may not cause harmful interference and (2) this device must accept any interference
received, including interference that may cause undesired operation.
This Class B digital apparatus complies with Industry Canada Standard ICES-003.
Cet appareil numérique de la classe B est conform à la norme NMB-003 d’Industrie Canada.
CE Marking and European Union Compliance
Products intended for sale within the European Union are marked with the CE Mark which indicates
compliance to applicable Directives and European Normes (EN), as follows. Amendments to these
Directives or ENs are included:
ENGLISH
CLASS 1
CLASS 2
DANISH
KLASSE 1
KLASSE 2
DUTCH
KLASSE 1
KLASSE 2
FINNISH
LUOKKA 1
LUOKKA 2
FRENCH
CLASSE 1
CLASSE 2
GERMAN
KLASSE 1
KLASSE 2
HEBREW
CLASS 1 LASER PRODUCT
LASER LIGHT
DO NOT STARE INTO BEAM
CLASS 2 LASER PRODUCT
KLASSE 1 LASERPRODUKT
LASERLYF
SE IKKE IND I STRÅLEN
KLASSE 2 LASERPRODUKT
KLASSE-1 LASERPRODUKT
LASERLICHT
NIET IN STRAAL STAREN
KLASSE-2 LASERPRODUKT
LUOKKA 1 LASERTUOTE
LASERVALO
ÄLÄ TUIJOTA SÄDETTÄ
LUOKKA 2 LASERTUOTE
PRODUIT LASER DE CLASSE 1
LUMIERE LASER
NE PAS REGARDER LE RAYON FIXEMENT
PRODUIT LASER DE CLASSE 2
LASERPRODUKT DER KLASSE 1
LASERSTRAHLEN
NICHT DIREKT IN DEN LASERSTRAHL SCHAUEN
LASERPRODUKT DER KLASSE 2
ITALIAN
CLASSE 1
CLASSE 2
PRODOTTO AL LASER DI CLASSE 1
LUCE LASER
NON FISSARE IL RAGGIOPRODOTTO
AL LASER DI CLASSE 2
NORWEGIAN
KLASSE 1
LASERPRODUKT, KLASSE 1
KLASSE 2
LASERLYS IKKE STIRR INN I LYSSTRÅLEN
LASERPRODUKT, KLASSE 2
PORTUGUESE
CLASSE 1
PRODUTO LASER DA CLASSE 1
CLASSE 2
LUZ DE LASER NÃO FIXAR O RAIO LUMINOSO
PRODUTO LASER DA CLASSE 2
SPANISH
CLASE 1
CLASE 2
SWEDISH
KLASS 1
KLASS 2
PRODUCTO LASER DE LA CLASE 1
LUZ LASER
NO MIRE FIJAMENTE EL HAZ
PRODUCTO LASER DE LA CLASE 2
LASERPRODUKT KLASS 1
LASERLJUS STIRRA INTE MOT STRÅLEN
LASERPRODUKT KLASS 2
To transfer bar code data from the scanner to the computer, use the third party application software
to upload stored data from the scanner to your computer. (Application software is not included with
the scanner.)
Note: The manner in which this transfer occurs depends on your specific application. Refer to the
application software manual for instructions. When communication starts, the indicator blinks green
and the scanner beeps.
For developers interested in writing software applications for a CS 1504, a Software Developer’s Kit
is available for downloading. Visit: http://www.symbol.com/consumer for more information.
Upload Bar Code Data to the Computer
3.
2.
1.
Connect the 9-pin connector of the serial cable to the
9-pin connector of the USB-to-Serial converter.
Ensure that the connection is secure.
Connect the USB (4-pin) connector of the USB-toSerial converter to the corresponding USB port on the
back of the computer according to the manufacturer’s
directions. Ensure that the connection is secure.
Holding the other end of the serial cable with the arrow
facing up, slide the connector into the data
communication jack on the side of the scanner.
Serial Cable
Clean the CS 1504 with a soft, clean cloth. Do NOT use any solvent such as alcohol or any abrasive
substances.
Cleaning
To toggle the beeper tone on or off, press and hold the large button for 10 seconds until the LED
indicator turns solid amber (beeper tone off) or until the LED turns solid amber and a double tone is
heard (beeper tone on).
Audio Control
USB-to-Serial
Converter
USB Connection
Practice scanning this sample bar code.
Connect the included serial (9-pin) connector to the
corresponding communication port on the back of the
computer according to the manufacturer’s directions.
Ensure that the connection is secure.
Holding the other end of the serial cable with the
arrow facing up, slide the connector into the data
communication jack on the side of the scanner.
The CS 1504 will indicate a low power state to the user by blinking the LED indicator red while trying
to scan a bar code.
Low Battery Warning
Serial Cable
Connecting the Scanner to Your Computer
Replacing the Batteries
Scan Bar Codes (Add Items to Memory)
Note: Before beginning, shut down your computer according to your computer manufacturer’s
directions.
When it is necessary to replace the
batteries:
1. Remove screw securing the
battery cover.
2. Lift battery cover.
3. Remove the old batteries.
4. Insert four new batteries noting
the polarity.
5. Close battery cover and replace
screw.
Welcome!
© 2001-2004 SYMBOL TECHNOLOGIES, INC. All rights reserved.
Thank you for selecting this world class, bar code memory scanner. This scanner, when
combined with a third party application (software not included), allows you to capture bar
codes for a variety of uses. Whether you’re scanning bar codes to generate a shopping
list, purchasing products, or finding information on the Internet, this scanner is the
easiest data capture device to use. Simply point, and scan!
Delete Button
Scan Button
Battery Cover
(underneath)
LED
Indicator
Scanner Exit
Window
2.
1.
Serial Connection
Data
Communication
Connector Jack
Unpacking Your Scanner
Depending upon the configuration purchased, the scanner is packaged with either a
serial communication cable or a USB communication cable set. If items are missing,
contact your reseller.
Serial Communication Cable
USB-to-Serial Converter and Serial
Communication Cable
Symbol reserves the right to make changes to any product to improve reliability, function, or design.
Symbol does not assume any product liability arising out of, or in connection with, the application or use of any
product, circuit, or application described herein.
No license is granted, either expressly or by implication, estoppel, or otherwise under any patent right or patent,
covering or relating to any combination, system, apparatus, machine, material, method, or process in which Symbol
products might be used. An implied license only exists for equipment, circuits, and subsystems contained in Symbol
products.
Symbol is a registered trademark of Symbol Technologies, Inc. Other product names mentioned in this manual may
be trademarks or registered trademarks of their respective companies and are hereby acknowledged.
Symbol Technologies, Inc.
One Symbol Plaza
Holtsville, N.Y. 11742-1300
http://www.symbol.com
1.
2.
Scanner
Use the small Delete Button to clear the scanner memory of all
stored items.
1. Aim the scanner away from any bar codes.
2. Press and hold the Delete Button for 6 seconds, until you
hear a long beep.
Clear All
Aim the scanner at the bar code to be deleted from memory.
Press and hold the small Delete Button on the scanner until you hear a tone and the blinking
indicator turns solid amber.
Note: If the sample bar code above is scanned three times there will be three listings of this bar code
in the CS 1504’s memory. To delete all three listings of the bar code from memory, scan the sample
bar code three times using the small Delete button (-) on the scanner. Upon each minus scan you
will receive a single beep. When the last entry has been deleted, a long double beep will be emitted
indicating all listings of that bar code have been removed from memory.
1.
2.
Delete Bar Codes (Remove Items from Memory)
0123
Aim the scanner at the sample bar code shown below.
Press and hold the large button on the scanner until you
hear the tone and the blinking indicator turns solid green.
•
Make sure the scanner beam covers the entire bar
code and extends as far out as indicated by the endpoints in the bar code below.
•
The scanner should be held approximately 2.5" from
the bar code and at a slight angle.
Getting Started
Owner’s Guide
Patents
This product is covered by one or more of the following U.S. and foreign Patents:
U.S. Patent No. 4,593,186; 4,603,262; 4,607,156; 4,652,750; 4,673,805; 4,736,095;
4,758,717; 4,760,248; 4,806,742; 4,816,660; 4,845,350; 4,896,026; 4,897,532; 4,923,281; 4,933,538; 4,992,717; 5,015,833;
5,017,765; 5,021,641; 5,029,183; 5,047,617; 5,103,461; 5,113,445; 5,130,520; 5,140,144; 5,142,550; 5,149,950; 5,157,687;
5,168,148; 5,168,149; 5,180,904; 5,216,232; 5,229,591; 5,230,088; 5,235,167; 5,243,655; 5,247,162; 5,250,791; 5,250,792;
5,260,553; 5,262,627; 5,262,628; 5,266,787; 5,278,398; 5,280,162; 5,280,163; 5,280,164; 5,280,498; 5,304,786; 5,304,788;
5,306,900; 5,324,924; 5,337,361; 5,367,151; 5,373,148; 5,378,882; 5,396,053; 5,396,055; 5,399,846; 5,408,081; 5,410,139;
5,410,140; 5,412,198; 5,418,812; 5,420,411; 5,436,440; 5,444,231; 5,449,891; 5,449,893; 5,468,949; 5,471,042; 5,478,998;
5,479,000; 5,479,002; 5,479,441; 5,504,322; 5,519,577; 5,528,621; 5,532,469; 5,543,610; 5,545,889; 5,552,592; 5,557,093;
5,578,810; 5,581,070; 5,589,679; 5,589,680; 5,608,202; 5,612,531; 5,619,028; 5,627,359; 5,637,852; 5,664,229; 5,668,803;
5,675,139; 5,693,929; 5,698,835; 5,705,800; 5,714,746; 5,723,851; 5,734,152; 5,734,153; 5,742,043; 5,745,794; 5,754,587;
5,762,516; 5,763,863; 5,767,500; 5,789,728; 5,789,731; 5,808,287; 5,811,785; 5,811,787; 5,815,811; 5,821,519; 5,821,520;
5,823,812; 5,828,050; 5,848,064; 5,850,078; 5,861,615; 5,874,720; 5,875,415; 5,900,617; 5,902,989; 5,907,146; 5,912,450;
5,914,478; 5,917,173; 5,920,059; 5,923,025; 5,929,420; 5,945,658; 5,945,659; 5,946,194; 5,959,285; 6,002,918; 6,021,947;
6,029,894; 6,031,830; 6,036,098; 6,047,892; 6,050,491; 6,053,413; 6,056,200; 6,065,678; 6,067,297; 6,082,621; 6,084,528;
6,088,482; 6,092,725; 6,101,483; 6,102,293; 6,104,620; 6,114,712; 6,115,678; 6,119,944; 6,123,265; 6,131,814; 6,138,180;
6,142,379; 6,172,478; 6,176,428; 6,178,426; 6,186,400; 6,188,681; 6,209,788; 6,209,789; 6,216,951; 6,220,514; 6,243,447;
6,244,513; 6,247,647; 6,308,061; 6,250,551; 6,295,031; 6,308,061; 6,308,892; 6,321,990; 6,328,213; 6,330,244; 6,336,587;
6,340,114; 6,340,115; 6,340,119; 6,348,773; 6,380,949; 6,394,355; D305,885; D341,584; D344,501; D359,483; D362,453;
D363,700; D363,918; D370,478; D383,124; D391,250;
D405,077; D406,581; D414,171; D414,172; D418,500; D419,548; D423,468; D424,035;
D430,158; D430,159; D431,562; D436,104.
Invention No. 55,358; 62,539; 69,060; 69,187, NI-068564 (Taiwan); No. 1,601,796; 1,907,875; 1,955,269 (Japan); European
Patent 367,299; 414,281; 367,300; 367,298; UK 2,072,832; France 81/03938; Italy 1,138,713
rev. 06/02
CS 1504 Consumer Memory Scanner
http://www.symbol.com/consumer
72-50875-03
Revision A - February 2004