1
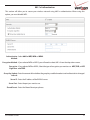
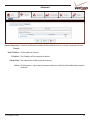
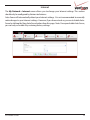
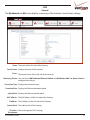
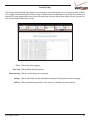
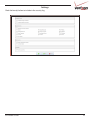
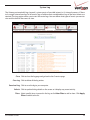
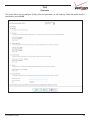
D-Link DSL-2750B Wireless Gateway
User Guide
Version 1.1
July 19, 2013
Table of Contents
Product Overview....................................................................................................................................... 5
Product Description............................................................................................................................................................... 5
Safety Instructions.................................................................................................................................................................. 5
Networking Requirements.................................................................................................................................................. 6
Hardware Features.................................................................................................................................................................. 7
LED Indicators................................................................................................................................................................. 7
Ports/Buttons................................................................................................................................................................... 7
Installation.................................................................................................................................................. 8
DSL Filters/Microfilters.......................................................................................................................................................... 8
Configure your Computer.................................................................................................................................................... 8
Windows® 8/7/Vista®/XP/2000.................................................................................................................................. 8
Mac OS® X......................................................................................................................................................................... 9
Connect your Gateway........................................................................................................................................................10
Web-based Configuration Utility............................................................................................................ 11
Wireless............................................................................................................................................................................13
Overview..................................................................................................................................................................13
Settings.....................................................................................................................................................................14
Wireless.....................................................................................................................................................................15
Wireless Network Settings..........................................................................................................................16
MAC Filtering...................................................................................................................................................17
WPS......................................................................................................................................................................18
WPA/WPA2 Security.......................................................................................................................................19
WEP Security....................................................................................................................................................20
802.1x Authentication..................................................................................................................................21
Advanced..........................................................................................................................................................22
My Network....................................................................................................................................................................23
Overview..................................................................................................................................................................23
Internet.....................................................................................................................................................................24
LAN.............................................................................................................................................................................25
General...............................................................................................................................................................25
Settings..............................................................................................................................................................27
Internet Protocol.............................................................................................................................................29
DNS Server........................................................................................................................................................29
IP Address Distribution (DHCP).................................................................................................................30
DHCP Server Pools (DHCP Reservation).................................................................................................31
Routing.....................................................................................................................................................................32
Bridging....................................................................................................................................................................33
Advanced.................................................................................................................................................................34
DSL-2750B User Guide
2
Firewall Settings...........................................................................................................................................................35
Overview..................................................................................................................................................................35
Access Control........................................................................................................................................................36
Port Forwarding..............................................................................................................................................37
DMZ Host..........................................................................................................................................................39
Port Triggering................................................................................................................................................40
Connections.....................................................................................................................................................41
Advanced Filtering.........................................................................................................................................42
Remote Administration................................................................................................................................43
Security Log......................................................................................................................................................44
Settings..............................................................................................................................................................45
System Log.......................................................................................................................................................46
Services............................................................................................................................................................................47
Overview..................................................................................................................................................................47
QoS.............................................................................................................................................................................48
Overview...........................................................................................................................................................48
Utilization by Computer...............................................................................................................................49
Utilization by Application............................................................................................................................49
Traffic Priority...................................................................................................................................................50
Traffic Shaping.................................................................................................................................................51
DSCP Settings..................................................................................................................................................52
802.1p Settings...............................................................................................................................................53
Class Statistics..................................................................................................................................................54
Parental Controls...................................................................................................................................................55
Overview...........................................................................................................................................................55
Filtering Policy.................................................................................................................................................56
Advanced Options.........................................................................................................................................58
Statistics.............................................................................................................................................................59
Storage......................................................................................................................................................................60
File Server..........................................................................................................................................................60
Disk Management..........................................................................................................................................61
Personal Domain Name (DDNS)......................................................................................................................62
IP Address Distribution (DHCP)........................................................................................................................63
System..............................................................................................................................................................................64
Overview..................................................................................................................................................................64
Settings.....................................................................................................................................................................65
Date and Time..................................................................................................................................................66
Users..........................................................................................................................................................................67
Overview...........................................................................................................................................................67
RADIUS Client..................................................................................................................................................68
Network Connections..........................................................................................................................................69
DSL-2750B User Guide
3
Monitor.....................................................................................................................................................................70
Network.............................................................................................................................................................70
CPU......................................................................................................................................................................70
Routing.....................................................................................................................................................................71
Overview...........................................................................................................................................................71
PPPoE Relay......................................................................................................................................................71
Universal Plug and Play (UPnP™).....................................................................................................................72
Maintenance...........................................................................................................................................................73
Reboot................................................................................................................................................................73
Restore Factory Settings..............................................................................................................................73
Firmware Upgrade.........................................................................................................................................74
Diagnostics.......................................................................................................................................................75
Objects and Rules.................................................................................................................................................76
Protocols............................................................................................................................................................76
Network Objects.............................................................................................................................................77
Scheduler Rules...............................................................................................................................................78
Certificates........................................................................................................................................................79
Advanced Configuration.......................................................................................................................... 80
Bridge Mode...........................................................................................................................................................................80
Multiple Static Public IPs.....................................................................................................................................................83
Connect to your Wireless Network.......................................................................................................... 86
Windows® 8.............................................................................................................................................................................86
Windows® 7.............................................................................................................................................................................88
Windows Vista®......................................................................................................................................................................90
Windows® XP..........................................................................................................................................................................91
Networking Basics.................................................................................................................................... 92
Check your IP address..........................................................................................................................................................92
Windows® 8 Users........................................................................................................................................................92
Windows® 7/Vista® Users...........................................................................................................................................92
Windows® XP Users.....................................................................................................................................................92
Statically Assign an IP Address.........................................................................................................................................93
Windows® 8 Users.........................................................................................................................................................93
Windows® 7/ Vista® Users..........................................................................................................................................94
Windows® XP Users.....................................................................................................................................................95
DSL-2750B User Guide
4
Product Overview
Product Description
The Verizon® D-Link® DSL-2750B Wireless Gateway provides reliable, high-speed, Internet access to your
existing small office phone line and is capable of data rates hundreds of times faster than a traditional analog
modem. But unlike analog modems, the Gateway allows you to use the same phone line for simultaneous
voice/fax communications and high-speed Internet access, eliminating the need for dedicated phone lines
for voice and data needs. In addition, it supports a variety of networking interfaces along with the following
optional features:
• Four 10/100 Ethernet Ports
• 802.11n wireless technology to provide the best wireless performance
• Advanced firewall features including parental control, access control, and content filtering
• Wi-Fi Protected Setup (WPS) Push Button/PIN setup
• UPnP Support
• USB port for sharing music/video/images using a thumb drive or external hard drive
Safety Instructions
• Never install any telephone wiring during a lightning storm.
• Never install telephone jacks in wet locations unless the jack is specifically designed for wet
locations.
• Never touch non-insulated telephone wires or terminals unless the telephone line has been
disconnected at the network interface.
• Use caution when installing or modifying telephone lines.
WARNING: Risk of electric shock. Voltages up to 140 Vdc (with reference to ground) may be present on
telecommunications circuits.
DSL-2750B User Guide
5
Networking Requirements
The following system specifications are required for optimum performance of the Router via 10/100 Ethernet
or 802.11n/g wireless.
ETHERNET:
• Pentium® or equivalent class machines or higher
• Microsoft® Windows® (8, 7,Vista®, XP, 2000, ME, NT 4.0, 98 SE) Mac OS® X, or Linux installed
• 64 MB RAM (128 MB recommended)
• 10 MB of free hard drive space
• 10/100 Base-T Network Interface Card (NIC)
• Internet Explorer® 6.0, Firefox® 3.0, Safari® 3.0 or Chrome 2.0 or higher
WIRELESS:
• Pentium® or equivalent class or higher
• Microsoft® Windows® (8, 7,Vista®, XP, 2000) or Mac OS® X installed
• 64 MB RAM (128 MB recommended)
• 10 MB of free hard drive space
• Internet Explorer® 6.0, Firefox® 3.0, Safari® 3.0 or Chrome 2.0 or higher
• Available IEEE 802.11n/g wireless clients
DSL-2750B User Guide
6
Hardware Features
LED Indicators
This section explains the LED states and descriptions. LED indicators are used to verify the unit’s operation and
status.
1
Power
2
Ethernet (1-4)
3
Wireless
4
USB
5
DSL
6
Internet
A solid green light indicates the unit is powered on.
A red light indicates a malfunction.
A solid light indicates a connection to an Ethernet-enabled computer
on ports 1-4. This LED blinks during data transmission.
A solid green light indicates the wireless function is operating correctly.
A flashing green light indicates wireless traffic is passing through the
router.
A solid green light indicates a good connection to a USB device. This
light will blink during data transmission.
A solid light indicates the DSL is synchronized.
A flashing LED indicates the modem is attempting to synchronize with
the DSL provider.
A solid green light indicates that the modem has an IP address and is
connected to the Internet.
A red light indicates that the modem does not have an IP address or
authentication has failed.
No light indicates that an ADSL connection is not present or the
modem is in bridge mode.
Ports/Buttons
The following chart displays the Router’s connector types:
1
2
DSL Port
LAN Ports (1-4)
3
USB Port
4
WLAN Button
5
Reset Button
6
7
ON/OFF
Power Receptor
8
WPS Button
DSL-2750B User Guide
Connect to an active telephone line (RJ-11).
Connect Ethernet devices such as computers, switches, and hubs.
Connect a USB thumb drive or external hard drive and share files with
users on your network.
Pressing this button to turn the Wireless feature on or off.
Pressing the Reset button for 10 seconds restores the modem to its
original factory default settings.
Press this button to turn the unit on or off.
Receptor for the supplied power adapter.
Press the WPS button located on the side to add your device to an
existing network or to create a new network.
7
Installation
This section will explain how to configure your computers to connect to the gateway, configure the gateway
to connect to the Internet, and set up your wireless clients.
DSL Filters/Microfilters
ADSL signals must be blocked from reaching each telephone, answering machine, fax machine, or any similar
conventional device. Failure to do so may degrade telephone voice quality and ADSL performance.
Install a microfilter if you desire to use the DSL-equipped line jack for telephone, answering machine, fax
machine or other telephone device connections. Microfilter installation requires no tools or telephone
rewiring. Just unplug the telephone device from the baseboard or wall mount and plug in a microfilter and
then plug in the telephone device.
You can purchase microfilters from your local electronics retailer, or contact the original provider of your DSL
equipment.
Configure your Computer
Windows® 8/7/Vista®/XP/2000
Follow the steps below to configure your computer to automatically receive its IP settings from the Gateway:
1. Windows® 8 - Press the Windows key and then type IP. Click Settings on the right side and then click
View Network Connections. Windows® 7 - Click on Start > Control Panel > Network and Internet > Network and Sharing Center.
Windows Vista® - Click on Start > Control Panel > Network and Internet > Network and Sharing
Center > Manage Network Connections.
Windows® XP - Click on Start > Control Panel > Network Connections.
Windows® 2000 - From the desktop, right-click My Network Places > Properties.
2. Right-click on the Local Area Connection which represents your D-Link network adapter and select
Properties.
3.Highlight Internet Protocol (TCP/IP) or Internet Protocol Version 4 (TCP /IPv4) and click Properties.
4. In the Internet Protocol (TCP/IP) Properties dialog box, click on the radio buttons labeled Obtain an
IP address automatically and Obtain DNS server address automatically.
5.Click OK twice to save your settings.
DSL-2750B User Guide
8
Mac OS® X
Below are instructions for configuring your Mac OS® X operating system
1. In the Mac OS X Dock, click on the System Preferences icon.
2.Under Internet & Network, click Network. In the Show menu, select Built-in Ethernet or Ethernet
(Depending on your Mac OS version.)
3. Click the TCP/IP tab.
4. In the Configure menu, select Using DHCP.
5.Click Apply Now and Save if your computer prompts you to save changes.
If you want to assign a static IP address, please use the settings below:
• Your PC’s TCP/IP address: 192.168.1.x (where “x” is any number between 2 and 254)
• The Default Gateway’s IP address: 192.168.1.1
• Subnet mask: 255.255.255.0
• DNS server:192.168.1.1 (same IP as the Gateway) or supplied by Verizon
DSL-2750B User Guide
9
Connect your Gateway
1. Connect an RJ-11 (phone) cable from your wall phone jack to the DSL port on the back of the DSL-2750B gateway.
2. Connect an Ethernet cable from the LAN1 port on the back of the DSL-2750B to the Ethernet port on your
computer.
3. Connect the supplied power adapter into the power receptor on the back of the DSL-2750B gateway to a power
outlet or a surge protector (recommended).
4. Once you connect the power adapter, press the ON/OFF button on the back of the gateway to turn the unit on. Desktop Computer
DSL-2750B Gateway
12VDC IN
RESET
DSL
DSL-2750B User Guide
LAN4
LAN3
LAN2
LAN1
USB
WLAN
ON/OFF POWER
10
Web-based Configuration Utility
To log into the gateway, follow the steps below:
1. Launch your web browser such as Internet Explorer.
2. In the address bar enter http://192.168.1.1 and press Enter.
3. The Home page will appear. The Overview screen displays the gateway status summary in one
convenient location. The user can quickly and efficiently view important details of the connection
status and hardware peripherals, as well as the status of different services. If you click any other
link/tab, you will be asked to log in.
Map View depicts the various network elements, such as the Internet connection, firewall,
gateway, internal network interface (Ethernet, USB, and Wireless), and local network computers
and peripherals visually.
4.Click Settings to configure your router. Once the login screen appears, enter Admin next to
Username and then enter your password (refer to “login password” on the label located on
the bottom of the Gateway). Click Continue.
DSL-2750B User Guide
11
The Home > Overview screen will appear. This screen gives you an overview of your Gateway including the
Internet connection status, system information, local network information, and storage status.
When the router is configured with DHCP, you will be able to Release and Renew your WAN IP Address with
the buttons located here.
DSL-2750B User Guide
12
Wireless
Overview
The Wireless > Overview screen displays the Gateway’s current wireless settings.
Enable Button: Click the Enable button to turn on the wireless function.
DSL-2750B User Guide
13
Settings
The Wireless > Settings screen allows you to change the Gateway’s wireless settings.
Device Name: Displays the name of the Interface.
Status: Displays the current connection state.
Schedule: Select a time frame from the drop-down menu to have the wireless function active.
Network: LAN is selected.
Connection Type: Displays the wireless mode the Gateway is set to.
Physical Address: Displays the MAC address of the Gateway (wireless side).
MTU: Maximum Transmission Unit - you may need to change the MTU for optimal performance with
your specific ISP. 1500 is the default MTU.
DSL-2750B User Guide
14
Wireless
The Wireless > Wireless screen allows you to change the Gateway’s wireless network settings.
DSL-2750B User Guide
15
Wireless Network Settings
Wireless Network Service Set Identifier (SSID) is the name of your wireless network. Create a name using up to 32
(SSID): characters. The SSID is case-sensitive. For security reasons, do not choose a name with personal
information.
SSID Broadcast: When this box is checked, the SSID (name of your wireless network) will broadcast. Wireless
clients within range of your Gateway will be able to see your network. For added security, you
may uncheck this box but will have to manually enter the SSID on your wireless clients.
802.11 Mode: Select the type of wireless clients that will connect to your wireless network.
802.11b/g Mixed - Select if you are using a mix of 802.11b and 11g wireless clients.
802.11g Only - Select if all of your wireless clients are 802.11g.
802.11b Only - Select if all of your wireless clients are 802.11b.
802.11b/g/n - Select if you are using a mix of 802.11b, 11g, and 11n wireless clients.
802.11n Only - Select only if all of your wireless clients are 802.11n.
802.11g/n - Select if you are using a mix of 802.11n and 11g wireless clients.
Channel (FCC): Select the wireless channel. It is strongly recommended to select Automatic.
Channel Width Select the Channel Width:
Mode:
20MHz - This is the default setting. Select if you are not using any 802.11n wireless clients.
20/40MHz (dynamic) - Select if you are using both 802.11n and non-802.11n wireless
devices.
40MHz - Select if using only 802.11n wireless clients.
Network Select the authentication mode from the drop-down. Open System is the default settings.
Authentication: When using WEP encryption, it is recommended to select Shared Key.
DSL-2750B User Guide
16
MAC Filtering
Use MAC (Media Access Control) Filtering to allow or deny wireless computers and devices by their MAC
addresses from accessing the Network. You will need to manually add the MAC address of your wireless client
you want to filter.
MAC Filtering: Select from the drop-down menu:
Disable - turn off MAC filtering.
Allow - Allows only the computers/devices you want from your network to access the
Internet. All other computers will be blocked if not added.
Deny - Blocks computers/devices you want from your network from accessing the Internet.
All other computers will be allowed to connect.
Action/New MAC Click the green + icon or New MAC Address to add your wireless clients. To find the MAC address
Address: on a computer, please refer to the Networking Basics section in this manual.
Add New MAC Address
Step 1: Click the green + icon under Action.
Step 2: Enter the MAC Address of your computer or device and click OK.
Step 3:Your newly added device will now be displayed in the list. Click the red X to remove the device from
the list. To add more, repeat steps 1 and 2.
DSL-2750B User Guide
17
WPS
Wi-Fi Protected Setup (WPS) System is a simplified method for securing your wireless network during the
“Initial setup” as well as the “Add New Device” processes. The Wi-Fi Alliance (WFA) has certified it across different
products as well as manufactures. The process is just as easy, as pressing a button for the Push-Button Method
or correctly entering the 8-digit code for the Pin-Code Method. The time reduction in setup and ease of use
are quite beneficial, while the highest wireless Security setting of WPA2 is automatically used.
Push Button
Step 1:Select Push Button from the drop-down and then click the Go button to start the WPS process.
Step 2: Within 2 minutes, press the WPS button on your wireless client. Some clients may require you to launch its
software utility and click a WPS button. Please refer to your wireless client’s user guide for more information.
Step 3: Allow 1-2 minutes for the devices to communicate. Once complete your client will connect to the gateway.
Client PIN Code
A PIN is a unique number that can be used to add the router to an existing network or to create a new network.
You will need to get the PIN number from one of your wireless clients. Please refer to your wireless client’s user
guide for more information.
Step 1: From your wireless client, write down the PIN and activate/start the WPS process.
Step 2: Within 2 minutes from the Gateway, select Client Pin Code from the drop-down, enter the PIN number
in the box, and then click the Go button.
Step 3: Allow 1-2 minutes for the devices to communicate. Once complete your client will connect to the gateway.
DSL-2750B User Guide
18
WPA/WPA2 Security
This section will allow you to secure your wireless network using WEP, WPA, or WPA2 encryption. When using
these options, you must disable WPS. Refer to the previous page and uncheck the WPS box.
The default setting and recommended level of security is WPA2.
Authentication Select WPA or WPA2.
Method:
Advanced WPA: Check this box to change the pre-shared key (passphrase).
Pre-Shared Key: Displays the current WPA/WPA2 passphrase.
Encryption Select AES, TKIP, or AES and TKIP.
Algorithm:
Group Key Update Enter the amount of time before the group key used for broadcast and multicast data is changed.
Interval:
DSL-2750B User Guide
19
WEP Security
WEP is an older, less-secure encryption option. It is strongly recommended to use WPA or WPA2.
Authentication Select WEP from the drop-down menu.
Method:
WEP Keys: You may enter up to 4 different keys. Select the key you want to use.
Encryption Key: Enter a WEP key.
Entry Method: Select the type of key from the drop-down menu.
Hex - letters A-F and numbers 0-9 are valid.
ASCII - all letters and numbers are valid.
Key Length: Select the level of encryption (40 or 104-bit).
DSL-2750B User Guide
20
802.1x Authentication
This section will allow you to secure your wireless network using 802.1x authentication. When using this
option, you must disable WPS.
Authentication Select 802.1x WEP, WPA or WPA2.
Method:
Encryption Method: If you selected WPA or WPA2, you will need to select 802.1x from the drop-down menu.
Encryption If you selected WPA or WPA2, Select the type of encryption you want to use - AES, TKIP, or AES
Algorithm: and TKIP.
Group Key Update Enter the amount of time before the group key used for broadcast and multicast data is changed.
Interval:
Server IP: Enter the IP address of the RADIUS server.
Server Port: Enter the port you want to use.
Shared Secret: Enter the Shared Secret passphrase.
DSL-2750B User Guide
21
Advanced
Internet Connection Check the Enable box to enable the firewall feature for your wireless computers/devices.
Firewall:
New IP Address: Click to add a new device.
IP Address: The IP address of the computer or device.
Subnet Mask: The subnet mask of the computer or device.
Action: Click the green + sign to add a computer or device, or click the red X to delete the computer
or device.
DSL-2750B User Guide
22
My Network
Overview
The My Network > Overview screen displays your network devices on your network and any
attached storage devices.
Wireless Network: This section will display any wireless device connected to your Gateway.
Local Network: This section will display any Ethernet device connected to your Gateway.
You can click the computer name, IP address or “Shared Files” to access any shares on that
computer.
Attached Devices: This section will display if any USB storage devices (thumb drive/external hard drive) are
connected to your Gateway.
DSL-2750B User Guide
23
Internet
The My Network > Internet screen allows you to change your Internet settings. This section
should only be configured by Verizon technicians.
Auto-Sense will automatically detect your Internet settings. It is not recommended to manually
make changes to your Internet settings. However, if you choose to do so, you must disable AutoSense by clicking the Stop Auto-Sense button from this page. Note: Once you disable Auto-Sense,
you can only re-enable it by restoring factory settings.
DSL-2750B User Guide
24
LAN
General
The My Network > LAN screen displays a summary of the Gateway’s local (router) settings.
Name: The name of the LAN side of the Gateway.
Device Name: Displays the name of the Interface.
Status: The current status of the LAN side of the Gateway.
Underlying Device: You may click LAN Hardware Ethernet Switch or LAN Wireless 802.11n Access Point to
configure their settings.
Connection Type: Displays the connection type.
Download Rate: Displays the Ethernet download speed.
Upload Rate: Displays the Ethernet upload speed.
MAC Address: The MAC address of the LAN side of the Gateway.
IP Address: The IP address of the LAN side of the Gateway.
Subnet Mask: The subnet mask of the Gateway.
IP Address Click to change the DHCP settings.
Distribution:
DSL-2750B User Guide
25
Received Packets: Amount of packets received.
Sent Packets: Amount of packets sent.
Time Span: Displays the time connected.
Disable Button: Click to disable the use of the Ethernet ports (LAN) on your Gateway.
DSL-2750B User Guide
26
Settings
This section allows you to change the network settings (LAN) of your Gateway.
DSL-2750B User Guide
27
Device Name: Displays the name of the Interface.
Status: Displays the current connection state.
Schedule: Select a time frame from the drop-down menu to have your wired devices able to connect to
the Internet.
Network: LAN is selected.
Connection Type: Displays the connection type the Gateway is set to.
Physical Address: Displays the MAC address of the Gateway (LAN side).
MTU: Maximum Transmission Unit - you may need to change the MTU for optimal performance with
your specific ISP. 1500 is the default MTU.
DSL-2750B User Guide
28
Internet Protocol
Internet Protocol: Select Use the Following IP Address from the drop-down menu.
IP Address: If you want to change the Gateway IP address, enter it here. If you do change this IP address,
you must use it in the future to log into the Gateway.
Subnet Mask: Enter the Subnet Mask of your local network.
DNS Server
DNS Server: Select Use the Following DNS Server Addresses from the drop-down menu.
Primary DNS Server: Enter the IP Address of your primary DNS server.
Secondary DNS Server: Enter the IP Address of your secondary DNS server.
DSL-2750B User Guide
29
IP Address Distribution (DHCP)
DHCP stands for Dynamic Host Control Protocol. The Gateway has a built-in DHCP server. The DHCP Server will
automatically assign an IP address to the computers /devices on the LAN/private network. Be sure to set your
computers to be DHCP clients by setting their TCP/IP settings to “Obtain an IP Address Automatically.” When
you turn your computers on, they will automatically load the proper TCP/IP settings provided by the Gateway.
The DHCP Server will automatically allocate an unused IP address from the IP address pool to the requesting
computer/device. You must specify the starting and ending address of the IP address pool (refer to the next
page).
DNS Server: Select DHCP Server from the drop-down menu (default setting) if you want the Gateway to
automatically assign your wired and wireless clients their network settings automatically. If
you disable this function, you will have to statically assign the IP/network settings on your
clients.
Start IP Address: Enter the starting IP address of the DHCP range.
End IP Address: Enter the end IP address of the DHCP range.
Subnet Mask: Enter the subnet mask of your local network.
WINS Server: Enter the IP address of your WINS server (if one).
Lease Time in Minutes: Enter the DHCP lease time (in minutes).
Provide Host Name if If the DHCP client does not have a host name, the Gateway will automatically assign one.
Not Specified by Client:
Provide DNS Server to Check this box if you want the Gateway to assign your clients the IP address(es) of the ISPs
Clients: DNS servers.
DSL-2750B User Guide
30
DHCP Server Pools (DHCP Reservation)
If you want a computer or device to always have the same IP address assigned, you can create a DHCP
reservation. The router will assign the IP address only to that computer or device.
Criteria: Displays the current created server pool.
Dynamic IP Range: Displays the IP address range.
Action: Click the green + sign to add a new rule, click the pencil icon to edit, or click the red X to
remove the rule.
New IP Range: Click to add a new entry.
DSL-2750B User Guide
31
Routing
Routing Mode: Select the routing mode from the drop-down menu.
Device Metric: Enter the metric value. The route metric is a value from 1 to 15 that indicates the cost of
using this route. A value 1 is the lowest cost and 15 is the highest cost.
Default Route: Check this box to use the default route.
Multicast - IGMP Proxy This box is checked by default.
Internal:
IGMP Query Version: Select the IGMP Query version from the drop-down menu.
Routing Table: Displays the entered routes.
Name: Displays the name of the route you created.
Destination: The IP address of the destination location.
Gateway: The gateway IP address of the destination location.
Netmask: The netmask of the destination location.
Metric: The metric value assigned to this route.
Status: Displays the status of the route.
Action: Click the green + icon to add a new route, click the pencil icon to edit the route, or click the
red X to delete the route.
DSL-2750B User Guide
32
Bridging
Bridging: Displays the default segments of the Gateway. Click the pencil icon to edit the settings.
Name: The name of the segment.
VLANs: The VLAN status of the segment.
Status: The connection status of the segment.
STP: (Spanning Tree Protocol) is a method for automatically calculating the best route of a network
with or without loops.
Action: Click the pencil icon to edit the segment.
Bridge Filter: You can enter your own devices to add to the bridge filter table. Click New Entry to add a
device to the LAN Bridge.
Action: Click the green + icon to add a new entry, click the pencil icon to edit, or click the red X to
delete the entry.
DSL-2750B User Guide
33
Advanced
Internet Connection Check the Enable box to enable the firewall feature for your wired computers/devices.
Firewall:
New IP Address: Click to add a new device.
IP Address: The IP address of the computer or device.
Subnet Mask: The subnet mask of the computer or device.
Action: Click the green + sign to add a computer or device, or click the red X to delete the computer
or device.
DSL-2750B User Guide
34
Firewall Settings
Overview
This section explains how to configure your Router’s firewall security features. The Router’s firewall security
settings allow you reduce the risk of unauthorized access to your network by prohibiting certain types of
inbound and outbound network traffic and by allowing you to configure specific firewall rules.
To change your firewall security level, click the option next to the desired security setting. Next, click Apply to
allow the changes to take effect.
Maximum Security High security level only allows basic Internet functionality. Only Mail, News, Web, FTP, and
(High): IPSEC are allowed. All other traffic is prohibited.
Typical Security Like High security, Medium security only allows basic Internet functionality by default.
(Medium): However, Medium security allows customization through NAT configuration so that you can
enable the traffic that you want to pass.
Minimum Security Low security setting will allow all traffic except for known attacks. With Low security, your
(Low): Gateway is visible to other computers on the Internet.
DSL-2750B User Guide
35
Access Control
The Access Control section allows you to control access in and out of your network. Use this feature as Parental
Controls to only grant access to approved sites, limit web access based on time or dates, and/or block access
from applications like P2P utilities or games.
Click New Entry to add a rule.
Address: Select a device from the list or select User Defined to create a new object.
Protocol: Select the protocol or service you want to block. The default list will have basic services. You
can select Show All Services for a large list. If you do not see the service you want, select
User Defined to create your own. The complete list can be view and edited at System >
Objects and Rules > Protocols.
Reply with an Check this box if you want to redirect the user who tries to access a blocked service to a
HTML Page: website of your choice. To change the web site, go to Services > Parental Control >
Advanced Options.
Schedule: Select Any or a user defined schedule. Select User Defined to create a schedule rule. You
can create/view/edit schedules at Services > Objects and Rules > Scheduler Rules.
DSL-2750B User Guide
36
Port Forwarding
Port Forwarding allows you to open a single port or a range of ports. Certain applications and games may
require ports to be opened or forwarded to your computer to work. Click New Entry to create a rule.
Local Host: Displays the name of the host name.
Local Address: Displays the IP address of the host.
Protocols: Displays the protocol(s) used in the port forwarding rule.
Local Port: Displays the port(s) used in the port forwarding rule.
Status: Displays the current status of the rule (Active or Disabled).
Action: Click the green + icon to add a new entry, click the pencil icon to edit, or click the red X to delete
the entry.
New Entry: Click to add a new port forwarding rule (refer to the next page).
DSL-2750B User Guide
37
Create a Rule
Step 1: Click New Entry.
Step 2: Next to Local Host, select a computer or device from the drop-down menu.
Step 3: Next to Protocols, select a pre-defined service from the drop-down menu. The default list will have
basic services. Select Show All Services for a much larger list of specific games and applications. If you do not
see the service you want, select User Defined to create your own. The complete list can be view and edited at
System > Objects and Rules > Protocols.
Step 4: Click OK to save the rule.
Step 5: The new rule will appear in the list. You can click the green + icon to add a new entry, click the pencil
icon to edit, or click the red X to delete the entry.
DSL-2750B User Guide
38
DMZ Host
If an application has trouble working from behind the Gateway, you can expose one computer to the Internet
and run the application on that computer.
Note: Placing a computer in the DMZ will expose that computer to a variety of security risks. Use of this option
is only recommended as a last resort.
DMZ Host IP Address: Check the box to DMZ. This will de-activate any port-forwarding rules.
Enter the IP address of the computer you want to open to the Internet.
DSL-2750B User Guide
39
Port Triggering
The Port Triggering feature allows you to forward a range of ports to an IP address on your local network (LAN)
only after specific outbound traffic is detected. You can set up a port triggering entry based on your specific
ports.
IMPORTANT: Using various Internet applications depends on the Router’s firewall settings. Make sure that the
Router’s firewall is set to Medium Security or lower to take advantage of all the port forwarding features.
Firewall settings take precedence over port forwarding services configured in the Router. For example, if the
firewall is set to Medium Security, this will block ICMP packets even if the ICMP service is enabled. If a port
forwarding service is not working, try setting the firewall to a lower setting.
Protocol: Displays the protocol/service. Check the box to activate the rule.
Outgoing Trigger Ports: Displays the outgoing port(s) and protocol(s) used by the application.
Incoming Ports to Displays the incoming port(s) and protocol(s) opened by the application.
Open:
Action: Click the red X to delete the rule.
Add: Select a service/application from the drop-down menu to add.
DSL-2750B User Guide
40
Connections
This page will display connection from your local network (LAN) to the Internet.
Action: Click the red X to delete the listing.
Close: Click to go to the Overview page.
DSL-2750B User Guide
41
Advanced Filtering
Some applications require multiple connections, such as Internet gaming, video conferencing, Internet
telephony and others. These applications have difficulties working through NAT (Network Address Translation).
Port Triggering makes some of these applications work with the Gateway.
Protocol: Displays the protocol/service. Check the box to activate the rule.
Outgoing Trigger Ports: Displays the outgoing port(s) and protocol(s) used by the application.
Incoming Ports to Displays the incoming port(s) and protocol(s) opened by the application.
Open:
Action: Click the red X to delete the rule.
Add: Select a service/application from the drop-down menu to add.
DSL-2750B User Guide
42
Remote Administration
Remote management allows the Gateway to be configured from the Internet by a web browser. A username
and password is still required to access the Web-Management interface.
Example: http://x.x.x.x:8080 whereas x.x.x.x is the WAN IP address of the Gateway and 8080 is the port used for
the Web Management interface.
Allow Incoming WAN Access to Web Check the box of the port you want to use. The default port is 80.
Management:
Diagnostic Tools: Check the box to activate the diagnostic tools rule.
DSL-2750B User Guide
43
Security Log
The Gateway automatically logs (records) security events of possible interest in it’s internal memory. If there
isn’t enough internal memory for all events, logs of older events are deleted but logs of the latest events are
retained. The Logs option allows you to view the router logs. You can define what types of events you want to
view and the level of the events to view.
Close: Click to close the log page.
Clear Log: Click to delete all the log entries.
Download Log: Click to save the log to your computer.
Settings: Click to select filters for the information displayed in the log (refer to the next page).
Refresh: Click to update the log details on the screen so it displays any recent activity.
DSL-2750B User Guide
44
Settings
Check the box(es) below to include in the security log.
DSL-2750B User Guide
45
System Log
The Gateway automatically logs (records) system events of possible interest in it’s internal memory. If there
isn’t enough internal memory for all events, logs of older events are deleted but logs of the latest events are
retained. The Logs option allows you to view the router logs. You can define what types of events you want to
view and the level of the events to view.
Close: Click to close the log page and go back to the Overview page.
Clear Log: Click to delete all the log entries.
Download Log: Click to save the log to your computer.
Refresh: Click to update the log details on the screen so it displays any recent activity.
Filters: Select specific items to record in the log or click New Filter to add an item. Click Apply
Filters to add it to the list.
DSL-2750B User Guide
46
Services
Overview
This page displays the status of each service. Click on the service to configure.
DSL-2750B User Guide
47
QoS
Overview
This screen allows you to configure Quality of Service parameters in the Gateway. Select the profile that fits
you the best and click OK.
DSL-2750B User Guide
48
Utilization by Computer
This screen displays bandwidth usage from computers on your local network.
Utilization by Application
This screen displays bandwidth usage from applications on your local network.
DSL-2750B User Guide
49
Traffic Priority
This screen displays the QoS input and output rules. These will change depending on the selection you
selected on the Services > QoS > Overview page.
DSL-2750B User Guide
50
Traffic Shaping
This page allows you to add traffic shaping rules. Click New Entry to add a rule.
Once you click New Entry, select the device/Gateway segment you want to configure from the drop-down
menu.
Tx Bandwidth: Select the Tx traffic bandwidth from the drop-down. Select Specify to enter your own value,
Automatic, or Unlimited.
TCP Serialization: Select Enabled or Disabled.
Queue Policy: Select Class Based or Strict Priority.
Rx Bandwidth: Select the Rx traffic bandwidth from the drop-down. Select Specify to enter your own
value, Automatic, or Unlimited.
Queue Policy: Select Policer, Class Based or Strict Priority.
DSL-2750B User Guide
51
DSCP Settings
This page allows you to configure DSCP (Differentiated Services Code Point) settings. Click the pencil icon to
edit the priority and settings for each DSCP value.
DSL-2750B User Guide
52
802.1p Settings
This page allows you to configure 802.1p settings. Select the queue for each 802.1p value.
DSL-2750B User Guide
53
Class Statistics
DSL-2750B User Guide
54
Parental Controls
Overview
To activate parental control, check the Enable Web Content Filtering box and then click OK. You will be
directed to the Filtering Policy page (refer to the next page).
DSL-2750B User Guide
55
Filtering Policy
Once you enable Parental Controls, you can create filtering rules here.
Default Filtering Policy: This is a global setting. If you select Block All, it will over-ride LAN Computer Policies and
Filtering Policies created and block all computers/devices from connecting to the Internet.
To use created policies, select Allow All.
LAN Computer Policy: This list will display any LAN computer policies. You can click the green + icon to add a new
entry, click the pencil icon to edit, or click the red X to delete the entry.
Click Add a LAN Computer to create a new entry (see below).
Filtering Policy: This list will display any filter policies that were created. You can click the green + icon to
add a new entry, click the pencil icon to edit, or click the red X to delete the entry.
Click Add a Policy to create a new entry (refer to the next page).
Add a LAN Computer
Enter the name or IP address (x.x.x.x) of your computer or device and then select Allow All, Block All, or any
created policy (see next page). You can then select a schedule from the drop-down. Click OK to continue.
WARNING: If you enter the computer you are working on and select Block All, you will disconnect from
the Gateway and will not be able to log back in (since you are blocked). You will have to connect to the
Gateway from another computer or reset the Gateway back to factory default settings.
DSL-2750B User Guide
56
Add a Policy
Name: Enter a name for your policy.
Description: Enter a description.
Websites and URL Select either Block Access to These Websites and URL Keywords or Allow Access to
Keywords Filtering: These Websites and URL Keywords from the drop-down menu.
List of Websites: Enter specific websites you want to block or allow.
List of Keywords: Enter keywords that are on websites that you want to block or allow.
OK: Click to save your policies.
Created policies will then appear in the drop-down list when adding LAN computers.
DSL-2750B User Guide
57
Advanced Options
If a user from your local network attempts to visit a site that you blocked, they will get redirected to the URL
you want. Enter the URL below and click OK. Click Reset Redirect URL to clear out the URL.
DSL-2750B User Guide
58
Statistics
This page displays the number of allowed and blocked sites that were attempted to be view from your local
network.
DSL-2750B User Guide
59
Storage
File Server
You can connect a USB thumb drive or external hard drive to the router and share it with users on your local
network.
Enabled: Check to enable access to your USB drive.
NetBIOS Workgroup: Enter the name of your workgroup.
Automatically Share All Check to automatically allow all partitions on your drive shared.
Partitions:
Allow Guest Access: Select the user rights for Guests - Disabled, Read only, or Read/Write.
File Server Shares: Your drive will appear here. Click the name of the drive to access the folders and files.
Advanced users can click New Entry to assign specific users, groups to specific folders on
your USB drive.
OK: Click OK to save your settings.
DSL-2750B User Guide
60
Disk Management
Enabled: Check to enable the disk management.
Status: Displays the status of your USB drive.
System Storage Area Displays the status of the
Status:
Automatically Create Check to automatically create a system storage area for your USB drive. The default partition
System Storage Area: name will be A. If you uncheck this box, you can rename the partition (storage area).
Disks: Displays information about your USB drive. Click on the Name of the drive to access more
information about the drive (see below). Also, click the name under Partitions to view the
files on your drive.
DSL-2750B User Guide
61
Personal Domain Name (DDNS)
Dynamic DNS is a dynamic IP address that can aliased to a static host name, allowing a computer on the
network to be more easily accessible from the Internet.
To add your DDNS information, click New Dynamic DNS Entry.
Host Name: Enter your full DDNS domain name (e.g. myrouter.dyndns.org).
Connection: Select the connection to which you would like to couple the DDNS service. The DDNS service will
only use the chosen device, unless failover is enabled. In this case, the failed-to device will be used
instead (assuming its route rules consent), until the chosen device is up again.
Provider: Select your DDNS service provider. The screen will refresh, displaying the parameters required by each
provider. The provider depicted herein is dyndns, which includes all available parameters.
User Name: Enter your DDNS user name.
Password: Enter your DDNS password.
Offline: If you wish to temporarily take your site offline (prevent traffic from reaching your DDNS domain
name), check this box to enable redirection of DNS requests to an alternative URL, predefined in your
DDNS account. The availability of this feature depends on your account’s level and type of service.
SSL Mode: With the gateway versions that support Secure Socket Layer (SSL), secured DDNS services are accessed
using HTTPS. Upon connection, the gateway validates the DDNS server’s certificate. Use this entry to
choose the certificate’s validation method.
DSL-2750B User Guide
62
IP Address Distribution (DHCP)
Dynamic DNS is a dynamic IP address that can aliased to a static host name, allowing a computer on the
network to be more easily accessible from the Internet.
Click LAN Bridge to configure.
IP Address Distribution: Select DHCP Server to have your Gateway assign IP settings to your Ethernet devices
connected to the LAN ports.
Start IP Address: Enter the starting IP address in your DHCP range.
End IP Address: Enter the end IP address in your DHCP range.
Subnet Mask: Enter the subnet mask of your network.
WINS Server: Enter the IP address of your WINS server (optional).
Lease Time in Minutes: Enter the lease time (in minutes).
Provide Host Name: Check this box if you want the Gateway to assign a host name to your device if one is
not supplied.
Provide DNS Server: Check this box to assign the DNS server to your devices.
DHCP Server Access Select Disable (turn off option), Served (to have the Gateway assign IP settings to only
Control: the devices in the list), or Denied (to have the Gateway assign IP settings to all devices
except for the ones in the list). Click New Entry to add devices to the list.
DSL-2750B User Guide
63
System
Overview
This section displays system information about the Gateway.
DSL-2750B User Guide
64
Settings
This section allows you to change system settings on the Gateway. It is strongly recommended not to change
any of these settings. Click Date and Time on the right side to change the time and date on the Gateway (refer
to the next page).
DSL-2750B User Guide
65
Date and Time
This feature allows you to set the date and time values on your Gateway.
Local Time: Displays the current Gateway date and time.
Time Zone: Select your time zone from the drop-down menu.
Daylight Saving Time: Check to enable daylight saving time and then enter the desired Start and End values in
the fields provided. Click Apply to save the settings.
Automatic Time Update: Check the Enable box to use a time server. Check either TOD or NTP protocol and then
enter the Update Every box with a value (in hours). Click Sync Now to connect to the server.
You may use the default server or add your own server information by clicking New Entry.
DSL-2750B User Guide
66
Users
Overview
The System > Users page allows you to create users and groups, and assign permissions. Administrator is the
default user.
Users: Displays active users, roles, and permissions. Under Action, you can click the pencil icon to
edit the user’s settings, the green + to add a user, or the red X to delete the user.
Groups: Displays active group, description, and members (users assign to that group). Under Action,
you can click the pencil icon to edit the group’s settings, the green + to add a group, or the
red X to delete the group.
DSL-2750B User Guide
67
RADIUS Client
This page allows you to use a RADIUS server to authenticate users to log into the router.
Enabled: Check this box to enable RADIUS server authentication.
Server IP: Enter the IP address of the RADIUS server.
Server Port: Enter the port used.
Shared Secret: Enter the shared secret (passphrase).
DSL-2750B User Guide
68
Network Connections
This page will display the status of your network connections. You may add, edit, and delete these connections.
Name: Displays the name of the connection. Click on the name to edit.
Status: Displays the status of the connection.
Action: Click the pencil icon to edit the connection, the green + icon to add a new connection, or
the red X to delete the connection.
New Connection: Click to add a new connection.
DSL-2750B User Guide
69
Monitor
Network
This page will display network statistics on the Gateway.
CPU
This page will display the Gateway’s CPU statistics.
DSL-2750B User Guide
70
Routing
Overview
The routing table will display any routes. Check the IGMP Enabled box and check to enable IGMP Fast Leave
and/or IGMP Multicast to Unicast. Click OK to save your settings.
PPPoE Relay
Check the Enabled box to activate PPPoE relay. Click OK to save your settings.
DSL-2750B User Guide
71
Universal Plug and Play (UPnP™)
Allow Other Network Check this box to broadcast the router to all computers on your local network. You
Users to Control Verizon’s computer (if UPnP is enabled on your computer) will detect the router as a UPnP
Network Features: device.
Enable Automatic Check this box to have the Gateway automatically remove unused UPnP services.
Cleanup of Old Unused
UPnP Services:
WAN Connection Select Publish Only the Main WAN Connection.
Publication:
OK: Click OK to save your settings.
DSL-2750B User Guide
72
Maintenance
Reboot
Click OK to reboot the Gateway.
Restore Factory Settings
Click OK to reset the Gateway to the default factory settings. All rules, users, groups, etc you configured will
be lost.
DSL-2750B User Guide
73
Firmware Upgrade
Visit the Verizon website to download a firmware upgrade file to your computer if available. Click Browse and
then navigate to the location of the upgrade file; the path will appear in the window. Next, click OK to begin
the upload to your Gateway.
DSL-2750B User Guide
74
Diagnostics
This page will allow you to test different connection using Ping, ARP, Traceroute, PVC Scan, and OAM Ping.
Enter the IP address of your target (destination) and adjust settings if needed, then click Go. The results will
appear next to Status.
DSL-2750B User Guide
75
Objects and Rules
Protocols
The Protocols page will display all the default and user-created services and their port information. This is
used for the Port Forwarding and Port Triggering features. You may click the pencil icon to edit the item, click
the red X to remove the item, or scroll all the way to the bottom and click New Entry on the left side to create
a new protocol.
DSL-2750B User Guide
76
Network Objects
Network objects are devices on your local network such as computers, game consoles, media players, Internet
TVs, and network storage (NAS) devices, or a specific IP address or a range of IP address. You can add a network
object by clicking New Entry.
DSL-2750B User Guide
77
Scheduler Rules
Scheduler Rules will allow you to set up a specific schedule that you can apply to parental control and firewall
features. For example if you want to block your kids’ computers from the Internet at certain times, you can
create a schedule that specifies the day and time you want blocked, and then apply that schedule to a firewall
rule. Click New Entry or the green + icon.
Click New Entry or the green + icon under Action and the following screen will appear.
Name: Enter a name for your rule.
Rule Activity Settings: Select either the time frame is going to be active or inactive.
New Time Segment Entry: Click to enter the time frame you want for the rule.
OK: Click to save your rule.
DSL-2750B User Guide
78
Certificates
DSL-2750B User Guide
79
Advanced Configuration
Bridge Mode
Before following the steps below, please factory reset the DSL-2750B. After it has booted up, disable the
Wireless by depressing the button on the back of the unit. Complete the following steps to set up Bridge
mode on the DSL-2750B:
1. Open a web browser and enter http://192.168.1.1.
2. Log in with the default user name (admin) and password (refer to back label of 2750B).
3.Select My Network > Internet.
4. From the drop-down menu next to Connection type, select LAN-WAN Bridged Ethernet Connection
over ATM (Bridged ETHoA).
5.Click Apply.
6. When the following message appears, click OK.
DSL-2750B User Guide
80
7. Browse to System > Network Connections and click WAN-LAN Bridge.
8. Click the Settings tab.
DSL-2750B User Guide
81
9.Under Internet Protocol, change the setting to No IP Address. Click Apply.
10. When the Browser Reload message appears, click OK.
11. The following settings take place once the DSL-2750B is in Bridge mode:
a. VPI/VCI: 0/35
b. Encapsulation: LLC
c. DHCP server is disabled for both wired/wireless clients
d. GUI is accessible only through 192.168.1.1 by a PC configured with static IP address of 192.168.1.x/24.
Note: Once you have configured the DSL-2750B for Bridge mode, release and renew your network adapter cards.
On a DHCP line, your PC will now receive a public IP address.
On a PPPoE line, you should receive a 169.254.x.x IP address. The GUI will not be accessible and you should get the
following message when trying to do so.
DSL-2750B User Guide
82
Multiple Static Public IPs
Before following the steps below, please factory reset the DSL-2750B.
1. Open a web browser and enter http://192.168.1.1.
2. Log in with the default user name (admin) and password (refer to back label of 2750B).
3.Select My Network > Internet.
4. From the drop-down menu next to Connection type, select LAN-WAN Bridged Ethernet Connection
over ATM (Bridged ETHoA).
5.Click Apply.
6. When the following message appears, click OK.
DSL-2750B User Guide
83
7.Click System > Network Connections > WAN-LAN Bridge.
8.Click Settings.
9. From the drop-down menu next to Internet Protocol, select Use the Following IP Address.
a. This will give you the option to input the static IP Address, Subnet, Gateway and DNS.
b. Enter your information and click Apply.
DSL-2750B User Guide
84
10. When the following message appears, click OK.
11. Additional Public IP Addresses can be statically configured on LAN PCs.
DSL-2750B User Guide
85
Connect to your Wireless Network
Windows® 8
1. Click on the wireless computer icon in your system tray (lower-right corner
next to the time).
2. A list of available wireless networks will appear.
3. Click the wireless network (SSID) you want to connect to and then click
Connect.
4. If the network is secure/encrypted, enter the Wi-Fi password (security key)
and click Next.
DSL-2750B User Guide
86
5. Click either to enable or disable file sharing.
6. You will now be connected to your wireless network.
If you get a good signal but cannot access the Internet, confirm the encryption by reviewing the profile or
check the TCP/IP settings for your wireless adapter. Refer to the Networking Basics section in this manual for
more information.
DSL-2750B User Guide
87
Windows® 7
It is recommended to enable wireless security (WPA/WPA2) on your wireless router or access point before
configuring your wireless adapter. If you are joining an existing network, you will need to know the passphrase
being used.
1. Click on the wireless icon in your system tray
(lower-right corner).
Wireless Icon
2. The utility will display any available wireless networks in your area.
DSL-2750B User Guide
88
3. Highlight the wireless network (SSID) you would like to connect
to and click the Connect button.
If you get a good signal but cannot access the Internet, check
your TCP/IP settings for your wireless adapter. Refer to the
Networking Basics section in this manual for more information.
4. The following window appears while your
computer tries to connect to the Gateway.
5. Enter the same passphrase that is on your
Gateway and click Ok.
It may take 20-30 seconds to connect to the
wireless network. If the connection fails, please
verify that the security settings are correct.
The passphrase must be exactly the same as
on the Gateway.
DSL-2750B User Guide
89
Windows Vista®
Windows Vista® users may use the built-in wireless utility. If you are using another company’s utility please refer
to the user manual of your wireless adapter for help with connecting to a wireless network. Most utilities will
have a “site survey” option similar to the Windows Vista® utility as seen below.
1. Right-click on the wireless computer icon in your system tray
(lower-right corner next to the time). Select Connect to a
network.
2. The utility will display any available wireless networks in
your area. Click on a network (displayed using the SSID)
and click the Connect button.
3. Enter the same security key or passphrase that is on your
router and click Connect.
It may take 20-30 seconds to connect to the wireless
network. If the connection fails, please verify that the
security settings are correct. The key or passphrase must
be exactly the same as on the wireless router.
DSL-2750B User Guide
90
Windows® XP
Windows® XP users may use the built-in wireless utility. If you are using another company’s utility, please refer
to the user manual of your wireless adapter for help with connecting to a wireless network. Most utilities will
have a “site survey” option similar to the Windows® XP utility as seen below.
1. Right-click on the wireless computer icon in your system tray
(lower right corner next to the time). Select View Available
Wireless Networks.
2. The utility will display any available wireless networks
in your area. Click on a network (displayed using the
SSID) and click the Connect button.
3.The Wireless Network Connection box will appear.
Enter the WPA/WPA2 passphrase and click Connect.
It may take 20-30 seconds to connect to the wireless
network. If the connection fails, please verify that
the WPA/WPA2 settings are correct. The WPA/WPA2
passphrase must be exactly the same as on the wireless
router.
DSL-2750B User Guide
91
Networking Basics
Check your IP address
After you install your new D-Link wireless adapter and have established a wireless connection, by default, the
TCP/IP settings should be set to obtain an IP address from a DHCP server (i.e., router) automatically. To verify your
IP address, please follow the steps below.
Windows® 8 Users
• Press the Windows key and R together. Type cmd in the box
and click OK.
• At the prompt, type ipconfig and press Enter.
• This will display the IP address, subnet mask, and default
gateway of your adapter.
Windows® 7/Vista® Users
•Click Start, type cmd in the search box and then click OK.
• At the prompt, type ipconfig and press Enter.
• This will display the IP address, subnet mask, and default
gateway of your adapter.
Windows® XP Users
• Click on Start > Run. In the run box type cmd and click OK.
• At the prompt, type ipconfig and press Enter.
• This will display the IP address, subnet mask, and the default
gateway of your adapter.
If the address is 0.0.0.0, check your adapter installation, security settings, and the settings on your router.
Some firewall software programs may block a DHCP request on newly installed adapters.
DSL-2750B User Guide
92
Statically Assign an IP Address
If you are not using a DHCP capable gateway/router, or you need to assign a static IP address, please follow
the steps below:
Windows® 8 Users
• Press the Windows key and then type IP. Click
Settings on the right side and then click View
Network Connections.
• Right-click on the adapter which represents your
wireless network adapter.
•Highlight Internet Protocol Version 4 (TCP /IPv4)
and click Properties.
•Click Use the following IP address and enter an IP
address that is on the same subnet as your network
or LAN IP address on your router or network.
Example: If the router’s LAN IP address is
192.168.0.1, make your IP address 192.168.0.X
where X is a number between 2 and 99. Make sure
that the number you choose is not in use on the network.
•Set Default Gateway the same as the LAN IP address of your router or gateway.
•Set Primary DNS the same as the LAN IP address of your router or gateway.
•The Secondary DNS is optional (you may enter a DNS server from your ISP).
•Click OK to save your settings.
DSL-2750B User Guide
93
Windows® 7/ Vista® Users
• Click on Start > Control Panel (make sure you are in
Classic View). Double-click on the Network and Sharing
Center icon. If you are using Windows Vista, click on
Manage network connections along the left panel in
the window. For Windows® 7, click on Change adapter
settings.
• Right-click on the Local Area Connection which
represents your wireless network adapter which will be
connected to your network.
•Highlight Internet Protocol Version 4 (TCP /IPv4) and
click Properties.
•Click Use the following IP address and enter an IP
address that is on the same subnet as your network or
LAN IP address on your router or network.
Example: If the router’s LAN IP address is 192.168.0.1, make your IP address 192.168.0.X where X is a number
between 2 and 99. Make sure that the number you choose is not in use on the network.
•Set Default Gateway the same as the LAN IP address of your router or gateway.
•Set Primary DNS the same as the LAN IP address of your router or gateway.
•The Secondary DNS is optional (you may enter a DNS server from your ISP).
•Click OK to save your settings.
DSL-2750B User Guide
94
Windows® XP Users
• Click on Start > Control Panel. Make sure you are in Classic
View. Double-click on the Network Connections icon.
• Right-click on the Local Area Connection which represents
your wireless network adapter.
•Highlight Internet Protocol (TCP/IP) and click Properties.
•Click Use the following IP address and enter an IP address
that is on the same subnet as your network.
Example: If the router’s LAN IP address is 192.168.0.1, make
your IP address 192.168.0.X where X is a number between 2
and 99. Make sure that the number you choose is not in use
on the network.
•Set Default Gateway the same as the LAN IP address of your router or gateway.
•Set Primary DNS as the LAN IP address of your router or gateway.
•The Secondary DNS is optional (you may enter a DNS server from your ISP).
•Click OK to save your settings.
DSL-2750B User Guide
95