1
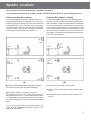
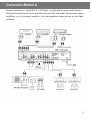
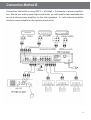
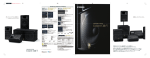
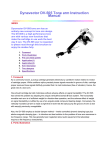
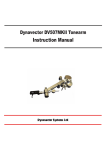
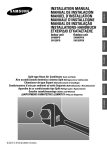
Dynavector SuperStereo Processor SSP-5 Operation Manual Introduction ............................................................ Speaker Locations ................................................ Recommended speakers for SuperStereo ............. Connection Method A ............................................ Connection Method B ............................................. Front Panel Controls ............................................... Rear Panel Controls ............................................... Preset Controls for Adjusting the Input Level ......... Adjusting the Sound Balance Between Speakers .. Operation --- Sound Reproduction ......................... Specifications ......................................................... 16-15 Iwamoto-cho 2-chome Chiyoda-ku Tokyo 101-0032 Japan Phone 813-3861-4341 Fax 813-3862-1650 1 2 3 4 5 6 7 8 9 10 11 12 Introduction What is SuperStereo? Superstereo has been developed over many years by Dynavector to remedy the deficiencies of normal 2 speaker stereo and conventional surround sound systems. The object has been to produce a sound from music sources, whether live broadcasts or recorded mono or stereo sound, which has the kind of immediacy, life and naturalness found in live music. SuperStereo has been developed after much theoretical and practical study of how sound is propagated in enclosed spaces. These studies have shown that conventional audio engineering has failed to recognise crucial aspects of the propagation of sound. As a result, there is an ever increasing production of stereo and surround sound equipment based on ever more complex digital techniques which is quite unable to get closer to the sound of live music. Only the unique and patented Dynavector SuperStereo system can achieve this result. It is theoretically impossible for a 2 speaker stereo system to produce the kind of life-like sound heard in a concert hall since the recovery of the important dispersive elements of the original sound is thereby not possible; and neither do the many multi-channel system on offer provide a solution. Dynavector has perfected its SuperStereo processors which provide frequency related time delays to sound which is replayed through additional satellite or sub speakers. The interaction of the sound between the front and sub speakers produces significant group delays in the listening room. While the group delays are not identical to those of the original or listening environment (which is impossible to achieve) , it has been established in many trials that an approximate simulation can produce a life-like reality from broadcast or recorded music which is much closer to the original sound. 6 Channel SuperStereo While the addition of 2 extra centre speakers using the Adp-2 SuperStereo processor with a conventional stereo system will produce highly enjoyable and musical results, the use of the SSP-5 processor together with the Adp-2 and a total of 4 sub speakers to give 6 speaker SuperStereo will further significantly enhance the naturalness and immediacy of the sound. This manual explains how the best results may be obtained from such a 6 speaker SuperStereo set -up. Main Features of the SSP-5 (1) 4 different frequency delay patterns, selectable by remote control, to provide music replay with a closer match to concert hall and recording studio venues; (2 ) Instant switching between normal stereo and SuperStereo modes by remote control; (3) Motorised, remotely controllable master volume control; (4) Can accept inputs from two different sources, with a choice of high or low levels; (5) Simple , front panel rotary controls for front/center and front/rear speakers' sound balance. 2 Speaker Locations We recommend two alternative speaker locations. You should choose the one best suited to the size and type of your listening room. Position (A) Normal Location Position (B) Compact Location Locate each speaker as shown in the drawing at (A) Side speakers should be located between 1.5 and 2.5 meters from the front speakers and are best situated at a height between 1.5 to 2.0 meters. The rear speakers should be located at the rear wall and are best situated near the ceiling. It is important to position the speakers so that they face towards the front speakers. Locate each speaker as shown in the drawing at (B) The side and rear speakers are located in the same position ie between 1.5 and 2.5 meters from the front speakers. In this positioning the sound is directed towards the front speakers and this layout is recommended for small rooms with insufficient depth for rear placement, and where the listener prefers not to have sound from the rear. Again, it is important to ensure that all 4 sub-speakers face the front speakers (A) (B) The best listening position is usually a little behind the line joining the two side speakers. POLARITY CHECK for speakers’ terminals After listening for a while, try reversing the polarities of the speaker terminals (+ or -) for the side and rear speakers, keeping the front speakers the same. Then choose the polarity setting which gives the most natural and deep bass. z Small room (room depth is insufficient) z Listener’s main music preference is Popular or Rock music z Listeners who do not wish to have the sound from the rear. You can reverse the polarity for the side speakers by using the SUB SPEAKERS POLARITY switch on the rear panel of the ADP-2. 3 Recommended speakers for SuperStereo We recommend small sub speakers for SuperStereo since they are quite capable of bringing out the ambience of even a large concert hall. Recommeded speakers z Front speakers:use existing speakers z Side speakers:use small speakers (5 – 10 cm driver unit) z Rear speakers:use small speakers (10- 13cm driver unit) NOTE 1.When you use large speakers for the side and the rear the sound will tend to be boomy and lack definition. Even when you use large speakers for the front you should use small speakers for the side and the rear. 2. Sealed box type rather than ported sub-speakers have the advantage that they are less affected by being put closer to the room boundaries and can give better control in the bass, but they are often less sensitive. Bass reflex speakers can also be used. Should you have any problems with the latter, you can improve the sound by using foam or felt to plug the port. 3.When you wish to have high sound levels, it is still recommended to use a number of small speakers for the side and the rear. In this way, 2, 4 or more small speakers can be used for each channel. When this is done, the speakers, whether of 4ohms or 8ohms, should be connected up according to the impedance of the speakers and the number of speakers being used. So, for example, when 2 small speakers of 4ohms are being used, they should be connected in series so as to present a load of 8ohms. When there are 2 small speakers of 8 ohms, they should be connected in parallel to give a load of 4 ohms. When 4 small speakers (per channel) are used, they should be connected in series and in parallel so as to give 4 ohms. 4 Connection Method A Normal connection / using SSP-5 + SS-Adp2 + 4 channels of power amplification. We recommend this set-up for normal home use. You will need 2 extra stereo power amplifiers (or a 4-channel amplifier), the side speakers being driven by the Adp2 amplifier. 5 Connection Method B Connection Method B is using SSP-5 + SS-Adp2 + 6 channels of power amplification. Should you wish to have high sound levels, you will need to have available also an extra stereo power amplifier for the side speakers. A multi-channel amplifier would be more suitable for this system construction. 6 Front Panel Controls (1) POWER Press the Power button to turn on the unit. speakers. When turned to the right the sound level of the center speakers is increased. (2) SENSOR (10) MASTER VOLUME Receiver for the Remote Control Unit Adjusts the overall sound level once the sound balance has been set using (8) and (9). (3) INPUTS The two inputs ( A and B) are selectable.Thus you can connect two sources to the SSP-5 (eg a pre-amplifier and a CD player). (4) MODE Normal stereo and four modes of SuperStereo are selectable, either manually or by use of the remote control. The first position is for normal stereo and the remaining four positions give increased levels of SuperStereo (5) OVERFLOW INDICATOR The red light will blink when the signal level to either input (A or B) is too high. (6) SUPER BASS LEVEL Control for the Super Bass level. This functions as super low frequency re-inforcement. eg when the control (7) is set at 42Hz, a signal of 42Hz will be generated. The SUPER BASS is provided for professional use with PA or SR. We do not recommend its use for home audio and the control should be normally set at the minimum level. Remote Control Unit (1) MUTE key The LED of the MASTER VOLUME will blink and no sound will come from the speakers. To restore the sound, press the MUTE key again. (2) INPUT key To select between input sources, press the INPUT key A or B. (3) MODE key Press the MODE key to select normal stereo or one of the 4 SuperStero modes. (4) MASTER VOLUME key To change the sound level, press and hold the UP or DOWN key until the desired volume is reached. The LED of the MASTER VOLUME will light up when the MASTER VOLUME control is being used. (7) SUPER BASS FREQUENCY Control for the Super Bass Frequency. The frequency can be adjusted according to the music source. (8) FRONT/REAR BALANCE Turning the control to the left reduces the sound level to the rear speakers. When turned to the right, the sound level to the front is reduced. (9) FRONT MAIN/CENTER LEVEL Control for adjusting the sound volume of the center Reception Limits for Remote Control Unit 30 degrees up or down or to the right or left of the central position with a maximum working distance of about 7metres. 7 Rear Panel Controls (1) INPUT LEVEL SWITCH To select HIGH or LOW level to suit the output level of the source. With HIGH: the acceptable input level is 2.5 volts and suitable for pre-amplifier or CD player With LOW : appropriate input level is 1.0 volt and suitable for tape deck or phono stage When the overflow indicator on front panel of SSP-5 lights up or blinks, you should select the HIGH position. If the indicator light is still seen, then the input source level should be reduced eg by using attenuators on the inter-connects. (7) REAR AUX IN For use as an AUX input to connect an optional device. (8) FRONT MAIN / CENTER OUTPUT This output will be as set by the switch at (5). When the switch at (5) FRONT MAIN/CENTER AUX IN is set to the FRONT MAIN position, the output will be the signal entering into INPUT A or B. When the switch for FRONT MAIN/CENTER AUX IN is set to the CENTER position, the output will be the signal going in to the CENTER AUX IN and can be used to connect a power amplifier for the side speakers. (9) FRONT OUTPUT The INPUTS for connecting the source devices. Two such sources can be connected. The output signal will be the combined signal from the source (input A or B) and the signal put in to FRONT AUX IN and can be used to connect a power amplifier for the front speakers. (3) MONITOR OUT (10) REAR OUTPUT (2) INPUT A and B This is the line-output and can be used to connect an optional device like the SS-Adp2. The output will be identical to the signal entering in to INPUT A or B . The maximum output level is 1.0 volt. (4) FRONT MAIN / CENTER AUX IN These can be used as an aux input to connect an optional device such as the SS-Adp2. The output signal will be a combined signal made up of the SuperStereo rear processing signal and the signal put in to REAR AUX IN. This can be used to connect a power amplifier for the rear speakers. (11) POWER CABLE To be plugged into a suitable AC power supply. (5) SWITCH for FRONT MAIN / CENTER AUX IN The FRONT MAIN/CENTER (8) output signal is varied by this switch as follows: FRONT MAIN position: The signal put into INPUT A or B will be the output. CENTER position: the signal put into CENTER AUX IN will be the output. (6) FRONT AUX IN For use as an AUX input to connect an optional device. 8 Preset Controls for Adjusting the Input Level Mal-adjustment of the input level will cause distorted sound or a poor signal-to-noise ratio. The procedure below should be followed to ensure the input level is correct. Connection of CD player, tape deck and phono stage or signal from REC OUT of the integrated amplifier. 1. Select LOW position of the INPUT LEVEL switch of SSP-5 on the rear panel. Connection of a Pre-amplifier 1. Select LOW position of the INPUT LEVEL switch of SSP-5 on the rear panel. 2. The MASTER VOLUME control on the front panel of SSP-5 should be turned to the minimum. 2. The MASTER VOLUME on the front panel of SSP5 should be turned to the minimum. 3. Press the power buttons of all the audio systems. 3. The volume control on the pre-amplifier should be turned to the minimum. 4. Play some music with a good dynamic range. 5. Check the overflow indicator on the front panel of SSP-5 to see whether or not it blinks. 4. Press the power buttons of all the audio systems. 5. Play some music with a good dynamic range. 6. When the indicator blinks at frequent intervals you should select HIGH position of the INPUT LEVEL switch of SSP-5. 6. The volume control of the pre-amplifier should be turned up to gradually until just before the overflow indicator on the front panel of SSP-5 starts to blink. The volume control of the pre-amplifier should be set at this position. 9 Adjusting the Sound Balance Between Speakers It is important to adjust the sound volume of each pair of speakers to obtain the best SuperStereo performance. This adjustment is done as follows. 1. The MASTER VOLUME control of SSP-5 should be turned to the minimum. 2. The volume control of each power amplifier should be turned up to the maximum. 3. When a pre-amplifier is used, you should set the volume control of it as set by (5). When you use an integrated amplifier you should set the volume control of it to the minimum position . 4. Select 3 of the MODE switch on the front panel of SSP-5. 5. The FRONT MAIN/CENTER LEVEL control of SSP-5 should be turned to minimum. The sound level from the side speakers should now be at a minimum. 6. The FRONT/REAR BALANCE control of SSP-5 should be turned to the center as at 12 o'clock. 8. The MASTER VOLUME control of the SSP-5 should be turned up gradually and a check made to ensure there is sound from the front and rear speakers, but there will not yet be any sound from the side speakers. 9. The FRONT/REAR BALANCE control of SSP-5 should be turned to the right gradually and you should adjust it to give the best SuperStereo effect at your listening position. When the FRONT/REAR BALANCE control is turned to the left the sound volume from the rear speakers will be reduced, and when the control is turned to the right the sound volume of the front speakers will be reduced. 10. The FRONT MAIN/CENTER LEVEL control of SSP-5 should be turned to the right gradually to the point which gives the best and most natural sound reproduction. 11. Once you have set the FRONT/REAR BALANCE control and the FRONT MAIN/CENTER LEVEL control so as to gives the best result; you should from now on adjust the sound volume just by the MASTER VOLUME control. 7. Now play some music. 10 Operation --- Sound Reproduction Once you set the input level of SSP-5 and the sound volume of each pair of speakers, you can operate SSP-5 most easily by using the unit’s remote control. Now MUTING the sound 1. Play some music on a CD player or other source. 2. Select the MODE switch on the front of the SSP5 according to your personal preferences. 3. Use the MASTER VOLUME control to give the most enjoyable sound level. Press the MUTE key of the remote control unit. The LED of the MASTER VOLUME will blink and no sound will come from any speaker. To restore the sound, press the MUTE key again. Mode of SuperStereo Normal stereo position gives sound from the front speakers only. Suitable for rock music, intimate jazz and classical music in small venues e.g. solo artists and chamber music. Suitable for jazz , dance and other popular music, opera and classical music in larger halls. Suitable for popular and classical music in large halls and for movie/cinema music soundtracks. Suitable for classical music in very large halls and Church music. NB the above SuperStereo mode explanations are approximate. The best mode will be influenced by the size of your listening room, the nature of the recording (or live broadcast) and the type of recording venue. Choose the one which gives you the most enjoyment. 11 Specifications Type Reverberation Analogue/digital SuperStereo processor SuperStereo analogue/digital feedback gain Input impedance Low pass filter 50Kohms (INPUT A,B, AUX IN FRONT, REAR, CENTER) <REAR low pass filter fc=2,000Hz, -12dB/oct> Input voltages INPUT A, B AUX IN HIGH 2.5 volts LOW 1.0 volt 1.5 volts Output voltages 3 .0 volts (FRONT, REAR, FRONT MAIN/CENTER) Load impedance over 10K ohms T.H.D. FRONT under 0.03% CENTER under 0.03% (at 1KHz/1 volt input/1volt output) Delay time <Digital>8 - 128 msec <Analogue>134msec/50Hz,110msec/100Hz,74msec/ 200Hz,36msec/500Hz,18msec/1,000Hz> preset modes 1 - 4 Power supply voltage AC 100/110 volts or AC 220 – 240 volts 50/60Hz 14VA According to country of use Dimensions 430W x 83H x 343Dmm Weight 6.9kg(approx.) Accessories -remote control unit -shorting plugs x 6 -warranty cord -operation manual Country of origin Made in Japan Guarantee 12 months (parts and labour) return to supplier 12