1
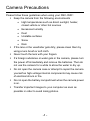
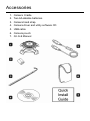
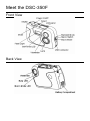
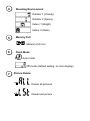
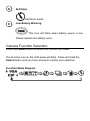
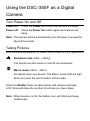
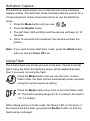
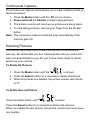
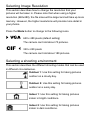
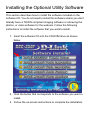
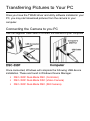
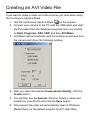
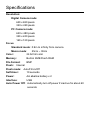
DSC-350F Dual-Mode Digital Camera Manual Rev. 04-01-2002 Contents Camera Precautions .............................................................................. 1 Accessories.............................................................................................. 2 Meet the DSC-350F................................................................................. 3 Front View.............................................................................................. 3 Back View............................................................................................... 3 LCD Panel Indicator ............................................................................. 4 Camera Function Selection................................................................. 6 Using the DSC-350F as a Digital Camera ......................................... 7 Turn Power On and Off........................................................................ 7 Taking Pictures ...................................................................................... 7 Self-timer Capture................................................................................. 8 Using Flash............................................................................................ 8 Continuous Capture.............................................................................. 9 Deleting Pictures ................................................................................... 9 Selecting Image Resolution ..............................................................10 Selecting a shooting environment....................................................10 Installing the Optional Utility Software ........................................... 11 Transferring Pictures to Your PC .....................................................12 Connecting the Camera to you PC ..................................................12 Transferring Pictures from Camera..................................................13 Creating an AVI Video File ..................................................................15 Using the DSC-350F as a PC Camera (Webcam) .........................16 Specifications ........................................................................................17 Limited Warranty...................................................................................18 D-Link Offices ........................................................................................21 Revision 1.0 Camera Precautions Please follow these guidelines when using your DSC-350F: § Keep the camera from the following environments • High temperatures such as direct sunlight, heater, closed vehicle or other hot sources • Excessive humidity • Dust • Unstable surfaces • Snow • Rain § If the lens or the viewfinder gets dirty, please clean them by using a lens brush or soft cloth. § Never touch the lens with your fingers. § If a foreign substance or water gets in the camera, please turn the power off immediately and remove the batteries. Then do not use the camera for a while to allow the water to dry up. § Do not open the camera case or attempt to repair the camera yourself as high-voltage internal components may cause risk of electrical shock or fire. § Do not open the battery compartment when the camera power is on. § Transfer important images to your computer as soon as possible in order to avoid losing photos. -1- Accessories 1. 2. 3. 4. 5. 6. 7. Camera Cradle Two AA alkaline batteries Camera hand strap Camera driver and utility software CD USB cable Camera pouch Q.I.G & Manual Meet the DSC-350F Front View Back View LCD Panel Indicator 7 8 9 6 1 5 2 4 1 3 Picture Counter Total number of pictures you have captured 2 Continuous Capture Continuous capture mode 3 Image Resolution 640 x 480 pixels (default setting) 320 x 240 pixels 4 Shooting Environment Outdoor 1 (Cloudy) Outdoor 2 (Sunny) Indoor 1 (Bright) Indoor 2 (Dark) 5 Memory Full Memory full icon 6 Flash Mode Auto mode Off mode (default setting, no icon display) 7 Picture Delete Delete all pictures Delete last picture 8 Self-timer Self-timer mode 9 Low Battery Warning This icon will blink when battery power is low. Please replace the battery soon. Camera Function Selection Press then Mode button to select the function you need. The function icon on the LCD panel will blink. Press and hold the Select button until you hear a beep to confirm your selection. Function Mode Diagram Using the DSC-350F as a Digital Camera Turn Power On and Off Power on: Power off: Press the Power On button and camera will beep. Press the Power On button again and camera will beep. Note: The camera will be automatically turn off power if unused for about 60 seconds. Taking Pictures With the camera powered on, select focus mode for your application Standard mode (0.9m ~ infinity) You should use this mode in most all circumstances. Macro mode (25cm ~ 30cm) For taking close-up pictures. The Marco mode LED will light when you push the macro switch to this mode. Press the Shutter button to take picture and camera will beep. LCD Panel will show the number of pictures you have taken. Note: When memory is full, the battery icon with blink and beep continuously. Self-timer Capture The Self-timer mode allows you to take pictures using a delayed capture setting. The Self-timer mode will delay taking a picture for a 10 second period. Follow these instructions to use the Self-timer mode. 1. Press the Mode button until you see 2. Press the Shutter button. 3. The self-timer LED will blink and the camera will beep for 10 seconds. 4. Once 10 seconds has transpired, the camera will take the picture. Note: If you want to leave Self-timer mode, press the Mode button until you see the Timer Off icon. Using Flash The Flash allows you to take pictures in the dark. Please note that when using the flash, the batteries power will be depleted quicker than if you were not using the flash. Press the Mode button until you see this icon. In Auto Flash mode, the flash will fire automatically when required using the current exposure setting. Press the Mode button once more to turn the Flash mode off. The flash's working range is 0.8~1.5 meters, the best is 1.0~1.2 meters. When taking picture in Flash mode, the "Busy" LED on the back of the camera will blink after you press the Shutter button so that the flash can be recharged. Continuous Capture The Continuous Capture mode allows you to take multiple photos in rapid succession. 1. Press the Mode button until the icon is shown. 2. Press and hold the Shutter to begin taking pictures. 3. The picture counter will count up as pictures are being taken. 4. To stop taking pictures, remove your finger from the Shutter button. Note: The continuous capture mode will stop automatically If the memory gets full. Deleting Pictures This section describes how to delete the photos in the camera’s memory. Be careful that you don’t delete photos that you want and have not downloaded to your PC yet. Follow these steps to delete photos on your camera… To Delete All Pictures 1. Press the Mode button until the is shown. 2. Press the Select button for 2 seconds to delete all pictures. 3. When all pictures are deleted, the picture counter will refresh to "0". To Delete the Last Picture Press the Mode button until is shown Press the Select button for 2 seconds to delete last pictures. When you delete the last picture, the picture counter will count down one number. Selecting Image Resolution This section describes how to change the resolution that your pictures will be taken in. Please note that when using a higher resolution (640x480), the file sizes will be larger and will take up more memory. However, the higher resolutions will provide more detail in your photos. Press the Mode button to change to the following icons. 640 x 480 pixels (default setting) The camera can hold about 70 pictures. 320 x 240 pixels The camera can hold about 180 pictures. Selecting a shooting environment This section describes the different shooting modes that can be used in different circumstances. Outdoor 1: Use this setting for taking pictures outdoor on a cloudy day. Outdoor 2: Use this setting for taking pictures outdoor on a sunny day. Indoor 1: Use this setting for taking pictures indoor in bright conditions. Indoor 2: Use this setting for taking pictures indoor in dark conditions. Installing the Optional Utility Software This section describes how to install the software included on the software CD. You do not need to install this software unless you don’t already have a TWAIN compliant imaging software or retrieving the photos, or video software for the webcam. Follow the following instructions to install the software that you want to install. 1. Insert the software CD into the CD-ROM drive as shown below. 2. Click the button that corresponds to the software you want to install. 3. Follow the on-screen instructions to complete the installation. Transferring Pictures to Your PC Once you have the TWAIN driver and utility software installed in your PC, you may start download pictures from the camera to your computer. Connecting the Camera to you PC Use the supplied USB cable to connect the camera to your computer Once connected, Windows will complete the following USB device installation. These are found in Windows Device Manager. § DSC-350F Dual-Mode DSC (Controller) § DSC-350F Dual-Mode DSC (Video Camera) § DSC-350F Dual-Mode DSC (Still Camera) Transferring Pictures from Camera Follow these steps to transfer the pictures on the camera to your computer. These instructions use ArcSoft’s Photo Impression 2000 software as the imaging software. You may use other TWAIN compliant imaging software such as Adobe Photoshop, but the instructions will not follow these steps. 1. Open "Photo Impression 2000" using the Start menu. 2. Click the Get Photo button. 3. Click the Camera/Scanner button. 4. Select "D-Link DSC-350F" from the “Select Source” list. 5. Choose the destination album for your pictures from the "Select Album" list. Acquire Select Camera/Scanner 6. Click the Acquire button. The Camera TWAIN software window will open. 7. The pictures you taken will automatically display in the TWAIN window. 8. Choose pictures that you want or click Select All to select all pictures, then click the Transfer button. Select All Transfer Creating an AVI Video File If you want to make a video out of the pictures you took when using the Continuous Capture Mode 1. Use the Continuous Capture Mode on the camera. 2. Connect your camera to the PC with the USB cable and start the AVI maker from the Windows programs menu by clicking on Start, Programs, DSC-350F and then AVI Maker. 3. AVI Maker will automatically read the continuous pictures from the camera and show the following window. 4. After you select the desired Compression Quality, click the Create button. 5. You will then see the Save As Window. Select a name and location for your AVI file and click the Save button. 6. Once saved, the video will automatically open in Windows Media Player (or the default program for AVI video files). Using the DSC-350F as a PC Camera (Webcam) You can connect the DSC-350F to your computer and use it as a PC camera, or webcam as it is sometimes called. Follow these steps to use the camera as a webcam. 1. Connect the USB cable to the camera and to your PC’s USB port. The LCD panel will display PC. 2. See the documentation of the PC camera software you are using for instructions on using the DSC-350F as a PC camera. 3. Normally, you will need to select which camera you would like to use as the webcam. Select "DSC-350F PC Camera" if the software you are using has a video capture source list. Important Note: Do not disconnect the USB cable while you are running the DSC-350F as a PC Camera. Doing so may cause your computer or software to lock-up or freeze. Specifications Resolution: Digital Camera mode: 640 x 480 pixels 320 x 240 pixels PC Camera mode: 640 x 480 pixels 320 x 240 pixels 160 x 120 pixels Focus Standard mode: 0.9m to infinity from camera Macro mode: 25cm ~ 30cm Color: 24 bit full color Memory: Built-in 8MB Flash RAM File Format: BMP Flash: Internal Flash mode: Auto/Fill-in/Off Self-timer: 10 seconds Power: AA alkaline battery x 2 Interface: USB Auto Power Off: Automatically turn off power if inactive for about 60 seconds Limited Warranty D-Link Systems, Inc. (“D-Link”) provides this limited warranty for its product only to the person or entity who originally purchased the product from; • D-Link or its authorized reseller or distributor. • Products purchased and delivered with the fifty United States, the District of Columbia, US Possessions or Protectorates, US Military Installations, addresses with an APO or FPO. Limited Hardware Warranty: D-Link warrants that the hardware portion of the D-Link products described below (“Hardware”) will be free from material defects in workmanship and materials from the date of original retail purchase of the Hardware, for the period set forth below applicable to the product type (“Warranty Period”) if the Hardware is used and serviced in accordance with applicable documentation; provided that a completed Registration Card is returned to an Authorized D-Link Service Office within ninety (90) days after the date of original retail purchase of the Hardware. If a completed Registration Card is not received by an authorized D-Link Service Office within such ninety (90) day period, then the Warranty Period shall be ninety (90) days from the date of purchase. Product Type Warranty Period • Product (excluding power supplies and fans) purchased and delivered within One (1) Year of purchase. • Power Supplies and Fans One (1) Year. • Spare parts and spare kits Ninety (90) days. D-Link’s sole obligation shall be to repair or replace the defective Hardware at no charge to the original owner. Such repair or replacement will be rendered by D-Link at an Authorized D-Link Service Office. The replacement Hardware need not be new or of an identical make, model or part; D-Link may in its discretion replace the defective Hardware (or any part thereof) with any reconditioned product that D-Link reasonably determines is substantially equivalent (or superior) in all material respects to the defective Hardware. The Warranty Period shall extend for an additional ninety (90) days after any repaired or replaced Hardware is delivered. If a material defect is incapable of correction, or if D-Link determines in its sole discretion that it is not practical to repair or replace the defective Hardware, the price paid by the original purchaser for the defective Hardware will be refunded by D-Link upon ret urn to D-Link of the defective Hardware. All Hardware (or part thereof) that is replaced by D-Link, or for which the purchase price is refunded, shall become the property of D-Link upon replacement or refund. Limited Software Warranty: D-Link warrants that the software portion of the product (“Software”) will substantially conform to D-Link’s then current functional specifications for the Software, as set forth in the applicable documentation, from the date of original delivery of the Software for a period of ninety (90) days (“Warranty Period”), if the Software is properly installed on approved hardware and operated as contemplated in its documentation. D-Link further warrants that, during the Warranty Period, the magnetic media on which D-Link delivers the Software will be free of physical defects. D-Link’s sole obligation shall be to replace the non-conforming Software (or defective media) with software that substantially conforms to D-Link’s functional specifications for the Software. Except as otherwise agreed by D-Link in writing, the replacement Software is provided only to the original licensee, and is subject to the terms and conditions of the license granted by D-Link for the Software. The Warranty Period shall extend for an additional ninety (90) days after any replacement Software is delivered. If a material non-conformance is incapable of correction, or if D-Link determines in its sole discretion that it is not practical to replace the non-conforming Software, the price paid by the original licensee for the non-conforming Software will be refunded by D-Link; provided that the non-conforming Software (and all copies thereof) is first returned to D-Link. The license granted respecting any Software for which a refund is given automatically terminates. What You Must Do For Warranty Service: Registration Card. The Registration Card provided at the back of this manual must be completed and returned to an Authorized D-Link Service Office for each D-Link product within ninety (90) days after the product is p urchased and/or licensed. The addresses/telephone/fax list of the nearest Authorized D-Link Service Office is provided in the back of this manual. FAILURE TO PROPERLY COMPLETE AND TIMELY RETURN THE REGISTRATION CARD MAY AFFECT THE WARRANTY FOR THIS PRODUCT. Submitting A Claim. Any claim under this limited warranty must be submitted in writing before the end of the Warranty Period to an Authorized D-Link Service Office. The customer must submit as part of the claim a written description of the Hardware defect or Software nonconformance in sufficient detail to allow D-Link to confirm the same. • The original product owner must obtain a Return Material Authorization (RMA) number from the Authorized D-Link Service Office and, if requested, provide written proof of purchase of the product (such as a copy of the dated purchase invoice for the product) before the warranty service is provided. • After an RMA number is issued, the defective product must be packaged securely in the original or other suitable shipping package to ensure that it will not be damaged in transit, and the RMA number must be prominently marked on the outside of the package. • The customer is responsible for all shipping charges to and from D-Link (No CODs allowed). Products sent COD will become the property of D-Link Systems, Inc. Products should be fully insured by the customer and shipped to D-Link Systems Inc., 53 Discovery Drive, Irvine CA 92618. D-Link may reject or return any product that is not packaged and shipped in strict compliance with the foregoing requirements, or for which an RMA number is not visible from the outside of the package. The product owner agrees to pay D-Link’s reasonable handling and return shipping charges for any product that is not packaged and shipped in accordance with the foregoing requirements, or that is determined by D-Link not to be defective or non-conforming. What Is Not Covered: This limited warranty provided by D-Link does not cover: Products that have been subjected to abuse, accident, alteration, modification, tampering, negligence, misuse, faulty installation, lack of reasonable care, repair or service in any way that is not contemplated in the documentation for the product, or if the model or serial number has been altered, tampered with, defaced or removed; Initial installation, installation and removal of the product for repair, and shipping costs; Operational adjustments covered in the operating manual for the product, and normal maintenance; Damage that occurs in shipment, due to act of God, failures due to power surge, and cosmetic damage; and Any hardware, software, firmware or other products or services provided by anyone other than D-Link. Disclaimer of Other Warranties: EXCEPT FOR THE LIMITED WARRANTY SPECIFIED HEREIN, THE PRODUCT IS PROVIDED “AS-IS” WITHOUT ANY WARRANTY OF ANY KIND INCLUDING, WITHOUT LIMITATION, ANY WARRANTY OF MERCHANTABILITY, FITNESS FOR A PARTICULAR PURPOSE AND NON-INFRINGEMENT. IF ANY IMPLIED WARRANTY CANNOT BE DISCLAIMED IN ANY TERRITORY WHERE A PRODUCT IS SOLD, THE DURATION OF SUCH IMPLIED WARRANTY SHALL BE LIMITED TO NINETY (90) DAYS. EXCEPT AS EXPRESSLY COVERED UNDER THE LIMITED WARRANTY PROVIDED HEREIN, THE ENTIRE RISK AS TO THE QUALITY, SELECTION AND PERFORMANCE OF THE PRODUCT IS WITH THE PURCHASER OF THE PRODUCT. Limitation of Liability: TO THE MAXIMUM EXTENT PERMITTED BY LAW, D-LINK IS NOT LIABLE UNDER ANY CONTRACT, NEGLIGENCE, STRICT LIABILITY OR OTHER LEGAL OR EQUITABLE THEORY FOR ANY LOSS OF USE OF THE PRODUCT, INCONVENIENCE OR DAMAGES OF ANY CHARACTER, WHETHER DIRECT, SPECIAL, INCIDENTAL OR CONSEQUENTIAL (INCLUDING, BUT NOT LIMITED TO, DAMAGES FOR LOSS OF GOODWILL, WORK STOPPAGE, COMPUTER FAILURE OR MALFUNCTION, LOSS OF INFORMATION OR DATA CONTAINED IN, STORED ON, OR INTEGRATED WITH ANY PRODUCT RETURNED TO D -LINK FOR WARRANTY SERVICE) RESULTING FROM THE USE OF THE PRODUCT, RELATING TO WARRANTY SERVICE, OR ARISING OUT OF ANY BREACH OF THIS LIMITED WARRANTY, EVEN IF D-LINK HAS BEEN ADVISED OF THE POSSIBILITY OF SUCH DAMAGES. THE SOLE REMEDY FOR A BREACH OF THE FOREGOING LIMITED WARRANTY IS REPAIR, REPLACEMENT OR REFUND OF THE DEFECTIVE OR NON-CONFORMING PRODUCT. GOVERNING LAW: This Limited Warranty shall be governed by the laws of the state of California. Some states do not allow exclusion or limitation of incidental or consequential damages, or limitations on how long an implied warranty lasts, so the foregoing limitations and exclusions may not apply. This limited warranty provides specific legal rights and the product owner may also have other rights which vary from state to state. Trademarks Copyright 1999 D-Link Corporation. Contents subject to change without prior notice. D-Link is a registered trademark of D-Link Corporation/D-Link Systems, Inc. All other trademarks belong to their respective proprietors. Copyright Statement No part of this publication may be reproduced in any form or by any means or used to make any derivative such as translation, transformation, or adaptation without permission from D-Link Corporation/D-Link Systems Inc., as stipulated by the United States Copyright Act of 1976. CE Mark Warning This is a Class B product. In a domestic environment, this product may cause radio interference, in which case the user may be required to take adequate measures D-Link Offices D-Link Australia Unit 16, 390 Eastern Valley Way, Roseville, NSW 2069, Australia TEL: 61-2-94177100 FAX: 61-2-94171077 URL: www.dlink.com.au D-Link Canada #2180 Winston Park Drive Oakville, Ontario, L6H 5W1 Canada TEL: 1-905-8295033 FAX: 1-905-8295095 URL: www.dlink.ca D-Link China 2/F., Sigma Building, 49 Zhichun Road, Haidian District, 100080 Beijing, China TEL: 86-10-88097777 FAX: 86-10-88096789 D-Link South America Isidora Goyeechea 2934 of 702, Las Condes Santiago ¡V Chile S.A. TEL: 56-2-232-3185 FAX: 56-2-232-0923 URL: www.dlink.cl D-Link Denmark Naverland 2, DK-2600 Glostrup, Copenhagen, Denmark TEL: 45-43-969040 FAX: 45-43-424347 URL:www.dlink.dk D-Link Middle East 7 Assem Ebn Sabet Street Heliopolis Cairo, Egypt TEL: 20-2-6356176 FAX: 20-2-6356192 URL: www.dlink-me.com D-Link France Le Florilege #.2, Allee de la Fresnerie 78330 Fontenay le Fleury France TEL: 33-1-30238688 FAX: 33-1-30238689 URL: www.dlink-france.fr D-Link Germany Schwalbacher Strasse 74 D-65760 Eschborn Germany TEL: 49-6196-77990 FAX: 49-6196-7799300 URL: www.dlink.de D-Link India Plot No.5, Kurla-Bandra Complex Rd. Off Cst Rd. Santacruz (E), Bombay - 400 098, India TEL: 91-22-652-6696 FAX: 91-22-652-8914 URL: www.dlink-india.com D-Link International (Singapore) 1 International Bussiness Park #03-12 The Synergy Singapore 609917 TEL: 65-774-6233 FAX: 65-774-6322 URL: www.dlink-intl.com D-Link South Africa 102 - 106 Witchhazel Avenue, Einstein Park 2, Block B, Highveld Technopark Centurion, South Africa TEL: 27(0)126652165 FAX: 27(0)126652186 D-Link Sweden P.O. Box 15036, S-167 15 Bromma, Sweden TEL: 46-(0)8564-61900 FAX: 46-(0)8564-61901 URL: www.dlink.se D-Link Italia via Nino Bonnet n. 6/b 20154 ¡V Milano, Italy TEL: 39-02-2900-0676 FAX: 39-02-2900-1723 URL: www.dlink.it D-Link Taiwan 2F, No. 119 Pao-Chung Rd. Hsin-Tien, Taipei, Taiwan TEL: 886-2-2910-2626 FAX: 886-2-2910-1515 URL: www.dlinktw.com.tw D-Link Japan 10F, 8-8-15 Nishi-Gotanda Shinagawa-ku, Tokyo 141, Japan TEL: 81-3-5434-9678 FAX: 81-3-5434-9868 URL: www.d-link.co.jp D-Link U.K.(Europe) 4th Floor, Merit House Edgware Road, Colindale London NW9 5AB, U.K. TEL: 44-20-8731-5555 FAX: 44-20-8731-5511 BBS: 44-181-235-5511 URL: www.dlink.co.uk D-Link Russia Michurinski Prospekt 49, 117607 Moscow, Russia TEL: 7-095-737-3389, 7-095-737-3492 FAX: 7-095-737-3390 D-Link U.S.A 53 Discovery Drive Irvine, CA 92618, U.S.A. TEL: 1-949-788-0805 FAX: 1-949-753-7033 URL: www.dlink.com