1
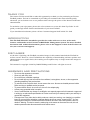
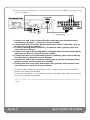
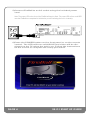
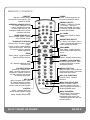
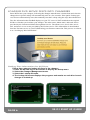
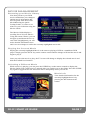
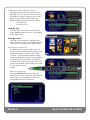
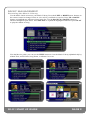
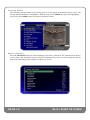
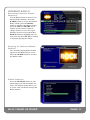
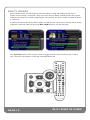
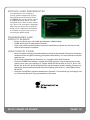
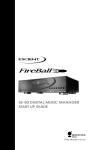
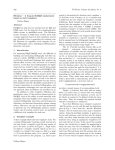
SE-D1 DVD AND MUSIC MANAGER
START UP GUIDE
P/N: M32002-01A2
THANK YOU
The team at Escient would like to take this opportunity to thank you for purchasing an Escient
FireBall product. Escient is committed to providing our customers the most technologically
advanced, yet easier-than-ever to use products that converge the power of the Internet with home
entertainment.
To maximize your enjoyment, please take a few minutes to review this Start Up Guide. It will
guide you through all the features and benefits of your new FireBall.
If you should need assistance please call our Customer Support Staff at 800.372.4368
INTRODUCTION
This FireBall Manual is intended to provide the reader with an overview of the main
features and benefits of the Escient FireBall Media Management System. For more detailed
instruction and technical information, please refer to the Support section of the Escient web
site (www.escient.com/support).
DISCLAIMER
At the time of printing, the FireBall screenshot images in this manual matched the FireBall interface screens. However, since FireBall has the capability of downloading software updates and
enhancements on a regular basis, the resulting screen updates may no longer match the images in
this manual.
This manual is copyright ©2005 by D&M Holdings and Escient. All rights reserved.
WARNINGS AND PRECAUTIONS
•
•
•
•
•
•
•
•
•
Do not use this apparatus near water.
Clean only with a dry cloth.
Do not block any ventilation openings.
Do not install near any heat sources such as radiators, heat registers, stoves, or other apparatus
(including amplifiers) that produce heat.
To reduce the risk of electric shock, do not remove the cover. No user serviceable parts are inside.
Refer servicing to qualified service personnel.
To prevent electric shock, do not use a 3 wire to 2 wire adapter plug.
A three prong grounded outlet is required.
You are cautioned that any change or modification not expressly approved in this manual or approved
in writing by an authorized representative of Escient could void your warranty and/or your authority to
operate this equipment.
Prolonged use of any video device which produces a static (non-moving, non-changing) or repetitive
image on your projector, television or plasma display device can cause “screen burn-in”. You are
encouraged to leave the FireBall screen-saver turned on and set to the lowest possible “time-out”
duration. Warning: This device uses the mains plug as the means to disconnect the unit, this unit
remains powered unless disconnected from the mains source.
INSTALLATION
1)Unpack the FireBall, cables, and accessories. Install the
included batteries into the remote. Write down the FireBall serial number (located on the back) here:
SERIAL NUMBER: _________________________________
CONTENTS
FireBall
IR Remote Control (batteries included)
Analog Audio/Composite Video Cable (red, white, and yellow)
RS-232 Serial Control Cable
Ethernet Cable
Power Cable
Start Up Guide
SE-D1 START UP GUIDE
PAGE 1
2)Follow these steps to connect your Sony CD/DVD changers to
your FireBall:
1. Connect one end of the included RS-232 serial cable into Communication
Port labeled “Changer”, on the back of your FireBall.
2. Connect the other end of the RS-232 serial cable into the “RS-232C” port on
the back of your Sony changer.
3. Locate the Analog Audio (red/white) / Composite Video (yellow) cable that
came with your changer.
4. Connect one end of the Analog Audio (red/white) cable into the Analog Audio
(red/white) In jacks on the back of your FireBall
5. Connect the other end of the Analog Audio (red/white) cable into the Analog
Line Out jacks on the back of your changer.
6. Connect one end of the Composite Video (yellow) into the Composite Video
(yellow) In jacks on the back of your FireBall
7. Connect the other end of the Composite Video (yellow) cable into the Video
Line Out jacks on the back of your changer.
• For the best audio quality, you should also connect a digital optical cable (not included)
between your changer and FireBall.
• For the best video quality, you should also connnect component video cables (not included)
between your changer and FireBall.
Note: The RS-232 serial control cable between the FireBall and the changer must be 25 feet or less
in length.
PAGE 2
SE-D1 START UP GUIDE
3)Connect FireBall to your A/V Receiver and TV
A)Locate the included Analog Audio/Composite Video Cable.
B)Connect FireBall to any available A/V input on your receiver
or TV
Note: You may use optional s-video or component video cables and optional digital audio cables for
the best picture and sound quality. Contact your Escient dealer for more information
VIDEO IN
AUDIO IN
TV or A/V Receiver
4)Connect FireBall to your network using the included Ethernet
cable.
INTERNET
ROUTER
PC OR MAC
SE-D1 START UP GUIDE
PAGE 3
5)Connect FireBall to an AC outlet using the included power
cord.
Note: The power LED on the front of the FireBall will begin to flash. The power LED will turn solid RED
once the FireBalll has completed its initialization process indicating the unit is in standby.
6)Press the POWER button on the front panel or on the remote
control. The LED will turn solid BLUE and video will be displayed on the TV when the unit is on. Follow the instructions
on the screen to complete the setup procedure.
PAGE 4
SE-D1 START UP GUIDE
REMOTE CONTROL
CODE SET
Code Set - used to set the
universal IR source buttons. See
manual for details.
UNIVERSAL SOURCE SELECT
TV / Cable / Receiver / DVD
- used to configure the remote
to control other devices. See
manual for details on the universal remote functions.
MODE GUIDE SELECT
Movies / iRadio / Music - used to
select FireBall modes.
TRANSPORT CONTROLS
Rewind / Play / Forward / Record
/ Stop /
Pause - used to control playback
of movies and music. Also used
for text entry and for canceling
certain operations.
GUIDE
Guide / Player - toggles between
Guide and Player screens.
INFO
Info - displays additional movie
and music info
VOLUME CONTROL
Volume Up / Volume Down /
Mute - Universal remote can be
configured to operate volume on
TVs and receivers. See manual
for detailed setup steps.
KEY PAD
Alpha / Numeric / Enter - used
for entering numbers and text.
Also used for searching in the
movies, music and radio guides.
CONTROL
Mode - changes music play
modes: normal, random, repeat
etc.
Setup - displays Setup menu.
SE-D1 START UP GUIDE
POWER
Power - used to toggle the current source device on and off.
FIREBALL SELECT
FireBall 1 / FireBall 2 / FireBall
3 / FireBall 4 - use FB1 to
control the FireBall. Use other
FB buttons if additional FireBall
products are installed.
ALL / NONE
Toggle ALL or NONE on Select
Guides.
NAVIGATION & SELECT
Up / Down / Left / Right / Select
- used to navigate and select onscreen menus and buttons.
VIEW / MENU
View / Menu - toggles through
various Guide Views (artist, title,
cover).
CONTROL
Options - displays Options menu.
CHANNEL / PAGE CONTROL
Channel/Page Up/Down - used
to page up and down in Guide
and Player screens.
MACRO FUNCTION
Macro Function - used to directly
access various music, movie and
radio items and controls.
DISC PLAY FUNCTIONS
Previous / Next - skip disc
functions.
MUSIC PLAY FUNCTIONS
Repeat / Random - used to
cause the system to play the
current group/genre in repeat or
random playback mode.
MUSIC FAVORITES
Add-Favorites / Play-Favorites
- used to add the currently
highlighted music track to the
Favorites playlist and to play the
favorites playlist.
PAGE 5
LOADING DVD MOVIE DISCS INTO CHANGERS
Insert DVDs into your changers, following the changer manufacturer’s instructions and close the
changer door. Quick Lookup will automatically start in a few seconds. If the Quick Lookup process does not automatically start, then manually start the Lookup using the steps described below.
The disc information that FireBall displays on your TV screen is NOT included on the original
DVDs or CDs that you load into your changer. The artist name, album name, and track list are
provided by the Gracenote® Music Recognition Service. The album cover, movie title, movie
info, and movie cover art are provided by the Escient service. This information is downloaded
from the Escients servers to your FireBall using your Internet connection. This process is referred
to as “Looking up Disc Information”.
Getting Disc Information for All Discs
Follow these steps to lookup all discs in the changer:
1. Press the SETUP key on the remote to display the Setup menu.
2. Select the Changer Management menu.
3. Select the Lookup All menu.
4. The Lookup All screen displays the progress and results as each disc in each
changer is looked up.
PAGE 6
SE-D1 START UP GUIDE
MOVIE MANAGEMENT
Browsing your Movie Library
Now that you have your DVD
movies loaded into your changers
and the movie information has
been acquired from the Escient
MovieDB using the Quick
Lookup feature, it’s time to see
what’s in your collection using the
Movies Guide.
The Movies Guide displays a
scrolling list of all your Movies.
Using the remote control, you can
navigate up and down the list. As
each Title is highlighted, you will
notice that the Information Area
and Cover Art changes to reflect the currently highlighted movie title.
Playing the Current Movie
Playing the currently highlighted Movie is the same as playing a DVD in a standalone DVD
player. Simply press the PLAY key on the remote control and the changer will load the movie and
begin to play it.
Once you select the movie to play, the TV screen will change to display the selected movie and
hide the FireBall user interface.
Selecting a Different Movie
While a movie is playing, you can press the GUIDE key on the remote control to display the
Movies Guide. The current movie is paused when you switch over to the Guide. Press the GUIDE
key again to toggle back to the full screen movie and pickup where you left off.
Movie Info
View detailed infromation for the
currently highlighted movie by
pressing the Info button on the
remote.
SE-D1 START UP GUIDE
PAGE 7
Changing the Guide View
The Movies Guide provides you with two
different ways to view the contents of your
DVD Movie Library. There are two Views
that you can switch between using the
MENU/VIEW key on the remote control:
•
View By Title
•
View By Cover
View By Title
View By Title will order the list of DVD
Titles alphabetically from A to Z, according
to the Movie Title.
View By Cover
View By Cover displays a graphical 4x2
grid of DVD cover art, sorted alphabetically
from A to Z, according to the Movie Title.
Viewing by Genre
In addition to the current Guide View, the
Movies Guide automatically organizes your
DVDs into default “Genres” also called
“Groups”. The Group Bar displays a horizontal scrolling list of Genres corresponding
to the movies in your library. Five Genres
or Groups are visible at one time. The “All”
genre is the default, which displays all Titles
in your Movie Library.
remote.
Movie Options
Press the OPTIONS button to edit and
manage your movie collection. The Options
menu allows you to edit Movie Info, create/edit/delete Groups, and more.
PAGE 8
SE-D1 START UP GUIDE
MUSIC MANAGEMENT
Browsing the Music Library
Use the Music Guide to browse your Music Library. Press the LEFT or RIGHT arrow buttons on
the remote control to change Genres or view All of your Music in one list. Press UP or DOWN
buttons to highlight any Album or Song in the list. Use the PAGE UP or DOWN buttons to
advance through all your music. Press SELECT to expand the highlighted Album or press PLAY
to play the Album or Song.
Like the Movies guide, you can use the VIEW button to view the Music Library alphabetically by
Album Title, Artist Name, Song Name, or Album Cover Art.
SE-D1 START UP GUIDE
PAGE 9
Playing Music
The currently playing Album, Artist, Song, and Cover Art appear in the Music Player screen. Use
the Up and Down buttons to highlight a different song. Press SELECT to play the highlighted
song. Press the GUIDE button to return to the Music Guide.
Music Options
Press the OPTIONS button to edit and manage your music collection. The Options menu allows
you to create, edit, and delete Groups, Playlists, and Music files. You can also change the current
play mode and change other options for the music source.
PAGE 10
SE-D1 START UP GUIDE
INTERNET RADIO
Browsing Internet Radio
Stations
Use the Radio Guide to browse your
Internet Radio Stations. Press the
RADIO button to access the Internet
Radio Guide (press the MUSIC
button to return to the Music Guide).
Press the LEFT or RIGHT arrow
buttons on the remote control to
change Genres or view All of your
Stations in one list. Press the UP or
DOWN buttons to highlight any station in the list. Press PLAY to connect
to and start playing the station.
Playing an Internet Radio
Station
The currently playing Radio Station
appears in the Radio Player screen.
Press the GUIDE button to return to
the Radio Guide.
Radio Options
Press the OPTIONS button to edit
and manage your Internet Radio stations. The Options menu allows you
to create, edit, and delete Groups and
Radio stations.
SE-D1 START UP GUIDE
PAGE 11
SELECT GUIDES
Select Guides are the special Guide screens used when creating and editing custom movie
Groups, music Groups, or Playlists. They are used to browse library content just like the regular
Guide screens, however, instead of playing the selected item, the item is marked to indicate that it
is “selected”.
All selected items in the current Select Guide are added to the current movie Group, music Group,
or Playlist. Selection when you press the RECORD button to save the Selection.
The TOGGLE button on the remote is used to toggle all items in the current list On or Off at
once. This saves the trouble of selecting each individual track.
PAGE 12
SE-D1 START UP GUIDE
SETTING USER PREFERENCES
User preferences are available to
specify global configuration options
and preferred system settings. Press
the SETUP key on the remote control
to display the Setup Menu. Use the
navigation keys on the remote control
(up, down, left, and right) to highlight
and select any menu item to display a
Setup screen. Additional information
is available on each Setup screen by
selecting the HELP button.
TRADEMARKS AND
SERVICE MARKS
• Escient, the Escient logo, and FireBall are trademarks of D&M Holdings.
• FireBall and Physital are trademarks of Escient®.
• Other product names mentioned herein are used for identification purposes only and may be trademarks of their respective companies.
GRACENOTE CDDB
• Music recognition technology and related data are provided by Gracenote®. Gracenote is the industry
standard in music recognition technology and related content delivery. For more information visit www.
gracenote.com.
• CD and music-related data from Gracenote, Inc., copyright © 2000-2005 Gracenote.
• Gracenote CDDB® Client Software, copyright 2000-2005 Gracenote. This product and service may
practice one or more of the following U.S. Patents: #5,987,525; #6,061,680; #6,154,773, #6,161,132,
#6,230,192, #6,230,207, #6,240,459, #6,330,593, and other patents issued or pending. Services supplied and/or device manufactured under license for following Open Globe, Inc. United States Patent
#6,304,523.
• Gracenote and CDDB are registered trademarks of Gracenote. The Gracenote logo and logotype, and
the “Powered by Gracenote” logo are trademarks of Gracenote.
SE-D1 START UP GUIDE
PAGE 13
WARRANTY INFORMATION
Terms of Coverage
Each Escient branded media management system sold comes with a standard one (1) year warranty. This warranty provides no-charge coverage under normal product usage, for a period of one
year from the date of registration and/or purchase (whichever is earlier). This warranty program
provides the following key features and benefits:
• Twelve (12) months service, parts and labor.
• Five (5) day turn around time on all standard in-warranty repairs. No charges to
the customer other than in-bound shipping charges which are determined by the
shipping method. All return shipments will be via Standard Ground Transportation
(approximately 5 business days).
• Twelve (12) months of regular hour telephone support (9AM to 7PM EST), Monday
through Friday.
• 24-hour email response from the Escient Support Website.
• Software maintenance updates provided via a broadband Internet connections.
• Access to 24-hour music and movie databases and entertainment services providing access to thousands of CD titles and associated information.
What is Covered
The goal of this warranty is to cover operational problems that might arise with your product
during normal use. This includes failure to start, improper operation, or intermittent failures. As
part of the warranty, Escient will pay for all labor and materials used in the repair of the system.
Escient reserves the right to use new or factory refurbished parts in the repair of these in-warranty
systems. Escient will also pay for the return shipment of the repaired system via standard ground
transportation. At Escient’s discretion, the Company will repair or replace any system sent in for
repair. Upon repair, the product will be new or like-new in condition and will meet all necessary
regulatory requirements.
What is Not Covered
Escient products are sold through Escient approved dealers. A number of items must remain intact
in order for Escient to verify and validate this warranty. Additionally, there are several conditions
which violate Escient’s warranty program. These include:
• The product was not purchased through an approved Escient Dealer.
• Any product, on which the serial numbers has been defaced, modified or removed physically or
electronically will not be covered by an Escient warranty.
• Escient will not cover under warranty damage to the product as a result of accident, misuse, abuse,
neglect, fire, water, lightning, or other acts of God or nature, improper storage, unauthorized modification, or failure to follow instructions.
• Any type of unauthorized repair or modifications made to the system resulting in damage to the
product will not be covered under this warranty.
• Damage caused to the product as a result of improper shipping or installation.
• Any problems related to the use of the product which is not a direct problem with the product.
• Damage caused to the product as a result of improper installation to third party peripherals or products, or incorrect connection to peripheral or products.
PAGE 14
SE-D1 START UP GUIDE
• Additionally, Escient does not cover the following items under the terms or its warranty programs:
- Installation or removal charges.
- Cost of initial technical adjustments (setup costs).
- Battery replacement
Escient’s sole liability for any defective product is limited to the repair or replacement of the product
at our discretion. Escient shall not be liable for damages to other property caused by defects in this
product, damages based upon inconvenience, loss of use of the product, loss of time or data, commercial loss or any other damages, whether real, incidental or consequential.
Escient shall not be liable for damage or loss of data including but not limited to music recorded to
storage devices. It is the customer’s responsibility to maintain the original media and/or appropriate
backup copies within the specific rights of the media’s copyright holder.
How to Return a Product
Contact your dealer or Escient’s Customer Support group at 317-616-6789 or 800-372-4368 (U.S.
only). Please have the following information ready for your dealer or Escient’s Customer Support
technician:
• Product Serial Number
• Model Number
• Date of Registration or Purchase
• Place of Purchase
Upon reviewing the request for repair under warranty provisions, Escient’s Technical Support
group will issue a Return Material Authorization (RMA) number. This number is to be attached
to the outside of the shipping carton. Additional instructions will be provided by technical support. Please be sure to use original packing carton and internal packing materials to assure proper
shipment of the system. Insurance costs are the responsibility of the customer. Most shippers only
provide standard coverage for $100 in cost so please protect yourself by providing additional
insurance for the returned product.
Out of Warranty Repair
Escient provides out of warranty repair service on a cost plus labor basis. Minimum charges will
apply. Technical support will provide information on this service at the time of the call.
SE-D1 START UP GUIDE
PAGE 15