1
Operation Guide 5366
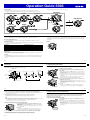
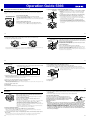
Bearing Memory Pointer
Direction Reading Calibration Methods
The Bearing Memory pointer indicates the bearing value that is currently stored in Bearing Memory.
Example:
Bearing straight ahead
Bearing Memory direct to the left
Bearing straight back
Calibrating Direction Readings
You can use the information in this section to calibrate direction readings, which helps to improve digital
compass accuracy.
Important!
• To ensure correct direction readings by this watch, be sure to perform bidirectional calibration before
using it. The watch may produce incorrect direction readings if you do not perform bidirectional
calibration.
• Keep the watch away from audio speakers, magnetic necklace, cell phone, and other devices that
generate strong magnetism. Exposure to strong magnetism can magnetize the watch and cause
incorrect direction readings. If incorrect readings continue even after you perform bidirectional
calibration, it could mean that your watch has been magnetized. If this happens, contact your original
retailer or an authorized CASIO Service Center.
Bidirectional Calibration
• Use this method when using the watch to take readings in an area where magnetic force is present, or
if you notice that the readings produced by the watch are different from another compass.
Magnetic Declination Calibration
• You can use this method to specify a magnetic declination value, which sets the digital compass up to
take magnetic north or true north readings.
Precautions about bidirectional calibration
• You can use any two opposing directions for bidirectional calibration. You must, however, make sure
that they are 180 degrees opposite each other. Remember that if you perform the procedure
incorrectly, you will get wrong bearing sensor readings.
• Do not move the watch while calibration of either direction is in progress.
• You should perform bidirectional calibration in an environment that is the same as that where you plan
to be taking direction readings. If you plan to take direction readings in an open field, for example,
calibrate in an open field.
E-24
E-25
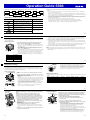
To perform bidirectional calibration
1. In the Digital Compass Mode, hold down A for two seconds.
• This will cause the bidirectional calibration screen to appear on the
digital display.
• The second hand will move to 12 o’clock. This is indicated by an
upward pointing arrow ( ) and 1 on the digital display.
• Whenever you enter a setting mode, the hour and minute hands
will automatically move to positions that allow easier viewing of the
digital dials.
2. Place the watch on a level surface facing any direction you want, and
press C to calibrate the first direction.
• When calibration is successful, OK will appear in the display for a
short while, and then a downward pointing arrow ( ) and 2 appear
on the digital display. This indicates that the watch is ready for
calibration of the second direction.
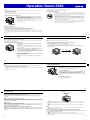
• Magnetic Declination Correction
With magnetic declination correction, you input a magnetic declination angle (difference between
magnetic north and true north), which allows the watch to indicate true north. You can perform this
procedure when the magnetic declination angle is indicated on the map you are using. Note that you can
input the declination angle in whole degree units only, so you may need to round off the value specified
on the map. If your map indicates the declination angle as 7.4°, you should input 7°. In the case of 7.6°
input 8°, for 7.5° you can input 7° or 8°.
To perform magnetic declination correction
1. In the Digital Compass Mode, hold down A for two seconds.
Magnetic declination
• This will cause the bidirectional calibration screen to appear on the
angle direction value
digital display.
(E, W, or OFF)
2. Press D to enter the magnetic declination correction mode.
3. Rotate the watch 180 degrees.
4. Press C again to calibrate the second direction.
• After calibration is successful, the digital display will show OK and
then the watch will return to the Digital Compass Mode.
• ERR will appear on the digital display for a short while if an error
occurs. After that, the digital display will automatically return to the
first direction calibration screen (the one that appears after A is
held down in step 1).
Magnetic declination
angle value
3. Use E (East) and B (West) to change the settings.
• The following explains magnetic declination angle direction
settings.
OFF: No magnetic declination correction performed. The northerly
magnetic declination setting will be 0°.
E:
When magnetic north is to the east (east declination)
W: When magnetic north is to the west (west declination)
• You can select a value within the range of W 90° to E 90° with
these settings.
• You can turn off (OFF) magnetic declination correction by pressing
E and B at the same time.
• The illustration, for example, shows the value you should input
and the direction setting you should select when the map shows a
magnetic declination of 7° West.
E-26
E-27
4. When the setting is the way you want, press A to exit the setting screen.
Digital Compass Precautions
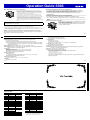
Magnetic North and True North
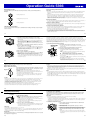
The northerly direction can be expressed either as magnetic north or true
True north
north, which are different from each other. Also, it is important to keep in
mind that magnetic north moves over time.
Magnetic north
• Magnetic north is the north that is indicated by the needle of a
compass.
• True north, which is the location of the North Pole of the Earth’s axis, is
the north that is normally indicated on maps.
• The difference between magnetic north and true north is called the
Earth
“declination”. The closer you get to the North Pole, the greater the
declination angle.
Storage
• The precision of the bearing sensor may deteriorate if the watch becomes magnetized. Because of
this, you should store the watch away from magnets or any other sources of strong magnetism,
including: permanent magnets (magnetic necklaces, etc.) and household appliances (TVs, personal
computers, washing machines, freezers, etc.).
• Whenever you suspect that the watch may have become magnetized, perform the procedure under “To
perform bidirectional calibration” (page E-26).
Other
• Any ongoing digital compass operation is paused temporarily while the watch is performing an alert
operation (daily alarm, Hourly Time Signal, countdown timer alarm) or while illumination is turned on (by
pressing B). The digital compass operation resumes for its remaining duration after the operation that
caused it to pause is finished.
• The auto light switch is disabled while a digital compass operation is in progress.
Location
• Taking a direction reading when you are near a source of strong magnetism can cause large errors in
readings. Because of this, you should avoid taking direction readings while in the vicinity of the
following types of objects: permanent magnets (magnetic necklaces, etc.), concentrations of metal
(metal doors, lockers, etc.), high tension wires, aerial wires, household appliances (TVs, personal
computers, washing machines, freezers, etc.).
• Accurate direction readings are impossible while in a train, boat, air plane, etc.
• Accurate readings are also impossible indoors, especially inside ferroconcrete structures. This is
because the metal framework of such structures picks up magnetism from appliances, etc.
E-28
E-29
Taking Temperature Readings
Temperature Sensor Calibration
This watch uses a temperature sensor to measure temperature.
The temperature sensor built into the watch is calibrated at the factory and normally require no further
adjustment. If you notice serious errors in the temperature readings produced by the watch, you can
calibrate the sensor to correct the errors.
Temperature
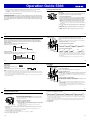
To take temperature readings
1. While in the Timekeeping Mode, press E to enter the Thermometer
Mode.
• TEMP will appear on the digital display and temperature
measurement will start. After about one second, the measurement
reading will appear on the digital display.
• The watch will continue to take temperature readings every fi ve
seconds for one or two minutes.
2. Press D to return to the Timekeeping Mode.
• The watch will return to the Timekeeping Mode automatically if you
do not perform any operation for about one or two minutes after
entering the Thermometer Mode.
Temperature
• Temperature is displayed in units of 0.1°C (or 0.2°F).
• The displayed temperature value changes to - - - °C (or °F) if a measured temperature falls outside the
range of –10.0°C to 60.0°C (14.0°F to 140.0°F). The temperature value will reappear as soon as the
measured temperature is within the allowable range.
Display Units
You can select either Celsius (°C) or Fahrenheit (°F) for the displayed temperature value. See “To specify
the temperature unit” (page E-33).
E-30
Important!
• Incorrectly calibrating the temperature sensor can result in incorrect readings.
Carefully read the following before doing anything.
– Compare the readings produced by the watch with those of another reliable and accurate thermometer.
– If adjustment is required, remove the watch from your wrist and wait for 20 or 30 minutes to give the
temperature of the watch time to stabilize.
To calibrate the temperature sensor
1. Take a reading with another measurement device to determine the
exact current temperature.
2. With the watch in the Timekeeping Mode, press E to enter the
Thermometer Mode.
3. Hold down A for about two seconds until the temperature reading
disappears from the digital display. Release A at this time, which will
cause the temperature reading to flash, which indicates the setting
mode.
• Whenever you enter a setting mode, the hour and minute hands
will automatically move to positions that allow easier viewing of the
digital dials.
E-31