1
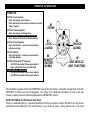
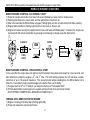
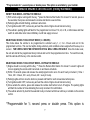
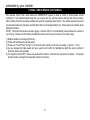
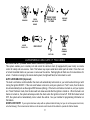
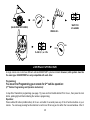
EZ-45DP/EZ-55DP
1-Way Paging Remote Engine Starting & Keyless
Entry System with 5 Button Sidekick Remote Control
OPERATING INSTRUCTIONS
-PRIMARY: These are features that must be connected in order for the system to operate properly i.e.
Remote Start connections, Flashing lights, Brake Reset. For programming, the hood pin and program button
are required.
-OPTIONAL: These are features are to be connected only if desired or agreed upon by the customer and the
installing dealer i.e. Door Locks, Trunk Pop, Dome Light Illumination, Horn-Honk, Anti-Grind, etc. These
features may also require additional parts and/or labor fees. Consult with your installer beforehand to be sure
of what is going to be installed with your particular system.
TECHNICAL SUPPORT: (800) 998-6880
Monday - Friday 8:00am - 4:30pm Pacific Std. Time
Web Site: www.crimestopper.com
E-mail: [email protected]
CRIMESTOPPER SECURITY PRODUCTS, INC.
1770 S. TAPO STREET, SIMI VALLEY, CA. 93063
REV A – 11.11.2005
This device complies with FCC Rules part 15. Operation is
subject to the following two conditions: 1) This device may not
cause interference, and (2) this device must accept any
interference that may be received, including interference that
may cause undesired operation. The manufacturer is not
responsible for any radio or TV interference caused by
unauthorized modification to this equipment. Such
modification could void the user's authority to operate the
equipment.
TABLE OF CONTENTS
Operation Cautions & Warnings….………………..….…………………………………….……………….….………2
Remote Operation………………………………………………………………………………………………..…...….3
Remote Engine Starting ,Idle Down Mode, Infinity Run Mode, ………………………………………….…...…..4-7
Turbo Timer Mode……………………………….……………………………………...…………………….…..….…..8
Convenience and Safety Features…………………………….………………..………………………..….…..….9-10
Transmitter Programming….…………….………………………………………….……………….…..…….….....…11
2 Vehicle Operation.………………………………….………………...……………………..………...………………12
Troubleshooting “Before You Call”………….…………..………………………………………….…………..….12-13
OPERATION CAUTIONS & WARNINGS
CRIMESTOPPER SECURITY PRODUCTS, INC. and its VENDORS shall not be liable for any accident
resulting from the use of this equipment. This system is designed to be professionally installed into a car or
vehicle in which all items, such as parking brake and all associated components, door switches, transmission
shift linkage, throttle linkage, and all engine safety features, are in perfect working condition.
DO NOT install the Remote Engine Starting System on MANUAL TRANSMISSION vehicles. If
accidentally left in gear the vehicle could become a self-propelled threat to life and property.
IT IS ABSOLUTELY THE OWNER’S SOLE RESPONSIBILITY TO: A) Understand the operation of this
system and its safety features. B) Check for proper operation of the system prior to accepting delivery of the
vehicle from the installation facility. C) Check and maintain the condition of the vehicle and all items relative to
the proper operation of this system and its safety features. D) Always leave the doors and windows closed
and locked to protect against accident and theft.
DO NOT remote start the vehicle in a closed garage. Make sure that the garage door is open or there is
adequate ventilation. Failure to observe this rule could result in injury or death from poisonous Carbon
Monoxide fumes.
2
REMOTE OPERATION
OPERATION:
BUTTON 1 (Lock Symbol):
· Press and release to Lock doors.
· Press and Hold for more than 3 seconds to activate
“Panic” feature.
BUTTON 2 (Unlock Symbol):
· Press and release to Unlock doors.
For EZ-55DP only (Driver Door Priority Unlock)
· Press 2 times for Driver Door Priority Unlock.
BUTTON 3 (Trunk Symbol):
· Press and Hold for ½ second or press twice to
activate trunk pop.
BUTTON 4 (Start):
Replacement
Battery
· GP23A
Press and
Hold for ½ second or press twice to
(12volt)
Start/Stop Engine.
ND
BUTTON 5 (Vehicle #2/ 2 Function)
§ AUX #2: Press button 5 then press button 1.
§ Press and Hold for 2 sec. for vehicle #2.
For EZ-55DP only (AUX3/AUX4)
§ AUX #3: Press button 5 then press button 2.
§ AUX #4: Press button 5 then press button 4.
#3
TRUNK
#2
UNLOCK
(AUX#3)
#1
LOCK
(AUX#2)
START
#4
REMOTE
STARTER
(AUX#4)
EZEE START
#5
2ND VEHICLE
(2ND FUNCTION)
The transmitter supplied with the EZ-45DP/55DP system has five buttons. The button configuration of the EZ45DP/55DP is Factory-set and unchangeable. See Page 12 for additional information on how to use your
remote to operate a second vehicle equipped with a EZEESTART system.
NOTE: BUTTON #4 and #3 Remote Start/Trunk
There is a deliberate delay or 2 presses (Optional) built into the system on button #4 and #3 to help prevent
accidental remote starting from the remote being in your pocket or purse. During normal use, if you press
3
button #4 or #3 too quickly, the system may not start the engine or open trunk.
REMOTE ENGINE STARTING
REMOTE ENGINE STARTING - SUCCESSFUL START:
1) Press the remote start button for at least 1/2 second (Default) or twice if set for double press.
2) Parking lights flash once; return solid, and the Ignition/Acc circuits turn on.
3) After a few seconds the Starter Motor engages, Parking lights and Acc circuits will turn off while cranking.
4) Engine Starts and Runs. Parking Lights and Acc turn back on, Doors Lock.
5) Engine will remain running for programmed run time until reset with Brake pedal. If needed, the engine can
be turned off with remote transmitter by pressing and releasing or double press the Start button.
SOLID
FLASH 1X
AFTER
IGN
4
SEC.
THEN
SOLID
STARTER
REMOTE ENGINE STARTING - UNSUCCESSFUL START
In the event that the engine does not start on the first attempt, the system shuts down for a few seconds, and
then attempts to restart the engine a 2nd and 3rd time. For hard starting engines, the unit will allow a starter
crank time of up to 10 seconds maximum. This should provide ample cranking time for difficult starts, but is
limited to 13 seconds to help prevent damage to the starter from over cranking.
1) If engine starts on 2nd or 3rd attempt, see steps 4 & 5 above of "Successful Start".
2) If Third attempt fails to start engine, the system will turn off and doors will remain locked.
NO FURTHER ATTEMPTS WILL BE MADE AUTOMATICALLY
TURNING OFF A REMOTE STARTED ENGINE:
1) Engine is running in Remote Start (Parking lights ON).
2) Press and release the remote start button.
4
3) Engine & parking lights OFF, Doors re-lock/re-arm.
REMOTE ENGINE STARTING Cont.
ENTERING YOUR REMOTE STARTED VEHICLE:
1) With engine running, Remote Unlock system (If equipped) or open door with key.
2) Enter vehicle and be careful not to step on brake pedal! (Remote Start Reset).
3) Turn Ignition to ON/RUN position, then press brake pedal to reset the Remote Starter & Shift out of park.
4) Remote starter will reset instantly when the brake is pressed. Parking lights will turn off and the ignition key
is now controlling your vehicle.
REMOTE START RUN TIME RESET:
You can now reset the engine-run timer to allow for more running time after remote start has already occurred
using the remote control. After a successful remote start, press both the Lock & Unlock buttons together for at
least 2 seconds. The parking lights will flash 3 times and internal engine timer will reset back to zero minutes.
REMOTE ENGINE STARTING Cont. (IDLE DOWN MODE)
IDLE DOWN MODE:
This mode allows the unit to take over operation of the parked vehicle while the ignition key is removed and
you exit the vehicle. The vehicle is put into a remote running condition before you exit and it will remain
running for the programmed run time or until you come back.
Examples:
· You pull up to a convenience store for a quick stop, "Idle Down" mode keeps engine running when you exit the
vehicle, (with keys in hand) remote lock doors or arm alarm. When you return, unlock, turn ignition ON and drive
away.
5
REMOTE ENGINE STARTING Cont. (IDLE DOWN MODE)
IDLE DOWN MODE - EXITING THE VEHICLE:
1) With vehicle engine running with key, **press the Remote Start button for at least a 1/2 second or twice if
set for double press.
2) Parking Lights will turn ON.
3) Doors will unlock, or if brake pedal is being depressed, doors will unlock when it is released.
4) Turn OFF Ignition and remove key. Engine should remain running.
5) Exit vehicle, then remote lock doors if desired.
6) Engine will remain running for programmed run time or until you return (whichever comes first).
SOLID
IGN
OFF
UNLOCK
ENTERING A VEHICLE DURING “IDLE-DOWN” or “INFINITY RUN” MODES:
1. With engine running in "IDLE DOWN" (parking lights ON), unlock door via remote or key.
2. Enter vehicle and be careful not to step on brake pedal! (Remote Start Reset)
3. Turn Ignition to ON/RUN position, then depress brake pedal to reset the Remote Starter. Parking lights
will turn off indicating the Remote Start is OFF and Vehicle is running by the Key. Drive away as normal
INFINITY RUN MODE
This mode can only be activated when "Idle Down" procedure. The Infinity Run mode allows the vehicle
engine to remain running INDEFINITELY after the programmed run time elapses. This mode will allow the
vehicle to be left running and unattended without the ignition key in the switch preventing the vehicle from
being stolen. This mode can be beneficial to law enforcement or commercial trucks that need to remain
running unattended for long periods of time. See next page for Infinity mode steps.
6
**Programmable for ½ second press or double press. This option is selectable by your installer.
REMOTE ENGINE STARTING Cont. (Infinity Run Mode)
INFINITY RUN MODE – EXITING THE VEHICLE:
1) With vehicle engine running with the key, **press the Remote Start button for at least 1/2 second, pause a
few seconds, then press and release the remote start button a second time.
2) Parking Lights will start flashing, and doors will unlock.
3) Turn Ignition switch OFF, remove key and exit the vehicle. Engine should remain running.
4) The vehicle’s parking lights will flash for the programmed run time of 12, 24, or 36, or 48 minutes and then
switch to solid while motor runs indefinitely or until fuel supply runs out.
SELECTABLE HOURLY COLD-START MODE (1- 4 HOURS)
This mode allows the vehicle to be programmed to self-start every 1, 2, 3 or 4 hours and run for the
programmed run time. This can be helpful during extremely cold conditions where engine fluid freeze-up is a
concern. THE VEHICLE MUST BE OUTDOORS OR IN A WELL VENILATED AREA! Once this mode is set,
the unit will start at the programmed hourly interval and run for the programmed run time. To reset this mode,
start the vehicle with the key or the remote control.
SELECTABLE HOURLY COLD-START MODE – EXITING THE VEHICLE:
1) Engine should be running with the Key. ** Press the Remote Start button for at least 1 second. Lights will
turn on signaling the remote start has turned on and doors will unlock.
2) Within 10 seconds press and release the valet/program button once for each hourly increment (1 time =
1hour, 2X = 2 hours, 3X = every 3 hours, 4X = every 4 hours).
3) Parking Lights will turn once the button is pressed and flash for each consecutive button press.
4) Turn Ignition switch OFF, remove key and exit the vehicle. Engine should remain running.
5) Once outside the vehicle, press and release the remote start button to turn off engine. The parking lights
will flash the number of times indicating the hourly increment for confirmation.
6) The vehicle will start by itself at the selected hourly increment until driven with key or started via the remote
control.
**Programmable for ½ second press or double press. This option is
7
selectable by your installer.
TURBO TIMER MODE (OPTIONAL)
The optional Turbo Timer mode allows the EZEESTART system to keep a Turbo or Turbo Diesel vehicle
running for 1 to 5 minutes [selectively] after you remove the key, exit the vehicle, and lock the doors remotely.
This is handy for turbo cool-down without the need for expensive turbo timers. This mode requires the use of
an extra part called a momentary switch/button that is not included with the kit. Check with your installer about
adding this feature.
NOTE: The turbo timer button will also trigger a remote start if it is inadvertently pressed when the vehicle is
not running. Please note this when installing the button and choose a location out of harm’s way.
1)
2)
3)
4)
Engine should be running with the key.
Press and hold down the brake pedal.
Press your “Turbo Timer” button 1 to 5 times for each minute of run time you desire. (1 press = 1 min.)
As you release the brake pedal and your system will confirm by flashing the lights the same number of
times the button was pressed.
5) Turn Ignition switch OFF, remove key and exit the vehicle. Remote lock your doors for safety. The engine
should remain running for the selected number of minutes.
8
RUNNING
LIGHTS
FLASH 1-5X
PRESS
AND HOLD
BRAKE
PRESS TURBO
TIMER BUTTON
1-5 TIMES
RELEASE
BRAKE
REMOVE KEY
EXIT VEH.
REMAIN
RUNNING
1-5 MIN.
CONVENIENCE AND SAFETY FEATURES
KEYLESS ENTRY (POWER DOOR LOCK CONTROL, Optional)
This system enables you to remotely lock and unlock the vehicle’s doors (if equipped with power locks) via remote
control for safety and convenience. Note: This feature may require extra labor and/or parts to install. Press the Lock
or Unlock transmitter button as you leave or come near the vehicle. Parking lights will flash once for lock and twice for
unlock. If vehicle is running by the remote start system, the lights will flash, but return back to solid.
AUTO LOCK/UNLOCK (Improved)
The Auto Lock feature controls whether the doors will automatically lock/unlock on your vehicle when driving or with
turning the Ignition ON/OFF. If the Auto Lock feature is turned on, and your system is in “Tach” mode, then the doors
should automatically lock as the engine RPM increase (driving). If the Auto Lock feature is turned on, and your system
is in “Smart Tachless” mode, then the doors will lock a few seconds after the Ignition is turned on. When the Auto Lock
feature is turned on, the system will always unlock the doors when the Ignition is turned off. With this feature turned
OFF, the system will not automatically lock or unlock the vehicle. See your installer for programming information on
this feature.
DOOR LOCK NOTE: If your system has been setup with an optional starter kill relay, but you do not have power door locks,
note the following: The lock and unlock buttons on the remote control must still be utilized to operate the Starter disable.
9
REMOTE PANIC (Used only with Optional HORN HONK feature installation)
For personal safety this unit now includes a panic feature. To sound the vehicle car horn, press the Lock Button on the
remote for more than 2 seconds. The vehicle horn will honk along with flashing parking lamps for 1 minute. Reset
Remote Panic by pressing either the lock or unlock button. See next section for Horn Honk information.
HORN CHIRP/HONK OUTPUT (Optional: with Horn connection & programming)
This feature, if installed, will provide audible confirmation chirps from the factory horn for lock and unlock. When using
this feature, pressing the Lock/Unlock button a 2nd time within 3-7 seconds or single press lock/unlock will provide a
horn chirp for audible confirmation. The system can also be programmed to provide 3 chirps when a remote start is
requested using the remote. Note: Horn honk/chirp feature may require extra labor and/or parts to install.
REMOTE TRUNK RELEASE OR DOMELIGHT ILLUMINATION (Optional)
This EZEESTART system includes an output that can be programmed to remotely release a factory electronic trunk or
illuminate the interior light when you unlock your vehicle for lighted entry at night. If you have the optional trunk pop
installed, simply press and release the Trunk Button #3 on the transmitter or if option # 6 is turned on you must press
Button # 3 twice within 3 seconds, to remotely open trunk. If your system is programmed for Dome Light illumination,
then it will work automatically lighting the dome light for 30 seconds when you unlock your vehicle via the remote. The
dome light will turn off after 30 seconds, or turning the key on (whichever comes first). The trunk Pop or Dome Light
Illumination may require extra labor and/or parts to install.
CONVENIENCE AND SAFETY FEATURES
VALET MODE / STARTER DISABLE OVERRIDE
Before servicing your vehicle or handing the keys over to a Valet we recommend putting the unit into valet
mode. The remote start function WILL NOT operate when in Valet mode. To enter Valet mode, turn the key
to the ON position, press and hold Program/Valet switch for 5-6 seconds. The LED will turn on solid and the
system is now in valet. Perform this procedure again to exit of Valet mode. The keyless entry will still function
normally while in valet mode. In the event of a lost or broken transmitter, perform this step to override the
Starter Disable (if installed).
ANTI-GRIND / STARTER DISABLE (Optional, relay not included)
This Optional feature prevents the user from accidentally grinding the starter if the Ignition key is turned too far to the start
position while engine is already running from the remote starter. The Anti-Grind/Starter Disable requires the use of an external
relay. This system must be programmed to allow the relay to work as a starter disable.
Driver’s Door Priority For RS-55DP only (Optional, additional part may be needed.)
When using the optional separate driver’s and passenger unlock function, press and release button #2
10
(Unlock symbol) on the transmitter to unlock driver’s door only, then press the #2 button again within 2-4
seconds to unlock remaining doors. This feature is optional and requires additional parts and/or labor.
HOOD OPEN SAFETY (Requires grounding hood pin installation)
Prevents the engine from being Remote Started when hood is open and will shut OFF the engine if opened
during while remote started. Eliminates risk of injury to someone working under the hood of the vehicle with a
properly working hood pin installed. If Remote Start button is pressed with the hood open, the lights will flash
once and the unit will not attempt a start.
BRAKE PEDAL RESET
Prevents starting or shuts off a remote started vehicle when this circuit is active or activated. Prevents unauthorized tampering.
This circuit shuts the system down immediately when brake pedal is pressed if the key is not in ignition and turned to the ON
position.
OEM ALARM INTERFACE
This feature is designed to Disarm and Re-arm Factory equipped security systems in conjunction with remote start and keyless
entry (if needed for your vehicle). This feature will maintain the original integrity and security of your vehicle’s factory equipped
systems before, during, or after remote start.
NOTE:
When changing, charging, or jumpstarting the vehicle’s battery we recommend removing the main power
fuses located on the heavy gauge RED wires near the remote start module.
TRANSMITTER PROGRAMMING
Note: All transmitter codes must be learned at time of programming!! The unit will learns up to 4
different transmitter codes.
1.
2.
3.
4.
Open Hood (If no hood pin installed with your system, then you must ground the Blue Hood pin wire).
Turn key to the ON position.
Press Programming button 4 times, then after a few seconds the unit flashes the parking lights 4 times.
Press button #1 on the transmitter to be coded. You should get 2 light flashes indicating the unit is waiting
for a 2nd code, then press button #1 on the second transmitter, the unit will flash 3 times indicating its
waiting for the 3rd code and so on. If all 4 codes are learned, the unit will automatically exit code learning
mode, otherwise turn key off and close hood. See diagram below.
11
IGN
OFF
WAIT FOR
4 FLASHES
(BLUE WIRE GROUNDED)
PRESS 4X's
IGN
OFF
START
FLASH 2, 3, or 4 X's
2-VEHICLE OPERATION
A single remote can control two different vehicles EZEESTART systems installed. However, both systems must be
the same type. EZ-45DP/55DP are only compatible with each other.
Programming:
You must first Programming your remote for 2nd vehicle operation:
(2nd Vehicle Programming and Operation instruction):
In step #4 of transmitter programming (see page 11) press and hold middle button #5 for 2 sec., then press the lock
button, parking light will flash indicating the remote is programming.
Operation:
Press vehicle #2 button (middle button) for 2 sec. and within 3 seconds press any of the 4 function buttons on your
remote. You can keep pressing function buttons to control car #2 as long as it is within the 3-second window. After 3
12
seconds have elapsed, the remote will revert back to Car #1 operation.
TROUBLESHOOTING: “BEFORE YOU CALL” SECTION
UNIT WILL NOT ATTEMPT A START (KEYLESS ENTRY STILL FUNCTIONS NORMALLY):
The unit is in Valet mode. Turn Ignition ON, press and hold valet/programming button for 6 seconds then turn
key off. Unit is now out of valet mode and should perform a remote start. If optional LED indicator is installed,
then it will be on solid when in Valet and OFF when out of Valet.
UNIT FLASHES LIGHTS ONCE AND WILL NOT ATTEMPT A START:
The unit senses a fault at the Brake (Purple wire is active) or the Hood is OPEN (Blue wire grounded). This is
a safety feature of the unit. Check installation for faults and make sure hood is closed and latched and brake
wire is not active. Make sure hood is in good condition and is depressed when hood is closed.
TROUBLESHOOTING cont.
NO RESPONSE FROM REMOTE TRANSMITTERS: (4 Parts)
1. Check for proper power/ground wiring connections at module.
2. Check Antenna Module connection. The antenna module included with this system must be plugged in.
3. Transmitters may need to be programmed to the unit. See transmitter programming steps on Page 11.
4. Check transmitter Batteries and replace if necessary.
UNIT CRANKS VEHICLE BUT ENGINE NEVER STARTS: (2 parts)
1. In extreme cold or severe weather conditions, the unit may take more than the first attempt to start the
vehicle. The remote start unit will make up to 3 attempts to start the engine.
2. In some vehicles, there may be a Factory anti-theft system that will not allow the engine to run without the
key in the ignition. These systems may include Factory Security Modules, GM Passkey®/Passlock®, and
RF Transponder systems (Ford P.A.T.S. ®). Many late 1990’s through 2005 vehicles include some type of
13
Anti-Theft system which may require a bypass module. Check with your installer to make sure that the
bypass device (if equipped) is functioning properly.
SYSTEM IS UNSUCCESSFUL AT REMOTE START DURING EXTREME COLD CONDITIONS:
Please be aware that during sub-freezing conditions your remote starter may take more that one attempt to
start or it may not successfully start the vehicle after 3 attempts. During these conditions the vehicle may not
properly start even using the key; therefore trying to start by the remote would also be unsuccessful.
VEHICLE STARTS BUT “CHECK ENGINE” LIGHT COMES ON OR ENGINE RUNS BADLY: (2 parts)
1. Many 1995-UP General Motors cars/trucks require a secondary ignition circuit for the Transmission
computer and other on board systems. If the vehicle is started without this wire energized, there may be a
“Check Engine” or “Service Engine Soon” light on the dash. This may cause damage if the vehicle is driven
in this condition. Check with installer to see if this circuit is present and has been properly connected to the
system.
2. In some cases [commonly Nissan vehicles], an additional “Start” (Cranking) circuit is required for the
vehicle to run properly. The EZEESTART system includes a wire that can be used for this Starter #2
circuit. Check with your installer for details.
BATTERY REPLACEMENT
To replace the battery: Simply remove the screws on back of the transmitter and open the case. Remove
the battery and replace. The replacement battery for all transmitters is GP23A.
14
www.crimestopper.com
[email protected]
© 2005 Crimestopper Security Products
ONLINE TECHNICAL SUPPORT
http://www.crimestopper.com/index3.html
15