1
ClickShare
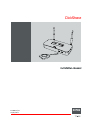
Installation manual
R5900014/03
30/04/2014
Barco nv
President Kennedypark 35, 8500 Kortrijk, Belgium
Phone: +32 56.23.32.11
Fax: +32 56.26.22.62
Support: www.barco.com/esupport
Visit us at the web: www.barco.com
Printed in China
Changes
Barco provides this manual ’as is’ without warranty of any kind, either expressed or implied, including but not limited to the implied warranties or merchantability and fitness for a particular purpose. Barco may make improvements and/or changes to the product(s) and/or the
program(s) described in this publication at any time without notice.
This publication could contain technical inaccuracies or typographical errors. Changes are periodically made to the information in this
publication; these changes are incorporated in new editions of this publication.
The latest edition of Barco manuals can be downloaded from the Barco web site www.barco.com or from the secured Barco web site
https://www.barco.com/en/signin.
Copyright ©
All rights reserved. No part of this document may be copied, reproduced or translated. It shall not otherwise be recorded, transmitted or
stored in a retrieval system without the prior written consent of Barco.
Barco ClickShare End-User License Agreement (EULA/Software License)
PLEASE READ THIS DOCUMENT CAREFULLY BEFORE OPENING OR DOWNLOADING AND USING SOFTWARE OR HARDWARE
PROVIDED TO YOU BY BARCO AS IT CONTAINS THE TERMS AND CONDITIONS BY WHICH BARCO OFFERS TO LICENSE THE
SOFTWARE. BY OPENING THE SOFTWARE PACKAGE, OR USING THE HARDWARE IN WHICH THE SOFTWARE IS EMBEDDED,
YOU AGREE TO BECOME BOUND BY THE TERMS OF THIS AGREEMENT.
The Software as supplied by BARCO is licensed, not sold to you, on a non-exclusive basis for use only under the terms of this license,
and BARCO reserve all rights not expressly granted to you. You may own the carrier on which the Software is provided, but the Software
is owned and copyrighted by BARCO or by third party suppliers. Your license confers no title or ownership and is not a sale of any rights
in the Software or its documentation.
By installing, executing and/or using the Software, either as initial version or as an upgrade, update, patch or enhancement of a prior
release, this Software License shall supersede any terms and conditions previously agreed upon (whether or not in writing) between Barco
and you with respect to the subject matter of this Software License and such previous terms shall from the date hereof cease to have any
force or effect; provided, however that this Software License shall not be construed as a renunciation, discharge or waiver of any right or
remedy provided in any terms and conditions previously agreed upon with respect to a failure of either party to perform any of its obligations
under any terms and conditions previously agreed upon.
Software Specifications
The Software contains the following software products: ClickShare
Software License Terms
1.
This Software License is between you and BARCO NV, a corporation organized and existing under the laws of Belgium registered
under number BE 0473.191.041, Commercial Companies’ Register of Kortrijk, having its registered office President Kennedypark, 35
at B-8500 Kortrijk, Belgium ("Barco") for the use of the Software.
You hereby undertake to inform all users authorized by you to make use of the computing device on which the Software is loaded/installed (“Authorized Users”) of the terms of this Software License and to bind all Authorized Users to accept all such terms of this
Software License as applies to them.
2.
Barco grants you a limited, non-exclusive, non-assignable, non-transferable user license (without the right to grant sublicenses).
Unless specifically agreed upon otherwise between you and Barco or unless specifically allowed by the Software (or its DRM management) itself, i) the license under this Software License applies to one (1) copy of the Software to be used on one single computing
device and ii) installation on a computing device that may be concurrently accessed by more than one user shall not constitute a
permitted use and a separate license is required for each active user connected to a computing device on which the Software is being
used.
You and Authorized Users are entitled to use the Software for the purposes and in the manner set out in this Software License (and
documentation), but neither you nor any Authorized User are entitled to: (i) sell or grant a security interest in the Software to other
parties in any way, or to rent, lease or sub-license the Software to others without the express prior written consent of Barco; or (ii)
exploit the Software or any of its component parts for any commercial purpose, other than use by you and/or Authorized Users of the
Software.
Neither you nor any Authorized User may, whether in whole or in part, copy, translate, reverse engineer, derive source code from,
modify, disassemble, decompile, create derivative works based on the Software, or remove any proprietary notices or labels on the
Software, save as may be permitted by law or this Software License, without the prior consent, in writing, of Barco.
3.
Barco (and Barco’s licensors, as appropriate) retain ownership of all intellectual property rights in the Software and any copies you
or any Authorized User may make of such Software. The Software is protected by national copyright laws, international copyright
treaties and conventions, and other applicable laws. All rights not expressly licensed to you in this Software License are reserved
to Barco and Barco’s licensors, as appropriate. The Software contains certain other licensed materials and Barco’s licensors may
protect their rights in the event of any violation of this Software License.
4.
Barco shall hold you harmless, defend and indemnify you from and against direct damages, losses and expenses arising from infringement or alleged infringement of any patent, trademark or copyright of such third party by the license and the right to install the
Software as permitted by this Software License and settle at its sole expense any amounts awarded in a final judgment or settlement
resulting therefrom, under the condition that (i) you promptly notify Barco in writing after a claim has been asserted against you or
the commencement of any claim, action, suit or proceeding (whichever is the earlier), and (ii) Barco shall be allowed to assume sole
control of the defense and any settlement negotiations related to any claim, action, suit or proceeding, and (iii) you shall not negotiate,
settle or compromise any claim, action, suit or proceeding without the prior written consent of Barco and (iv) you, at your cost, shall
cooperate with Barco and provide assistance and support, as may reasonably be required by Barco, in connection with the defense
and any settlement negotiations related to any claim, action, suit or proceeding. Barco shall have no indemnity obligation for any
Software, or any portion thereof, (i) that is based on specifications, drawings, models or other data furnished by you or, (ii) that is
not provided by Barco or, (iii) that is modified, in spite of the prohibition for you to modify the software or, (iv) to the extent that you
continue allegedly infringing activity after having been provided modifications that avoid the alleged infringement, or (v) where the use
of the Software, or the combination or thereof with other Software, processes or materials or the distribution thereof rather than the
Software itself is the primary cause of an alleged infringement. In case it has been determined by a finally awarded judgment that
Barco infringed or misappropriated such third party rights or earlier, at Barco’s discretion, it may, at its option and cost, (i) modify the
Software in such a way that it shall not infringe upon or misappropriate the rights of the third party or (ii) obtain for you a license or
other right to use the rights allegedly infringed or (iii) replace the Software in question with non-infringing Software. The remedies set
forth in this paragraph shall constitute your sole and exclusive remedy and Barco’s sole and exclusive liability for a third party claim
that the Software infringes or misappropriates any intellectual property right of a third party.
5.
The duration of this Software License will be from the date of your acceptance (as set forth above) of the Software (whereby you acknowledge that use of the Software implies acceptance), with no termination date, unless otherwise specified. You may terminate this
Software License at any time by destroying all copies of the Software then in your possession and returning all associated materials
and documentation, to Barco or the appointed Barco reseller that sold or provided these to you. Barco may terminate this Software
License forthwith by informing you at any time if you and/or any Authorized User are in breach of any of the Software License’s terms.
6.
YOU UNDERSTAND THAT THE SOFTWARE IS BEING PROVIDED TO YOU "AS IS". BARCO DOES NOT MAKE NOR INTENDS
TO MAKE ANY WARRANTIES OR REPRESENTATIONS, EXPRESS OR IMPLIED AND SPECIFICALLY DISCLAIMS ALL IMPLIED
WARRANTIES OF MERCHANTABILITY FITNESS, FOR A PARTICULAR PURPOSE AND NON-INFRINGEMENT OF INTELLECTUAL PROPERTY AND DOES NOT WARRANT THAT THE SOFTWARE WILL BE FREE FROM ERRORS OR THAT SUCH ERRORS
WILL BE CORRECTED BY BARCO AND YOU ARE SOLELY RESPONSIBLE FOR ALL COSTS AND EXPENSES ASSOCIATED
WITH RECTIFICATION, REPAIR OR DAMAGE CAUSED BY SUCH ERRORS.
YOU ALSO ACKNOWLEDGE AND AGREE THAT:
BARCO ACCEPTS NO LIABILITY FOR ANY DAMAGES, LOSSES OR CLAIMS YOU OR ANY THIRD PARTY MAY SUFFER AS
A RESULT OF YOUR USE OF THE SOFTWARE. IN JURISIDCTIONS WHERE BARCO’S LIABILITY CANNOT BE EXCLUDED,
BARCO’S LIABILITY FOR DIRECT DAMAGES SHALL BE LIMITED TO AN AMOUNT OF 250 EURO IN THE AGREGATE (OR TO
THE MAXIMUM EXTENT PERMITTED BY LAW WHERE NO FURTHER EXCLUSION IS LEGALLY ALLOWED).
TO THE MAXIMUM EXTENT PERMITTED BY LAW, IN NO EVENT WILL BARCO BE LIABLE FOR ANY INDIRECT, SPECIAL,
PUNITIVE, INCIDENTAL OR CONSEQUENTIAL LOSS OR DAMAGES OF ANY KIND WHICH MAY ARISE OUT OF OR IN CONNECTION WITH THE SOFTWARE, THIS SOFTWARE LICENSE OR THE PERFORMANCE OR PURPORTED PERFORMANCE
OF OR FAILURE IN THE PERFORMANCE OF BARCO’S OBLIGATIONS UNDER THIS SOFTWARE LICENSE OR FOR ANY ECONOMIC LOSS, LOSS OF BUSINESS, CONTRACTS, DATA, GOODWILL, PROFITS, TURNOVER, REVENUE, REPUTATION OR
ANY LOSS ARISING FROM WORK STOPPAGE, COMPUTER FAILURE OR MALFUNCTION OF THE SOFTWARE AND ANY AND
ALL OTHER COMMERCIAL DAMAGES OR LOSSES WHICH MAY ARISE IN RESPECT OF USE OF THE SOFTWARE, EVEN IF
BARCO HAS BEEN ADVISED OF THE POSSIBILITY OF THEIR OCCURRENCE.
YOU HEREBY AGREE TO INDEMNIFY, KEEP INDEMNIFIED, DEFEND AND HOLD HARMLESS BARCO AND BARCO’S AFFILIATES AND SUBSIDIARIES FROM AND AGAINST ANY AND ALL ACTIONS, PROCEEDINGS, LIABILITY, LOSS, DAMAGES, FEES
AND COSTS (INCLUDING ATTORNEYS" FEES), AND OTHER EXPENSES INCURRED OR SUFFERED BY BARCO ARISING OUT
OF OR IN CONNECTION WITH ANY BREACH BY YOU OF THE TERMS OF THIS SOFTWARE LICENSE.
7.
You shall treat as confidential all information obtained from the other pursuant to this Software License which is marked "confidential"
or the equivalent or has the necessary quality of confidence about it and shall not divulge such information to any persons without
Barco’s prior written consent provided that this Paragraph 7 shall not extend to information which was rightfully in the possession of
you prior to the commencement of the negotiations leading to this Software License, which is already public knowledge or becomes
so at a future date (otherwise than as a result of a breach of this paragraph 7), is required to be disclosed by law or which is trivial or
obvious. You are aware of and ensure to comply with the provisions of this paragraph 7. The foregoing obligations as to confidentiality
shall survive any termination of this Software License.
8.
You will remain responsible for the maintenance of your hardware, operating system, the functioning of your network and in keeping
your systems virus-free. You acknowledge that the Software is a complex computer software application, and that the performance
thereof may vary depending hardware platform, software interactions and configuration. You acknowledge that the Software is not
designed and produced specifically to meet your specific requirements and expectations and the selection of the Software by you is
entirely your own choice and decision. For the avoidance of doubt, nothing in this Software License shall impose any obligation on
Barco to provide support services (on the Software or any other hardware or software product).
9.
This Software License is the only understanding and agreement between you and Barco for use of the Software by you and/or Authorized Users. The Software License supersedes all other communications, understandings or agreements we had prior to this Software
License (with the exception of any continuing confidentiality agreement) although nothing in this Software License purports to exclude
liability for fraudulent misrepresentation. You may not export or re-export the Software or any copy or adaptation in violation of any
applicable laws or regulations. This Software License shall not be altered, amended or varied. If any provision of this Software License is determined to be illegal, void or unenforceable, or if any court of competent jurisdiction in any final decision so determines,
this Software License shall continue in full force save that such provision shall be deemed to be deleted with effect from the date of
such decision, or such earlier date, and shall be replaced by a provision which is acceptable by law and which embodies the intention
of this Software License a close as possible.
10. You acknowledge that this Software may be subject to U.S. or other governments Export Jurisdiction. You agree to comply with all
applicable international and national laws that apply to the Software, including the U.S. Export Administration Regulations, as well as
end-user, end-use, and destination restrictions issued by the U.S. or other governments.
11. Barco shall be entitled to sub-contract all or any of Barco’s obligations hereunder to a third party and/or any of Barco’s affiliated
companies.
12. The construction, validity and performance of this Software License shall be governed in all respects by the laws of Belgium without
recourse to its conflict of law principles. All disputes arising in any way out of or affecting this Software License shall be subject
to the exclusive jurisdiction of the courts of Kortrijk, without prejudice to enforcement of any judgment or order thereof in any other
jurisdiction. The United Nations Convention on Contracts for the International Sale of Goods (the "Convention") shall not apply to this
Software License, however, if the Convention is deemed by a court of competent jurisdiction to apply to this Software License, Barco
shall not be liable for any claimed non-conformance of the Software under Article 35(2) of the Convention.
Trademarks Software License Terms
Brand and product names mentioned in relation to the Software may be trademarks, registered trademarks or copyrights of their respective
(third party) holders. All such brand and product names mentioned in relation to the Software serve as comments or examples and are not
to be understood as advertising for the products or their manufacturers.
Privacy Policy
You acknowledge and agree that the Software is gathering technical information about the functionality of the products which are connected
through the Software (“Functional Information”) and that Barco may make use of such Functional Information (with the exclusion of any
personal data) for any reason Barco sees fit, including but not limited to providing services to you / your organization, allowing third party
to access to such Functional Information and/or to provide services to you / your organization .
You hereby explicitly give consent that Barco may gather, access, preserve, and/or disclose the personal data you provide to us (e.g.
connected with your account allowing for the gathering of Functional Information as well as any content associated with that account) as
well as personal information we receive from you through the use of the Software:
•
For the benefit of the business purposes of Barco and/or its affiliates;
•
In order to provide, maintain, protect and/or improve the Software and to develop new software;
•
For administration of the relationship between you, your organization and Barco and/or its affiliates ;
•
For any other legitimate purpose (including i) direct marketing purposes from Barco, its affiliates or selected third parties, and ii)
allowing third parties to provide services to you related to the Software);
•
if required to do so by law or in a good faith belief that such access preservation or disclosure is reasonably necessary to:
-
Satisfy any applicable law, regulation, legal process or enforceable governmental request;
-
Enforce this Software License, including investigation of potential violations hereof;
-
Detect, prevent, or otherwise address fraud, security or technical issues (including, without limitation, the filtering of spam);
-
Protect against imminent harm to the rights, property or safety of Barco, its users or the public as required or permitted by law.
Barco shall not process any “sensitive information” whatsoever, including but not limited to medical information.
You understand that the technical processing and transmission of or by the Software, including your content, may involve:
•
Transmissions over various networks;
•
Changes to conform and adapt to technical requirements of connecting networks, devices and/or services.
You hereby explicitly give consent that Barco may export your personal data to any country worldwide, especially to any country where
Barco and/or its affiliates have infrastructure, or where a third party is making available infrastructure to Barco and/or its affiliates, to process
personal data.
Barco fully adheres to the EU Directive 95/46/EC on the protection of individuals with regard to the processing of personal data and the
free movement of such data, as implemented in the local EU member states. In accordance with these regulations, you have a right of
access to, and rectification of, your personal data. You may exercise these rights by contacting Barco.
Open Source Software provisions:
This product contains software components released under an Open Source license. A copy of the source code is available on request
by contacting your Barco customer support representative.
EACH SEPARATE OPEN SOURCE SOFTWARE COMPONENT AND ANY RELATED DOCUMENTATION ARE PROVIDED "AS IS" WITHOUT EXPRESS OR IMPLIED WARRANTY INCLUDING, BUT NOT LIMITED TO, THE IMPLIED WARRANTIES OF MERCHANTABILITY
AND FITNESS FOR A PARTICULAR PURPOSE. IN NO EVENT SHALL THE COPYRIGHTHOLDER OR ANY OTHER CONTRIBUTOR
BE LIABLE FOR DIRECT, INCIDENTAL, SPECIAL, EXEMPLARY OR CONSEQUENTIAL DAMAGES, EVEN IF ADVISED OF THE POSSIBILITY OF SUCH DAMAGES, HOWEVER CAUSED AND ON ANY THEORY OF LIABILITY, WHETHER IN CONTRACT, STRICT LIABILITY, OR TORT (INCLUDING NEGLIGENCE OR OTHERWISE) ARISING IN ANY WAY OUT OF THE USE OF THIS OPEN SOURCE
SOFTWARE. MORE INFORMATION/DETAILS IS TO BE FOUND IN EACH SPECIFIC OPEN SOURCE LICENSE.
Copyright on each Open Source Software component belongs to the respective initial copyright holder, each additional contributor and/or
their respective assignee(s), as may be identified in the respective documentation, source code, README file, or otherwise. You shall not
remove or obscure or otherwise alter the respective copyrights.
You acknowledge living up to the conditions of each separate Open Source Software license.
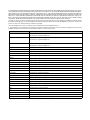
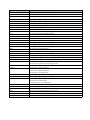
In the development of the Software, the following Open Source Software components have been used (an updated list may be made
available through the (customer section of the) Barco website or other (online) means):
Open Source component
Open Source License
alsa-lib
http://www.gnu.org/licenses/gpl.html
http://www.gnu.org/licenses/lgpl.html
alsa-utils
http://www.gnu.org/licenses/gpl.html
http://www.gnu.org/licenses/lgpl.html
alsa-plugins
http://www.gnu.org/licenses/gpl.html
http://www.gnu.org/licenses/lgpl.html
busybox
http://opensource.org/licenses/GPL-2.0
dropbear
http://opensource.org/licenses/mit-license.php
fakeroot
http://www.gnu.org/licenses/gpl.html
linux
http://www.gnu.org/licenses/old-licenses/gpl-2.0.html
gmp
http://www.gnu.org/licenses/lgpl.html
iproute2
http://www.gnu.org/licenses/gpl.html
kobs-ng
http://www.gnu.org/licenses/gpl.html
rsync (<3.0.0)
http://www.gnu.org/licenses/old-licenses/gpl-2.0.html
rsync (>=3.0.0)
http://www.gnu.org/licenses/gpl.html
uClibc
http://www.gnu.org/licenses/lgpl.html
wireless_tools
http://www.gnu.org/licenses/gpl.html
wpa_supplicant
http://opensource.org/licenses/BSD-3-Clause
imx-bootlets
http://www.gnu.org/licenses/gpl.html
Crypto++
http://www.cryptopp.com/License.txt
libresample
http://www.gnu.org/licenses/lgpl.html
libjpeg-turbo
http://opensource.org/licenses/BSD-3-Clause
acpid
http://www.gnu.org/licenses/gpl.html
avahi
http://www.gnu.org/licenses/lgpl.html
coreutils
http://www.gnu.org/licenses/gpl.html
crda
http://opensource.org/licenses/ISC
cron
http://opensource.org/licenses/ISC
dbus
http://www.gnu.org/licenses/old-licenses/gpl-2.0.html
dhcpd
http://opensource.org/licenses/ISC
dmidecode
http://www.gnu.org/licenses/old-licenses/gpl-2.0.html
Open Source component
Open Source License
e2fsprogs
http://www.gnu.org/licenses/old-licenses/lgpl-2.1.html
eglibc
http://www.gnu.org/licenses/lgpl.html
ethtool
http://www.gnu.org/licenses/lgpl.html
gdbserver
http://www.gnu.org/licenses/lgpl.html
grub
http://www.gnu.org/licenses/lgpl.html
gstreamer
http://www.gnu.org/licenses/lgpl.html
hdparm
http://opensource.org/licenses/BSD-3-Clause
hostapd
http://opensource.org/licenses/BSD-3-Clause
i2c-tools
http://www.gnu.org/licenses/old-licenses/gpl-2.0.html
iftop
http://www.gnu.org/licenses/old-licenses/gpl-2.0.html
iperf
http://opensource.org/licenses/BSD-3-Clause
iptables
http://www.gnu.org/licenses/old-licenses/gpl-2.0.html
iw
http://opensource.org/licenses/BSD-3-Clause
acl
http://www.gnu.org/licenses/old-licenses/gpl-2.0.html
attr
http://www.gnu.org/licenses/old-licenses/gpl-2.0.html
libarchive
http://opensource.org/licenses/bsd-license.php
libav
http://www.gnu.org/licenses/old-licenses/lgpl-2.1.html
libcap2
http://www.gnu.org/licenses/gpl.html
libdaemon0
http://www.gnu.org/licenses/old-licenses/lgpl-2.1.html
libdrm2
http://opensource.org/licenses/MIT
libexpat1
http://opensource.org/licenses/MIT
libfontconfig1
http://opensource.org/licenses/BSD-3-Clause
libfontenc1
http://opensource.org/licenses/BSD-3-Clause
freetype
http://freetype.sourceforge.net/FTL.TXT
http://www.gnu.org/licenses/old-licenses/gpl-2.0.html
libgcc1
http://www.gnu.org/licenses/gpl.html
libgcrypt11
http://www.gnu.org/licenses/gpl.html
http://www.gnu.org/licenses/lgpl.html
http://www.gnu.org/copyleft/fdl.html
libglib-2
http://www.gnu.org/licenses/old-licenses/lgpl-2.1.html
libgnutls26
http://www.gnu.org/licenses/lgpl.html
libgpg-error0
http://www.gnu.org/licenses/gpl.html
http://www.gnu.org/licenses/lgpl.
html http://www.gnu.org/copyleft/fdl.html
libjpeg8
BSD like licensee
libnl2
http://www.gnu.org/licenses/lgpl.html
libnss-mdns
http://www.gnu.org/licenses/gpl.html
libpam
http://www.gnu.org/licenses/old-licenses/gpl-2.0.html
libpcap
http://opensource.org/licenses/BSD-3-Clause
libpcre0
http://opensource.org/licenses/BSD-3-Clause
Open Source component
Open Source License
libpixman-1-0
http://changelogs.ubuntu.com/changelogs/pool/main/p/pixman/pixman_0.10.00ubuntu1/libpixman-1-0.copyright
libpng12-0
http://www.libpng.org/pub/png/src/libpng-LICENSE.txt
libpopt0
http://opensource.org/licenses/MIT
libsm6
libstdc++6
http://www.gnu.org/licenses/gpl.html
libtalloc2
http://www.gnu.org/licenses/lgpl.html
libusb
http://www.gnu.org/licenses/old-licenses/lgpl-2.1.html
libxml2
http://opensource.org/licenses/MIT
libz1
Free license
lighttpd
http://opensource.org/licenses/BSD-3-Clause
lmsensors
http://www.gnu.org/licenses/gpl.html
logrotate
http://www.gnu.org/licenses/gpl.html
makedevs
http://www.gnu.org/licenses/gpl.html
memtest86plus
http://www.gnu.org/licenses/gpl.html
mesa
http://opensource.org/licenses/MIT
module-init-tools
http://www.gnu.org/licenses/old-licenses/gpl-2.0.html
modutils
http://www.gnu.org/licenses/old-licenses/gpl-2.0.html
monit
http://www.gnu.org/licenses/gpl.html
ncurses
http://opensource.org/licenses/MIT
netbase
http://www.gnu.org/licenses/old-licenses/gpl-2.0.html
openssh-sftp-server
http://opensource.org/licenses/BSD-3-Clause
openssl
http://www.openssl.org/source/license.html
opkg
http://www.gnu.org/licenses/old-licenses/gpl-2.0.html
pciutils
http://www.gnu.org/licenses/old-licenses/gpl-2.0.html
perl
http://perldoc.perl.org/perlartistic.html
http://www.gnu.org/licenses/old-licenses/gpl-1.0.html
php
http://www.php.net/license/3_01.txt
procps
http://www.gnu.org/licenses/gpl.html
qt
http://qt-project.org/doc/qt-5.0/qtdoc/gpl.html
read-edid
Free license
rgb
rockbox-imxtools
http://www.gnu.org/licenses/old-licenses/gpl-2.0.html
rsyslog
http://www.gnu.org/licenses/gpl.html
splashutils
http://www.gnu.org/licenses/gpl.html
strace
http://opensource.org/licenses/BSD-3-Clause
sysfsutils
http://www.gnu.org/licenses/old-licenses/gpl-2.0.html
sysvinit
http://www.gnu.org/licenses/old-licenses/gpl-2.0.html
tcpdump
http://opensource.org/licenses/BSD-3-Clause
ttf-arphic-uming
ttf-dejavu-common
Open Source component
Open Source License
ttf-dejavu-sans-mono
ttf-dejavu-sans
ttf-sazanami-gothic
ttf-sazanami-mincho
ttf-un-fonts
udev
http://www.gnu.org/licenses/old-licenses/gpl-2.0.html
update-modules
http://www.gnu.org/licenses/old-licenses/gpl-2.0.html
update-rc
http://www.gnu.org/licenses/old-licenses/gpl-2.0.html
usbutils
http://www.gnu.org/licenses/old-licenses/gpl-2.0.html
util-linux-ng
http://www.gnu.org/licenses/gpl.html x
server-xorg
http://opensource.org/licenses/MIT
zeroconf
http://www.gnu.org/licenses/gpl.html
node.js
https://raw.github.com/joyent/node/v0.10.26/LICENSE
express
http://opensource.org/licenses/MIT
passport
http://opensource.org/licenses/MIT
passport-http
http://opensource.org/licenses/MIT
Guarantee and Compensation
Barco provides a guarantee relating to perfect manufacturing as part of the legally stipulated terms of guarantee. On receipt, the purchaser
must immediately inspect all delivered goods for damage incurred during transport, as well as for material and manufacturing faults Barco
must be informed immediately in writing of any complaints.
The period of guarantee begins on the date of transfer of risks, in the case of special systems and software on the date of commissioning,
at latest 30 days after the transfer of risks. In the event of justified notice of complaint, Barco can repair the fault or provide a replacement
at its own discretion within an appropriate period. If this measure proves to be impossible or unsuccessful, the purchaser can demand a
reduction in the purchase price or cancellation of the contract. All other claims, in particular those relating to compensation for direct or
indirect damage, and also damage attributed to the operation of software as well as to other services provided by Barco, being a component
of the system or independent service, will be deemed invalid provided the damage is not proven to be attributed to the absence of properties
guaranteed in writing or due to the intent or gross negligence or part of Barco.
If the purchaser or a third party carries out modifications or repairs on goods delivered by Barco, or if the goods are handled incorrectly,
in particular if the systems are commissioned operated incorrectly or if, after the transfer of risks, the goods are subject to influences not
agreed upon in the contract, all guarantee claims of the purchaser will be rendered invalid. Not included in the guarantee coverage are
system failures which are attributed to programs or special electronic circuitry provided by the purchaser, e.g. interfaces. Normal wear as
well as normal maintenance are not subject to the guarantee provided by Barco either.
The environmental conditions as well as the servicing and maintenance regulations specified in the this manual must be complied with by
the customer.
EN55022/CISPR22 Class A ITE (Information Technology Equipment)
Class A ITE is a category of all other ITE which satisfies the class A ITE limits but not the class B ITE limits. Such equipment should not
be restricted in its sale but the following warning shall be included in the instructions for use:
Warning : This is a class A product. In a domestic environment this product may cause radio interference in which case the user may be
required to take adequate measures.
Federal Communication Commission Interference Statement
You are cautioned that changes or modifications not expressly approved by the part responsible for compliance could void the user’s
authority to operate the equipment.
This equipment has been tested and found to comply with the limits for a Class A digital device, pursuant to Part 15 of the FCC Rules.
These limits are designed to provide reasonable protection against harmful interference when the equipment is operated in a commercial
environment. This equipment generates, uses, and can radiate radio frequency energy and, if not installed and used in accordance with
the instruction manual, may cause harmful interference to radio communications. Operation of this equipment in a residential area is likely
to cause harmful interference in which case the user will be required to correct the interference at his own expense.
If this equipment does cause interference with radio communications services, which can be determined by turning the equipment off and
on, you are encouraged to try to correct the interference by one or more of the following measures:
•
Reorient or relocate the receiving antenna.
•
Increase the separation between the equipment and receiver.
•
Connect the equipment into an outlet on a circuit different from that to which the receiver is connected.
•
Consult the dealer or an experienced radio/TV technician for help.
This device complies with Part 15 of the FCC Rules. Operation is subject to the following two conditions:
1.
this device may not cause harmful interference, and
2.
this device must accept any interference received, including interference that may cause undesired operation of the device.
FCC RF Radiation Exposure Statement: This device is capable of operating in 802.11a mode. For 802.11a devices operating in the
frequency range of 5.15 - 5.25 GHz, they are restricted for indoor operations to reduce any potential harmful interference for Mobile Satellite
Services (MSS) in the US. WIFI Access Points that are capable of allowing your device to operate in 802.11a mode (5 .15 - 5.25 GHz band)
are optimized for indoor use only. If your WIFI network is capable of operating in this mode, please restrict your WIFI use indoors to not
violate federal regulations to protect Mobile Satellite Services.
Base Unit FFC ID: RYK-WUBR507N
Button FCC ID: XF6-RS9110N1103
Canada, Industry Canada (IC) Notices
This device complies with Industry Canada licence-exempt RSS standard(s). Operation is subject to the following two conditions: (1) this
device may not cause interference, and (2) this device must accept any interference, including interference that may cause undesired
operation of the device.
Radio Frequency (RF) Exposure Information
The radiated output power of the Barco Wireless Device is below the Industry Canada (IC) radio frequency exposure limits. The Barco
Wireless Device should be used in such a manner such that the potential for human contact during normal operation is minimized.
Base Unit IC ID: IC: 6158A-WUBR507N
Button IC ID: 8407A-RS9110N1103
IC Antenna statement
Under Industry Canada regulations, this radio transmitter may only operate using an antenna of a type and maximum (or lesser) gain
approved for the transmitter by Industry Canada. To reduce potential radio interference to other users, the antenna type and its gain should
be so chosen that the equivalent isotropically radiated power (e.i.r.p.) is not more than that necessary for successful communication.
This radio transmitter 6158A-WUBR507N has been approved by Industry Canada to operate with the antenna types listed below with the
maximum permissible gain and required antenna impedance for each antenna type indicated. Antenna types not included in this list, having
a gain greater than the maximum gain indicated for that type, are strictly prohibited for use with this device.
Type: Dipole
Maximum Peak Gain: 2 dBi
Impedance: 50 Ohm
Canada, avis d’lndustry Canada (IC)
Le présent appareil est conforme aux CNR d’Industrie Canada applicables aux appareils radio exempts de licence. L’exploitation est
autorisée aux deux conditions suivantes : (1) l’appareil ne doit pas produire de brouillage, et (2) l’utilisateur de l’appareil doit accepter tout
brouillage radioélectrique subi, même si le brouillage est susceptible d’en compromettre le fonctionnement.
Informations concernant l’exposition aux fréquences radio (RF)
La puissance de sortie émise par l’appareil de sans fil Barco est inférieure à la limite d’exposition aux fréquences radio d’Industry Canada
(IC). Utilisez l’appareil de sans fil Barco de façon à minimiser les contacts humains lors du fonctionnement normal.
IC ID Unité de Base: 6158A-WUBR507N
IC ID Button : 8407A-RS9110N1103
Déclaration d’antenne d’Industrie Canada (IC)
Conformément à la réglementation d’Industrie Canada, le présent émetteur radio peut fonctionner avec une antenne d’un type et d’un gain
maximal (ou inférieur) approuvé pour l’émetteur par Industrie Canada. Dans le but de réduire les risques de brouillage radioélectrique
à l’intention des autres utilisateurs, il faut choisir le type d’antenne et son gain de sorte que la puissance isotrope rayonnée équivalente
(p.i.r.e.) ne dépasse pas l’intensité nécessaire à l’établissement d’une communication satisfaisante.
Le présent émetteur radio 6158A-WUBR507N a été approuvé par Industrie Canada pour fonctionner avec les types d’antenne énumérés
ci-dessous et ayant un gain admissible maximal et l’impédance requise pour chaque type d’antenne. Les types d’antenne non inclus dans
cette liste, ou dont le gain est supérieur au gain maximal indiqué, sont strictement interdits pour l’exploitation de l’émetteur.
Type: Dipole
Gain maximum: 2 dBi
Impédance: 50 Ohm
Table of contents
TABLE OF CONTENTS
1. Introduction to the Installation Guide .. .. .. .. .. .. .. .. .. .. .. .. .. .. .. .. .. .. .. .. .. .. .. .. .. .. .. .. .. .. .. .. .. .. .. .. .. 3
1.1
1.2
Documentation. . . . . . . . . . . . . . . . . . . . . . . . . . . . . . . . . . . . . . . . . . . . . . . . . . . . . . . . . . . . . . . . . . . . . . . . . . . . . . . . . . . . . . . . . . . . . . . . . . . . . . . . . . . . . . . . . . . . . . . . 3
Symbols and fonts . . . . . . . . . . . . . . . . . . . . . . . . . . . . . . . . . . . . . . . . . . . . . . . . . . . . . . . . . . . . . . . . . . . . . . . . . . . . . . . . . . . . . . . . . . . . . . . . . . . . . . . . . . . . . . . . . . . . 3
2. ClickShare Specifications .. .. .. .. .. .. .. .. .. .. .. .. .. .. .. .. .. .. .. .. .. .. .. .. .. .. .. .. .. .. .. .. .. .. .. .. .. .. .. .. .. .. .. .. 5
2.1
2.2
2.3
2.4
About the ClickShare product . . . . . . . . . . . . . . . . . . . . . . . . . . . . . . . . . . . . . . . . . . . . . . . . . . . . . . . . . . . . . . . . . . . . . . . . . . . . . . . . . . . . . . . . . . . . . . . . . . . . . . . .
About the Base Unit . . . . . . . . . . . . . . . . . . . . . . . . . . . . . . . . . . . . . . . . . . . . . . . . . . . . . . . . . . . . . . . . . . . . . . . . . . . . . . . . . . . . . . . . . . . . . . . . . . . . . . . . . . . . . . . . . .
About the Button . . . . . . . . . . . . . . . . . . . . . . . . . . . . . . . . . . . . . . . . . . . . . . . . . . . . . . . . . . . . . . . . . . . . . . . . . . . . . . . . . . . . . . . . . . . . . . . . . . . . . . . . . . . . . . . . . . . . . .
Mobile Device Support . . . . . . . . . . . . . . . . . . . . . . . . . . . . . . . . . . . . . . . . . . . . . . . . . . . . . . . . . . . . . . . . . . . . . . . . . . . . . . . . . . . . . . . . . . . . . . . . . . . . . . . . . . . . . . .
5
6
8
9
3. Getting started .. .. .. .. .. .. .. .. .. .. .. .. .. .. .. .. .. .. .. .. .. .. .. .. .. .. .. .. .. .. .. .. .. .. .. .. .. .. .. .. .. .. .. .. .. .. .. .. .. .. . 11
3.1
3.2
Environmental Condition Check . . . . . . . . . . . . . . . . . . . . . . . . . . . . . . . . . . . . . . . . . . . . . . . . . . . . . . . . . . . . . . . . . . . . . . . . . . . . . . . . . . . . . . . . . . . . . . . . . . . . 11
Basic Workflow . . . . . . . . . . . . . . . . . . . . . . . . . . . . . . . . . . . . . . . . . . . . . . . . . . . . . . . . . . . . . . . . . . . . . . . . . . . . . . . . . . . . . . . . . . . . . . . . . . . . . . . . . . . . . . . . . . . . . . 11
4. ClickShare installation .. .. .. .. .. .. .. .. .. .. .. .. .. .. .. .. .. .. .. .. .. .. .. .. .. .. .. .. .. .. .. .. .. .. .. .. .. .. .. .. .. .. .. .. .. . 13
4.1
4.2
4.3
4.4
4.5
4.6
4.7
4.8
Installation methods for the Base unit . . . . . . . . . . . . . . . . . . . . . . . . . . . . . . . . . . . . . . . . . . . . . . . . . . . . . . . . . . . . . . . . . . . . . . . . . . . . . . . . . . . . . . . . . . . . . . 13
Table mounting . . . . . . . . . . . . . . . . . . . . . . . . . . . . . . . . . . . . . . . . . . . . . . . . . . . . . . . . . . . . . . . . . . . . . . . . . . . . . . . . . . . . . . . . . . . . . . . . . . . . . . . . . . . . . . . . . . . . . . 13
Wall mounting. . . . . . . . . . . . . . . . . . . . . . . . . . . . . . . . . . . . . . . . . . . . . . . . . . . . . . . . . . . . . . . . . . . . . . . . . . . . . . . . . . . . . . . . . . . . . . . . . . . . . . . . . . . . . . . . . . . . . . . . 13
Recommendations about antenna placement and orientation . . . . . . . . . . . . . . . . . . . . . . . . . . . . . . . . . . . . . . . . . . . . . . . . . . . . . . . . . . . . . . . . . . . . . 15
Video signal connections to the Base unit . . . . . . . . . . . . . . . . . . . . . . . . . . . . . . . . . . . . . . . . . . . . . . . . . . . . . . . . . . . . . . . . . . . . . . . . . . . . . . . . . . . . . . . . . . 15
Audio connection . . . . . . . . . . . . . . . . . . . . . . . . . . . . . . . . . . . . . . . . . . . . . . . . . . . . . . . . . . . . . . . . . . . . . . . . . . . . . . . . . . . . . . . . . . . . . . . . . . . . . . . . . . . . . . . . . . . . 16
LAN connection. . . . . . . . . . . . . . . . . . . . . . . . . . . . . . . . . . . . . . . . . . . . . . . . . . . . . . . . . . . . . . . . . . . . . . . . . . . . . . . . . . . . . . . . . . . . . . . . . . . . . . . . . . . . . . . . . . . . . . 16
Power connection . . . . . . . . . . . . . . . . . . . . . . . . . . . . . . . . . . . . . . . . . . . . . . . . . . . . . . . . . . . . . . . . . . . . . . . . . . . . . . . . . . . . . . . . . . . . . . . . . . . . . . . . . . . . . . . . . . . 17
5. Preparing the buttons . .. .. .. .. .. .. .. .. .. .. .. .. .. .. .. .. .. .. .. .. .. .. .. .. .. .. .. .. .. .. .. .. .. .. .. .. .. .. .. .. .. .. .. .. .. . 19
5.1
5.2
Pairing . . . . . . . . . . . . . . . . . . . . . . . . . . . . . . . . . . . . . . . . . . . . . . . . . . . . . . . . . . . . . . . . . . . . . . . . . . . . . . . . . . . . . . . . . . . . . . . . . . . . . . . . . . . . . . . . . . . . . . . . . . . . . . . 19
Pre-install of the Launcher service. . . . . . . . . . . . . . . . . . . . . . . . . . . . . . . . . . . . . . . . . . . . . . . . . . . . . . . . . . . . . . . . . . . . . . . . . . . . . . . . . . . . . . . . . . . . . . . . . . 20
6. ClickShare Web Interface . .. .. .. .. .. .. .. .. .. .. .. .. .. .. .. .. .. .. .. .. .. .. .. .. .. .. .. .. .. .. .. .. .. .. .. .. .. .. .. .. .. .. .. . 21
6.1
6.2
6.3
6.4
6.5
6.6
6.7
6.8
6.9
6.10
6.11
6.12
6.13
6.14
6.15
6.16
6.17
6.18
6.19
6.20
6.21
6.22
6.23
6.24
6.25
Accessing the ClickShare Web Interface . . . . . . . . . . . . . . . . . . . . . . . . . . . . . . . . . . . . . . . . . . . . . . . . . . . . . . . . . . . . . . . . . . . . . . . . . . . . . . . . . . . . . . . . . . . 21
Language setup Web interface . . . . . . . . . . . . . . . . . . . . . . . . . . . . . . . . . . . . . . . . . . . . . . . . . . . . . . . . . . . . . . . . . . . . . . . . . . . . . . . . . . . . . . . . . . . . . . . . . . . . . 22
About ClickShare tabs. . . . . . . . . . . . . . . . . . . . . . . . . . . . . . . . . . . . . . . . . . . . . . . . . . . . . . . . . . . . . . . . . . . . . . . . . . . . . . . . . . . . . . . . . . . . . . . . . . . . . . . . . . . . . . . 23
Basic settings . . . . . . . . . . . . . . . . . . . . . . . . . . . . . . . . . . . . . . . . . . . . . . . . . . . . . . . . . . . . . . . . . . . . . . . . . . . . . . . . . . . . . . . . . . . . . . . . . . . . . . . . . . . . . . . . . . . . . . . . 24
Wallpaper (background) selection . . . . . . . . . . . . . . . . . . . . . . . . . . . . . . . . . . . . . . . . . . . . . . . . . . . . . . . . . . . . . . . . . . . . . . . . . . . . . . . . . . . . . . . . . . . . . . . . . . 26
Personalized wallpapers . . . . . . . . . . . . . . . . . . . . . . . . . . . . . . . . . . . . . . . . . . . . . . . . . . . . . . . . . . . . . . . . . . . . . . . . . . . . . . . . . . . . . . . . . . . . . . . . . . . . . . . . . . . . 27
Display settings . . . . . . . . . . . . . . . . . . . . . . . . . . . . . . . . . . . . . . . . . . . . . . . . . . . . . . . . . . . . . . . . . . . . . . . . . . . . . . . . . . . . . . . . . . . . . . . . . . . . . . . . . . . . . . . . . . . . . . 28
Display output settings . . . . . . . . . . . . . . . . . . . . . . . . . . . . . . . . . . . . . . . . . . . . . . . . . . . . . . . . . . . . . . . . . . . . . . . . . . . . . . . . . . . . . . . . . . . . . . . . . . . . . . . . . . . . . . 29
On-screen text format . . . . . . . . . . . . . . . . . . . . . . . . . . . . . . . . . . . . . . . . . . . . . . . . . . . . . . . . . . . . . . . . . . . . . . . . . . . . . . . . . . . . . . . . . . . . . . . . . . . . . . . . . . . . . . . 30
Audio settings. . . . . . . . . . . . . . . . . . . . . . . . . . . . . . . . . . . . . . . . . . . . . . . . . . . . . . . . . . . . . . . . . . . . . . . . . . . . . . . . . . . . . . . . . . . . . . . . . . . . . . . . . . . . . . . . . . . . . . . . 32
Advanced settings: Hostname . . . . . . . . . . . . . . . . . . . . . . . . . . . . . . . . . . . . . . . . . . . . . . . . . . . . . . . . . . . . . . . . . . . . . . . . . . . . . . . . . . . . . . . . . . . . . . . . . . . . . . 33
Advanced settings: LAN network settings . . . . . . . . . . . . . . . . . . . . . . . . . . . . . . . . . . . . . . . . . . . . . . . . . . . . . . . . . . . . . . . . . . . . . . . . . . . . . . . . . . . . . . . . . . 34
Advanced settings: WiFi settings . . . . . . . . . . . . . . . . . . . . . . . . . . . . . . . . . . . . . . . . . . . . . . . . . . . . . . . . . . . . . . . . . . . . . . . . . . . . . . . . . . . . . . . . . . . . . . . . . . . 35
Integration, Polycom. . . . . . . . . . . . . . . . . . . . . . . . . . . . . . . . . . . . . . . . . . . . . . . . . . . . . . . . . . . . . . . . . . . . . . . . . . . . . . . . . . . . . . . . . . . . . . . . . . . . . . . . . . . . . . . . . 36
Maintenance, status check ClickShare . . . . . . . . . . . . . . . . . . . . . . . . . . . . . . . . . . . . . . . . . . . . . . . . . . . . . . . . . . . . . . . . . . . . . . . . . . . . . . . . . . . . . . . . . . . . . 38
Maintenance, Buttons information . . . . . . . . . . . . . . . . . . . . . . . . . . . . . . . . . . . . . . . . . . . . . . . . . . . . . . . . . . . . . . . . . . . . . . . . . . . . . . . . . . . . . . . . . . . . . . . . . . 39
Base Unit software update . . . . . . . . . . . . . . . . . . . . . . . . . . . . . . . . . . . . . . . . . . . . . . . . . . . . . . . . . . . . . . . . . . . . . . . . . . . . . . . . . . . . . . . . . . . . . . . . . . . . . . . . . . 41
Downloads from Base Unit . . . . . . . . . . . . . . . . . . . . . . . . . . . . . . . . . . . . . . . . . . . . . . . . . . . . . . . . . . . . . . . . . . . . . . . . . . . . . . . . . . . . . . . . . . . . . . . . . . . . . . . . . . 41
Manage System Configuration . . . . . . . . . . . . . . . . . . . . . . . . . . . . . . . . . . . . . . . . . . . . . . . . . . . . . . . . . . . . . . . . . . . . . . . . . . . . . . . . . . . . . . . . . . . . . . . . . . . . . . 42
Load Default Settings . . . . . . . . . . . . . . . . . . . . . . . . . . . . . . . . . . . . . . . . . . . . . . . . . . . . . . . . . . . . . . . . . . . . . . . . . . . . . . . . . . . . . . . . . . . . . . . . . . . . . . . . . . . . . . . 43
Administrator password . . . . . . . . . . . . . . . . . . . . . . . . . . . . . . . . . . . . . . . . . . . . . . . . . . . . . . . . . . . . . . . . . . . . . . . . . . . . . . . . . . . . . . . . . . . . . . . . . . . . . . . . . . . . . 45
Integrator password . . . . . . . . . . . . . . . . . . . . . . . . . . . . . . . . . . . . . . . . . . . . . . . . . . . . . . . . . . . . . . . . . . . . . . . . . . . . . . . . . . . . . . . . . . . . . . . . . . . . . . . . . . . . . . . . . 45
Log settings . . . . . . . . . . . . . . . . . . . . . . . . . . . . . . . . . . . . . . . . . . . . . . . . . . . . . . . . . . . . . . . . . . . . . . . . . . . . . . . . . . . . . . . . . . . . . . . . . . . . . . . . . . . . . . . . . . . . . . . . . . 46
ClickShare Help, Barco contact data . . . . . . . . . . . . . . . . . . . . . . . . . . . . . . . . . . . . . . . . . . . . . . . . . . . . . . . . . . . . . . . . . . . . . . . . . . . . . . . . . . . . . . . . . . . . . . . 47
Barco ClickShare EULA . . . . . . . . . . . . . . . . . . . . . . . . . . . . . . . . . . . . . . . . . . . . . . . . . . . . . . . . . . . . . . . . . . . . . . . . . . . . . . . . . . . . . . . . . . . . . . . . . . . . . . . . . . . . . 48
7. Software updates. .. .. .. .. .. .. .. .. .. .. .. .. .. .. .. .. .. .. .. .. .. .. .. .. .. .. .. .. .. .. .. .. .. .. .. .. .. .. .. .. .. .. .. .. .. .. .. .. . 51
7.1
Software update . . . . . . . . . . . . . . . . . . . . . . . . . . . . . . . . . . . . . . . . . . . . . . . . . . . . . . . . . . . . . . . . . . . . . . . . . . . . . . . . . . . . . . . . . . . . . . . . . . . . . . . . . . . . . . . . . . . . . 51
8. ClickShare Troubleshooting.. .. .. .. .. .. .. .. .. .. .. .. .. .. .. .. .. .. .. .. .. .. .. .. .. .. .. .. .. .. .. .. .. .. .. .. .. .. .. .. .. .. . 53
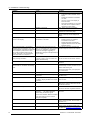
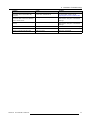
8.1
Troubleshooting list . . . . . . . . . . . . . . . . . . . . . . . . . . . . . . . . . . . . . . . . . . . . . . . . . . . . . . . . . . . . . . . . . . . . . . . . . . . . . . . . . . . . . . . . . . . . . . . . . . . . . . . . . . . . . . . . . . 53
A. Environmental information .. .. .. .. .. .. .. .. .. .. .. .. .. .. .. .. .. .. .. .. .. .. .. .. .. .. .. .. .. .. .. .. .. .. .. .. .. .. .. .. .. .. .. . 57
A.1
A.2
A.3
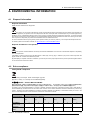
Disposal information . . . . . . . . . . . . . . . . . . . . . . . . . . . . . . . . . . . . . . . . . . . . . . . . . . . . . . . . . . . . . . . . . . . . . . . . . . . . . . . . . . . . . . . . . . . . . . . . . . . . . . . . . . . . . . . . . 57
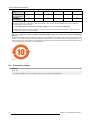
Rohs compliance . . . . . . . . . . . . . . . . . . . . . . . . . . . . . . . . . . . . . . . . . . . . . . . . . . . . . . . . . . . . . . . . . . . . . . . . . . . . . . . . . . . . . . . . . . . . . . . . . . . . . . . . . . . . . . . . . . . . 57
Production address . . . . . . . . . . . . . . . . . . . . . . . . . . . . . . . . . . . . . . . . . . . . . . . . . . . . . . . . . . . . . . . . . . . . . . . . . . . . . . . . . . . . . . . . . . . . . . . . . . . . . . . . . . . . . . . . . . 58
Index. .. .. .. .. .. .. .. .. .. .. .. .. .. .. .. .. .. .. .. .. .. .. .. .. .. .. .. .. .. .. .. .. .. .. .. .. .. .. .. .. .. .. .. .. .. .. .. .. .. .. .. .. .. .. .. .. .. .. . 59
R5900014 CLICKSHARE 30/04/2014
1
Table of contents
2
R5900014 CLICKSHARE 30/04/2014
1. Introduction to the Installation Guide
1. INTRODUCTION TO THE INSTALLATION GUIDE
In this section you get a short introduction to the available ClickShare documentation.
1.1
•
Documentation
•
Symbols and fonts
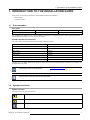
Documentation
This guide
Partnumber
Description
Level
R5900014
Installation Guide
Installation engineer
This installation guide explains how to install ClickShare in a meeting room, It explains also how to make everything operational. It
provides detailed information on how to configure ClickShare.
Available System documentation
This guide is part of the documentation set describing the ClickShare product.
Guide
Article number
User Guide
R5900013
Installation Guide
R5900014
Safety Guide
R5900015
Service Guide
R5900016
Button Guide
R5900007
Recycling Manual
R5900009
API Guide
R5900018
A printed copy of the Safety Guide and an electronic version of the user and installation guide on USB stick is included in the
ClickShare box at purchase.
Always check for the latest version of the manual on www.barco.com/clickshare Click on Visit the ClickShare
product page and go to tab Downloads..
Depending on the ClickShare version, some graphics might be different to the ones used in this manual. This
however does not have any effect to the functionality.
1.2
Symbols and fonts
Symbol overview
The following icons are used in the manual :
Caution
Warning
Info, term definition. General info about the term
R5900014 CLICKSHARE 30/04/2014
3
1. Introduction to the Installation Guide
Note: gives extra information about the described subject
Tip: gives extra advice about the described subject
Font overview
4
•
Buttons are indicated in bold, e.g. OK.
•
Menu items are indicated in italic.
•
Step related notes, tips, warnings or cautions are printed in italic.
•
Procedure related notes, tips, warnings or cautions are printed in bold between 2 lines preceded by the corresponding icon.
R5900014 CLICKSHARE 30/04/2014
2. ClickShare Specifications
2. CLICKSHARE SPECIFICATIONS
About this chapter
It gives an overview of the specifications of a ClickShare set. and of the different components in the set.
Overview
•
2.1
About the ClickShare product
•
About the Base Unit
•
About the Button
•
Mobile Device Support
About the ClickShare product
ClickShare sets
ClickShare makes connecting to the meeting room’s video system a matter of clicking a Button. This one click wonder not only
helps the presenter get the presentation on-screen in a second, but it also allows the other people in the meeting to participate more
actively. The result is enhanced meeting efficiency and better decision-making.
At the moment 4 different sets are available on the market. Each set is sold in its specific region and it can only be used in that
specific region.
Components ClickShare set
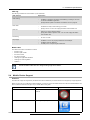
A standard ClickShare set consists of a Base Unit and 2 Buttons. Depending on the location where you buy the product, the software
of the Base Unit is different. If needed, you can buy additional Buttons.
1
2
Image 2-1
ClickShare main components
1
Base unit
2
Button
Accessories included
Depending on the country where you buy the product, the following regionalized accessories are also included in the ClickShare
box.
R5900014 CLICKSHARE 30/04/2014
5
2. ClickShare Specifications
Regional version
R9861008xx1
Contains
Accessories included
•
R9861008
•
•
2x R9861006D01
DC adapter with AC clips type A, C,
G, I
•
USB stick with user documentation
•
Printed safety manual
•
Wall mount bracket
•
2 antennas
Contact your local sales representative for the correct regional variant to be used in your country.
2.2
About the Base Unit
Base Unit
The Base Unit receives the wireless input from the Buttons and controls the content of the meeting room display and
the sound of the meeting room’s audio system.
The Base Unit can be installed in two different ways.
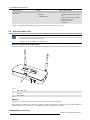
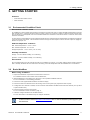
Front and Top layout of the Base Unit
At the front of the Base Unit you can find a power button and a USB port. Status LED strips are mounted on the top of the Base unit.
1
2
3
Image 2-2
1
Status LED strips
2
USB port
3
Power Button
Table 2-3
USB port
The USB port is used to update the soft- and firmware of both the Base Unit and the Buttons.
When plugging in the Button into the Base Unit, the Button is paired to the Base Unit. The Base Unit checks whether the Button’s
software and firmware are up to date. If not, the Base Unit updates the software and/or firmware.
1. xx=EU, CN, NA, WW
6
R5900014 CLICKSHARE 30/04/2014
2. ClickShare Specifications
To update the Base Unit software, download the latest version of the software from the Barco website. Copy the file on a USB stick
and plug it into the USB port of the Base Unit. Follow the progress and instructions on the display.
Status LED strips
The color of the LEDs at the front of the Base Unit give information on the status of the system.
LEDs behavior
Explanation
static red
blinking white
static white
red blinking
•
receiving content from the Buttons and streaming towards the display.
•
pairing and software update of the Button is done. You can now unplug the
Button from the Base Unit.
•
during the first phase of the Base Unit boot process.
•
system is starting up (during the second phase)
•
Button pairing is in progress
•
software update of the Base Unit
•
awake and ready (i.e. showing the welcome message on the display)
•
pairing is done
•
an error occurred
Power button
The button at the front of the Base Unit has a power on/off function once the Base unit is powered
•
When the system is powered on, a push makes the system to shut down and power off.
•
When the system is shut down, a push triggers the system to start up.
Auto reboot
Every 24 hours the Base Unit checks if it is in standby for more than 2 minutes. If so, the Base Unit reboots. When it is in use at the
moment of reboot, it postpones the reboot until the meeting is finished and the Base Unit is in standby for more than 2 minutes.
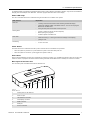
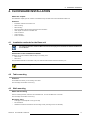
Back layout of the Base Unit
The connection panel is situated at the back of the Base unit.
1
2
3
4
5
6 7
1
Image 2-3
Backside Base unit
1
Fixture points for the antenna
2
Audio out port
3
LAN Ethernet connection
4
VGA display connector
5
HDMI connector
6
USB port
7
Power connection
R5900014 CLICKSHARE 30/04/2014
7
2. ClickShare Specifications
Mechanical fixture points
The mechanical fixture points are located at the bottom of the Base Unit
Antenna
Two antennas are included in the ClickShare box. To avoid damage during transport, they are not pre-mounted.
The antennas can rotate for a better wireless connection.
Usage of antennas other than the ones provided with the unit are allowed within the restrictions on usage of other antennas defined
by local regulations. Barco does not take responsibility for damage or disturbance of other devices that may be caused by using a
different antenna. The use of an active power amplifier is not allowed.
Antenna type : Dipole
Gain : Maximum 2dBi peak gain in 2.4GHz and 5Ghz band
Bottom layout of the Base Unit
The serial number label with the applicable certification logos is stuck at the bottom of the Base Unit.
The serial number label contains:
•
the Barco logo
•
the Barco part number
•
the serial number
•
the revision number
•
the production date (week/year)
•
markings for applicable standards (CE, CCC, UL, ...)
•
markings for waste regulation
•
“Made in ...”
2.3
About the Button
Buttom
A Button toggles the sharing of the individual PC or MAC screen on the meeting screen.
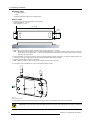
Button layout
A Button consists of three main components.
1
2
3
Image 2-4
Button layout
1
USB connector
2
Button
3
LED ring
Table 2-6
USB connector
Using the USB connector the Button can be plugged into a laptop (for sharing your screen) or the Base Unit (for pairing the Button
to the Base Unit or updating its software).
Button
Click the Button to display the content of the laptop’s screen on the meeting room display. Clicking the Button during the meeting
will toggle the sharing of the screen.
8
R5900014 CLICKSHARE 30/04/2014
2. ClickShare Specifications
LED ring
The LED ring indicates the current status of your ClickShare.
LEDs behavior
Explanation
white blinking
static white
static red
red blinking
off (no light)
•
the Button is plugged in the laptop and initializing or waiting for the user
to start the ClickShare application.
•
pairing/software update of the Button in the Base Unit is in progress.
•
ClickShare is ready to start sharing your screen.
•
pairing is done. You can now unplug the Button from the Base Unit.
•
sharing your screen with the display.
•
pairing and software update is done. You can now unplug the Button
from the Base Unit.
•
an error occurred.
•
the Button is not or not properly inserted into the USB port.
•
the Button might be defective.
•
the USB port or computer might be defective.
Button label
The label at the bottom of the Button contains:
•
the Barco logo
•
the Barco part number
•
the serial number
•
the revision number
•
markings for applicable standards
•
markings for waste regulation
•
“Made in...”
Handle the Button cable with care. Rough handling might cause defects.
2.4
Mobile Device Support
Overview
The below list of Apps are supported by ClickShare and can be installed on your mobile device from Google Play or Apple App Store.
Before you can use your mobile device with ClickShare, you have to connect the mobile device Wi-Fi with the ClickShare Base Unit
Wi-Fi. Follow the instructions as given in your mobile device user guide.
App
Used on
ClickShare Presenter
iOS
Logo
Android
MirrorOp Sender for Galaxy
R5900014 CLICKSHARE 30/04/2014
Samsung Galaxy only
9
2. ClickShare Specifications
10
R5900014 CLICKSHARE 30/04/2014
3. Getting started
3. GETTING STARTED
Overview
3.1
•
Environmental Condition Check
•
Basic Workflow
Environmental Condition Check
Environment condition check
For installations in environments where the device is subject to excessive dust, then it is highly advisable and desirable to have this
dust removed prior to it reaching the device clean air supply. Devices or structures to extract or shield excessive dust well away
from the device are a prerequisite; if this is not a feasible solution then measures to relocate the device to a clean air environment
should be considered.
It is the customer’s responsibility to ensure at all times that the device is protected from the harmful effects of hostile airborne particles
in the environment of the device. The manufacturer reserves the right to refuse repair if a device has been subject to negligence,
abandon or improper use.
Ambient temperature conditions
Max. ambient temperature : +40°C or 104°F
Min. ambient temperature: +0°C or 32°F
Storage temperature: -10°C to +60°C (14°F to 140°F)
Humidity Conditions
Storage: 0 to 90% relative humidity, non-condensing
Operation: 0 to 85% relative humidity, non-condensing
Environment
Do not install the device in a site near heat sources such as radiators or air ducts, or in a place subject to direct sunlight, excessive
dust or humidity. Be aware that room heat rises to the ceiling; check that temperature near the installation site is not excessive.
3.2
Basic Workflow
Before using ClickShare
1. Unpack the ClickShare components and accessories from the box.
For a detailed overview of the content of the ClickShare box,
2. Install the Base Unit in the meeting room using one of the 2 possible installation methods.
For more information on the installing procedures,
3. Connect the video signal between the Base Unit and the display.
4. Connect the audio from the Base Unit to the meeting room’s sound system (only required for audio via jack).
5. If configuration via a network is needed, connect a network cable between the Base Unit and the local network (if not yet done
to power the Base unit).
6. Connect the Base unit to the mains power.
For more information "Power connection", page 17,
7. If desired, configure ClickShare via the Web Interface.
For more information on the different ways to configure ClickShare,
For more information on using ClickShare, refer to the ClickShare User Guide (R5900014). This manual can
be found on Barco’s website www.barco.com/clickshare Click on Visit the ClickShare product page and go to
tab Downloads..
R5900014 CLICKSHARE 30/04/2014
11
3. Getting started
12
R5900014 CLICKSHARE 30/04/2014
4. ClickShare installation
4. CLICKSHARE INSTALLATION
About this chapter
The installation chapter gives an overview of the different ways to install and connect ClickShare’s Base unit.
Overview
•
Installation methods for the Base unit
•
Table mounting
•
Wall mounting
•
Recommendations about antenna placement and orientation
•
Video signal connections to the Base unit
•
Audio connection
•
LAN connection
•
Power connection
4.1
Installation methods for the Base unit
For optimal performance, install the Base unit close to the display and avoid obstacles between the Base unit
and the Buttons.
Introduction to the installation methods
The Base unit can be installed in different ways in a meeting room.
•
Table mount
•
Wall mount
The articulated antennas are removable. They can rotate for better wireless connection and they can
WARNING:
4.2
Ceiling mount is not allowed !
Table mounting
Overview
Put the Base Unit directly on the meeting room table.
The total weight of the Base Unit is 530 g.
4.3
Wall mounting
About wall mounting
Use the mounting brackets, inserted in the ClickShare box, to mount the Base unit on the wall.
The total weight of the Base Unit is 530 g.
Necessary tools
•
a drill (type of drill depends on the type of wall)
•
Flat screwdriver
•
Additional screwdriver that matches the mounting screws (mounting screws not delivered)
R5900014 CLICKSHARE 30/04/2014
13
4. ClickShare installation
Necessary parts
•
4 mounting screws
•
4 plugs
•
Mounting bracket (included in the ClickShare box)
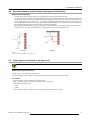
How to install
1. Drill four holes in the wall as indicated on the drawing.
Horizontal distance : 111 mm,
Vertical distance: 15 mm
111 ±0.15
15 ±0.15
Ø4.4
Image 4-1
Mounting bracket
2. Insert a plug in each hole (if needed, depends on the wall type) and drive in 4 screws.
Note: Mounting screws and plugs are not included in the ClickShare box . The type of screws and plugs depend on the type
of wall (stone, wood, plasterboard, ...) you are mounting the Base Unit to. Make sure the head of the screw is not larger
than the hole in the bracket.
3. Place the bracket on the wall so that the holes in the fixation flanges matches the holes in the wall and that the flanges are
touching the wall. Also, make sure that the big head of the fixation slots is facing upwards.
4. Fixate the bracket with 4 screws (not delivered).
Note: Make sure that the head of your screws is bigger than the holes in the plate.
5. At the bottom side of the Base unit, turn in both delivered fixation screws.
Image 4-2
Base unit fixation screws
6. Hook the Base unit into the mounting bracket and slide the Base unit downwards until it is fixed in the bracket.
CAUTION: It is only allowed to mount the Base Unit front side up or down. Mounting on its side is not allowed!
14
R5900014 CLICKSHARE 30/04/2014
4. ClickShare installation
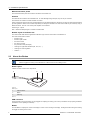
4.4
Recommendations about antenna placement and orientation
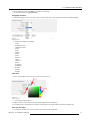
Antenna placement rules
•
The antennas should be oriented vertically, so perpendicular to the ceiling and parallel to the walls.
•
The antennas should be installed far enough (at least 50cm/1.6ft) from metallic surfaces to avoid unwanted reflections and
far enough (at least 1m/3.3ft) from other radio equipment that operates in the same frequency range, e.g. other Wi-Fi access
points, cordless telephone, microwave ovens, …. It is also best to install antennas at least 15 cm (6 inches) from concrete walls.
•
The most favorable situation is a direct line of sight between antennas and Buttons. Any obstruction will cause the signal to
follow a longer propagation path, which can result in performance degradation.
•
Due to the particular radio pattern of the dipole antennas, the antennas should not be placed just above potential positions of
ClickShare users. As a result, the advised position for the antennas is at the side of the meeting room.
Image 4-3
Closer view of antennas installation in the meeting room
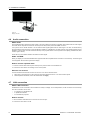
4.5
Video signal connections to the Base unit
CAUTION:
Make sure the Base Unit is installed properly before connecting.
About Video signal connection
A single screen can be connected to the Base unit.
To connect a display, a VGA or HDMI connection should be made between the Base Unit and the display.
To connect
1. Connect the Base unit to the display using a display cable.
Note: No display cables are included in the ClickShare box at purchase.
Supported types of displays are:
-
VGA
-
HDMI
When setting up a display configuration, connect the VGA or the HDMI cable to the display.
R5900014 CLICKSHARE 30/04/2014
15
4. ClickShare installation
VGA
HDMI
Image 4-4
Display connection
4.6
Audio connection
About audio
The ClickShare Button captures the audio output of the user’s laptop and sends it to the Base Unit together with the video signal.
The audio will be output at line levels from the mini jack socket (3.5mm) and via the HDMI connector.
It is up to the user to decide whether or not to send the audio signal together with the video signal. The user can decide this by
using the same tools as he would to control the laptop’s speakers or a headphone: the audio controls of the operating system (eg for
Windows: Control Panel > Sounds and audio devices) or the physical buttons on the keyboard of their laptop (mute/unmute, lower
volume, higher volume).
There will be synchronization between the audio and video signal.
Audio via HDMI
When your display is connected via HDMI and it supports audio than a separate audio connection is not necessary. The audio signal
is sent together with the video signal to the display.
How to connect separate audio
1. Connect an audio cable with mini jack socket (3.5mm) into the audio out of the Base unit.
2. Connect the other side to the meeting room’s sound system.
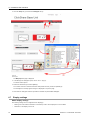
Sound is not sent out
In some Windows environments sound is not sent out. This can be solved as follow:
1.
Right click on the sound icon in the system tray and select Playback devices. The Sound window opens.
2.
Select Speakers ClickShare, select Set default and click Apply.
4.7
LAN connection
About LAN connection
The Base Unit can be connected to a local network or directly to a laptop. For normal operation, a LAN connection is not necessary.
The LAN connection can be used:
•
to configure your ClickShare unit
•
to update the software
•
for maintenance purposes
How to connect
1. Insert a network cable with RJ-45 connector into the LAN port.
2. Connect the other side to a LAN.
16
R5900014 CLICKSHARE 30/04/2014
4. ClickShare installation
4.8
Power connection
About power
The Base unit can be powered via an external power adapter.
Once the Base unit is powered, it starts up. Then the power button can be used to switch on or off.
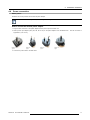
How to connect the external power adapter.
1. Plug the barrel connector of the power adapter into the power input of the Base unit.
2. Slide a power input adaptor piece (US, CN, EU or UK) on the power adapter of the ClickShare Link . Use the one which is
applicable in your country.
Image 4-5
Type A
Image 4-6
Type C
Image 4-7
Type G
Image 4-8
Type I
3. Connect the power cable to the wall outlet.
R5900014 CLICKSHARE 30/04/2014
17
4. ClickShare installation
18
R5900014 CLICKSHARE 30/04/2014
5. Preparing the buttons
5. PREPARING THE BUTTONS
Overview
5.1
•
Pairing
•
Pre-install of the Launcher service
Pairing
Pairing of the Buttons with the Base Unit
To be able to use a Button it should be assigned to the Base Unit you are using. This process is called pairing. By default, the two
Buttons delivered with the ClickShare set are already paired to the specific Base Unit.
In case you buy additional Buttons or when a Button should be assigned to another Base Unit, the Button needs to be paired (again).
When updating the Base Unit software, it is advised to also pair your Buttons with the Base Unit to update their software.
A Button can only be paired to one Base Unit at a time.
The Button will always make connection to the Base Unit it was last paired to.
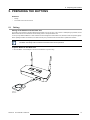
To pair a Button to the Base unit
1. Insert the Button in the USB port at the front of the Base Unit you are using.
Image 5-1
Pair button
R5900014 CLICKSHARE 30/04/2014
19
5. Preparing the buttons
Both the LEDs of the Button and the LEDs of the Base Unit are blinking white. This means pairing is in progress.
The Base Unit automatically checks whether the software of the Button is up to date. If not, the Base Unit updates the Button
software. This may take more time.
During the pairing and update process, a small status bar is display.
Image 5-2
Pairing message
The result of the pairing process can be as follows:
-
When the LEDs become static white, the Button is paired to the Base Unit, but no software update was needed. You can
unplug the Button from the Base Unit.
-
When the LEDs become static red, the Button is paired to the Base Unit and the software update has finished. You can unplug
the Button from the Base Unit.
Image 5-3
Pairing finished
2. Unplug the Button from the Base Unit.
The Button is now ready for use.
5.2
Pre-install of the Launcher service
Launcher service pre-install
The ClickShare Launcher service can be pre-installed on your laptop or on company level. How this is done depends on your IT
infrastructure.
When the Launcher service is pre-installed, a launcher application runs in the background. When you plug the Button in your laptop,
the ClickShare application will be run from the Button automatically. There is no need to run the file from the Button.
The pre-installer can be downloaded from the Base Unit’s web interface and the Barco website.
20
R5900014 CLICKSHARE 30/04/2014
6. ClickShare Web Interface
6. CLICKSHARE WEB INTERFACE
Overview
•
Accessing the ClickShare Web Interface
•
Language setup Web interface
•
About ClickShare tabs
•
Basic settings
•
Wallpaper (background) selection
•
Personalized wallpapers
•
Display settings
•
Display output settings
•
On-screen text format
•
Audio settings
•
Advanced settings: Hostname
•
Advanced settings: LAN network settings
•
Advanced settings: WiFi settings
•
Integration, Polycom
•
Maintenance, status check ClickShare
•
Maintenance, Buttons information
•
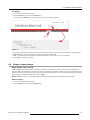
Base Unit software update
•
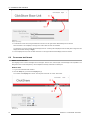
Downloads from Base Unit
•
Manage System Configuration
•
Load Default Settings
•
Administrator password
•
Integrator password
•
Log settings
•
ClickShare Help, Barco contact data
•
Barco ClickShare EULA
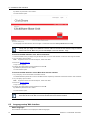
6.1
Accessing the ClickShare Web Interface
Getting access to the Web Interface
There are three ways to access the ClickShare Web Interface:
•
Via the LAN
•
Direct Ethernet connection between PC and Base Unit.
•
Via the Base Unit’s wireless network
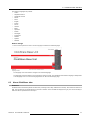
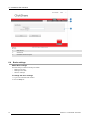
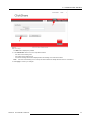
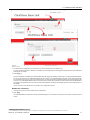
To access the Web Interface via the LAN
1. Open a browser.
Note: Supported browsers are Internet Explorer 8 or higher, Firefox, Google Chrome and Safari.
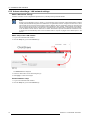
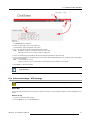
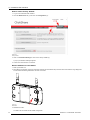
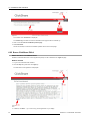
2. Browse to the IP address you can find in the top left corner of the ClickShare welcome screen.
Note: The Wired IP address is only visible when the Base Unit is connected to the LAN.
A login screen appears.
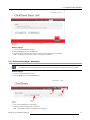
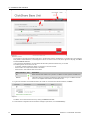
3. Enter the user name ’admin’ and the password and click OK.
R5900014 CLICKSHARE 30/04/2014
21
6. ClickShare Web Interface
By default, the password is set to ’admin’.
The web interface opens.
Image 6-1
Web interface, startup screen
The language of the web interface can be changed. It contains also three tabs: Setup, Maintenance and Help.
If you cannot find the IP address (e.g. there is no screen available) you should connect to the Base Unit
directly with your laptop via an Ethernet crossover cable and access the web interface using the fixed IP
address 192.168.1.23. Make sure your own LAN adapter is set in the 192.168.1. range.
To access the Web Interface via a direct connection.
1. Connect the Base Unit to your laptop using an Ethernet cable. On some older hardware a crossover cable might be needed.
2. On your laptop, open a browser.
Note: Supported browsers are Internet Explorer, Firefox and Safari.
3. Browse to http://192.168.1.23.
A login screen appears.
4. Enter the user name ’admin’ and the password and click OK.
By default the password is set to ’admin’.
The web interface opens.
To access the Web Interface via the Base Unit wireless network
1. On your laptop, connect to the Base Unit wireless network.
The default SSID and password to connect to the Base Unit are respectively ’ClickShare-<serial base number>’ and ’clickshare’.
2. On your laptop, open a browser.
Note: Supported browsers are Internet Explorer, Firefox and Safari.
3. Browse to http://192.168.2.1.
A login screen appears.
4. Enter the user name ’admin’ and the password and click OK.
By default the password is set to ’admin’.
The web interface opens.
Older laptops do not support the 5 GHz Frequency Band. If your Base Unit is set to that frequency range,
those devices will not be able to connect to the Base Unit via the wireless network.
6.2
Language setup Web interface
About languages
The ClickShare web interface can be displayed in different languages.
22
R5900014 CLICKSHARE 30/04/2014
6. ClickShare Web Interface
The following languages are possible:
•
Arabic
•
Simplified Chinese
•
Traditional Chinese
•
Danish
•
Dutch
•
English
•
Finnish
•
French
•
German
•
Italian
•
Japanese
•
Korean
•
Norwegian
•
Portuguese
•
Russian
•
Spanish
•
Swedish
How to change
1. Click on the drop down box next to Choose language and select the desired language.
Image 6-2
Language selection
The language of the web interface changes to the selected language.
The language of the web interface can be changed on nearly any page. The ClickShare Web Interface language is independent
of the language of the on screen text language which can be set on the Display page.
6.3
About ClickShare tabs
Overview
ClickShare has a main tab bar (red bar with white text) containing 3 tabs, Setup, Maintenance and Help. Each main tab contains sub
tabs. The sub tabs are only displayed when a main tab is selected. These sub tabs are displayed in a gray bar. The functionality of
these sub tabs is explained in the next topics.
R5900014 CLICKSHARE 30/04/2014
23
6. ClickShare Web Interface
Image 6-3
Tab pages
6.4
1
Main tab bar
2
Sub tab bar
3
Information and fill out pane
Basic settings
About Basic settings
The basic settings contain the following information:
•
Meeting room name
•
Meeting room location
•
Welcome message
To change the basic settings
1. Log in to the ClickShare web interface.
2. Click the Setup tab.
24
R5900014 CLICKSHARE 30/04/2014
6. ClickShare Web Interface
Image 6-4
Setup, basic settings
The Basic tab is displayed by default.
3. In the Identification section click in an input field and enter
-
the name of the meeting room
-
the location of the meeting room
-
a welcome message which will be displayed below the meeting room name and location.
Note:
The name of the meeting room is used by the Client software to identify the Base Unit it is connected to.
4. Click Apply to confirm your changes.
R5900014 CLICKSHARE 30/04/2014
25
6. ClickShare Web Interface
Image 6-5
A message is displayed to indicate that the changes are successful.
The new name, location and welcome message are displayed in the left top corner of the screen.
6.5
Wallpaper (background) selection
About wallpaper
When ClickShare starts up, a background (wallpaper) is displayed. By default a general ClickShare and a quick start wallpaper are
available. The possibility exists to upload personal backgrounds (wallpapers).
Wallpaper selection
1. Log in to the ClickShare web interface.
2. Click the Setup tab (1) and then the Wallpaper tab (2).
The content of the Wallpaper tab is displayed.
26
R5900014 CLICKSHARE 30/04/2014
6. ClickShare Web Interface
Image 6-6
Wallpaper selection
3. Select one of the available wallpapers (3) and click Apply (5)..
Note: By default a general Barco ClickShare wallpaper and a ClickShare Quick Start Guide wallpapers are available.
They are automatically resized to fit the aspect ratio of the screen.
The selected wallpaper is indicated with a red square around the preview. The preview pane shows the selected wallpaper before
it is applied.
The following message appears on top of the wallpaper selection window.
Image 6-7
The selected wallpaper is now in use.
4. The wallpaper can be switched on or off by checking or unchecking the check box next to Show wallpaper (4).
When the wallpaper is switched off, the display outputs are shut off wile nobody is sharing.
You can also add a personal wallpaper, e.g. your company logo. For more information on adding a new wallpaper to the list, see Managing background wallpapers.
6.6
Personalized wallpapers
About a personalized wallpaper
Via the web interface it is possible to upload personalized backgrounds or wallpapers. The free space to upload wallpapers is
indicated in the Available storage pane.
The upload file should be a JPEG, PNG, BMP or TIFF format with a maximum size of 2.5MB.
Maximum one custom wallpaper can be uploaded. To upload another, the first one needs to be removed first.
How to upload
1. Log in to the ClickShare web interface.
R5900014 CLICKSHARE 30/04/2014
27
6. ClickShare Web Interface
2. Click the Setup tab (1) and then the Wallpaper tab (2).
Image 6-8
Add wallpaper
The Wallpaper tab page is displayed.
3. In the Background wallpapers pane, click on the “+” sign (3).
A browser window opens.
4. Select the desired file (4) and click Open (5).
The content of the file is checked and when valid (format and size), the file is uploaded (6).
The message Successfully applied changes is displayed on top of the page.
5. Now follow the wall paper selection procedure to activate the personalized wallpaper.
6.7
Display settings
About display settings
The following settings can be configured for the display(s):
28
•
Meeting room and network information on the startup screen can be displayed or can be hidden.
•
Resolution of the display can be set.
R5900014 CLICKSHARE 30/04/2014
6. ClickShare Web Interface
To change
1. Log in to the ClickShare web interface.
2. Click the Setup tab (1) and then the Display tab (2).
The content of the Display tab is shown. The first pane shows the Display Settings.
Image 6-9
Display settings
3. To show the meeting room and network info on the meeting room display, check the check box behind the corresponding item.
4. Resolution setup. Click on the drop-down list and select the desired resolution.
Note: The maximum output resolution supported by ClickShare is 1920 x 1080. This is also the default.
5. Click Apply to confirm your changes.
6.8
Display output settings
About display output settings
A screen saver can be activated after a certain time. The delay time to activate the screen saver can be set via the slider bar.
When the slider is set completely to the right, the screen saver will never be activated. Slide the slider to the left until the desired
delay time is reached. This delay time can never be larger than the Display Timeout. A warning will be displayed when the delay
time is larger than the display timeout after clicking on Apply.
Display Timeout : If there is no input signal detected during the display timeout period, both outputs are set to blank.
How to change
1. Log in to the ClickShare web interface.
2. Click the Setup tab (1) and then the Display tab (2).
R5900014 CLICKSHARE 30/04/2014
29
6. ClickShare Web Interface
Image 6-10
Display output settings
3. To activate the screen saver, drag the slider bar to the left or to the right until the desired delay time is reached.
When the slider is set completely to the right, the screen saver will never be activated.
The delay time can never be larger than the Display Timeout. A warning will be displayed when the delay time is larger than the
display timeout after clicking on Apply.
4. To set a display time out, move the slider to the left or to the right until the desired display timeout is reached.
6.9
On-screen text format
About on-screen text
The language of the on-screen messages can be changed. Also the color, size and style of the messages can be updated. The
background color and the transparency can be adapted so that they match with the text layout.
How to start
1. Log in to the ClickShare web interface.
2. Click the Setup tab (1) and then the Display tab (2).
The content of the Display tab is shown. The last pane shows the On-screen Text Format
Image 6-11
On-screen text
30
R5900014 CLICKSHARE 30/04/2014
6. ClickShare Web Interface
3. When changes are made, click Apply to activate the new settings.
To cancel the changes, click Refresh Page.
Language selection
1. Select the language of the on-screen text. Click on the drop down box next to Language and select the desired language.
Image 6-12
Language selection
The following languages are possible:
-
Arabic
-
Simplified Chinese
-
Traditional Chinese
-
Danish
-
Dutch
-
English
-
Finnish
-
French
-
German
-
Italian
-
Japanese
-
Korean
-
Norwegian
-
Portuguese
-
Russian
-
Spanish
-
Swedish
Text color
1. Click in the input field next to Text color or click on the color icon (1).
Image 6-13
Text color selection
A color selection window opens.
2. Drag the marker in the color bar up or down until the desired color is obtained (2).
3. To change the tint of the selected color, drag the circler marker in the square until the desired tint is obtained (3).
Text size and style
1. To change the text size, click on the drop down menu and select the desired size.
R5900014 CLICKSHARE 30/04/2014
31
6. ClickShare Web Interface
The following sizes are possible:
-
Small
-
Medium
-
Large
2. To change the text style, click on the drop down menu and select the desired style.
Background color
1. Click in the input field next to Background Color or click on the color icon.
Image 6-14
Background color
2. Drag the marker in the color bar up or down until the desired color is obtained (2).
3. To change the tint of the selected color, drag the circler marker in the square until the desired tint is obtained (3).
Transparency
1. Move the slider to the left or the right to obtain the desired transparency.
Image 6-15
Transparency
-
Slider to the right: more transparency
-
Slider to the left: less transparency
6.10 Audio settings
About the audio settings
The audio functionality can be disabled or enabled. When the enable and/or disable setting is changed, the Buttons must be re-paired
before the setting becomes active.
32
R5900014 CLICKSHARE 30/04/2014
6. ClickShare Web Interface
Image 6-16
Audio setting
How to change
1. Log in to the ClickShare web interface.
2. Click the Setup tab and then the Audio tab.
3. To enable audio on the Base Unit, check the check box next to Enable Audio Functionality.
Note: Changing the audio setting, requires a re-pairing of the Buttons.
6.11 Advanced settings: Hostname
Hostname
Hostnames are human-readable nicknames that correspond to the address of a device connected to a network.
How to change
1. Log in to the ClickShare web interface.
2. Click the Setup tab (1) and click Advanced (2).
Image 6-17
Hostname
3. Click in the input field next to Hostname (3)
4. Select the current name and enter a new name.
Note: The default hostname is “ClickShare-<serial number>”.
R5900014 CLICKSHARE 30/04/2014
33
6. ClickShare Web Interface
6.12 Advanced settings: LAN network settings
About LAN network settings
A network connection can be configured through DHCP or by manually entering a fixed IP address.
DHCP
Dynamic host configuration protocol. DHCP is a communications protocol that lets network administrators manage
centrally and automate the assignment of IP addresses in an organization’s network. Using the Internet Protocol, each
machine that can connect to the Internet needs a unique IP address. When an organization sets up its computer users
with a connection to the Internet, an IP address must be assigned to each machine. Without DHCP, the IP address
must be entered manually at each computer and, if computers move to another location in another part of the network,
a new IP address must be entered. DHCP lets a network administrator supervise and distribute IP addresses from
a central point and automatically sends a new IP address when a computer is plugged into a different place in the
network.
DHCP setup of the LAN network
1. Log in to the ClickShare web interface.
2. Click the Setup tab (1) and click Advanced (2).
Image 6-18
DHCP setup
The Advanced tab is displayed.
3. Check the radio button next to DHCP Assigned (3).
4. Click Apply to confirm the changes.
Fixed IP address setup
1. Log in to the ClickShare web interface.
2. Click the Setup tab (1) and click Advanced (2).
34
R5900014 CLICKSHARE 30/04/2014
6. ClickShare Web Interface
Image 6-19
Fixed IP address
The Advanced tab is displayed.
3. Check the radio button next to Fixed address (3).
The IP address, subnet and gateway input opens.
4. Click in the input field of the IP address and fill out the 4 fields.
Note: An address contains 4 octets with a maximum value of 255.
This must NOT be 0.0.0.0 for static IP-Address assignment
5. Click in the Subnet mask input fields and fill out the 4 fields as appropriate for the local subnet.
6. Click in the Default Gateway input fields and fill out the 4 fields. Set the Default-Gateway to the IP-Address of the router (MUST
be on the local subnet!).
Note:
This must NOT be 0.0.0.0.
If there is no router on the local subnet then just set this field to any IP-Address on the subnet.
7. Click Apply to confirm the changes.
Do not use IP address 192.168.2.x for a Subnet mask 255.255.255.0 and IP address 192.168.x.x for a Subnet
mask 255.255.0.0
6.13 Advanced settings: WiFi settings
WARNING: It is not allowed to operate the Base Unit outside its intended geographical region.
About WiFi
A connection with the Base Unit can be made via a wireless connection. A fixed wireless IP address is used to establish the connection.
How to set up
1. Log in to the ClickShare web interface.
2. Click the Setup tab (1) and click Advanced (2).
R5900014 CLICKSHARE 30/04/2014
35
6. ClickShare Web Interface
Image 6-20
WiFi settings
3. Enter a public name (SSID) for the wireless network.
The default SSID is ClickShare-<serial base number>.
4. If you want to broadcast this SSID, check the checkbox behind Broadcast SSID.
5. Enter a new password and confirm that password.
6. Select the wireless connection frequency band: 2.4 GHz or 5 GHz by clicking on the drop down box and selecting the correct
setting
Note: Make sure your PC’s wireless interface supports the 5 GHz band before selecting it on the Base Unit.
7. Select the wireless connection channel by clicking on the drop down box and selecting the desired channel.
The channels available in the list vary according to the regional version of your Base Unit. Re-pairing the Buttons is not required
when changing the frequency band or wireless connection channel.
8. Click Apply to confirm the changes.
Note: Changes made to the WiFi settings will require a reboot of the device after applying.
6.14 Integration, Polycom
About the integration
When both, ClickShare and Polycom systems are installed in a meeting room, typically the video output of the ClickShare Base Unit
is connected to the Polycom unit as a source input. In this case, a user can share content using ClickShare, which is then shown
on the Polycom system.
Depending on the design and configuration of the Polycom system, the last content that arrives to the Polycom system is considered
to be the current content and is shown on the display. Therefore, the ClickShare Polycom integration must overcome that the
ClickShare Button keeps sharing while other content is shown.
To setup the integration the ClickShare Base Unit and the Polycom system need to be connected to the same network.
How to enable
1. Log in to the ClickShare web interface.
2. Click the Setup tab (1) and click Integration (2).
36
R5900014 CLICKSHARE 30/04/2014
6. ClickShare Web Interface
Image 6-21
Integration, Polycom
3. To enable Polycom integration, check the check box next to Enable Polycom Integration (3).
The user is asked to fill in the IP address or hostname (5) of the target Polycom unit together with the Telnet port2 (6) that allows
sending API commands.
4. Click Apply (7).
Once the integration is enabled, the ClickShare Base Unit will enter to the standby mode if there is no sharing ClickShare Button.
As soon as the connection is established between the two systems3, the ClickShare Base Unit sends “notify vidsourcechanges”
API command to the Polycom unit. From that moment on, if content coming from ClickShare is taken out from the display by the
Polycom unit , all ClickShare Buttons that are currently sharing content will go to Ready to Share mode and the ClickShare Base
Unit will go to the standby mode. The client can start sharing again by clicking to their buttons and their content will be shown on
the display.
In case of an error, the LED will turn to red and an error string will be shown.
Disable the connection
1. Uncheck the check box next to Enable Polycom Integration.
2. Click Apply.
The ClickShare Base Unit will send “nonotify vidsourcechanges” API command to the Polycom unit and the connection will be
closed.
2. Telnet port is set to 24 by default.
3. Since establishing the connection may take some time, refreshing the current page may be necessary to see the latest status of the connection.
R5900014 CLICKSHARE 30/04/2014
37
6. ClickShare Web Interface
6.15 Maintenance, status check ClickShare
About status check
The status tab within Maintenance gives an overview of
•
the LAN interface settings,
•
the WiFi settings,
•
System identification
•
Historical updates
•
Subsystem status
•
System management
To check the system status
1. Log in to the ClickShare web interface.
2. Click the Maintenance tab and click Status.
The Status tab page is displayed.
Image 6-22
Status overview
Detailed info for the WiFi network
To see the MAC address of the associated devices, click on the corresponding detail button to get an overview.
38
R5900014 CLICKSHARE 30/04/2014
6. ClickShare Web Interface
Image 6-23
Detail associated devices
System Management
Use the Restart System button to restart ClickShare.
Use the Shutdown System button to shutdown ClickShare.
Image 6-24
System management
6.16 Maintenance, Buttons information
About buttons
The Buttons tab gives information on the Buttons that have been paired to the Base Unit.
The following information is given:
•
Connected or not
•
Serial number
•
Last connected
•
Status
How to get the information
1. Log in to the ClickShare web interface.
2. Click the Maintenance tab (1) and then click Buttons (2).
The content of the Buttons tab is displayed.
R5900014 CLICKSHARE 30/04/2014
39
6. ClickShare Web Interface
Image 6-25
Paired butons, overview
The list gives an overview of the Buttons that have in the past been paired to this Base Unit. If a Button has in the meantime
been paired to another Base Unit, it will still appear in this list. To remove it from the list, at the right of the tab page, click More
and select Remove from list.
In the overview of paired Buttons, for each Button that has been paired to this Base Unit, you will find:
The following items can be seen in the list:
-
Connected: indicates whether the button is connected or not at the moment.
-
Serial number: the unique serial number of the button.
-
Status the firm- and software status of the button.
Status indication
Icon
Explanation
OK
Button firmware and software are up to date. The Button has been paired to the Base Unit.
ERROR
The Button needs to be paired to the Base Unit again before using it. The Button firmware
version is incompatible with the Base Unit firmware version.
3. To get more information on the Button firmware, the number of connections and the MAC address, click More....
Image 6-26
The Button can be removed from the list by clicking on Remove From List.
4. To download the configuration file for the Button manager to pair buttons, click on Download (3)
40
R5900014 CLICKSHARE 30/04/2014
6. ClickShare Web Interface
6.17 Base Unit software update
About Software update
The software of the Base Unit can be updated via the web interface. The latest version of the software is available on Barco’s
website.
How to update
1. Download the latest version of the software from Barco’s website.
2. Log in to the ClickShare web interface.
3. Click the Maintenance tab (1) and then click Software (2).
Image 6-27
Update software
The content of the Software tab is displayed.
The current version of the Base Unit software is shown in the Base Unit Software pane.
4. To upload a new version of the Base Unit software, click Upload New Software... . (3).
A browser window opens.
5. Browse to the file with the new software and click Open to start the upload.
Note: This should be an nad file. You might have to unzip the file downloaded from Barco’s website.
Note:
Updating the software to the Base Unit takes several minutes. Progress can be followed on the meeting room display.
The Base Unit software is updated.
It is advised to pair all Buttons in the meeting room to the Base Unit after a software update has been done.
The Base Unit checks if the Button software needs to be updated and if needed, the update is executed.
6.18 Downloads from Base Unit
About downloads
The launcher service and the ClickShare client software for PC or MAC are stored on the Base Unit and can be downloaded for
installation on the user’s PC.
For more information, see "Pre-install of the Launcher service", page 20.
R5900014 CLICKSHARE 30/04/2014
41
6. ClickShare Web Interface
How to download
1. Log in to the ClickShare web interface.
2. Click the Maintenance tab (1) and then click Software (2).
Image 6-28
Downloads software
The content of the Software tab is displayed.
3. To download the Launcher Service, for Windows, click on Download Windows Launcher or for Mac, click on Download Mac
Launcher.
4. To download the ClickShare Client, for Windows, click on Download Windows Client or for Mac, click on Download Mac Client.
6.19 Manage System Configuration
About Manage system configuration
A full backup can be downloaded but cannot be used to duplicate configuration settings to other Base units. Therefore, it is possible
to download a Portable version. This portable version can be uploaded via the upload configuration button on other Base units. Via
the same button, the full backup can be uploaded on the original Base Unit.
A portable backup contains:
•
Wallpapers
•
Wallpapers settings
•
Logging settings
•
All display settings
•
OSD language
•
Location
•
Welcome message
•
WiFi channel
•
WiFi frequency
To manage the system configuration
1. Log in to the ClickShare web interface.
2. Click the Maintenance tab (1) and then click Configuration (2)..
42
R5900014 CLICKSHARE 30/04/2014
6. ClickShare Web Interface
Image 6-29
Manage system configuration
The content of the Configuration tab is displayed.
3. To download a full backup, click on Download Full Backup (3).
An xml file, containing all information and history will be downloaded. This file can be reused on the same Base Unit only.
4. To download a portable version, click on Download Portable Version (4).
An xml file, containing portable information to duplicate settings on another Base Unit.
5. To upload a configuration, click on Upload Configuration (5).
A browser window opens. Navigate to the upload file (xml file) and click Open to upload.
When uploading a config file, the history of software updates and paired dongles is lost. Paired dongles will
however remain functional if the Base Unit has not changed from SSID or wireless password.
6.20 Load Default Settings
About default settings
The ClickShare Base Unit can return to the factory default settings.
The following settings are the defaults:
•
Meeting room identification info is cleared.
•
Language is set to English.
•
Custom wallpapers are removed and the default wallpaper is restored.
•
Standby timer is reset to infinity
•
Hostname and SSID is set to clickshare-serialnumber.
•
The SSID is broadcasted
•
WiFi password is reset to clickshare.
•
The default WiFi channel is set back to frequency 2.4 GHz, channel 6.
•
The update history is cleared.
•
The table with the associated Buttons is cleared.
•
The admin password is reset to admin.
•
Debug logging and remote logging are disabled.
R5900014 CLICKSHARE 30/04/2014
43
6. ClickShare Web Interface
How to restore factory defaults
1. Log in to the ClickShare web interface.
2. Click the Maintenance tab (1) and then click Configuration (2)..
Image 6-30
Factory defaults
3. Click on Load Default Settings to return to the factory defaults (3).
A pop-up confirmation message appears.
4. Confirm the reboot and the unit reboots.
Restore defaults via reset button
1. Start up the Base unit.
2. When Barco logo appears, press the reset button (bottom side of the Base unit) Press this button until the Barco logo disappears
and the LEDs are blinking red/white for at least 10 seconds.
Image 6-31
Reset button
3. Release the button.
The Base unit will restart with its default configuration.
44
R5900014 CLICKSHARE 30/04/2014
6. ClickShare Web Interface
6.21 Administrator password
About the administrator password
The administrator password to log in in the web interface can be changed at any time.
To change the administrator password
1. Log in to the ClickShare web interface.
2. Click the Maintenance tab (1) and then click Password (2)..
The content of the Password tab is displayed.
Image 6-32
Password
3. Enter the old password (3).
4. Enter the new password (4).
5. To confirm, enter the new password a second time (5).
6. Click Apply.
The administrator password is changed.
6.22 Integrator password
About the integrator password
When an integrator wants to access the ClickShare Base Unit via API commands a typical password can be required. This password
can be changed at any time by the administrator of the ClickShare Base Unit.
To change the integrator password
1. Log in to the ClickShare web interface.
2. Click the Maintenance tab (1) and then click Password (2)..
R5900014 CLICKSHARE 30/04/2014
45
6. ClickShare Web Interface
Image 6-33
Integrator password
3. Enter the new password (3).
4. To confirm, enter the new password a second time (4).
5. Click Apply.
The integrator password is changed.
6.23 Log settings
About logging
Both Button and Base Unit log data is saved in log files on the Base Unit. These log files can contain debugging information. They
can be downloaded on a local computer and cleared on the Base Unit. Debug logging covers about 1 to 4 hours of logging before
it will be overwritten. Therefore, it is important if you discover a problem with your system to download the logging immediately.
How to use
1. Log in to the ClickShare web interface.
2. Click the Maintenance tab (1) and then click Logging (2)..
The content of the Logging tab is displayed.
46
R5900014 CLICKSHARE 30/04/2014
6. ClickShare Web Interface
Image 6-34
Logging
3. To create a debug log, check the check box next to Debug Logging (3).
4. Reproduce the issue you want to report.
5. To download the current log file, click on Download Log (4).
6. To clear the current log file, click Clear Log (5).
7. • To enable logging by the ClickShare client (6):
-
If the launcher service is running hold down the shift key while connecting the dongle to the PC, until logging is started.
-
If the launcher service is not running : hold down the shift key while double clicking the ClickShare application.
The following message appears on the sys tray:
Image 6-35
Client logging
8. Click Apply.
6.24 ClickShare Help, Barco contact data
About ClickShare Help
All kind of manuals, firmware and software updates can be found on Barco’s website. For technical assistance contact your reseller.
How to consult
1. Log in to the ClickShare web interface.
2. Click the Help tab (1) and then click Contact (2).
R5900014 CLICKSHARE 30/04/2014
47
6. ClickShare Web Interface
Image 6-36
The content of the Contact tab is displayed.
The Contact page contains a link to the ClickShare home page on Barco’s website (3).
3. Click on the link Visit the ClickShare product page.
4. Click Downloads
All kind of manuals, brochures and software updates can be found on that page.
6.25 Barco ClickShare EULA
About the Barco ClickShare EULA
The Barco ClickShare End-User License Agreement (EULA) can be consulted on the Legal tab page.
How to consult
1. Log in to the ClickShare web interface.
2. Click the Help tab (1)and then click Legal (2).
The End-User license agreement is displayed.
Image 6-37
EULA
3. If desired, click Save ... (3) to save a copy of the agreement on your laptop.
48
R5900014 CLICKSHARE 30/04/2014
6. ClickShare Web Interface
4. In the File Download window, click Save.
The Save as window opens.
5. Browse to the location where to store the EULA file and click Save.
A copy of the Barco ClickShare EULA has been saved to your laptop.
R5900014 CLICKSHARE 30/04/2014
49
6. ClickShare Web Interface
50
R5900014 CLICKSHARE 30/04/2014
7. Software updates
7. SOFTWARE UPDATES
7.1
Software update
About Software updates
There are two ways to update the Base Unit software:
•
via the Web Interface, for more information, page 21
•
by copying the software on a USB stick
To update the Base Unit software by copying the software on a USB stick
1. Download the latest version of the software from Barco’s website, , www.barco.com/clickshare. Click on Visit the ClickShare
product page and go to tab Downloads
2. Copy the NAD file to a USB stick.
3. Rename the file to clickshare_firmware.nad.
Renaming is necessary as the software will look for that specific filename on the device.
4. Insert the USB stick into the USB port at the front of the Base Unit.
5. Follow the instructions on the meeting room screen.
6. When the on-screen message indicates that the process is finished, remove the USB stick.
The Base Unit shuts down.
It is advised to pair all Buttons in the meeting room to the Base Unit after a software update has been done.
The Base Unit checks if the Button software needs to be updated and if needed, the update is executed.
R5900014 CLICKSHARE 30/04/2014
51
7. Software updates
52
R5900014 CLICKSHARE 30/04/2014
8. ClickShare Troubleshooting
8. CLICKSHARE TROUBLESHOOTING
8.1
Troubleshooting list
Problem solving
Locate the problem you are experiencing in the table below and apply the solution.
Problem
Cause
Quality of the image on the meeting room
display is not satisfactory
The quality or length of the cable between
•
the Base Unit and the display or the
connection between these two.
•
Bad resolution of the display
The system can handle the average
laptop resolution of 3 Megapixel.
However, up or down scaling on the
meeting room display can cause visible
artefacts.
Users have a bad wireless connection.
The connection from the Button to the
Base Unit keeps falling away.
Wireless congestion
Low signal strength
Web interface is not accessible
Browser
Use another cable.
Change the resolution on the web
interface and match it to the native
resolution of the meeting room display.
•
Use a WiFi scanner to find a free
wireless channel and select it via
the web interface. You can use
commercial as well as free online
tools such as inSSIDer or Xirrus for
this. Refer to “Changing advanced
ClickShare settings”.
•
Put the Base Unit closer to the
meeting room table.
•
Change the orientation of the
antennas at the back of the Base
Unit.
•
Remove or limit as much as possible
all obstructions between the Buttons
and the Base Unit.
Use another browser (version).
•
Check the browser settings.
•
There are three methods to access
the web interface. Refer to the
corresponding chapter of the
documentation.
•
Check the proxy settings
No automatic refresh of drives
•
Refresh your view on the laptop.
Windows tries to assign the
ClickShare drive to an already
reserved drive letter
•
Use Microsoft Windows Disk
Management to assign it to a free
drive letter.
Bad connection at USB port on the laptop
R5900014 CLICKSHARE 30/04/2014
Replace the cable.
•
No connection
Users do not get a ClickShare drive when
•
inserting the Button in their laptop.
•
Solution
•
Some types of USB devices might
be blocked as a company policy.
•
USB port settings on the laptop
might limit the usage of high power
USB devices when on battery power.
•
Reconnect to the USB port.
•
Try another USB port.
•
Reboot the laptop.
If possible, change the USB port policy
on the laptop.
53
8. ClickShare Troubleshooting
Problem
Cause
Low video performance
Laptop performance
Video is not shown on screen
Some programs of Windows are not
shown on the display
Solution
•
Lower the screen resolution of the
laptop.
•
Disable the hardware acceleration
for video.
•
Use only a part of the display to
show the video.
•
Right click ClickShare icon in system
tray and click on Capture mode to
toggle the current setting..
Wireless connectivity
See “Users have bad connectivity”
Player uses overlays
Disable the usage of overlays in the
preferences of the video player.
The content uses HDCP
ClickShare does not support showing
HDCP content (it will be displayed as
black)
Use of overlays, 3D or hardware
acceleration in the GPU
•
Disable overlays or hardware
acceleration in the GPU.
•
Disable AeroGlass in Windows 7
•
Upgrade the Base Unit to the latest
software version.
When using Windows 7 the following
message about the Windows Aero color
scheme appears: "Windows has detected
your computer’s performance is slow.
This could be because there are not
enough resources to run the Windows
Aero color scheme. To improve...".
It is safe to ignore this message and
ClickShare uses resources from the
GPU. In combination with other programs choose ’Keep the current color scheme’.
which do so, Windows 7 sometimes
shows this message suggesting to
disable Aero to improve the performance
of your laptop.
Your screen is not shown on the display
when pressing the Button
You are the second person that wants
to share content. Only one screen can
appear simultaneously
Click and hold the button for 2 seconds
to use the Show me full screen function.
The ClickShare software is not running.
Go to the ClickShare drive and run the
software.
Connection to the Base Unit is lost.
ClickShare tries to restore the connection
automatically. If it fails, the LEDs on the
Button start blinking red.
Your content is removed from the display
and the LEDs on the button are blinking
white
Unplug the button from your laptop and
try a new button.
Noting is shown on the displays at all.
Bad WiFi connectivity
The displays are switched off.
Switch on the displays.
The display cable is not correctly
connected
Insert the display cable to the display and
the Base Unit.
The display does not recognize or is
not able to display the Base Unit output
resolution.
Change the corresponding setting via the
web interface.
The Base Unit is in standby mode
Briefly push the standby button on the
Base Unit or insert a button and run the
ClickShare software.
Congestion of the wireless channel
Use wireless network scan tools to look
for free or the least congested channels.
Metal cabinets, walls, construction
elements, ... can cause reflections
deteriorating the wireless signal.
Move the Base Unit to another place in
the room.
Obstructions between Buttons and Base
Unit cause lowering of the wireless
strength and quality.
Avoid placing it inside cabinets, false
ceiling, below the table, behind a wall, in
another room, ....
Re-orient he Base Unit antennas
Check out the ClickShare White paper
on WiFi See www.barco.com/clickshare.
54
R5900014 CLICKSHARE 30/04/2014
8. ClickShare Troubleshooting
Problem
Cause
Solution
In Windows XP, I cannot see the
ClickShare drive in the window “My
Computer”.
This problem might be caused by a
known issue of Windows XP
You can find more details and
the appropriate solution via link :
http://support.microsoft.com/kb/297694
Web Interface shows error in the
processes “WiFi Access Point Daemon”
and/or “DHCP Server”
Configuration file is corrupted
Browse to the Configuration tab on the
Web Interface and press “Load Default
Settings”.
ClickShare Base Unit does not start up
correctly
Configuration file is corrupted
Browse to the Configuration tab of the
Web Interface and press “Load Default
Settings”.
No LAN connection with the Base Unit
Wrong IP address
IP address is not within your LAN range.
DHCP is not enabled.
No WiFi connection with Base Unit
R5900014 CLICKSHARE 30/04/2014
SSID not correct
Enter the correct SSID
55
8. ClickShare Troubleshooting
56
R5900014 CLICKSHARE 30/04/2014
A. Environmental information
A. ENVIRONMENTAL INFORMATION
A.1
Disposal information
Disposal Information
Waste Electrical and Electronic Equipment
This symbol on the product indicates that, under the European Directive 2012/19/EU governing waste from electrical and
electronic equipment, this product must not be disposed of with other municipal waste. Please dispose of your waste equipment by
handing it over to a designated collection point for the recycling of waste electrical and electronic equipment. To prevent possible
harm to the environment or human health from uncontrolled waste disposal, please separate these items from other types of waste
and recycle them responsibly to promote the sustainable reuse of material resources.
For more information about recycling of this product, please contact your local city office or your municipal waste disposal service.
For details, please visit the Barco website at: http://www.barco.com/en/AboutBarco/weee
Disposal of batteries in the product
This product contains batteries covered by the Directive 2006/66/EC which must be collected and disposed of separately
from municipal waste.
If the battery contains more than the specified values of lead (Pb), mercury (Hg) or cadmium (Cd), these chemical symbols will
appear below the crossed-out wheeled bin symbol.
By participating in separate collection of batteries, you will help to ensure proper disposal and to prevent potential negative effects
on the environment and human health.
A.2
Rohs compliance
Turkey RoHS compliance
Türkiye Cumhuriyeti: AEEE Yönetmeliğine Uygundur.
[Republic of Turkey: In conformity with the WEEE Regulation]
中国大陆 RoHS – Chinese Mainland RoHS
根据中国大陆《电子信息产品污染控制管理办法》(也称为中国大陆RoHS), 以下部分列出了Barco产品中可能包含的有毒和/或有
害物质的名称和含量。中国大陆RoHS指令包含在中国信息产业部MCV标准:“电子信息产品中有毒物质的限量要求”中。
According to the “China Administration on Control of Pollution Caused by Electronic Information Products” (Also called RoHS of
Chinese Mainland), the table below lists the names and contents of toxic and/or hazardous substances that Barco’s product may
contain. The RoHS of Chinese Mainland is included in the MCV standard of the Ministry of Information Industry of China, in the
section “Limit Requirements of toxic substances in Electronic Information Products”.
零件项目(名称)
有毒有害物质或元素
Component Name
Hazardous Substances or Elements
汞
铅
镉
(Hg)
(Pb)
(Cd)
六价铬
多溴联苯
多溴二苯醚
(Cr6+)
(PBB)
(PBDE)
印制电路配件
x
0
x
0
0
0
Printed Circuit
Assemblies
电(线)缆
x
0
x
0
0
0
Cables
R5900014 CLICKSHARE 30/04/2014
57
A. Environmental information
底架
x
0
x
0
0
0
Chassis
电源供应器
x
0
x
0
0
0
Power Supply Unit
文件说明书
0
0
0
0
0
0
Paper Manuals
O: 表示该有毒有害物质在该部件所有均质材料中的含量均在 SJ/T 11363-2006 标准规定的限量要求以下.
O: Indicates that this toxic or hazardous substance contained in all of the homogeneous materials for this part is below the
limit requirement in SJ/T11363-2006.
X: 表示该有毒有害物质至少在该部件的某一均质材料中的含量超出 SJ/T 11363-2006 标准规定的限量要求.
X: Indicates that this toxic or hazardous substance contained in at least one of the homogeneous materials used for this part is
above the limit requirement in SJ/T11363 2006.
在中国大陆销售的相应电子信息产品(EIP)都必须遵照中国大陆《电子信息产品污染控制标识要求》标准贴上环保使用期限(EFUP)
标签。Barco产品所采用的EFUP标签(请参阅实例,徽标内部的编号使用于制定产品)基于中国大陆的《电子信息产品环保使用期限
通则》标准。
All Electronic Information Products (EIP) that are sold within Chinese Mainland must comply with the “Electronic Information Products
Pollution Control Labeling Standard” of Chinese Mainland, marked with the Environmental Friendly Use Period (EFUP) logo. The
number inside the EFUP logo that Barco uses (please refer to the photo) is based on the “Standard of Electronic Information Products
Environmental Friendly Use Period” of Chinese Mainland.
Image A-1
A.3
Production address
Factory
Barco N.V.
12F, Citychamp Building, No. 12, Tai Yang Gong Zhong Lu, Chaoyang District, Beijing, P.R.C
58
R5900014 CLICKSHARE 30/04/2014
Index
INDEX
A
Hostname
About 3, 5–6, 8
Base Unit 6
Button 8
ClickShare product 5
Guide 3
Antenna placement 15
Recommendations 15
B
Barco contact data 47
Base unit 13
Installation 13
Methods 13
Table mounting 13
Wall mounting 13
Base Unit 6, 15–17
About 6
Audio 16
Connection 16
Display 15
Connection 15
Ethernet 16
Connection 16
LAN 16
Connection 16
Power 17
Connection 17
Basic Workflow 11
Button 8, 19
About 8
Pairing 19
Prepare 19
C
33
I
Installation 13, 15
Antenna placement 15
Recommendations 15
Base unit 13
Methods 13
Table mounting 13
Base unit 13
Wall mounting 13
Base Unit 13
Introduction 3
Fonts 3
Installation Guide 3
symbols 3
L
LAN network 34
Settings 34
Launcher service 20
Pre-install 20
Logging 46
M
Maintenance 38–39, 41
Buttons 39
Software 41
Status 38
Mobile Device 9
Support 9
O
Configuration 42–43
Default settings 43
Manage system 42
Connecting 15–17
Base Unit 15–17
Audio 16
Display 15
Ethernet 16
LAN 16
Power 17
On-screen text format
30
P
Display settings 28
Documentation 3
Pairing Buttons 19
Password administrator 45
Change 45
Password integrator 45
Change 45
Pre-install 20
Launcher service 20
Prepare 19
Button 19
Product specifications 5
Production address 58
E
S
D
Environment condition check 11
Environmental information 57
Disposal information 57
Rohs compliance 57
EULA 48
G
Getting started
11
H
Help 47–48
Barco contact data
EULA 48
Safety 11
Environment condition check
Setup 36
Integration 36
Software 51
Update 51
Software updates 51
Specifications 5
Symbols 3
11
T
47
R5900014 CLICKSHARE 30/04/2014
Table mounting 13
Base unit 13
Troubleshooting 53
59
Index
Troubleshooting list
53
U
Update 51
Software 51
W
Wall mounting 13
Base unit 13
Web interface 21–24, 26–30, 32–36, 38–39, 41–43, 45–48
Audio settings 32
Background 26–27
Personalized 27
Selection 26
Basic settings 24
Configuration 42–43
Default settings 43
Manage system 42
Display settings 28
Help 47–48
Barco contact data 47
EULA 48
60
Hostname 33
LAN network 34
Settings 34
Language setup 22
Logging 46
Maintenance 38–39, 41
Buttons 39
Software 41
Status 38
On-screen text format 30
Password 45
Change 45
Password administrator 45
Change 45
Setup 36
Integration 36
Tabs 23
Wallpaper 26–27
Personalized 27
Selection 26
WiFi settings 35
Web Interface 21
Access 21
WiFi settings 35
R5900014 CLICKSHARE 30/04/2014