1
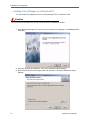
Installation and
Configuration Guide
Intellex® Policy Manager
Version 4.3
Part Number 8200-2640-11 A0
Notice
The information in this manual was current when published. The manufacturer reserves the right to revise and improve its products.
All specifications are therefore subject to change without notice.
Copyright
Under copyright laws, the contents of this manual may not be copied, photocopied, reproduced, translated or reduced to any
electronic medium or machine-readable form, in whole or in part, without prior written consent of Tyco International Ltd. © 2009 and
its Respective Companies. All Rights Reserved.
American Dynamics
6600 Congress Avenue
Boca Raton, FL 33487 U.S.A.
Customer Service
Thank you for using American Dynamics products. We support our products through an extensive worldwide network of dealers. The
dealer through whom you originally purchased this product is your point of contact if you need service or support. Our dealers are
empowered to provide the very best in customer service and support. Dealers should contact American Dynamics at (800) 507-6268
or (561) 912-6259 or on the Web at www.americandynamics.net.
Trademarks
Intellex® is a registered trademark of Sensormatic Electronics Corporation. Windows® is a registered trademark of Microsoft
Corporation. PS/2® is a registered trademark of International Business Machines Corporation. Sony® is a registered trademark of
Sony Corporation.
Trademarked names are used throughout this manual. Rather than place a symbol at each occurrence, trademarked names are
designated with initial capitalization. Inclusion or exclusion is not a judgment on the validity or legal status of the term.
ii
License Information
READ THIS LICENSE AGREEMENT BEFORE OPENING THE DISK PACKAGE, INSTALLING THE SOFTWARE, OR USING YOUR
SYSTEM.
THIS LICENSE AGREEMENT DEFINES YOUR RIGHTS AND OBLIGATIONS. BY BREAKING THE SEAL ON THIS PACKAGE,
INSTALLING THE SOFTWARE, OR USING YOUR SYSTEM, YOU AGREE TO ALL OF THE TERMS AND CONDITIONS OF THIS
AGREEMENT. IF YOU DO NOT AGREE TO ALL OF THE TERMS AND CONDITIONS OF THIS AGREEMENT, YOU MAY, WITHIN
30 DAYS, RETURN THIS PACKAGE, ALL THE DOCUMENTATION, AND ALL ACCOMPANYING MATERIAL(S) TO THE POINT OF
PURCHASE FOR A REFUND.
SOFTWARE LICENSE
The Software includes the computer code, programs, and files, the associated media, hardware or software keys, any printed
material, and any electronic documentation. The Software may be provided to you pre-installed on a storage device (the media) as
part of a system. The Software is licensed, not sold.
GRANT OF LICENSE
This agreement between Sensormatic Electronics Corporation (Sensormatic) and you permits you to use the Software you
purchased. Once you have purchased the number of copies you require, you may use the Software and accompanying material
provided you install and use no more than the licensed number of copies at one time. The Software is only licensed for use with
specified Sensormatic supplied equipment. If the Software is protected by a software or hardware key or other device, the Software
may be used on any computer where the key is installed. If the key locks the Software to a particular System, the Software may only
be used on that System.
OTHER RIGHTS AND LIMITATIONS
•
•
A demonstration copy of the Software is considered purchased and is covered by this license agreement.
You may not de-compile, disassemble, reverse engineer, copy, transfer, modify, or otherwise use the Software except as stated in
this agreement.
• The hardware/software key, where applicable, is your proof of license to exercise the rights granted herein and must be retained
by you. Lost or stolen keys will not be replaced.
• If the Software is provided as part of a System, the Software may only be used with the System.
• You may not sub-license, rent or lease the Software, but you may permanently transfer the Software to another party by
delivering the original disk and material comprising the Software package as well as this license agreement to the other party.
Initial use of the Software and accompanying material by the new user transfers the license to the new user and constitutes the
new user's acceptance of its terms and conditions.
• The Software is not fault tolerant and may contain errors. You agree that the Software will not be used in an environment or
application in which a malfunction of the Software would result in foreseeable risk of injury or death to the operator of the
Software, or to others.
• Sensormatic reserves the right to revoke this agreement if you fail to comply with the terms and conditions of this agreement. In
such an event, you must destroy all copies of the Software, and all of its component parts (e.g., documentation, hardware box,
software key).
• The Software may contain software from third parties that is licensed under a separate End User License Agreement (EULA).
Read and retain any license documentation that may be included with the Software. Compliance with the terms of any third party
EULA is required as a condition of this agreement.
• The Software may require registration with Sensormatic prior to use. If you do not register the Software this agreement is
automatically terminated and you may not use the Software.
• The Microsoft® Windows® Preinstallation Environment Version 1.2, Services Edition software, if included with this software or
system, may be used for boot, diagnostic or recovery purposes only. NOTE: THIS SOFTWARE CONTAINS A SECURITY
FEATURE THAT, IF USED AS AN OPERATING SYSTEM, WILL CAUSE YOUR DEVICE TO REBOOT WITHOUT PRIOR
NOTIFICATION AFTER 24 HOURS OF CONTINUOUS USE OF THE SOFTWARE.
• UPGRADES AND UPDATES. Software Upgrades and Updates may only be used to replace all or part of the original Software.
Software Upgrades and Updates do not increase the number copies licensed to you. If the Software is an upgrade of a
component of a package of Software programs that you licensed as a single product, the Software may be used and transferred
only as part of that single product package and may not be separated for use on more than one computer. Software Upgrades
and Updates downloaded free of charge via a Sensormatic authorized World Wide Web or FTP site may be used to upgrade
multiple systems provided that you are licensed to use the original Software on those systems.
• INTELLEX PLAYER. The Intellex Player Software that is exported with video clips and/or distributed via Sensormatic authorized
World Wide Web site may be copied by you for use within your organization or for distribution to external parties for law
enforcement, investigative, or adjudicative purposes and only to display video recorded by an Intellex system. The Intellex Player
Software may not be sold. All other terms and conditions of this agreement continue to apply.
• TOOLS AND UTILITIES. Software distributed via Sensormatic authorized World Wide Web or FTP site as a tool or utility may be
copied and installed without limitation provided that the Software is not distributed or sold and the Software is only used for the
intended purpose of the tool or utility and in conjunction with Sensormatic products. All other terms and conditions of this
agreement continue to apply.
Failure to comply with any of these restrictions will result in automatic termination of this license and will make available to
Sensormatic other legal remedies.
COPYRIGHT
The Software is a proprietary product of Tyco International Ltd. © 2009 and its Respective Companies. All Rights Reserved.
LIMITED WARRANTY
Sensormatic warrants that the recording medium on which the Software is recorded, hardware key, and the documentation provided
with it, will be free of defects in materials and workmanship under normal use for a period of ninety (90) days from the date of delivery
to the first user. Sensormatic further warrants that for the same period, the software provided on the recording medium under this
iii
license will substantially perform as described in the user documentation provided with the product when used with the specified
hardware.
CUSTOMER REMEDIES
Sensormatic's entire liability and your exclusive remedy under this warranty will be, at Sensormatic's option, to a). attempt to correct
software errors with efforts we believe suitable to the problem, b). replace at no cost the recording medium, software or
documentation with functional equivalents as applicable, or c). refund the license fee and terminate this agreement. Any replacement
item will be warranted for the remainder of the original warranty period. No remedy is provided for failure of the Software if such
failure is the result of accident, abuse, alteration or misapplication. Warranty service or assistance is provided at the original point of
purchase.
NO OTHER WARRANTIES
The above warranty is in lieu of all other warranties, express or implied, including, but not limited to the implied warranties of
merchantability and fitness for a particular purpose. No oral or written information or advice given by Sensormatic, its representatives,
distributors or dealers shall create any other warranty, and you may not rely on such information or advice.
NO LIABILITY FOR CONSEQUENTIAL DAMAGES
In no event will Sensormatic be liable to you for damages, including any loss of profits, loss of data or other incidental or
consequential damages arising out of your use of, or inability to use, the Software or its documentation. This limitation will apply even
if Sensormatic or an authorized representative has been advised of the possibility of such damages. Further, Sensormatic does not
warrant that the operation of the Software will be uninterrupted or error free. This limited warranty gives you specific legal rights. You
may have other rights that vary from state to state. Some states do not allow the exclusion of incidental or consequential damages, or
the limitation on how long an implied warranty lasts, so some of the above limitations may not apply to you.
GENERAL
If any provision of the agreement is found to be unlawful, void, or for any reason unenforceable, then that provision shall be severed
from this agreement and shall not affect the validity and enforceability of the remaining provisions. This agreement is governed by the
laws of the State of Florida. You should retain proof of the license fee paid, including model number, serial number and date of
payment, and present such proof of payment when service or assistance covered by this warranty is requested.
U.S. GOVERNMENT RESTRICTED RIGHTS
The software and documentation are provided with RESTRICTED RIGHTS. Use, duplication, or disclosure by the Government is
subject to restrictions as set forth in subparagraph (c)(1)(ii) of the Rights in Technical Data and Computer Software clause at DFARS
252.227-7013 or subparagraph (c)(1) and (2) of the Commercial Computer Software-Restricted Rights at 48 CFR 52.227-19, as
applicable. Manufacturer is Sensormatic Electronics Corporation, 6600 Congress Avenue, Boca Raton, FL, 33487.
iv
Table of Contents
Installation and Configuration
Compatibility of Policy Manager Configurations. . . . . . . . . . . . . . . . . . . . . . . . . . . . . . 1
Compatibility Within the 4.3 Release. . . . . . . . . . . . . . . . . . . . . . . . . . . . . . . . . . . . 1
Minimum Training Prerequisites . . . . . . . . . . . . . . . . . . . . . . . . . . . . . . . . . . . . . . . 2
Network Requirements . . . . . . . . . . . . . . . . . . . . . . . . . . . . . . . . . . . . . . . . . . . . . . 3
Minimum Hardware Requirements . . . . . . . . . . . . . . . . . . . . . . . . . . . . . . . . . . . . . 3
Minimum Configuration . . . . . . . . . . . . . . . . . . . . . . . . . . . . . . . . . . . . . . . . . . . . . . . . 4
Upgrading Policy Manager from v1.3 to v4.3 . . . . . . . . . . . . . . . . . . . . . . . . . . . . . 7
Installation Instructions. . . . . . . . . . . . . . . . . . . . . . . . . . . . . . . . . . . . . . . . . . . . . . . . . 7
Accounts and Roles . . . . . . . . . . . . . . . . . . . . . . . . . . . . . . . . . . . . . . . . . . . . . . . . 8
Updating Policy Manager Server - Instrument account. . . . . . . . . . . . . . . . . . . . . . 8
Updating Policy manager server - Security/Site Administrators . . . . . . . . . . . . . . . 9
Installing Policy Manager Components on Intellex . . . . . . . . . . . . . . . . . . . . . . . . 19
Installing Policy Manager on a Windows Active Directory Domain . . . . . . . . . . . . 24
Uninstalling Policy Manager . . . . . . . . . . . . . . . . . . . . . . . . . . . . . . . . . . . . . . . . . 24
Adding Other Policy Manager Users and Roles . . . . . . . . . . . . . . . . . . . . . . . . . . 25
Manually Setting Remote Launch and Activation Permissions . . . . . . . . . . . . . . . 25
Configuration . . . . . . . . . . . . . . . . . . . . . . . . . . . . . . . . . . . . . . . . . . . . . . . . . . . 28
Explanation 28
Solution 28
Appendix A
Installing Policy Manager on Windows XP (SP2). . . . . . . . . . . . . . . . . . . . . . . . . . . . 37
Configuring Windows Firewall . . . . . . . . . . . . . . . . . . . . . . . . . . . . . . . . . . . . . . . . 37
Assign port range DCOM TCP/IP protocols . . . . . . . . . . . . . . . . . . . . . . . . . . . . . 39
Configure Group Policy to allow remote administration exception . . . . . . . . . . . . 40
Appendix B
Installing Policy Manager on a Windows 2003 Server . . . . . . . . . . . . . . . . . . . . . . . . 43
v
Table of Contents
vi
Installation and Configuration Guide
Installation and Configuration
Caution
You must read these instructions before installing Policy Manager.
It is essential that you adhere to the compatibility matrix below when configuring versions of Intellex, the
Policy Manager Admin Client, and the Policy Manager server.
Compatibility of Policy Manager Configurations
Policy Manager 4.3 is compatible with Intellex versions 3.2, 4.0, 4.1, 4.2, 4.3 and their service
packs.
Compatibility Within the 4.3 Release
There are two types of compatibility:
• Intellex compatibility with the client-side drivers
Intellex
Version
PM 1.1
Drivers
PM 1.1 SP1
Drivers
PM 1.2
Drivers
PM 1.3
Drivers
PM 4.3
Drivers
3.2
X
N/A
N/A
N/A
N/A
3.2 SP1
N/A
X
N/A
N/A
X
4.0
N/A
N/A
X
X
N/A
4.1
N/A
N/A
X
X
N/A
4.2
N/A
N/A
N/A
X
N/A
4.3
N/A
N/A
N/A
N/A
X
Only one version of PM drivers works with each version of Intellex. All other configurations
are invalid.
• PM server compatibility with PM client (PM Admin Client or PM Intellex drivers)
PM Server
PM Client
1.1
PM Client
1.1 SP1
PM Client
1.2
PM Client
1.3
PM Client
4.3
1.1
X
N/A
N/A
N/A
N/A
1.1 SP1
X
X
N/A
N/A
N/A
1.2
X
X
X
N/A
N/A
1.3
X
X
X
X
N/A
4.3
X
X
X
X
X
The server should always be the same, or a newer version of the client.
1
Installation and Configuration
Introduction
This document presents the following instructional aids to guide you through installation of the
Policy Manager for Intellex software:
• Minimum Configuration
• Site Worksheet
• Installation Instructions
First, complete the Site Worksheet on page 5 to keep track of vital information as you proceed with
the installation. Follow the Installation Instructions beginning on page 7 for a concise tour through
the process. Please note that depending on your configuration, the compatibility requirements
differ for different versions of Policy Manager and Intellex. The User Requirements that precede
the instructions cover the minimum skill set for an administrator installing Intellex Policy Manager.
The minimum configuration is a starting point for setting up Policy Manager. If, however, you wish
to use an alternate system setup, adjust the process where necessary to accommodate your
custom configuration.
Note
Before proceeding, anyone planning to install Policy Manager must participate in the official
training and certification program for Policy Manager for Intellex.
If you want to install other modules from American Dynamics, such as Archive Manager for
Intellex, refer to the specific installation documentation for those products.
Caution
If Archive Manager is already installed, and you want to install Policy Manager, you must first uninstall
Archive Manager. After installing Policy Manager, reinstall Archive Manager.
Minimum Training Prerequisites
We recommend that the user have Microsoft network administration training or equivalent
experience. The prerequisites include the following levels of expertise.
Ability to:
• Create and manage domain user and group accounts
• Differentiate between various types of network architectures
• Join XP Professional and Server 2003 computers to domains
General understanding of the:
• Different types of user accounts and administering security in a Windows 2003, Windows XP,
or Microsoft Vista environment
• Principal features of the Windows operating systems
• Basics of networking in a Windows 2003, Windows XP, or Microsoft Vista environment
• Common hardware components used in network communication
• Active Directory (if applicable to your network)
• WAN/LAN environments
2
Intellex® Policy Manager
Installation and Configuration
Preparing to Install Policy Manager
Before installing Policy Manager, you must set up the domain network and user accounts.
Network Requirements
Policy Manager is not network administration software and does not provide any tools for setting
up a network, adding computer names, instrument or user accounts. These areas are outside the
scope of this document. The following prerequisites are part of general network setup steps and
must be completed before installing Policy Manager:
• A network domain, using a Windows server 2003 domain controller must be in place.
• Both the computer server where you are installing Policy Manager, and all Intellex units, must
be connected to the domain where you plan to install Policy Manager.
• All users who will access video from Intellex and/or Network Client, including administrators
using Policy Manager Admin Client to administer Intellex security, must have user accounts
on the domain.
Caution
Do not install Policy Manager server software on the domain controller.
Do not install Policy Manager server or Admin Client software on Intellex.
When installing Network Client on the Policy Manager client machine, install Network Client first. This
brings up the login screen to access Intellex units under advanced security.
Minimum Hardware Requirements
In addition to your existing network, the following computers and instruments are required:
Item
Quantity
Explanation
Policy Manager Server
1
Reliable machine that must be running for Policy
Manager to execute.
Must be configured with XP Professional, Server
2003, or Windows Vista operating system.
Hardware Key
(provided)
1
USB
Workstation to run Policy
Manager Admin Client
1
Must be configured with XP Professional, Server
2003, or Windows Vista operating system.
Update server and workstation machines with the
latest Windows service pack unless you have
already done so.
Intellex Unit
1 or more
Note
Keep operating systems current with the latest security updates from Microsoft.
Use high-speed network interface cards in a private network.
Installation and Configuration Guide
3
Installation and Configuration
Windows Firewall
Policy Manager Server does not support the Windows Firewall on Windows Server 2003 (SP1). If
you want to install the server on this specific operating systems, you must disable the firewall.
Refer to Microsoft documentation for instructions. This restriction does not have an impact on
installation of the client software. Refer to the Appendix for instructions on how to install Policy
Manager on Windows XO (SP2).
Minimum Configuration
The minimum configuration for Policy Manager follows.
Policy Manager for
Intellex Admin-Client
software
Policy Manager for
Intellex server software
Corporate Network (LAN, WAN, VPN)
Intellex
Network
Client
Primary Domain Controller
4
Intellex® Policy Manager
Installation and Configuration
Site Worksheet
Complete this worksheet and use as a reference for all the computer names and user accounts
related to the Intellex DVMS network with Policy Manager.
Note
These accounts must either already exist, or you must add them to the domain before beginning
installation.
Network Domain Name:
• ___________________________
Computer Server Name:
Where Policy Manager will be installed
• ___________________________
Note
The computer must be on the domain before
installing Policy Manager
Username - Policy Manager Server User
Account:
Username Example: PMSRVACC
• ___________________________
Password – Policy Manager Server User Account:
You must complete this entry
• ___________________________
Username - User Account for all Intellex Units:
Username Example: PMINSTACC
• ___________________________
Password – User Account for all Intellex Units:
You must complete this entry
• ___________________________
Installation and Configuration Guide
5
Installation and Configuration
Site Worksheet Continued
Enter account names for users who fill the following three roles. Use these later when assigning
permissions to the roles.
Instruments
(Have permission to auto log on from instruments
to the network and connect to Policy Manager
server)
• ______________________________
• ______________________________
• ______________________________
• ______________________________
• ______________________________
Security Administrators:
(Can modify security settings)
• ______________________________
• ______________________________
• ______________________________
• ______________________________
• ______________________________
Site Administrators:
(Have full control over this Policy Manager site.
Refer to User’s Guide section on roles and
permissions.)
• ______________________________
• ______________________________
• ______________________________
• ______________________________
• ______________________________
Note
Remember that Site Administrators can also change security configurations.
6
Intellex® Policy Manager
Installation and Configuration
Upgrade Instructions
Upgrading Policy Manager from v1.3 to v4.3
When you install the Policy Manager server, the following message appears:
Do you want the installation to reset your existing SiteMap settings? This will also delete all
existing instrument settings and default security template.
• If you select Yes, your settings are deleted and you start a new install.
• If you select No, your existing settings are retained and your default security template is
converted to the Policy Manager 4.3 format.
• When an Intellex registers or connects to the Policy Manager server, it automatically sends the
correct format information based upon the version of Policy Manager drivers that are installed on
the Intellex.
Caution
Before starting the upgrade install of the Policy Manager server, make sure that it is not running using
Component Services and that all clients are closed.
Caution
If Archive Manager is already installed, and you want to install Policy Manager, you must first uninstall
Archive Manager. After installing Policy Manager, reinstall Archive Manager.
Installation Instructions
Policy Manager can only be installed on a networked computer registered on a network domain.
The Intellex systems are also required to be registered on the same network domain and all users
of Policy Manager and those managed by Policy Manager will need to be registered domain users.
If you are unsure of any of the above information please contact your network administrator or
your IT department to confirm that the individuals intending to use Policy Manager and the system
on which you intend to install Policy Manager meets these requirements.
Before starting to install Policy Manager, it is important to identify those users that you wish to act
as Site Administrators and Security Administrators. During installation you will need to select these
users and assign them the appropriate roles. These users will need to be registered users on the
network domain.
You will need to contact your IT department or network administrator to add two new user accounts
to the network domain that Policy Manager will be connected to. These accounts are:
• An account for the Policy Manager Server itself – this can be set up with a relevant user
name such as pmsrvacc. Ensure that you are given the password since you will need to enter
both details during the installation procedure.
• An instrument account – this is used by all Intellex systems to log on to the network domain.
Again, ensure that you are given the password since you will need to enter both details
during the installation procedure. Once the Intellexes are set up after the installation of Policy
Manager they will automatically log on to the network and enter advanced security mode.
Installation and Configuration Guide
7
Installation and Configuration
To ensure that these accounts are active and the passwords are correct prior to beginning the
installation procedure, simply log on to the network domain using the user name and password for
each account.
A typical installation would use a networked PC set aside for the Policy Manager application. Refer
to Appendix A for information on installing Policy Manager on a Windows Server 2003 system.
Accounts and Roles
• The PM Server account is the account on which the PM service runs.
• The Instrument account is the auto-domain login account added during the PM Server
installation and later referenced to during the PM Intellex Components installation on the
Intellex.
• The Security Administrator is a user or group of users who can modify Intellex security
settings within the Admin Client but not administer the entire PM site. The user logs into the PM
Server with Admin Client also installed or to the remote AdminClient computer using their
domain login credentials and then open PM AdminClient software and manage user and group
permission. The Security Administrator could also be a user, or user in a group, added within the
AdminClient and allowed or denied access to an Intellex locally or remotely. The user would then
log into the Intellex at the Advanced Security login screen using domain login credentials, or at
the Network Client Advanced Security login screen.
• The Site Administrator is a user or group of users who can modify the entire PM AdminClient
site. The user logs in to the PM Server with AdminClient also installed or to the remote
AdminClient computer using their domain login credentials and then opens PM AdminClient
software and manages all settings. The Site Administrator could also be a user, or user in a
group, added within the AdminClient and allowed or denied access to an Intellex locally or
remotely. The user would then log in to the Intellex at the Advanced Security login screen using
domain login credentials, or at the Network Client Advanced Security login screen.
Updating Policy Manager Server - Instrument account
Those users that were granted ‘Instruments’ roles will need to have their COM Security properties
updated on the Policy Manager Server machine. In order to perform the following procedure, you
must have local administrative privileges.
1 From the Run prompt, type ‘dcomcnfg’.
2 Select Open.
3 Double click Computers, in the left hand window, under Component Service.
4 Right click on My Computer.
5 Select Properties.
6 Select COM Security in the dialog box which opens.
7 The COM Security dialog box will open. Select Edit Limits in the Access Permissions folder.
8 Add those users who were assigned ‘Instruments’ roles, during the ‘Populate Application Roles’
stage of Policy Manager installation, to the Group of User Names list.
9 Allow all added user Local as well as Remote access.
10 Click OK.
11 Select the Launch and Activation Permission folder.
12 Select Edit Limits.
8
Intellex® Policy Manager
Installation and Configuration
13 Add those users added in step 8.
14 Allow those added users Local and Remote launch. Also allow them Local and Remote
activation.
15 Select OK.
16 Select Apply in the My Computer Properties COM Security properties dialog box.
17 Select OK.
18 Close the Component Services window.
Restart your machine.
Updating Policy manager server - Security/Site Administrators
Security and Site Adminstrators maut be assigned during the installation of Policy Manager
Server, in order that they can fulfill their role’s responsibilities. You must have local administrative
privileges to perform the following procedure.
1 Access the Control Pannel window.
2 Select User Accounts.
3 Select Manage User Accounts.
4 Select the Add function.
5 The User Accounts Wizard will open. Add the name and domain of the account that you used
to log in.
6 Grant Standard User access.
7 Repeat steps 3, 4 and 5 for all users to have Security or Site Administrator privileges.
8 Click OK when complete.
Installation and Configuration Guide
9
Installation and Configuration
Installing Policy Manager on a Networked PC
You can install Policy Manager on a PC running Windows XP Pro or Microsoft Vista.
Caution
Do not connect the hardware key until the end of the server installation procedure.
1 Insert the Policy Manager CD. Setup.exe will run and the Policy Manager - InstallShield Wizard
will display:
2 Click Next to begin the installation. The License Agreement dialog displays.
3 Review and accept the license agreement and click Next. The Choose Destination dialog
displays:
10
Intellex® Policy Manager
Installation and Configuration
4 Confirm that the install destination folder is correct. Click on the Browse... button to select
another.
5 Click Next. The Select Features dialog displays:
Caution
DO NOT select
Policy Manager
Intellex Components.
6 Select Policy Manager Server and Policy Manager AdminClient and click Next.
Note
Policy Manager AdminClient is recommended as it provides an interface with which you can
administer Policy Manager using the system on which it is installed.
Do not select Policy Manager Intellex Components.
7 The Ready to Install dialog displays. Click Install. The Set Application Identity dialog displays:
8 Enter the Username, Password, and Domain Name for the Policy Manager Server user
account.
Installation and Configuration Guide 11
Installation and Configuration
9 Click Next. The Populate Application Roles dialog displays:
This screen
defaults to the
Instruments
option. Click on
the other
application roles
to display current
assignees for that
role.
Note
This screen allows you to assign application roles to user accounts that are already registered
on your network. The screen defaults to the Instruments option and the Policy Manager
account will already be listed as having the instrument role.
10 Click on the Add Member... button. The Select Users or Groups dialog displays:
Note
Different versions of the operating system may have different versions of this dialog. Refer to
your Microsoft documentation for information about this dialog.
12
Intellex® Policy Manager
Installation and Configuration
11 To assign the Instrument role:
a
Select a user and click on the Add button.
b Repeat as appropriate (you can assign the Instrument role to more than one user).
c
Click OK.
12 The Populate Application Roles dialog redisplays:
The users you selected in step 12 will display in the Members Assigned to Instruments section.
13 Select the Security Administrators option (in the Application Roles section). The following
screen displays:
14 Click on the Add Member... button. The Select Users or Groups dialog displays.
15 To assign the Security Administrator role:
a
Select a user and click on the Add button.
b Repeat as appropriate (you can assign the Security Administrator role to more than one
user).
c
Click OK.
Installation and Configuration Guide 13
Installation and Configuration
16 The Populate Application Roles dialog redisplays. The users you selected in step 15 will
display in the Members Assigned to Security Administrators section.
17 Select the Security Administrators option (in the left-hand side of the screen). The Populate
Application Roles screen displays:
18 Click on the Add Member... button. The Select Users or Groups dialog displays.
19 To assign the Site Administrator role:
a
Select a user and click on the Add button.
b Repeat as appropriate (you can assign the Site Administrator role to more than one user).
c
Click OK.
20 The Populate Application Roles dialog redisplays. The users you selected in step 19 will
display in the Members Assigned to Site Administrators section.
21 Click OK. The installation will continue and the following dialog will appear:
22 Ensure that you do not have the hardware key attached to the system and click OK.
14
Intellex® Policy Manager
Installation and Configuration
23 The installation will continue and the following screen will eventually appear:
24 In the Username field, enter the Policy Manager Server account that you created in step 8. The
Domain Name text box should be filled in for you.
25 Click Next. The following dialog displays:
26 Select Yes and click Finish.
27 Your computer will restart and eventually present you with a log on dialog. Log on using the
account with which you installed the software.
Note
The installation does not finish carrying out operations in the background until the computer
has restarted and you have logged on.
Installation and Configuration Guide 15
Installation and Configuration
28 Insert the hardware key into a USB socket and double-click on the AdminClient Management
Console icon that has been placed on your desktop. The Archive Manager Console displays:
Note
If you do not have Site Administrator or Security Administrator roles, the following dialog
displays instead of the Archive Manager Console:
If this happens, click OK. Log off and log on again using an account with Security
Administrator or Site Administrator roles.
29 Click on the + sign beside Intellex Management Suite to expand the list. Click on the + sign
beside License Manager and select Policy Manager. The following screen will display:
16
Intellex® Policy Manager
Installation and Configuration
30 The hardware key serial number should be recognized and the License Status box should be
auto-populated with the terms of your license agreement. If the License Status box does not
auto-populate or if it suggests that the license Product ID is invalid, click on the Update button.
The following screen displays:
31 Enter your Product ID and click Update. Installation is now complete.
Installation and Configuration Guide 17
Installation and Configuration
Installing Policy Manager AdminClient on a Local PC
In the previous section, you may have chosen to install the Policy Manger AdminClient on a
networked PC. You can also install AdminClient on a local PC. Policy Manager AdminClient is
recommended as it provides an interface with which you can administer Policy Manager using the
system on which it is installed.
By default, Policy Manager allows multiple concurrent administration sessions. For more
information, refer to Working with Policies through Global Site Policies on pages 7-8 in the Policy
Manager User’s Guide.
1 Insert the Policy Manager CD. Setup.exe will run and the Policy Manager - InstallShield Wizard
will display.
2 Click Next to begin the installation. The License Agreement dialog displays.
3 Review and accept the license agreement and click Next. The Choose Destination dialog
displays:
4 Confirm that the install destination folder is correct. Click on the Browse... button to select
another.
18
Intellex® Policy Manager
Installation and Configuration
5 Click Next. The Select Features dialog displays:
Caution
DO NOT select
Policy Manager
Intellex Components.
6 Select Policy Manager AdminClient and click Next.
Note
Do not select Policy Manager Intellex Components.
7 On the dialog that displays, click Install.
8 At the Locate Server screen, enter or browse for the computer name of the Policy Manager
server that you previously installed. Click Next.
9 At the Set DCOM Access permission screen, enter the user name for the Policy Manager
Server user account (refer to the Site Worksheet), as well as the domain name. Click Next.
10 At the prompt to restart, select Yes and click Finish.
11 Log on as a site administrator.
Installing Policy Manager Components on Intellex
Before installing:
• Ensure that the Intellex is on the same network domain as your Policy Manager server.
• Ensure that the user account you use to carry out the installation has administrative rights on
each Intellex you wish to install the components on.
• Make sure you exit Intellex to the Windows desktop. Refer to the Intellex User’s Guide for
more information.
Installation and Configuration Guide 19
Installation and Configuration
1 Insert the Policy Manager CD. Setup.exe will run and the Policy Manager - InstallShield Wizard
will display:
2 Click Next to begin the installation. The License Agreement dialog displays.
3 Review and accept the license agreement and click Next.
4 Click Next. The Select Features dialog displays:
Caution
DO NOT select
Policy Manager
Server or Policy
manager
AdminClient.
5 Select Policy Manager Intellex Components and click Next.
Note
Do not select Policy Manager Server or Policy Manager AdminClient.
20
Intellex® Policy Manager
Installation and Configuration
6 On the dialog that displays, select Install. The following screen displays:
Installation and Configuration Guide 21
Installation and Configuration
7 Enter your Policy Manager server name.
Note
To locate the server on the network, click on the Browse... button. The following dialog will
display:
Select Entire Network >
Microsoft Windows Network >
“Your Domain" (example Ntlxvideo) >
“PM Server Name” (example: Pmserver)
Navigate to your server and click OK. The server you selected displays in the Server Name
field.
8 Click Next. The following screen displays:
22
Intellex® Policy Manager
Installation and Configuration
9 Enter the instruments role account name, password, and domain specified on your Site
Worksheet to be used for Automatic Domain Logon.
Note
These details relate to the instrument account set up by your network administrator or IT
department.
10 Click Next. The following dialog displays:
11 Click Yes.The following screen displays:
12 Enter your Policy Manager Server account username and domain name. Click Next.
13 The Wizard is now complete. Click Yes on the dialog that appears to restart your computer.
Installation and Configuration Guide 23
Installation and Configuration
14 Intellex’s advanced security logon screen displays:
15 Enter valid logon details and click OK.
Note
Select the Remember User Name/Domain radio button if you want Intellex to remember your
logon details.
16 Installation is now complete. You should be able to see this Intellex in the Policy Manager list of
secured instruments.
Note
If this is the first time you are logging onto Intellex, you may receive a message box asking you
to set up storage.
Installing Policy Manager on a Windows Active Directory Domain
If you are installing Policy Manager in an active directory domain and encounter any problems,
refer to the Troubleshooting Guide/FAQ document that is included with your Policy Manager
software.
Uninstalling Policy Manager
1 Go to Start, then go to the Policy Manager folder.
2 To uninstall any PM software, click the Uninstall PolicyManager shortcut.
24
Intellex® Policy Manager
Installation and Configuration
Adding Other Policy Manager Users and Roles
Note
If you add new users later, you must manually set the remote launch and activation permissions
for those users, and then re-export the application. To set remote launch and activation
permissions manually, see Manually Setting Remote Launch and Activation Permissions on
page 25.
1 To start Component Services MMC, go to Settings > Control Panel > Administrative Tools >
Component Services.
Note
In Windows XP, from Control Panel, you must be in classic mode to view the Administrative
Tools.
2 Expand Component Services > Computers > My Computer > Com+ Applications >
PolicyManagerRemoteServices > Roles. The following appear:
• Instruments
• Security Administrators
• Site Administrators
3 Expand Instruments, open Users, right-click Users, select New, and then select User.
4 Assign the PolicyManager server user account to the Instruments role. If installing Policy
Manager with Archive Manager, assign the ArchiveManager server user account to the
Instruments role as well.
Note
Make sure to set the location to the domain.
5 Populate the Instruments role by adding Intellex Instrument accounts. Refer to the Site
Worksheet for account information.
6 Expand Security Administrators, open Users, right-click Users, select New, then select User.
7 Populate the Security Administrators role. Refer to the Site Worksheet for account information.
8 Expand Site Administrators, open Users, right-click Users, select New, then select User.
9 Populate the Site Administrators role. Refer to the Site Worksheet for account information.
10 Right-click PolicyManagerRemoteServices, then select shut down.
Note
You may change role assignments at any time, with the exception of the server role. If you do
change any assignments, you must restart the server.
Manually Setting Remote Launch and Activation Permissions
Note
If after installation you add individual users to a role on a server running WinXP SP2 or Windows
Server 2003 SP1, you must reconfigure the launch and activation permissions used by the
operating system to control access to the server application. You must also manually export the
server application proxy (see Preparing a client proxy export on page 28 for more information).
You will find the launch and activation settings in the properties dialog of the local computer where
the server application exists.
Installation and Configuration Guide 25
Installation and Configuration
1 Open Component Services and navigate to the local computer.
2 Right-click the computer icon and select Properties. The properties for the local computer
appear.
26
Intellex® Policy Manager
Installation and Configuration
3 Select the COM Security tab and click Edit Limits for Launch and Activation Permissions. The
Access Control Editor appears.
4 Click Add to display the object picker to select new users and/or groups. For each new user or
group you add, be sure that full access is granted. To do so, select the Allow check box for all of
the following permissions:
• Local Launch
• Remote Launch
• Local Activation
• Remote Activation
When finished, click OK to exit and save the changes.
Installation and Configuration Guide 27
Installation and Configuration
Exporting the Proxy after New Users are Added on Windows XP Service
Pack 2 or Windows Server 2003 SP1
This section describes the required steps to run the PolicyManager AdminClient software on
workstations using Windows XP with SP2 installed.
Configuration
Explanation
Service Pack 2 dramatically alters the security environment of Windows XP. A number of
enhancements have resulted in a superior level of security for the user. Unfortunately, these
changes can affect both software already installed or new software. AdminClient uses COM+
and DCOM services to connect to and receive messages from the server process and these
two areas in particular are affected by SP2. There are two aspects to this problem:
• The client must be able to open a connection to the server process. Here the changes to
COM+ security are checking for machine-wide Launch and Activation permissions for the
current user. It is this check that is failing.
• The server intermittently calls back to the client with information on the current state of the
site. The new Windows Firewall disallows that communication if it is not properly configured.
Solution
Preparing a client proxy export
This part of the process occurs on the server machine. To prepare the client proxy export installer:
1 Create a client installer script from the server.
28
Intellex® Policy Manager
Installation and Configuration
a
From Component Services, right-click the PolicyManagerRemoteServices application and
select Export…
b The welcome screen for the Component Services export dialog appears. Click Next to enter
the main dialog. Choose Export as Application proxy. Be sure to export to a shared network
drive that is accessible from the client machine where you will install the AdminClient
software. Assign the new installer a name. Click Next and then Finish.
You have completed the steps to create a client installer script. An AdminClientProxy.MSI
and a Windows Installer Package file are created in the destination folder.
Installation and Configuration Guide 29
Installation and Configuration
Installing a client proxy
Note
If you have not done a normal installation of the AdminClient software on the target client machine,
install it now. The following steps are based on your having a valid installation for the client
software on the target machine before you begin.
To install the client proxy on the target XP SP2 workstation:
1 Navigate to C:\ Control Panel\Administrative Tools and open the Component Services
management console.
2 Open the COM+ Applications folder and delete the existing PolicyManagerRemoteServices
application.
30
Intellex® Policy Manager
Installation and Configuration
3 Right-click COM+ Applications and select New > Application.
The new application dialog appears.
Installation and Configuration Guide 31
Installation and Configuration
4 Click Install pre-built application(s). In the dialog box, navigate to the network share folder
where you saved the exported application from step 1b above.
5 Select the proxy .MSI file and click Open. The Select Application Files dialog appears.
32
Intellex® Policy Manager
Installation and Configuration
6 Click Next to proceed to the Application Installation Options dialog.
7 Click Next and then click Finish.
Installation and Configuration Guide 33
Installation and Configuration
Windows Firewall Settings on Client
To allow the server to call back to the client, the Windows Firewall must allow the port used by
DCOM to pass. To enable the DCOM port:
1 Navigate to C:\Control Panel and open the Security Center.
34
Intellex® Policy Manager
Installation and Configuration
2 Click the Windows Firewall entry and the firewall settings dialog appears.
3 Select the Exceptions tab, then click Add Port…. The Add a Port dialog appears.
Installation and Configuration Guide 35
Installation and Configuration
4 Fill in the record as shown and then click change scope. The Change Scope dialog appears.
5 Select My network (subnet) only and click OK to return to the Add a Port dialog.
6 Click OK to add the port. Exceptions contains an entry for DCOM.
Click OK to complete the process. Your system is ready to run the PolicyManager AdminClient.
36
Intellex® Policy Manager
Appendix A
Installing Policy Manager on Windows XP (SP2)
To allow the server to receive call back from the Intellex to DCOM and RPC service running on PM
server, Windows operating system must configured to restrict DOCM/RPC to use certain range of
ports (1024-1034) and Windows Firewall must allow each one of the port to pass.
Note
You must have (local) administrative privilege to make following changes on computer running PM
server.
Configuring Windows Firewall
Perform the following steps:
1 In the Control Panel, double-click Windows Firewall
2 In the Windows Firewall dialog box, select On (recommended) and make sure Don't allow
exceptions is not checked.
3 In the Windows Firewall dialog box, click the Exception tab and then click Add Port.
4 In the Add a Port dialog box, type P1024 or another descriptive name in the Name box, type
1024 in the Port Number box and then select TCP.
5 To close the Add a Port dialog box, click OK
6 For added security, you can optionally click Change Scope to modify the default scope to My
network (subnet only).
7 Repeat steps 3 and 4 for port number 1025 to 1034.
8 Make sure File and Printer Sharing Exception is allowed to pass port 139, 445, 137 and 138.
37
Appendix A
38
Intellex® Policy Manager
Appendix A
Assign port range DCOM TCP/IP protocols
Perform the following steps to assign the Port Range protocols:
1 In the Control Panel, double-click Administrative Tools.
2 In the Administrative Tools, double-click Component Services.
3 In the left-side panel under Console Root, double-click Component Services.
4 In the left-side panel under Component Service, double-click Computers.
5 Right-click on My Computer, and click the Properties menu item.
6 In the My Computer Properties dialog box, click the Default Protocols tab and then double-click
Connection-oriented TCP/IP.
7 In the Properties for COM Internet Service dialog box, click the Add button.
8 In the Add Port Range dialog box, type 1024-1034 in the Port range box.
9 To close the Add Port Range dialog box, click OK.
Installation and Configuration Guide 39
Appendix A
10 To close the Properties for COM Internet Services dialog box, click OK.
11 In the My Computer Properties dialog box, click Apply and then close the dialog box by clicking
OK.
12 Close the Component Services window.
Configure Group Policy to allow remote administration exception
1 In the Start menu, click Run
2 In the Run dialog box, type gpedit.msc in the open box and then click OK
3 In the Group Policy dialog box, navigate to the Local Computer Policy > Computer
Configuration > Administrative Templates > Network > Network Connections > Windows
Firewall > Domain Profile
40
Intellex® Policy Manager
Appendix A
4 In the right side panel, double-click Windows Firewall: Allow remote administration exception
5 In the Windows Firewall: Allow remote… dialog box, select Enabled and type localsubnet in the
Allow unsolicited incoming message from and then click OK
Installation and Configuration Guide 41
Appendix A
42
Intellex® Policy Manager
Appendix B
Installing Policy Manager on a Windows 2003 Server
To install Policy Manager on a Windows 2003 server, perform the following steps before
proceeding with installation.
1 In Control Panel > Administrative Tools, open the Configure Your Server Wizard. The Configure
Your Server Wizard dialog appears.
43
Appendix B
2 Click Next to display a short introductory screen.
3 Click Next again. A progress dialog appears while the wizard gathers information about the
current settings.
44
Intellex® Policy Manager
Appendix B
After the information has been gathered, it displays and you can make changes.
4 Select the entry for Application server (IIS, ASP.NET). If, as shown above, it is not currently
installed (configured), you must install it.
Installation and Configuration Guide 45
Appendix B
5 Select the Application server (IIS, ASP.NET) entry and click Next. The Application Server
Options page appears.
46
Intellex® Policy Manager
Appendix B
6 Policy Manager requires enabling the ASP.NET sub-system. Select that item and click Next.
The Summary of Selections page displays.
Note
You may need to insert the Windows 2003 server.
7 To finish the installation, click Next and follow the instructions.
Installation and Configuration Guide 47
Appendix B
8 If the installation completes successfully, the completion page appears.
For further information about configuring server Roles, consult the Windows 2003 server
documentation.
48
Intellex® Policy Manager