1
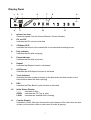
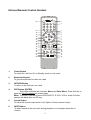
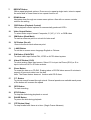
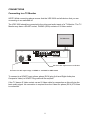
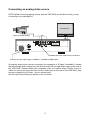
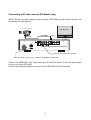
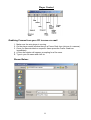
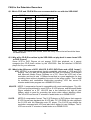
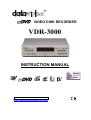
VIDEO DISK RECORDER
VDR-3000
CO
MP
AT
IB
LE
INSTRUCTION MANUAL
http://www.datavideo-tek.com
CONTENTS
Introduction
Packing list --------------------------------------------------------------------------Front & Rear Panel ---------------------------------------------------------------Display Panel ----------------------------------------------------------------------Remote Control Handset --------------------------------------------------------
3
4
7
8
Connections
Connection a TV/Monitor --------------------------------------------------------Connecting an analog video source ------------------------------------------Connecting a DV video source (DV Model only) --------------------------Connecting a digital still camera ----------------------------------------------Connecting to a Project TV /monitor with component video------------Connecting a digital audio CD player -----------------------------------------
11
12
13
14
15
16
Operation
Switching on ------------------------------------------------------------------------ 17
Playing a disk ----------------------------------------------------------------------- 17
Recording a disk ------------------------------------------------------------------- 18
PC Playback
Playing CD’s in your PC --------------------------------------------------------- 20
Grabbing Frames from your CD to save or e-mail ------------------------ 22
Advanced Operation
Color correcting the video source before recording ---------------------- 23
Frequently Asked Questions ------------------------------------------------
24
Specifications --------------------------------------------------------------------
32
Contact Information ------------------------------------------------------------
33
2
PACKING LIST
VDR-3000 is supplied with the following accessories:
Main Power Cord
S-Video Cable
3 Phono (RCA) to 3 Phono (RCA) Audio/Video Cable
IEEE1394 “Firewire” Cable (DV Model only)
3
VDR-3 00 0
REC
ERASE
F. F
PAU SE
STOP
PLAY
2 x “AAA” Batteries for Handset
ST P
STEP
I/ P
I/ P
REW
VI DEO
AUD IO
BM
RECALL
BOOK MARK
RC
LAN G
P/ N
TS
CL
LANG
O/ P
O SD
TI ME S ET PAL/ N TSC
TM
PL
OW
SL
CLEAR
C
COM P.
VI DEO
PB
PLAY LI ST TI ME MODE D I SP LAY
ENT
RE
TU
A/ B AT
E
REP
0
9
+1 0
6
5
7
2
1
MUTE
3
RN
8
CE
AT
4
RE
PE
POWER
Infrared Remote Control Handset
CD-RW Rewritable CD.
Rear Panel
1
3
4
I N PUT
SOURCE
I NP UT
COMP ONEN T VI DEO OUTP UT
Y/ G
P B/ B
P R/ R
OUTPU T
AC I N PUT
DIGITAL INPUT RI GHT
LEFT
AUDI O
S
VI DEO
VI DEO
2 30 VAC
AC VOLTS
2
7
6
5
1. Main Power Cord connecting socket
To connect to the main power supply
2. AC Main voltage selector
Sets the voltage input to 115 VAC or 230VAC. Note: This setting does not need to be
changed under normal conditions. Do not adjust this setting without consulting your
dealer or a qualified electrician.
3. Input Source Selector Switch (DV Model only)
To select DV or Analog Video Input
4. Audio and Video Inputs
To connect left and right audio and composite or S-Video signals from a
camcorder/VCR etc.
5. Component Video Output
Component Y.U.V. or R.G.B. video signal output for project or big screen TV/Monitor.
Note: The component video output cannot be used with the S(Y/C) output and the
composite output at the same time. Outputing to both outputs will lower the video
output level.
6. Audio and Video Outputs
To connect to a TV or Monitor
4
7. Digital Audio Input
To connect a audio digital signal from a CD player to duplicate an audio CD without
sound quality loss. Please note: The Audio Digital Duplicate is only available with Audio
CD-R due to copyright protection.
Front Panel
8
9
10
17
18
19 22 20 24 21
R
Video Di sk Recorder
CD DVD
/ S-VCD/ VCD/ CD VDR-3000
MENU
/
ENTER
POWER
EJECT
REC
11
N EX T
ERA SE
12 13 14
F. F.
DV
FI NALI ZE
VOL. A
P REV IO US
REW
MI C. A
VOL. B
MI C. B
PBC
15
16
23
25
26
27
28
8. Power Button
To switch the unit from On to Standby mode or vice versa.
9. Menu/Enter Button
This button contents two functions: Menu and Enter
Menu: Press this key to open the Color Processor on screen menu for adjustment
Enter: To select a recording format CDDVD, DVD-PHOTO, S-VCD, HQ-VCD, VCD or
Audio CD after inserted the blank disc into CD tray
10. Finalize Button
To finalize the disc. Until a disc is finalized it can only be played back in the VDR 3000.
A finalized disc can be played back in other suitable devices such as Audio CD, VCD,
S-VCD, DVD player or CD-ROM in PC.
11. IEEE 1394 DV “iLink” Socket (DV Model only)
To input Digital Video/Audio from DV Camcorders etc.
12. Previous Button
To skip back to the previous track during playback or to navigate up the on screen
menu options
13. Next Button
To skip forward to the next track during playback or to navigate down the on screen
menu options
14. Erase Button
To erase the data on a CD-RW disc. Erasing takes a CD-RW disc takes around 2
minutes irrespective of how much data is on the disc. Note: The Erase feature does not
function with CD-R discs.
5
15. PBC Button
Playback control button for commercially produced VCD’s
16. CD Tray
To load discs into the unit
17. Display Panel (see separate illustration)
Shows current status of unit.
18. Eject Button
To Open the CD Tray for loading or removing CD
19. REC Button
To start recording
20. REW Button
To picture search backward through a track. Several speeds are available each press
of the button will increase the speed.
21. F.F. Button
To picture search forward through a track. Several speeds are available each press of
the button will increase the speed.
22. STOP Button
To stop the disk during playback or record
23. PAUSE Button
To pause the disk during playback
24. PLAY Button
To start the disk playing
25. Microphone Volume Control (Left/Mono)
To control the volume of the Left Channel Microphone. Also controls the volume of
mono microphone track.
26. Microphone Input Jack (Left/Mono)
Input Jack for Left Channel Microphone. Also for single mono microphone.
27. Microphone Volume Control (Right)
To control the volume of the Right Channel Microphone.
28. Microphone Input Jack (Right)
Input Jack for Right Channel Microphone.
6
Display Panel
1
2
3
CD
6
7
REPEAT 1
8
9
A - B
TRK
PBC
Super VC D
4
5
10
11
1.
Infrared receiver
Receives signals from the Infrared Remote Control Handset
2.
DV on LED
Indicates the DV source is selected
3.
CD/Super/VCD
Indicates the format of the loaded disk or the selected recording format
4.
Play Indicator
Indicates that the disk is playing
5.
Pause Indicator
Indicates that the disk is paused
6.
Repeat
Indicates that Repeat function is activated
7.
A-B Repeat
Indicates that A-B Repeat function is activated
8.
Track Indicator
Indicates the total number of tracks on the disk when the disk is static or the
track number when the disk is playing
9.
PBC
Indicates that Play Back Control function is activated
10.
Initial Status Display
---Indicates no disk
OPEN
Indicates the CD Tray is open
LOAD
Indicates the inserted disk is loading
11.
Counter Display
Indicates in Hours: Minutes: Seconds the total duration of the disk when the disc
is static or the position within a track when the disk is playing.
7
Infrared Remote Control Handset
36
MUTE
POWER
2
1
2
3
4
5
6
7
8
9
0
+1 0
CE
35
RE
TU
B
A/ AT
PE
RE
34
3
4
RN
5
33
28
27
RE
PE
AT
ENT
OW
SL
32
31
30
29
PB
PLAY LI ST TI ME MODE DI SPLAY
PL
TM
CLEAR
26
25
24
23
22
21
20
1
OSD
TI ME SET PAL/ NTSC
CL
TS
P/ N
AUDI O
VI DEO
I/ P
I/ P
C
VI DEO
BOOK MARK
O/ P
BM
LANG
RECALL
LAN G
RC
REW
P LAY
F. F
ST EP
PAUSE
STOP
ERASE
REC
ST P
VDR-30 00
6
7
8
9
10
11
12
13
14
15
16
17
18
19
1.
Power Button
To switch the unit from On to Standby mode or vice versa.
2.
Numerical Keypad
To give direct access to tracks on a disk
3.
RETURN Button
To return to the first track on a disk
4.
ENT Button (ENTER)
This button contents two functions: Menu and Enter Menu: Press this key to
open the Color Processor on screen menu.
Enter: To select a recording format DVD-PHOTO, S-VCD, VCD or Audio CD after
inserted the blank disc into CD tray
5.
Sound Output
To select the sound output mode: Left, Right or Stereo channel output
6.
NEXT Button
To skip forward to the next track during playback or to navigate down the on
Screen
8
7.
REPEAT Button
Offers repeat playback options. Press once to repeat a single track, twice to repeat
the entire disk or three times to turn repeat function off.
8.
DOWN Arrow
Navigates down through on screen menu options. Also with on screen controls
reduces the setting
9.
PBC Button (Playback Control)
Offers playback control options for commercially produced VCD’s
10.
Video Output Button
To select video output format: Composite, S (Y/C), Y.U.V. or RGB video
11.
BM Button (Book Mark)
To mark a reference point on a track for later recall
12.
RC Button (Recall)
Goes to the book mark reference point
13.
LANG Button
To set the on screen menu language English or Chinese
14.
P/N Button (PAL/NTSC)
To select video input format PAL, NTSC or AUTO detect system
15.
Video I/P Button (CV/S)
To select analog video input source. Select CV to input via Phono (RCA) or S to
input via the mini 4 Pin S-Video sockets.
16.
Erase Button
To erase the data on a CD-RW. Erasing takes a CD-RW takes around 2 minutes in
respect of how much data is on the disk
Note: The Erase feature does not function with CD-R discs.
17.
F.F. Button
To picture search forward through a track. Several speeds are available each press
of the button will increase the speed
18.
REC Button
To start recording
19.
STOP Button
To stop the disk during playback or record
20.
PAUSE Button
To pause the disk during playback
21.
STP Button (Step)
To step forward one frame at a time. (Single Frame Advance)
9
22.
PLAY Button
To start the disk playing
23.
REW Button
To picture search backwards through a track. Several speeds are available each
press of the button will increase the speed
24.
Audio Input Button
To select the digital audio or analog audio input source
25.
TS Button (Time Set)
To jump to any point on a disk enter the time in minutes and seconds
26.
CL Button (Clear)
Clears entries from the user programmable Play List
27.
PL Button (Play List)
Calls up a user programmable Play List of up to 12 tracks
28.
TM Button (Time Mode)
To change the counter display from position in the track to time remaining
29.
OSD Button
Turns on “On Screen Display”. During playback Track number, Counter, Disk format
and Audio format can be displayed on the screen
30.
RESUME Button
Will resume playback from the same point in a track if playback has been stopped
31.
SLOW Button
To select slow motion playback. Three speeds are available press once for ½
speed, twice for ¼ speed and three times for 1/8 speed
32.
PREV Button (Previous)
To skip back to the previous track during playback or to navigate up the on screen
menu options
33.
EJECT Button
To open and close the CD tray
34.
UP Arrow
Navigates up through on screen menu options. Also with on screen controls
increases the setting
35.
A/B Repeat Button
To mark start and stop points within a track for repeat play
36.
Mute button
To mute the volume during playback
10
CONNECTIONS
Connecting to a TV Monitor
NOTE: While connecting please ensure that the VDR 3000 and all devices that you are
connecting to are switched off.
The VDR 3000 should be connected to the video and audio inputs of a TV Monitor. The TV
Monitor may have a SCART socket, PHONO (RCA) sockets or S-Video socket.
TV/ Moni tor
R L
S
Sel ects the input source to Vi deo
Sel ects the AC i nput range 1 1 5 VAC or 2 3 0 VAC for VDR-3 0 0 0
To connect to a SCART input a three phono (RCA) plug (Left and Right Audio plus
Composite Video) to SCART Plug cable will be required.
If the TV has an S-Video socket use an S-Video cable for connection as this will give the
best quality signal. No connection is required from the Video Out phono (RCA) if S-Video
is connected.
11
Connecting an analog video source
NOTE: While connecting please ensure that the VDR 3000 and all devices that you are
connecting to are switched off.
TV/ Moni tor
Source Audi o/ Vi deo
R L
S
Sel ects the input source to Vi deo
Sel ects the AC i nput range 1 1 5 VAC or 2 3 0 VAC for VDR-3 0 0 0
An analog video device can be connected via composite or S-Video if available. Connect
the left and right audio output from the device to the left and right audio input on the rear of
the VDR 3000. Connect either the composite video out (yellow phono (RCA)) or the SVideo out (mini 4 pin) from the device to the video input on the rear of the VDR 3000. Only
connect composite or S-Video – do not connect both.
Set the Input Source Selector Switch to the V position.
12
Connecting a DV video source (DV Model only)
NOTE: During connection please ensure that the VDR 3000 and all devices that you are
connecting are switched off.
Source Player
TV/ M oni t or
DV IN/OU T
DV I n
DV Out
R L
S
Sel ect s the i nput source t o DV
Sel ect s the AC i nput range 1 1 5 VAC or 2 3 0 VAC for VDR-3 0 0 0
Connect the IEEE1394 “iLink” cable from your DV/mini DV device to the DV Input socket
on the front of the VDR 3000.
Set the Input Selector Switch on the rear of the VDR 3000 to the DV position
13
Connecting a Digital Still Camera
NOTE: While connecting please ensure that the VDR 3000 and all devices that you are
connecting to are switched off.
Di git al Photo Camera
Vi deo Out
Audi o CD Pl ayer
TV/ M oni tor
Audi o Out
R L
S
Sel ects the i nput source t o Vi deo
Sel ect s t he AC i nput range 1 1 5 VAC or 2 3 0 VAC for VDR- 3 0 0 0
Digital still cameras can be connected to the Video Input on the rear of the VDR 3000.
Connect the Video Out from the Digital Still Camera to the Video In Phono (RCA) socket
on the VDR 3000. Set the Input Source Selector Switch to the V position.
Note: 1. To achieve a high quality video photo CD, please select the “DVD-PHOTO” video
format after you have loaded a blank disc into the VDR 3000.
Do not record more than 98 tracks and 37 minutes on a disk in the
DVD-PHOTO format.
14
Connecting to a Projection TV / Monitor with Component Video
NOTE: While connecting please ensure that the VDR 3000 and all devices that you are
connecting to are switched off.
The VDR 3000 should be connected to the component R.G.B. or Y.U.V. video and audio
inputs of a Projection TV / Monitor.
Proj ect TV/ M oni t or
PR PB Y
R B G
To Hi -Fi System
Sel ect s t he AC i nput range 1 1 5 VAC or 2 3 0 VAC for VDR-3 0 0 0
To connect to a component input a three BNC plug (R.G.B. or Y.U.V. Video) to BNC Plug
cable will be required.
NOTE: The Composite and S (Y/C) video cables should be disconnected when hooking
up the Component video output to TV/Monitor to ensure the best component video
level.
15
Connecting a Digital Audio CD Player (Optional)
NOTE: During connection please ensure that the VDR 3000 and all devices that you are
connecting are switched off.
Di gi t al Audi o Pl ayer
AU DI O CD
OP T.
Opt i cal Cabl e
To H i -Fi Syst em or TV/ M oni t or Audi o I nput Ja ck
Sel ect s t he AC i nput r ange 1 1 5 VAC or 2 3 0 VAC for VDR- 3 0 0 0
To connect to a digital audio input either a optical fiber plug to a optical fiber plug cable or
phono (RCA) plug to phono (RCA) plug cable will be required.
To connect the audio output from VDR 3000 to audio input of either audio hi-fi system or
TV/Monitor.
Note: The VDR 3000 requires an Audio CD-R to duplicate Audio CDs because of
Copyright protection.
16
OPERATION
Switching on
Once all cables are in place it is ok to power on the VDR-3000.
Press the Power Button on the front of the VDR 3000 or on the remote control handset,
the display panel should light up and display ” - - - -“.
Power on the TV Monitor and select the correct A/V channel, the VDR 3000 start-up
screen will appear. The TV screen it will display ” Insert CD”.
1
Playing a disk
Press the Eject Button on the front of the VDR 3000 or on the remote control handset and
the CD tray will slide open.
The VDR 3000 will accept Audio CD, VCD, HQ-VCD, S-VCD, DVD-Photo or CDDVD disks.
Place the disk that you want to load onto the tray, printed side facing up.
Press the Eject Button and the CD tray will close and “LOAD” will appear on the display
panel.
After a few moments the display panel will indicate the format of the loaded disk
(CD/VCD/HQVCD/SVCD/DVD-PHOTO/ CDDVD). It will also show how many tracks the
loaded disk features and the total running time of the disc.
Note: The VDR-3000 cannot play DVD media.
To play the disc from the beginning, press the Play Button on the VDR 3000 or on the
remote control handset.
To play a specific track, select the track number from the numeric keypad on the remote
control handset.
To skip forward to the next track press the Next Button on the VDR 3000 or remote control
handset
1
Screen shots are simulated.
17
To return to the previous track press the Previous Button on the VDR 3000 or remote
control handset
If you wish to search through a track during playback you can press the F.F. Button. There
are several speeds available and pressing the F.F. Button will cycle through to a faster
fast forward speed.
To search back through a track, press the REW Button. There are several speeds
available and each press of the REW Button will cycle through to a faster rewind speed.
To pause a track during playback, press the Pause Button. This will stop the playback and
a still image of the frame will be held on the TV Monitor (video disk only). You can move
forward one frame at a time by pressing the STP (STEP) Button. To release the pause and
return to normal playback press the Play Button.
To stop playback press the Stop Button.
To silence the track during playback press the Mute Button. To cancel the mute function
press the Mute Button a second time.
To remove the disk press the Eject Button, the CD tray will slide open. Remove the disk
and press the Eject Button again to close the CD tray.
Recording a disk
The VDR 3000 can record onto CD-R and CD-RW disks. CD-R disks can only be recorded
once whereas CD-RW disks can be erased and re-recorded several times.
Press the Eject Button on the front of the VDR 3000 or on the remote control handset and
the CD tray will slide open.
Place the disk that you want to record on to in the tray, printed side facing up.
Press the Eject Button and the CD tray will close and “LOAD” will appear on the display
panel.
If the disk is blank after a few seconds’ six recording format options will appear on the TV
screen VCD/HQVCD/SVCD/DVD-PHOTO/ CDDVD and CD-DA. Highlight the format that
you want to record in by using the Up/Down Arrow Buttons and then press the Enter
Button. This can be achieved by using the front panel of the VDR 3000 or by using the
supplied remote control.
18
2
The VDR 3000 will take a few moments to prepare the disk for recording. If CDDVD, DVDPHOTO, HQ-VCD, VCD or SVCD has been selected then once prepared the VDR 3000
start up screen will disappear and the system will be ready to start recording. If CD-DA is
selected the VDR 3000 start up screen will remain on the TV.
Select the video input source:
DV Input (Option): To select a DV input source, set the slide switch on the rear panel to
DV position. Analog Input: To select the analog video input, set the slide switch on the
rear panel to VIDEO position. To select an analog video format by pressing the “VIDEO
INPUT” key on the remote controller. The “Video” will appear on the screen. Press the
“VIDEO INPUT” key again to cycle through Video and S-Video source and press the
“ENTER” key to select the desire video source.
Note: The default setting is composite video input mode.
Select the audio input source:
Press the “AUDIO INPUT” key on the remote controller to select the digital audio or analog
audio input source. Note: The default setting is set at analog audio input mode.
Select the video output format:
Press the “VIDEO OUTPUT” key, the video output format would be cycle shown on the top
of TV screen:
Video/S-Video
Sony Betacam
Mastushita M2
SMPTE
R.G.B.
The Sony Betacam, Mastushita M2 and SMPTE format are all output with component
Y.U.V. video format with slight different level. Press the “VIDO OUTPUT” key till find the
format you want. The default setting is set at Video/S-Video format. Note: Please don’t
hook up the video cables to Y.U.V./R.G.B. and Video/S-Video connectors at same time. It
will cause the incorrect (lower) video output level.
NOTE: The VDR-3000 will return to default settings when powered on.
2
Screen Shots are simulated.
19
After set up the audio/video input and output. Start the source machine playing, in the case
of a video source the picture will appear on the TV screen. Find the footage that you want
to record to the disc and press the Rec. Button.
On the TV screen “record” will appear in the corner of the screen and after a moment
“recording” will appear. The display panel will start counting up in minutes and seconds to
indicate the recording length. When you reach the end of the footage press the Stop
Button.
To start recording the next track press the Record Button again. The Record message will
again appear on the TV screen, a new track number will appear on the display panel and
the counter will start counting from zero to indicate the record duration of the new track.
When you reach the end of the footage press the Stop Button. The display panel will
indicate how many tracks have been recorded and the total record duration of all the
tracks on the disc.
The tracks that have been recorded can be played back in the VDR 3000 but until the disc
is finalized the disc will not playback in other devices. Once a disc has been finalized it
is not possible to add any further tracks.
To finalize the disk press the Finalize Button on the front of the VDR 3000.
Note: The disk will be finalized automatically if the whole disk has been filled with
audio/video.
Finalizing CD appears on the TV screen. Finalizing takes about two minutes and once
finished the message disappears. The finished disk will now playback in other compatible
devices.
To remove the disk press the Eject Button, the CD tray will slide open. Remove the disk
and press the Eject Button again to close the CD tray.
PC Playback
Datavideo has provided a player that will be recorded onto every CD that is created by the
VDR 3000. The player will auto-run in a Windows based Personal Computer.3
!"#
$
""$
$
"""$
%#
&'($
&'$
%$
)$
Windows® 95/98/NT/2000 with DirectShow® installed (for Windows® NT 4.0 and
Windows® 95 download DXMedia® Runtime here). 32 MB RAM, Any VGA card
20
4
Playing CD’s in your PC:
1. The PC auto player is a MPEG-2 decoder, which requires a large amount of PC
resources. It is recommended that you close all running applications before
inserting the autoplay disk.
2. Insert your disk into your CD-ROM drive.
3. It could take up to 30 seconds for the disk to auto-play. Your PC will start the player
if it does not. Double left click “my computer”. Double left click your CD-ROM drive
and then double left click “playwnd.exe” icon (
).This should start the auto
player.
4. A large video window will appear and a smaller play control window will appear.
Shown below:
Video Window
5
4
5
Screen shots are simulated.
Screen shots are simulated.
21
Player Control
Grabbing Frames from your CD to save or e-mail
1. Make sure the auto player is running.
2. On the player control window there is a Frame Grab Icon (picture of a camera).
3. Once you have decided on a specific frame press the Frame Grab icon
immediately.
4. A Save As window will appear, prompting for a file name.
5. Type in your file name and click ok.
Shown Below:
22
ADVANCED OPERATION
Colour correcting the video source before recording
The VDR-3000 has a built in a Digital Colour Processor that is very useful for recording a
videodisc from a low quality video source such as old VHS and Video 8 tape.
To make a correction to the video source, select the video format for the disc and then
press the Enter key. The Colour Processor on screen menu will appear on the TV screen,
AGC ON
Brightness
Contrast
Sharpness Color/
Hue
move the cursor up and down by using the “Up” and “Down” keys to select an adjustment
item and then press the “Enter” key again. The high light bar will be shown on the top of
TV screen. Please press the “Previous”(-) and “Next”(+) keys to adjust the level of
Brightness, Contrast, Sharpness, Colour and Hue (Hue adjustment only available with
NTSC system) for the source video. Note: To ensure to record a active video onto VCD or
S-VCD with less blocking. Please adjust the sharpness to “Soft” (high light bar to the end
of left side) position.
Please keep AGC (Auto Gain Control) turned “ON” for recording to ensure that the correct
video level is recorded on disc. If the video signal is too bright (can’t see the grade level of
light gray color) and cannot be corrected by adjusting the Contrast and Brightness
controls. Please switch the AGC to “OFF” by pressing the “Enter” when the cursor is on
“AGC On” position. Press the “Enter” key again to switch AGC mode back to “ON” status.
23
FAQ for the Datavideo Recorders
Q1. Which CD-R and CD-R/W Disc are recommended for use with the VDR-3000?
CD-R Disc
Brand
Speed
CD-R/W Disc
Brand
Speed
CMC
Datavideo
FUJI
LeadData
Mitsubishi
Maxell
Mitsui
Prodisc Silver
PIONEER
Ritek
RICOH
SONY
TDK
Taiyo Yuden
1-12X
Acer
1-4X
1-12X
CMC
1-4X
1-12X
Datavideo
1-4X
1-12X
Megadata
1-4X
1-12X
Mitsubishi
1-4X
1-12X
Princo
1-4X
1-12X
Ritek
1-4X
1-12X
RICOH
1-4X
1-12X
Seantram
1-4X
1-12X
1-12X
1-12X
1-12X
1-12X
1-12X
Note: These discs have been tested, there are many others that will work that have
not been tested.
Q 2. Why will a CD-R Disc written by the VDR-3000 not play back in some home VCD
or DVD Players?
Some VCD or DVD Players do not support CD-R disc playback, so it cannot
recognize the CD-R that’s written by the VDR-3000. See the attached VCD/DVD
player list for your reference.
Q3. What is the difference of VCD, HQ-VCD, S-VCD, DVD-Photo and CDDVD format ?
VCD: MPEG-1 is a compression format compatible with most of VCD and DVD
players. The VCD disc can be played back by most VCD players, DVD players
and Microsoft Media Player Software on a PC. Since the VCD has a low
resolution and low bit rate 1.15Mbps format that is a good application for long
recording times without degrading too much of the image quality. This is ideal
for seminars and conference audio/video recording. VCD can record 74
minutes audio/video program on a 650MB CD-R disc.
HQ-VCD: MPEG-1 compression format is compatible with most media players. The HQVCD can be played back by most DVD or S-VCD players and Microsoft Media
Player software on a PC. HQ-VCD has a low resolution but high bit rate
4Mbps, which is good for recording the active video without blocking effect.
The HQ-VCD can record 37 minutes of audio/video on a 650MB CD-R.
S-VCD:
MPEG-2 compression format. The S-VCD player or DVD player that supports
S-VCD format can playback the S-VCD disc. PC CD-ROM can also playback
the S-VCD with the Datavideo auto PC player. The S-VCD has double the
resolution compared with VCD and also has a higher bit rate 2.4Mbps. The SVCD can record 37 minutes of audio/video on a 650MB CD-R.
24
DVD-Photo: MPEG-2 video compression format. The DVD-Photo disk can be played back
on a DVD player which supports S-VCD format and can be played back by PC
CD-ROM with the Datavideo auto PC player. DVD-Photo is full D1 resolution
(same as DVD) but only available for still images or slow motion video sources
due to low data transfer rate of 2.4Mbps for a high video resolution. The DVDPhoto mode is very useful for creating a video album with high quality images
on disk. The DVD-Photo can record upto 98 images on a CD-R disc with DVD
video image quality.
CDDVD:
MPEG-2 compression format. The CDDVD disk can be played back by newer
version DVD players and by a PC’s CD-ROM drive with our auto player. The
CDDVD disk is full D1 resolution (same as DVD) with a very high data transfer
rate of 4.8Mbps. It provides high quality video images for presentations,
educational or personal video collections. The CDDVD disk can record 18
minutes audio/video program on a 650MB CD-R.
Q4. Why will home DVD Players not playback SVCD Discs.
1、SVCD is not a DVD standard format, so most DVD Players do not support
SVCD Disc playback.
2、Some VCD or DVD Players do not support CD-R disc playback, so it cannot
recognize the CD-R written by the VDR-3000. See the attached VCD/DVD player
list for your reference.
Q5. Why will the recorded video not synchronize with it’s audio on playing back?
We have evaluated similar conditions on playing back the disc with few Players,
but this problem won’t happen on playing back the disc by most famous brand of
VCD/DVD player, such as Pioneer, SAMPO, ACER… so it is a VCD/DVD player
related compatible problem.
Q6. Why does the VDR-3000 take a much longer time on reading some various
Brands of CD-R, CD-R/W discs?
Some CD-R, CD-R/W disc are not fully compatible with the VDR 3000 CD-R/W
drive, so it will take a longer time to recognize the new disc or sometimes it will
fail. We recommend using the Datavideo specific VDR-1000R CD-R or VDR1000R/W CD-R/W disc, which have been verified and approved good quality for
VDR-3000.
Q7. Why does the recorded video have some flicking or shifting phenomenon?
Most of the root cause is the original video source quality, problems due to too old
VHS tape or others. Datavideo manufactures a Time Base Corrector machine
TBC-1000 or TBC-3000, which you may use it to correct the unstable video
source and color processing (TBC-3000 only).
Q8. Why does recording fail on some discs.
If there are more than 10% recording fail situation, please contact Datavideo for
further support.
According to the quality level of CD-R disc manufacture:
The “A” grade disc field failure rate is about --- 2%
The “B” grade disc field failure rate is about --- 6%
The “C” grade disc field failure rate is about --- 10%
So there is the opportunity to have a failure recording due to bad disk.
25
Q9. Why do some recorded CD-R/W discs have mosaic video or overlay video
effect after a few erase and re-write cycles?
It’s because the erase operation was not completed; you may double erase the
disc in VDR-3000 to resolve the problem.
Q10. What is the right setting for Power MAC G4 or iMAC to output video to VDR1000/3000DV for producing Video CD disc?
a). Require MAC O.S. 9.0.4 and QuickTime V4.1.2 for Power MAC G4 or iMAC
b). Please use the Final Cut Pro or iMovie software utility in the G4 for video capture
b). To disable the "remote function" in the Apple fire wire device control and treat the
VDR-1000DV interface as a video capture card, which means you need to "click"
on capture video manually as soon as the video is showing on the screen.
c). Online Un-plug the VDR-1000/3000DV fire wire cable from the G4 and re-plug it
back again to initialize the cable link and the G4 will find the correct protocol to
work with VDR-1000/3000DV.
Q11. Why am I getting the error message "Vencmpeg did not start"?
The VDR-3000 needs to have a signal to synchronize to before it records.
This error message is usually given when a user enables recording on the
VDR-3000 before playing back source material. When recording from
DV(IEEE/1394) you must play your source before pressing record on the
VDR-3000. Running 10 seconds of black should allow for a smooth recording
entry.
Q12. Why isn't the DV input working?
When connecting to your unit make sure that you have switched the
selector switch in the back of the VDR-3000 to "DV". Once the DV
selector switch is changed to DV, a red led will appear on the front
panel of the VDR-3000. Play your source video and watch to see
that the video is appearing on your monitor.
Q13. Why doesn't the S-video input work?
If you want to record from an S-video input source the selector button
on the remote control must be pressed when the unit is powered up.
On the lower right corner of the remote control there is a button marked
"I/P" this is the button that must be pressed. The default input for video
is composite (RCA type connectors) if you don't change the input the
S-video input will roll and the video signal will not pass through.
Q14. Why doesn't the CD-R disc that was written by the VDR-3000
play back in my home DVD player?
Not all consumer dvd players are compatible with the VCD or SVCD
formats. Some consumer dvd players are unable to read CD-R and
CD-RW discs.
26
Q15. Is there a way to get Windows Media Player or any other
editing program to recognize the "avseq01.dat" file created
by the VDR-3000?
The file name and extension of the raw mpeg file can be renamed
to a "*.mpg" extension. Windows Media Player is able to recognize this format.
Note: This will only work with mpeg-1 formats (VCD and HQ-VCD Modes)
that are created on the VDR-3000.
To achieve this, follow the directions below:
Explore your VCD or HQ-VCD disk in Windows Explorer
Look for a folder called "MPEGAV" (this is where each track of *.dat files
are saved in) Copy the AVSEQ01.DAT file to C:\ or any directory on your
hard drive. Right click your "AVSEQ01.DAT" file and choose "Rename"
Rename the file (anyname).MPG
Then press - Enter
The file now appears as a Windows Media Player icon
with the name you gave it.
The file will now be recognized as such and will open in programs that
are compatible with Windows Media Player.
Q16. What do I do if my machine has a rolling picture and I am inputting
an NTSC signal?
The unit could be set to the wrong format such as PAL@25 frames/second.
To change the input selector back to NTSC mode, the remote control is
needed.
There is a button on the remote called "P/N" it stands for PAL/NTSC.
It sets the input format of the machine. To change it back to NTSC
please do the following:
1. Power the VDR on.
2. Insert a blank CD-R.
3. Select any recording format. (VCD, etc.)
4. Press the "P/N button on the remote controller.
5. Keep pressing it until it either says "Auto or NTSC".
(Either one of these modes should be fine.)
6. Once this is completed, eject the blank disk and discard it.
This should make the PAL menu display go away and put the
VDR 3000 into NTSC mode.
27
Q17. DVD Players that can play back CD-R, CD-RW Discs and CD-DVD SVCD HQVCD and VCD format video (For reference only)
Yes
Yes
Yes
Yes
Capable
of
CD-R/W
Playback
Yes
Yes
?
Yes
DVD players that can playback
CD-DVD, HQ-VCD,SVCD,VCD
Unless otherwise noted, VCD
playback only is assummed
CD-DVD, SVCD,HQ-VCD,VCD
SVCD,HQ-VCD,VCD MP3
Yes
Yes
Yes
No
Yes
Yes
Yes
Yes
Yes
Yes
Yes
No
Yes
Yes
Yes
Yes
Yes
Yes
No
Yes
Yes
Yes
Yes
No
Yes
Yes
?
Yes
Yes
No
Yes
Yes
Yes
Yes
Yes
No
Yes
Yes
Yes
Yes
Yes
Yes
Yes
Yes
No
Yes
Yes
Yes
SVCD、HQ-VCD、VCD、MP3
SVCD、VCD、MP3
Yes
No
Yes
Yes
Yes
Yes
Yes
Yes
Yes
Yes
Yes
Yes
Yes
Yes
Yes
Yes
Yes
Yes
Yes
No
?
?
SVCD、HQ-VCD、VCD、MP3
MP3
Yes
Yes
DVD Model
Capable
of CD-R
Playback
Acer DVD-5150
Afreey LD-2060
Aiwa XD-DV500
Apex AD-500
/600/660/700/703
Amoisonic DVR2000
Amoisonic DVD8506
Denon DVD1500
Denon DV3000
Denver JVD200
Digitron DVS360
DMW360 Sanyo
Eclipse
Formax AV-2188
GE Digital GE1105P
GPX DV2000
Hitachi DV-K2
Hitachi DV-P250/E/U
Hitachi DV-P300U
Hitachi DV-P505U
HTK DVD868T
Hoyo 8200
JVC XV-D501BK
JVC XV-D701
JVC XV-511
JVC XV-515GD
JVC XV-523GD
JVC XV-521/525BK
Kenwood
DVF 5010/7010
Kiss 1302/1502
Kones DVD-3000
Konka KD-1800U
Labway Xwave 900
Lasonic 850/2000
LB 900 Xwave
Lenoxx 725B
Loewe Xemix
Marantz DVD-890
Marantz DVD-4000
Memorex
MVD-2025/2026
Metz DE81
28
SVCD、HQ-VCD、VCD、MP3
MP3
SVCD、HQ-VCD、VCD、MP3
SVCD、HQ-VCD、VCD、MP3
CD-DVD, SVCD,HQ-VCD,VCD
SVCD、HQ-VCD、VCD、MP3
SVCD、HQ-VCD、VCD、MP3
SVCD、HQ-VCD、VCD、MP3
CD-DVD, SVCD,HQ-VCD,VCD
SVCD、HQ-VCD、VCD
SVCD、HQ-VCD、VCD、MP3
SVCD、HQ-VCD、VCD、MP3
SVCD、HQ-VCD、VCD
DVD Model
Capable
of CD-R
Playback
MICO A980
Microboss MP3 Rock
Micromega minium
Oritron DVD200
Panasonic A100
Panasonic A105
Panasonic A110
Panasonic A115
Panasonic A120
Panasonic A160
Panasonic A300/
310/320/350/360
Panasonic L50
Panasonic LV75
Panasonic M360K
Panasonic P10
Panasonic RV20
Panasonic RV30
Panasonic SCHT80
Panasonic T-2000
Phoenix 203
Philips DVD701
Philips DVD701/710/
711/718/730/750/751/
825/865AT/
930/940/950/955
Philips DVD315AT
Phoenix 204
Pioneer DV-333/414/
434/505/515/525(K)/5
35/606(D)/626(D)/717
/C302D/C530D/F727
Pioneer DV-K101
Pioneer DV-K102
Pioneer DV-K505
Pioneer DVL 909/91
Pioneer PDV-LC10
Pioneer NS-DV1
Pioneer NS-DV55
Pioneer NSVSX09TX
ProScan PS8682P
Raite AVPhile 713 /
715/722D/727D
RCA 5210P
RCA 5215P/5220P/
5221P/5223P
Yes
Yes
Yes
Yes
No
No
No
No
No
No
No
Capable
of
CD-R/W
Playback
Yes
Yes
Yes
Yes
Yes
Yes
Yes
Yes
Yes
Yes
Yes
Yes
Yes
Yes
Yes
Yes
Yes
No
No
Yes
Yes
Yes
Yes
No
Yes
No
No
Yes
Yes
Yes
Yes
Yes
Yes
?
Yes
Yes
Yes
?
Yes
No
Yes
Yes
Yes
Yes
Yes
Yes
Yes
Yes
Yes
Yes
Yes
Yes
Yes
?
?
No
Yes
No
Yes
Yes
No
Yes
Yes
29
DVD players that can playback
CD-DVD, HQ-VCD,SVCD,VCD
Unless otherwise noted, VCD
playback only is assummed
SVCD、HQ-VCD、VCD、MP3
SVCD,HQ-VCD,VCD
Drop frames
CD-DVD,
SVCD,HQ-VCD,VCD
SVCD,HQ-VCD,VCD
CD-DVD,
SVCD,HQ-VCD,VCD
DVD Model
Capable
of CD-R
Playback
Sampo DVE 560+
Sampo DVE-611
Sampo DVE-660
Samsung
DVD608/611/709/711
/811/812/909
Samsung DVD 927
Sanyo DVD 6070
Sharp 600U
Shinco DVD 360
Shinco DVD 8320
Shinco DVD 868
Skyworth
Smart DVD 2000
SMC 330S/530
SM Supervision 2000
Sony DAVS-300
Sony DVP-C600D
Sony DVP-C650D
Sony DVP-CX850D
Sony DVP-FX1
Sony DVP-K330
Sony DVP-S300
Sony DVP-S315
Sony DVP-S325
Sony DVP-S330
Sony DVP-S335
Sony DVP-S336
Sony DVP-S360
Sony DVP-S3000
Sony DVP-S500D
Sony DVP-S501D
Sony DVP-S525D
Sony DVP-S530D
Sony DVP-S550D
Sony DVP-S560D
Sony DVP-S715
Sony DVP-S725D
Sony DVP-S7700
Thomson
DTH 2500
Thomson
DTH 2600
Tokal 715S
Toshiba SD1200
Toshiba SD2107
Toshiba SD2109
Yes
Yes
Yes
Yes
Capable DVD players that can playback
of
CD-DVD, HQ-VCD,SVCD,VCD
Unless otherwise noted, VCD
CD-R/W
Playback
playback only is assummed
Yes
CdDVD, HQ-VCD, SVCD, VCD
Yes
CdDVD, HQ-VCD, SVCD, VCD
Yes
CdDVD, HQ-VCD, SVCD, VCD
Yes
Yes
Yes
No
Yes
Yes
Yes
Yes
Yes
Yes
Yes
Yes
Yes
No
No
Yes
No
Yes
Yes
Yes
Yes
Yes
Yes
Yes
Yes
Yes
Yes
Yes
No
Yes
No
Yes
Yes
Yes
Yes
No
?
Yes
No
Yes
Yes
Yes
Yes
Yes
?
Yes
No
Yes
Yes
Yes
Yes
Yes
No
Yes
Yes
Yes
Yes
Yes
No
Yes
No
Yes
Yes
Yes
Yes
Yes
Yes
No
No
No
Yes
Yes
No
No
Yes
Yes
Yes
No
Yes
30
SVCD、HQ-VCD、VCD、MP3
SVCD、HQ-VCD、VCD、MP3
Can not use the blue color CD-R
Can not use the blue color CD-R
SVCD、HQ-VCD、VCD、MP3
SVCD、HQ-VCD、VCD
DVD Model
Capable
of CD-R
Playback
Toshiba SD2200
Toshiba SD3107
Toshiba SD3107e
Toshiba SD3109
Whanedale
DVD-750
Yamaha DVDS 795
Yes
Yes
Yes
No
Yes
Capable
of
CD-R/W
Playback
Yes
No
?
Yes
No
No
?
DVD players that can playback
CD-DVD, HQ-VCD,SVCD,VCD
Unless otherwise noted, VCD
playback only is assummed
Drops frames
Note:
YES: Only Means that it can read a particular media type.
NO: Only means that it cannot read a particular media type.
?: Means it has not been tested.
It would be appreciated if you can add to the compatibility information of DVD
players, which we can share with other users. For new information on DVD players,
please mail to [email protected]
31
SPECIFICATIONS:
Playback Disc Type
CDDVD/DVD-Photo/SVCD/HQ-VCD/VCD/Audio CD
Recorder Disc Type
CD-R, CD-R/W 650MB
Audio CD sampling rate
44.1KHz, 16bit CD quality
Video format
CCIR601 NTSC and PAL
CDDVD
NTSC 704x480 at 30fps
PAL 704x576 at 25fps
Bit rate at 4.8Mb/sec
DVD-Photo
NTSC 704x480 at 30fps
PAL 704x576 at 25fps
Bit rate at 2.4Mb/sec
S-VCD video resolution
NTSC 352x480 at 30fps
PAL 352x576 at 25fps
Bit rate at 2.4Mb/sec
HQ-VCD video resolution
NTSC 352x240 at 30fps
PAL 352 x288 at 25fps
Bit rate at 2.4Mb/sec
VCD video resolution
NTSC 352x240 at 30fps
PAL 352 x288 at 25fps
Bit rate at 1.15Mb/sec
Video inputs:
Y/C (S-Video) mini DIN
CVBS (Video) RCA
Optional DV (IEEE1394/i-Link) 4-pin connector
*. By DV25 YUV 4:1:1 NTSC or YUV 4:2:0 PAL at
25Mb/sec bit rate
Video Outputs:
Y/C (S-Video) mini DIN
CVBS (Video) RCA
Y.U.V. Sony Betacam BNC
Y.U.V. Mastushita M2 BNC
Y.U.V. SMPTE BNC
R.G.B. BNC
Digital Audio Input
Audio Inputs:
Stereo RCA 20Hz – 20KHz
Audio Outputs:
Stereo RCA 20Hz – 20KHz
Microphone input
Two dynamic microphone inputs, 600 ohm
Power supply
115 –230VAC, 50/60Hz selectable
Dimension
16.1x11.8x3.6 inches (410x300x92mm)
Weight
9.3lbs / 4.2kg
S/PDIF 44.1KHz, 16bit CD quality
32
Personal Computer Playerback Minimum System Requirements:
MMX-enhanced CPU (Intel® Pentium MMX, Pentium II, Celeron, Pentium III, AMD® K6-2,
K6-3, Athlon, etc.),
Windows® 95/98/NT/2000 with DirectShow® installed (for Windows® NT 4.0 and
Windows® 95 download DXMedia® Runtime here).
32 MB RAM
VGA card
Datavideo does not guarantee compatibility with all PCs.
For further information or technical support, visit our website at: www.datavideo-tek.com.
If your question cannot be answered from the website, please contact one of our locations.
Datavideo Locations
Datavideo Corporation USA
12300-U East Washington Blvd.,
Whittier, CA 90606
Tel: (562) 696-2324
Email: [email protected]
Datavideo Technologies Europe
Bv
Californiedreef 26,
3565 BL Utrecht, The
Netherlands
Tel: +31 30 261 9656
Email: [email protected]
Datavideo Technologies Co., LTD.
7F. Number 352, secretary. 2, Chung
Shan Rd.
Chung Ho City, Taipei Hsien,
Taiwan R.O.C.
Tel: 886-2-2246-7979
Email: [email protected]
www.datavideo-tek.com
P/N: 0820603112E
33