1
TELECOM
SAGEM
MF 5461 / MF 5481
3000267953_02
Instruction booklet
Dear customer
For your security and comfort, we urge you to carefully read the chapter Security, page 1 before attempting use.
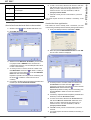
In buying this multifunction machine, you have opted for a quality SAGEM product. Your device satisfies all of the
different needs of a modern office automation tool.
This machine allows you to scan and fax in color and black and white, to print and copy in black and white. You can
connect the multifunction device to your PC (Microsoft Windows 98SE/ME/2000/XP).
Install the software included to use the multifunction device as a printer. Besides, you can scan, edit and save
documents through your PC. If you have a WLAN adaptor (optional) you can communicate with a personal computer
wirelessly.
WLAN is an optional working only with a specific adaptor that you can obtain from your retailer. You will find further
information on our website: www.sagem.com.
Thanks to its navigator and its multitask access, it is powerful, user-friendly and easy to use.
The MF 5461 / MF 5481 multifunction machines, come with a 600 dpi scanner and a black and white laser printer
offering a printing speed of 16 ppm. The Companion Suite Pro LL software provided allows you to use your
multifunction machine as a scanner and a printer from a personal computer. It also gives you the ability to manage your
multifunction machine.
Consumables
Refer to section Consumable specifications, page 66.
Dear customer
MF 5461 / MF 5481
Contents
Left and right printing margins setup
Top and bottom printing margins setup
Format paper setup
Dear customer
I
Consumables
I
Security
Security directives
Positions of Safety labels on the machine
Symbols for the main power switch
Certification
Environment
The packaging
Batteries and rechargeable batteries
The product
Software use license
Definition
License
Property
Duration
Warranty
Responsibility
Development
Applicable law
Registered trademarks
Prohibited reproductions
Installation
Location conditions
Cautions of use
Paper recommendations
Loading paper in the main unit tray
Handling of paper
Humidity control
Utilisation d’enveloppes
EP Cartridge recommendations
Terminal description
Command panel
Accessing terminal menus
Packaging contents
Device installation
Installing the document feeder
Feed cassette paper insertion
Cartridge installation
Paper delivery stop
Starting your device
Device connection
Paper insertion in the manual input tray
Copy
Simple copy
ECO mode copy
Advanced copying
Special setup for the copying
Resolution setup
Zoom setup
Assembled copy setup
Analysis origin setup
Contrast setup
Brightness setup
Paper type setup
Paper tray selection
Sheet-feed analysis margins setup
Analysis margins setup
Fax
Fax transmission
Immediate transmission
Delayed transmission
Transmission with auto redial
Fax reception
Relay broadcast
Fax answering machine
Saving an access code
Activating / Deactivating the answering
machine
Printing fax messages stored in the memory
Fax rerouting
Activating rerouting
Setting the re-direction contact
Printing rerouted documents
Rerouting fax messages to a USB memory key
Activating rerouting
Printing rerouted documents
Transmission waiting queue
Performing immediate transmission from
the waiting queue
Consulting or modifying the waiting queue
Deleting a transmission on hold
Printing a document in waiting or in deposit
Printing the waiting queue
Cancelling a transmission in progress
MailBoxes (MBX Fax)
Creating an MBX
Modifying the features of a MBX
Printing the contents of a MBX
Deleting a MBX
Printing the MBX list
MBX deposit in your fax
MBX deposit in a remote fax
MBX polling from a remote fax
Deposit and Polling
Placing a document in deposit
Polling a deposited document
1
1
2
2
2
3
3
3
3
4
4
4
4
4
4
4
4
5
5
5
6
6
6
7
7
7
7
7
7
8
9
9
10
10
10
10
11
12
12
12
13
SMS
SMS Parameters
Presentation of the sender
SMS Center transmission number
Sending an SMS
Parameters/Setup
14
Date/Time
Your fax number/Your name
Type of network
Geographical settings
Country
Network
Language
Local prefix
Prefix
Transmission report
Document feed type
Economy period
Reception Mode
Reception without paper
Number of copies
14
14
14
15
15
15
15
15
15
15
16
16
16
16
-I-
16
16
16
17
17
17
17
17
17
18
18
18
18
18
19
19
19
19
19
19
19
19
20
20
20
20
20
20
20
20
21
21
21
21
21
21
21
22
22
22
23
23
23
23
23
24
24
24
24
24
24
24
25
25
25
25
25
25
26
26
26
Contents
MF 5461 / MF 5481
Fax or PC reception
Received faxes reduction mode
Technical Parameters
Printing the functions guide
Printing the logs
Print the list of setups
Font printing
Lock the machine
Lock the keyboard
Lock the numbers
Lock the SMS service
Read the counters
Sent pages counter
Received pages counter
Scanned pages counter
Printed pages counter
Display the consumables status
Calibrate your scanner
Directory
Creating subscribers record
Creating subscribers list
Modifying a record
Deleting a record or a list
Printing the directory
Local network settings
Selecting the type of your local network
Ethernet network settings (Model MF5481)
Automatic configuration
Manual configuration
IP address
Sub-network mask
Gateway address
IEEE Address (or Ethernet address)
or MAC address
NetBIOS names
Serveurs de nom
WLAN network
Type of radio network
Radio infrastructure network
Radio ad-hoc network
Radio networks (WLAN)
Connect your WLAN adaptor
Configure your network
Creating or rejoining a network
Referring to or changing your network
parameters
An example of how an AD-HOC network
may be set up
Setting up a multifunction machine
Setting up the PC
Message service (Model MF5481)
Information required to set up message service
Configuring initialisation parameters
Access to servers parameters
Accès aux paramètres d'authentification SMTP
Sending an E-Mail
Sending an E-mail text
Scan to FTP
Simply put the file in an FTP server :
Connection configuration
Standard settings
Selecting the connection type
Selecting the transmission type
Modifying the connection period (Periodic type)
26
26
27
29
29
29
29
29
30
30
30
30
30
30
30
30
30
31
Modifying the connection time(s)
(Set Times type)
Selecting the print mode for the deposit notice
Printing the Internet settings
Mail sorting
F@X Only mode
PC Only mode
Share PC mode
USB memory key
Use of the USB memory key
Print your documents
Print the list of files located in the key
Print the files located in the key
Delete your files located in the key
Analyse the USB memory key content
Save a document on a USB memory key
PC Features
Introduction
Configuration requirements
Installation
Install the software on your PC
Connections
32
32
32
32
33
33
USB Connection
Network connection
Uninstall the software from your PC
Multifunction Terminal's Supervision
Checking the connection between the PC
and the multifunction machine
MF Director
Graphical presentation
Utilities and applications activation
MF Monitor
Graphical presentation
Display the consumable status
Scan To
Companion Suite Pro LL functionalities
Document analysis
34
34
34
34
34
34
34
34
34
34
34
35
35
Analysis with Scan To
Analysis from a TWAIN compatible software
Character recognition software (OCR)
35
35
35
35
36
Printing
36
36
38
38
39
39
39
39
39
- II -
42
42
42
42
42
43
43
43
44
44
44
44
44
46
46
46
47
48
48
48
48
48
49
49
49
49
49
49
50
50
50
50
50
51
51
51
52
52
52
52
52
Import or export a directory
52
Import a directory
Save your address book
52
52
Send a fax from the hard disk or the terminal
Send a fax from application
40
40
40
41
41
41
Address book
Add a contact to the terminal address book
Add a group to the terminal address book
Manage the address book
Fax communications
Presentation of the Fax window
Send a fax
39
39
40
40
40
40
41
Printing with the multifunction machine
Modify the information related to a contact
Modify a group
Delete a contact or a group from the
address book
Print the address book
38
40
41
41
52
52
53
53
53
Receive a fax
Follow-up of fax communications
54
54
The outbox
The send memory (items sent)
The outbox log
The inbox log
54
54
54
54
Contents
MF 5461 / MF 5481
Fax parameters
Access to fax parameters
Description of the tab Log and Report
Description of the tab Fax Parameters
Cover sheet
Creating a cover sheet
Description of the tab Cover page
Creating a cover page template
SMS Communication
Presentation of the SMS window
Send an SMS
Follow-up of SMS
The outbox
The outbox log
The sent item memory (items sent)
SMS Parameters
Access to SMS parameters
Description of the tab Logs and reports
Maintenance
Service
General information
Toner cartridge replacement
Issues with smart cards
Cleaning
Scanner reading system cleaning
Printer cleaning
Printer external cleaning
Printer issues
Error messages
Paper jam
Scanner issues
Miscellaneous issues
Communication errors
Transmission from the feeder
Transmission from memory
Communication error codes
General codes
Specifications
Physical specifications
Electrical specifications
Environmental specifications
Peripheral specifications
Consumable specifications
54
54
55
55
55
55
56
56
58
58
58
59
59
59
59
59
59
60
61
61
61
61
61
62
62
62
62
62
62
62
63
63
63
64
64
64
64
65
65
65
65
65
66
- III -
Contents
MF 5461 / MF 5481
Security
Security directives
Before turning on your device, check that the outlet that you are going to plug it into conforms to the indications shown
on the information plate (voltage, current, power network frequency) located on your device. This device shall be
connected to a single phase power network. The device shall not be installed on bare ground.
Batteries and rechargeable batteries, packaging and electric and electronic equipment (EEE), shall be thrown away,
as specified by the Instructions of the ENVIRONMENT chapter of this manual.
Because of the device model, the power connector is the only way to disconnecting the device from the power network,
that is why it is imperative to apply the following safety measures: your device shall be connected to a power outlet
located nearby. The outlet shall be easily accessible.
Your device is delivered with a grounded power cord. It is imperative to connect a grounded connector to a grounded
outlet connected to the building earthing.
Repairs-maintenance: Repairs and maintenance should only be carried out by a
qualified technician. No user serviceable parts inside the machine. To reduce the risk
of electrical shock, you shall not proceed with these operations yourself, because by
opening or removing the lids, you could expose yourself to two hazards:
APPAREIL A RAYONNEMENT LASER DE CLASSE 1
CLASS 1 LASER PRODUCT
LASER KLASSE 1 PRODUKT
PRODUCTO LASER DE CLASE 1
APARECCHIO LASER DI CLASSE 1
- The laser beam can cause irreversible eye damage.
- Avoid contact with powered parts because it can lead to electrical shock with
unfortunate consequences.
For installation conditions and safe use precautions, refer to chapter Installation, page 6.
-1-
1 - Security - Certification - Environment - Licence
MF 5461 / MF 5481
Positions of Safety labels on the machine
The device has warning labels at the positions shown below. For your safety, you must never touch these surfaces
when you remove a paper jam or when you replace the EP cartridge.
Symbols for the main power switch
In accordance with IEC 60417, this machine uses the following symbols for the main power switch:
-
means POWER ON.
-
means POWER OFF.
Certification
The
tagging attests to the product's compliance with the demands of the R&TTE 1999/5/CE directive.
For users security, in accordance with the 73/23/CE directive. For electromagnetic disturbances, in accordance with
the 89/336/CE directive.
The manufacturer declares that the products are manufactured in accordance with the APPENDIX II of the R&TTE
1999/5/CE directive.
The conformity declaration is available on www.sagem.com, see the support section or at the following address:
Sagem Communication - Customer relations department
4, rue du Petit Albi - 95800 Cergy Saint-Christophe - France
-2-
1 - Security - Certification - Environment - Licence
MF 5461 / MF 5481
Environment
The preservation of the environment is of importance to the manufacturer. The manufacturer wishes to service the
installations with respect to the environment and has chosen to integrate the environmental performance in the whole
lifecycle of its products, throughout manufacturing, release, use and disposal.
The packaging
The (green point) logo indicates that a contribution is given to an approved national organization to improve
the packaging salvage and recycling infrastructures.
To make recycling easier, follow local rules and regulations concerning sorting and disposal of such waste.
Batteries and rechargeable batteries
If your product contains batteries or rechargeable batteries, these shall be disposed of at the designated
collecting centers.
The product
The crossed bin symbol on the product indicates that it belongs to the electric and electronic equipment
family.
Therefore, according to European regulations you are requested to dispose of it at the selected collection
areas:
- to distribution centers in case of equivalent equipment purchase,
- to the available local collecting centers (dump, selective collection, etc.).
In doing so, you will participate in the "Waste of Electric and Electronic Equipment reuse and development scheme"
which will help prevent potential effects on the environment and human health.
-3-
1 - Security - Certification - Environment - Licence
MF 5461 / MF 5481
Software use license
CAREFULLY READ ALL THE TERMS AND CONDITIONS OF THE PRESENT LICENSE BEFORE OPENING THE
SEALED ENVELOPE CONTAINING THE SOFTWARE. OPENING THIS ENVELOPE INDICATES THAT YOU
ACCEPT THESE TERMS AND CONDITIONS.
In case you should not accept the terms of this license, the CD-ROM packaging should be returned to the retailer
unopened, along with the other components of the product. The purchase price of this product will be refunded. No
refunds will be made for products if the CD-ROM packaging have been opened, if components are missing or if the
reimbursement request is made after ten (10) days from the purchase date, your receipt is the proof of purchase.
Definition
The Software designates programs and associated documentation.
License
- This license allows you to use this Software on personal computers on a local network. You only have permission to
use this Software to print on one multifunction machine; you can not lend the Software or authorize anyone to use it.
- You are allowed to make a back up copy.
- This license is non-exclusive and non-transferable.
Property
The manufacturer or its providers hold the Software property right. You only become the owner of the CD-ROM. You
shall not modify, adapt, decompile, translate, create any derived piece, rent or sell the Software or the documentation.
Any rights not explicitly approved are reserved by the manufacturer or its providers.
Duration
This license remains valid until cancelled. You can cancel it by destroying the program and the documentation as well
as any other copies of them. This license will automatically be canceled in case you do not respect the terms of this
license. If the license is rendered invalid, you agree to destroy all copies of the program and the associate
documentation.
Warranty
The Software is provided "as is" with no warranties what so ever, whether expressed or implied, including without
limitation, any warranties of merchantability or fitness for a particular purpose; all the risks concerning the results and
performance of this Software are assumed by the buyer. In case the program should appear defective, all the repair
and service expenses will be covered by the buyer.
Nevertheless, the license holder benefits from the following warranty: we guarantee that the CD-ROM on which the
Software is recorded is free from hardware or manufacturing faults if used in normal conditions, the guarantee is valid
for ninety (90) days from the delivery date, the copy of the receipt being the proof of purchase. In case of a CD-ROM
fault that due to accident or misuse, the CD-ROM will not be replaced as per the warranty.
Responsibility
If the CD-ROM is not working properly, send it to the retailer together with a copy of the receipt. It is the retailer's sole
responsibility to replace the CD-ROM. Nobody, not even the manufacturer who is involved in the creation, realization,
merchantability and delivery of this program would be responsible for direct, indirect or immaterial damages, such as,
but not limited to, loss of information, loss of time, execution loss, loss of revenue, loss of customers, due to the use or
inability to use the program.
Development
With a constant concern for improvement, the manufacturer reserves the right to modify the Software specifications
without any notice. In case of modification, your user right does not give you access to free updates.
-4-
1 - Security - Certification - Environment - Licence
MF 5461 / MF 5481
Applicable law
This license is under the French law. Any dispute following the interpretation or execution of this license will be
submitted to the Paris Court.
Given the continuous technology development, the manufacturer reserves the right to modify the technical
specifications indicated for this product, at any time, without prior notice, and/or to stop manufacturing of the product.
All the names of the products and brands that could be trademarks registered by their respective owners are
recognized in the present document.
Registered trademarks
Given the technical evolution, Sagem Communication reserves the right to modify the technical specifications of this
product and/or to stop its manufacturing at any time and without notice. Companion Suite Pro is a registered trademark
of Sagem Communication.
Adobe® and the Adobe® products referred to here are registered trademarks of Adobe Systems Incorporated.
PaperPort9SE is a registered trademark of ScanSoft.
Microsoft® Windows® 98, Microsoft® Windows® Millennium®, Microsoft® Windows NT®, Microsoft® Windows
2000®, Microsoft® Windows XP®, and any other Microsoft® product referred to here are registered trademarks of
Microsoft Corporation registered and/or used in the United States and/or in other countries.
All the other brands or products referred to as examples or in order to give additional information are registered
trademarks of their respective owners.
The informations contents of this user manual are subject to change without notice.
Prohibited reproductions
Do not copy or print any item for which reproduction is prohibited by law.
Copying or printing the following items is generally prohibited by local law :
- bank notes;
- checks;
- bonds;
- stock certificates;
- bank drafts;
- passports;
- driver's licenses.
The preceding list is meant as a guide only and is not inclusive. If you have any questions concerning the legality of
copying or printing certain items, consult with your legal advisor.
-5-
1 - Security - Certification - Environment - Licence
MF 5461 / MF 5481
Installation
Location conditions
By choosing an appropriate location, you preserve the longevity of the machine. Check that the selected location has
the following characteristics:
- Choose a well ventilated location.
- Make sure not to obstruct the ventilation grids located on the left and right sides of the device. During the
installation, make sure to place the machine thirty centimeters away from the surrounding objects so all the lids
can be easily opened.
- Make sure that this location does not present any ammonia nor any other organic gasses emission hazard.
- The ground outlet (refer to the security notices presented in the Security chapter) to which you plan to connect
the machine must be located close to this one and have an easy access.
- Make sure that the machine is not directly exposed to sun light.
- Make sure not to place the machine in an area exposed to an air flow generated by an air conditioning, heating or
ventilation system, nor in an area subject to large temperature or humidity variations.
- Choose a solid and horizontal surface on which the machine will not be exposed to intense vibrations.
- Keep the machine away from any object that could obstruct its ventilation ports.
- Do not place the machine close to hangings or any other flammable objects.
- Choose a location where splashes of the water and other liquids are limited.
- Make sure that this location is dry, clean and dust free.
Make sure to place the machine in well ventilated premises. When in operation, the printer generates
a small amount of ozone. An unpleasant smell can come from the printer if it is used intensively in
poorly ventilated premises. For a secure use, make sure you place the machine in well ventilated
premises.
Cautions of use
Take into account the important precautions below when using the machine.
Running environment:
- Temperature: 10 °C to 32 °C with a maximum amplitude of 10 °C per hour.
- Humidity: 15 to 80 % of ambient humidity (without condensation), with a maximum amplitude of 20 % per hour.
Terminal:
The section below describes the precautions to be taken when using the machine:
- Never turn the machine off and never open the lids while printing.
- Never use gas or flammable liquids, or objects generating magnetic field close to the machine.
- When you unplug the power cord, always hold the connector without pulling the cord. A damaged cord presents
a potential fire hazard or an electric shock hazard.
- Never touch the power cord with wet hands. You risk getting an electric shock.
- Always unplug the power cord before moving the machine. Otherwise, you could risk having the cord damaged
and create a fire hazard or an electric shock hazard.
- Always unplug the power cord when you plan not to use the machine for a long period of time.
- Never put objects on the power cord, never pull it and never fold it. This could cause a fire hazard or an electric
shock hazard.
- Always make sure that the machine is not sitting on the power cord or any other electric device communication
cables. Make sure also that neither cord nor cable is introduced to the machine inner mechanism. This would
expose you to a machine malfunction risk or to a fire hazard.
- Make sure that the printer is unplugged from the power outlet before connecting or disconnecting an interface
cable to the printer (use a shielded interface cable).
- Never try to remove any fixed pane or hood. The machine contains high voltage circuits. Any contact with these
circuits can cause an electric shock risk.
-6-
2 - Installation
MF 5461 / MF 5481
- Never try to modify the machine. This could cause a fire hazard or an electric shock hazard.
- Always make sure that paper clips, staples or other small metallic items do not get inside the machine via the
ventilation ports or other ports. Such items create fire hazards or electric shock hazards.
- Prevent water and any other liquid from spilling on the machine or near to it. Any contact of the machine with water
or liquid can cause a fire hazard or an electric shock hazard.
- If liquid or metallic item gets accidentally inside the machine, turn it off immediately, unplug the power cord and
contact your retailer. Otherwise, you will face a fire hazard or an electric shock hazard.
- In case of heat, smoke, unusual smell or abnormal noise emissions, turn the machine off, unplug the power cord
immediately and contact your retailer. Otherwise, you will face a fire hazard or an electric shock hazard.
- Avoid using the machine during an "electric storm", this can cause an electric shock hazard due to lightning.
- Never move the terminal during printing.
- Always lift the terminal when you wish to move it.
Paper recommendations
Loading paper in the main unit tray
- Insert paper with the face down, and adjust paper guides to the paper format to avoid feed failure, skewing, and
paper jams.
- Amount of loaded paper must not exceed the loading mark. If the loading mark is exceeded, this may cause feed
failure, skewing, and paper jams.
- Adding paper in the pile must be avoided because it may cause double feeding.
- When withdrawing the cassette from the main unit, always support it with both hands to avoid doing drop it.
- If you use paper already printed by your machine or another printer, the printing quality may not be optimal.
Handling of paper
- Curling must be corrected before printing. Curls must not exceed 10 mm.
- Care must be taken with storage to prevent feed faults and image defects due to leaving the paper in conditions
of high humidity.
Humidity control
- Paper which has become damp, or paper which has been left unused for a very long time.
- After opening the paper, it must be kept in a plastic bag.
- Paper with waved ends, paper which is creased, paper with crumples, and any other non-normal paper must not
be used.
Utilisation d’enveloppes
- Feeding can be done only through the manual feed.
- Recommended area should be the area which excludes 15 mm from the leading edge, 10 mm from and both the
left and right edges, and the rear edge.
- A few lines may be given in solid print at the part of being overlapped.
- Envelopes which are not recommended may lead to improper printing (refer to the paragraph Peripheral
specifications, page 65).
- Curled envelope after printing should be fixed manually.
- Small crumples on the edge of the wide side of envelopes. Smearing, or less clear printing may appear on the
reverse side.
- Set envelope by pressing the folding line of four edges properly after releasing air inside. Set envelope in a proper
position after aligning in case it is bent or warped.
EP Cartridge recommendations
- Must not be stood on the side, or held upside down.
-7-
2 - Installation
MF 5461 / MF 5481
MF 5461 / MF 5481
2 - Installation
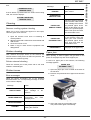
Terminal description
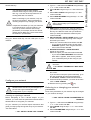
Front side
Control panel
Document feeder
Paper output
Smart card
insertion point
Fold-down stop
for paper
delivery
Master USB
connection
(USB key)
Manual
input tray
Manual paper feed
setup guides
Paper tray
Cartridge access cover
Back side
Paper jam cover
LAN Connection
(model MF5481)
Master USB
connection (USB key)
(model MF5461)
Power supply cord
connection
Slave USB
connection (for PC)
Additional telephone
cable socket
Telephone cable
socket
On/Off switch
-8-
Command panel
1
26
27
28
29
30
31
2
3
32
4
25
5
COL
24
6
23
7
22
21 20 19 18 17
16
15
14
13
12
1. Screen.
4. Key Í: deletes the character to the left of the cursor.
7. Key
: input or line feed.
8
: Validation.
18. Key : menu access and navigation down the
menus.
19. Key C: back to the previous menu and input
correction.
: access to special characters.
20. Key
: Shift.
21. Key
8. Key SCAN: document analysis to the PC.
: navigation up the menus.
: stops the current operation.
22. Key ECO: sets up the activation delay.
9. Key COPY: local copy.
10. Key STOP PRINT: stops the current printing.
11. Key
: sending of an SMS (Short Message
Service).
23. Key
: color analysis mode selection.
24. Key
: analysis resolution setup.
25. Key
: contrast setup.
26. Icon
12. Key
: sending of a fax.
13. Key
: access to directory and quick dial numbers.
14. Key
: line manual connection, listen for tone
during fax sending.
15. Key
SMS).
9
17. Key OK: confirms the displayed selection.
3. Alphabetical keypad.
6. Key
10
16. Key
2. Digital keypad.
5. Key
11
27. Icon
: Photo resolution.
28. Icon
: Fin resolution.
29. Icon
: colour mode.
30. Icon
: multiple contact sending (fax, e-mail or
: Superfin resolution.
: activity on the telephone line.
31. Icon
: Fax mode.
32. Icon
: external answering machine mode.
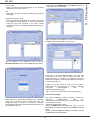
Accessing terminal menus
All terminal functions and settings are available via the menu and are associated to a specific menu command.
For example, the menu command 51 launches the printing of the functions list (the functions list stores the list of all
terminal menus, sub-menus and their identification number).
Two methods are available to access menu items : the step by step method or the shortcut method.
To print the functions list whitch details the Step by step method:
1 Press .
2 Use the
or
button to browse the menu and select 5 - PRINT. Confirm with OK.
3 Use the
or
button to browse the menu PRINT and select 51-FUNCTIONS LIST. Confirm with OK.
To print the functions list with with the shortcut method:
1 Press on .
2 Enter 51 with the numerical keypad to directly print the functions list.
-9-
2 - Installation
MF 5461 / MF 5481
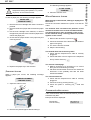
Packaging contents
1 initialisation card
The packaging contains the items listed below:
Multifunction device
Device installation
1 Unpack the device.
2 Install the device respecting the security notices
stated at the beginning of this booklet.
3 Remove all stickers from the machine.
4 Remove the plastic protection film from the screen.
5 Place the control panel in front of the machine,
insert the control panel in its back slots (A).
B
A
Control panel
B
1 toner cartridge
6 Push the front side of the control panel (B) to clip it.
Installing the document feeder
1 Secure the document feeder by fitting the two clips
(B) in the notches (A) provided for this purpose.
A
1 installation guide and 1 PC installation CD ROM
B
1 power cord
1 telephone cord
Feed cassette paper insertion
Before inserting paper, refer to the
paragraph Paper recommendations,
page 7.
Your device accepts a number of formats and types of
papers (refer to the paragraph Consumable
specifications, page 66).
- 10 -
2 - Installation
MF 5461 / MF 5481
4 Take a paper stack, pull the paper off and align it
on a flat surface.
You can use paper weighing between
60 and 105 g/m2.
1 Remove the paper feed cassette completely.
5 Put the paper stack in the feed cassette
(ex: 200 sheets of 80 g/m² paper).
6 Put the feed cassette back in its location.
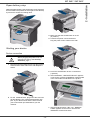
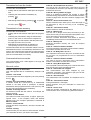
Cartridge installation
1 Stand in front of the machine.
2 Push the left and right sides of the cover and pull it
towards you at the same time.
2 Push the lower panel down until it clicks.
PUSH
3 Unpack the new cartridge. Gently roll the cartridge
5 or 6 times to distribute the toner evenly inside the
cartridge. Thoroughly rolling the cartridge will
assure the maximum copies per cartridge..
3 Setup the back side feed cassette stop by pushing
the "PUSH" lever (A).
Then adjust the lateral paper guides to the paper
format by pushing lever (B) located on the left
guide. Adjust the length paper guide to the paper
format by pushing lever (C).
C
4 Insert the cartridge in its slot by pushing it until it
clicks (last move down) as shown on the picture
below.
A
B
5 Close the cover.
- 11 -
2 - Installation
MF 5461 / MF 5481
MF 5461 / MF 5481
2 - Installation
Paper delivery stop
Adjust the paper delivery stop, depending on the format of
the document to be printed. Do not forget to raise the flap
to prevent the sheets from falling down.
3 Make sure that the On/Off switch is on Off
(O position).
4 Connect the power cord to the device.
Plug the power cord to outlet on the wall
Starting your device
Device connection
Before plugging the power cord, it is
imperative to refer to the Security
directives, page 1.
1 Plug the end of the telephone line into the terminal
socket and the other end into the wall telephone
socket.
5 Press the On/Off button to turn on the device
(I position).
6 After initialisation, "WAITING FOR INIT" appears
on the screen. Insert the initialisation card provided
in the card reader as indicated on the picture.
2 For the model MF5481, plug end of the LAN cord
(as provided by your network administrator) into
port of your fax machine and the other end into
your local network port dedicated to your fax
machine.
7 After an analysis phase, "INIT. OK - REMOVE
CARD" appears on the screen. Remove the
initialisation card from the drive.
- 12 -
8 By default, the machine is set to operate in the UK
in English. To modify this parameter, refer to
Country, page 24.
9 Set the date and time, refer to Date/Time, page 24.
Paper insertion in the manual input
tray
Before inserting paper, refer to the
paragraph Paper recommendations,
page 7.
The manual input tray allows you to use various paper
formats with greater weightings than the one used in the
paper feed cassette (refer to the paragraph Consumable
specifications, page 66).
Only one sheet or envelope can be fed at a time.
You can use paper, which weights
between 52 and 160 g/m².
1 Spread the manual feed guides to the maximum.
2 Insert a sheet or an envelope in the manual input
tray.
3 Adjust the paper guides against the right and left
edges of the sheet or the envelope..
Before printing, check that the paper
format you are using matches the
paper format set on the printer (refer to
Copy, page 14).
- 13 -
2 - Installation
MF 5461 / MF 5481
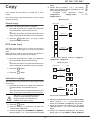
Copy
Your machine has the function to make one or more
copies.
button.
5 Choose with the buttons
or
the printing
option (see examples below) depending on the
copy mode that you want:
Combined
mode
(document
feeder):
1 Page onto 1,
2 Pages onto 1,
or
4 Pages onto 1.
You can also setup several parameters in order to make
copies at your will.
Simple copy
MOSAÏC Copy mode
Output
Analyzed sheets
2 Press the
button twice. The copy is made
using the default parameters.
1 page to 1
1
1
1
2 pages to 1
1 2
In this case, the default parameters are applied.
1 Place the document to be copied in the automatic
document feeder, printed face on the top.
or
Place the document to be copied face down on the
glass, respecting the indications around the glass.
4 pages to 1
1 2
3 4
2
COPY
ECO mode copy
2
The ECO mode enables you to reduce the amount of
toner consumed on the page so as to save your printing
costs.
When the ECO mode is used, the toner consumption is
reduced and the print density becomes lighter.
1 Place the document to be copied in the automatic
document feeder, printed face on the top.
or
Place the document to be copied face down on the
glass, respecting the indications around the glass.
2 Press the
COPY
button.
3 Press the
ECO
button.
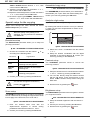
The sophisticated copy allows to do custom setups for the
current copy.
1 Place the document to be copied in the automatic
document feeder, face printed on the top.
or
Place the document to be copied face down on the
glass, respecting the indications around the glass.
After step 1, you can directly enter the
number of copies with the numerical
keypad and press the OK button to
validate. Then refer to step 4.
COPY
3
4
- Poster mode (flat-bed scanner): 1 Page to 1,
1 Page to 4 or 1 page to 9.
POSTER Copy mode
Analyzed sheets
A
Advanced copying
2 Press the
1
1 page to 1
A
1 page to 4
A
1 page to 9
Output
A
Confirm with the OK button.
button.
3 Enter the number of copies that you want and
confirm with the OK button.
4 Choose the paper tray AUTOMATIC or MANUAL
with the buttons
or , then confirm with the OK
- 14 -
6 Adjust the desired zoom level, from 25% TO 400%
with the buttons
or
, confirm with the OK
button (only available in 1 Page to 1 copy mode).
7 Adjust the desired origin values with the digital
keyboard buttons or then confirm with the OK
button.
8 Choose the resolution depending on the printing
quality that you want DRAFT, AUTO, QUALITY
3 - Copy
MF 5461 / MF 5481
TEXT or PHOTO with the buttons
or , then
confirm with the OK button.
9 Adjust the contrast level with the buttons
or ,
then confirm with the OK button.
10 Adjust the desired brightness level with the buttons
or , then confirm with the OK button.
11 Choose the paper type NORMAL, THICK with the
buttons
or , then confirm with the OK button.
Assembled copy setup
843 - ADVANCED FCT/COPY/ASSEMBLED
The ASSEMBLED parameter allows you to assemble or
disassemble your copies. Enter the desired setting and
confirm your choice by pressing the OK button.
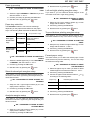
Analysis origin setup
Special setup for the copying
If you want, you can change the origin of the scanner.
By entering new values for X and Y in mm (X < 209 and
Y < 280), you move the analysed area as shown on the
diagram below.
DEBUT
BEGIN.
OFFEUILLE
SHEET
When the quality of the printing is not
satisfying, you can proceed to a calibration
with MENU 80.
Resolution setup
The RESOLUTION parameter allows you to setup the
photocopy resolution.
x
y
ENDFIN
OFFEUILLE
SHEET
Setups done through this menu become the device
default setups after you confirm.
Analysed area
844 - ADVANCED FCT/COPY/ORIGIN
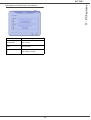
841 - ADVANCED FCT/COPY/RESOLUTION
1 Choose the resolution with the buttons
according to the following table:.
Parameter
1 Select the X and Y coordinates with the buttons
or .
2 Setup the desired coordinates with the digital
keyboard or the buttons
and , confirm your
choice by pressing on the OK button.
or
Signification
DRAFT
Low resolution.
Contrast setup
AUTO
Standard resolution for documents
containing text and graphics.
The CONTRAST parameter allows to choose the
photocopy contrast.
QUALITY
TEXT
Optimal resolution for documents
containing text.
PHOTO
Optimal resolution for documents
containing photographies.
845 - ADVANCED FCT/COPY/CONTRAST
1 Setup the desired level of contrast with the buttons
and , confirm by pressing the OK button.
2 You can also directly setup the desired contrast
with the
button, press several times on this
button until the desired setup without using the
Menu 845.
2 Confirm your choice by pressing the OK button.
You can also change the resolution by
pressing the
3 Quit this menu by pressing the
button.
button.
Brightness setup
Zoom setup
The ZOOM parameter allows you to reduce or enlarge an
area of a document by choosing the origin and the zoom
level to apply to the document, from 25 to 400 %.
The BRIGHTNESS parameter allows to lighten or darken
your original document.
842 - ADVANCED FCT/COPY/ZOOMING
1 Enter the desired zoom level with the
Alpanumerical keyboard or choose among
predefined values with the buttons
and .
2 Confirm your choice by pressing the OK button.
- 15 -
846 - ADVANCED FCT/COPY/LUMINOSITY
1 Setup the desired brightness with the buttons
and .
2 Confirm your choice by pressing the OK button.
3 Quit this menu by pressing the
button.
3 - Copy
MF 5461 / MF 5481
Paper type setup
3 Quit this menu by pressing the
851 - ADVANCED FCT/SCAN. & PRINT/PAPER
TYPE
1 Select the paper NORMAL or THICK that you use
with the buttons
and .
2 Confirm your setup by pressing the OK button.
3 Quit this menu by pressing the
Left and right printing margins setup
If you want to, you can offset the lateral margins of the
document to the left or right during printing.
855 - ADVANCED FCT/SCAN. & PRINT/
PRINTER MARG
button.
1 Setup the left / right margins offsets (by 0.5 mm
steps) with the buttons
and .
2 Confirm by pressing the OK button.
Paper tray selection
The Automatic selection can have two meanings
depending on the paper format defined on the paper
trays. The following table describes the different cases.
Default tray
Same paper
format in the
trays
Different paper
format in the
trays
3 Quit this menu by pressing the
AUTOMATIC
MANUAL
If you want to, you can offset the lateral margins of the
document towards the top or the bottom during printing.
856 - ADVANCED FCT/SCAN. & PRINT/TOP
PRINT.
The manual tray is
used.
1 Setup the top / bottom margins offsets (by 0.5 mm
steps) with the buttons
and .
2 Confirm by pressing the OK button.
The main tray is used
The manual tray is
used.
3 Quit this menu by pressing the
852 - ADVANCED FCT/SCAN. & PRINT/TRAY
PAPER
1 Select the default paper tray to use, AUTOMATIC
or MANUAL, with the buttons
and .
2 Confirm by pressing the OK button.
3 Quit this menu by pressing the
button.
Format paper setup
This menu allows you to define the default paper format
of the manual tray and the main tray. You can also setup
the default scanning width.
button.
Sheet-feed analysis margins setup
If you want to, you can offset the lateral margins of the
document to the left or right during the analysis with your
sheet-feed scanner.
853 - ADVANCED FCT/SCAN. & PRINT/ S.F.
MARGINS
1 Setup the left / right margins offsets (by 0.5 mm
steps) with the buttons
and .
2 Confirm by pressing the OK button.
3 Quit this menu by pressing the
button.
Top and bottom printing margins setup
Tray used for copy
Selection between the
AUTOMATIC main tray and the
manual tray.
MANUAL
button.
857 - ADVANCED FCT/SCAN. & PRINT/
PAPER FORMAT
1 Select the paper tray for which you want to define
a default paper format with the buttons
and .
2 Confirm by pressing the OK button.
3 Choose the paper format with the buttons
or
according to the following table:.
Paper tray
Available paper format
MAN. TRAY
A5, A4, Legal and Letter
AUTO. TRAY
A5, A4, Legal and Letter
SCANNER
LTR/LGL and A4
4 Confirm by pressing the OK button.
button.
5 Quit this menu by pressing the
Analysis margins setup
If you want to, you can offset the lateral margins of the
document to the left or right during the analysis with your
flat-bed scanner.
854 - ADVANCED FCT/SCAN. & PRINT/
FLATBED MARG
1 Setup the left / right margins offsets (by 0.5 mm
steps) with the buttons
and .
2 Confirm by pressing the OK button.
- 16 -
button.
3 - Copy
MF 5461 / MF 5481
Fax
Transmission with auto redial
This function allows you to monitor the dialling operation
during a fax transmission. In this case, the maximum
transmission rate will be 14400 bps.
This function allows for example:
• to hear if the subscriber’s fax is engaged and if so,
choose the moment when the line is clear to start the
document transmission.
• to control the communication progress in case of
uncertain numbers, etc.
This chapter describes all the fax processing and
configuration functions.
You will also find a section describing fax mailboxes.
Fax transmission
Immediate transmission
1 Place the document to be copied in the automatic
document feeder, face printed on the top.
or
Place the document to be copied face down on the
glass, respecting the indications around the glass.
2 Enter the fax number or choose your dialling mode
then press
.
The
icon flashes during the call phase, it stays
lit when both faxes are in communication.
3 At the end of transmission the initial screen is
displayed.
To take the line manually:
1 Place the document in the fax feeder.
2 Press
.
3 If necessary, set the sound level with navigator
or
keys.
4 If not already done, enter the subscriber number.
As soon as you hear the remote fax tone, the line is
clear and you can start the transmission.
5 Press
If your machine is set in order to print a
transmission report (Transmission report,
page 25), the reduced copy of the document
first page will not be printed and it notifies you
that the communication is manual.
Delayed transmission
This function allows you to transmit a document at a later
time.
To program a postponed transmission you need to
identify the subscriber number, transmission time, feeder
type and number of pages.
to start the document transmission.
Fax reception
Fax reception depends on the parameter settings of your
machine.
The following parameters let you customize the printing of
received faxes :
When sending in "Deferred Send" mode,
make sure that the document is located in the
right direction.
- Reception Mode, page 26;
To delay the transmission time of your document :
1 Place the document to be copied in the automatic
document feeder, face printed on the top.
or
Place the document to be copied face down on the
glass, respecting the indications around the glass.
2 Select 31 - FAX / TRANSMISSION.
3 Enter the subscriber number you wish to program
at a different time or choose your dialling mode and
confirm with OK.
4 Next to the current time, enter the new time and
confirm with OK.
5 Choose SCAN B & W or COLOR SCAN.
6 Adjust the contrast and confirm with OK.
7 Select the feed type, FEEDER or MEMORY and
confirm with OK.
8 You may enter the number of pages before
transmission and confirm with OK.
9 Confirm postponed transmission by pressing
- Reception without paper, page 26;
- Number of copies, page 26;
- Fax or PC reception, page 26;
- Received faxes reduction mode, page 26;
- Technical Parameters, page 27.
The printing is not possible on A5 paper
format.
The following tables gives which tray is used to print
received fax depending on the default tray and the paper
format in both trays.
key
.
Your document is stored and will be sent at the new time.
- 17 -
4 - Fax
MF 5461 / MF 5481
document next to the current time and press OK.
6 If you wish to modify the document feed type,
select one of the options FEEDER or MEMORY,
then press OK.
7 If you wish, you may enter the number of pages of
your documents before transmitting.
Default tray set to Manual:
Manual tray
paper format
Main tray
paper format
A4,Letter and
Legal
A4,Letter and
Legal
The fax is printed on
manual tray.
A4,Letter and
Legal
A5
The fax is printed on
manual tray.
A4,Letter and
Legal
An error message is
displayed on the screen.
The paper on manual
tray is incompatible.
The document in the feeder will be relayed either
immediately or at a later time (according to your choice)
to the remote fax which will relay the document.
Fax answering machine
A5
An error message is
displayed on the screen.
The paper on manual
tray is incompatible.
A5
A5
Action
8 Activate relay by pressing key
The Fax answering machine allows you to keep
confidential documents in storage and to avoid printing
them as you receive them.
Default tray set to Automatic:
Manual tray
paper format
Main tray
paper format
A4,Letter and
Legal
A4,Letter and
Legal
The fax is printed with
an automatic selection
of tray.
A4,Letter and
Legal
A5
An error message is
displayed on the screen.
The paper on automatic
tray is incompatible.
A5
A4,Letter and
Legal
The fax is printed on the
main tray.
A5
An error message is
displayed on the screen.
The paper on automatic
tray is incompatible.
A5
.
The
indicator light lets you know the state of your Fax
answering machine:
• Light on: the answering machine is on.
• Blinking: your fax has documents in storage or is in the
process of receiving faxes.
• Light off: memory full, the terminal cannot receive any
more documents.
Action
You can assure document confidentiality by using the 4
digit access code. Once saved, you will require this
access code for:
• printing fax messages in memory,
• activating or deactivating the fax answering machine.
Saving an access code
383 - FAX / FAX ANSW. / ANSWER CODE
1 Enter the code (4 digits) and confirm with OK.
Relay broadcast
2 Quit this menu by pressing the
Your fax machine (initiator) can relay a document, in other
words, transmit a document to your subscribers via a
remote fax and with a precise relay list.
To do this the initiator fax and the remote fax must both
have the relay function.
To relay you need to supply the remote fax with the
document and the relay list number. The remote fax will
then transmit this document to all subscribers on the list.
Once the relay is activated by your fax and as soon as the
document is received by the remote fax, the document is
printed before relaying to all subcribers on the list.
To activate relay from your fax machine:
1 Insert the document to relay.
2 Select 37 - FAX / BROADCAST.
3 Enter the remote fax number where you will relay to
or choose your dialling mode and press OK.
4 Enter the relay list number used by the remote fax
and press OK.
5 You may enter the time you wish to transmit the
button.
Activating / Deactivating the answering
machine
382 - FAX / FAX ANSW. / ACTIVATION
1 If you saved an access code for your fax answering
machine, enter it and validate with OK.
2 Select the required option WITH or WITHOUT
answering machine and confirm you choice
with OK.
3 Quit this menu by pressing the
button.
Printing fax messages stored in the memory
- 18 -
The printing is not possible on A5 paper
format.
381 - FAX / FAX ANSW. / PRINT
4 - Fax
MF 5461 / MF 5481
1 If you have defined an access code for your fax
answering machine, enter it and press OK.
Documents received and stored in the memory are
printed.
Fax rerouting
This function is used to reroute faxes received to a
directory contact. To use this function, you have to
perform two operations:
1 Activate rerouting.
2 Set the rerouting address of the fax.
Fax messages that are rerouted are therefore saved on
the USB memory key with format Tiff and are named as
follows
:
"FAXYYMMDDHHMMSS"
where
YYMMDDHHMMSS corresponds to the fax reception
date and time.
You can also print fax messages rerouted to your USB
memory key automatically by activating menu 052
PRINT.
Activating rerouting
Before activating this function, connect the
USB memory key to the terminal.
051 - MEDIA / FAX ARCHIVING / ACTIVATION
Activating rerouting
1 Using the keys
and
within the navigator,
select option WITH and confirm your choice
with OK.
2 Quit this menu by pressing the
button.
391 - FAX / REROUTING / ACTIVATION
Make sure that the subscriber exists in the
directory (Directory, page 32 ).
Printing rerouted documents
1 Using the keys
and
within the navigator,
select option WITH.
2 Using the keys
and
within the navigator,
select the subscriber from the directory
3 Confirm with OK.
The printing is not possible on A5 paper
format.
052 - MEDIA / FAX ARCHIVING / IMPRIMER
1 Using the keys
and , select the copy option
WITH to print all rerouted documents
automatically.
2 Confirm your choice with OK.
3 Quit this menu by pressing the
button.
If the function WITHOUT is selected, the menus 392 and
393 will not be included in the functions overview, when it
is printed out.
Setting the re-direction contact
392 - FAX / REROUTING / DESTINATION
1 Using the keys
and
within the navigator,
select the subscriber from the directory.
2 Quit this menu by pressing the
button.
Printing rerouted documents
393 - FAX / REROUTING / COPY
1 Using the keys
and
within the navigator,
select the COPY option (local printout of the
information relayed to your device) either WITH or
WITHOUT.
2 Confirm with OK.
3 Quit this menu by pressing the
button.
Rerouting fax messages to a USB
memory key
This function allows you to reroute received fax messages
to a USB memory key connected to your terminal. The
USB memory key then becomes the terminal reception
memory.
Transmission waiting queue
This function lets you obtain a recap of all documents
queuing, for transmission, including those in deposit or in
delayed transmission, etc.
It allows you to:
• Consult or modify the waiting queue. In this waiting
queue the documents are coded the following way:
Order number in the queue / document status /
subscriber’s telephone number.
Documents may have the following status:
- TX: transmission
- REL: relay
- DOC: in deposit
- POL: polling
- MBX: send to mailbox
- PMB: mailbox polling
- TR: ongoing commands
- SMS: SMS transmission
• Immediately perform a transmission from the waiting
queue,
• Print a document in storage, waiting to be transmitted
or in deposit,
• Print the waiting queue, in order to get the status of
each document in the queue, by either:
- 19 -
4 - Fax
MF 5461 / MF 5481
•
- queue order number,
- document name or number,
- scheduled transmission time (fax),
- operation type regarding the document: transmission
from memory, delayed transmission, deposit,
- number of pages of the document,
- document size (percentage of space stored in
memory)
Cancel a transmission request in the waiting queue.
1 Press
.
A message will ask you to confirm cancellation by
pressing
2 Press
a second time.
to confirm cancellation in progress.
If your machine is set to print a transmission report, it will
print that the communication was cancelled by the user.
Performing immediate transmission from
the waiting queue
61 - COMMANDS / PERFORM
1 Select the document in the waiting queue and
confirm your choice with OK or
to immediately
perform the selected transmission.
Consulting or modifying the waiting queue
62 - COMMANDS / MODIFY
1 In the waiting queue select the required document
and confirm your choice with OK.
2 You may now modify the parameters of the given
document then confirm your modifications by
pressing
To cancel transmission in progress:
.
Deleting a transmission on hold
63 - COMMANDS / CANCEL
1 In the waiting queue select the desired document
and confirm your choice with OK.
Printing a document in waiting or in deposit
64 - COMMANDS / PRINT
1 In the waiting queue select the desired document
and confirm your choice with OK.
Printing the waiting queue
65 - COMMANDS / PRINT LIST
A document called ** COMMAND LIST ** is printed.
Cancelling a transmission in
progress
MailBoxes (MBX Fax)
There are 32 mailboxes (MBX), enabling you to transmit
documents in complete confidence using an access code
(named MBX code), to all subscribers equipped with a fax
compatible to yours.
MBX 00 is public. It is handled directly by the terminal to
record the messages of the fax TAD as soon as this is put
into service.
MBX’s 01 to 31 are private. Each is password-protected.
They can be used to receive documents confidentially.
The use and access to MBX 01 - 31 are conditioned by
the initialisation, defined by a MBX code (if needed) and
a mnenonic (its S.I.D.).
Later you may:
• modify the features of an MBX,
• print the contents of an MBX, only possible if the MBX
contains one or more documents (with a star next to
the MBX). When the contents of an MBX have been
printed it becomes empty,
• delete an MBX, only if the MBX is initialised and
empty,
• print the the list of your fax machine’s MBX’s.
You may receive and send through an MBX in complete
confidentiality.
When depositing a document into your MBX, the access
code is not needed. All documents deposited in a MBX
are added to the ones already present.
In polling, the MBX’s are only accessible with an MBX
code.
You may perform MBX deposits or polls by:
• depositing a document in a fax MBX,
• transmitting to deposit a document in a remote fax
MBX,
• performing document poll from a remote fax.
Creating an MBX
71 - MAILBOXES / CREATE MBX
Cancelling a transmission in progress is possible no
matter what the type of transmission but varies depending
on whether the transmission is a single call number or a
multi-call number.
• For a single call number from the memory, the
document is erased from the memory.
• For a multi-call number, only the call number in
progress at the time of the cancellation is erased from
the transmission queue.
- 20 -
1 Select a free MBX out of the 31 MBX or directly
enter the number of a free MBX and confirm
with OK.
2 Select option MAILBOX CODE and press OK.
Value 0000 is always displayed.
3 Enter the code of your choice, if needed, and
press OK.
4 - Fax
MF 5461 / MF 5481
The list gives the status of each MBX.
4 Select option MAILBOX NAME and press OK.
5 Enter this MBX’s S.I.D. (20 characters max.) and
press OK.
MBX deposit in your fax
The MBX is initialised. If you wish to initialise
another, press C and repeat the same procedure.
6 To exit the MBX, press
.
Modifying the features of a MBX
71 - MAILBOXES / CREATE MBX
1 Select the desired MBX out of the 31 MBX’s, or
enter the number of the MBX directly and
press OK.
2 Enter the code of this MBX, if there is one, and
confirm with OK.
3 Select the menu MAILBOX CODE or MAILBOX
NAME, then confirm your choice with OK.
4 Perform data modification of the menu and confirm
with OK.
1 Insert the document in the fax machine’s feeder.
2 Select 72 - MAILBOXES / DEPOSIT MBX and
confirm with OK.
3 Select the desired MBX out of the 31 MBX’s, or
enter the number of the MBX directly and
press OK.
The document is placed in the feeder and saved in the
selected MBX.
MBX deposit in a remote fax
1 Insert the document in the fax machine’s feeder.
2 Select 35 - FAX / MBX SENDING and confirm
with OK.
3 Enter your subscriber’s number for MBX deposit or
choose your dialling mode and validate with OK.
4 Enter the subscriber’s MBX number and confirm
with OK.
5 If you wish to delay transmission, enter the new
transmission time next to the current time and
press OK.
6 If you wish to modify the document feed type,
select one of the options FEEDER or MEMORY,
and press OK.
7 If you wish, you may enter the number of pages of
your document before transmitting and confirm
with OK.
8 Confirm the transmission request to a remote MBX
If needed, repeat the last two steps for the other menu.
Printing the contents of a MBX
73 - MAILBOXES / PRINT MBX
1 Select the desired MBX out of the 31 MBX’s, or
enter the number of the MBX directly and
press OK.
2 Enter the code of this MBX, if there is one, and
confirm with OK.
All documents found in the MBX are printed and the MBX
is emptied.
Deleting a MBX
Before deleting an MBX, you need to make sure it is
empty, by printing its content.
fax by pressing key
.
In the case of an immediate transmission, the document
is sent immediately.
If the document is set for a postponed transmission, the
document will be stored in the memory and sent at the
requested time.
MBX polling from a remote fax
36 - FAX / MBX POLLING
74 - MAILBOXES / DELETE MBX
1 Enter your subscriber’s number for MBX polling or
choose your dialling mode and confirm with OK.
2 Enter the subscriber MBX number and press OK.
3 Enter this MBX access code and press OK.
4 If you wish to delay the poll time, enter the
departure time next to the current time and
press OK.
5 Confirm the MBX poll request by pressing
.
1 Select the desired MBX out of the 31 MBX’s, or
enter the number of the MBX directly and
press OK.
2 Enter the code of this MBX, if there is one, and
confirm with OK.
3 Press OK to confirm the MBX deletion.
The MBX is deleted and will appear as a free MBX in the
list.
Printing the MBX list
As soon as the remote fax is subscribed, either
immediately or later, the document(s) in the remote fax
MBX are receveid in your fax.
75 - MAILBOXES / PRT MBX LIST
- 21 -
4 - Fax
MF 5461 / MF 5481
Choix
Please check for remote fax compatibility.
Deposit and Polling
You may deposit a document in your fax and keep it
available to one or more subscribers who can obtain a fax
of this document by calling your fax with the POLL
function.
Setting the machine for document deposits, you must
define the type:
• SIMPLE- it may be polled only once from the memory
or feeder,
• MULTIPLE- it may be polled as many times as
necessary from the memory.
Setting the machine for polled documents, you must
define the poll number, then depending on the type of poll
you may:
• launch an immediate poll,
• program a delayed poll with a chosen time,
• launch a multi-poll, either immediately or later.
Placing a document in deposit
1 Insert the document to deposit in the feeder.
2 Select 34 - FAX / POLLING TX and confirm
with OK.
3 Choose the deposit type, according to the table
below:
Menu
Procedure
Simple
1 Select FEEDER or MEMORY.
2 If necessary, adjust the contrast
and confirm with OK.
3 Enter the number of pages that you
wish to deposit.
Multiple
1 If necessary, adjust the contrast
and confirm with OK.
2 Enter the number of pages that you
wish to deposit.
3 Confirm deposit by pressing OK.
Polling a deposited document
33 - FAX / POLLING RX
1 Enter the number of the party whose document you
want to poll or choose your dialling mode.
You can poll several documents using the key
2 Depending on the type of poll, you should:
.
- 22 -
4 - Fax
MF 5461 / MF 5481
Procédure
Immediate
poll
1 Press
Delayed poll
1 Press OK.
2 Next to the current time, enter
the time you wish to poll the
.
document and press
.
SMS
•
to delete a character (by moving the cursor to
the left), use Í or C.
3 Validate with OK.
4 Dial the number of the recipient (mobile phone or
any other SMS-compatible device) in one of the
following ways:
• dial the number using the digital keypad,
• enter the first letters of the recipient name,
Thanks to the SMS button, you can send an SMS to
subscribers all over the world. An SMS (Short Message
Service) is a service which permits short written
messages to be sent to mobile phones or other SMScompatible devices.
The number of characters you can send per message is
dependent upon the service provider and the country you
are sending your SMS from (e.g. France 160 characters,
Italy 640 characters).
The SMS service is dependent upon the country and the
service provider.
•
•
•
There is a special scale of charges for the
SMS service.
5 Press the
key and enter the next recipient's
number.
6 Repeat the operations as many times as required
(10 persons max.). Press OK to validate the last
recipient; "SENDING SMS" is displayed as the
SMS is being sent.
SMS Parameters
Presentation of the sender
•
This setting allows you to show the name or the number
of the sender when sending an SMS.
41 - SMS SERVICE / SENDER
1 Select the option WITH or WITHOUT presentation
of the sender using the
or
keys.
2 Validate with OK.
•
SMS Center transmission number
This setting allows you to enter the transmission number
for the SMS Server. Your Internet provider will provide
you with this number.
421 - SMS SERVICE / INIT. SMS / SERVER
1 Enter the number of the transmission server using
the digital keypad.
2 Validate with OK.
Sending an SMS
1 Press the
press the
key until the required name
appears (names are classified in alphabetical
order).
Your SMS may be sent to only one person or to
several people. To send an SMS:
to only one person, press OK to confirm,
to several people:
key.
2 Write your SMS using the alphabetical keypad.
To do so, an editor is at your disposal:
• for upper case letters, use the Ï key,
• to move inside the data entry field, use
and ,
• to move in the text from one word to another,
press CTRL and one of the navigator keys
( or ).
• to go to the next line, use
,
- 23 -
If SMS appears, then the SMS has been put on hold
and a further attempt will take place a couple of
minutes later. To immediately execute or cancel
transmission, refer to paragraph Transmission
waiting queue, page 19.
To check the SMS has been sent properly, you may
print the transmission/reception log (refer to paragraph
Printing the logs, page 29).
5 - SMS
MF 5461 / MF 5481
Parameters/
Setup
Type of network
You can connect your fax to either a PSTN or a private
network such as private automatic branch exchange
(PABX). You must select the network which is in use.
You can setup your machine as you like depending on the
use. You will find in this chapter description of the
functions.
To select the type of network:
251 - SETUP / TEL. NETWORK / NETWORK TYPE
1 Select option PABX or PSTN then confirm your
choice with OK.
You can print the functions guide and the available setup
of your multifunction machine.
2 To exit this menu, press
Your machine is continuously being updated,
new functions are regularly made available.
To benefit, visit our website www.sagem.com
and download the last updates.
.
Geographical settings
These settings will enable you to use your machine in
different preset countries using different languages.
Country
Date/Time
At any moment you may change the date and time on
your multifunction machine.
21 - SETUP / DATE/TIME
By choosing a country, you initialise:
• the settings for the public telephone network,
• the language by default.
To select the country:
1 Press , enter 21 using the keypad. Confirm with
OK.
2 Enter the numbers of the required time and date
one after another (for example November 8 2004 at
9h33, press 0 8 1 1 0 4 0 9 3 3) and press OK to
confirm.
3 To exit this menu, press
201 - SETUP / GEOGRAPHICAL / COUNTRY
1 Select the required option and press the OK key to
confirm.
2 To exit this menu, press
.
Network
Your fax number/Your name
Your multifunction machine will print out your fax number
and your name on each document it transmits if you save
these settings.
This setting enables you to manually set the type of public
telephone network (PSTN) for a country, so that your
machine can communicate over the public telephone
network in compliance with the applicable standards.
By default, setting a country using the
201 OK
command automatically sets the type of PSTN to use
in the selected country.
To benefit from this feature, you must set
SENDING HEADER to WITH (Technical
Parameters, page 27).
22 - SETUP / NUMBER/NAME
1 Press , enter 22 using the keypad. Confirm with
OK.
2 Enter your fax number (20 digits max.) and press
OK to confirm.
3 Enter your name (20 characters max) then press
OK to confirm.
These settings are different from the
NETWORK TYPE, which allows you to
choose between public and private network.
To manually select the type of public telephone network:
202 - SETUP / GEOGRAPHICAL / NETWORK
For example, if you want to type the letter C, press
the key C until it appears on the screen.
4 To exit this menu, press
.
.
- 24 -
1 Select the required option and press the OK key to
confirm.
2 To exit this menu, press
.
6 - Parameters/Setup
MF 5461 / MF 5481
Language
This setting enables you to choose the menu language of
your choice. By default, the multifunction machine is set
to English.
203 - SETUP / GEOGRAPHICAL / LANGUAGE
1 Select the required language using
then press the OK key to confirm.
2 To exit this menu, press
and
,
.
printing reports:
• WITH: a report is given when the transmission was
properly performed or when it is completely
abandoned (but there is only one report per request),
• WITHOUT: no transmission report, however, your fax
will note all transmissions that took place in its log,
• ALWAYS: a report is printed with each transmission,
• ON ERROR: a report is printed only if the transmission
failed or is abandoned.
With each transmission report from memory, a reduced
version of the first page is automatically reproduced.
To select the report type:
231 OK - SETUP / SEND / SEND REPORT
Local prefix
This function is used when your fax is installed with a
private network, behind a company’s PABX. It allows you
to program an additional automatic local prefix (to be
defined), enabling you to automatically exit the
company’s telephone network system, but only under
certain conditions:
• the company’s internal numbers, where a prefix is not
required, must be short numbers less than the
minimal size (to be defined, for example France has
10 digits),
• the outside numbers requiring a prefix, must be long
numbers greater or equal to the minimal size (to be
defined, for example France has 10 digits).
Programming your fax with the local prefix consists of two
steps:
1 defining the minimal size (or equal) of the
company’s outside numbers,
2 defining the outgoing local prefix of the company’s
telephone network. This prefix will automatically be
added as soon as an external number is dialled.
1 Select the required option WITH, WITHOUT,
ALWAYS or ON ERROR and confirm your choice
with OK.
2 To exit this menu, press
.
Document feed type
You may choose the way you want to feed your
documents:
• from memory, transmission will take place only after
memory storage of the document and dialling.
It allows you to get your originals back quickly to free
up the machine.
• from the feeder of the sheet-feed scanner,
transmission will occur after dialling and paper
scanning. It allows transmission of larger documents.
To select the way you want to feed your documents:
232 - SETUP / SEND / MEMORY SEND.
1 Select the option MEMORY or FEEDER and
validate your choice with OK.
In feeder mode, reduced images will not appear on
the transmission report.
If you define a local prefix, do not add it to
the numbers stored in the directory, it will
be automatically dialled with each number.
Prefix
2 To exit this menu, press
.
252 - SETUP / TEL. NETWORK / PREFIX
1 You can change the default value for the minimal
size of the company’s outside numbers and
validate with OK.
The minimal size will range between 1 and 30.
2 Enter the outgoing local prefix of the company’s
telephone network (maximum 5 characters) and
validate with OK.
3 To exit this menu, press
.
Economy period
This function allows you to defer a fax transmission to "offpeak hours" and thus reduce the cost of your
communications.
The economy period, via the telephone network (at offpeak hours), is preset by default from 7.00 pm to 7.30 am.
Nevertheless you may change this time slot.
To modify the economy period:
Transmission report
233 - SETUP / SEND / ECO PER.
You may print a transmission report for all
communications over the telephone network (PSTN).
You may choose between more than one criteria for
- 25 -
1 Enter the hours of the new economy period and
confirm your selection with the key OK.
6 - Parameters/Setup
MF 5461 / MF 5481
To use the economy period:
Paper out is indicated by a beep and a
message on the screen.
Received faxes are then stored in memory
32 - FAX / ECO TRANS.
1
2
3
4
Enter the call number and confirm with OK.
Choose SCAN B & W or COLOR SCAN.
Adjust the contrast and confirm with OK.
Select the feed type, FEEDER or MEMORY and
confirm with OK.
5 You may enter the number of pages before
transmission and confirm with OK.
Reception Mode
(icon
flashing) to be printed as soon as
you add paper into the feeder.
Number of copies
You may print incoming documents more than once (1 to
99).
To set the number of each document received:
243 - SETUP / RECEPTION / NBR OF COPIES
This function allows you, when you connected an external
device (telephone, answering machine) to your terminal,
to select the device you wish to receive fax and / or voice
messages on.
You may choose between the following reception modes :
• MANUAL : the terminal does not receive any
documents automatically. When you receive a fax
•
•
message, you must press the
button to receive the
fax message on your terminal.
FAX : the Fax reception mode is launched on the
terminal systematically.
FAX/REPONDEUR : the terminal handles reception of
fax messages automatically, the external device
handles reception of telephone communications
automatically.
To set the reception mode:
241 - SETUP / RECEPTION / MODE
1 Select the required option and confirm with OK.
2 To exit this menu, press
.
1 Enter the wanted number of copies and confirm
with OK.
At each document reception, your fax will print the
number of copies requested.
Fax or PC reception
This menu, combined with a software program installed
on your PC will enable you to select the machine you wish
to receive the documents on:
• fax,
• PC,
• PC if available, fax otherwise.
244 - SETUP / RECEPTION / PC RECEPT.
For more details, please refer to the instruction manual
provided with the software kit.
Received faxes reduction mode
Reception without paper
Your fax offers you the possibility to either accept or
refuse document reception if your printer is unavailable
(no paper...).
If your fax printer is unavailable, you may choose between
two modes of reception:
• reception mode WITHOUT PAPER, your fax saves
the incoming messages in the memory,
• reception mode WITH PAPER, your fax refuses all
incoming subscribers.
To select the reception mode:
242 OK - SETUP / RECEPTION / REC. PAPER
1 Select the option WITH PAPER or WITHOUT
PAPER and confirm your choice with OK.
This menu allows you to reduce received faxes for
printing. This adjustment can be automatic or manual.
Automatic mode
This mode automatically resizes received faxes.
To set automatic mode:
246 - SETUP / RECEPTION / REDUCTION
1 Select Automatic and confirm with OK.
2 To exit this menu, press
.
Manual mode:
The machine proposes a 70 to 100 % reduction. Outside
these values, the machine beeps for error. This fixed
reduction will be used when printing received documents,
regardless of the used paper format.
To set the manual mode:
246 - SETUP / RECEPTION / REDUCTION
- 26 -
6 - Parameters/Setup
MF 5461 / MF 5481
1 Select FIXED and confirm with OK.
2 Enter the reduction value (between 70 and 100)
and confirm with OK.
3 To exit this menu, press
Parameter
7 - COM. display
Choice between transmission
speed displayed or number of
the page in progress.
8 - Eco energy
Choosing the printer standby
delay: the printer will switch to
standby after a delay (in
minutes) of NON-operation or
during the period of time of
your choice.
10 - RX header
If this parameter is on, all
documents received by your fax
will include the subscriber’s
header with his name, number
(if available) fax print date and
the page number.
11 - RX speed
Transmission speed for
incoming documents.
For a quality telephone line
(compatible, no echo),
communications occur at
maximum speed.
However, it may be necessary
to restrict the transmission
speed for some calls.
12 - Rings
Number of rings to
automatically start your
machine.
13 - Discard size
The Discard Size parameter only
defines the printing of received
faxes . The number of lines of a
document can be too high for the
printing
paper
format.
This
parameter defines the threshold
beyond which the extra lines are
printed on a second page. Bellow
this threshold, extras lines are
deleted.
If you choose With, the threshold
is set on 3 centimeters.
If you choose Without, the
threshold is set on 1 centimeter.
20 - E.C.M.
This parameter helps correct the
calls made on disturbed
telephone lines. It is used when
the lines are weak or too noisy.
Transmission times may be
longer.
.
Technical Parameters
As delivered your machine is preset by default. However,
you may adjust it to meet your requirements by resetting
the technical parameters.
To set the technical parameters:
29 - SETUP / TECHNICALS
1 Select the desired parameter and confirm with OK.
2 With the keys
or , modify the parameter
settings by following the table below and press OK.
Parameter
Signification
1 - Scanning mode
Default value of the scan mode
resolution for the documents to
be transmitted.
2 - TX header
If this parameter is on, your
header will appear on all
documents sent to your
subscribers with your name,
number, date and number of
pages.
Warning: If you send a fax
from the document loader, the
transmission header will not
appear on the document your
correspondent receives.
3 - TX speed
Transmission speed for
outgoing documents.
For a quality telephone line
(compatible, no echo),
communications occur at
maximum speed.
However, it may be necessary
to restrict the transmission
speed for some calls.
4 - Echo protect
If this parameter is on, the online echo will be reduced during
long distance calls.
6 - EPT mode
For some long distance calls
(satellite), the on-line echo may
disturb the call.
Signification
- 27 -
6 - Parameters/Setup
MF 5461 / MF 5481
Parameter
Signification
25 - TEL Impedance
This parameter lets you choose
between a complex impedance
and a 600 Ohm impedance,
depending on the telephone
network your terminal is
connected to.
81Font number
Starts the printing of the log list.
This parameter lets you set the
default PCL font. The possible
values are included between 5
and 128 inclus. The default
value is 0 (Courier).
73 - Improve rep @
This parameter lets you
automatically register the
Internet
address of your subscribers fax
during a call (if available).
82 Form lines
74 - Erase mailbox
When the fax machine receives
an e-mail with an attachment
and cannot open it, it erases the
message from the ISP MBX,
prints and transmits with a
notice of uncomprehension to
the message sender.
At E-mail reception, the fax
does not destroy the MBX
message, it prints a notice of
uncomprehension asking you to
recuperate this message with
your computer equipment.
This parameter is useful only if
you have PC equipment. The
memory capacity is limited, you
need to empty your MBX or
else new messages may not be
received.
This parameter lets you set the
number of lines per page.
This variable is linked to the
PJL variables: PAPER and
ORIENTATION. If you modify
one of these variables, the Form
Lines variable is automatically
updated (only for the print job
in progress) to respect the same
spacing.
The possible values are
included between 5 and 128
inclus. The default value is 60.
83 Font pitch
This parameter lets you set the
default font spacing, in
characters per inch (the default
font must be of type nonproportional).
The possible values are
included between 0,44 and
99,99 inclus. The default value
is 10,00.
84 Ptsize
This parameter lets you set the
default font height, in points
(the default font must be of type
proportional).
The possible values are
included between 4,00 and
999,75 (by step of 0,25). The
default value is 12,00.
85 Line termin.
This parameter lets you define
line breaks conversion: <CR>,
<LF> and <FF>.
The possible values are
included between 0 and 3. The
default value is 0.
86 Orientation
This parameter lets you set the
page orientation: portrait or
landscape. The default value is
"portrait".
90 - RAW Port
RAW network print port
connection.
75 - Text Attchmt.
Editing YES / NO and printing
the received Internet
documents.
76 - Attchmt format
Default format of document
sent on the Internet:
PDF : monochrome or colour
IMAGE : monochrome (TIFF)
or colour (JPEG)
77 - LAN speed
To define the communication
speed of the peripheral units in
relation to the implemented
Local Area Network (LAN).
80 - Toner save
Makes printing lighter to save
toner cartridge ink.
Parameter
- 28 -
Signification
6 - Parameters/Setup
MF 5461 / MF 5481
Parameter
91 - Printer error
timeout
Time-out before document
being printed is deleted
following a print error in PC
print mode.
92 - Printer wait
timeout
Wait time-out for data from PC
before the task is deleted in PC
print.
93 - Replace format
Page format change. This
parameter allows you to print a
LETTER format document on
A4 pages using the LETTER/
A4 setting.
94 - Printer class
Printing in PCL-/Postscript
Mode
Printing in GDI mode
95 Symbol set
This parameter lets you set the
default character set. The
possible values are included
between CS1 and CS30 inclus.
The default value is CS1
(Roman8).
96 - NBR. WEP
Keys
•
•
•
•
Signification
•
transmission mode (Normal, Fine, SFine or Photo),
number of pages sent or received,
call duration,
incoming or outgoing results: noted CORRECT if
properly transmitted,
or
information codes for special calls (polling, manual
subscribers, etc.)
reason for call error (example: your subscriber does
not answer)
To print the logs:
52 - PRINT / LOGS
1 Press on
and enter 52 with the digital keypad.
The printing of the logs starts.
The incoming and outgoing logs are printed on
the same page.
Print the list of setups
The printing is not possible on A5 paper
format.
To print the list of setups:
Number of WEP keys allowed
(from 1 to 4).
54 - PRINT / SETUP
1 Press on , enter 54 with the digital keypad.
The printing of the list of setups starts.
Printing the functions guide
Font printing
You can print the list of fonts installed on your terminal at
any time.
The printing is not possible on A5 paper
format.
51 - PRINT / FUNCTIONS LIST
1 Press on
and enter 51 with the digital keypad.
The printing of the functions guide starts.
Printing the logs
To print PCL fonts:
57 - PRINT / PCL FONTS
To print SG Script fonts:
58 - PRINT / SGSCRIPT FONTS
Lock the machine
The printing is not possible on A5 paper
format.
The incoming and outgoing logs list the last 30
transmissions (incoming and outgoing) made by your
machine.
An automatic print out will take place after every 30
transmissions. However, you may request a print out at
any time.
Each log (incoming or outgoing) contains a table with the
following information:
• date and time of the incoming or outgoing document,
• subscriber’s number or E-mail address,
This function prevents non-authorized people from
accessing the machine. An access code will be required
every time someone wants to use the device. After each
use, the device will lock automatically.
Before that you have to enter a lock code.
- 29 -
If a code is already registered, enter the old
code before typing the new one.
811 - ADVANCED FCT / LOCK / LOCKING CODE
6 - Parameters/Setup
MF 5461 / MF 5481
1 Press on , enter 811 with the digital keyboard.
2 Enter your lock code (4 digits) with the keyboard,
confirm with OK.
3 Enter again your lock code (4 digits) with the
keyboard, confirm with OK.
4 Quit this menu by pressing the
button.
•
•
•
received pages,
scanned pages,
printed pages.
Sent pages counter
To view the number of pages sent from your machine:
Lock the keyboard
821 - ADVANCED FCT / COUNTERS / SENT PAGES
Everytime you use your machine, you will have to enter
your code.
1 Press on , enter 821 with the keyboard.
2 The number of sent pages appears on the screen.
3 Quit this menu by pressing the
button.
812 - ADVANCED FCT / LOCK / LOCK KEYBD.
1 Press on , enter 812 with the keyboard.
2 Enter the lock code and confirm with OK.
3 With the buttons
or , choose WITH and
confirm with OK.
4 Quit this menu by pressing the
button.
Received pages counter
To view the number of pages received on your machine:
822 - ADVANCED FCT / COUNTERS / RECEIVED
PG
Lock the numbers
1 Press on , enter 822 with the keyboard.
2 The number of received pages appears on the
screen.
3 Quit this menu by pressing the
button.
This function locks dialling and the numerical keypad is
disabled. Transmissions are only possible from numbers
included in the directory.
To access the number interlocking option:
813 - ADVANCED FCT / LOCK / LOCK NUMBER
1 Enter the four-digit interlock code with the keypad.
2 Press key OK to confirm.
3 With keys
or
of the navigator, select the
option DIRECT ONLY.
4 Press key OK to confirm.
5 Quit this menu by pressing the
button.
Scanned pages counter
To view the number of pages scanned on your machine:
823 - ADVANCED FCT / COUNTERS / SCANNED
PAGE
1 Press on , enter 823 with the keyboard.
2 The number of scanned pages appears on the
screen.
3 Quit this menu by pressing the
button.
Lock the SMS service
This function prevents access to the SMS service.
To access the SMS service locking menu:
Printed pages counter
815 - ADVANCED FCT / LOCK / LOCK SMS
To view the number of pages printed on your machine:
824 - ADVANCED FCT / COUNTERS / PRINTED PG
1 Enter the four-digit locking code with the numerical
keypad.
2 Press key OK to confirm.
3 Enter the four-digit locking code again to confirm it.
4 Press key OK to confirm.
When a code is already registered in the machine, you will
have to enter this registered code first before you can type
and register a new one.
1 Press on , enter 824 with the keyboard.
2 The number of printed pages appears on the
screen.
3 Quit this menu by pressing the
button.
Display the consumables status
You can read at any time the remaining toner in the
cartridge. This level appears in percentage.
Read the counters
86 - ADVANCED FCT / CONSUMABLES
This function allows you to view the activity counters for
your machine at any time.
According to your needs, you can read the counters for:
• sent pages,
- 30 -
1 Press on , enter 86 with the keyboard.
2 The available toner percentage appears on the
screen.
6 - Parameters/Setup
MF 5461 / MF 5481
3 Quit this menu by pressing the
button.
Calibrate your scanner
You can do this operation when the quality of photocopied
documents is not satisfactory anymore.
80 - ADVANCED FCT / CALIBRATION
1 Press on , enter 80 with the keyboard, confirm
with OK.
2 The scanner is triggered and a calibration is done
automatically.
3 At the end of the calibration, the machine comes
back to the screen saver.
- 31 -
6 - Parameters/Setup
MF 5461 / MF 5481
Directory
5 Select W. ASSOC. KEY if you want to assign a
shortcut key (letter) to your subscriber record. The
first available letter appears, use or to choose
another letter. Confirm with OK.
6 Select the appropriate transmission RATE to send
faxes among the values 2400, 4800, 7200, 9600,
12000, 14400 and 33600 using
or . Confirm
with OK.
The maximum speed can be used if the telephone
line is of good quality, meaning appropriate,
without echo.
Your multifunction machine lets you create a directory by
memorising subscriber records and subscriber lists. Your
machine can store up to 250 subscriber records, which
you can group in 20 subscriber lists.
For all subscriber records or subscriber lists you may
create, consult, modify or delete contents. You can also
print the directory.
Furthermore, your machine lets you create and manage
your phone directory from your PC Kit. For more
information on this feature, refer to chapter PC Features.
If your multifunction machine is connected to
a PABX, you may insert a pause for dial tone
after the outgoing local prefix dialling. To do
so, insert the character "/" after the local
prefix.
Creating subscribers record
To create subscribers record:
11 - DIRECTORY / NEW CONTACT
1 Press on , enter 11 with the digital keypad.
2 Enter the NAME of your contact with the
alphanumerical keypad (20 characters maximum),
confirm with OK.
3 Enter the TEL number of your contact with the
digital keypad (30 digits maximum), confirm
with OK.
4 Choose the RECORD NO from your directory with
the digital keypad or accept the displayed number,
and confirm with OK.
At this stage, you may associate an e-mail address
or an FTP address to your subscriber. If you do not
wish to do so, confirm with OK and refer to step 5.
To associate an e-mail address:
• Enter the E-Mail address of your subscriber and
confirm with OK.
• Define the attachment format (Image or PDF)
then confirm with OK.
• Refer to step 5.
Or to associate an FTP address :
• Do not enter the e-mail address and confirm
with OK.
• Enter the FTP address of the contact (for
example: 134.1.22.9), then confirm with OK.
• Enter the FTP user name (for example: Durand)
then confirm with OK.
• Enter the password of the FTP user, then confirm
with OK..
• If necessary, enter the file destination directory
(when this field is not completed, the files are
stored directly under the root) of the FTP server
(for example: server name / Durand). Confirm
with OK.
• Define the attachment format (Image or PDF)
then confirm with OK.
• Refer to step 5.
Creating subscribers list
To create subscribers list:
12 - DIRECTORY / NEW GROUP
1 Press on , enter 12 with the digital keypad.
2 Enter the LIST NAME with the alphanumerical
keypad (20 characters maximum), confirm
with OK.
3 CALLED NUMBER: use
ou
to select from
existing records the contacts of your list and
confirm with OK. Repeat this operation for each
subscriber you want to add to your list.
4 Enter the LIST NUMBER assigned to your list with
the digital keypad or accept the displayed number,
and confirm with OK.
In the directory, the letter G placed next to a
name identifies a subscribers group.
Modifying a record
To modify a subscribers record or list:
13 - DIERCTORY / MODIFY
- 32 -
1 Press , enter 13 with the digital keypad.
2 With
or , browse the directory and select the
record or list you want to modify by pressing OK.
3 With
or , browse the entries of the selected
record or list. Press on OK when the entry you want
to modify appears on screen.
4 The cursor appears at the end of the line. Press
on C to delete characters.
5 Enter the new entry and confirm with OK.
6 Repeat the operations for each line you want to
modify.
7 - Directory
MF 5461 / MF 5481
Deleting a record or a list
To delete a subscribers record or list:
14 - DIRECTORY / CANCEL
1 Press on , enter 14 with the keypad.
2 With
or , browse the directory and select the
record or list you want to delete by pressing OK.
3 Press on OK to confirm the deletion.
4 Repeat the operations for each record or list you
want to delete.
Printing the directory
The printing is not possible on A5 paper
format.
To print the directory:
15 - DIRECTORY / PRINT
1 Press on
, enter 15 with the keypad.
The printing of the directory starts, in alphabetical order.
- 33 -
7 - Directory
MF 5461 / MF 5481
Local network
settings
IP address
272 - SETUP/LAN ETHER/ADRESSE IP
1 Enter the IP address of your terminal and press OK
to confirm.
You may connect your multifunction terminal to an
Ethernet or a wireless network.
However, practical knowledge of your computer
configuration is required to set up a network.
Sub-network mask
273 - SETUP/LAN ETHER/MSK SS RES.
1 Enter the sub-network mask of your terminal and
press OK to confirm.
Selecting the type of your local
network
Gateway address
Ce paramètre permet de configurer votre terminal en
fonction du type de réseau dans lequel il va être installé.
274 - SETUP/LAN ETHER/PASSERELLE
1 Enter the IP address of the network gateway and
press OK to confirm.
26 - SETUP/LOCAL NETWORK
1 Select the desired network type using the
or
buttons
- WLAN if using a wireless network
- LAN ETHERNET if using a wired network
2 Confirm with OK.
IEEE Address (or Ethernet address) or MAC
address
275 - SETUP/LAN ETHER/IEEE ADDRESS
The Ethernet card of your terminal already has an
unmodifiable, yet consultable, IEEE address.
Ethernet network settings
(Model MF5481)
NetBIOS names
Automatic configuration
We recommend that you carry out a manual configuration
of your terminal. The automatic configuration of the local
network settings may be considered, if your local network
features a DHCP or BOOTP server that can dynamically
assign addresses to the peripheral devices present on the
LAN.
To automatically configure the local network settings:
271 - SETUP/LAN ETHER/IP CONFIG.
1 Choose Automatic and press OK to confirm. The
terminal scans the local network for a DHCP or
BOOTP server that can assign it its settings
dynamically (the message Self-conf is displayed).
2 Once the message Self-conf has disappeared,
check for the IP Address, Sub-network mask and
Gateway address. If these are missing, you should
carry out a manual configuration (see below).
These names, which can be used with the network
options, are used to identify your terminal machine from a
PC connected to a local network (for instance with the
name "IMP-NETWORK-1").
276 - SETUP/LAN ETHER/NETBIOS 1
277 - SETUP/LAN ETHER/NETBIOS 2
1 Enter the selected name (15 characters max) and
press OK to confirm.
Serveurs de nom
The WINS1 and WINS2 servers, used with the network
options, allow access to terminals on other sub-networks
by means of their NetBIOS name.
278 - SETUP/LAN ETHER/NETBIOS 1
279 - SETUP/LAN ETHER/NETBIOS 1
1 Enter the IP address of each server, then validate
with OK.
Manual configuration
To configure your terminal manually, you should obtain
the usual information used to set a peripheral device (IP
address, sub-network mask, network and gateway
address).
To configure the local network setting manually:
271 - SETUP/LAN ETHER/IP CONFIG.
3 Choose Manual and press OK to confirm.
- 34 -
Si le terminal est paramétré en Configuration
automatique (menu 271), ces adresses
peuvent être remplies automatiquement par
certains serveurs DHCP.
8 - WLAN network
MF 5461 / MF 5481
WLAN network
well as the number of barriers, such as walls or ceilings.
You can connect your machine to a PC using a USB cable
or make a wireless connection (via radio) with a PC or
network.
Beware, when you are using a wireless
connection, that certain items of medical
equipment, sensitive or security systems may
be affected by the radio transmissions of your
device; in all cases, please follow safety
guidelines closely.
If you have a WLAN adaptor, you can incorporate your
machine as a network printer into a radio network. This
works only with an approved adaptor that you can obtain
from our ordering department. For further information,
contact www.sagem.com.
Radio networks (WLAN)
Three steps are necessary to incorprate your machine
into a radio network (WLAN):
Type of radio network
1 Configure the network to your PC.
2 Set up the parameters for your machine so that it
can function in a network.
3 Having set up the parameters your device, install
the Companion Suite LL software onto your PC
with the necessary printer drivers.
A radio network or WLAN (Wireless Local Area Network)
is created when at least two computers, printers or other
peripheral devices communicate with each other in a
network via radio waves (high frequency waves). The
transmission of data in the radio network is based on the
standards 802.11b and 802.11g. According to how the
network is set up, it may be described as an infrastructure
network or an ad-hoc network.
The PC and all other devices must have their
parameters set up to the same network as the
multifunction machine. All the details needed
for setting up the device, such as the network
names (SSID), type of radio network, WEP
key, IP address or subnetwork mask, must
match the specifications of the network.
Radio infrastructure network
In an infrastructure network, several devices
communicate via a central access point (a gateway or
router). All data is sent to the access point (gateway or
router) from where it is re-distributed.
You will find these details on your PC or on
the Access Point.
To find out how to set up the parameters for
your PC, please consult the users’ manual for
your WLAN adaptor. For large networks,
please seek the advice of your network
administrator.
You can be sure of perfect communication if
you use an approved adaptor in conjunction
with your PC.
All of the latest printer drivers for the
approved adaptor may be found on our
website together with further information:
www.sagem.com.
Radio ad-hoc network
In an ad-hoc network, the devices communicate directly
with each other without passing through an access point.
The speed of communication across the whole radio
network is as fast as the weakest connection in the
network. The speed of communication is also dependent
on spatial distance between transmitter and receiver, as
Connect your WLAN adaptor
Your machine belongs to a new generation of terminals
that you can incorporate into a WLAN network using a
- 35 -
8 - WLAN network
MF 5461 / MF 5481
1 Type in , select the menu SETUP using the keys
or
and confirm with OK.
2 Select WLAN using the keys t or s and confirm with
OK.
3 Select ASS. CONFIG. using the keys t or s and
confirm with OK.
4 Select NEW NETWORK using the keys t or s and
confirm with OK.
WLAN USB key.
Your machine’s network radio adaptor
transmits data using the radio protocol IEEE
802.11g; it can also be incorporated into an
existing IEEE 802.11b network.
When connecting to your machine, only use
the approved adaptor. Other transmitting or
receiving adaptors may damage your device.
If you choose and exisiting network, steps 5
and 6 ( and possibly 7) are carried out
automatically.
Irrespective of whether you use your machine
in an infrastructure or ad-hoc network, you
must set up certain network and security
parameters (for example, the Service-Set-ID
(SSID) and the WEP key). These must match
the network’s specifications.
5 SSID appears on the screen, enter the name of
your network using the numerical keypad, pressing
the keys one after the other until you obtain the
name you want (32 characters maximum) and
confirm with OK.
6 AD-HOC MODE or INFRA. MODE appear on the
screen. Go back to the beginning of the chapter
and make your choice.
Select one of these modes and confirm with OK.
- If you choose AD-HOC mode, the sub-menu
CHANNEL appears, enter a figure between 1
and 13 and confirm with OK.
7 WITHOUT SECURITY or WITH SECURITY
appear on the screen.
Select the option you want and confirm with OK.
- If you choose WITH SECURITY the sub-menu
WEP KEY 1 appears, enter the key number
(1 to 4 maximum) that you are using on your
network.
Plug your WLAN USB key into the USB port of your
machine.
The WEP key number may be configured in
the menu:
29 - SETUP / TECHNICALS / WEP KEYS
NBR
8 IP CONF.: MANU or IP CONF.: AUTO appear on
the screen.
If you choose to set up the system manually, go to
the next paragraph and enter the parameters
IP ADDRESS, SUBNET MASK and GATEWAY.
9 At the end of this procedure, you return to the main
menu of ASS. CONFIG.
10 Exit this menu by pressing the
key.
Configure your network
We recommend that the settings of your
WLAN network should only be changed by a
person with a good knowledge of the
configuration of your computer.
Referring to or changing your network
parameters
Each of the parameters of your network may be changed
as your network develops.
Creating or rejoining a network
Before attempting to use a WLAN adaptor on your
machine, you must enter the parameters that will allow a
WLAN network to recognise your machine.
On your machine you will find simple instructions that
guide you step by step through the set-up of your network.
Just follow them!
281 - SETUP / WLAN / ASS. CONFIG.
- 36 -
2822 - SETUP / WLAN / PARAMETERS / IP
ADDRESS
1 Type in , select the menu SETUP using the keys
or
and confirm with OK.
2 Select WLAN using the keys
or
and confirm
with OK.
3 Select PARAMETERS using the keys or and
confirm with OK.
8 - WLAN network
MF 5461 / MF 5481
or
and confirm with OK.
2 Select WLAN using the keys
or
and confirm
with OK.
3 Select PARAMETERS using the keys or and
confirm with OK.
4 Select MODE using the keys
or
and confirm
with OK.
5 The symbol >>, tells you that your network is in
active mode.
6 Select one of the modes and confirm with OK.
- If you choose the AD-HOC MODE, the submenu CHANNEL will appear; enter a number
between 1 and 13 and confirm with OK.
4 Select IP ADDRESS using the keys
or
and
confirm with OK.
5 The dumber of your IP address will appear in the
format 000.000.000.000. Enter the new IP address
for your machine in the format displayed and
confirm with OK.
6 Exit this menu by pressing the
key.
2823 - SETUP / WLAN / PARAMETERS / SUBNET
MASK
1 Type in , select the menu SETUP using the keys
or
and confirm with OK.
2 Select WLAN using the keys
or
and confirm
with OK.
3 Select PARAMETERS using the keys or and
confirm with OK.
4 Select SUBNET MASK using the keys or and
confirm with OK.
5 The number of your subnet mask will appear in the
format 000.000.000.000. Enter the new submask
of your machine in the format displayed and
confirm with OK.
6 Exit this menu by pressing the
key.
7 Exit this menu by pressing the
In an AD-HOC network, the devices
communicate directly with each other without
passing through an access point. The speed
of communication across the whole AD-HOC
radio network is as fast as the weakest
connection in the network. The speed of
communication is also dependent on spatial
distance between transmitter and receiver, as
well as the number of barriers, such as walls
or ceilings.
2824 - SETUP / WLAN / PARAMETERS / GATEWAY
1 Type in , select the menu SETUP using the keys
or
and confirm with OK.
2 Select WLAN using the keys
or
and confirm
with OK.
3 Select PARAMETERS using the keys or and
confirm with OK.
4 Select GATEWAY using the keys
or
and
confirm with OK.
5 The number of your gateway will appear in the
format 000.000.000.000. Enter the new gateway
for your machine in the format displayed and
confirm with OK.
6 Exit this menu by pressing the
key.
2827 - SETUP / WLAN / PARAMETERS / SECURITY
This parameter allows you to make your network secure.
2825 - SETUP /WLAN / PARAMETERS / SSID
1 Type in , select the menu SETUP using the keys
or
and confirm with OK.
2 Select WLAN using the keys
or
and confirm
with OK.
3 Select PARAMETERS using the keys or and
confirm with OK.
4 Select SSID using the keys
or
and confirm
with OK.
5 The name of your network will appear on the
screen. Enter the new name of your network and
confirm with OK.
6 Exit this menu by pressing the
key.
1 Type in , select the menu SETUP using the keys
or
and confirm with OK.
2 Select WLAN using the keys
or
and confirm
with OK.
3 Select PARAMETERS using the keys or and
confirm with OK.
4 Select SECURITY using the keys
or
and
confirm with OK.
5 Choose WITH or WITHOUT and confirm by OK.
If you choose WITH, enter a password:
- In a 64 bit security configuration, the password
must contain five characters exactly.
- In a 128 bit security configuration, the password
must contain 13 characters exactly.
You may also enter the password using the
hexadecimal system, if this is the case:
- For a 64 bit security configuration, the
password must contain exactly
10 hexadecimal characters.
- For a 128 bit security configuration, the
password must contain exactly
26 hexadecimal characters.
6 Exit this menu by pressing the
2826 - SETUP / WLAN / PARAMETERS / MODE
1 Type in
key.
, select the menu SETUP using the keys
- 37 -
key.
2828 - SETUP / WLAN / PARAMETERS /
HOSTNAME
8 - WLAN network
MF 5461 / MF 5481
11 Enter "169.254.0.2" in the field IP ADDRESS and
confirm with OK.
12 Enter "255.255.0.0" in the field SUBNET MASK
and confirm with OK.
13 Enter "0.0.0.0" in the field GATEWAY and confirm
with OK.
14 At the end of this process, you return to the main
menu of ASS. CONFIG.
15 Exit this menu by pressing the
key.
The machine name allows you to identify your machine on
the network via a PC (for example with the name "PRINTNETWORK-1").
1 Type in , select the menu SETUP using the keys
or
and confirm with OK.
2 Select WLAN using the keys
or
and confirm
with OK.
3 Select PARAMETERS using the keys or and
confirm with OK.
4 Select HOSTNAME using the keys
or
and
confirm with OK.
5 Type in the desired name (15 characters
maximum) and confirm with OK.
6 Exit this menu by pressing the
Once the network has been set up, the LED of the WLAN
USB key should be on.
You must now set up the PC.
Setting up the PC
key.
Once your connection has been set up, you must install
the network printer driver "Laser Pro LL Network" on
your PC so that you can print your documents.
Refer to the paragraph Network connection, page 46.
An example of how an AD-HOC network may be
set up
An example of how to configure an Ad-hoc network
without security protection using the following
parameters:
• network name: "house"
• radio type: "ad-hoc"
• channel: "1"
• PC’s IP address: "169.254.0.1"
• PC’s subnetwork mask: "255.255.0.0"
• PC’s gateway: "0.0.0.0"
• IP address of the multifunction machine: "169.254.0.2"
• subnetwork mask of the multifunction machine:
"255.255.0.0"
• multifunction machine’s gateway: "0.0.0.0"
For this section, refer to the instructions supplied by the
manufacturer of the WLAN USB key to help you to find
and join the "house" network.
1 You may need to install the software for the WLAN
USB key on the PC, if this has not already been
done.
2 Plug WLAN USB key into a USB port on the PC.
3 Use the software of the WLAN USB key to detect
the network.
4 Join the network "house" once this has been
detected.
5 Now set up the WLAN network connection of your
PC.
Setting up a multifunction machine
1 Plug the WLAN USB key into the USB connector of
the multifunction machine.
2 Type in , select the menu SETUP using the keys
or
and confirm with OK.
3 Select WLAN using the keys
or
and confirm
with OK.
4 Select ASS. CONFIG. using the keys
or
and
confirm with OK.
5 Select NEW NETWORK using the keys
or
and confirm with OK.
6 SSID appears on the screen, enter "house" using
the numerical keypad and confirm with OK.
7 Select the mode AD-HOC MODE and confirm with
OK.
8 Enter "1" in the field CHANNEL and confirm with
OK.
9 Select WITHOUT SECURITY and confirm with OK.
10 Select IP CONF.: MANU and confirm with OK.
- 38 -
To guide you through this stage, refer to the
paragraph “Setting the parameters for a
connection” in the manufacturer’s instructions.
To do this, you must configure the element
Protocol Internet (TCP/IP) for the WLAN
connection that has been created. If this element is
set up in such a way as to obtain an IP address
automatically, you must change it to manual mode
to set up the TCP/IP address ("169.254.0.1" in our
example), the subnet mask ("255.255.0.0" in our
example) and the default gateway ("0.0.0.0" in our
example).
6 Enter OK.
8 - WLAN network
MF 5461 / MF 5481
MF 5461 / MF 5481
Message service
(Model MF5481)
ID.MESS.SERV to keep the same identification
parameters as in the messaging service or
AUTHENT. SPEC. to define other identification
parameters, then validate by pressing OK key.
3 When you select AUTHENT. SPEC, carry out the
two following operations:
4 Enter the IDENTIFIER then validate with OK key.
5 Enter the PASSWORD then validate with OK key.
Your terminal lets you send and receive emails via your
local network.
To do so, you must connect your terminal to a local
network. You must also configure the message service
settings.
Sending an E-Mail
1 Place the document to be copied in the automatic
document feeder, face printed on the top.
or
Place the document to be copied face down on the
glass, respecting the indications around the glass.
2 Enter the addressee’s E-mail address or choose
your dialling mode.
3 Enter the address of who you want to receive a
copy of the document (CC:), and press OK to
confirm.
4 Enter the object for mail (80 characters max.) and
press OK.
5 Enter the text with the alphabetical keypad (100
lines of 80 characters) and confirm with OK.
To go to the next line, use key .
6 Press OK to confirm.
7 Select B&W SCAN to send a black and white
document or COLOUR SCAN to send a color
document, and validate with OK key (this setting
can be changed at any time during the send
procedure, using the colour key).
8 Enter the name of the attachment and validate with
OK key.
9 If necessary, change the attachment format: PDF
or IMAGE and validate with OK key.
10 If you have started to scan with the flat scanner, the
unit will scan the other pages. Put your second
page to scan, select NEXT and validate with OK.
11 Press OK to confirm.
12 Set contrast and resolution if necessary.
The document is scanned and the mail sent to
memory. It will be sent during the next connection
to the local network.
Information required to set up
message service
Your network administrator must provide you the
following elements:
•
•
•
•
message service identifier
message service password
email address
servers’identifiers (SMTP, POP, DNS1 and DNS2)
Configuring initialisation parameters
91 - E-MAIL / SUPPLIER
1 Select the LOCAL NETWORK from the list and
confirm with OK.
Choosing No Access disables access to local
network functions.
921 - E-MAIL / INIT ETHERNET / MESS. SERV
1 Enter Email Identifier, press OK.
2 Enter Email Password, press OK.
3 Enter E-mail Adr, press OK.
Access to servers parameters
922 - E-MAIL / INIT ETHERNET / SERVERS
1
2
3
4
Enter Smtp, press OK.
Enter Pop3, press OK.
Enter Dns 1 (primary), press OK.
Enter Dns 2 (secondary), press OK.
Sending an E-mail text
You can send a typed message to an E-mail mailbox.
Access through the menu. :
95 - E-MAIL /SEND EMAIL
Accès aux paramètres d'authentification SMTP
923- E-MAIL / INIT ETHERNET / SMTP AUTHENT.
1 In the ACTIVATION menu, select WITH to activate
SMTP authentification then validate with OK key.
2 In the PARAMETERS menu, select
- 39 -
13 Enter the addressee’s E-mail address or choose
your dialling mode.
14 Enter the address of who you want to receive a
copy of the document (CC:), and press OK to
confirm.
15 Enter the object for mail (80 characters max.) and
press OK.
Standard settings
16 Enter the text with the alphabetical keypad (100
lines of 80 characters) and confirm with OK.
To go to the next line, use key .
17 Press OK to confirm.
The mail is memorised and will be sent at the next
connection to the local network.
Your machine has two types of settings that let you
define:
• The type and frequency of the connection to your
ISP.
Scan to FTP
The scan to FTP function enables you to put your TIFF,
JPEG and PDF files in an FTP server, for example, for
archiving.
To connect to the FTP server, you must know the name
of the FTP user and the PASSWORD.
When sending files, the machine connects to the FTP
server using the defined connection parameters.
SET TIMES
an Internet connection is established
every day at 9:00 am, 12:30 am and
5:00 pma.
PERIODIC
an Internet connection is established
every 3 hours1 (default value).
ON DEMAND
an Internet connection is established at
your request by IMMED. ACCESS.
a. To avoid Internet access saturation, the automatic
connection will occur in reality 12 minutes, give or
take, around the requested time.
Simply put the file in an FTP server :
•
1 Place the document to be copied in the automatic
document feeder, face printed on the top.
or
Place the document to be copied face down on the
glass, respecting the indications around the glass.
2 Press key PC. A choice screen is displayed.
3 Select Scan to FTP with keys
or
then press
OK key OK.
4 Enter the FTP address of the server or select it
from the directory by pressing the key.
5 Enter the name of the FTP user (operation
prohibited when the address is in the directory).
6 Enter the password of the FTP user (operation not
necessary when the address is selected in the
directory).
7 Validez par la touche OK.
8 Select B&W SCAN to send a document in black
and white or COLOUR SCAN to send a document
in colour. Validate with OK key (this setting may be
changed at any time during the send procedure
with the colour key).
9 Enter the name of the attachment and validate with
OK key.
10 If necessary, change the attachment format: PDF
or IMAGE et validate with OK key.
Type of transmission over the Internet.
document transmission will occur
immediately at each transmission
request.
IMMEDIATE
DURING
CONNECTIONS
transmissions will only occur at
programmed connections of SET TIMES or
PERIODIC TYPE.
At any moment you may print the settings of your machine
to know their status.
Selecting the connection type
941 - E-MAIL / SETTINGS / CONNEC. TYPE
1 Select one of the connection options among Set
Times, Periodic or On Demand and press OK to
confirm.
Selecting the transmission type
942 - E-MAIL / SETTINGS / SEND TYPE
1 Select one of the send options Immediate or During
cnx then press OK to validate..
Modifying the connection period (Periodic type)
943 - E-MAIL / SETTINGS / PERIOD
If you have started to scan with the flat scanner, the unit
will scan the other pages. Put your second page to scan,
select NEXT and validate with OK.
1 With the Periodic mode, enter the new connection
period by means of the numerical keypad (between
00:01 am and 11:59 pm) and press OK to confirm.
A local network connection will be established
every three hours (default value).
Connection configuration
The settings are divided into several categories:
• the standard settings define the connection type and
frequency to the local network as well as the
transmission type for your documents,
• the E-mail sorting defines treatment for all stored Email messages received.
Modifying the connection time(s) (Set Times
type)
- 40 -
943 OK - E-MAIL / SETTINGS / TIME STTINGS
1 After selecting the Set Times mode, use the and
keys to place the cursor under the figure to be
modified. Enter the new connection time(s) by
means of the numeric keypad (value between
9 - Message service (Model MF5481)
MF 5461 / MF 5481
MF 5461 / MF 5481
OK to confirm.
00:01 and 23:59) and validate with the OK key.
Selecting the print mode for the deposit notice
Menu
944 - E-MAIL / SETTINGS / DEPOSIT NOTICE
1 Select one of the deposit notice options With,
Without, Always or On Error and press OK to
confirm.
SEND ALL MAILS
All E-Mails are sent to the PC.
UNUSABLE
ATTAC
The fax machine polls and prints the
usable E-mails and transfers to the
PC mailbox all the E-mails containing
attachments it cannot use.
Printing the Internet settings
946 - E-MAIL / SETTINGS / PRINT
The Internet settings are printed.
These settings may also be printed together with all the
other settings of your machine (refer to paragraph
Printing the logs, page 29).
Description
To use the fax as an E-Mail printer:
1 Select option W/O PC Trans and press OK to
confirm.
2 Select your option from the table below and
validate with OK.
Mail sorting
This function lets you choose the mode for all Internet
documents stored in your mail box.
You have three choices:.
Vous avez le choix entre trois possibilités :
• F@x only, lets you poll and print E-Mails in your
machine.
• PC only, lets you keep your E-Mails in you mailbox for
later use with a computer (no E-Mail poll),
• Share PC lets you:
- if your PC and fax have two different addresses,
transfer all mails or only those with attachments to a
PC,
- if your PC and fax share the same address, use the
fax as a printer for E-Mails for the PC.
96 - E-MAIL / SORT MESSAGES
Menu
Description
DELETE MAILS
The E-mails opened and read by the
fax (w/o attachment) are erased after
the fax has printed.
SAVE MAILS
The E-mails opened and read by the
fax are not erased.
At each connection, the number of E-mails still present in
your mailbox are displayed on the screen.
F@X Only mode
1 Select option F@x only and press OK to confirm.
All E-Mails are polled and printed.
PC Only mode
1 Select option PC only and press OK to confirm.
The E-mails are neither polled nor printed and they may
be used with a computer.
At each connection, the number of E-mails in your
mailbox is displayed on the screen.
Share PC mode
1 Select option Share PC and press OK to confirm.
You may choose to transfer your E-mails to a PC or use
the fax as an E-mail printer.
To transfer the E-Mails to a PC:
2 Select option With PC Trans. and press OK to
confirm.
3 Enter the E-Mail address of the computer you wish
to transfer your E-Mail and press OK to confirm.
4 Select your option from the table below and press
- 41 -
USB memory key
You can connect a USB memory Key on the front side of
your machine. The files stored in TXT, TIFF and JPEG
formats will be analysed and you will be able to use the
following actions:
- print the stored files contained in your USB memory
key1,
- delete the files contained in your USB memory key,
- run an analysis on the contents of the inserted USB
memory key,
- digitalise a document on your USB memory key,
- fax archiving (see section Rerouting fax messages to
a USB memory key, page 19).
with OK.
4 The list is shown in a table with the following
information:
- the analyzed files are indexed in an incremental
1 by 1 order,
- the files name with their extension,
- the date of the files last save,
- the files size in Kbytes.
Print the files located in the key
To print the files located in the key:
01 - MEDIA / PRINT DOC. / FILE
Use of the USB memory key
Always respect the insertion way when you
connect a USB memory key to the machine.
Do not disconnect your USB memory key
while the machine is reading its contents or
writing contents.
1 Insert the USB memory key on the front side of the
machine respecting the way of insertion.
MEDIA ANALYSIS appears on the screen.
2 Select PRINT DOC. with the
or
buttons and
confirm with OK.
3 Select FILE with the
or
buttons and confirm
with OK.
4 You have three possibilities to print your files:
- ALL, to print all the files located in the USB
memory key.
Select ALL with the
or
buttons and
confirm with OK. The printing is started
automatically.
-
Print your documents
SERIES, to print a series of files located in the
USB memory key.
Select SERIES with the
or
buttons and
confirm with OK.
FIRST FILE and the first indexed file appears
on the screen. Select with the
or
buttons
the first file of the series to print and confirm with
OK. A star (Ä) appears on the left side of the
file.
LAST FILE appears on the screen. Select with
the
or
buttons the last file of the series to
print and confirm with OK.
Press the
The printing is not possible on A5 paper
format.
COPIES NUMBER appears on the screen,
enter the desired number of copies with the
digital keypad and confirm with OK.
Select the printing format: A4 or 10x15 and
confirm with OK.
Select the printing format: THICK or NORMAL
and confirm with OK to start printing.
You can print the stored files or a list of the files located in
the USB memory key.
Print the list of files located in the key
To print the list of files located in the key:
01 - MEDIA / PRINT DOC. / LIST
1 Insert the USB memory key on the front side of the
machine respecting theinsertion way.
MEDIA ANALYSIS appears on the screen.
2 Select PRINT DOC. with the
or
buttons and
confirm with OK.
3 Select LIST with the
or
buttons and confirm
button.
-
SELECTION, to print one or several files
located in the USB memory key.
Select with the
or
buttons the file to print
and confirm with OK. A star (Ä) appears on the
left side of the file.
Repeat this step for each file you want to print.
Press the
button.
COPIES NUMBER appears on the screen,
enter the desired number of copies with the
digital keypad and confirm with OK.
1. It may be possible that some TIFF files of your USB
memory key cannot be printed due to data format limitation.
- 42 -
10 - USB memory key
MF 5461 / MF 5481
Select the printing format: A4 or 10x15 and
confirm with OK.
Select the printing format: THICK or NORMAL
and confirm with OK to start printing.
5 Quit this menu by pressing the
07 - MEDIA / MEDIA ANALYSIS
1 Press on , enter 07 with the keyboard.
2 The USB memory key analysis is started.
3 You can print or delete the detected files located in
your USB memory key. Refer to the previous
chapters.
button.
Delete your files located in the key
You can delete files located in your USB memory key.
06 - MEDIA / DELETE / MANUAL
This function allows you to digitise and save a document
directly in a USB memory key.
1 Insert your USB memory key on the front side of
your machine respecting the way of insertion.
MEDIA ANALYSIS appears on the screen.
2 Select DELETE with the
or
buttons and
confirm with OK.
3 Select MANUAL with the
or
buttons and
confirm with OK.
4 You have three possibilities to delete your files:
- ALL, to delete all the files located in the USB
memory key.
Select ALL with the
or
buttons and
confirm with OK.
You come back to the previous menu.
-
Save a document on a USB memory
key
1 Place the document to be copied face down on the
glass.
2 Insert the USB memory key in the USB connector
of your multifunction device.
The USB memory key analysis is started.
When the analysis is finished, the MEDIA menu is
displayed.
3 Select SCAN TO with the
or
buttons then
confirm with the OK button.
You can also access this function in two other
ways:
• by pressing the SCAN button of the
machine deck then by selecting SCAN-TOMEDIA.
• By pressing the
button from the screen
saver then by typing 03 on the digital
keyboard.
SERIE, to delete a series of files located in the
USB memory key.
Select SERIE with the
or
buttons and
confirm with OK.
FIRST FILE and the first indexed file appears
on the screen. Select with the
or
buttons
the first file of the series to delete and confirm
with OK. A star (Ä) appears on the left of the
file.
LAST FILE appears on the screen, select with
the
or
buttons the last file of teh series to
delete and confirm with OK. A star (Ä) appears
on the left side of the file.
Press the
4 Choose the COLOUR between BLACK&WHITE and
COLOUR with the
or
buttons and the button
OK.
5 With the alphanumeric keyboard, give a name to
the scan file (up to 20 characters) and confirm with
OK.
6 Choose the scan format between IMAGE and PDF,
and confirm to start the scan and the recording of
the document.
IMAGE allows to have the same kind of file as a
photo. PDF is a format for the digital documents
creation.
button.
You come back to the previous menu.
-
SELECTION, to delete only one or several files
located in the USB memory key.
Select with the or buttons the file to delete
and confirm with OK. A star (Ä) appears on the
left side of the file.
Repeat this step for each file you want to delete.
Press the
.
With the IMAGE format, if you have selected:
• BLACK&WHITE, the picture will be saved
in TIFF format.
• COLOUR, the picture will be saved in
JPEG format.
button.
You come back to the previous menu.
5 Quit this menu by pressing the
button.
Analyse the USB memory key content
After a period of inactivity, your machine will return to the
main menu. To view the USB memory key again please
proceed as follows:
The beginning button
immediately starts the scan
and sends a file to the support with the parameters
defined in the analysis format.
- 43 -
10 - USB memory key
MF 5461 / MF 5481
PC Features
This screen allows you to install and uninstall the
software, access the product's user guides or
browse the CD-ROM contents.
4 Place your cursor on PRODUCT INSTALLATION and
confirm with left-click of the mouse.
5 The Products Installation screen appears.
Place your cursor on FULL and confirm by left-click
with the mouse.
Introduction
The Companion Suite Pro software allows the connection
of a personal computer with a compatible multifunction
machine.
The FULL installation copies on your hard disk
the software required for the good execution of
the Companion Suite Pro kit, which is:
- Companion Suite Pro (machine management
software, printer drivers, scanner, ...),
- Adobe Acrobat Reader,
- PaperPort.
From the PC, you can:
-
manage the multifunction machine, allowing you to
set it up according to your needs,
-
print your documents on the multifunction machine
from your usual applications,
-
scan colour, grey scale or black and white
documents and edit them on your PC, or process
them into text using the character recognition
software (OCR),
You may already be the owner of a version of
the software available in the installation CDROM.
In this case use the CUSTOM installation, select
the software that you want to install on your
hard drive and confirm your choice.
Configuration requirements
The minimum configuration requirements for your
personal computer are:
Supported operation systems:
-
Windows 98SE,
-
Windows Millennium,
-
Windows 2000 with at least Service Pack 3,
-
Windows XP (Home and Pro).
The multifonction machine components only appear
if your Windows Installer version is older than 2.0.
The installation resumes, a progress bar appears.
Processor:
-
500 MHz for Windows 98SE,
-
800 MHz for Windows Me or 2000,
-
1 GHz for Windows XP (Home and Pro),
You can stop the program's installation by clicking on the
STOP THE INSTALL button.
A CD-ROM drive
A free USB port
600 Mbytes of available disk space for the installation
After search and analysis of the PC components and the
multifunction machine's components, you need to restart
your PC for the modifications to take effect.
Click on the OK button.
RAM memory:
-
128 Mbytes minimum for Windows 98, Me, and
2000,
-
192 Mbytes minimum for Windows XP (Home and
Pro).
Installation
Install the software on your PC
Turn your PC on. Open an ADMINISTRATOR account
session unless working in 98SE and ME environments.
1 Open the CD-ROM drive, insert the installation CDROM and close the drive.
2 An installation procedure is automatically run (Auto
run).
3 A screen titled COMPANION SUITE PRO LL appears.
- 44 -
11 - PC Features
MF 5461
6 After restart, the InstallShield Wizard screen shows
the progress of the assistant preparation.
You can stop the procedure at any time by clicking
on the CANCEL button.
12 The final installation is ready to be executed.
13 Click on the INSTALL button.
14 A screen informs you of the installation progress.
7 The welcome screen appears.
15 The Companion Suite Pro software is installed on
your PC.
8 Click on the NEXT button to launch the installation
of the COMPANION SUITE PRO kit on your PC.
9 To continue, you need to accept the proposed
license agreement.
16 Click on the CONTINUE button to copy the utilities
and PaperPort SE software that come along with
the kit.
17 At the end of the installation, you need to restart
your PC to update the system files.
10 Click on the YES button.
11 Click on the NEXT button.
- 45 -
11 - PC Features
MF 5461
button.
5 Select the location where the system has to look for
the driver. Only the CD-ROM DRIVES checkbox has
to be ticked. Click on the NEXT button. The search
takes a few moments.
6 A window informs you that the driver has been
located. Click on the NEXT button.
7 A screen informs you that the XML interface
software has been installed. Click on the FINISH
button.
The ADD HARDWARE assistant window appears.
8 Click on the NEXT button.
9 Select FIND THE APPROPRIATE DRIVER FOR MY
HARDWARE (RECOMMENDED). Click on the NEXT
button.
10 Select the location where the system shall look for
the driver. Only the CD-ROM DRIVES checkbox has
to be ticked. Click on the NEXT button. The search
takes a few moments.
11 A window informs that the driver has been located.
Click on the NEXT button.
12 A screen informs you that the COMPANION SUITE
PRO F@X ACTIVITIES software has been installed.
Click on the FINISH button.
18 Select your choice and click on the FINISH button.
19 Your "Companion Suite Pro" kit is successfully
installed on your PC.
You can start the multifunction machine's management
software from the menu START > PROGRAMS
> COMPANION SUITE > COMPANION SUITE PRO LL
> MF DIRECTOR or by clicking on the icon MF DIRECTOR
located on your desktop.
It is possible to add LAN printers without
installing the Companion Suite Pro software
on Windows 2000 and XP. From the Windows
menu Start > Parameters > Printers and faxes,
select "Add Printer" and follow the instructions
on screen.
Connections
Make sure that your multifunction machine is powered off.
USB Connection
The connection between the PC and the machine
requires a USB 2.0 shielded cable no more than 3 meters
long.
You can now use the multifunction machine to print or
scan your documents.
It is recommended to install the
Companion Suite Pro software first and
then to connect the USB cable to your
machine.
Network connection
You may connect your multifunction terminal to an
Ethernet or a wireless network (model MF5481 only).
If you connect the USB cable before installing
the Companion Suite Pro software the
recognition system (plug and play) identifies
automatically that new hardware has been
added. To start your machine drivers
installation, follow the instructions on screen. If
a window asking about the location of the
drivers pops up, then indicate the installation
CD-ROM.
The Companion Suite Pro LL software shall be
installed to perform this operation.
0
1 Locate your USB cable connectors and connect as
shown below on the picture.
2 Power on your multifunction machine.
The ADD HARDWARE assistant window appears.
3 Click on the NEXT button to finish the installation.
4 Select FIND THE APPROPRIATE DRIVER FOR MY
HARDWARE (RECOMMENDED). Click on the NEXT
- 46 -
1 Run the MF Director application by clicking on the
icon located on your desktop or from the menu
START > PROGRAMS > COMPANION SUITE
> COMPANION SUITE PRO LL > ADD PRINTER.
2 Click on the NEXT button to run the installation
procedure.
11 - PC Features
MF 5461
Uninstall the software from your PC
3 The next screen shows the list of compatible
hardware found on the network.
Run the programs removal from the menu START
> PROGRAMS > COMPANION SUITE > COMPANION SUITE
PRO LL > UNINSTALL.
1 A preparation screen appears.
You can make another search on the network by
clicking on the REFRESH button.
Remark:
A hardware device may not appear in the
list in which case click on the NOT IN THE
LIST button. The next window appears.
2 Select REMOVE and confirm your choice by clicking
on the NEXT button.
Type the IP address or the NetBIOS name
of the hardware that you wish to add. You
can test the connection between the PC and
the hardware by clicking on the TEST button.
Click on the OK button.
4 Select what you wish to add from the hardware list.
Click on the NEXT button.
5 For the model MF 5481, with a LAN connection,
you must choose one printer among the list.
Nota: the PCL printer is more fast in the most case.
6 The next window lists the different features of the
printer that are about to be installed. Click on the
NEXT button.
3 A confirmation screen appears. Click on OK button
to continue the COMPANION SUITE PRO LL program
removal.
4 A preparation screen appears. You can cancel the
removal by clicking on CANCEL.
7 The window indicating that the installation
procedure was successful pops up. Click on the
FINISH button.
- 47 -
11 - PC Features
MF 5461
5 You need to restart your system at the end of the
procedure. Close all open programs, select YES,
I WANT TO RESTART MY COMPUTER NOW and click on
the FINISH button.
Graphical presentation
Run the application by clicking on the MF Director icon
located on your desktop or from the menu START
> PROGRAMS > COMPANION SUITE > COMPANION SUITE
PRO LL > MF DIRECTOR.
Multifunction Terminal's Supervision
By default, MF DIRECTOR is displayed with dark blue
rounded shape. You can modify its shape and color by
right-clicking with the mouse.
The software that you have installed contains two
multifunction machine management applications,
MF DIRECTOR and MF MONITOR, which allow you to:
Utilities and applications activation
-
check whether the multifunction machine is
connected to your PC,
-
monitor the multifunction machine activitie,
-
monitor the status of the multifunction machine
consumables from the PC,
-
quickly access the graphic editor applications, OCR
etc.
The COMPANION SUITE PRO graphical interface allows you
to run the following utilities and software:
-
get HELP from the current documentation,
-
run the PaperPort software (Doc Manager).
To manage the multifunction machine, run the MF
Director application by clicking on the icon located on your
desktop or from the menu START > PROGRAMS
> COMPANION SUITE > COMPANION SUITE PRO LL > MF
DIRECTOR.
Checking the connection between the PC
and the multifunction machine
To check if the connection between the devices is good,
run the MF MONITOR software from the icon located on the
desktop and check that the same information is displayed
on the multifunction machine (for instance the date).
To run a software or utility contained in the COMPANION
SUITE PRO kit, place the cursor on it and left-click with the
mouse.
MF Director
This graphical Interface allows you to run the utilities and
the software to manage your multifunction machine.
- 48 -
11 - PC Features
MF 5461
MF Monitor
Scan To
Graphical presentation
The setup of this tab, becomes the default setup for the
scanner.
Run the application by clicking on the MF Monitor icon
located on your desktop or from the menu START
> PROGRAMS > COMPANION SUITE > COMPANION SUITE
PRO LL > COMPANION MONITOR.
Remark:
The function SCAN TO can only be used if
the application is running. If this is not the
case, activate it.
1 Select the Scan To tab.
2 Select one of the possible choices:
- colour,
- grayscale,
- black and white.
3 Select the scanner resolution (72 dpi to 4800 dpi).
4 Confirm your choices by clicking on the OK button.
From this screen you can monitor the information or
configure your multifunction machine from the tabs:
-
COMPANION: Presents the multifunction machine
screen.
-
CONSUMABLES: Displays the consumables status.
-
SCAN TO: Scan Mode and Resolution parameters
setup, these parameters will be taken into account
when clicking on the SCAN button from the machine.
Display the consumable status
The following information will be available from the
Consumables tab:
- current consumables status,
- number of printed pages,
- number of scanned pages.
Companion Suite Pro LL
functionalities
Document analysis
The document analysis can be carried out in two ways:
• either by the SCAN TO function (application accessible
from the MF Director window or from the SCAN button
from the machine),
• or directly from a TWAIN standard compatible
application.
- 49 -
11 - PC Features
MF 5461
Analysis with Scan To
Character recognition software (OCR)
Run the application by clicking on the MF Director icon
located on your desktop or from the menu START
> PROGRAMS > COMPANION SUITE > COMPANION SUITE
PRO LL > MF DIRECTOR.
The character recognition function allows to create a
usable data file for desktop applications from a hardcopy
document or from a picture.
The character recognition only works for printed
characters, such as printer outputs or typed text.
Nevertheless you can request for a handwritten text block
to be kept intact (a signature for instance) by outlining it.
Given your machine environment and the character
recognition from your machine, the OCR is done with a
Drag&drop of a document from the PaperPort to the
Notepad icon.
1 Left-click with the mouse on the SCAN TO graphical
image or click the SCAN button from your machine.
2 You can follow the ongoing digitisation on a screen.
For more details about the usage of this
software, check the on-line help of the
product.
Printing
You have the possibility to print your documents via the
USB connection or the Wifi connection.
3 At the end of the digitisation, the scanned picture
appears in the PaperPort window.
During the installation of the software, the LASER PRO LL
printer driver will be installed automatically onto your pc.
This will allow you to print your documents on the
machine via the USB connection.
The LASER PRO LL NETWORK printer driver allows to print
via the wireless connection. This driver is installed when
you add a network printer.
Printing with the multifunction machine
To print a document with the machine from your PC is like
printing a document in Windows (use the PRINT command
from the FILE menu of the currently open application on
the screen). Select the LASER PRO LL printer to print via
the USB connection or the LASER PRO LL NETWORK
printer to print via the Wifi connection.
The LASER PRO LL printer becomes the default
printer when the Companion Suite Pro
software is installed.
If the PaperPort software is not installed on
your hard drive, the scanned picture will
appear on your desktop in TIFF format.
Analysis from a TWAIN compatible software
1 Run the picture editor application and then run the
acquisition command.
The document analysis window appears.
2 Setup the parameters (contrast, resolution, ...)
before starting the digitisation.
3 Once the document is digitised, you can archive it
or edit it.
- 50 -
11 - PC Features
MF 5461
Address book
Add a group to the terminal address book
1 Click the link ADDRESS BOOK of the window MF
DIRECTOR.
The address book enables you to store the numbers of
the contacts you call the most frequently. The purpose of
this function is to facilitate dialing your contact’s number
when you want to send an SMS or fax. If you want, you
can print the list of numbers stored in the Directory.
You also have the possibility of creating groups of
contacts from the Address book. Like this, you can group
together all contacts from, for example, a given company
or the same service, etc, to which you frequently send
common documents.
2 Select the terminal address book.
3 Click NEW and select GROUP in the displayed
menu.
The software can also manage the address
books of the operating system of the
messaging software installed on the PC. The
method of use of these address books is not
detailed in this manual. Check with the online
documentation of the software for more
details.
Add a contact to the terminal address book
1 Click on the link ADDRESS BOOK of the window MF
DIRECTOR.
The address book is displayed on the screen.
4 Enter the name of the group. The group may consist of
contacts from the address book or new contacts.
1st case: group members are from the address book.
Click SELECT THE MEMBERS.
The selection window is displayed.
2 Select the terminal address book.
3 Click on NEW and select CONTACT in the displayed
menu.
The input window for the contact data is displayed..
Select a contact or a group in the zone ADDRESS BOOK,
click on (to add a contact to the group you can also
double click on it).
4 Enter the contact name as well as the fax or GSM
Click on OK.
telephone number, the fax transmission rate with this
person, the associated quick dial key, the E-mail address
and the default transmission format (Pdf or Image). Click
on OK.
The new contact is added to the list.
2nd case: adding new contacts.
Click on NEW then add the personal data of the new
contact, as in the procedure for adding a contact.
5 As soon as the group is complete, click on OK.
The new group is added to the list.
- 51 -
11 - PC Features
MF 5461
Manage the address book
1 Select EXPORT in the menu FILE of the window
ADDRESS BOOK.
2 Enter the name of the file and select the destination
directory, then click on SAVE.
When you are working in the directory, you can perform different
operations:
-
print a list of contacts in your address book,
-
delete a contact or a group in your address book,
-
search for a contact or a group of contacts in the
address book using the first letters of the name,
-
check the datasheet of a contact or a group in order
to modify it.
Modify the information related to a contact
1 Select the contact whose data you want to modify, using
the mouse.
2 Click on PROPERTIES.
3 Make the necessary changes in the window ADDRESS
BOOK.
4 Click on OK.
Modify a group
1
2
3
4
Fax communications
The fax communication enables you to:
-
send documents as faxes from one of the scanners
of your terminal, from the hard disk or from the
screen of your PC,
-
to receive fax documents,
-
to monitor communications through various services:
the inbox, the outbox, the sent items, the outbox log
and the inbox log.
Parameters are available to modify the way your terminal
works with regard to fax communications. You can modify
these parameters to adapt the fax communications to
your requirements. For this procedure, refer to paragraph
Fax parameters.
Presentation of the Fax window
Select the group in the address book list.
Cllick on PROPERTIES.
Make the necessary changes.
Click on OK.
1
2
3
4
6
5
7
Delete a contact or a group from the address
book
1 Select the name of the contact or the name of the group
you want to delete, using the mouse.
2 Click on DELETE.
9
When a contact is deleted from the directory, it
is automatically deleted from any group in
which it may be included.
Print the address book
1 Click on PRINT.
The list of the address book is printed on the terminal (if
no contact is selected).
8
Import or export a directory
Item
Import a directory
Importing a directory makes it possible to exchange
address book entries between two devices without having
to enter contacts one by one manually. Directories can be
imported from files in EAM format. EAB files are
automatically generated during export.
1 Select IMPORT in the menu FILE of the window
ADDRESS BOOK.
2 Select the file to import, click on OPEN.
Save your address book
This operation lets you save your address book to a file in Csv
format.
- 52 -
Action
1
Create a new fax to send.
2
Delete a fax using one of the fax manager
directories. Except for directories SENT LOG and
RECEPTION LOG for which the effect of this
command is to delete the entire log
3
Print a fax from one of the Fax manager
directories.
4
Display a fax with the Viewer.
5
Access to the address book.
6
Stop sending a fax (only enabled for the
outbox).
11 - PC Features
MF 5461
Item
Action
7
Display all faxes in the selected directory in the
Fax manager.
8
Fax preview.
9
Fax manager directories.
6 To add a cover sheet, select the tab COVER PAGE then
click the box WITH THE COVER PAGE. Select the cover
sheet you want to add from the pop-down menu, or
create a new one. For more information, refer to
paragraph Cover sheet.
7 Click OK to send your fax to all contacts in your list of
contacts.
Your send request can then be checked, if necessary, in the
outbox.
Send a fax
Send a fax from application
Send a fax from the hard disk or the terminal
1 Click the icon
This method is used to directly send a document you have
created using a desktop software without printing it beforehand.
of the window MF DIRECTOR.
1 From your desktop software, select FILE > PRINT.
2 Click NEW then click FAX.
2 Select the printer COMPANION SUITE FAX and click OK.
The fax oubox window is displayed.
3 Select no zone SOURCES, SCANNER if your document
is in paper format or MEMORY if the document is a
computer file located on your hard disk (this file must be
in TIFF or FAX format).
4 To send your fax to a contact, enter his number in the
field RECIPIENTS and click on
or select a contact (or
group) from one of the directories in the field ADDRESS
BOOK and click on the button .
Repeat this operation as many times as necessary (use
the button
to delete a contact from the list of
contacts).
5 If necessary, adjust the advanced options (send later and
resolution) in the tab ADVANCED OPTIONS.
3 To send your fax to a contact, enter his number in the
field RECIPIENTS and click the button
or select a
contact (or a group) from one of the directories in the field
ADDRESS BOOK and click the button .
Repeat this operation as many times as necessary (use
the button Erase to delete a contact from the list of
contacts).
4 If necessary, adjust the advanced options (send later and
resolution) in the tab ADVANCED OPTIONS.
5 To add a cover sheet, select the tab COVER PAGE then
click the box WITH THE COVER PAGE. Select the cover
sheet you want to add from the pop-down menu, or
create a new one. For more information, refer to
paragraph Cover sheet.
6 Click OK to send your fax to all contacts in your list of
contacts.
7 Your send request can then be checked, if necessary, in
the outbox.
- 53 -
11 - PC Features
MF 5461
Receive a fax
The send memory (items sent)
The window MF Manager and MF Director show, using
different messages, the reception of a fax. The icon
is
displayed at the bottom of the window MF Manager and
the icon
appears in the task bar..
You can automatically print faxes on reception. To do this,
you have to define this parameter, refer to paragraph Fax
parameters.
The sent memory is used to keep all faxes you have sent.
The information in the send memory is:
Follow-up of fax communications
an outbox,
-
an inbox,
-
a sent item memory,
-
an outbox log,
-
an inbox log.
the recipient of the fax,
-
the date the fax was created,
-
the date the fax was sent,
-
the size of the fax.
The outbox log
Follow-up of fax communications is by means of:
-
-
The outbox log is used to keep a history of all fax
communications (successful or rejected) that your
Terminal processes. The log is printed automatically as
soon as an A4 page is filled.
The button DELETE deletes the entire log, and
not simply the selected message(s).
These services enable you to always know exactly what
communications are taking place on the terminal, whether
sending or receiving.
The outbox and inbox logs are automatically printed when
their contents fill an A4 page. After automatic printout, the
terminal creates a new log.
The information held in the log is:
-
the recipient of the fax,
-
the date the fax was sent,
-
the status (sent, rejected ...).
The outbox
The inbox log
In the fax outbox, there are the following:
The inbox log is used to keep a history of all faxes
received by your Terminal. The log is printed
automatically as soon as an A4 page is filled.
-
the requests being sent,
-
the send later requests,
-
the requests for which one or more send attempts
have already been made, and which will soon be
redialed,
-
the rejected requests (calls not put through).
The button DELETE deletes the entire log, and
not simply the selected message(s).
The information held in the inbox log is:
-
the sender of the fax,
-
the date and reception of the fax,
-
the status.
Fax parameters
Access to fax parameters
1 Click on the icon
of the window MF DIRECTOR.
2 Select TOOLS > OPTION > FAX.
3 Make the adjustments require, referring to the
description of parameters below and click OK.
The requests are classed in the order in which they are
executed.
The rejected requests are filed at the end of the list so that
they are more accessible if you want to work with them
(request a new send) or delete them.
- 54 -
11 - PC Features
MF 5461
Description of the tab LOG AND REPORT
Field
Description
Automatic printing of a
received document
The fax is automatically printed
when received.
Printing of a inbox
report
A report is printed out for each fax
received.
Printing of inbox log
The log is automatically printed
when it fills an A4 page.
Automatic printing of a
sent document
The fax is automatically printed
when it is sent.
Printing of an outbox
report
An outbox report is printed after
each fax is sent
Printing of the outbox
log
The log is automatically printed
when it fills an A4 page.
Description of the tab FAX PARAMETERS
Field
Description
Dialling prefix
This dialing prefix shall be
automatically inserted in front of the
number before sending on this line.
Type of dialing
Must be parametered according to
the type of switchboard your
terminal is connected to.
Header
Displays a Communication
Identification Line (LIC) on the
documents you send or on the
documents you receive.
ECM
Corrects communication errors due
to line disturbance. This option
ensures that received documents
are integral. On the other hand,
communication times may be longer
if the line is bad.
Number of attempts
Number of attempts the Terminal
must make if send fails.
Interval between
attempts
Duraton between two send
attempts.
Cover sheet
The cover sheet is part of a fax document automatically
generated by your terminal, on which there is information
concerning the sender, the recipient, the date, the time
sent, comments, etc...
This page may be sent alone or in front of a fax document,
but always at the same time as the document. A
document may be sent with a cover sheet from the
multifunction terminal or from the central processing unit.
In the latter case, some of the information in the cover
sheet may be provided by yourself when making the send
request. It is necessary to create model cover sheets
before sending a document using them. On the other
hand, once the cover sheet is created, a model cover
sheet may be used for all documents sent.
Your terminal offers the possibility of creating and
customizing some model cover sheets which you can
choose when sending a fax.
Creating a cover sheet
It is necessary to create a model cover sheet
before sending a fax with it.
Field
1 From the tab COVER PAGE, click on the button NEW.
2 Select the model cover sheet you have created
using the menu FILE.
Description
Transmission speed
Fax default transmission speed.
Line number
Number of the line where your
terminal is connected.
A window with the model cover sheet you have
created is displayed:
- 55 -
11 - PC Features
MF 5461
Description of the tab COVER PAGE
3 Click on the icon
to display the available fields.
Field
To add a field, proceed as follows:
- Select the field you want to insert by clicking the field
palette. A stamp replaces the cursor of your mouse.
- Click the location where you want to put the field on the
model.
- You can move or enlarge the field as you like.
Description
Name of the cover
sheet
Either the name of the page
selected by default or the page you
have selected to use.
Sender
You can enter information
concerning the sender.
Destination: Name,
Company, Department
You can enter information
concerning the recipient.
If the word Auto is entered in one of
the fields, the field is updated during
sending if the recipient is listed in the
directory, favorites, a group or a
distribution list.
Comments
This is an editing window with all the
basic functions of a text editor so
that you can enter a text which will
be sent in the cover sheet.
Preview of the model
The preview enables you to see the
cover sheet you are going to send.
Creating a cover page template
Creating a cover page creates a template which fields (fax
number, comment, subject and so on) will be
automatically filled by the Fax Application depending on
the information provided for each recipient of a document.
To create this cover page template, there are two major
steps:
• First step : Create a background image with the logos and the
layout that you wish.
Adjust the size of your field so that the text is
readable.
• Second step : Add the field that you want to be displayed in
the cover page: fax number, comment, subject and so on. As
mentioned before, these fields will be filled by Fax application
at emission time.
4 As soon as fields are inserted, save the cover sheet.
For the first step, there are two methods to create the
This cover sheet can be selected in the tab COVER PAGE of the
fax send window.
background image.
- 56 -
11 - PC Features
MF 5461
You can either
• Option (A): Draw this background image in your preferred
application (such as Word, Excel,...),
• Option (B): Launch MFMANAGER, select NEW FAX, select the
scanner source as shown below :
OR
• Option (B): Scan a sheet of paper containing the layout of the
cover page.
Details about Option A and B:
• Option (A): Open the application that you want to use to edit
the background (Word, Wordpad...). Draw the background
image then print this document in the printer named
"Companion Suite Fax". At that point the MFSendFax dialog is
displayed:
Add any recipient to the recipient list, click on the tab ADVANCED
OPTIONS, select resolution FINE as shown below:
Add any recipient to the recipient list, click on the tab
ADVANCED OPTIONS, select resolution FINE as shown below:
Finally click on the button SAVE AS DRAFT in the lower right
corner (this is the button with the floppy disk icon). The
background image is created in the directory C:\Program
Files\Companion Suite Pro LM\Documents\FAX\Temporary and
has the file extension .fax.
Whether you choose Option A or B, you end up with a
background image with extension .fax, which is located in
C:\Program
Files\Companion
Suite
Pro
LM\Documents\FAX\Temporary.
Î You can now proceed to the second step right below.
For the second step:
Finally click on the button SAVE AS DRAFT in the lower right
corner (this is the button with the floppy disk icon). The
background image is created in the directory C:\Program
Files\Companion Suite Pro LM\Documents\FAX\Temporary and
has the file extension .fax
Now that the background image is created in directory in
C:\Program
Files\Companion
Suite
Pro
LM\Documents\FAX\Temporary, you can add the fields on top
of the background image.
Please follow the procedure below:
(a)Launch MFMANAGER, select NEW FAX, click on the tab
COVER PAGE, and check the check box named WITH THE COVER
PAGE.
(b)Click on the button NEW, this displays a new window with the
title CREATION OF THE COVER PAGE.
- 57 -
11 - PC Features
MF 5461
(c)Press the button OPEN in the toolbar, change the file filter to *.fax
and browse to the directory C:\Program Files\Companion Suite Pro
LM\Documents\FAX\Temporary that contains the background
image that you have created in the First step.
(d)Click on the button FIELDS in the toolbar, a window pops up
allowing you to add the fields on top of the background image.
(e)Click on the button SAVE to save the Cover Page template
and exit this window.
(f)The window NEW FAX is displayed, you can now choose the
Cover Page template that you want to use. When you double
click the preview image in the lower right corner, another window
pops up giving you a preview of the cover page with the fields
filled with the recipient's information.
Item
Action
1
Write an SMS.
2
Delete an SMS from one of the SMS manager
directories. Except for the directories SEND LOG
and RECEPTION LOG for which the effect of this
command is to delete the entire log.
3
Print an SMS from one of the SMS manager
directories.
4
Display an SMS with the Viewer.
5
Access to the address book.
SMS Communication
6
Stop SMS sending (only enabled for the
outbox).
Sending SMSs is via the modem of your Multifunction
Laser. For more details, refer to the User Manual of your
Multifunction Laser.
7
Displays all SMSs in the directory selected in
the Fax manager.
8
SMS preview.
9
SMS manager directories.
The SMS service is available depending on
the countries and the operators.
Send an SMS
Your PC Kit can be used to easily send faxes to a single
recipient or to multiple recipients using the distribution
groups.
1 Click on the icon SMS
of the window MF
DIRECTOR.
2 Click on NEW then on SMS.
Communications being sent are monitored by means of
the outbox, the outbox log and the outbox memory (items
sent).
Presentation of the SMS window
1
2
3
4
5
6
7
9
3 Enter your message in the field CONTENT OF MESSAGE
provided for this purpose.
You can use the buttons and the "smiley" located
to the left of the input field to customize your message, or
to automatically insert the date and time.
4 To send your SMS to a contact, enter his / her
number in the field TELEPHONE NUMBER of the part
CONTACTS and click on
or select a recipient (or
group) from one of the directories in the field
CONTACT LIST and click on .
8
Repeat this operation as many times as necessary
(use the button REMOVE to delete a contact from
the list of contacts).
- 58 -
11 - PC Features
MF 5461
MF 5461
11 - PC Features
5 If necessary, adjust the advanced parameters (to send
later or give priority to the SMS) by pressing the button
ADVANCED PARAMETERS.
6 Click on OK to send your SMS to all contacts in the
field LIST OF RECIPIENTS.
Your send request can then be checked, if necessary, in
the outbox.
The outbox log
The outbox log is used to keep the entire history of SMS
communications (successful or rejected) that have been
processed by your terminal. The log is automatically
printed as soon as an A4 page is complete.
Follow-up of SMS
The button DELETE deletes the entire log and
not simply the message(s) selected.
SMS communications are monitored by means of:
-
an outbox,
-
a sent item memory,
-
an outbox log.
The information in the sent box is:
These services make it possible to have complete
information on the terminal activity with regard to
communications.
The outbox log is automatically printed when its contents
fill an A4 page. After this automatic printing, the terminal
creates a new log.
The outbox
The following is grouped in the SMS outbox:
-
the SMS recipient,
-
the date of sending of the SMS,
-
the status (sent, rejected, etc...).
The sent item memory (items sent)
The sent item memory is used to keep a copy of all SMS
messages you have sent.
The information in the sent item memory is:
-
the SMS recipient,
-
the date of creation of the SMS,
-
requests being sent,
-
the date of sending of the SMS,
-
send later requests,
-
the size of the SMS.
-
requests for which one or more send attempts have
already been made, and which will soon be redialed,
-
requests which have been rejected.
SMS Parameters
Access to SMS parameters
1 Click the icon SMS
of the window MF
DIRECTOR.
2 Select TOOLS > OPTIONS > SMS.
3 Make any adjustments required in relation to the
description of the parameters above and validate
with OK.
- 59 -
MF 5461
Field
11 - PC Features
Description of the tab LOGS AND REPORTS
Description
Automatic printing of a
sent document
The SMS is automatically printed
when it is sent.
Printing of a send
report
An outbox report is printed after
each fax is sent.
Printing of the outbox
log
The log is automatically printed
when it fills an A4 page.
- 60 -
Maintenance
5 Unpack the new cartridge and insert it into the slot
as indicated in the diagram below.
Service
General information
For your safety, it is imperative to refer to the
security directives presented in chapter
Security, page 1.
6 Close the cover.
The following message appears:
To ensure that your machine is kept in the best
conditions, it is recommended that you periodically clean
the inner parts.
HAVE YOU CHANGED
THE TONER? <OK>
Please respect the following rules while using this
machine:
- Do not leave the scanner cover open.
- Do not try to lubricate the device.
- Do not close the scanner cover violently or do not
apply vibrations to the machine.
- Do not open the cartridge access cover while printing.
- Do not try to disassemble the machine
- Do not use paper which would has stayed in the tray
for too long.
7 Press OK.
8 When this message appears,
INSERT THE
TONER CARD
insert the smart card provided with the new toner
cartridge as shown on the picture below.
Toner cartridge replacement
Your machine comes with a current consumable
management system. It tells you if your toner cartridge is
close to its end of cycle. The following message will
appear on your machine screen.
TONER NEAR
END
9 A wait message appears.
PLEASE
WAIT
After this message has been displayed, you
are able to change the cartridge.
The smart card is read.
NEW TONER
REMOVE CARD
To quit this screen, press OK.
Remove the smart card from the reader, your
machine is ready to print again.
To replace the toner cartridge, proceed as shown below.
When the following message is displayed on the screen:
TONER EMPTY
REPLACE <OK>
Issues with smart cards
If you use a smart card that has already been used, the
machine will display:
1 Press OK.
PLEASE
WAIT
OPEN FRONT COVER
REPLACE TONER
2 Stand in front of the device.
3 Push on the left and right sides of the cover and pull
it towards you.
4 Raise and remove the toner cartridge from the
machine.
then,
REMOVE CARD
ALREADY USED
If you use a defective smart card, the machine will display:
- 61 -
PLEASE
WAIT
12 - Maintenance
MF 5461
then,
Message
UNKNOWN CARD
REMOVE CARD
If the C button is pressed while the smart card is being
read, the machine displays:
ACTION CANCELLED
REMOVE CARD
Action
CLOSE COVER
PRINTER
The printer front cover is
open, close it.
TONER EMPTY
REPLACE <OK>
Replace the toner cartridge.
PAPER JAM
REMOVE TONER
A sheet of paper is jammed
in the machine. Take out the
toner cartridge and remove
the jammed paper sheet.
Take out the paper tray and
remove the jammed paper
sheet. Then open and close
the consumable cover.
PAPER JAM
EXTERNAL TRAY
A sheet of paper is jammed
in the machine. Open the
paper jam cover. Remove
the jammed paper sheet.
Then open and close the
consumable cover.
PAPER EMPTY
Add paper in the paper tray.
Cleaning
Scanner reading system cleaning
When one or more vertical lines appear on the copies,
clean the glass of the scanner.
1 Open the scanner cover until it is standing in
vertical position.
2 Wipe the glass with a soft lint-free cloth soaked with
mild alcohol.
3 Close the scanner cover.
4 Make a copy to check that the symptoms have
disappeared.
Printer cleaning
Paper jam
Dust, dirtiness and paper debris on the external and
internal surfaces of the printer can affect its operation. We
advise that it is cleaned regularly.
When printing, a sheet of paper may get stuck in the
printer or the paper tray and cause a paper jam.
Printer external cleaning
In case of a paper jam in the machine, the following
message appears:
Clean the external part of the printer with a soft cloth
soaked in mild detergent.
PAPER JAM
EXTERNAL TRAY
1 Open the paper jam cover located at the back of
the machine.
2 Remove the jammed sheet of paper and close the
cover.
Printer issues
Error messages
When the printer encounters any of the problems
described below, the corresponding message is shown
on the machine display.
Message
CHECK TONER
Action
Check the presence of a
toner cartridge in the
machine.
TONER NEAR END
Indicates
that
consumable
will
changing soon.
REPLACE PAPER
Add paper in tray.
HEATING
your
need
3 Open and close the consumable cover.
The printer starts again automatically.
Message displayed when
starting the machine.
- 62 -
12 - Maintenance
MF 5461
The following message appears:
CLOSE COVER
SCANNER
The fusion unit can reach a very high
temperature during the operation. To prevent
any harm, do not touch this area.
3 Close the scanner cover.
Miscellaneous issues
In case of paper jam, the following message appears:
PAPER JAM
REMOVE TONER
1 Remove the toner cartridge and check if a sheet is
jammed.
2 Remove the sheet of paper which causes the paper
jam.
3 Put the toner cartridge in the machine, or remove
the paper tray and remove the sheet of paper which
causes the paper jam.
4 Check that the paper sheets in the paper tray are
correctly placed.
When turning on the terminal, nothing is displayed on
the screen.
Check the connection between the power cord and the
outlet.
The terminal does not detect the presence of the
document inserted in the scanner document feeder.
The message READY does not appear on the screen.
At the start and during scanning, REMOVE DOCUMENT
appears on the screen.
1 Remove the document or press key
.
2 Check the thickness of the document (50 sheets of
paper of 80 g/m2).
3 Iron out the sheets if needed.
4 Help the sheets along.
The terminal does not receive any faxes.
1 Check that the telephone line cable is correctly
plugged in.
2 Check that there is a tone signal on the telephone
line by means of the key
5 Replace the paper tray in the machine.
Scanner issues
When a paper jam occurs, the following message
appears:
REMOVE DOCUMENT
CONFIRM <STOP>
1 Open the scanner cover.
2
1
.
You receive a blank page.
1 Make a photocopy of a document; if it is correct
then your fax is functioning normally.
2 Call back the subscriber and have him resend the
document. It was probably sent with the sheet
inserted backwards.
You cannot send a fax.
1 Check that the telephone line cable is correctly
plugged in.
2 Check the tone by pressing the key
.
3 Check the prefix is correctly programmed and
used.
Communication errors
If the communication fails, the terminal advises you of an
automatic retry later.
Example of what is displayed:
Current time
Time of next try
2 Remove the jammed paper without tearing it.
- 63 -
FRI 12 DEC 20:13
0142685014 20:18
12 - Maintenance
MF 5461
Transmission from the feeder
You have the choice between:
• waiting until the transmission takes place at the given
time,
• restarting the transmission immediately by
pressing
•
,
abandoning transmission by pressing
document, press
. To eject the
again.
Transmission from memory
You have the choice between:
• waiting until the transmission takes place at the given
time,
• restarting the transmission using the transmission
queue. In this case, for a document composed of
several pages, the transmission will take place from
the page where the error occured,
• abandoning the transmission by deleting the
corresponding command in the transmission line.
The terminal makes at most 5 automatic redials. The nontransmitted document is automatically deleted from the
memory and a transmission report is then printed together
with an error code and the cause for transmission failure
(see the communication error codes).
Communication error codes
The communication error codes appear in the logs and
transmission reports.
General codes
Code 01 - Busy or no fax answer
This code appears after 6 unsatisfactory attempts. Call
later.
Code 03 - User break
A communication has been stopped by the user pressing
the key
.
Code 04 - Non programmed number
A number saved as a one-touch key or abbreviated
number is not valid, check it. (Example: a delayed
transmission was programmed with a one-touch key and
this key has been deleted in the meantime).
Code 05 - Scanning default
An incident occurred with the scanner, for example, the
sheet is jammed.
Code 06 - Printer default
An incident occurred in the printer: no paper, paper jam,
opened cover... In the reception mode, this incident
appears only if the reception parameter is switched to
WITHOUT PAPER.
Code 07 - Disconnected
The link has been cut (bad line). Check the number and
try again.
Code 08 - Quality
The document you sent was not well received. Contact
your subscriber to see if you need to send again.
Code 0A - No document to be polled
You tried to poll a document from a subscriber who had
not prepared his document (no deposit) or the password
entered was incorrect.
Code 0B - Wrong number of pages
There is a difference between the number of pages
indicated during preparation for the transmission and the
number of pages sent. Check the number of pages in the
document.
Code 0C - Received document error
Ask the subscriber who called you to check the length of
his document (it may be too long to be completely
received).
Code 0D - Transmission failed
Ask the sender to resend the document.
Code 13 - Memory full
Your fax can no longer receive since its memory is full.
There are too many received unprinted documents or too
many documents in the transmission line.
Print the received documents and delete or transmit
immediately the documents in the transmission line.
Code 14 - Memory full
Received document memory full. Print all received
documents.
Code 15 - Unknown mailbox number
You wish to deposit a document in a subscriber’s mailbox.
The mailbox number does not exist.
Code 16 - No Relay Bcst list Nr x
You requested a document relay from a remote fax but
the fax has not programmed the list of subscribers
requested.
Code 17 - Unknown mailbox number
You wish to recover a document from a subscriber’s
mailbox. The mailbox number does not exist.
Code 18 - Relay Bcst impossible
You requested a document relay from a remote fax which
does not have the relay broadcast function.
Code 19 - Subscriber has stopped
The communication has been stopped by your
subscriber. (Example: a fax wanted to poll your fax but
there is no document deposited).
Code 1A - Disconnected
The transmission has not started. The telephone line is
busy.
Code 1B - Transmission failed
During transmission: start again.
During reception: ask your subscriber to resend the
document.
Code 50 - Server error
Check the number configured for the SMS server or a
communication error occured during data transmission.
- 64 -
12 - Maintenance
MF 5461
Specifications
Physical specifications
Dimensions:
Weight:
412 x 447 x 386 mm
13 kg
Electrical specifications
Power supply:
Electric consumption:
Single phase 220-240 V - 50/60 Hz - 4.5 A
12 W typical in powersave
16 W typical in standby
340 W average during printing
Environmental specifications
Operating temperature:
Acceptable humidity level:
In operation: + 10 °C to 32 °C
In operation: 15 % to 80 % HR (without condensation)
Peripheral specifications
Printer
Type:
Resolution:
Speed:
Preheating time:
First page out time:
Laser (on normal paper)
600 dpi
16 ppm maximuma
21 sec.
13 sec.
a. Printing speed may vary depending on used operating systems, computer specifications, software applications,
connection modes (LAN, USB or WLAN), paper formats as well as file types and sizes.
Copier
Type:
Copy speed:
Resolution:
Multiple copies:
Zoom range:
Autonomous Black and White
16 ppm maximum
600 dpi
99 pages maximum
25 % to 400 %
Scanner
Type:
Color depth:
Resolution:
Software compatibility:
Maximum paper format:
Color scanner
36 bits
600 dpi (optical)
2400 dpi (interpolated)
TWAIN
Letter
Printing supports
Main paper tray capacity:
Output tray capacity:
Main tray paper format:
Paper format for manual printing:
250 sheets maximum (60 g/m²), 200 sheets maximum (80 g/m²)
50 sheets
A4, A5, Legal, Letter
60 to 105 g/m² paper
A4, A5, Legal, Letter, B5, exec, A6
52 to 160 g/m² paper
PC connection
Slave USB 2.0 port (PC connection)
Master USB 2.0 port (Wlan connection, reader, USB memory key reader)
Operating System: Windows 98 SE, 2000, ME, XP
Consumable specifications
Reference paper
Scanner :
Printer :
Inapa tecno SPEED A4.
Ricoh T6200 A4
Toner cartridge
Reference
CTR 360
CTR 365
Specifications are subject to changes for improvement without notice.