1
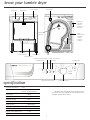
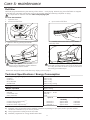
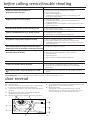
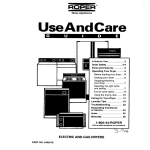
installation & operating
instructions and drying guidance
Condenser
Sensor Dryer
DRCS 68 W
DRCS 68 S
get
the
best
from
y
our
new tumble
drye
r
welcome
Dear customer
Congratulations on your choice of a Beko quality Tumble Dryer which has
been designed to give you lasting service.
Please read these instructions thoroughly before installing or using - and keep
for handy reference. Make sure you understand the controls prior to using your
appliance. The Tumble Dryer must only be used for its intended purpose, ie the
drying of clothes in the home.
Failure to observe these instructions may invalidate your right to free service
during the guarantee period.
If you have any questions, or if you are not sure about any information
contained in this booklet please contact us - details are on the back cover.
Beko Customer Service
Notes
Note that settings in this book are for guidance only. Always check the
clothing labels before selecting your drying programme.
Recycling: This product bears the selective sorting symbol for
waste electrical and electronic equipment (WEEE). This means
that this product must be handled pursuant to European
Directive 2002/96/EC in order to be recycled or dismantled to
minimize its impact on the environment. For further information,
please contact your local or regional authorities.
Electronic products not included in the selective sorting process are
potentially dangerous for the environment and human health due to the
presence of hazardous substances.
contents
Introduction
Welcome
Installation
Know your tumble dryers / specification
2
Safety information
3
Electrical connection
4
Installation
5
Operating
How to use
6
Function buttons
8
Programme descriptions
9
Practical usage tips, preparation and starting a program
10
Machine care
Care & maintenance
11
Before calling service/trouble shooting
12
Door reversal
12
Guarantee
13
Service
13
1
know your tumble dryer
Power cable
Control panel
Rating label
Water tank
Synthetics
Condenser Sensor Drying
6 kg
Timed
Programmes
10 min
Clean Filter
Drying
Water Tank Full
Ready to
Iron
Ready to
Wear
Ready to Ready to
Iron
Wear
Cottons
Extra dry
Ready to Wear
Ready to Iron
20 min
Delicates
40 min
End / Anticrease
Buzzer
Cancel
Start/
Pause/
Cancel
Freshen Up
60 min
DRCS 68
Water pipe
from water
collection
container to
water tank.
Caution !
Very hot !
Fluff filter
(inside machine)
Water
overflow pipe
from tank
to water
collection
container.
Levelling feet
Condenser cover
Programme progress lights
Buzzer cancel button
Child lock
Indicator lamp
On/Off button
Synthetics
Condenser Sensor Drying
6 kg
Timed
Programmes
10 min
Clean Filter
Drying
Water Tank Full
Ready to
Iron
Ready to
Wear
20 min
Ready to Ready to
Iron
Wear
Cottons
Extra dry
Ready to Wear
Ready to Iron
Delicates
40 min
End / Anticrease
Buzzer
Cancel
Start/
Pause/
Cancel
Freshen Up
60 min
DRCS 68
Start/Pause/Cancel button
specification
Capacity (dry fabric)
Programme selector
6 kg
Dimensions width x depth x height
Because we continually strive to improve our
products, we may change our specifications and
designs without prior notice.
59.5cm x 54cm x 82cm
Net weight
36 kg
Supply voltage
230-240V~ 50Hz
Nominal current
10A
Motor power
150 watts
Heater power
2000 watts
Drying speed
48 rpm
Drain hose diameter
min.1cm
Length of the drain hose
1.2m
Highest point of the hose
max 100cm
2
Important Safety Information
It is most important that this instruction book should be retained with the appliance for future reference. Should the
appliance be sold or transferred to another owner, or should you move house and leave the appliance, always ensure that
the book is supplied with the appliance in order that the new owner can get to know the functioning of the appliance
and relevant warnings. These warnings have been provided in the interest of safety. You must read them carefully before
installing or using the appliance.
INSTALLATION
• This appliance is not intended for commercial use it is a
household clothes tumble dryer.
• This appliance is heavy. Obtain assistance when moving
it.
• Any electrical work required to install this appliance
should be carried out by a qualified electrician or
competent person.
• Care must be taken to ensure that the appliance does
not trap the electrical supply cable.
• If the machine is situated on a carpeted floor, please
adjust the feet in order to allow air to circulate freely.
• If the tumble dryer is placed on a washing machine, a
stacking kit must be used. (optional accessory)
CHILD SAFETY
• This appliance is designed to be operated by adults.
• Children should not be allowed to tamper with the
controls or play with the product.
• Pets and children are known to climb into tumble
dryers. Please check your drum before use.
• Keep all packaging well away from children.
OPERATION SAFETY POINTS
• Do not overload the Dryer. (See programme descriptions)
• Clothes which are dripping wet should not be placed in
the dryer. Spin them again in the washing machine.
• Bulky duvets and eiderdowns should be dried in large
commercial machines because of their bulk, check with
the manufacturer of the item if it is suitable for drying in a
domestic machine, even if the dry weight of items is within
the limit advised.
• Please ensure that no gas lighter has accidentally been
left in pockets of garments to be tumble dried.
Danger of Explosion
• Never tumble dry items that have been in contact
with inflammable solvents(petrol, methylated spirits, dry
cleaning fluid and the like). As these substance are volatile,
they could cause an explosion. Tumble dry only items
washed with water.
Risk of Fire :
• Items that have been spotted or soaked with vegetable
or cooking oil constitute a fire hazard and should not be
placed in the tumble dryer.
These items should be washed throughly with water prior
to drying.
• In order to avoid danger of fires caused by excessive
drying, do not dry the following items:
• Cushion, quilts and similar stuffed items (These items
accumulate heat)
• Items containing rubber foam or materials similar to
rubber foam.
• Leave the door slightly ajar when the dryer is not being
used. This will allow the seal to be preserved.
• Always check for pets in the tub before further use.
• Clean the fluff filter after using the tumble dryer. To
prevent fire risk, do not use the dryer if the fluff filter is
damaged.
• Never attempt to repair the appliance yourself! You
could endanger your own life and the life of other
users! Only authorised electricians, such as our service
technicians, are permitted to repair electric appliances.
Electrical connection
• Connect the appliance to a properly installed
earthed outlet, protected by a fuse of adequate capacity.
Make sure that you have an earthed power outlet socket
rated at 13 amps (min.).
Attention!
If you use your machine as built-in, the socket must be
reachable after installation, or a separate switch (which can
disconnect the two poles) must be used in the installation.
For a permanent connection, a master switch with at least
3mm contact clearance must be used.
Connect the power cord to the appropriate electrical
socket with an equivalent current rating indicated on the
rating plate at the front of the machine inside the front
door.
Electrical requirements
Before you insert the plug into the wall socket make sure
that the voltage and the frequency shown in the rating
label corresponds to your electricity supply.
We recommend that this appliance be connected to the
mains supply via a suitable switched and fused socket in a
readily accessible position.
• When connecting to the mains, make sure the On/Off
button is in Off position.
Important
• The connection must conform to the prevailing
regulations in force.
• The power cable plug must be accessible after
installation.
A damaged power cable must be replaced by an
authorised qualified electrician. Until the appliance has
been repaired it must not be operated!
Note down the appliance’s model and serial number
from the rating plate in case you need help from Customer
Service.
• The voltage shown must match your mains voltage.
• The appliance must not be connected via extension
cables or multiple sockets.
3
electrical connection
Important
Make sure that you have an earthed power outlet
socket rated at 13 amps (minimum).
Attention!
If you use your dryer as built-in, the socket must
be reachable after installation, or a separate switch
(which can disconnect the two poles) must be used in
the installation. Check for suitability.
For a permanent connection, a master switch with
at least 3mm contact clearance and minumum 13 A
rating must be used.
Fitting a different plug
As the colours of the wires in the mains lead of
this appliance may not correspond with the coloured
markings identifying the terminals on your plug,
proceed as follows:
1 Connect the green - yellow or green (earth) wire
to the terminal in the plug marked ‘E’ or with the
symbol or coloured green and yellow or green.
2 Connect the blue (neutral) wire to the terminal in
the plug marked ‘N’ or coloured black.
3 Connect the brown (live) wire to the terminal in
the plug marked ‘L’ or coloured red.
With the alternative plugs a 13A fuse must be
fitted either in the plug or adaptor or in the main
fuse box. If in doubt contact a qualified electrician.
Electrical requirements
Before you insert the plug into the wall socket
make sure that the voltage and the frequency shown
in the rating label corresponds to your electricity
supply.
We recommend that this appliance be connected
to the mains supply via a suitable switched and fused
socket in a readily accessible position.
Should the mains lead of the appliance
become damaged or need replacing at any time,
it must be replaced by a special purpose made
mains lead which can only be obtained from a Beko
Authorised Service Agent.
Green and yellow
or green
Warning
This appliance must be earthed
If the fitted moulded plug is not suitable for
your socket, then the plug should be cut off and an
appropriate plug fitted.
The moulded plug on this appliance incorporates
a 13A fuse. Should the fuse need to be replaced
an ASTA approved BS1362 fuse of the same rating
must be used. Do not forget to refit the fuse cover.
In the event of losing the fuse cover, the plug must
not be used until a replacement fuse cover has been
fitted. Colour of the replacement fuse cover must
be the same colour as that visible on the pin face of
the plug. Fuse covers are available from any good
electrical store.
In order to avoid hazards, damaged supply cord
should be replaced by the manufacturer, its service
agent or similarly qualified people.
N
Blue or black
Built-under installation
This appliance can be installed under a worktop.
L
Brown or red
Washer/dryer combination
Only authorised specialists are permitted to carry out a built-under installation. Risk of electric
shock!
Do not stack washing machine on top of the tumble
dryer. This would damage both appliances and
guarantees would become void. It is also unsafe to
stack an appliance on top of another without using a
suitable and approved stacking kit obtained from the
manufacturer of the appliances.
• A special stacking kit is required as an optional
extra please contact customer service.
4
installation
Disposal
Where to leave the packaging?
The plastic wrapping must be kept away from children!
Risk of suffocation!
The packaging is made of materials which can be recycled.
Check with your local council for recycling details.
product is level and re-adjust levelling if required.
Water Tank
When drying, water is separated from the airstream of
the laundry which is condensated in the condenser. This
water is collected in the water tank. The water tank needs
emptying after every drying cycle, or if during the drying
cycle the ‘‘Water Tank Full’’ indicator flashes; in that case the
programme stops. Do not remove the water tank while the
machine is operating.
Emptying the water tank:
1. Remove the water tank carefully by drawing it out of
What to do with the old appliance?
Dispose of your old appliance in an environmentally friendly
manner.
its housing; make sure you hold the rear with the other
hand.
• Ask your dealer or your local refuse collection service
how to best dispose of your old appliance.
Warning!
Water tank, when full, is heavy, take care not to drop it.
2. Pour the water out.
3. Remove any fluff balls from the stopper of the tank, if
present. Close the stopper.
4. Slide the water tank fully in.
Disconnect it from the mains, cut off the power cable
and disable the door lock so children will not be
endangered by becoming trapped inside.
Installation
Never drink water from the tank!
Condensed water is not suitable
drinking water!
The proper location
For drying the appliance requires a sufficient supply of clean,
cool room air.
Do not operate the appliance together with furnaces
(gas-, oil-, coal-fired) or fireplaces. The airflow may
aspirate their exhaust fumes, withdraw oxygen and
extinguish flames Poisoning hazard!
Operate the appliance only in well ventilated, low dust
rooms. Do not block or cover the appliance’s vent slots.
The floor must have a sufficient loadbearing capacity!
If, for example, you are stacking a washer and the
dryer, this combination can when loaded reach a total
weight of 160 kg.
Important:
• Place appliance on an even and level floor only. Antislip feet pads are supplied if additional grip is required
on the floor surface
• Do not stand appliance on the power cable.
• Keep at least 1 cm distance from walls or other
furniture, in ideal condition.
• Do not restrict the floor clearance through deep pile
carpets, strips of wood or similar.
Do not let children to tamper
with the water tank and
condenser assembly.
Condenser :
In the “Condenser” the moist, warm air stream is cooled by
drawn-in cold room air, causing the water to condense on
the internal plates.
Please clean the condenser
- after 20 drying times or
- once a month.
To clean the condenser:
1. Open the door. Wait for the appliance to cool down.
2. Open the condenser cover latch. Then turn the 4 latches
to release the condenser.
3. Pull the condenser out gently using the handle..
4. Rinse condenser – vertically and horizontally thoroughly
under running water. Let water drain thoroughly.
Close properly
and check the 4
locking latchs?
Levelling
• Adjust feet until the appliance is level and does not
rock. Checking with a spirit level is recommended.
Important:
• Adjust by the feet only, do not use wooden wedges or
similar. Never remove the feet!
Two rubber friction pads are
supplied with your tumble dryer
in case required to stop the appliance moving on a slippery or
smooth surface.
Take care not to damage the Condenser.Otherwise
performance of the appliance would be affected.
A Damaged water tank would leak water, so never
use a damaged water tank.
To fit friction pads underneath
the height adjustable front feet,
gently tilt the tumble dryer backwards as shown in the diagram and push the pads firmly on the feet. Check that the
5
how to use
The first time
The right amount
• To remove any possible residue from production
wipe out the drum with a moist cloth before the
first drying cycle.
• During the first empty drying cycle protective
coating need to be burnt off smell / fumes will
be emitted but this is quite normal.
Ensure the room is well ventilated during this
process.
• The maximum load capacity depends on the
textile type and the corresponding drying
programme.
Before Drying
What can be dried
• The laundry should be spun-dried as much
as possible–to the extent permissible for the
respective fabric.
Always observe the care symbols shown on the
garment labels!
Please note the information given in the
“Programme descriptions”! Overloading the
drum has an adverse effect on the drying result.
( See note on page 9 )
Care symbols for drying
Always try to utilise the maximum load capacity.
Suitable for drying at high
temperature:
Hot wash / coloured cottons, cotton,
linen
The door
• To open, pull the door handle area.
• Put laundry loosely in the drum.
• Close the door; push against the door until you
hear the door lock engage.
Take care no textiles are caught in the door.
Suitable for drying at reduced
temperature:
Easy-care synthetics (polyester,
polyamide); mixed fabrics (with
cotton)
Programmes
Not suitable for drying:
Sensitive fabrics (viscose, silk, etc.);
curtains
Programme selector
The programme selector can be turned either
clockwise or anti-clockwise.
• Tumble dry only textiles labelled accordingly–and
only with the appropriate drying programme.
• If possible load textiles of the same kind; thin
tea towels will dry much quicker than thick bath
towels.
• Remove metal parts (buckles, etc.) or put textiles
in a linen bag or similar.
• Empty pockets, remove all foreign objects (coins,
pens, etc.). Close zippers, hooks and eyes.
Synthetics
Timed
Programmes
10 min
20 min
What must not be dried
–
–
–
–
–
40 min
Do not load dripping wet laundry in the dryer.
The dryer may be damaged, and the energy
consumption will be excessively high.
Sensitive fabrics (silk, curtains woollen, etc.) may
crease.
Downfilled textiles (pillows, duvets) are not
suitable.
Air-tight (rubberized) textiles.
Foam or rubber parts (shoulder pads and the
like) might deform and damage laundry or
appliance.
Textiles that were treated with cleaners or drycleaned.
The vapours generated may cause a risk of fire
or explosion, poisoning hazard or damage to the
appliance!
60 min
6
Ready to Ready to
Wear
Iron
Cottons
Extra dry
Ready to Wear
Ready to Iron
Delicates
Freshen Up
Pushing the On/Off button, the appliance is
turned on; the programme, however, will start
only when the >Start/Stop/Cancel< button is
pressed.
When changing to a different programme the
programme must be; cancelled first; >Start<
button must be pressed for 3 sec. to cancel the
programme.
Tumble dry only textiles labelled accordingly.
For extremely sensitive textiles the use of a laundry
bag is recommended.
Application:
1. Before loading the dryer all small and fresh stains
must be removed. Otherwise the stains will be dried
in and difficult to remove later
2. Introduce 1 to 4 pieces into the drum or first into
the laundry bag.
3. Select the delicates program.
4. When the program has finished, take laundry out
from the drum or the laundry bag and place them
over a hanger to avoid creasing.
For detailed information about the individual drying
programmes, refer to the “Programme descriptions”.
(Page 9)
Always choose a programme suitable for the
textile type.
Observe the care symbols shown on the garment
labels!
Standard programmes
Freshen Up:
For refreshing or airing, for all types of fabrics.
Depending on the textile type, several standard
programmes are available:
Timed programmes
–
–
For final drying or airing your washing several timed
programmes are available.
– 60min, 40min, 20min, 10min
Drying at a reduced temperature; the drying cycle will
always end after the chosen time has elapsed or if
the drying level reaches to extra dry.
Cottons:
Drying at high temperature.
Easy-care:
Drying at reduced temperature.
Each standard programme offers different drying
levels to be chosen.
Drying level
Result
Extra dry*
thick, multi-layer textiles:
dried ready for the linen
cupboard
Ready to Wear
regular textiles: dried
ready for the linen
cupboard
Ready to Iron
Anti-crease
If the textiles cannot be removed from the dryer
after completion of the drying cycle, this anticreasing cycle will automatically start, separating and
smoothing your clothing to reduce creasing.
Throughout this anti-crease stage the drum
rotates briefly every 60 seconds for 2 hours; at
the same time a buzzer sounds.
The machine will not run in the following
conditions:
1. When the loaded clothing is fully dry,
2. When the dryer is empty
requiring regular ironing
* only for White/coloured cottons
Select drying level only as high as absolutely
necessary. This will treat the textiles with care
and limits the energy consumption.
When the laundry is dry at the beginning phase of
the cycle, the sensor thinks that either the tumble is
empty or laundry is fully dry. In this case anti-crease
cycle will be aborted.
Special programmes
A number of special programmes are also available:
–
Delicate Program
Extra gentle drying at a reduced temperature
and limited programme duration of approx. 20
minutes. Textiles such as fine textiles, delicate
underwear and accessories like a scarf can be
dried by this programme.
7
function buttons
Optional Functions
• When you set a programme and press the start
button, one of the indicators will light indicating
that the program is started.
Buzzer Cancel
• When the programme is running, one of the
indicators is illuminated indicating the current
programme stage:
When the programme ends and throughout the anticrease stage a buzzer sounds.
• If this is inconvenient, press this button to mute
the buzzer.
• There is no need to press the button again for
the next drying cycle, the dryer remembers this
setting.
• You may remove the textiles at any time and end
the programme.
Drying
– is illuminated during the actual heating phase of
a drying programme.
Ready to Iron
– is illuminated when the clothes have reached
Iron Dry level.
Ready to Wear
–
is illuminated when the clothes have reached
Cupboard Dry level.
Child lock
This function can be set during the programme or in
non-usage and standby.
End/Anti-Creasing
– is illuminated when the programme has been
completed and flashes while the anti-crease
stage is active.
To activate the child lock:
Press and hold both buttons indicated for approx. 3
seconds, until the child lock is activated.
A bleep will advise that child lock is activated.
Indicator lamps
To cancel the child lock:
Press and hold both buttons indicated for approx. 3
seconds,until the child lock is cancelled.
A bleep will advise that child lock has been cancelled.
Clean Filter
– is illuminated at programme end to remind you
to clean the fluff filter (see “Fluff filter”).
(Page 11)
Child lock does not prevent opening the door.
The child lock will disable all buttons except the
On/Off button.
If Clean Filter indicator is flashing during the
programme see “Trouble shooting”.
Programme progress
indicator
Tank Full :
is illuminated at programme end to remind you
to “Empty the condensed water tank”.If Tank
Full indicator is flashing during the programme
( see “ Emptying the condensed water tank)
(Page 5)
This row of indicators indicate the progress of the
running programme.
8
Buzzer cancel
Anti-crease
Optional
function
Maximum dry load (kg)
Approximate Duration (min)
Programme
Care symbol
Textile type Fabric type
programme descriptions
White/coloured cottons
Cotton and linen textiles
Extra dry
150’
Ready to Wear
130’
Ready to Iron
100’
Ready to Wear
100’
Ready to Iron
60’
Delicates
Delicates
20’
1.0
Use as needed
Freshen Up
10’
6.0
60 min
60’
40 min
40’
20 min
20’
10 min
10’
6.0
Easy-care / Synthetics
Synthetics (polyester,
polyamide); mixed fabrics
(with cotton)
3.0
Special programmes
Timed programmes
Use as needed
as
above
maximum 2 hours extra anti-crease stage after programme end
audible signal at programme end and during the Anti-crease stage
Note:
Overloading or tight packing of textiles in the drum:
By overloading or tight packing of textiles will prevent free movement in the tub.
Symptoms can be outer layer dry, inner/middle textiles still wet or damp. The humidity sensors are mounted
behind the fluff filter and if free movement is restricted the sensors only touch the outer dry textile.Therefore
always ensure textiles can tumble freely when loading the drum.
9
practical usage tips, preparation and starting a program
Preparation and start
1.
2.
3.
4.
5.
– Clean the condenser.
– Clean sensor ribs.
Sort the laundy according to cottons, synthetics,
etc.
Put laundry in the drum and close the door.
Turn the appliance on by pressing On/Off button
Set the programme selector knob to desired
programme.
Press the Start/Pause/Cancel button. Programme
starts and the drying indicator light comes on.
Changing the programme
5.
When changing to a different programme the
current programme must be cancelled first.
To do so first press the Start /Pause/Cancel button
for 3 sec. in order to cancel the programme.
Do not use scrubbers and scrubbing powders!
These will damage the plastic parts and painted
surfaces.
Cancelling a programme
Do not turn the appliance off during the heating
phase while progress indicator is on. Risk of heat
accumulation is possible in clothing! Fire Risk!
1.
2.
3.
4.
When the door is opened during the programme,
the programme will pause automatically and the
start button light will flash. Close the door and
press the start button to continue the programme.
First stop the running programme (press the Start
/Pause/Cancel button. Then press it again for 3
seconds to cancel the programme
Set the programme selector to
Freshen Up
Press the Start /Pause/Cancel button to start the
programme.
Wait for the programme to end.
Drain hose connection
•
Adding more laundry
1.
2.
3.
Only add additonal clothing at the begining of a
drying cycle, otherwise the result will be a mixture
of damp and too dry textiles.
Press Start /Pause/Cancel button. Start/Stop
indicator will flash.
Put laundry in the drum and close the door.
Press the >Start /Pause/Cancel < button. Start/Stop
indicator will be on.
•
•
Laundry final drying
1.
In order to reach desired dryness level you can
use additional final drying using one of the timed
programmes.
If the dryness level is not satisfactory set the
programme selector to one of the timed programmes
60min, 40min, 20min or 10min.
2.
The programme cycle is completed when the
indicators >End/Anti-Creasing< and >Clean filter< are
illuminated.
3.
4.
The water arising from drying (“condensed water”)
is normally collected in the condensed water
container, which needs to be emptied after every
drying cycle.
The condensed water can also be drained
permanently by means of the drain hose supplied
into a siphon trap or any other drain.
In that case the condensed water container
needs no longer to be drained –nevertheless the
»Reservoir full « indicator will light at the end of
each drying cycle.
Important:
In order for the water to run off observe the
maximum hose length and highest point above
the floor (see“Specifications”)!
Ensure that there are no sharp bends in the hose!
Here’s how to proceed:
At the rear of the appliance, Water drain
connections, Pull off the white hose by hand. DO
NOT USE PLIERS.
Push the drain connecter into the hose on the
machine and drain hose firmly. Run the drain hose
to the waste outlet of a washbasin and connect it.
hose connector
Programme end
1.
2.
When required
– Clean housing and fascia using a soft cloth and
a mild soap; wipe dry with a soft cloth.
Drain hose connector
Throughout the anti-crease stage the indicator
>End/Anti-Creasing< flashes. The programme can
then be ended at any time.
Set the On/Off button to off position.
Open door, remove laundry, check drum for
foreign objects.
After every drying cycle :
– Clean the fluff filter (see “Fluff filter”). (Page 14)
- Empty condensed water tank (see “Emptying
Tank”) (Page 5)
After approx. 20 drying cycles or four times a
year
Water pipe (white ) from
water collection container
to water tank
3.
10
If the drain hose is hung to the edge of a
washbasin or bathtub, secure it against slipping
off.
For this installation please contact your Beko
Customer Service.
Care & maintenance
Fluff filter
Fluff balls are generated during the wearing of the clothes - not by drying. When drying, these fluff balls are trapped
in the fluff filter. Normally, laundry are worn out by everyday usage and washing compared to drying.
It is important to clean the fluff filter after every drying cycle
To clean the fluff filter:
1.
2.
Open the door.
Pull out the fluff filter.
4.
Open out the fluff filter
5. Carefully remove the fluff by hand or with
a soft, dry cloth.
3. Open the filter by pushing the handle.
Check regularly that inside the filter,
there is no accumulation of fibre and dust.
Clean using a vacuum cleaner.
Once a month, wash the filter very gently under
clean and cold tap water to get rid of the dust. Place
it in a dry place until the filter is dry and re-fit before
next using your tumble dryer.
Water tank: Empty the water tank after every drying cycle see page 5.
Technical Specifications / Energy Consumption
Load capacity (dry weight)
– Cottons
– Synthetics
– Short delicate
– Fluff/Refresh
max. 6.0 kg
max. 3.0 kg
max. 1.0 kg
max. 6.0 kg / 3.0 kg
Drying method
Condenser, sensor controlled
Weight, unpacked
approx. 36 kg
Electrical connection
– Voltage
– Connected load
– Fuse protection
230-240 V ~ 50 Hz
2200 W
13 A
Consumption 1)
– Cottons linen cupboard dry2) 3)
– Cottons ironing dry 2)
– Synthetics linen cupboard dry 2)
1)
2)
3)
spun at
1000 min-1
1000 min-1
600 min-1
Residual
Humidity
approx %60
approx %60
approx %50
Energy
3.84 kWh
3.40 kWh
2.00 kWh
Standard values, determined under standard conditions. Depending on spin speed, textile type and ambient
conditions a deviation of up to 10% is possible.
Test programme according to EN 61121:2005
Standard programme for energy identification label.
11
before calling service/trouble shooting
If you notice…
check…
Appliance cannot be turned on or
programme does not start
•
•
•
•
Appliance does not react to input
• Child lock activated?
• If fault persists: unplug, wait a few seconds before
plugging in again.
• Condenser service door opened? Close properly and check
the locking latchs?
Indicator ‘End’ flashes, buzzer sounds (for 2h)
• Anti-crease stage is active.
• Turn appliance off and take the laundry out.
Light of ‘End/Anticrease’ is on, buzzer sounds
• Programme end reached.
• Turn appliance off and take the laundry out.
Light of Clean filter is flashing.
• Clean the filter. Press the >Start< button.
Programme stops without apparent reason
• Door is opened? Press the >Start< button.
• Did a power failure occur? Press the >Start< button.
• Condenser service door opened? Close properly and check
the locking latchs?
Programme selected? Start<button pressed?
Door properly closed?
Power cable plugged in?
Condenser service door opened? Closed properly and
check the locking latchs?
.cContact our customer service•
If the first programme progress indicator light is
flashing a incorrect operation or fault has occurred
Laundry too moist or drying time too long or clean
fluff filter indicator flashes
•
•
•
•
•
Indicator Tank Full is on
• Empty the water tank. Press the >Start< button.
Textiles are shrunk, felted, damaged
• Dry only textiles labelled suitable for tumble drying.
• Dry only with a programme suitable for the particular
textile type.
Light of programme progress indicators is flashing.
• If fault persists: turn appliance off and contact customer
service.
Drum overloaded? See “Programme descriptions”.
Make sure of good ventilation. Check vent slots.
Clean fluff filter.
Clean sensor ribs.
Finish dry with a suitable timed programme.
Let us help you! : If you cannot solve the problem yourself contact our customer service.
door reversal
1.
2.
3.
4.
5.
6.
Unplug the dryer.
Open the door.
Turn the contact pin in the upper part of door by 90°
in the anti-clockwise direction and remove it.
Unscrew the 2 screws of each door hinge and remove
the door.
Removing the door lock: Using a flat screwdriver
release the snap-fitted door lock.
Remove 2 plugs for the hinges and one for the door-
7.
8.
12
lock on the opposite side.
Insert the door lock system on the opposite side of the
hinge and be sure it is properly fitted.
Reverse the door:
Fit the door on the opposite side using 4 screws
removed. Fix the contact pin into the top side of the
door by turning 90° in the clockwise direction.
guarantee
Your new Beko product is guaranteed against the cost
of breakdown repairs for twelve months from the date
of the original purchase.
Important notes
What is covered?
•
•
•
•
Repairs necessary as a result of faulty materials,
defective components or manufacturing defect.
The cost of functional replacement parts, but
excluding consumable items.
The labour costs of a Beko approved repairer to
carry out the repair.
•
•
•
What is not covered?
•
•
•
•
•
•
Transit, delivery or accidental damage or misuse
and abuse.
Cabinet or appearance parts, including knobs,
flaps, handles or container lids.
Accessories or consumable items including but not
limited to, ice trays, scrapers, cutlery baskets, filters
and light bulbs.
Repairs required as a result of unauthorised repair
or inexpert installation that fails to meet the
requirements contained in the user instruction
book.
Repairs to products used on commercial or nonresidential household premises.
Loss of frozen food in freezers or fridge/freezers.
(Food loss insurance is often included within your
household contents insurance policy, or may be
available separately from your retailer).
•
•
•
•
•
Your Beko product is designed and built for
domestic household use only.
The guarantee will be void if the product is
installed or used in commercial or non-residential
domestic household premises.
The product must be correctly installed, located
and operated in accordance with the instructions
contained in the User Instructions Booklet
provided.
Professional installation by a qualified Electrical
Domestic Appliance Installer is recommended for
all Washing Machines,Tumble Dryers, Dishwashers,
Dryers and Electric Cookers
Gas Cookers must only be installed by a CORGI (or
BORD GAIS) registered Gas Installer.
The guarantee is given only within the boundaries
of the United Kingdom and the Republic of Ireland.
The guarantee is applicable only to new products
and is not transferable if the product is resold.
Beko disclaims any liability for incidental or
consequential damages.
The guarantee does not in anyway diminish your
statutory or legal rights.
service
Please keep your purchase receipt or other proof of
purchase in a safe place; you will need to have it should
the product require attention under guarantee.
You should also complete the details below; it will
help us assist you when requesting service. (The model
number is printed on the Instruction Booklet and the
serial number is printed on the Rating Label affixed to
the appliance)
Republic of Ireland
All Refrigeration,
01 862 3411
All Cookers
Washing Machines & Dryers, Tumble Dryers
Dishwashers
Before requesting service please check the troubleshooting guide in the Operating Instructions as a
charge may be levied where no fault is found even
though your product may still be under guarantee.
Model No:
Serial No:
Retailer:
Date of purchase:
For service under guarantee simply telephone the
appropriate number below
UK Mainland & Northern Ireland
Fridges & Freezers
0870 241 0638
Electric Cookers
0870 241 1320
Gas &
0870 241 1321
Dual Fuel Cookers
Washing Machines & Dryers
Tumble Dryers
0870 241 0357
Service once the manufacturers
guarantee has expired.
If you have purchased an extended guarantee please
refer to the instructions contained within the extended
guarantee agreement document. Otherwise please call
the appropriate number above where service can be
obtained at a charge.
Should you experience any difficulty in obtaining
service please contact the Beko Customer Help-Line.
Tel: 0870 774 1050
e-mail:[email protected]
13
Beko plc Beko House, Caxton Way, Watford
Hertfordshire, WD18 8UF
Tel: 01923 654650
Fax: 01923 819653
Email: [email protected]
www.beko.co.uk