1
SPECIFICATIONS
CAMERA TYPE
LENS MOUNT
IMAGE CAPTURE
Image sensor
No. of pixels (approx.)
Sensitivity
White balance control
Digital SLR with built-in flash and interchangeable lenses
Minolta A-type bayonet mount * see lens list
Interline primary color CCD (23.5 mm x 15.7 mm) with interlace scan
Total: 6.3 million, Effective: 6.1 million
Auto, ISO 100 / 200 / 400 / 800 / 1600 / 3200 equivalent
Automatic, Preset (Daylight, Shade, Cloudy, Tungsten, Fluorescent, Flash), Custom,
Color temperature (2500 ~ 9900 K with 19-step Magenta / Green compensation)
RECORDING
Recording media
Type I and Type II CompactFlash Cards, Microdrive, SD Memory Card*,
MultiMediaCard* * with optional SD-CF1
JPEG, RAW
(DCF 2.0 compliant, DPOF supported by printing functions in ver.1.1, Exif 2.21)
No. of recorded pixels L: 3008 x 2000, M: 2256 x 1496, S: 1504 x 1000
Storage capacity (approx.) (L: 3008 x 2000 / M: 2256 x 1496 / S: 1504 x 1000)
(with 512 MB CF card in L / M / S size) STD: 277 / 470 / 926, FINE: 163 / 282 / 584, EXTRA-FINE: 82 / 145 / 314,
RAW+JPEG: 39 / 44 / 48, RAW: 53
Color modes
Natural, Natural Plus, Portrait, Landscape, Sunset, Night View, Night Portrait,
Black & White, Adobe RGB, Embedded Adobe RGB. Except for Adobe RGB
and Embedded Adobe RGB, all other color modes use the sRGB color space.
Image quality modes
Standard, Fine, Extra-Fine, RAW, RAW+JPEG
Contrast / Saturation / Sharpness
5 steps: -2, -1, ± 0, +1, +2
Noise reduction
Available at shutter speeds longer than 1 s
Delete function
Single, multiple, or all frames in a folder / memory card can be deleted.
Folders can be deleted in the File Browser.
File format
PLAYBACK
LCD monitor
Playback modes
AF SYSTEM
Type
Sensor
Sensitivity range
Main functions
AF illuminator
2.5-inch TFT color, Total pixels: 115,000
Single-frame (Image only, Image and information), Histogram with luminance limit display,
Index (4, 9, or 16 frames), Enlarged playback (up to approx. 5x), File Browser,
Slideshow, manual and auto rotation
TTL phase-detection system
CCD line sensors (9 points, 8 lines with center cross-hair sensor)
-1 EV ~ 18 EV (at ISO 100 equivalent)
Wide AF area, spot AF area, and 9 local AF areas with Focus Area Selection.
AF-A / AF-S / AF-C / DMF. Predictive Focus Control (with moving subjects in
AF-A and AF-C), auto-tracking focus-point display
Available with built-in flash.
Range: 1 m ~ 5 m / 3.3 ft ~ 16.4 ft
AE SYSTEM
Metering type
Metering cell
Metering range
Exposure modes
TTL metering; multi-segment metering, Center-weighted metering, Spot metering
14-segment honeycomb-pattern SPC
+1 EV ~ +20 EV (+4 EV to +20 EV with Spot metering), (at ISO 100 with f/1.4 lens)
Auto recording / P (with program shift), A, S, M, and Portrait, Sports Action,
Landscape, Sunset, and Night Portrait Digital Subject Programs
Exposure compensation ±2 EV in 1/3 EV increments
AE lock
Automatically activated with AF lock, available via AEL button
BUILT-IN FLASH
Flash metering system
Flash compensation
Guide No.
Recycling time
Control
Flash modes
SHUTTER
Type
Speed range
Flash sync speed
Compact Digital SLR with
Body-Integral Anti-Shake Technology
ADI / Pre-flash TTL flash metering
±2 EV in 1/3 EV increments
GN 12 (in meters at ISO 100) / 39.4 (in feet at ISO 100)
Approx. 3 s
Manual (raise the flash to activate)
Fill Flash, Red-eye reduction (via pre-flash), Rear Sync Flash
{Wireless / Remote off-camera flash, High-speed sync available with
MAXXUM Flash 5600HS(D) / 3600HS(D)}, Slow sync activated via AE lock button
GUIDE BOOK
Electronically-controlled, vertical-traverse, focal-plane type
1/4000 s ~ 30 s, bulb exposures possible
1/160 s (with Anti-Shake off), 1/125 s (with Anti-Shake on)
VIEWFINDER
Type
Focusing screen
Field of view
Magnification
Eye relief
Fixed eye-level system with roof mirror type pentaprism
Spherical Acute Matte
95 %
0.83 x * with 50mm lens at infinity, -1 m-1
Approx. 20 mm from the eyepiece, 16 mm from the eyepiece frame
at -1 diopter (-1m-1)
-2.5 ~ +1.0 m-1
Diopter control
DRIVE
Drive mode
Single-frame advance, Continuous advance, 10 s and 2 s Self-timer,
Single-frame advance bracketing, Continuous-advance bracketing.
Continuous-advance rate: 3 frames per second (approx.),
Max. 5 frames (RAW), max. 3 frames (RAW+JPEG)
With 0.3 EV / 0.7 EV increments, 3 frames
Exposure bracketing
ANTI-SHAKE
System
CCD-Shift mechanism
Anti-Shake display
Anti-Shake scale in viewfinder
Anti-Shake compensation Approx. 2 EV ~ 3 EV decrease in shutter speed
(varies according to shooting conditions and lens used)
OTHERS
Other functions
PC interface
Video output
Operating temperature
Printing output control
Battery
Battery performance
External power source
Dimensions (WxHxD)
Weight (approx.)
Instant playback, Customization, Zone Matching, Depth-of-field preview
USB: Full-Speed 12Mbps data transfer with a USB2.0 compatible computer
NTSC / PAL (selected on the camera)
0 – 40° C / 32 – 104° F
Exif Print, PRINT Image Matching III, PictBridge
Lithium-ion battery NP-400
No. of frames recorded: approx. 550 (CIPA measurement),
approx. 700 (Konica Minolta measurement)
6 V DC (with AC adapter AC-11)
Approx. 130.5 mm x 92.5 mm x 66.5 mm / 5.1 in. x 3.6 in. x 2.6 in.
Approx. 590 g / 20.8 oz. * without batteries, memory card and body accessories
COMPATIBLE COMPUTERS
IBM PC / AT compatible computers: Windows Me, Windows 2000 Professional, Windows XP (Home /
Professional), Windows 98, or Windows 98 Second Edition
Apple Macintosh computers: Mac OS 9.0 – 9.2.2, Mac OS X v.10.1.3 – 10.1.5, v.10.2.1 – 10.2.8, v.10.3 – 10.3.9, v.10.4 – 10.4.1
Number of frames recorded based on image quality and size
Image quality mode
Image size*1
8.8 MB
5
53
L
11.5 MB
3
39
M
10.2 MB
3
S
9.3 MB
L
EX-FINE (JPEG)
Image quality mode
Image size*1
*2 Storage capacity
File size (approx.) Continuous advance
(w/ 512 MB CF Card )
L
3.0 MB
10
163
M
1.7 MB
40
282
44
S
850 KB
584
584
3
48
L
1.8 MB
24
277
5.9 MB
3
82
M
1.0 MB
470
470
M
3.3 MB
9
145
S
540 KB
926
926
S
1.6 MB
314
314
RAW
RAW + JPEG
*2 Storage capacity
File size (approx.) Continuous advance
(w/ 512 MB CF Card )
FINE (JPEG)
STD (JPEG)
*1 L: 3008 x 2000, M: 2256 x 1496, S: 1504 x 1000
*2 In AF-S mode at shutter speeds above 1/500 s, using a SanDisk ULTRA II 512MB CompactFlash card. File size and frame storage capacity vary according to subject matter.
DiMAGE Master (v.1.1)*1: System requirements
DiMAGE Master Lite: System requirements
CPU*2
Operating System
IBM PC/AT compatible computers
Apple Macintosh series computers
Pentium II Processor or later
PowerPC G3 or later
(Pentium III or later recommended)
(PowerPC G4 or later recommended)
CPU*2
Windows 98, or Windows 98 Second Edition, Mac OS X v.10.1.3 – 10.1.5,
Operating System
Windows Me, Windows 2000 Professional, v.10.2.1 – 10.2.8, v.10.3 – 10.3.9,
Windows XP (Home / Professional)
IBM PC/AT compatible computers
Apple Macintosh series computers
Pentium II Processor or later
PowerPC G3 or later
(Pentium III or later recommended)
(PowerPC G4 or later recommended)
Windows 2000 Professional,
Mac OS X v10.1.3 – 10.1.5,
Windows XP (Home / Professional)
v.10.2.1 – 10.2.8, v.10.3 – 10.3.9,
v.10.4 – 10.4.1
v.10.4 – 10.4.1
RAM
128 MB (256 MB or more recommended)
RAM
128 MB (256 MB or more recommended)
Hard-disk space
200 MB or more (100 MB or more for installation)
Hard-disk space
200 MB or more (100 MB or more for installation)
Monitor
A 16-bit color monitor with a minimum resolution of 1024 x 768 (XGA), or higher
Monitor
A 16-bit color monitor with a minimum resolution of 1024 x 768 (XGA), or higher
*1 DiMAGE Master v.1.1 is required for MAXXUM 5D RAW data image processing. *2 Necessary to meet the requirements recommended for use with the OS.
● The actual number of frames recorded may vary according to the subject and media used. ● The computer and operating system must be guaranteed by their manufacturers to support a USB interface. ■ Problems may be encountered when other
USB devices are being used in parallel with this product. ■ Only built-in USB ports are supported; problems may be encountered if the camera is connected to a USB hub. ● Users with Windows 98 and Windows 98 Second Edition operating systems must install dedicated driver software included on the DiMAGE Master Lite CD-ROM. ● Inherent limitations in current LCD manufacturing technology may result in the appearance of one or more light or dark pixels in the LCD monitor. Such
light or dark pixels do not affect overall performance or camera operation and are not indicative of monitor damage. ● Images other than product photos may be simulated for design purposes.
Specifications and accessories are based on the information available at the time of printing and are subject to change without notice. For the latest information, please visit: http://5d.konicaminolta.com
■The Konica Minolta logo and “The essentials of imaging” are trademarks or registered trademarks of Konica Minolta Holdings, Inc. ■ MAXXUM, DiMAGE and CxProcess are trademarks or registered trademarks of Konica
Minolta Photo Imaging, Inc. ■ Windows is a registered trademark of Microsoft Corporation in the United States and other countries. ■ Apple, Macintosh and Mac OS are trademarks of Apple Computer, Inc., registered in
the U.S. and other countries. ■ EasyShare is a trademark or a registered trademark of Eastman Kodak Company. ■ All other brand and product names are trademarks or registered trademarks of their respective owners.
Konica Minolta Photo Imaging, Inc. Shinjuku Nomura Bldg., 1-26-2 Nishishinjuku, Shinjuku-ku, Tokyo, 163-0512 Japan
This brochure is printed with soy ink to help preserve the environment.
©2005 Konica Minolta Photo Imaging, Inc.
9242-4964-06 (MC-E) 0805-A1
Printed in Japan
http://konicaminolta.com
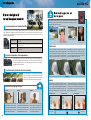
Main Features
6 Major Benefits of the MAXXUM 5D
Digital SLR
Basics
The high-performance MAXXUM 5D is outstandingly easy to use and boasts
six major benefits for enhanced photographic enjoyment.
1
Body-Integral Anti-Shake
The MAXXUM 5D’s advanced Anti-Shake system
prevents the most common cause of blurriness
—camera shake—from spoiling your pictures.
And because Anti-Shake is built into the camera
body, it provides blur-free protection with any
genuine MAXXUM AF lens*.
2
The freedom to use interchangeable lenses
Compact digital
camera
Large, 2.5-inch LCD Monitor
The LCD monitor on the back of the camera has a large, 2.5-inch
screen that makes it easy to review captured images. When you’re
shooting, the monitor also assists you by displaying current exposure
values and function settings in large, easy-to-read type.
5
Simplicity and Easy Operation
The MAXXUM 5D is so easy to operate, you’ll be able to take
beautiful photos even if you’ve never used an SLR camera before. In
addition to full-auto operation, it lets you take advantage of Digital
Subject Program Selection to obtain optimum results in a variety of
shooting situations.
Easy-to-Handle
Compact Body
Although packed with features, the
MAXXUM 5D is 22% more compact
than its big brother, the MAXXUM 7D.
Easy to handle and carry even on long
trips, you’ll want to take it with you
wherever you go.
6
Interchangeable lenses
Wide-angle lens
The large, 6.1-megapixel CCD delivers superb image quality with
excellent highlight and shadow detail because its larger sensor
elements can capture more information per pixel. An exclusive
primary-color, low-pass filter and an advanced image processor also
contribute to superior quality, while CxProcess III image optimization
assures true-to-life reproduction of texture and color.
4
Digital SLR
camera
Large, 6.1-Megapixel CCD
* Except MAXXUM Macro Zoom 3x – 1x.
3
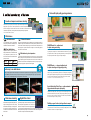
WhatÕs so special about
digital SLR photography, anyway?
* 35mm film equivalent
39mm
117mm
Unlike compact digital cameras, digital SLR cameras allow you to switch lenses at any
time, opening the door to a whole new world of creative freedom. From macro to wideangle and ultra-telephoto, you’re free to choose the lens that suits your subject best.
And you can take advantage of the superior brightness and resolving power of fixed
focal-length lenses, as well as the flexibility and versatility of zoom lenses.
Telephoto lens
Macro lens
MAXXUM 7D
Fast, responsive shooting
92.5 mm
/ 3.6 in.
130.5 mm / 5.1 in.
66.5 mm
/ 2.6 in.
A Wide Range of
SLR System Accessories
Conventional compact digital cameras can take time to focus,
and cause you to miss once-in-a-lifetime photo opportunities.
But MAXXUM digital SLR cameras benefit from Konica Minolta’s
expertise as the company that introduced the first 35mm SLR
cameras with body-integral autofocus. As a result, the
MAXXUM 5D features fast focusing and shutter release that
make it easy to capture the “magic moment.”
Digital SLR camera
Compact digital camera
The ability to control depth of field
Another benefit of MAXXUM 5D ownership is the wide range of
genuine MAXXUM SLR system lenses and accessories that are
available. From close-up macro photos of flowers and insects to ultratelephoto shots of sports and wildlife, you can expand your
photographic horizons to the limit.
Digital SLR cameras allow greater control over depth of field
than compact cameras, enabling you to emphasize the primary
subject by ensuring that distracting background elements are
slightly out of focus. The high quality of MAXXUM lenses
helps to heighten this effect by ensuring smooth background
blurring that makes the main subject stand out even more.
Digital SLR camera
Compact digital camera
A bright, clear, real-image viewfinder
With many ordinary compact digital cameras, the only way
to view your subject is on a built-in LCD monitor. This
makes it hard to see details and track moving subjects.
With a digital SLR, the image from the lens is reflected
directly up to the viewfinder, providing you with a bright,
clear, real-image view of your subject that makes it easy to
confirm focus and fine detail.
Digital SLR camera:
viewing the subject in the viewfinder
A/D converter
lens
2
Compact digital camera:
viewing the subject on the LCD
mirror CCD LCD monitor
lens CCD LCD monitor
3
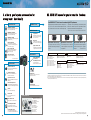
Self-timer lamp
Built-in flash
Image Sensor
Anti-Shake Switch
! "# $$%
&
() ) *(++,* ( -
'
* Except MAXXUM Macro Zoom 3x – 1x.
"
Easy-to-understand viewfinder
information display
Easy-to-understand LCD monitor
information display
A green LED display at the bottom of the viewfinder shows
essential focus and exposure information at a glance. A red
indicator mark superimposed on the viewfinder screen lets you
instantly confirm the active autofocus target.
During shooting, exposure values and camera settings are
displayed on the monitor in large, easy-to-read type. The display
switches to a vertical format when you rotate the camera, and
shuts off when you put your eye to viewfinder.
Lens release
q
w e
r
t
y
q
w
e
Depth-of-field preview button
Lens mount
i
r
!2
Menu button
Viewfinder
Display button
Main switch
y i
Function Button
!3
Exposure compensation button / Enlarge button
t
AE lock button
u o
!0
!1
q % %
w e & % r t y u ' i ( %
Access lamp
!2
!3
!4 !5
o
!4
!0
!5
u
@0
!1
@1
@2
!6
!7
@3
!8
!6
o !0 !1 !2 !3 !4 !5 )
!6 q w e r t y u i !9
o !0 !1 !2 !3 !4 !5 !6 !7 !8 !9 ! @0 @1 " #
@2 " $
@3 * Simultaneous display for demonstration only.
Quick access to
frequently used menu settings
Delete button
AF / MF switch
Playback button
Remote-control terminal
A press of the Function button displays a selection menu for the
frequently used functions listed below. It’s a fast and convenient
way to exercise creative control without having to navigate
multiple menus.
DC terminal
2.5-Inch LCD Monitor
Battery-chamber door
Spot-AF button
Card-slot / USB port /
Video-out terminal door
AF Area: Wide AF Area, Spot AF Area, or Focus Area Selection.
AF Modes: Single-Shot AF, Direct Manual Focus, Automatic AF, or Continuous AF.
Metering Modes: Multi-Segment Metering, Center-Weighted Metering, or Spot Metering.
Flash Compensation: Flash compensation of ±2 EV can be set in 1/3 EV increments.
Digital Effects Control: Contrast, color saturation, and sharpness can be set for specific color modes.
Controller
White Balance Dial & Button
Control dial
Shutter-release button
White-balance dial
Quick, intuitive exposure mode selection
The large exposure mode dial on the top of the camera makes mode selection easy and intuitive even if you’ve
never used a digital SLR camera before. In addition to Auto mode, you can choose P (Program) mode, A
(Aperture Priority) mode, S (Shutter Priority) mode or M (Manual) mode. There are also five Digital Subject
Program modes, each of which is marked by an easy-to-recognize icon.
Drive-mode button
Color temperature / CC filter setting
Camera-sensitivity (ISO) button
Custom white balance
Preset white balance
Eyepiece sensors
Auto white balance
Exposure Mode Dial
# % . Auto mode
Portrait Mode
/ Program mode
Sports Action Mode
/ Aperture Priority mode
Landscape Mode
/ Shutter Priority mode
Sunset Mode
/ Manual mode
Night Portrait Mode
/ 0
*
+
A built-in solution for blur-free shooting with any MAXXUM AF lens
Basics
of
Digital
SLR
Digital
BasicsSLR
Holding the camera correctly
*1
Right
The MAXXUM 5D’s body-integral Anti-Shake is
an exclusive Konica Minolta system that compensates for camera shake caused by hand
movement (high-speed shake) and body move*2
ment (low-speed shake) . As a result, you can
shoot at shutter speeds 2~3 steps slower than
*3
would otherwise be possible . Anti-Shake not only reduces the number of
shots spoiled by blurring, it allows you to shoot in places where it would be
difficult to use a tripod.
Wrong
Support the camera body
Keep your elbows close
Even with Anti-Shake, it’s important to hold the camera
correctly. For maximum stability and operating ease,
grip the camera firmly with your right hand while
supporting the body with the palm of your left hand.
Keep your elbows close to your sides and press the
back of the camera firmly against your cheekbone as
you frame your subject. To focus, press the shutter
button halfway. When you have confirmed that focus is
correct, press the shutter button all the way down in a
smooth motion.
*1 Except MAXXUM Macro Zoom 3x – 1x.
*2 High-speed shake = 8~12Hz, low-speed shake = 1~2Hz.
*3 Effectiveness varies according to shooting conditions and lens.
The causes of blurring: camera shake, incorrect focus, and subject motion
Anti-Shake System
The three most common causes of blurring are camera shake, incorrect
focus, and subject motion. Camera shake is most likely to occur at slow
shutter speeds, and although the MAXXUM 5D’s Anti-Shake system
lets you shoot at slower speeds than would otherwise be possible, the
best way to avoid blurring is to choose a shutter speed that is faster
than “1 / current focal length.” In other words, if you are shooting at a
focal length of 28mm, you should set the shutter speed to 1/30 or
faster; if you are shooting at 200mm, you should set it to 1/200 or
faster. To avoid blurring caused by incorrect focus, make sure your
subject is within the focus frame. If necessary, focus on your subject
first, and then lock the focus by holding the shutter button pressed
halfway while you compose the shot. To avoid blurring caused by
subject motion, use an extremely fast shutter speed or simply wait for a
pause in the action before you take a shot.
CCD Shift Mechanism
++,
Highly sensitive angle/speed sensors and a unique Smooth Impact Drive
Mechanism work together, instantly shifting the CCD left/right or up/down to
compensate for camera shake. The system is so advanced it can even
adjust the amount of compensation to match the lens in use.
Sharp, blur-free image
Shooting data: AF 75 – 300mm f/4.5 – 5.6(D), 1/80 s, F4.5, ISO 200, WB: Manual, Anti-Shake On
Camera shake indication
A camera shake warning symbol in the viewfinder alerts you whenever there is a danger of
blurring. And when Anti-Shake is activated, a 5-step scale is displayed to indicate the degree
of stabilization that is being applied.
Less stabilization
Camera shake
Incorrect focus
Subject motion
Greater stabilization
Exercise special care on telephoto shots
Camera shake warning
$
Anti-Shake scale
Camera shake tends to be much more noticeable on telephoto shots, so it's a good idea to hold the camera securely and take several extra
shots when using a high-power telephoto or zoom lens.
%
Digital Subject Program Selection—optimum settings, applied with ease
The MAXXUM 5D’s Digital Subject Program Selection makes it easy to obtain beautiful results in a wide range of shooting
situations. Simply set the mode dial to the icon for the Digital Subject Program that matches the scene you’re shooting—
the camera will automatically apply the optimum exposure and image control settings for you.
Sports Action Mode
Portrait Mode
Shoot with confidence at any focal length
The MAXXUM 5D’s Anti-Shake system works with any lens* in the MAXXUM AF lineup, assuring you of blur-free imaging in virtually any shooting situation.
And because the Anti-Shake system is integrated into the camera’s body, MAXXUM lenses can offer uncompromising optical performance without the added
weight and bulk of lens-based optical stabilization systems.
AF 28 – 75mm f/2.8(D)
* Except MAXXUM Macro Zoom 3x – 1x.
AF 75 – 300mm f/4.5 – 5.6(D)
Equivalent focal length when mounted on
MAXXUM 5D: 112.5 – 450mm
Telephoto
Portrait mode emphasizes your subject by softening the background
focus. It also regulates color to assure faithful reproduction of smooth,
natural skin tones.
ON
Macro
Anti-Shake
OFF
AF 100mm f/2.8 Macro(D)
AF DT 18 – 70mm f/3.5 – 5.6(D)
Equivalent focal length when mounted on
MAXXUM 5D: 150mm
Equivalent focal length when mounted on
MAXXUM 5D: 27 – 105mm
Night Scene
Equivalent focal length
when mounted on MAXXUM 5D:
112.5 – 450mm
Sports Action mode automatically adjusts exposure settings to freeze the
action. It also activates continuous AF and continuous advance drive mode
so you can track fast-moving subjects.
Sunset Mode
Landscape Mode
Anti-Shake
AF 75 – 300mm
f/4.5 – 5.6(D)
Equivalent focal length
when mounted on MAXXUM 5D:
42 – 112.5mm
AF DT 11 – 18mm
f/4.5 – 5.6(D)
AF DT 18 – 200mm
f/3.5 – 6.3(D)
Equivalent focal length
when mounted on MAXXUM 5D:
16.5 – 27mm
Equivalent focal length
when mounted on MAXXUM 5D:
27 – 300mm
Landscape mode regulates exposure to enhance the resolving power of the
lens and assure maximum depth of field. It also heightens the contrast and
ensures rich, vibrant color.
Although similar to Landscape mode in the exposure settings it uses,
Sunset mode allows the rich, warm color tones of the sky at sunset to be
faithfully rendered in all their glory.
Night Portrait Mode
Auto Mode
Anti-Shake
Anti-Shake
ON
ON
AF DT 18 – 70mm
f/3.5 – 5.6(D)
Equivalent focal length
when mounted on MAXXUM 5D:
27 – 105mm
&
Anti-Shake
Anti-Shake
OFF
OFF
Night Portrait mode ensures proper exposure of foreground and
background elements when shooting with flash, and regulates image
quality for natural color balance in fluorescent or neon light.
You can revert to full-auto operation at any time by setting
the exposure mode dial to Auto. This clears any changes
you have made to the aperture, shutter speed, autofocus,
white balance, and ISO sensitivity settings, and allows you to
enjoy carefree full-auto shooting ease.
'
CCD & Image Quality
A large, 6.1-megapixel CCD and CxProcess III
image processing for assured image quality
TM
Large CCD + advanced imaging technology = superior image quality
To assure the highest level of image quality, the MAXXUM 5D uses a large 6.1-megapixel CCD for image capture.
In addition, it features advanced CxProcess III image processing that draws on Konica Minolta’s long experience in
film technology and human color perception. CxProcess III ensures that colors are rendered just as the human
eye perceives them, with rich, expressive tonal gradations and minimal noise.
Natural skin tones
Fine details
A choice of image quality modes
The MAXXUM 5D lets you choose the quality and file size you want to use
for image recording. RAW mode records the uncompressed image data
precisely as it was captured. It offers the highest image quality and assures
that all data is available when retouching and editing photos later. Images
can also be recorded in Extra Fine, Fine, or Standard JPEG modes. JPEG
image data results in smaller file sizes and is easily manipulated on a
personal computer.
Choosing the right image size
When shooting in JPEG mode, you can choose from three image sizes. To
record the maximum amount of image detail, choose L size; if you just want
to output the image as a standard size photo print*, choose M size; and if
you only intend to post the image on a website or send it as an e-mail
attachment, choose S size. By choosing the appropriate size for your needs,
you can maximize the storage potential of the memory media in use.
* Approx. 8 x 11 cm / 3.1 x 4.3 in.
Image quality mode
Faithful reproduction of the color and texture of
human hair requires both high resolution and a
wide tonal range. With the MAXXUM 5D, you’ll
be able to see every strand clearly.
L: 3008 x 2000
M: 2256 x 1496
S: 1504 x 1000
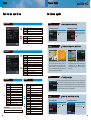
Maximum no. of recordable frames by memory capacity
( )* +
( ,
This option offers the greatest
flexibility by allowing you to use
the JPEG data for viewing and
reference, and the RAW data for
retouching and printing.
* Fixed at Fine mode
Image size
Natural skin tones are essential to true-to-life
image reproduction. With the MAXXUM 5D, you
can capture the same healthy glow and fine
texture that you can see with the naked eye.
Simultaneous
RAW+JPEG recording
RAW
RAW+JPEG*
Extra-Fine (JPEG)
Fine (JPEG)
Standard (JPEG)
!% '
! '
! '
'
!
"
#
!#
$%
&#
$#
&
"
$
!
!
"
!
!
&
$!
$
%
&
!"!
%
!
&
"
&&
&%
%!
&
&
!%!
%&
!$$
&$#
"!
#$
%#
"#
"%
!"!
!"
!
$#
"&
%
* No. of frames approximate; will vary according to subject matter and shooting conditions.
Smooth defocusing
Vibrant colors
Digital SLR
Basics
RAW or JPEG? What’s the difference?
When shooting at larger apertures with a
shallow depth of field, the larger size of the CCD
ensures smooth background defocusing that
makes the primary subject stand out beautifully.
Image processing that overemphasizes skin
tones can cause bright colors to appear muted.
With CxProcess III, you get both natural skin
tones and rich, vibrant, primary colors.
Shooting data: AF 28 –75mm f/2.8(D)
1/125 s, F4, ISO 100, WB: Manual, Anti-Shake On
A CCD that offers both high resolution and a wide tonal range
With 6.1 million pixels and an effective imaging area of 23.5 x 15.7 mm /
0.9 x 0.6 in. (approx.) the MAXXUM 5D’s large, 6.1-megapixel CCD
captures outstanding image detail. And because the pixels (individual
sensor elements) are much larger (pixel pitch approx. 7.8µm) than the
pixels in a compact camera CCD of equivalent resolution, images have a
much wider tonal range and significantly less noise. Thanks to this ideal
combination of high resolution and a wide tonal range, you can produce
stunningly beautiful prints in sizes as large as A3 (297 x 420 mm / 11.7 x
16.5 in.).
#
MAXXUM 5D
6-megapixel
compact digital camera
CCD size comparison (not actual size)
Image captured by a conventional
compact digital camera with 6-megapixel CCD
Although digital images can be stored in a wide variety of data
formats, the JPEG format is the most universal. It is compatible with
almost all imaging devices and software programs, and results in
smaller file sizes that allow efficient use of memory media storage
capacity. The RAW format, on the other hand, stores the CCD output
signal directly, without compressing or processing it in any way.
Although it results in larger file sizes and must later be “developed”
before images can be viewed or printed, it offers higher image quality
than the JPEG format and greater flexibility when editing and
retouching images.
What’s all this talk about “color spaces”?
Digital cameras record images as a series of RGB (Red, Green,
Blue) color values. However, since most output devices are not
capable of reproducing the entire spectrum of colors in the natural
world, the concept of color spaces has evolved. Color spaces allow
image data to be digitized in a form that suits the way in which the
image will be used. One of the most common color spaces is sRGB,
which includes the color spectrum that most monitors can display,
and which offers a high standard of quality for both on-screen
display and printing. Another color space that is becoming
increasingly common is Adobe RGB, which offers a wider color
spectrum with a richer palette of red and green tones. Although
Adobe RGB is often preferred for high-quality printing, the software
and printer used to output the image must support the Adobe RGB
color space to reproduce colors correctly. The MAXXUM 5D
supports both types of color space, and has 10 different color modes
(accessed via the Function button) that let you use Digital Effect
Control to adjust saturation, contrast, and sharpness.
LCD Monitor
Large, 2.5-inch LCD for easy settings selection
and image reviewing
Easy-to-view shooting information
Simultaneous image
and histogram display
It’s easy to check exposure values because the monitor’s large size
allows an image thumbnail, histogram, and shooting data to be simultaneously displayed in separate areas of the screen—a significant
advantage when assessing exposure quality.
When the MAXXUM 5D is set to any of its shooting modes, the big, 2.5-inch LCD monitor
keeps you informed by displaying the current settings in large, easy-to-read type. And to
ensure that light from the display doesn’t distract you when you shoot, a sensor below the
viewfinder automatically switches the display off when you put your eye to the eyepiece.
In addition, information is automatically displayed in a vertical format when you rotate
the camera to frame your subject vertically.
0
255
Dark
Light
A histogram is a graphic representation of the brightness of an
image, ranging from 0 on the left (dark) to 255 on the right (light). If
there are a lot of dark pixels in an image, the peak in the graph will
be toward the left; if there are a lot of light pixels, the peak will be
toward the right. If the graph tapers off to the base line on both sides,
it indicates that all of the brightness values in the scene have been
captured, and none of the shadow or highlight detail has been lost.
Luminance limit display
Enlarged display
Understanding histograms
Basic recording display
Vertical-format display
Large screen area and versatile image reviewing functions
The MAXXUM 5D’s monitor offers the largest viewing area of any currently available SLR camera, and has a range of functions that make it easy to find and
display the image you want. Images are clear and easy to see even when viewed at an angle, and there’s a backlight to assure improved visibility when
reviewing images outdoors.
Actual Size
With any digital camera there are times when the extremes of light and
shadow in a scene may exceed the range of recordable values and result
in a loss of image detail. These areas of lost image detail are referred to
as “blown-out highlights” (100% white) and “blocked-in shadows” (100%
black), and they cannot be recovered by using photo-retouching software.
The MAXXUM 5D’s histogram display alerts you to this problem with a
flashing grey overlay on the thumbnail image in areas that approach the
shadow and highlight luminance limits.
Index Display function
2.5-inch
Normal image
In the histogram for this
image, the graph extends
over the full width of the
histogram, and tapers to
the baseline without being “clipped” on either side. This indicates
that the camera’s dynamic range has been fully utilized, and that all
of the elements in the frame have been properly exposed.
Dark image
1.8-inch
Correct exposure of a
night scene or other very
dark subject will result in
a histogram that has the
peak on the left side. In the image shown here, the dark night sky
creates a tall peak on the left, and the lights and illuminated areas
create a long, gradual slope on the right.
During image review, the Index
Display can be set to show 4, 9, or
16 frames, allowing quick selection
via the controller’s 4-way keypad.
File Browser function
A convenient File Browser lets you
organize images stored on the
camera’s memory card into tabbed
folders for fast, easy retrieval.
Automatic focus point enlargement
When you press the Enlarge button to check
focusing accuracy, the MAXXUM 5D automatically
enlarges the focus point that was active when the
picture was taken. And it’s easy to compare
multiple shots because the enlarged view is
maintained when you press the controller to
advance to the next frame.
Light image
Blown-out
highlights
In the example above, blown-out highlights in the sky and blocked-in
shadows in the girl’s hair are indicated by flashing grey areas in the
thumbnail image, allowing you to adjust exposure values to capture the
part of the scene that is most important to you.
In this image of a flower
and seashells against a
white background, the
peak in the histogram is
at the extreme right. Although the flower is correctly exposed, the
extreme right edge of the histogram is slightly clipped, indicating
that a small amount of highlight detail has been lost.
!
Auto Focus
High-performance, high-speed autofocusing
means fewer missed photo opportunities
Basics
of
Digital
SLR
Digital
BasicsSLR
Composing your shots
Focus lock
Focus lock is a function that lets you “lock in” the correct focus by
keeping the shutter button pressed halfway, so you can reframe the
shot to get the composition you want. Focus lock is also useful when
Wide-area, 9-point autofocus system
The MAXXUM 5D’s high-performance autofocus system benefits from
Konica Minolta’s expertise as the company that pioneered built-in AF
systems for SLR cameras. Offering exceptional accuracy, it features
9 separate AF sensors for wide-area coverage that gives you great flexibility
in how you frame your subject. And it lets you exercise control by using the
focus area selector switch to choose any of the nine sensors as a spotfocusing target—the selected focus point will
be indicated by a red mark superimposed on
the image in the viewfinder.
you want to take a picture of the sky or some other subject that is
difficult for the autofocus system to “see.” (Focus lock is disabled
when AF-C continuous autofocus is active.)
Focus on the building
in the distance and
hold the shutter button
pressed halfway.
Aim the camera at
the sky and press
the shutter button
all the way down.
The golden rule of composition
Distance metering point
Distance metering area
In both art and photography, the golden rule of composition is to visualize a grid like the
one shown here, and to position your primary subject on one of the points where the
gridlines intersect.
Predictive focus control for
moving subjects
With fast-moving subjects, the position of the subject can change in the
split-second between focusing and shutter release, resulting in an out-offocus image. In Continuous AF mode, the MAXXUM 5D overcomes this
problem by analyzing the subject’s speed and accurately predicting the
focus point at the moment of shutter release.
Things to watch out for
Shooting data: AF 100 – 300mm f/4.5 – 5.6 Apo(D), 1/640 s, F5.6, ISO 100,
WB: Manual, Anti-Shake On
Off-center is better
Watch out for “flowerpot heads”
Keep an eye on the horizon
Positioning your subjects in the center of the
frame usually results in a less dynamic and
interesting composition than if you position
them to one side.
Be aware of vertical background elements
like trees and poles, and shoot from an
angle that does not make them look like they
are growing out your subject’s head!
Try to avoid shooting from angles that
position the horizon right at your subject’s
neckline. You’ll get a more attractive
composition if you shoot from a slightly
higher or lower angle.
A choice of autofocus modes
A quick press of the Function button lets you access the
autofocus mode settings and select the one that best
suits your subject or shooting situation. Autofocus modes
include single-shot AF-S mode for portraits and subjects
that don’t move very much, continuous AF-C mode for
sports and fast-moving subjects, and an AF-A mode that
can detect subject motion and automatically switch between
continuous and single-shot modes as needed.
DMF (Direct Manual Focus)
When the shutter button is pressed halfway, the focus locks onto the subject and
the focus stays locked until the button is released.
Autofocusing is performed as in AF-S mode, but as soon as the focus locks onto
the subject, the focus drive is disengaged to allow manual fine-tuning.
AF-A (Automatic AF)
The autofocus system automatically switches between single-shot AF-S mode
and continuous AF-C mode in response to subject movement.
AF-C (Continuous AF)
The autofocus system remains active as long as the shutter button is pressed
halfway, continuously refocusing in response to subject movement.
MF (Manual Focus)
If you want to focus manually, autofocusing can be disabled via the AF/MF
switch on the front of the camera. Even during manual focusing, the focus
indicator in the viewfinder will illuminate when correct focus is achieved.
AF-S Mode (Single-Shot AF)
Bright, clear viewfinder for easy focusing and framing
The roof-mirror type viewfinder combines the advantages of low weight and compact size with 0.83x magnification that
assures a bright, clear view of your subject. In addition, it has a spherical acute matte focusing screen that makes it very
easy to confirm correct focus.
"
Spherical acute matte focusing screen
#
Auto Exposure
Master the light with
versatile exposure control
Basics
of
Digital
SLR
Digital
BasicsSLR
Understanding aperture and
shutter speed
In any given situation, there is usually more than one combination of aperture and shutter speed settings that
can be used to obtain a correct exposure. In deciding which exposure mode to use, consider the nature of your
subject and the effect you are trying to achieve.
3 metering systems assure maximum flexibility
P (Program) mode
A (Aperture Priority) mode
S (Shutter Priority) mode
M (Manual) mode
The MAXXUM 5D offers you a choice of multi-segment metering, center-weighted metering, and spot metering modes. Multi-segment metering
employs a sophisticated 14-segment honeycomb-pattern, and analyzes subject and AF system data to assure optimum exposures in direct light,
sidelight, and backlight. Center-weighted metering offers high-end 35mm SLR-type exposure control, while spot metering lets you aim at and measure
light levels for a specific area of the frame.
Multi-segment metering
An intelligent metering system that assures enhanced exposure accuracy under a wide range of lighting conditions.
Uses sophisticated algorithms to analyze subject distance as well as metered light values from across the 14-segment
honeycomb pattern.
Center-weighted metering
The type of metering featured on many high-end 35mm SLR cameras. Although it places greatest emphasis on light
levels in the center of the frame, it also takes overall lighting into account. In tricky lighting conditions, some exposure
compensation may be required.
Spot Metering
A metering system that measures light levels only within the area marked by the spot metering circle in the viewfinder.
Because it is unaffected by light levels in other areas of the frame, it allows you to set exposure values to suit a specific
part of the composition.
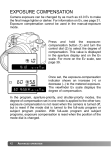
Exposure compensation + flash compensation
The MAXXUM 5D makes it easy to fine-tune your exposures without taking your eye away from the viewfinder. Simply
press the conveniently positioned exposure compensation button and rotate the control dial. Flash compensation can
also be adjusted by using the Function button and the controller. Both exposure compensation and flash compensation
can be adjusted ±2 EV in 1/3 EV increments.
The camera automatically sets both the
aperture and shutter speed.
You select the shutter speed you want to
use; the aperture is set automatically.
You select both the aperture and
shutter speed you want to use.
You select the aperture you want to use;
the shutter speed is set automatically.
Shutter speed
Shutter speed determines how much light enters the camera by
controlling how long the shutter stays open, and is usually expressed
in fractions of a second. When a shutter speed of 1/500th of a second
is selected, “500” is shown in the monitor and viewfinder information
displays. By changing the shutter speed, you can control how moving
1/4 seconds (F32)
objects appear in your photos. If you’re taking pictures at a sports
event, for example, you may want to use a fast shutter speed to
freeze the action. But if you’re taking pictures of a stream or waterfall,
you may want to add a sense of motion to the scene by using a slow
shutter speed to deliberately blur the flowing water.
1/30 seconds (F11)
1/500 seconds (F2.8)
The added security of automatic exposure bracketing
In tricky lighting conditions, you can use automatic exposure bracketing to
ensure you get the exposure you want. The camera will automatically fire
three shots when the shutter-release button is held down, bracketing the initial
exposure with two more shots taken at higher and lower exposure settings.
-0.7 EV
+
- 0 EV
+0.7 EV
Digital SLR
Basics
The difference that lighting can make
Direct light
Sidelight
Backlight
Slower
16
When light strikes your subject from the side, it
creates shadows that can add depth and interest
to the scene. But it can also make skin blemishes
and age lines more noticeable, and result in a
picture that is less flattering to your subject.
Although care needs to be taken to ensure that
the main subject is not underexposed, backlighting can make skin tones appear smooth and
natural. In addition, your subjects are less likely
to squint when the light is behind them.
Faster
Aperture
Aperture determines how much light enters the camera by controlling
how large the shutter opening is. Aperture is expressed in “F-stops”
(F8, F5.6, etc.), with larger numbers representing smaller apertures.
In other words, a setting of F8 admits less light than a setting of F5.6,
and will require a slower shutter speed to ensure correct exposure.
F2.8 (1/250 seconds)
In direct light, light falls evenly on the front of the
subject and is reflected to the camera. Although
the even illumination makes it easy to determine
correct exposure, images taken in direct light
can appear a bit flat and two-dimensional.
Shutter speed
Larger Aperture
(smaller F-stop number)
Changing the aperture also allows you to control depth of field, which
refers to the zone in front of and behind the main subject where other
objects appear to be in focus. In portrait photos, for example, you can
make your subject stand out from the background by using a larger
aperture to reduce the depth of field.
F5.6 (1/60 seconds)
Aperture
F16 (1/8 seconds)
Smaller Aperture
(larger F-stop number)
17
And more ...
A well-balanced array of features
The beautiful print quality your images deserve
Smooth and responsive continuous shooting
Continuous shooting is a great way to ensure that you capture the most exciting moment when
taking photos of sports events or other fast-paced action. To activate 3 frame-per-second
continuous shooting, press the drive mode button and use the controller to select Continuous Advance.
You’ll be able to capture as many as 24* large-size, standard-quality JPEG images in a single burst.
* With a SanDisk ULTRA II 512MB CompactFlash card.
White balance
<
> Auto white balance
In auto white balance mode, the camera evaluates
current lighting conditions and automatically sets the
white balance to assure natural color balance.
<
> Preset white balance
Six preset white balance settings are provided. To
display the selection menu, set the white balance dial
to the preset position and press the button in the
center of the dial. Then use the controller to select the
preset you want to use.
Daylight
Shade
Cloudy
Tungsten
Fluorescent
Flash
<
> Custom white balance
The custom setting allows white balance to be calibrated to match current lighting conditions. To
calibrate the setting, set the white balance dial to the custom position and press the button in the
center of the dial. The screen will then prompt you to aim the camera at a white object such as a
sheet of paper, and to press the shutter button. To register the new custom setting, press the
button in the center of the controller.
<
> White balance by color temperature
If you know the color temperature of the light source you are using, you can also set the white
balance by entering the color temperature value. To enter a value, set the white balance dial to
the color temperature (K) position and press the button in the center of the dial. Then use the
controller to increase or decrease the temperature (2500~9900°K) to match your light source.
If necessary, magenta/green compensation can also be applied.
BasicsSLR
of
Digital
Digital
SLR
Basics
Another way to use white balance
Although the primary purpose of white balance settings is to assure faithful color reproduction under various lighting conditions, you can also use
them to deliberately alter the mood and tone of your photos. For example, you can use the preset Tungsten setting to give a daytime scene a
“cooler” color tone, or the preset Daylight setting to give a night scene a “warmer” color tone.
DiMAGE Master Lite—software tools
for photo viewing and editing
Included with the MAXXUM 5D, DiMAGE Master Lite software offers a set of basic image file viewing, management, and editing tools. A convenient thumbnail window makes it easy to organize
your images into folders, and there’s a large viewing window that lets you rotate, enlarge/reduce,
and adjust image resolution before carrying out other image editing tasks.
Thumbnaill window for
easy image management
Viewing window for checking images
DiMAGE Master (v.1.1*) —advanced software tools
for photo retouching and high-quality printing
Optionally available DiMAGE Master software provides a complete suite of tools for RAW data
image processing*, professional-level image adjustment, color management, and high-quality
printing. Designed for high-volume image processing, it speeds your workflow with timesaving features and a convenient “Examiner” image-comparison window for easy “best shot” selection.
* DiMAGE Master v.1.1 is required for MAXXUM 5D RAW data image processing.
Precise, objective image comparison
Konica Minolta Inkjet Photo Paper—a wide assortment of
high-grade media for superior print quality
Daylight
White balance bracketing
White balance bracketing automatically creates three
images from a single exposure: one at the currently
selected white balance setting, one with a slight blue
shift, and one with a slight red shift. The amount of
color shift can be set in two levels via the drive mode
selection menu.
&
Tungsten
Fluorescent
Digital Effects Control
Digital Subject Program Selection automatically sets exposure
values and adjusts image parameters such as contrast, color
saturation, and sharpness to suit various shooting situations. But
you can also adjust these image parameters in Program, Aperture Priority, Shutter Priority, and
Manual exposure modes by using the Function button and controller to access the Digital Effects
Control menu. Five-step control is offered for each parameter.
Compatible with all inkjet printers, these high-grade, resin-coated photo papers draw on
Konica Minolta’s extensive expertise in photo printing technology. Available in glossy or satin
finish, they dry instantly, are water resistant, and offer excellent color reproduction with rich,
natural tones that bring out the best in your images.
PictBridge support for direct printing without a computer
The MAXXUM 5D lets you print your pictures without even using a computer. Simply use the
included USB cable to connect the camera directly to a PictBridge-compatible printer, and use the
menu button and controller to access the print settings menu.
'
New MAXXUM AF DT Series lenses for maximum digital SLR performance
External Flash Units
MAXXUM AF Lenses
MAXXUM Flash 5600HS(D)
High-powered unit with maximum guide number 56
(183.7 in feet). Supports ADI metering.
Developed specifically to maximize the performance of the large (23.5 x
15.7 mm / 0.9 x 0.6 in. ) CCDs used in MAXXUM digital SLR cameras*,
these new MAXXUM AF DT series lenses offer outstanding edge-to-
Viewfinder Accessories
edge sharpness and clarity. Naturally, they work seamlessly with the
MAXXUM 5D’s Anti-Shake system, and support Advanced Distance
Integration (ADI) for enhanced flash metering performance.
* MAXXUM AF DT series lenses are not compatible with conventional 35mm SLR cameras.
MAXXUM Flash 3600HS(D)
Versatile unit with maximum guide number 36
(118.1 in feet). Supports ADI metering.
Angle Finder VN
Makes it easier to use the camera at low
angles. Can be rotated to allow viewing
from the top, side or back.
MAXXUM Flash 2500(D)
Compact unit with maximum guide number 25 (82 in feet).
Supports ADI metering.
Magnifier VN
Enlarges the viewfinder image approx. 2.3
times. Ideal for macro and telephotography.
Macro Ring Flash 1200*
Maximum guide number (one flashtube) 12
(39.4 in feet). Provides shadowless lighting that’s
ideal for scientific photography.
Eyepiece Corrector 1000
Adjusts viewfinder focus for nearsightedness
or farsightedness. Available in 9 strengths.
Macro Twin Flash 2400*
■ AF DT ZOOM 18 - 70mm f/3.5 - 5.6(D)
■ AF DT ZOOM 11 - 18mm f/4.5 - 5.6(D)
■ AF DT ZOOM 18 - 200mm f/3.5 - 6.3(D)*
An all-purpose lens with a zoom range
that extends from wide-angle to telephotoportrait.
An ultra-wide-angle zoom lens that offers
enhanced perspective and superb edge-toedge sharpness.
A truly versatile zoom lens with a range that
extends from wide-angle to high-power
telephoto.
* Available late autumn, 2005
Maximum guide number (two flashtubes) 24
(78.7 in feet). Provides versatile lighting for
general macro photography.
Other Accessories
Macro Flash Controller
Power supply unit for macro flashes.
Remote Cable RC-1000L
(5 m / 16.4 feet) /
RC-1000S (50 cm / 1.6 feet)
* Macro Flash Controller required.
For remote shutter release.
Supports remote activation of autofocus.
Flash Accessories
Off-camera Shoe OS-1100
For off-camera mounting of MAXXUM Flash units.
(requires OC-1100 cable)
Off-camera Cable OC-1100
AC Adapter AC-11
For off-camera use of MAXXUM Flash units.
(connects to camera or OS-1100)
Allows camera to be powered by household current.
Supports 100–240V, 50/60 Hz.
Triple Connector TC-1100
Allows up to three MAXXUM Flash units to be fired
simultaneously.
Flash Shoe Adapter FS-1100
AF ZOOM LENSES
■ AF
■ AF
■ AF
■ AF
■ AF
■ AF
■ AF
■ AF
■ AF
■ AF
17 - 35mm f/2.8 – 4(D)
17 - 35mm f/3.5 G
24 - 105mm f/3.5 – 4.5(D)
28 - 75mm f/2.8(D)
28 -100mm f/3.5 – 5.6(D)
70 - 200mm f/2.8 Apo G(D) SSM
70 - 210mm f/4.5 – 5.6 II
75 - 300mm f/4.5 – 5.6(D)
100 - 300mm f/4.5 – 5.6 Apo(D)
100 - 400mm f/4.5 – 6.7 Apo
AF DT ZOOM LENSES
■ AF DT 11 - 18mm f/4.5 – 5.6(D)
■ AF DT 18 - 70mm f/3.5 – 5.6(D)
■ AF DT 18 - 200mm f/3.5 – 6.3(D)
WIDE-ANGLE LENSES
■ AF
■ AF
■ AF
■ AF
■ AF
16mm f/2.8 Fisheye
20mm f/2.8
24mm f/2.8
28mm f/2
35mm f/1.4 G
NEW
STANDARD LENSES
■ AF 50mm f/1.4
■ AF 50mm f/1.7
TELEPHOTO LENSES
■ AF
■ AF
■ AF
■ AF
■ AF
■ AF
85mm f/1.4 G(D)
100mm f/2.8 SOFT FOCUS
200mm f/2.8 Apo G
300mm f/2.8 Apo G(D) SSM
Reflex 500mm f/8
600mm f/4 Apo G
MACRO LENSES
■ AF 50mm f/2.8 Macro(D)
■ AF 100mm f/2.8 Macro(D)
■ AF 200mm f/4 Macro Apo G
AF TELE CONVERTERS
■ AF 1.4X Tele Converter Apo(D)
■ AF 2X Tele Converter Apo(D)
”G“ designates the G-Lens group, a selection of large-aperture, high-performance lenses. (D) indicates the distance encoder system. When attached to the MAXXUM 5D, D lenses enable ADI
(Advanced Distance Integration) flash metering with the built-in flash and external MAXXUM Flash 5600HS(D), 3600HS(D), and 2500(D). SSM (supersonic-wave motor) lenses provide quiet
operation, with the improved AF accuracy of ultrasonic motor drive.
Note: Lens focal lengths indicate the focal length obtained when the lens is mounted on a 35mm SLR body. When mounted on the MAXXUM 5D, the actual focal length will be approximately
1.5 times longer than the stated focal length.
Camera Case CS-5D
Allows the MAXXUM Flash 400AF/2800AF/1800AF
to be mounted on a MAXXUM digital SLR camera body.
Accommodates MAXXUM 5D with standard kit lens.
Cable CD
A cable for simple multi-flash shooting.
Extension Cable
A 1m / 3.3 feet extension cable for use
with the OC-1100.
Bounce Reflector V-Set
A bounce surface for soft, natural illumination.
External Battery Pack EP-2Set
A compact portable power pack for the
MAXXUM Flash 5600. (requires six AA batteries)
PC Flash Adapter PCT-100
Allows most studio and location lighting systems
to be connected to the camera with a standard PC cord.
Standard accessories
◆ Digital Camera Software CD-ROM
(DiMAGE Master Lite + EasyShare Software)
◆ Li-ion Battery NP400
◆ Li-ion Battery Charger BC-400
◆ USB Cable USB-3
◆ Video Cable VC-500
◆ Wide Strap WS-5
◆ Eyepiece Cup EC-1500
◆ Body Cap BDC-1000
◆ Shoe Cap SC-1000
◆ Eyepiece Cap II
◆ Remote Cord Clip
Availability of accessories may vary depending on region.
Specifications of accessories are based on the information available at the time of printing and are subject to change without notice.
Shooting
Recording Menu
Image size
To select L / M / S image size
Quality
To select file format (RAW, JPEG) and image quality
Inst. playback
To select the duration of instant playback (10 / 5 / 2 / 0 s)
Noise reduction
To set noise reduction on/off
Flash mode
To select Fill flash / Red-eye reduction / Rear Sync / Wireless • Remote flash modes
Flash control
To select ADI or pre-flash TTL flash control
Bracket order
To set bracketing frame order
Reset
To restore recording-mode factory default settings
Formatting the memory card
Setting image size and quality
In recording mode, press the Menu
button and enter your selections for
“Image size” and “Quality” on Tab 1 of
the
menu.
In playback mode, press the Menu
button and select “Format” on Tab 1 of
the menu.
Reviewing
Playback Menu
Delete
To delete images from memory card
Format
To format memory card
View folder
To select one or all folders to view in playback
Folder name
To specify the folder name for single-folder playback
Key lock
To protect images from deletion
Index format
To specify no. of frames (4 / 9 / 16 ) or tab browser index display
Slide show
To play back images automatically
DPOF set
To select images for DPOF printing
DATE imprint
To print the date of capture on each image
Index print
To create an index print with the DPOF order
Cancel print
To cancel DPOF print orders on the memory card
Press the Playback button to review images. You can scroll to the
next frame by pressing the controller’s left / right arrow keys or by
rotating the Control dial. Press the + / - button to enlarge an image;
the area to be enlarged can be specified by pressing the arrow
keys. A combined shooting information, histogram, and thumbnail
view can be displayed by pressing the Display button.
Printing
Custom Menu
Priority setup
Setup Menu
To select AF or shutter-release priority
Focus Hold button To select focus-hold or depth-of-field preview
AEL button
Exp. comp. set
To select ambient & flash, or ambient only
AF Illuminator
To set AF illuminator on/off
Card Shutter lock To set card shutter lock on/off
Lens Shutter lock
To set monitor brightness in 11 steps
Transfer mode
To select data storage or PTP (print to PictBridge-compatible
printer) data transfer mode
To select AE hold / AE toggle / Spot AE hold / Spot AE toggle
Control dial setup To select shutter speed or aperture control
LCD brightness
To set shutter lock on/off when no lens is mounted
AF area setup
To select the duration of focus area illumination (0.3 / 0.6 / 0 s)
Monitor display
To select manual shutoff or automatic shutoff when viewfinder is used
Rec. display
To select auto-rotate or horizontal (in vertical position)
Play. display
To select auto-rotate or manual-rotate
Function Button*
Video output
To switch between NTSC and PAL
Audio signals
To change or turn off the audio tone when shutter button is pressed
Language
To select one of the 11 menu languages
Date / Time set
To set the camera’s clock and calendar
File # memory
To activate the file number memory
Folder name
To set Standard or Date as the folder name format
Select folder
To select the destination folder for recorded images
New folder
To create a new folder
LCD backlight
To set the duration of backlight illumination (5 / 100 / 30 / 60 s)
Power save
To set the auto-power-save delay (1 / 3 / 5 / 10 / 30 min.)
Single images can be deleted by pressing the Delete button. To
delete multiple images, press the Menu button and select “Delete”
> “Marked Frames” on Tab 1 of the
menu. A frame selection
screen will appear from which you can select the frames you
want to delete.
In either playback or recording mode, press the Menu button and select “Transfer mode” > “PTP” on Tab 1 of the
menu. Next, use the included USB cable to connect the camera to a PictBridge-compatible printer; a
PictBridge frame selection screen will automatically be displayed when the camera and printer are connected and
switched on. Print options such as number of copies, paper size, print quality, batch printing, index printing, and
DPOF printing can be entered on Tabs 1, 2, and 3 of the PictBridge menu.
Resetting
Reset recording modes
Reset all modes and menus
In recording mode, press the Menu
button and select “
Reset” on Tab 2
of the menu.
In either playback or recording mode,
press the Menu button and select
“Reset default” on Tab 3 of the menu.
Men. Sec. Memory To save the last menu section opened
AF area / AF modes / Metering modes / Flash compensation / Digital Effects Control (DEC)
* See page 5 for details.
Delete confirmation To change the delete confirmation screen default setting
Clean CCD
To perform CCD surface cleaning
Reset default
To reset all camera modes and menus to factory-default settings
!
SPECIFICATIONS
CAMERA TYPE
LENS MOUNT
IMAGE CAPTURE
Image sensor
No. of pixels (approx.)
Sensitivity
White balance control
Digital SLR with built-in flash and interchangeable lenses
Minolta A-type bayonet mount * see lens list
Interline primary color CCD (23.5 mm x 15.7 mm) with interlace scan
Total: 6.3 million, Effective: 6.1 million
Auto, ISO 100 / 200 / 400 / 800 / 1600 / 3200 equivalent
Automatic, Preset (Daylight, Shade, Cloudy, Tungsten, Fluorescent, Flash), Custom,
Color temperature (2500 ~ 9900 K with 19-step Magenta / Green compensation)
RECORDING
Recording media
Type I and Type II CompactFlash Cards, Microdrive, SD Memory Card*,
MultiMediaCard* * with optional SD-CF1
JPEG, RAW
(DCF 2.0 compliant, DPOF supported by printing functions in ver.1.1, Exif 2.21)
No. of recorded pixels L: 3008 x 2000, M: 2256 x 1496, S: 1504 x 1000
Storage capacity (approx.) (L: 3008 x 2000 / M: 2256 x 1496 / S: 1504 x 1000)
(with 512 MB CF card in L / M / S size) STD: 277 / 470 / 926, FINE: 163 / 282 / 584, EXTRA-FINE: 82 / 145 / 314,
RAW+JPEG: 39 / 44 / 48, RAW: 53
Color modes
Natural, Natural Plus, Portrait, Landscape, Sunset, Night View, Night Portrait,
Black & White, Adobe RGB, Embedded Adobe RGB. Except for Adobe RGB
and Embedded Adobe RGB, all other color modes use the sRGB color space.
Image quality modes
Standard, Fine, Extra-Fine, RAW, RAW+JPEG
Contrast / Saturation / Sharpness
5 steps: -2, -1, ± 0, +1, +2
Noise reduction
Available at shutter speeds longer than 1 s
Delete function
Single, multiple, or all frames in a folder / memory card can be deleted.
Folders can be deleted in the File Browser.
File format
PLAYBACK
LCD monitor
Playback modes
AF SYSTEM
Type
Sensor
Sensitivity range
Main functions
AF illuminator
2.5-inch TFT color, Total pixels: 115,000
Single-frame (Image only, Image and information), Histogram with luminance limit display,
Index (4, 9, or 16 frames), Enlarged playback (up to approx. 5x), File Browser,
Slideshow, manual and auto rotation
TTL phase-detection system
CCD line sensors (9 points, 8 lines with center cross-hair sensor)
-1 EV ~ 18 EV (at ISO 100 equivalent)
Wide AF area, spot AF area, and 9 local AF areas with Focus Area Selection.
AF-A / AF-S / AF-C / DMF. Predictive Focus Control (with moving subjects in
AF-A and AF-C), auto-tracking focus-point display
Available with built-in flash.
Range: 1 m ~ 5 m / 3.3 ft ~ 16.4 ft
AE SYSTEM
Metering type
Metering cell
Metering range
Exposure modes
TTL metering; multi-segment metering, Center-weighted metering, Spot metering
14-segment honeycomb-pattern SPC
+1 EV ~ +20 EV (+4 EV to +20 EV with Spot metering), (at ISO 100 with f/1.4 lens)
Auto recording / P (with program shift), A, S, M, and Portrait, Sports Action,
Landscape, Sunset, and Night Portrait Digital Subject Programs
Exposure compensation ±2 EV in 1/3 EV increments
AE lock
Automatically activated with AF lock, available via AEL button
BUILT-IN FLASH
Flash metering system
Flash compensation
Guide No.
Recycling time
Control
Flash modes
SHUTTER
Type
Speed range
Flash sync speed
Compact Digital SLR with
Body-Integral Anti-Shake Technology
ADI / Pre-flash TTL flash metering
±2 EV in 1/3 EV increments
GN 12 (in meters at ISO 100) / 39.4 (in feet at ISO 100)
Approx. 3 s
Manual (raise the flash to activate)
Fill Flash, Red-eye reduction (via pre-flash), Rear Sync Flash
{Wireless / Remote off-camera flash, High-speed sync available with
MAXXUM Flash 5600HS(D) / 3600HS(D)}, Slow sync activated via AE lock button
GUIDE BOOK
Electronically-controlled, vertical-traverse, focal-plane type
1/4000 s ~ 30 s, bulb exposures possible
1/160 s (with Anti-Shake off), 1/125 s (with Anti-Shake on)
VIEWFINDER
Type
Focusing screen
Field of view
Magnification
Eye relief
Fixed eye-level system with roof mirror type pentaprism
Spherical Acute Matte
95 %
0.83 x * with 50mm lens at infinity, -1 m-1
Approx. 20 mm from the eyepiece, 16 mm from the eyepiece frame
at -1 diopter (-1m-1)
-2.5 ~ +1.0 m-1
Diopter control
DRIVE
Drive mode
Single-frame advance, Continuous advance, 10 s and 2 s Self-timer,
Single-frame advance bracketing, Continuous-advance bracketing.
Continuous-advance rate: 3 frames per second (approx.),
Max. 5 frames (RAW), max. 3 frames (RAW+JPEG)
With 0.3 EV / 0.7 EV increments, 3 frames
Exposure bracketing
ANTI-SHAKE
System
CCD-Shift mechanism
Anti-Shake display
Anti-Shake scale in viewfinder
Anti-Shake compensation Approx. 2 EV ~ 3 EV decrease in shutter speed
(varies according to shooting conditions and lens used)
OTHERS
Other functions
PC interface
Video output
Operating temperature
Printing output control
Battery
Battery performance
External power source
Dimensions (WxHxD)
Weight (approx.)
Instant playback, Customization, Zone Matching, Depth-of-field preview
USB: Full-Speed 12Mbps data transfer with a USB2.0 compatible computer
NTSC / PAL (selected on the camera)
0 – 40° C / 32 – 104° F
Exif Print, PRINT Image Matching III, PictBridge
Lithium-ion battery NP-400
No. of frames recorded: approx. 550 (CIPA measurement),
approx. 700 (Konica Minolta measurement)
6 V DC (with AC adapter AC-11)
Approx. 130.5 mm x 92.5 mm x 66.5 mm / 5.1 in. x 3.6 in. x 2.6 in.
Approx. 590 g / 20.8 oz. * without batteries, memory card and body accessories
COMPATIBLE COMPUTERS
IBM PC / AT compatible computers: Windows Me, Windows 2000 Professional, Windows XP (Home /
Professional), Windows 98, or Windows 98 Second Edition
Apple Macintosh computers: Mac OS 9.0 – 9.2.2, Mac OS X v.10.1.3 – 10.1.5, v.10.2.1 – 10.2.8, v.10.3 – 10.3.9, v.10.4 – 10.4.1
Number of frames recorded based on image quality and size
Image quality mode
Image size*1
8.8 MB
5
53
L
11.5 MB
3
39
M
10.2 MB
3
S
9.3 MB
L
EX-FINE (JPEG)
Image quality mode
Image size*1
*2 Storage capacity
File size (approx.) Continuous advance
(w/ 512 MB CF Card )
L
3.0 MB
10
163
M
1.7 MB
40
282
44
S
850 KB
584
584
3
48
L
1.8 MB
24
277
5.9 MB
3
82
M
1.0 MB
470
470
M
3.3 MB
9
145
S
540 KB
926
926
S
1.6 MB
314
314
RAW
RAW + JPEG
*2 Storage capacity
File size (approx.) Continuous advance
(w/ 512 MB CF Card )
FINE (JPEG)
STD (JPEG)
*1 L: 3008 x 2000, M: 2256 x 1496, S: 1504 x 1000
*2 In AF-S mode at shutter speeds above 1/500 s, using a SanDisk ULTRA II 512MB CompactFlash card. File size and frame storage capacity vary according to subject matter.
DiMAGE Master (v.1.1)*1: System requirements
DiMAGE Master Lite: System requirements
CPU*2
Operating System
IBM PC/AT compatible computers
Apple Macintosh series computers
Pentium II Processor or later
PowerPC G3 or later
(Pentium III or later recommended)
(PowerPC G4 or later recommended)
CPU*2
Windows 98, or Windows 98 Second Edition, Mac OS X v.10.1.3 – 10.1.5,
Operating System
Windows Me, Windows 2000 Professional, v.10.2.1 – 10.2.8, v.10.3 – 10.3.9,
Windows XP (Home / Professional)
IBM PC/AT compatible computers
Apple Macintosh series computers
Pentium II Processor or later
PowerPC G3 or later
(Pentium III or later recommended)
(PowerPC G4 or later recommended)
Windows 2000 Professional,
Mac OS X v10.1.3 – 10.1.5,
Windows XP (Home / Professional)
v.10.2.1 – 10.2.8, v.10.3 – 10.3.9,
v.10.4 – 10.4.1
v.10.4 – 10.4.1
RAM
128 MB (256 MB or more recommended)
RAM
128 MB (256 MB or more recommended)
Hard-disk space
200 MB or more (100 MB or more for installation)
Hard-disk space
200 MB or more (100 MB or more for installation)
Monitor
A 16-bit color monitor with a minimum resolution of 1024 x 768 (XGA), or higher
Monitor
A 16-bit color monitor with a minimum resolution of 1024 x 768 (XGA), or higher
*1 DiMAGE Master v.1.1 is required for MAXXUM 5D RAW data image processing. *2 Necessary to meet the requirements recommended for use with the OS.
● The actual number of frames recorded may vary according to the subject and media used. ● The computer and operating system must be guaranteed by their manufacturers to support a USB interface. ■ Problems may be encountered when other
USB devices are being used in parallel with this product. ■ Only built-in USB ports are supported; problems may be encountered if the camera is connected to a USB hub. ● Users with Windows 98 and Windows 98 Second Edition operating systems must install dedicated driver software included on the DiMAGE Master Lite CD-ROM. ● Inherent limitations in current LCD manufacturing technology may result in the appearance of one or more light or dark pixels in the LCD monitor. Such
light or dark pixels do not affect overall performance or camera operation and are not indicative of monitor damage. ● Images other than product photos may be simulated for design purposes.
Specifications and accessories are based on the information available at the time of printing and are subject to change without notice. For the latest information, please visit: http://5d.konicaminolta.com
■The Konica Minolta logo and “The essentials of imaging” are trademarks or registered trademarks of Konica Minolta Holdings, Inc. ■ MAXXUM, DiMAGE and CxProcess are trademarks or registered trademarks of Konica
Minolta Photo Imaging, Inc. ■ Windows is a registered trademark of Microsoft Corporation in the United States and other countries. ■ Apple, Macintosh and Mac OS are trademarks of Apple Computer, Inc., registered in
the U.S. and other countries. ■ EasyShare is a trademark or a registered trademark of Eastman Kodak Company. ■ All other brand and product names are trademarks or registered trademarks of their respective owners.
Konica Minolta Photo Imaging, Inc. Shinjuku Nomura Bldg., 1-26-2 Nishishinjuku, Shinjuku-ku, Tokyo, 163-0512 Japan
This brochure is printed with soy ink to help preserve the environment.
©2005 Konica Minolta Photo Imaging, Inc.
9242-4964-06 (MC-E) 0805-A1
Printed in Japan
http://konicaminolta.com