1
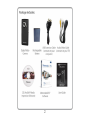
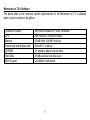
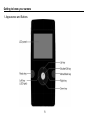
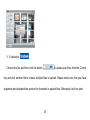
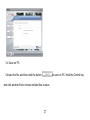
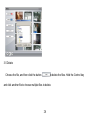
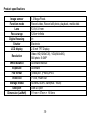
EVC1700 User Guide 2 Introduction Congratulations on your purchase of this digital video camera. Before using the camera, please read this user manual carefully. The main purpose is to shoot videos. It is also equipped with a secondary still shot feature. Please note that this is not meant to replace a regular still shot or digital camera. It is only a side feature. The illustrations in this user manual are to visually detail the operation of the digital video camera. Notice for use General: 1. Never open the housing of the digital video camera as some parts may cause an electrical shock. 2. Moisture, extreme pressure and overheating may damage this digital video camera. Memory and storage: 1. SD/SDHC class 2 and 4 memory cards are compatible with this digital video camera, with a maximum capacity of 32GB. Using a different class of card may result in video distortion and skipping. 2. When buying a SD//SDHC card, take the digital video camera with you to ensure compatibility. 3. When a SD//SDHC card is inserted, the internal memory of the digital video camera will not function. 5. When storing documents using the internal memory or the memory card, make sure that the size of the files do not exceed the capacity of the memory. Maintenance and care: 1. To clean the lens, the first step is to blow away dust from the surface. After doing so, use a cloth or tissue to wipe the lens. If necessary, use lens cleanser. 2. Avoid touching the lens with your fingers. 3 3. When left idle for long periods, remove the battery from your digital video camera and store it in a dry and dark place. Miscellaneous: 1. When switching video output between LCD display and video devices, be sure to exit from the „play‟ or „record‟ state. 2. This digital video camera is suitable for environments between 0 °- 40 ° C or 32 °-104 ° F. Never keep the digital video camera in extremely high temperatures, such as a car parked in the sun. Never keep the digital video camera in damp or moist places. In order to prevent the digital video camera from condensation, when moving from a cold to a warm place, be sure to keep it in a sealed plastic bag. Open the bag and take it out when the camera reaches the indoor temperature. 3. TV programs, movies, music, images and other resources may be protected by copyright; therefore, without prior permission, do not distribute copyrighted materials. System requirements When utilizing the Arcsoft software that is included with the camera, be sure the computer you are using meets the below system requirements: Operation System CPU Memory Sound card and display card CD-ROM Hard Disk Other Win2000,XP, Vista, Windows 7 Above Intel PIII667 or CPU of equal performance Above 128 MB DirectX8 or above. 4× speed or above 1 GB space above useable One standard USB 1.1 or USB 2.0 port 4 Memories on TV 4 Software The below chart is the minimum system requirements for the Memories on TV 4 software which is also included in the giftbox: Operation System CPU Memory Sound card and display card CDR/RW Hard Disk MOV Support Microsoft Windows XP, Vista, Windows 7 Intel Pentium II 300mHz or faster 64 MB RAM (128 MB Preferred) DirectX8.1 or above. 4× speed or above to burn discs 36 MB available hard disk space Quicktime 6 and above 5 Getting to know your camera 1. Appearance and Buttons 6 7 2. Basic operation 2.1 Installing the battery Press / slide down the battery cover and insert the included lithium battery. Align with correct polarity (+,-) of battery terminals. Close the battery cover. 2.2 Charging the battery 1. Power off the camera. 2. Connect the camera to the computer USB port or to a power adapter with the USB cable to charge the battery. 3. During charging, the busy red light will be on. The busy light is located on the top of the digital video camera to the left of the lens as shown on page 7. The light will turn off when the battery is fully charged. 8 4. Charge the camera for about 3 hours to get maximum battery power. Battery lasts as long as 2 hours under normal usage. 2.3 Using a SD/MMC/SDHC card Turn your camcorder OFF before inserting / removing an SD Card. Insert a memory card into the SD/MMC/SDHC card slot. Push it down until the card stays latched. Do not force – check card‟s position according to the position mark on the camera. To remove card, push card inward and it will pop out automatically. - Note that the SD Card has a tiny LOCK switch on the side. Set the switch to the un-LOCK position to store recorded videos and still pictures. 2.4 Powering on/off In the power-off state, press and hold the power key to turn the camera on. In the power-on state, press the power key to turn the camera off. The camera will turn off automatically if it is on and left idle for 1 minute. In power-on state, when the battery level is very low, the camera can turn off after several seconds. You must recharge the battery when this happens. 2.5 Video record 9 Your camera will automatically go to record mode after it is powered on. To record a video, press the shutter key to start video recording. While recording, press the shutter key again to stop recording. In video record mode,to change the resolution from 720p HD to VGA 640/480 and vice versa, press the right to get your desired setting. Press the left key to turn the Led light on or off. You can use the zoom feature by pressing the up or down key to zoom in or out on the image before you record or while you are recording. Please note the digital zoom feature degrades the picture the more you zoom in. 2.6 Playback videos or photos Press the mode key to change modes, from video mode to playback mode. Once in playback mode, press the ◄ key or ► key to select the desired file. When viewing a video clip, press the OK key to begin playing. Press the ◄ key to rewind and the ► key to fast forward. Press the up key to return back to normal speed. Press the OK key to pause and resume playing. Press the down key to stop playing the video. Press the down key again to see thumbnails of all of your videos. When viewing a Still photo, press the up or down key to zoom in or out of the image. While zooming, pressing the OK key can enter pan mode. At this time you can press the direction key to move the photo to view in LCD. 10 2.7 Still photos Press the Mode key to switch from playback mode to still photo mode (5MP). Press the left key to turn the Led light on or off. In still photo mode, press the shutter key to take a picture. Press the up or down key to zoom in or out of the image. 2.8 Video output After the camera is powered on, insert the terminal of the TV cable into the TV output port of the camera. The yellow port of the other terminal should be connected to the VIDEO IN port of the TV. The red (or white) port of the other terminal should be connected to the AUDIO IN port of the TV as shown in this illustration. 2.9 HDMI output If you want to output the video and sound from the video camera to an HD TV, insert a HDMI cable (not included) to the HDMI port of the camcorder and connect the other terminal of the HDMI cable to the HD TV. Note: During the period of HDMI output, the video camera can only enter playback mode (you will not be able to 11 record while the HDMI cable is connected). 2.10 Delete files In playback mode, press the Menu key to start menu-setup, and then choose the delete item to delete files. 3. Connect to PC 3.1 Turn the camcorder on. Slide the USB switch up to extend the USB connector. 3.2 Insert the camera‟s USB connector into computer‟s USB port, or use the supplied USB extension cable to make the connection. 12 4. Download files from the camera to PC 4.1 After connecting to a computer, go to "My Computer” and open the "Removable Disk" icon. The videos or photos will be saved in the \DCIM\ 100DSCIM folder in the removable disk. Choose the desired file in the 100DSCIM folder and copy (drag with mouse) it into a folder of your choice on your computer. 4.2 You can use ArcSoft MeidaImpression to edit videos or photos. 4.3 ArcSoft MeidaImpression can be installed from the CD included. User Preferences/Setup Options Light Frequency This value is set to 60 Hz as it is the standard light frequency value for the United States, You can change this to 50 Hz for other countries. Date & Time Set the current date and time and adjust the date display. This date and time will be attached to the video files so you can see when the video files were taken. Language Set the language in which the User Preferences Menu will be displayed. TV Out USB Set the TV mode on your camera. The camera is set to NTSC mode which is standard in the United States. Set the USB option to Computer or Printer. The USB is set to computer so that your computer will recognize the digital video camera when plugging it in. there is an option to change from Computer mode to Printer Mode. 13 Format Erase all data on the installed memory card. Reset All Reset all user preferences to defaults. Light Frequency Do not change the frequency from 60 Hz (default) unless you are outside of the United States. To change the frequency, click the Menu button to see your setup options. Press the right button and scroll down to the Light Frequency option. Press the Shutter key. You will see the 2 frequency options. Click the Shutter key on your desired frequency option (60 or 50) to confirm your selection. To Set the Date and Time If you would like to have each of your files stamped with the date, please do the following1- When in record or still mode, press the menu key. 2- When the yellow menu screen appears, press the right arrow. 3- Now press the minus sign key down twice until Date and Time is highlighted on screen. 14 4- Press the shutter key. 5- Now you can set the date and time by scrolling up or down on the desired highlighted field. The camera will start with the year. Simply press right or left to change the highlighted field. 6- When you are done setting the calendar, press the shutter key to set. 7- To get out of the calendar screen, press the menu key again to return to the main menu and then again to return to record mode. Language Your camera default only English nation language. TV Out To change the TV Mode on your camera, press the Menu key to see your setup options. Press the right key and scroll down to the TV Out option. Press the Shutter Key to see the TV Out options which are NTSC and PAL. Scroll up or down between the two options. When your preferred option is highlighted, press the Shutter Key to confirm your selection. Please note that the camea is set to NTSC which is standard in the United States. Do not change to PAL mode unless you are outside of the United States. 15 USB Your USB is set to Computer mode. This means that your computer will recognize your digital video camera when you plug it into the USB port of your computer. To change from Computer Mode to Printer mode, press the Menu Key to see your setup options. Press the Right key and scroll down to the USB option. Press the Shutter key and press it again once your desired option is highlighted (Computer or Printer). Please note that the Printer mode will only work with certain printers. Most printers will not recognize your digital video camera when you plug it into its USB port. Format To erase the data from your SD card, press the Menu key to see your setup options. Press the Right key and scroll down to the Format option. Press the Shutter key once. Scroll up to the Yes option and press the Shutter key again to confirm the action. Your files will be deleted. Reset All To reset all of the User preferences to the way they were when you first got your camera (to the defaults), press the Menu key to see your setup options. Press the Right key and scroll down to the Reset All option. Press the Shutter key. Press the Shutter key on the Yes option to confirm your action of resetting all of the preferences. 16 Application of attached Software 1. Introduction interface for software installation Put the CD into the CD-ROM of a computer, and then the following menu will appear: If the above screen does not show up, click the autorun.exe program under the directory of the CD. 2. MediaImpression Installation and Use Install MediaImpression: Click “Install MediaImpression” button and complete the installation as per the tips. 17 18 After installation, please restart the computer. Run MediaImpression: Double click the icon on the desktop or follow “Start → Programs” to open: After starting MediaImpression, click “Import” to import the media. 19 Choose the video camera storage and choose the output location. 20 Choose a file and click import. The selected file will be stored in the output location. Click “Go to start page” to return to the main screen. Then click “Video” or “All media” to use the “You Tube” function. 21 Choose a file and click the “upload to You Tube. Enter your username and password to login to You Tube to execute the upload. 22 3. UEZ Link Introduction and Use UEZ Link can help you easily upload your videos or photos to or . There are two ways to use the software: Ⅰ When connecting to a PC, UEZ link will pop-up automatically. Please make sure that your PC will not block any pop-up software. Otherwise it will not work. Ⅱ Double click the icon and then double click the icon from the CD to run. You can also copy files to your PC, to run. The interface below will appear: 23 3.1 Load Files UEZ link will automatically load all the files in the DCIM folder . You can load the desired files by clicking the button , and then choosing the files. Once the “Browse for folder” window opens, choose “Computer” then the driver where the files are located. (This 24 should be a “removable disk”, such as D, E, F…) Then choose the files. 3.2 Upload to Choose the file, and then click the button to upload your files. Hold the Control key and click another file to choose multiple files to upload. Please make sure that you have registered and activated an account for YouTube to upload videos. Otherwise, you will not be able to upload. 25 3. 3 Upload to Choose the file, and then click the button to upload your files. Hold the Control key and click another file to choose multiple files to upload. Please make sure that you have registered and activated the account for facebook to upload files. Otherwise it will not work. 26 3.4 Save on PC Choose the file, and then click the button to save on PC. Hold the Control key and click another file to choose multiple files to save. 27 . 3.5 Delete Choose the file, and then click the button to delete the files. Hold the Control key and click another file to choose multiple files to delete. 28 29 Product specifications Image sensor Function mode Lens Focus range Digital focusing Shutter LCD display Resolution White balance Exposure File format Video out Storage media USB port Dimension (LxWxH) 1.3 Mega Pixels Record video, Record still photo, playback, mobile disk F2.8,f=3.1mm 120cm~infinite 4× Electronic 2.0 inch TFT Display Video: HD(1280x720), VGA(640x480), Still photo: 5.0MP Automatic/Manual Automatic (Video)AVI, (Photo)JPEG TV out, HDMI out SD/MMC/SDHC card(max. 16GB) USB 2.0 port 111mm × 57mm × 19.5mm 30 31 32 33