1
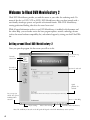
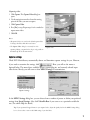
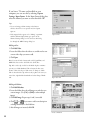
User Guide
Ulead Systems, Inc.
November 2002
Copyright
First English edition for Ulead DVD MovieFactory 2.0.
© 2000 - 2002 Ulead Systems, Inc. All Rights Reserved
No part of this publication may be reproduced or transmitted in any form or by any means, electronic or
mechanical, including photocopying, recording or storing in a retrieval system, or translated into any
language in any form without the express written permission of Ulead Systems, Inc.
Software license
The software described in this document is furnished under a License Agreement which is included with the
product. This agreement specifies the permitted and prohibited uses of the product.
Licenses and trademarks
ICI Library © 1991–1992 C-Cube Microsystems.
Ulead Systems, Inc., Ulead, the Ulead logo, and Ulead DVD MovieFactory are trademarks of Ulead Systems,
Inc. All other product names and any registered and unregistered trademarks mentioned in this manual are
used for identification purposes only and remain the exclusive property of their respective owners.
Sample files
Files provided as samples on the program CD can be used for personal demonstrations, productions and
presentations. No rights are granted for commercial reproduction or redistribution of any sample files.
North & South America
Ulead Systems, Inc.
International
Ulead Systems, Inc.
http://www.ulead.com
E-mail: [email protected]
http://www.ulead.com
http://www.asiapac.ulead.com
http://www.ulead.com.tw
E-mail: [email protected]
Japan
Ulead Systems, Inc.
http://www.ulead.co.jp
E-mail: [email protected]
Germany
Ulead Systems GmbH
http://www.ulead.de
E-mail: [email protected]
China
Ulead Systems, Inc.
http://www.ulead.com.cn
E-mail: [email protected]
Table of Contents
Welcome to Ulead DVD MovieFactory 2 ................................................... 4
Getting around Ulead DVD MovieFactory 2 ............................................................... 4
Which task should you choose? .................................................................. 5
Working on a project .................................................................................. 6
Add videos or slideshows ............................................................................................. 6
Capture settings .................................................................................................................... 7
Trim a video ................................................................................................................ 9
Edit video or slideshow .............................................................................................. 10
Extract video.............................................................................................................. 10
Replace audio............................................................................................................. 11
Split a video............................................................................................................... 11
Add/Edit chapters ...................................................................................................... 12
Setup menus .............................................................................................................. 13
Preview your movie ................................................................................................... 14
Output your movie ................................................................................................... 15
Edit disc .................................................................................................... 16
Direct to disc ............................................................................................ 16
Copy disc .................................................................................................. 18
Welcome To Ulead Photo Express* .......................................................... 19
Choose a Template..................................................................................................... 19
Insert your Photo....................................................................................................... 19
Add Text.................................................................................................................... 20
Save and Print............................................................................................................ 20
Glossary .................................................................................................... 21
* The availability of this program will depend on the DVD MovieFactory version you have.
Welcome to Ulead DVD MovieFactory 2
Ulead DVD MovieFactory provides you with the answer to your video disc authoring needs. No
matter if the disc is a DVD, VCD or SVCD, DVD MovieFactory takes you there instantly with a
user-friendly wizard-type process and specific task-oriented features. With DVD MovieFactory,
creating professional-looking video discs has never been easier!
While all crucial information on how to use DVD MovieFactory is included in this document and
the online Help, you can further receive the latest program updates, tutorials, technology advance
(such as the newest hardware compatibility list), and technical support by visiting your local Ulead Web
site.
Getting around Ulead DVD MovieFactory 2
Once you open the program, the first screen you will see is this:
The current step
you are in
Currently
selected task
Four tasks to
choose from
Options for each task
Quick
guideline for
each task
Save your project,
and list other options
including further
assistance
Access to online Help
Project settings
Move to the next step
Exit Ulead DVD MovieFactory
Note: The availability of the tasks on the left panel will depend on the DVD MovieFactory version you have.
4
Which task should you choose?
Now you have an overall picture of how Ulead MovieFactory looks like. The next thing to do is
choose the right task that fits your need:
•
Start Project - New project: Choose this task if you are creating a new DVD MovieFactory
project. Please select an output disc format, and then click Next to add media clips. (See
page 8 for details.)
•
Start Project - Existing project: Choose this task if you already have a previous created
DVD MovieFactory project saved on a hard drive or disc. Please use the drop-down list or
the browse button to locate a project file (*.dwz), and then click Next to start editing. (See
page 8 for details.)
•
Edit Disc: Choose this task if you would like to edit your DVD+R/RW, DVD-R/RW, or an
existing DVD MovieFactory project directly on a recordable disc. Please select the disc location
on your computer, and then click Next to start editing. (See page 18 for details.)
•
Direct to Disc: Choose this task if you want to capture videos straight from your video
device and burn a disc immediately. Please select an output disc format, and then click Next
to capture videos, setup menus, and finally burn the disc. (See page 19 for details.)
•
Copy Disc: Choose Copy from - Disc if you want to make a disc-to-disc (VCD or SVCD)
copy or burn a disc from a DVD folder located in the hard drive or a disc. You can also
choose Copy from - Disc image file to copy a disc image file and burn onto a disc. Click
Next to go to the output step directly. (See page 19 for details.)
5
Working on a project
Ulead DVD MovieFactory is a project-based program. Each project (*.dwz) file saves the latest
information on your video and menu editing as well as the settings you have made for that project. So,
you can always stop or resume your task at your convenience.
Note: You can only work on one project at a time in Ulead DVD MovieFactory.
Add videos or slideshows
Now, you have opened a project. The next thing is to insert media clips into it. These media clips
can be videos and/or slideshows. For example, using a compatible video capture card you can
capture videos from a video device such as a DV camcorder. You can also add videos from a disc/
hard drive, or create slideshows using a series of still images. Once these clips are inserted, you can
make further editing and set up selection menus later.
Tip: You can change the playback
sequence by moving a thumbnail
using the drag-and-drop method
in the Media clip list.
Use any of these
buttons to add videos
or slideshows.
Media clip list
(Click a thumbnail to select it.)
Select this to create an
introduction to your
movie. The first play video
is always playbacked first
automatically after the disc
is inserted into a player.
Click the text description for
editing as needed.
Add/Edit Media Clip step
Tip: Select Save [Ctrl+S] frequently to safeguard the latest update of your
project.
6
Capturing videos:
1 Click Capture. The Capture Video dialog box
opens.
2 Use the navigation controls to locate the starting
point of the video you want to capture.
3 Click Capture Video.
4 Press [Esc] to stop. Repeat steps 2 to 4 as needed to
capture more videos.
5 Click OK.
Notes:
• All captured videos are stored in the default capture folder.
To change the folder, click the browse button.
• The Capture Video dialog box is strictly for video
capturing. Playing a captured video clip is only possible in
the Media clip list of the main window.
Capture video
Capture settings
Ulead DVD MovieFactory automatically detects and determines capture settings for you. However,
. Here, you will see the menu as
if you need to customize the settings, click
depicted below. The menu shows available options, capture plug-ins, and currently selected input
video device. Mostly, you will want to select MPEG Settings for customization.
Menu shown after clicking
Capture Settings
In the MPEG Settings dialog box, you can choose from a number of presets or define your preferred
settings from Special Settings. Also, click Video Bit Rate if you want to set a particular variable bit
rate. (See online Help for details.)
Tip: If you experienced dropped frames in your captured video, adjust the Quality level in the MPEG Settings dialog
box to a lower value or turn on the DMA setting of your hard drive.
7
If you have a TV tuner card installed on your
computer, you can use this by selecting Capture
Settings: Input Source. In the Input Source dialog box,
select the channel you want to view then click OK.
Tips:
• If you are having problems viewing in the Preview
window, select Force to use preview mode in Capture
Options.
• If the captured video appears to be “shaking”, experiment
with the different Output frame type options in the
Advanced Settings dialog box. You can access this dialog
box through the MPEG Settings dialog box.
Input source
Adding videos:
1 Click Add Video.
2 Locate the folder where the videos are, and then select one
or more video clips you want to add.
3 Click Open.
Note: You can add video formats such as AVI, QuickTime, and
MPEG files. You can also add VCD video (DAT) files.
Tip: After a video clip is added to the Media clip list, sometimes
you may see a black thumbnail. This is because the first scene
(frame) of this video clip is a black screen. To change it, doubleclick to select this video clip and move the Jog Bar to the scene you
want. Next, right-click the thumbnail and select Change Thumbnail.
Open video file
Adding a slideshow:
1 Click Add Slideshow.
2 Locate the folder where the still images are and select one
or more images. (Use [Ctrl] or [Shift] to select multiple
images)
3 Click Add Image. Repeat steps 2 and 3 as needed.
4 Click
or
if you want to add a text description
or background music to the slideshow.
5 After all images are inserted, click OK.
Create a slideshow
8
Importing DVD videos:
1 Click Import DVD Video.
2 Locate the folder where the videos are. (For
example, locate the VIDEO_TS folder for the
DVD+R/RW or DVD-R/RW format; the
DVD_RTAV folder for the DVD-RAM format.)
3 Click to select the video clip you want to import,
and then click Finish. (Use [Ctrl] or [Shift] to
select multiple videos) Depending on the video
time length, wait a while until the capture process
completes.
Note: Sometimes you might see some white video thumbnails
in the Select Scenes to Capture dialog box. This is normal
because the first frame for this type of video thumbnails is
white or black.
Trim a video
You can trim a video using the Jog Bar, mark-in/out, and navigation controls. (See the illustration
below.) Trimming a video gives you the freedom to precisely edit the video length.
Mark-in
Set Mark-out
Set Mark-in
Jog Bar
Mark-out
Navigation controls
Before trimming
9
Trimming a video:
1 Double-click a video thumbnail to select it for
trimming.
2 Use the navigation controls or drag the Jog Bar to
move to the starting point of your desired trimmed
video. When you’re there, click Set mark-in.
Alternatively, simply drag mark-in to the starting
point.
3 Similarly, determine the ending point by using Jog
Bar and Set mark-in/mark-out.
4 Now, the trimmed video is ready. (You can preview
the trimmed video by pressing [Shift] and clicking
Play.
After trimming
Another way to trim your videos is to use the Extract Video feature. To learn about this feature, see
the section Extract video below.
Edit video or slideshow
If you have Ulead VideoStudio 6 installed on your computer, you can edit your video in the Media
. If you want to edit a slideshow, select the
clip list using VideoStudio 6 by clicking
slideshow thumbnail then click
.
Note: The availability of Edit Video will depend on the DVD MovieFactory version you have.
Extract video
Trim your video by drawing out specific portions of your clip. This feature allows you to select and
extract multiple portions from your clip and then modify your clip according to the portions you
have extracted.
Extracting videos:
1 Click the video in the Media clip list to select it
then click
. The Extract Video
dialog box opens.
2 To select a portion to retain, use the Jog Bar to go that
section of the video then use the In and Out buttons
10
(or Mark-in [F3] and Mark-out [F4] buttons on the
Trim Bar). Click In when you find the start of the
portion you want then click Out when you reach the
end of the portion you want extracted.
3 Repeat step 2 as often as necessary to extract more
portions from your clip.
4 Your extracted videos will appear on the Media clip
list. Preview the clips you have extracted by pressing
[Shift] and clicking the play button. Click OK.
5 The dialog box closes and you return to the Add/Edit
Media Clip step.
Extract Video
In the Add/Edit Media Clip step, you can see the portions you have extracted by looking at the Trim
Bar of the Preview window. The red segments on the Trim Bar are the portions that you have
extracted. Preview the clips you have extracted by pressing [Shift] and clicking the play button. If
you need to change the portions that you have extracted from your clip, click Extract Video again.
Note: The availability of Extract Video will depend on the DVD MovieFactory version you have.
Replace audio
Insert or replace the background music of your video by using this feature. Click
to
open the Replace Audio dialog box where you can specify an audio track you want to use with your
video.
Notes:
• After adding or replacing the background music, you can still remove or use the original music of your video file
again by clearing the Replace audio with selected file option in the dialog box.
• The availability of Replace Audio will depend on the DVD MovieFactory version you have.
Split a video
You can add more video thumbnails by breaking an existing video thumbnail into several ones.
Simply double-click to select a video thumbnail in the Media clip list, and then drag the Jog Bar (as
depicted on page 11) to move to the scene you want as the separating point. Next, click
. You can keep moving the Jog Bar and add as many video thumbnails as you like. Note
that the original video thumbnail is still retained while new ones are added accordingly based on the
number of newly added videos.
11
Add/Edit chapters
This feature is only available when the Create menus option is selected. By doing so, you can create
submenus linked to their associated video clip at the Setup Menu step later.
Represented as a video thumbnail in a submenu, each chapter is like a bookmark for a video clip.
Viewers can easily select a chapter then the video clip will immediately jump to the first scene of
that chapter and start the playback. This feature is particularly useful when you want to attract your
viewers by giving them the freedom to choose a particular part of the movie to watch. Note that
these small video thumbnails only link to its “mother” video without generating any additional
physical video files. So, you don’t need to worry about the possibility of unexpected file size increase.
Notes:
•
You can create up to 99 chapters for a video clip.
•
If the Create menu option is not selected, you will be guided to the Preview step immediately without creating any
menus after clicking Next.
Creating or editing chapters linked to a video clip:
1 Select a video in the Media clip list.
2 Click Add/Edit Chapter.
3 Click Auto to let Ulead MovieFactory help you
select chapters (such as at fixed intervals), or drag
the Jog Bar to move to a scene as the first frame of a
chapter, and then click Add.
Tips:
• If you want to use Auto, your video must be at least one
minute long or the video has scene change information.
• If you click Auto and your video is a DV-formatted AVI
file captured from a DV camcorder, DVD MovieFactory
can automatically detect scene changes and add chapters
accordingly.
• If the selected video is an MPEG-2 file with scene change
information, DVD MovieFactory automatically generates
these chapters for you when you click Auto.
4 Repeat Step 3 as needed. You can also use Remove
or Remove All to delete unwanted chapters.
5 Click OK.
12
Setup menus
At this step, you can create the main menu and submenus. They provide a list of interactive
thumbnail-styled options displayed on a screen for your movie viewer to choose from. Ulead DVD
MovieFactory offers a set of menu templates to best fit the purpose of each menu. Custom-made
menus are also available at your fingertips.
To help you better understand the DVD/SVCD/VCD menu structure, see the illustration below.
Menu heading
Clip 1
Clip 2
Clip 3
Clip 1
description
Clip 2
description
Clip 3
description
Main menu
Submenu #1 heading
Submenu #2 heading
Chapter 1
Chapter 2
Chapter 3
Chapter 1
Chapter 2
Chapter 1
description
Chapter 2
description
Chapter 3
description
Chapter 1
description
Chapter 2
description
Submenu #1
Submenu #2
In this example, Clip 1 has three chapters so when you click the Clip 1 video thumbnail, it will
jump to submenu #1. If you look at Clip 2, it has no chapters assigned to it therefore there is no
submenu for Clip 2.
Editing menus:
1 By default, DVD MovieFactory automatically
makes all required menus for you. Use Current
displayed menu to switch to the menu you want to
edit.
2 Click “My Title” to customize the menu heading.
You can also click the text description under each
video thumbnail for customization.
Note: If you skip Step 2, “My Title” and the thumbnail name
will be used as the menu heading and the text description
respectively. If you don’t want to show the menu heading or
the text description, simply delete it.
13
3 To change the image shown on each video
thumbnail, click it then drag the Jog Bar to
change.
4 To change a menu layout, use the Menu template
list and select another preset.
5 You can also click
to use your
own background image, or click
to use your background music.
6 To further customize and create your own menu
template in the My Favorites folder, click
.
7 When you’re done, click Next to preview the
movie.
Before
Jog Bar
Preview your movie
Now, it’s time to see how your movie looks like
before you burn it onto a disc. Simply move the
mouse and click Play to watch your movie and
test the menu selection on your computer. Use
the navigation controls here as you would on a
standard remote control of a home DVD player.
Tip: As you move between controls, a ToolTip pops up and
tells you its specific function.
14
After
Output your movie
This is the final step before your video disc or output file is ready. Here, you can choose the disc
burner, as well as select the folder where you want to output video files or a disc image file.
Tip: Before actual disc burning starts, make sure the disc in the correct format has already inserted into the disc burner.
Outputting your movie:
1 Enter a volume name (up to 32 characters) for the
output disc.
2 In Output settings, select one or more tasks you
want to do. For example, select the recording
format that best suits your need. (See the notes
below). You can also click Output Advanced
Settings if you want to add additional components
such as a video disc player or your personal data.
3 Select a disc burner and make settings (such as the
recording speed) compatible with your output disc
format.
4 Click Output.
5 The burning progress bar shows you the burning
status. Once it is done, click Close.
Note: The availability of Include DVD player in the Output Advanced Settings dialog box will depend on the DVD
MovieFactory version you have.
Notes on how to choose an appropriate recording format:
• DVD MovieFactory provides an option, DVD-Video (fast editable), that allows you to still use the industrial standard
DVD-Video format, however, it will only burn the necessary files you need so you can edit your video content (e.g. menus)
in the future. This option saves time in copying files and hard drive space when you edit the contents of your disc again but
may result in your disc not being compatible with some DVD players.
• If DVD-Video (fast editable) is selected, options in the Output Advanced Settings dialog box such as Include personal
folder to disc and Archive images of slideshows will not be available.
• If DVD-Video (fast editable) is selected, keep in mind that there is a 30MB file size limitation for menus, background audio
and project file combined. Audio files have larger file sizes and therefore it takes up the bulk of this file size limitation.
Reduce the file size of your audio (e.g. shorter length) if you plan to have a lot of menus.
• If you choose DVD-Video, you will be using the industrial standard DVD-Video format for maximum compatibility.
However, you cannot enjoy the advantages brought by the DVD-Video (fast editable) option.
15
Edit disc
With Ulead DVD MovieFactory, you can modify existing videos and menus in a DVD+R/RW,
DVD-R/RW, or miniDVD disc using a compatible disc burner.
Editing a disc:
1 Insert the disc you want to edit, and then click
Edit Disc. Select Show disc details if you want to
check the disc technical information. (If you
change the disc later, you must select this option
again to refresh the latest disc information.)
2 Click Next. The copying video process starts. You
will then be guided to the Add/Edit Media Clip
step.
3 Add, modify or remove videos as needed, and then
click Next.
4 Similarly, you can add, modify or remove menus as
needed, and then click Next.
5 Preview the movie as needed, and then click Next.
6 In Output settings, select Record to disc and click
Output.
Notes:
• DVD MovieFactory lets you do direct and fast on-disc editing without the need to copy files to the hard drive first, as long as
the disc was previous burned using the DVD-Video (fast editable) option.
• You can edit menus only when they are previously created using Ulead DVD MovieFactory.
• Editing slideshows is not available when editing a disc.
Direct to disc
Ulead DVD MovieFactory provides you with a fast way to capture videos directly from a video device
(such as DV camcorder or VCR) through an analog or IEEE-1394 (FireWire) capture card, and then
burn a video disc straightaway.
When this task is selected, DVD MovieFactory will initially check both your burner and disc to ensure
that there are no problems with your output device and media. After the program does this, you can go
to the Capture step then instantly preview your video and burn to disc anytime you wish to do so.
16
Directing to a disc:
1 Insert a disc where you want to burn the video
onto and then click Direct to Disc.
2 Select the output disc format you want then click
Next. You will then be guided to the Output
Options step.
Note: If you only have a CD burner, you should select either
VCD or SVCD as your output disc format.
3 Depending on the type of media you have in your
burner (e.g. DVD+R/RW), you will have different
options available in the Output Options step.
Determine the options you want then click Next.
Notes:
• The On-the-fly option (if available) allows you to directly
record your video to your disc without creating any data on
your hard drive.
• Select Do not erase existing DVD-Video (fast editable)
data if you do not want to overwrite existing data on the
disc.
• Select Create menus to create a selection menu for the
video that you will capture onto the disc.
• If you have a +RW media in your burner, there are options
in the Burner Advanced Settings dialog box that you can
use such as Format DVD+RW (recommended when
using the DVD+RW disc for the first time) and Quick
eject (speeds up finalization process but may create
compatibility problems with some DVD players).
4 Now you are in the Capture step. Turn on your
video device and use the navigation controls to
locate the starting point of the video to capture.
Once you’re done, click Capture & Burn.
Tips:
• If you are having problems using Direct to Disc, you may need to reconfigure some of the program settings. Click
Capture Settings to adjust the settings.
• If the video you captured doesn’t have audio, the reason may be that the recording input device has not been properly
set up. You can check this in Control Panel: Sounds and Multimedia - Audio tab. In the Sound Recording section,
click Volume then in the Recording Control dialog box, drag the volume slider of the appropriate device (usually
Line-in) to increase the recording volume.
17
Copy disc
Here, you can duplicate a disc (DVD, VCD or
SVCD), create a disc from your hard drive
containing a DVD root folder (including the
standard DVD+R/RW or DVD-R/RW’s
VIDEO_TS and AUDIO_TS subfolders), or
simply make a disc from an existing disc image
file (*.iso or *.ixa).
Copying a disc:
1 Insert a disc where you want to duplicate the video
onto and then click Copy Disc. Now, select Copy
from: Disc and click Next.
2 Enter the volume name for the disc and choose a
disc drive or folder containing the DVD root
folder.
3 Setup the disc burner, and then click Output.
4 Click Yes to erase the existing data (if any) on your
disc. The disc burning process will then start
automatically.
Tip: Select Create disc image file first to create the disc image file first on your hard drive before burning the disc.
This will reduce the risk of copying errors when duplicating discs.
Copying a disc from a disc image file:
1 Insert a disc where you want to burn the disc
image file onto and then click Copy Disc. Now,
select Copy from: Disc image file and click Next.
2 Enter the volume name for the disc and locate the
folder containing the disc image file.
3 Set up the disc burner, and then click Output.
4 Click Yes to erase the existing data (if any) on your
disc. The disc burning process will then start
automatically.
18
Welcome To Ulead Photo Express*
Ulead Photo Express brings you easy-to-use photo editing tools and a wide variety of photo sharing
options, including e-mail, printing and online sharing. With its visual file browser, you can view
and organize photos fast, and even play back multimedia files. A creative tool kit is also provided
for you to design and print labels and covers for your VCD/DVD/SVCD discs.
The procedure below shows you an example of how to create CD labels.
Choose a Template
Ulead Photo Express comes with ready-made CD labels. All you need to do is choose a preset
template and insert the photo you want to use on the CD label.
1. In Project Mode, select Get Project: Stationery Labels. Then, double-click the CD Labels folder.
2. Choose a template by double-clicking on it. In
this example, we’ll choose the Birthday Template.
Insert your Photo
Since a CD label is circular in shape, the positioning of the people/objects from your photo that
you wish to use should suit this shape.
3. Click the small photo symbol, then select Replace
from My Computer to replace the placeholder
image with a photo from your hard drive.
4. Locate your photo and drag it into the
placeholder’s position. Then adjust its position
and resize it (if necessary).
* The availability of this program will depend on the DVD MovieFactory version you have.
19
Add Text
Give a title for your CD and apply special effects to the text.
5. Click on the placeholder text, and click on the
blue box with the red letter 'A'. Then change the
text, and choose a font type, style, and color.
6. One fun effect that works well with the curved
shape of CDs is Text Wrap. Under the Edit
menu, choose Text: Reshape. Select Wrap from
the drop-down list and double-click a wrap effect
to apply it to your text.
Save and Print
It’s now time to save your work and print the CD label.
7. Save the CD label (in TPX format) so that you
can edit it in the future.
8. To print, select Print: Multiple. Then select Disk
and CD Labels (or other brands of printing
paper) under Paper layout.
9. Select URMH-A4 CD. Drag inward on the
black box surrounding your label to fit the
template size and center it.
10. Continue to click Next. Specify the number of
copies to print and click Print.
20
Glossary
Chapter
A chapter is a link to a video file in a DVD. Viewers select a chapter to see a particular portion of a
video clip. A video clip can contain up to 99 chapters.
Chapter selection menu
In Ulead DVD MovieFactory, we use the word “submenu” to help you distinguish it from the main
menu. The main menu contains a number of submenus, depending on how you design them.
DVD
Its full name is “Digital Versatile Disc” or “Digital Video Disc.” This is an optical disc that can
store data, music, or movie with a better quality than VCD and SVCD.
DVD+R/RW
A DVD storage format used to record DVD once (DVD+R) or multiple times (DVD+RW). This
format is promoted by the DVD+RW Alliance (http://www.dvdrw.com/).
DVD-R/RW
A DVD storage format used to record DVD once only (DVD-R), or about 1,000 times of rewrites
(DVD-RW). This format is promoted by the DVD Forum (http://www.dvdforum.com/).
DVD-RAM
A DVD storage format used to record DVD. It can be rewritable for about 100,000 times. This
format is also promoted by the DVD Forum (http://www.dvdforum.com/).
DVD-Video
A video format used in DVD. It uses MPEG-2 file format for videos and holds about 120-minute
videos on a single-sided, 4.7-GB DVD disc.
DVD-Video (fast editable)
Uses the standard DVD-Video format but gives you better flexibility when editing the contents of
your disc again. Using this format may cause your disc to be incompatible with some DVD players.
First play video
A video serves as an introduction to the movie on a video disc. This video can automatically play as
soon as the disc is inserted into a compatible disc player.
Main menu
The highest level of menus in a video disc. You can access it by pressing the “Menu,” “Title menu,”
or “Top menu” button on the remote control of your home DVD player or computer DVD player.
21
Menu
Includes the main menu, submenus, video thumbnails, and navigation controls for viewers to choose
from. A menu can also contain menu headings, text descriptions, and feature introductions. Thus,
viewers can have a better idea of what the disc content (movie) is about.
miniDVD
Sometimes called cDVD, miniDVD is basically DVD video on a CD-R/RW disc instead of a DVD
disc. Using the miniDVD format will hold approximately 15 minutes of video on a 650MB CD-R/
RW. Most DVD players don’t support miniDVD but it can be played on a computer with a DVDROM and DVD software player.
SVCD
Its full name is “Super Video Compact Disc.” While the available recording time is generally less
than a VCD, SVCD’s video and audio qualities are basically between a VCD and a DVD. You can
use CD-R/RW to record this type of video.
VCD
Its full name is “Video Compact Disc.” It is a video disc holding about 74-minute long MPEG-1
video, which is equivalent to the VHS quality. You can use CD-R/RW to record this type of video.
22