1
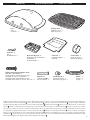
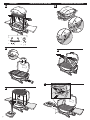
LP Gas Grill Owner’s Guide You must read this Owners Guide before operating your gas grill DANGER If you smell gas: 1. Shut off gas to the appliance. 2. Extinguish any open flames. 3. Open lid 4. If odor continues, keep away from the appliance and immediately call your gas supplier or your fire department. Leaking gas may cause a fire or explosion which can cause serious bodily injury or death, or damage to property. WARNING: Do not try to light this appliance without reading the “Lighting” Instructions section of this manual. WARNING 1. Do not store spare liquid propane cylinder within 10 feet (3m) of this appliance. 2. Do not store or use gasoline or other flammable liquids or vapors within 25 feet (8m) of this appliance. WARNING: Follow all leak-check procedures carefully in this manual prior to grill operation. Do this even if the grill was dealer-assembled. NOTICE TO INSTALLER: These instructions must be left with the owner and the owner should keep them for future use. THIS GAS APPLIANCE IS DESIGNED FOR OUTDOOR USE ONLY. DANGERS Failure to follow the Dangers, Warnings and Cautions contained in this Owner’s Manual may result in serious bodily injury or death, or in a fire or an explosion causing damage to property. WARNINGS Do not store a spare or disconnected propane cylinder under or near this grill. Improper assembly may be dangerous. Please carefully follow the assembly instructions in this manual. After a period of storage, and/ or nonuse, the Weber® gas grill should be checked for gas leaks and burner obstructions before use. See instructions in this manual for correct procedures. Do not operate the Weber® gas grill if there is a gas leak present. Do not use a flame to check for gas leaks. Combustible materials should never be within 24 inches of the top, bottom, back or sides of your Weber® gas grill. Your Weber® gas grill should never be used by children. Accessible parts of the grill may be very hot. Keep young children away while it is in use. You should exercise reasonable care when operating your Weber® gas grill. It will be hot during cooking or cleaning and should never be left unattended, or moved while in operation. Should the burner go out while in operation, turn the gas valve off. Open the lid and wait five minutes before attempting to relight, using the lighting instructions. Do not use charcoal or lava rock in your Weber® gas grill. Never lean over an open grill or place hands or fingers on the front edge of the cooking box. Should a grease fire occur, turn off the burner and leave lid closed until fire is out. Do not enlarge valve orifice or burner ports when cleaning the valve or burner. The Weber® gas grill should be thoroughly cleaned on a regular basis. Propane gas is not natural gas. The conversion or attempted use of natural gas in a propane unit or propane gas in a natural gas unit is dangerous and will void your warranty. Do not attempt to disconnect any gas fitting while your grill is in operation. Use heat-resistant grill mitts or gloves when operating the grill. Keep any electrical supply cord away from any heated surfaces. Combustion byproducts produced when using this product contain chemicals known to the state of 41894 06/02/05 California to cause cancer, birth defects, or other reproductive harm. Do not use this grill unless all parts are in place. The unit must be properly assembled according to the instructions outlined in the “Assembly Instruction” section of the Owner’s Guide. Do not use the Weber® Q™ grill in a vehicle trunk, station wagon, minivan, sport utility vehicle(SUV), or recreational vehicle(RV). Use the regulator that is supplied with your Weber® gas grill. Do not attempt to disconnect the gas regulator or any gas fitting while your grill is in operation. If you see, smell or hear the hiss of escaping gas from the propane cylinder: 1. Move away from propane cylinder. 2. Do not attempt to correct the problem yourself. 3. Call your fire department. # 41894 PARTS LIST LISTE DE VUES ÉCLATÉE LISTA DE PIEZAS Cooking Grate - 1 Parrilla de cocción - 1 Grille de cuisson - 1 Lid - 1 Tapa - 1 Couvercle - 1 Cotter Pin - 2 Asa - 2 Goupille fendue - 2 Stainless Steel Pan Head Phillips Screw (1/4 - 20 x 1 1/2" Screw) - 2 Tornillo Phillips de cabeza armada de acero inoxidable 1/4 - 20 x 1 1/2 pulgadas - 2 Vis Phillips à tête cylindrique large en acier inoxydable de 0,6 à 50 x 2,5 cm (1/4 - 20 x 1 po) - 2 Control Knob - 1 Perilla de control - 1 Manette de réglage - 1 Catch Pan - 1 Recipiente recibidor - 1 Lèchefrite - 1 Disposable Drip Pan - 2 Recipientes para escurrimientos desechables - 2 Contenant jetable - 2 Hinge Pin - 2 Tubo del quemador - 2 Axe de charnière - 2 Handle - 1 Pasador - 1 Poignée - 1 Handle Spacer - 2 Espaciador del asa - 2 Entretoise de poignée - 2 © 2004 The following trademarks are registered in the name of Weber-Stephen Products Co., an Illinois corporation, located at 200 East Daniels Road, Palatine, Illinois 60067 U.S.A. Australia; Smokey Joe, Weber, Kettle Silhouette ® , Genesis, Austria; Kettle Silhouette ® , Smokey Joe, Weber, Benelux; Kettle Silhouette Configuration, Botswana; Weber, Canada; Smokey Joe, Genesis, China; Kettle Silhouette Silhouette ® ® , Denmark; Kettle Silhouette ® ® , Smokey Joe, Weber, Compact Grill , Smokey Joe, Weber, Finland; Smokey Joe, France; Kettle , Smokey Joe, Weber, One-Touch, Germany; Smokey Joe, Weber, One-Touch, Greece; Smokey Joe, Ireland; Kettle Silhouette ® , Smokey Joe, Italy; Smokey Joe, Weber, Japan; Smokey Joe, Weber, Korea; Smokey Joe, Weber, New Zealand; Weber, Smokey Joe, Nigeria; Weber, Norway; Smokey Joe, Weber, Portugal; Weber, South Africa: Smokey Joe, Weber, Kettle Configuration, Spain; Smokey Joe, Weber, Sweden; Kettle Silhouette Smokey Joe, Weber, Weber One-Touch, U.S.A..; Kettle Configuration, Kettle Silhouette Kettle Silhouette ® ® ® , Smokey Joe, Switzerland; Kettle Silhouette ® , Smokey Joe, Weber, United Kingdom; , Smokey Joe, Weber, One-Touch, Firespice, Go-Anywhere, U.S.A.;Kettle Configuration, , Genesis, Flavorizer, Crossover, Flamgo, Performer, Rapidfire, Tuck 'N Carry, Jumbo Joe, Bar-B-Kettle, Master-Touch, Spirit, Grill Out, Summit, Platinum, 1-800- Grill-Out, Ranch, Matchless Flame, Zimbabwe; Weber, Kettle Configuration, Kettle Silhouette ® . pg2 ASSEMBLY INSTRUCTIONS DE MONTAGE INSTRUCCIONES DE MONTAJE B A 1 2 212- 1- 22- C D F E pg3 If you have questions or need advice regarding your grill or it’s safe operation, please call our tollfree hotline 1-800-446-1071 and a Weber® Q™. Your Weber® gas grill is a portable outdoor cooking appliance. With the Weber® gas grill you can grill, grill, roast and bake with results that are difficult to duplicate with indoor kitchen appliances. The closed lid produces that “outdoor” flavor in the food. The Weber® gas grill is portable so you can easily change its location in your yard or on your patio. Portability means you can take your Weber® gas grill with, if you move. Propane gas supply is easy to use and gives you more cooking control than charcoal fuel. • These instructions will give you the minimum requirements for assembling your Weber® gas grill. Please read the instructions carefully before using your Weber® gas grill. Improper assembly can be dangerous. • Not for use by children. • If there are local codes that apply to portable gas grills, you will have to conform to them. If there are no local codes, you must conform to the latest edition of the National Fuel Gas Code: ANSI Z 223.1/NFPA54. • The pressure regulator supplied with the Weber® gas grill must be used. This regulator is set for 11 inches of water column (pressure). • This Weber® gas grill is designed for use with propane gas only. Do not use with natural (piped in city) gas. The valve and regulator is for Propane gas only. • Do not use with charcoal fuel. • This Weber® gas grill is not intended for commercial use. • The use of alcohol, prescription or nonprescription drugs may impair the consumers ability to properly assemble or safely operate the appliance. • This Weber® gas grill is not intended for and should never be used as a heater. • Do not leave the Weber® gas grill unattended. Keep children and pets away from the Weber® gas grill at all times. • Check that the area under the control panel and the bottom tray are free from debris that might obstruct the flow of combustion or ventilation air. For Installation in Canada: These instructions, while generally acceptable, do not necessarily comply with the Canadian Installation codes, particularly with piping above and below ground. In Canada the installation of this appliance must comply with local codes and/or Standard CAN/ CGA-B149.1 Natural Gas and Propane Installation Code. Storage and/or Nonuse WARNING: When cooking, the appliance must be on a level, stable surface in an area clear of combustible material. An asphalt surface (blacktop) may not be acceptable for this purpose. WARNING: Turn your Weber® gas grill OFF and wait for it to cool before cleaning. ® • When the Weber gas grill is not in use, the propane cylinder must be DISCONNECTED and the propane cylinder stored outdoors in a well-ventilated space. Place dust caps on cylinder valve outlets when cylinder is not in use. • The Weber® gas grill should be checked for gas leaks and any obstructions in the burner tubes before using. (See Sections: “General Maintenance and Annual Maintenance.”) • The Spider/Insect Screen should also be checked for any obstructions. (See Section: “Annual Maintenance.”) Operating WARNING: Only use this grill outdoors in a well-ventilated area. Do not use in a garage, building, breezeway or any other enclosed area. WARNING: Your Weber® gas grill shall not be used under an unprotected combustible roof or overhang. WARNING: Your Weber® gas grill is not intended to be installed in or on recreational vehicles and/or boats. WARNING: Do not use the grill within 24 inches of combustible materials, bottom, back or sides of the grill. WARNING: The entire cooking box gets hot when in use. Do not leave unattended. WARNING: Keep any electrical supply cord away from any heated surface. WARNING: Keep the cooking area clear of flammable vapors and liquids such as gasoline, alcohol, etc., and combustible materials. WARNING: Never store an extra (spare) Propane cylinder under or near the Weber® gas grill. Weber® Spider/Insect screens Your Weber® gas grill, as well as any outdoor gas appliance, is a target for spiders and other insects. They can nest in the venturi section(1) of the burner tube. This blocks the normal gas flow, and can cause the gas to flow back out of the air shutter. This (1) could result in a fire in and around the air shutter, causing serious damage to your grill. Cooking Getting started: Refer to your Q™ Cards grilling guide. To light the grill: Refer to the lighting instructions in this owners manual and printed on the fold out tables of your grill. To preheat the grill: Light the Weber® Q™ according the lighting instructions in this owners manual. Close the lid and turn the Burner Control Knob to Start/Hi. Preheat the grill for 5-10 minutes (depending on conditions such as air temperature and wind). Once the grill is preheated, set the Burner Control knob to the setting specified in the recipe or suggested in the Q™ Cards grilling guide. Note: Wind and weather may require adjustment of the burner control knob to obtain the correct cooking temperature. If the burner goes out during cooking, open the lid, turn off the burner, and wait five minutes before relighting. Drippings and grease: Excess drippings and grease will collect in the catch pan in the slide-out bottom tray (located on the underside of the grill). Disposable Weber® drip pans are available that fit the catch pan. WARNING: Check the catch pan and the bottom of the grill for grease build-up before each use. Remove excess grease to avoid a fire in the bottom of the grill. WARNING: Do not move the Weber® Q™ when operating or while the grill is hot. The burner tube air shutter is fitted with a stainless steel screen(1) to prevent spiders and other insects access to the burner tube through the air shutter openings. We recommend that you inspect the Spider/Insect screen at least once a year. Also inspect and clean the the Spider/Insect screen if any of the following symptoms should ever occur: 1) The smell of gas in conjunction with the burner flames appearing yellow and lazy. 2) Grill does not reach temperature. Cleaning For availability of replacement cooking grate contact the Customer Service Representative in your region using the contact information on our web site. Log onto www.weber.com®. Outside surfaces - Use a warm soapy water solution to clean, then rinse with water. CAUTION: Do not use oven cleaner, abrasive cleansers (kitchen cleansers) cleaners that contain citrus products, or abrasive cleaning pads on grill or cart surfaces. Slide out Bottom tray - Remove excess grease, then wash with warm soapy water, then rinse Cooking grate - Clean with a suitable brass bristle brush. As needed, remove from grill and wash with warm soapy water, then rinse with water. Catch pan - Disposable foil trays are available, or you can line the catch pan with aluminum foil. To clean the catch pan, wash with warm soapy water, then rinse. Inside cooking Box - Brush any debris off of burner tubes. DO NOT ENLARGE BURNER PORTS (OPENINGS). Wash inside of cooking box with warm soapy water and a water rinse. Inside Lid - While lid is warm, wipe inside with paper towel to prevent grease build-up. Flaking built-up grease resembles paint flakes. Fold out work tables - Wash with a soft cloth and a soap and water solution. Do not use cleaners that contain acid, mineral spirits or xylene. Rinse well after cleaning. Fold out work tables are not to be used as cutting boards. 3) Grill heats unevenly. 4) Burner does not ignite. (1) DANGER Failure to correct the above mention-ed symptoms may result in a fire, which can cause serious bodily injury or death, and cause damage to property. pg4 ANNUAL MAINTENANCE Inspection and cleaning of the Spider/Insect screen To inspect the spider/insect screen, remove the control panel. If there is dust or dirt on the screen, remove the burner for cleaning the screen. Brush the spider/inspect screen, lightly, with a soft bristle brush (i.e. an old toothbrush). CAUTION: Do not clean the spider/insect screen with hard or sharp tools. Do not dislodge the spider/insect screen or enlarge the screen openings. Main Burner Cleaning Procedure Turn off the gas supply. Remove the burner. (See Replacing Burner Tube.) Look inside the burner with a flashlight. Clean the inside of the burner with a wire (a straightened-out coat hanger will work). Check for gas leaks After a period of nonuse, we recommend that you perform the following maintenance procedures for your safety. • Inspect the burner for correct flame pattern. Clean if necessary, following the procedures outlined in the “General Maintenance” section of this manual. • Check all gas fittings for leaks. WARNING: You should check for gas leaks every time you disconnect and reconnect a gas fitting. Note: All factory-made connections have been thoroughly checked for gas leaks. The burners have been flame tested. As a safety precaution however, you should recheck all fittings for leaks before using your Weber ® gas grill. Shipping and handling may have loosened or damaged a gas fitting. WARNING: Perform these leak checks even if your grill was dealer- or store-assembled. You will need a soap and water solution and a rag or brush to apply it. To perform leak checks make sure the Burner is in the off position and turn on gas supply. WARNING: Do not ignite burner while leak checking. Replacing Burner Tube 1) Your Weber® Q™ grill must be OFF and cool. 2) Unscrew and remove propane cylinder from the valve/regulator assembly. 3) Open the lid. 4) Remove cooking grate. 5) Unscrew and remove the 1/4 x 20 inch stainless steel hex nut and stainless steel washer that holds the burner tube inside the cook box(a). 6) Carefully slide the burner tube out from the cook box. Caution: The burner opening(1) must be positioned properly over the valve orifices(2). Lightly tap the burner to get debris and dirt out of the burner tube. Once the spider/insect screen and burner is clean replace the burner. If the spider/insect screen becomes damaged or cannot be cleaned, call Weber-Stephen Products Customer Service for replacement parts. Main Burner Flame Pattern The Weber® gas grill burner has been factory set for the correct air and gas mixture. The correct flame pattern is shown. Check and clean the air shutter opening at the ends of the burner. Check and clean the valve orifice at the base of the valve. Use a Steel bristle brush to clean outside of burner. This is to make sure all the burner ports are fully open. Check for leaks by wetting the connections with the soap and water solution and watching for bubbles. If bubbles form, or if a bubble grows, there is a leak. Note: Since some leak test solutions, including soap and water, may be slightly corrosive, all connections should be rinsed with water after checking for leaks. Check: 1) Regulator to propane cylinder connection. WARNING: If there is a leak at connection (1), remove propane cylinder. Do not operate grill. Use a different propane cylinder and recheck for leaks with soap and water solution. If a leak persists after retightening the propane cylinder, turn OFF the gas. DO NOT OPERATE THE GRILL. Contact the Customer Service Representative in your area using the contact information on our web site. Log onto www.weber.com®. Check: 2) Valve to-regulator connections. WARNING: If there is a leak at connection (2) turn OFF the gas. DO NOT OPERATE THE GRILL. Contact the Customer Service Representative in your area using the contact information on our web site. Log onto www.weber.com®. 7) To reinstall the burner, reverse 5) through 7). Make sure the igniter port hole(A) lines up with the arrow tab(B) on the igniter box. Ignition System Operations If the ignition system fails to ignite the burner, light the burner with a match. If the burner lights with a match, then check the ignition system. 1) Burner tube 2) Tips occasionally (1) flicker yellow (2) 3) Light blue (3) (4) 4) Dark blue If the flames do not appear to be uniform throughout the burner tube, follow the burner cleaning procedures. CAUTION: Do not enlarge the burner ports when cleaning. DANGER Do not use an open flame to check for gas leaks. Be sure there are no sparks or open flames in the area while you check for leaks. Sparks or flames will result in a fire or explosion, which can cause serious bodily injury or death, and damage to property. 1 ). When leak checks are complete, turn gas supply OFF at the source and rinse connections with water. • Check that both the white(1) and black(2) ignition wires are attached properly. • Check that the ignition button pushes the igniter (button) down, and returns to the up position. If the ignition system still fails to light, Contact the Customer Service Representative in your area using the contact information on our web site. Log onto www.weber.com®. 2 A. (a) 1. 2. (2) 1 B. (1) pg5 Attach Propane Cylinder Use propane cylinders with a capacity of 14.1 oz or less. Use propane cylinders that are approximately 3" inches in diameter and 11" inches in length. The propane cylinder must fit through the cylinder support ring (1). CAUTION: Use cylinders that are marked “Propane fuel” only. Note: Your Weber® gas grill is equipped with a cylinder supply system designed for vapor withdrawal. Slide propane cylinder through support ring (1). While holding carrying handle closest to propane cylinder with one hand, push propane cylinder into regulator and turn clockwise until tight. WARNING: Do not use a wrench to tighten the connection. Using a wrench could damage the regulator coupling and could cause a leak. Check for gas leaks: 1) Regulator to propane cylinder connection. WARNING: If there is a leak at connection (1), remove propane cylinder. Do not operate grill. Use a different propane cylinder and recheck for leaks with soap and water solution. If a leak persists after retightening the propane cylinder, turn OFF the gas. DO NOT OPERATE THE GRILL. DANGER Do not use an open flame to check for gas leaks. Be sure there are no sparks or open flames in the area while you check for leaks. Sparks or flames will result in a fire or explosion which can cause serious bodily injury or death, and damage to property. DANGER Do not store a spare LP-gas cylinder under or near this appliance. Never fill the cylinder beyond 80 percent full. If the instructions are not followed exactly, a fire causing death or serious injury may occur. 1) 1 ). 1). 2). 6). Contact the Customer Service Representative in your area using the contact information on our web site. Log onto www.weber.com®. 2) Valve to-regulator connections. WARNING: If there is a leak at connection (2) turn OFF the gas. DO NOT OPERATE THE GRILL. Contact the Customer Service Representative in your area using the contact information on our web site. Log onto www.weber.com®. When leak checks are complete, turn gas supply OFF at the source and rinse connections with water. Lighting Summary lighting instructions are on the fold out work surface. 1) Open the lid. 2) Unfold the work surfaces. 3) Make sure the control knob is turned OFF. (Push control knob in and turn clockwise to 2). ensure that it is in the OFF position.) WARNING: Do not lean over the open grill. Keep your face and body at least one foot away from the matchlight hole when lighting the grill. 4) Push burner control knob down and turn to START/HI. 5) Push the red ignition button several times, so it clicks each time. 6) Check that the burner is lit by looking down through the cooking grate. You should see a flame. WARNING: If the burner does not light, turn the burner control knob to OFF and wait 5 minutes to let the gas clear before you try again or try to light with a match. 5). 3). 4). OFF START/ HI DANGER Failure to open the lid while igniting the grill’s burner, or not waiting 5 minutes to allow the gas to clear if the grill does not light, may result in an explosive flame-up which can cause serious bodily injury or death. Manual Lighting 1) Open the lid. 2) Unfold the work surfaces. 3) Make sure the burner control knob is turned OFF. WARNING: Do not lean over the open grill. Keep your face and body at least one foot away from the matchlight hole when lighting the grill. 4) Turn the cylinder on by turning the cylinder valve counterclockwise. 5) Strike a match and put the flame into the matchlight hole under the igniter. 6) Push burner control knob down and turn to START/HI. 7) Check that the burner is lit by looking down through the cooking grate. You should see a flame. WARNING: If the burner does not light, turn the burner control knob to OFF and wait 5 minutes to let the gas clear before you try again or try to light with a match. To Extinguish Push in and turn burner control knob clockwise to the OFF position. CAUTION do not fold in tables until grill is cold. 5). START/ HI 2). 6). 4). 5). 1). OFF 3). 2). pg6