1
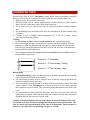
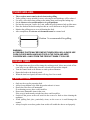
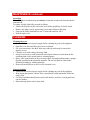
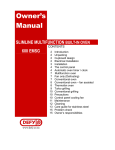
Owner’s
Manual
SLIMLINE STAINLESS STEEL
BUILT-IN OVEN
600 STE
THERMOFAN
www.defy.co.za
CONTENTS
2
2
2
3
3
4
5
5
5
6
7
8
10
10
10
Unpacking
Cupboard Design
Electrical Installation
Installation
The Control Panel
Thermofan Oven
Turbo Grilling
Ringer timer
Precautions
Maintenance
Cleaning
Care Guide for Stainless Steel
Problem Check
Owners Responsibilities
Service
INTRODUCTION
Congratulations on the purchase of this quality product.
We trust that you will enjoy many years of trouble free use. Please read these instructions
carefully before using the oven. This manual will provide you with information on how
to operate and care for your product in order that you gain the maximum benefit from it.
UNPACKING
• Please ensure that packaging material is disposed of in a responsible manner.
• Plastic bags should be cut up to prevent children playing with them and accidentally
suffocating.
• Remove all packing from the oven cavity and position the accessories.
• If the appliance is damaged in any way, do not use it. Report the damage to your
dealer, who will take the necessary corrective action.
CUPBOARD DESIGN
•
•
•
Cooking appliances generate considerable heat. The layout and materials of the
mounting cabinet should take account of the characteristics of the oven.
Surfaces immediately adjacent to the oven should be able to withstand temperatures
of up to 100°C without delaminating or discolouring.
Because the oven vents through the handle, overhanging doors above the oven may
be subjected to heat as well as condensation if very moist foods are being cooked.
ELECTRICAL INSTALLATION
“This appliance must be earthed and the manufacturer and the seller do
not accept responsibility for any damage due to incorrect installation or
electrical connection.”
•
•
This appliance should not be connected through an earth leakage system. Refer to
S.A.B.S. 0147.
Support the oven in front of the aperture and make the electrical connection before
installing. This will ensure enough cable length for subsequent servicing.
Connection to the power supply must be carried out by a licensed electrician, who will
ensure that the oven is correctly connected and safely earthed. The rated current is printed
on the serial number label attached to the oven side trim.
The appliance must be connected to the mains through a double pole isolating switch
which has a minimum clearance between the contacts of 3 mm. in both poles.
A means for disconnection must be provided in the fixed wiring.
INSTALLATION
•
•
•
Insert the oven into the cupboard.
Open the door to expose the fixing holes in the side trims.
Secure the oven by 4 countersunk screws (fasteners are not supplied).
_3
60 +
0
_3
590 +
0
Aperture
590 H x 565 W x 570 D
Aperture
Typical section showing
ventilation requirements
565 +
_3
0
_3
900 +
0
Aperture
Above floor
level
Floor
THE CONTROL PANEL
Ringer
timer
Bake / Grill
Oven
selector
Thermostat
THERMOFAN OVEN
Registered by Defy in 1978, Thermofan cooking differs from conventional cooking in
that it uses the principle of forced convection within the oven. The advantages are:
1. Both trays may be used at the same time.
2. Different dishes can be cooked simultaneously without flavour or aroma transfer.
Hence fish, meat and cakes can be baked at the same time.
3. The oven door may be opened any time for inspection purposes without risking a
flop.
4. By circulating hot air around the food, spit-roast chickens may be done without using
a rotisserie.
5. Cooking is done at slightly lower temperatures (10 C TO 20 C lower), saving
electricity and reducing splatter.
Cooking
• Set the selector to bake and the oven thermostat to the required temperature.
• The indicator light will glow and remain on until the oven has reached the selected
temperature. When the indicator light switches off, the food should be placed in the
oven. During cooking the indicator light will cycle on and off as the oven thermostat
maintains the selected temperature
• After completion, return the selector and the oven thermostat to the OFF position in
an anti clockwise direction.
Position 4 = T/fan baking
4
3
2
1
Position 2 = T/Fan roasting / baking
Position 1 = T/Fan roasting ( large)
Baking guide
• Thermofan baking is done with the oven trays in position. An unused tray should be
kept in position to facilitate proper airflow.
• For small items the entire area of each tray may be utilised. Larger items should be
placed towards the front of each tray.
• All ovens extract a certain amount of moisture from the food being cooked. The much
greater capacity of the Thermofan oven allows more food to be cooked and thus
more moisture may be released. This is normal and not detrimental to the food or the
oven.
• For professional results and perfect browning, open the oven door when half the
baking time has lapsed. Then turn the baking tins around so that the sides previously
facing the back of the oven now face the front.
Caution: Thermofan baking relies on good contact between the bottom of the cake
tin and the oven tray. Do not use spring form baking tins with a raised bottom. The
lack of contact will cause the bottom of the cake to be underdone. These tins may be
used on a wire shelf where no insulating air space is created.
TURBO GRILLING
•
•
•
•
•
•
•
•
The oven door must remain closed when turbo grilling.
Turbo grilling is most suitable for meat, as drying out and shrinkage will be reduced
Use only a wire shelf when grilling as the intense heat could warp the baking tray.
Set the selector and oven thermostat to the grill positions
Pre-heat the roast pan / broiler for 5 min. under the grill element to help seal the meat.
Place the food on the broiler and place this on a wire shelf near to the grill element.
Monitor the grilling process to avoid burning the food.
After completion, the selector and thermostat must be returned to 0.
4
3
Position 3 is recommended for grilling
2
1
WARNING:
ACCESSIBLE PARTS MAY BECOME HOT WHEN GRILLING. ALWAYS USE
OVEN GLOVES WHEN HANDLING FOOD IN THE OVEN AND KEEP
CHILDREN WELL AWAY FROM THE PRODUCT WHEN IT IS IN USE.
RINGER TIMER
•
•
•
•
The ringer timer may be used for timing the cooking period. It does not switch off the
oven but gives an audible ring when the selected time period has elapsed.
Turn the control knob to 60 minutes to wind up the mechanism.
Return the knob to the desired period.
When the time has elapsed, the timer will ring for a few seconds.
PRECAUTIONS
•
•
•
•
•
•
•
Only use the oven for preparing food.
Always keep children away from the product when it is in use.
Do not leave hot fat or oil unattended.
If overheating occurs, these could catch fire.
Do not store flammable items in the oven.
If the oven is inadvertently switched on, these could catch fire.
Switch off the power at the wall switch in the event of a fault or when cleaning the
appliance.
Avoid spilling fruit juice, particularly citrus, on the oven as it could damage the
enamel.
Always keep the oven door gasket clean as this will enable the door to seal properly.
MAINTENANCE
Lift-off oven door
• The oven door may be removed to improve access to the oven cavity and facilitate
cleaning.
• Open the door fully, turn the appropriate washers to lock the two hinges (see sketch)
and, using both hands, lift the door out as shown.
• After cleaning, refit in reverse order.
Removing the inner door glass.
• The glass may be removed for cleaning purposes
by removing the two screws which hold it in
place.
• It is now possible to clean the inside of the outer
glass if required.
• Wash the glass in hot soapy water, rinse and dry.
• Re-assemble by carefully locating the rubber seal
in the embossed groove before fitting the glass.
The glass is marked “THIS SIDE TOWARDS
OVEN”.
• Re-fit the two securing screws.
Removing the side racks and shelves
• The side racks and shelves may be removed for
cleaning purposes.
• Remove the bottom bake element guard.
• Slide the shelves and bake trays out fully
against the shelf stop.
• Lift the front slightly and slide it out
• The side racks may be removed by pulling the
retainer rod slightly downwards thereby
dislodging it from the retainer lug at the bottom
centre. Lift the racks free of the retaining slots
in the oven wall.
• Replace in reverse order.
MAINTENANCE continued
Oven light
The oven light is switched on by the selector switch and switches off when the knob is
returned to 0.
To replace a faulty light bulb, proceed as follows.
• Switch off the power at the wall switch to avoid the possibility of electric shock.
• Remove the light cover by unscrewing it in an anti-clockwise direction
• Unscrew the faulty bulb and fit a new 25 watt bulb rated for 300°C
• Refit the light cover.
CLEANING
Cleaning the oven
• Switch off the electrical power supply before cleaning any part of the appliance.
• Open the oven door and allow the oven to cool down.
• For your convenience, the shelf, bake trays and side racks may be removed to
improve access.
• Clean the oven with a damp, hot soapy cloth.
• It may be necessary to soak burnt soils with a liquid cleaner to soften them before
scrubbing them with a nylon brush or scouring sponge.
• Heavy soils on the bottom of the oven may require overnight soaking under a sponge
liberally sprinkled with household ammonia. The soil can then be removed the
following morning by washing normally.
• Do not use metal objects or steel wool to clean the oven.
General cleaning
• Switch off the electrical power supply before cleaning any part of the appliance.
• Wipe down glass panels, cabinet, door, control knobs, trims and handle with a hot
soapy cloth.
• Use only liquid household cleaners and avoid abrasive powders, scouring pads and
caustic cleaners.
• Rinse and wipe down with a clean cloth.
CARE GUIDE FOR STAINLESS STEEL
Stainless steel is not adversely affected by normal household use but because of it’s
reputation for durability, it is sometimes assumed to be indestructible, and therefore
subjected to misuse or even abuse. Care should be taken to avoid such ‘abnormal use’.
CLEANING MATERIALS
DO USE
• A soft cloth or synthetic sponge.
• Soap, or mild household detergent (Handy Andy)
• Diluted ammonia in warm water.
• A nylon bristle brush.
• Cleaners labelled “Suitable for stainless steel”
DO NOT USE
• Acids
• Coarse abrasive cleaning powders.
• Metallic scourers, steel wool or metal scrapers.
• Wire brushes or emery paper.
• So called ‘silver cleaners’.
• Kitchen scourer/foam pads
CLEANING PROCEDURE
•
•
•
•
Frequent cleaning is recommended rather than an occasional aggressive clean.
Routine cleaning will preserve the corrosion resistance and appearance of the
stainless steel for many years.
Clean the stainless steel as often as necessary (ie. when noticeably dull or dirty) and
use the simplest cleaning method that will effectively do the job.
Use clean water, or a mild detergent solution applied with a soft cloth or sponge.
Rinse well and wipe dry.
ALWAYS WIPE
IN THE DIRECTION OF THE
BRUSHED TEXTURE
ON THE STAINLESS STEEL
CONDITION
ACTION
NOTES AND COMMENTS
Requires routine cleaning
Mild detergent solution
If possible use warm to handapplied with soft sponge or hot water. A 5% addition of
cloth. Rinse and wipe dry. ammonia is beneficial.
Finger prints
Pre-treat finger marks with
alcohol or an organic
solvent. Follow
immediately with routine
cleaning
Minimize re-occurrence by
applying a wax or silicone
based household polish to the
clean dry surface
Wipe with a little baby oil Apply whenever necessary
and a soft lint free cloth.
Buff to shine.
Stubborn stains and
discolouration
Use a little Ceran cleaning Repeat several times rather
paste. (available from Defy than resorting to a single
aggressive cleaning method
Service Centres)
Rinse and dry.
Grease and fat splatter.
Wipe off excess with a soft
cloth or paper towel. Use a
water borne degreasing
agent (dishwashing
liquid).Follow up by
routine cleaning.
Scratches on the brushed
finish.
For slight scratches, use a Deep scratches will be
nylon pad loaded with an difficult to remove
iron free abrasive polishing completely. Do not use steel
compound. Follow the
wool or metal scourers unless
direction of the original
they are made from stainless
texture. Follow up with
steel.
routine cleaning. For deep
scratches use a coarser
abrasive initially and
follow up as for light
scratches.
It must be appreciated that some of the above suggested procedures will alter the
surface appearance of the treated area.
They should therefore only be applied with due consideration and care.
PROBLEM CHECK
Before calling a service technician to assist with a problem, PLEASE CHECK:
THE MAINS DISTRIBUTION BOARD
THE WALL SWITCH
DO NOT ATTEMPT REPAIRS YOURSELF
Remember that you may be charged for a service call even during the warranty period if
the fault is due to or caused by any of the above.
OWNER’S RESPONSIBILITY
Since the following are not factory faults, they are the owner’s responsibility.
• Damage to exterior finish.
• Breakage of glass and other components.
• Replacement of the light bulb.
• Damage through improper installation or use of the appliance.
• Damage caused by moving the appliance.
SERVICE
If you have followed the instructions and still have a problem, contact the nearest Defy
Service Centre. They will be able to advise you on any aspect of the product or send a
qualified technician to repair it.
The Manufacturer strives for continuous improvements. For this reason, the text and
illustrations in this book are subject to change without notice.
Part Number 060 400