1
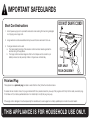
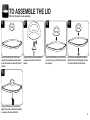
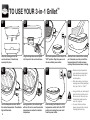
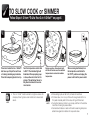
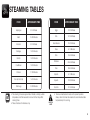
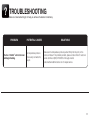
Instruction Manual
3-in-1 Grillet™
Questions or concerns
about your 3-in-1 Grillet™?
Before returning to the
store...
Aroma’s customer service
experts are happy to help.
Call us toll-free at
1-800-276-6286.
Answers to many common
questions and even
replacement parts can
be found online. Visit
www.AromaCo.com/Support.
For Model Numbers:
ASP-238
ASP-238B
Congratulations on purchasing your Aroma® 3-in-1 Grillet™. This versatile appliance is an indoor grill, slow cooker and steamer all in one!
The Aroma® 3-in-1 Grillet™ gives your food that desired grilled flavor in the comfort of your own kitchen. Now you can enjoy the taste of summer all year round as
you prepare burgers, hot dogs, steak, shish kabobs, chicken, lamb and more. The removable temperature control probe sets up to 450º F, heating quickly and
evenly thanks to the cast aluminum cooking pot. The grill’s ridge surface also provides a healthier way to cook as it channels away excess fat for delicious, leaner
meals. Its large 4-quart capacity and tempered glass lid make it perfect for slow cooking homemade favorites like tender roasts, delicious chili and savory stews.
Or simply steam your meats and vegetables, locking in the flavor and nutrients for an easy and healthy meal. The Aroma® 3-in-1 Grillet™’s unique versatility
makes it a hero of home cooking!
For more information on your Aroma® 3-in-1 Grillet™, or for product service, replacement parts and other home appliance solutions, please visit us online at
www.AromaCo.com.
See what’s cooking with Aroma® online!
www.AromaTestKitchen.com
www.facebook.com/AromaHousewares
Published By:
Aroma Housewares Co.
6469 Flanders Drive
San Diego, CA 92121, U.S.A.
1-800-276-6286
www.AromaCo.com
©2013 Aroma Housewares Company
All rights reserved.
www.twitter.com/AromaHousewares
IMPORTANT SAFEGUARDS
Basic safety precautions should always be followed when using electrical appliances, including the following:
1.
Important: Read all instructions carefully before first use.
10. Do not place on or near a hot burner or in a heated oven.
2.
Do not touch hot surfaces. Use handles or knobs.
3.
To protect against fire, electrical shock and injury to persons, do not immerse
cord, plug or the appliance in water or any other liquid.
11. Extreme caution must be used when using or moving the appliance while
containing hot oil or other hot liquids.
4.
Close supervision is necessary when any appliance is used by or near
children.
5.
Unplug from outlet when not in use and before cleaning. Allow the appliance
to cool before putting on or taking off parts and before cleaning the appliance. 14. Use only on a dry, level and heat-resistant surface.
6.
15. This appliance should be operated on a separate electrical circuit from other
Do not operate any appliance with a damaged cord or plug or after the
operating appliances. If the electrical circuit is overloaded with other appliances,
appliance malfunctions or has been damaged in any manner. Contact Aroma®
this appliance may not operate properly.
customer service for examination, repair or adjustment.
7.
The use of accessory attachments not recommended by Aroma®
Housewares may result in fire, electric shock or injury.
8.
Do not use outdoors.
9.
Do not let the power cord touch hot surfaces or hang over the edge of the
counter or table.
12. Do not use the appliance for other than its intended use.
13. Always attach the plug to the appliance first, and then plug the cord into the wall
outlet. To disconnect, turn any control to “OFF” then remove the plug from the
wall outlet.
16. Use only the thermostatically controlled appliance plug of type CTW300A
(2-conductor, Manufactured by Kaikai Electric Appliances Co Ltd) when
operating this appliance
17. This appliance is not intended for deep frying food.
SAVE THESE INSTRUCTIONS
1
IMPORTANT SAFEGUARDS
Short Cord Instructions
1.
A short power-supply cord is provided to reduce the risks resulting from becoming entangled
in or tripping over a longer cord.
2.
Longer extension cords are available and may be used if care is exercised in their use.
3.
If a longer extension cord is used:
a. The marked electrical rating of the extension cord should be at least as great as the
electrical rating of the appliance.
b. The longer cord should be arranged so that it will not drape over the counter top or
tabletop where it can be pulled by children or tripped over unintentionally.
DO NOT DRAPE CORD!
KEEP AWAY
FROM CHILDREN!
Polarized Plug
This appliance has a polarized plug (one blade is wider than the other); follow the instructions below:
To reduce the risk of electric shock, this plug is intended to fit into a polarized outlet only one way. If the plug does not fit fully into the outlet, reverse the plug.
If it still does not fit, contact a qualified electrician. Do not attempt to modify the plug in any way.
If the supply cord is damaged, it must be replaced by the manufacturer, its service agent or a similarly qualified person in order to avoid a hazard.
2
THIS APPLIANCE IS FOR HOUSEHOLD USE ONLY.
PARTS IDENTIFICATION
Handle
Tempered
Glass Lid
Cast Aluminum
Nonstick Cooking Pot
Cool-Touch Base
Removable
Temperature
Control Probe
Adjustable
Temperature
Control Dial
3
BEFORE FIRST USE
1. Please read all instructions and important safeguards.
2. Remove all packaging materials and check that all items have been received in good condition.
3. Tear up all plastic bags as they can pose a risk to children.
4. Pull the cooking pot away from the cool-touch base and wash the cooking pot, base and lid with warm, soapy water using a sponge or dishcloth.
5. Rinse the cool-touch base and lid thoroughly to remove all soap residue, wipe the cooking pot clean with a dry cloth.
6. Condition the nonstick surface of the cooking pan with oil or vegetable shortening.
• Do not clean with abrasive cleaners, metal scouring pads or products that are not considered safe to use on nonstick coatings.
• Do not wash or immerse cord or plug in water or any other liquid. The cord and plug are NOT dishwasher safe.
CAUTION
4
TO ASSEMBLE THE LID
The lid will require some assembly.
1
Locate the lid handle. The screw
needed to assemble the lid handle
to the lid will be screwed into the lid
handle.
2
Using a Phillips-head screwdriver,
unscrew the screw from the lid
handle.
3
Place the lid handle on top of the lid,
so that it lines up with the hole in the
lid correctly.
4
Place the screw beneath the lid so
that it fits correctly through the hole
in the lid and into the lid handle.
5
Using a Phillips-head screwdriver,
tighten the screw until the lid handle
is securely attached to the lid.
5
TO USE YOUR 3-in-1 Grillet™
1
2
3
4
OFF
Place the cooking pot into the
cool-touch base. It should snap
securely into place.
5
Plug the temperature control probe
into the port in the cool-touch base.
Turn the temperature control dial to the
“OFF” position. Plug the power cord
into an available power outlet.
Add food to be cooked to the cooking
pot. If desired, cover the pot with the
tempered glass lid to help decrease
cooking time and ensure even cooking.
7
6
NOTE
F
F
6
OF
OF
Turn the temperature control dial to
the desired temperature. The indicator
light will illuminate.
• Wooden, heat-proof plastic and
nylon utensils are recommended.
Metal utensils may scratch the
nonstick surface.
• When slow cooking, simmering or
steaming place the tempered glass
lid on top of the 3-in-1 Grillet™.
During operation, the indicator light
will turn off and on once the selected
temperature is reached to maintain
temperature.
When cooking has finished, turn the
temperature control dial to the “OFF”
position and unplug the power cord
from the power outlet.
• During and after use, the tempered
glass lid and the nonstick pot will
become very hot. Be sure to use
the handle and wear protective
CAUTION
oven mitts or gloves.
• To prevent food borne illness,
always make sure food is cooked
thoroughly before serving.
TO SLOW COOK or SIMMER
Follow Steps 1-3 from “To Use Your 3-in-1 Grillet™” on page 6.
4
5
6
7
F
OF
F
OF
Place food inside the 3-in-1 Grillet™.
Add one cup of liquid for each hour
of cooking including any marinade.
Place the tempered glass lid on top.
NOTE
Turn the temperature control dial
to 300º F. The indicator light will
illuminate. When preparing soup
or stew, allow extra time for it to
simmer. This will allow flavors to
fully blend and meat to become
more tender.
• The 3-in-1 Grillet™ functions similar to a high slow cooker. For
all recipes, follow high slow cook instructions to ensure best
results.
During operation, the indicator light
will turn off and on once the selected
temperature is reached to maintain
temperature.
HELPFUL
HINTS
When cooking has finished, turn
the temperature control dial to
the “OFF” position and unplug the
power cord from the power outlet.
• When adding liquid use half broth, half water for best flavor.
• To thicken stew, mix in ¼ cup of flour with enough water to form a
thin paste. Gradually add it to the stew, stirring until thickened.
• If using fresh parsley or herbs in your recipe, add them in the last few
moments of cooking to preserve flavor.
• Canned stew tomatoes or water with bouillon seasoning and spices
added make great stock starters for soups and stews.
7
TO STEAM
Follow Steps 1-3 from “To Use Your 3-in-1 Grillet™” on page 6.
4
5
6
OF
F
F
OF
Place food on a heat-safe dish or
metal rack that will fit inside the
3-in-1 Grillet™ with lid closed. Pour
one cup of water (or more if needed)
into the pot. Place food inside the
cooking pot. Place the tempered
glass lid on top.
NOTE
8
Turn the temperature control dial to
a high setting. The indicator light will
illuminate.
7
During operation, the indicator light
will turn off and on once the selected
temperature is reached to maintain
temperature.
• Wooden, heat-proof plastic and nylon utensils are recommended. Metal utensils may scratch
the nonstick surface.
• All vegetables should be thoroughly cleaned and washed before steaming. Thin, leafy
vegetables such as cabbage do not require as much water as root vegetables, such as carrots.
• Do not remove lid during steaming, as steam will escape and the cooking time will be
extended.
• Food can be placed directly on the grilled surface of the pot for steaming.
CAUTION
When steaming has finished, turn
the temperature control dial to
the “OFF” position and unplug the
power cord from the power outlet.
• During and after use, the glass cooking lid and
the nonstick pot will become very hot. Be sure
to use the handle and wear protective oven
mitts or gloves.
• To prevent food borne illness, always make
sure food is cooked thoroughly before serving.
STEAMING TABLES
NOTE
FOOD
APPROXIMATE TIME
FOOD
APPROXIMATE TIME
Asparagus
8-14 Minutes
Eggs
10-15 Minutes
Beef
18-26 Minutes
Fish
12-18 Minutes
Broccoli
8-12 Minutes
Green Beans
14-20 Minutes
Cabbage
12-18 Minutes
Peas
8-12 Minutes
Pork
18-24 Minutes
Carrots
12-18 Minutes
Potatoes
24-40 Minutes
Rice
30-45 Minutes
Spinach
8-12 Minutes
Cauliflower
12-18 Minutes
Chicken
17-20 Minutes
Corn (on the Cob)
14-18 Minutes
Squash
16-30 Minutes
Crab Legs
14-20 Minutes
Zucchini
12-18 Minutes
• The steaming times are approximate. Altitude, humidity, outside
temperature and thickness and/or amount of food may affect
cooking times.
• These charts are for reference only.
HELPFUL
HINTS
• To ensure meat tastes its best, and to prevent possible
illness, check that meat has reached its recommended safe
temperature prior to serving.
9
TO CLEAN
Always unplug the unit and allow it to cool completely before cleaning.
1
2
Disconnect the plug from the
wall outlet, and then remove the
temperature control probe from the
appliance.
NOTE
10
•
•
•
•
Allow the unit to completely cool.
Pull the cooking pot away from the
cool-touch base.
3
Wash the cooking pot, base and lid
with warm, soapy water, using
a sponge or dishcloth. Rinse
thoroughly to remove soap residue.
For faster cleanup, the cool-touch
base and lid can be washed in the
dishwasher.
4
Dry thoroughly with a soft cloth.
Do not clean with abrasive cleaners, metal scouring pads or products that are not considered safe to use on nonstick coatings.
Do not wash or immerse cord or plug in water or any other liquid. The cord and plug are NOT dishwasher safe.
Do not immerse the cooking pot in water or any liquid.
Any other servicing should be performed by Aroma® Housewares. Contact Aroma® customer service at 1-800-276-6286, Monday to Friday
8:30AM-4:30PM PST.
TROUBLESHOOTING
Below is a troubleshooting tip to help you achieve the desired consistency.
PROBLEM
The 3-in-1 Grillet™ will not turn on
and begin heating.
POTENTIAL CAUSES
The temperature probe is
not securely connected to
the pot.
SOLUTIONS
Make sure the temperature probe is pushed firmly into the port on the
cool-touch base. If the problem persists, please contact Aroma® customer
service toll-free at (800) 276-6286 or through email at
[email protected] for repair service.
11
RECIPES
Aroma’s Favorite BBQ Chicken
Ingredients
4
½ cup
¾ cup
2 teaspoons
2 tablespoons
2 tablespoons
1 teaspoon
½ teaspoon
chicken breasts
butter or margarine
lemon juice
garlic salt
cumin
cayenne pepper
salt
pepper
Set the 3-in-1 Grillet™ temperature to 300ºF and melt the butter in the pot. Add lemon
juice, garlic salt, cumin and cayenne pepper to the pot. Pour ½ of this marinade into a
large bowl. Pierce the chicken in several places and sprinkle with salt and pepper. Place
the chicken in the bowl with the marinade, turning occasionally to coat the chicken. Turn
the 3-in-1 Grillet™ temperature to 375ºF. Place the chicken into the pot, brushing with the
reserved marinade. Grill, turning and basting the chicken with the marinade occasionally,
until the chicken is thoroughly cooked (about 15 minutes).
Beef Stew
Ingredients
4 cups
5 cubes
1 teaspoon
2 cups
6
1 medium
2 tablespoons
1
1 small
12
water
beef bouillon
Worcestershire sauce
cooked beef, cubed
carrots, peeled and cut into chunks
onion, chopped
flour
garlic clove, minced
bay leaf
dash pepper
Set the 3-in-1 Grillet™ temperature to 350ºF. Add water and bouillon cubes to the pot and
bring to a boil until the bouillon cubes completely dissolve. Add Worcestershire sauce
and a dash of pepper to the pot. Add beef, carrots and garlic to the pot and stir until the
sauce begins to boil, adjusting the temperature if necessary. Place the bay leaf on top,
then cover with the lid and reduce heat.
Simmer for about 30 minutes or until the vegetables become tender. Pour about ½ of the
liquid into a small bowl and blend with flour. Increase the temperature of the pot again to
bring the stew to a boil. Slowly add the flour mixture to the stew and stir continuously until
the stew thickens. Remove the bay leaf and serve.
For additional 3-in-1 Grillet™ recipes, or even to submit your own, visit our website at www.AromaCo.com!
RECIPES (CONT.)
Classic Casserole
Ingredients
2
2
¼ cup
16 ounces
1
1
1
1
1 cup
2 tablespoons
yukon gold potatoes, peeled and diced
sweet potatoes, peeled and diced
panko bread crumbs
your favorite cooked sausage, diced
green zucchini, diced
yellow onion, diced
green bell pepper, diced
mild green chili pepper, diced
shredded mozzarella cheese
olive oil
Steam the potatoes in the 3-in-1 Grillet™ for 10 minutes. Remove from the pot and
then cook the sausage until brown. Remove the sausage from the 3-in-1 Grillet™
and set aside. Add olive oil, onion, peppers, zucchini and cook until browned. Add
potatoes and sausage and 1 cup of water. Let cook on high heat until most liquid
has evaporated. Sprinkle with panko and cheese and let steam under the lid for 5
minutes or so before serving.
Smothered Pork Chops
Ingredients
6
1 tablespoon
1 can
¹⁄₈ teaspoon
2 tablespoons
1 medium
pork chops, ½-inch thick (center cut or boneless)
corn starch
beef broth
pepper
butter
onion, sliced
Mix starch, broth and pepper. Melt butter in 3-in-1 Grillet™ and sauté chops, cooking
until browned. Remove chops and set aside. Add onion (add extra butter if needed)
and cook until tender-crisp. Add broth mixture. Cook until mixture boils and thickens,
stirring. Return chops to pot. Cover and cook over low heat 5 minutes or until done.
For additional 3-in-1 Grillet™ recipes, or even to submit your own, visit our website at www.AromaCo.com!
13
WARRANTY
SERVICE & SUPPORT
LIMITED WARRANTY
Aroma Housewares Company warrants its products against defects in
material and workmanship for two years from provable date of purchase in
the United States.
Within this warranty period, Aroma Housewares Company will repair or
replace, at its discretion, defective parts at no charge, provided the product
is returned, freight prepaid with proof of purchase and U.S. $20.00 for
shipping and handling charges payable to Aroma Housewares Company.
Before returning an item, please call the toll free number below for a return
authorization number. Allow 2-4 weeks for return shipping.
This warranty does not apply if the warranty period expired; the products
has been modified by any unauthorized service center or personnel; the
defect was subject to abuse, improper use not conforming to product
manual instructions, or environment conditions more severe than those
specified in the manual and specification, neglect of the owner or improper
installation; the defect was subject to Force Majeure such as flood,
lightning, earthquake, other natural calamities, war, vandalism, theft,
brownouts or sags (damage due to low voltage disturbances).
In the event of a warranty claim, or if service is required for this product, please
contact Aroma® customer service toll-free at:
1-800-276-6286
M-F, 8:30AM-4:30PM, Pacific Time
Or we can be reached online at [email protected].
For your records, we recommend stapling your sales receipt to this page along with
a written record of the following:
Date of Purchase:
Place of Purchase:
This warranty gives you specific legal rights, which may vary from state to
state, and does not cover areas outside the United States.
AROMA HOUSEWARES COMPANY
6469 Flanders Drive
San Diego, California 92121
1-800-276-6286
M-F, 8:30 AM - 4:30 PM, Pacific Time
Website: www.AromaCo.com
14
• Proof of purchase is required for all warranty claims.
NOTE