1
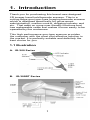
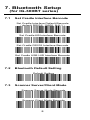
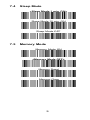
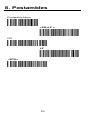
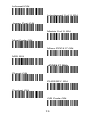
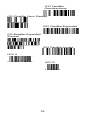
IG-300 (BT)
2D Imager Barcode Scanner
Quick Guide
Table of contents
1. Introduction ................................................. 1
2. Quick Start .................................................. 2
2.1
Standard Shipment Package ............... 2
2.2
Start Up .............................................. 2
2.3
User’s Manual..................................... 3
3. Program Sequence ...................................... 4
3.1
Factory Default Settings ...................... 4
4. Scanner Imager Mode ................................. 5
5. RS232 Parameters (for IG-300 series) .......... 6
5.1
Baud Rate .......................................... 6
5.2
Data Bits............................................. 6
5.3
Stop Bits............................................. 6
6. USB Parameter ............................................ 7
7. Bluetooth Setup (for IG-300BT series) ........... 8
7.1
Set Cradle Interface Barcode................8
7.2
Bluetooth Default Setting ….…………...8
7.3
Scanner Sever/Client Mode ...…………8
7.4
Sleep Mode .………………………….…9
7.5
Memory Mode ………...………………..9
8. Postambles ................................................ 10
9. Symbologies.............................................. 11
9.1
Enable Symbologies ……..…….….…11
9.2
Disable All Symbologies ….…………14
10. Test Symbologies ..................................... 15
11. Specification ............................................. 17
1. Introduction
Thank you for purchasing this brand-new designed
2D imager hand held barcode scanner. This is a
cutting-edge gun-type Area Imaging barcode scanner
which is designed specifically for government
administration, custom control, shipping industry and
etc. That adds on more user friendly functions and
has replaceable cable that makes it more easily to be
operated by the customers.
This high performance gun-type scanner provides
the customer with the most cost effective solution in
the market. It is perfectly suitable and definitely the
best choice for you.
1.1 Illustration
A. IG-300 Series
B. IG-300BT Series
1
2. Quick Start
2.1 Standard Shipment Package
The standard shipment package is provided with the
following items.
-
2D Imager Scanner (IG-300 or IG-300BT)
Cradle or Charger (optional for IG-300BT)
Power Adaptor (if applied)
Communication Cable
Skip resistant pad
Iron panel of cradle and screw
Visually inspect the device and accessories for any
evidence of physical damage. If anything is missing
or appears to be damaged, immediately contact your
dealer.
2.2 Start Up
A. IG-300 Series
The interface setting of the device has been set by
the manufacturer, your device can plug and play
without any setting.
Connect the communication cable on the RJ45
connector inlet of the scanner and your POS or Host
system. Power-on the device with the provided
power supply if applicable. Press the trigger button
and aim the barcode which covered by the LED red
light zone. You will hear a beep sound and the
green LED indicator will light on after scan
successfully.
In case you will use the IG-300 with USB Virtual
COM port emulation, please contact with your dealer
and download the correct USB driver for Virtual COM
port.
B. IG-300BT Series
Connect the communication cable provided to your
POS or Host system and cradle. Power on the
cradle with the provided power supply and scan the
2
Bluetooth MAC address code located on the bottom
of cradle.
After approximately five seconds your connection is
operational and the blue LED on the cradle is on.,
The scanner with Bluetooth must be charged for a
minimum of 8 hours before it can be used. If the
battery is full, the red light will be off.
2.3 User’s Manual
If you need the further information or more advanced
setup options you can contact with your dealer or
download the User’s Manual on the service website.
3
3. Program Sequence
You can setup your device by scanning all necessary
programming codes for parameters that meet
applications. After these scan(s), the device is
automatically configured.
The Chapter 4 to 9 provides you with the
programming codes necessary for a basic setup. For
more advanced setup options, please see the User’s
Manual
3.1 Factory Default Settings
The default RS232 settings are 57600 baud, 8 data
bits, and no parity.
The factory default settings are shown with bold
< > in the following pages.
By Scanning “Set factory default” code, the setting
will go back to the factory default setting. If you are
using a USB interface, your device will be lost USB
interface settings, please re-configure USB
parameter
Set factory default
4
4. Scanner Imager Mode
The area imager mode allows you to position the
hand-held scanner beam in any direction, regardless
of the orientation of the barcode, and perform a good
read on 1D and 2D barcodes.
The linear imager mode allows you to increase your
decoding speed while scanning 1D barcodes.
However, you need to position the beam across all
bars in the 1D barcode.
<Area imager>
Linear imager
1D and 2D Codes, Bright Environment
1D and 2D Codes With
Reflective Surface
5
5. RS232 Parameters
(for IG-300 series)
5.1 Baud Rate
38400
<57600>
115200
5.2 Data Bits
Data Bits 7
<Data Bits 8>
5.3 Stop Bit
<Stop Bit 1>
Stop Bit 2
6
6. USB Parameter
(for IG-300 series)
USB Mode
Attention:
The “Set factory default” setting (Chapter 3.1) would
return to the original default setting instead of the
customized setting. That is, if you are using a USB
interface, your device will lose USB interface settings
when the “Set factory default” be set. Then you must
to re-configure USB mode setting barcode again.
7
7. Bluetooth Setup
(for IG-300BT series)
7.1
Set Cradle Interface Barcode
Set Cradle Interface Default Barcode
(default RS232, 19200, N-8-1)
Set Cradle KB Interface Barcode
Set Cradle RS232 Interface Barcode
Set Cradle USB HID Interface Barcode
7.2
Bluetooth Default Setting
Default Setting
7.3
Scanner Server/Client Mode
Scanner Server Mode Barcode
Scanner Client Mode Barcode
8
7.4
Sleep Mode
<Sleep Mode 1 min. ON>
Sleep Mode 10 min. ON
Sleep Mode OFF
7.5
Memory Mode
Memory Mode ON
<Memory Mode OFF>
Memory Read
Memory Clear
9
8. Postambles
Postamble None
<CR+LF >
CR
LF
<ETX>
10
9. Symbologies
9.1
Enable Symbologies
Australian Post ON
AZTEC ON
BPO ON
Canada Post ON
Codabar ON
Codablock A ON
Codablock F ON
CODE 11 ON
<CODE 39 ON>
CODE 93 ON
11
<CODE 128 ON>
<GS1-128 ON>
<DATAMATRIX ON>
Dutch Post ON
<EAN-8 ON>
<EAN-13 ON>
<EAN 128 ON>
GS1 CC-A/B ON
GS1 CC-C ON
GS1 DataBar-Omni ON
GS1 DataBar Limited ON
GS1 DataBar Expanded ON
12
Infomail ON
Interleaved 2 of 5 ON
Japan Post ON
Matrix 2 of 5 ON
MaxiCode ON
Micro PDF417 ON
MSI ON
<PDF417 ON>
Planet ON
PLESSEY ON
Postnet ON
QR Code ON
13
Standard 2 of 5 ON
Sweden Post ON
Telepen ON
TLC 39 ON
<UPC-A ON>
<UPC-E ON>
9.2
Disable All Symbologies.
If you want to disable all Symbologies, please
scan this programming code.
Disable All Symbologies
14
10. Test Symbologies
Scan one or more of these barcodes to test barcode
symbologies you enabled.
Codabar
Code 39
Code 93
Code 128
DataMatrix
EAN 8
1234 5670
EAN13
1 234567 890128
EAN 128
Interleaved 2 of 5
MSI code
PDF417
15
GS1 DataBar
Omnidirectional
GS1 DataBar Omni Stacked
GS1 DataBar Expanded
GS1DataBar Expanded
Stacked
GS1 DataBar Limited
UPC A
0
12345 67890
5
UPC E
0
16
123456
5
11. Specification
11.1 Readable Symbologies
1D Symbologies
Symbologies
Readable
EAN/UPC
UCC/EAN128
ISBN
ISBT
Code 11
Code 39
Code 93/93i
Code 128
Interleaved
Matrix
Instustrial
Standard 2 of 5
Codabar
MSI
Plessey
Telepen
Postal codes
GS1 DataBar
Omnidirectional
○
○
○
○
○
○
○
○
○
○
○
○
○
○
○
○
○
○
GS1 DataBar Limited
○
GS1 DataBar Expanded
○
Default
Enable
○
○
○
○
○
2D Symbologies
Symbologies
Data Matrix
PDF 417
Micro PDF
417
Maxicode
QR code
Aztec
EAN.UCC
composite
Readable
Default Enable
○
○
○
○
○
○
○
○
17
11.2 Indicator LED Status
a) IG-300 Series
Light
Signal
Status
good read
Green 1 blink and 1 beep
and transmitted
b) IG-300BT Series
Scanner
Light
Signal
Status
good read
and transmitted
1 blink and 1 beep good read
Green
and save on memory
(BT disconnect)
continue on
battery charged full
3 long blink and 3
memory full
long beeps
4 blink and 4 beeps low Battery warning
good read
2 blink and 2 beeps
but transmit fail
continue on
in charging
3 blink and 3 beeps BT disconnect
fast flash twice
on connecting
per 2 seconds
Blue
BT disconnect
dark
before sleep
continuous on and
BT connected
1 long beep
Red 1 blink at the same
setting ok
Blue timeand 2 beeps
red and green light
Red
flash alternately start charging
Green
three times
Green
1 blink taking turns
Red
battery changed
3 times
Blue
Red
18
Cradle
Light
Red
continuous on
off
Status
good read
and transmitted
power on
power off
Blue
flash
continuous on
BT disconnect
BT connected
Green
Signal
1 blink
0145-88E0021
V00
19