1
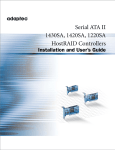
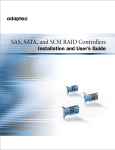
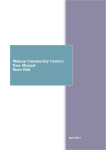
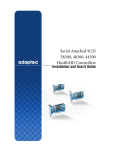
AnswersThatWorkTM How to set up a RAID1 mirror with a drive which already has Windows installed
How to create RAID 1 mirroring with a hard disk that
already has data or an operating system on it
Date
Company
PC / Server
details
Your name
(Who is doing the job)
When to use this document
One of the most irritating assumptions made by manufacturers of RAID controllers is the
assumption that RAID 1 mirroring will only ever be set up before the Windows operating
system is installed, or before a hard disk is used as a second drive. Well, nothing is
further from reality as many end-users and small businesses decide to implement RAID 1
mirroring at some stage after a PC or small server has been set up, and when they do
……….. they usually won’t be able to find anything in the documentation which explains
how to do it with the result that many users believe they have to re-install everything from
scratch if they want to convert to a RAID 1 mirroring setup !
This document rectifies the situation by explaining how to set up RAID 1 mirroring with an
Adaptec SATA controller, whether it be a SATA-II controller or a Serial Attached SCSI
controller (SAS), in a situation where the hard disk to be mirrored already has a Windows
operating system installed on it, ie. when you already have an existing Windows
installation.
If you are reading this document and do not know what RAID 1 mirroring is : the most
crucial part of a server PC, or of any PC for that matter, is the hard disk. If you are a home
user, the likelihood is that either you rarely backup your PC, if ever, or you backup some of
the data from time to time to a USB hard disk. If you are a small business you probably
have a backup tape drive for automated overnight backups. Well, the addition of a second
hard disk (the backup hard disk) inside your PC and the setting up of RAID 1 mirroring
whereby your main hard disk is automatically mirrored to the second hard disk, provides
great added protection against an unexpected failure of your main hard disk, with near
instant switch-over to the backup hard disk when disaster strikes.
Page 1 of 10
© Copyright AnswersThatW ork.com, 16-Apr-2010.
AnswersThatWorkTM How to set up a RAID1 mirror with a drive which already has Windows installed
Preparation (avoiding disaster!)
Setting up RAID 1 mirroring using a hard disk with existing data (or an existing operating
system) can have only two results : it is successful and you’re off and running, or your
entire hard disk is wiped out ! The second possibility is the one you need to focus on
right from the start, and by this we mean ……… focus on avoiding it completely !!
r
Plan the job : the initial replication phase of your source hard disk to the target
hard disk will take anything from 5 to 10 hours depending on the sizes of the hard
disks involved. Therefore, if this is a business fileserver, you will need to plan this
as an after-hours job or a weekend job.
r
Next, before you even think of doing anything, take an image backup of your
hard disk. There are many good products out there that you can use to take
images of a hard disk – after thorough evaluation of many of those products, we
ourselves prefer the low-cost yet comprehensive products from TeraByte Inc
(TeraByteUnlimited.com), Image for DOS, or Image for Windows. We tend to
use Image for DOS which you can use to backup any type of hard disk
(Windows, NetWare, Linux), but if you are more comfortable with a Windows
interface, then go for Image for Windows. Either way, our recommendation is that
you should buy Image for Windows which for $39 gives you Image for Windows,
Image for DOS, Image for Linux, and a few other goodies.
Tip : IT professionals and IT departments – check out TeraByte’s Image Technical Licence and
Image Deployment Licence interesting offerings.
r
Test the image backup you just made. This is as important as making the image
itself. Do not go to the next stage until you know you will be able to use your
backup image if something goes drastically wrong.
Getting Windows to recognize the
Adaptec controller
r
Now that you have a backup image that you can rely on if things go wrong, shut
down your PC/server and physically install your Adaptec RAID controller into the
PC/server (we used an Adaptec 1220SA for the purpose of this document).
r
Do not connect the boot hard disk to the adapter. Leave it connected to the
motherboard’s onboard controller for the moment.
r
Boot the PC/server into Windows.
Page 2 of 10
© Copyright AnswersThatW ork.com, 16-Apr-2010.
AnswersThatWorkTM How to set up a RAID1 mirror with a drive which already has Windows installed
r
Go to www.ATWDRIVERS.com and download the very latest drivers for your
Adaptec RAID controller (the drivers that come on the installation CD might not be
the very latest drivers).
r
Install the drivers you just downloaded and make sure that Windows now shows
the RAID adapter properly installed.
r
Now that your Adaptec RAID controller is fully installed into Windows we know that
if you connect your boot hard disk to the Adaptec RAID controller, your PC/server
will successfully boot into Windows.
r
So shut down your PC/server.
r
Now connect your main hard drive (the one that this PC/server boots from) to
Port 0 of your Adaptec RAID controller. Make sure it is definitely Port 0 and not
Port 1, Port 2, or any other port.
r
Start your PC/server again and make sure it boots properly into Windows. If it
does you are now ready to start the creation of your RAID 1 mirroring system.
Note : typically, on server operating systems, you will get a message saying that Windows has
detected a hardware change and that it wants you to re-activate Windows within 3 days. You can do
so at this stage or once you have completed the mirroring of your hard disk – your choice.
Going for it
Now that we know our Adaptec controller works fine, we can work on actually setting up
RAID 1 mirroring.
r
Shut down your PC/server.
r
Now connect the hard disk you will be using as mirror hard disk to Port 1 of
your Adaptec controller.
Tip : A good practice to have is to make sure before this step that the drive you intend to use as mirror
hard disk is actually empty, just in case you have picked up a drive which “someone” forgot to label
appropriately and that drive is a drive you really do not want to overwrite !!
Page 3 of 10
© Copyright AnswersThatW ork.com, 16-Apr-2010.
AnswersThatWorkTM How to set up a RAID1 mirror with a drive which already has Windows installed
r
Boot your server and watch out for
Press <Ctrl><A> for Adaptec RAID
Configuration Utility. When the message appears, press Ctrl+A to go into your
Adaptec controller BIOS (also called the “Configuration Utility”). Keep pressing
Ctrl+A until you get a message confirming that “Ctrl+A was pressed”.
r
Once inside your Adaptec controller’s BIOS, choose Disk Utilities.
r
Inside Disk Utilities check that both your hard disks are showing properly, and
make sure they show up as SATA-II (SATA-2) just in case your hard disks have
jumpers which configure them as SATA-1 (SATA-2 shows up as 3.0Gb/s
transfer speed).
r
Escape back to the Main Menu.
r
This time choose Array Configuration Utilities.
r
Next, choose Configure Drives
r
Press the space bar on each of the drives to select both drives so that both
drives show in SELECTED DRIVES in the top right-hand corner of the screen.
r
Press Enter.
r
At this point you will get a warning saying : “WARNING : One or more selected
drives has a valid partition and there is a risk of losing the data if configured.
Do you want to continue ? (Yes/No):”
r
Enter Y for Yes.
r
The screen will briefly show “Configuring the drives …” and will then take you
back to the Main Menu.
r
Next, choose Manage Arrays.
r
Your two drives should show as SIMPLE VOLUME in the “List of Arrays” in
the top right corner of the screen with your original LIVE hard disk showing on
Port 0. This step is purely to make sure we are on track, that everything has been
connected properly, and that all the steps up to this point have been followed
correctly.
r
Escape back to the Main Menu.
r
Now choose Create Array.
Page 4 of 10
© Copyright AnswersThatW ork.com, 16-Apr-2010.
AnswersThatWorkTM How to set up a RAID1 mirror with a drive which already has Windows installed
r
On the next window your two drives will show again. This is your last
opportunity to check that you have the correct SOURCE DRIVE on Port 0.
Do so. For example, if the two drives are of different size (the target mirror drive
must be of equal size, or larger, than the source drive), or of different makes, or
they are different model versions, the information on the screen will easily enable
you to verify that you have the hard disks connected properly.
r
Now, press the space bar on each of the drives in turn so that they show up in
the top right-hand corner in the SELECTED DRIVES section.
r
Hit ENTER.
r
On the next screen, Array Properties, you are prompted to choose what type of
RAID you want to use. Choose RAID 1.
r
Next, give a name to your RAID array, e.g. : My company Svr 1 RAID1
r
Your are next prompted with Create RAID via.
Enter.
r
Press Enter on DONE at the bottom of the window.
r
The next window you get is Select Source Drive.
r
Choose the hard disk showing on Port 0 and press Enter (now you understand
why we’ve been focusing on connecting your original source hard disk on
Port 0 !!).
r
You will now get the following warning message : “Building the RAID 1 may
take a few hours or more to complete. Do you still want to continue ?
(Yes/No) :”
r
Press Y to start the building of your RAID 1 system.
r
You will now see a screen which displays the progress of your RAID 1 system
being built (in effect, your original source hard disk being mirrored onto the target
hard disk).
Choose BUILD and press
At current SATA-2 hard disk speeds, April 2010, each 100GB of data takes,
at best 20 minutes to complete, and, at worst, 2 hours to complete. So plan
on this phase taking anything from 2 to 12 hours.
Page 5 of 10
© Copyright AnswersThatW ork.com, 16-Apr-2010.
AnswersThatWorkTM How to set up a RAID1 mirror with a drive which already has Windows installed
r
At this stage you can do either of two things :
–
You can wait till the mirroring process completes, and once it has
completed continue on with the next step below.
–
Or, once the mirroring process has reached 1%, you can turn OFF
your PC/server, reboot it, log into Windows, and continue using the
PC/Server. The mirroring process will continue in the background,
something you can monitor yourself through the Adaptec Storage
Manager software described in the next section.
r
At the end of the process you will get the following message : “Building the
array is successfully completed”.
r
Press any key to return to the Main Menu.
r
Next, verify that everything is alright. Choose Manage Arrays, then press Enter
on your RAID 1 system (array), and then check that the Array Status shows as
OPTIMAL. If it does, you’re in business.
r
Exit the Adaptec Configuration Utility and reboot your PC/server.
Putting the finishing touches
r
Now that your PC/server is up and running with the safety of RAID 1 mirroring, you
will need to install the monitoring software which will enable you to monitor the
good running of your RAID system, or whether your PC/Server is successfully
building/rebuilding the RAID 1 mirroring system, etc....
r
Locate the Adaptec Storage Manager CD, or download the software from
www.ATWDRIVERS.com. At the time of writing of this document the latest
version of Adaptec Storage Manager is version 5.10.17173 (23-Aug-2007).
r
When you install the software you will be prompted to create an “Administrator”
username and password. Choose Direct Attached Storage and change the
default “Admin” username to Administrator and use the same password as
the Administrator password on your PC/server (to avoid forgetting it). Next,
document this username and password.
Page 6 of 10
© Copyright AnswersThatW ork.com, 16-Apr-2010.
AnswersThatWorkTM How to set up a RAID1 mirror with a drive which already has Windows installed
r
Once you are in Adaptec Storage Manager immediately go to the VIEW menu
and configure it as follows for a more user friendly configuration :
r
As soon as you check Direct Attached Storage your new RAID 1 mirror system
will show. Double-click on it, login, and it will show the information to the right in
the above screenshot. If it says Optimal for both drives, then you’re in business.
r
Next, configure how you want the software to alert you if there is a problem with
your RAID 1 system (ie. one of the disks is generating errors).
Click
CONFIGURE on the toolbar and configure the General Settings as shown
below :
Page 7 of 10
© Copyright AnswersThatW ork.com, 16-Apr-2010.
AnswersThatWorkTM How to set up a RAID1 mirror with a drive which already has Windows installed
r
Next, click on the Email Notifications tab and set up an email alert so that the
Adaptec software emails notify you if there is a problem with your RAID 1 system.
For this you will need to set up one or more email recipients, e.g. yourself as
System Administrator, you will need to set up a sending email address, e.g.
[email protected], and you will need to know the
name of the SMTP server you can use to send the email through. If you have
an internal mail server such as Microsoft Exchange or Novell GroupWise, simply
use the IP address of your Exchange or GroupWise server; if you instead use
POP mail, then use your ISP’s SMTP server - if you do not know it try this page on
our website, www.ATWISPS.com.
Do not forget to specify against each recipient the type of information you want the
Adaptec Storage Manager software to send you : at AnswersThatWork we
normally set it to Error, Warning, Informational.
r
Click on Save changes to save your new configuration.
Replacing a faulty drive in your
RAID-1 system
One you have set up your RAID 1 array, you will want to know how to replace a faulty hard
disk when one does go faulty in the future. If you do encounter this situation, follow these
steps :
r
Shut down your PC/server.
r
Disconnect the faulty hard disk. You will typically have identified the hard disk
as faulty either through the Adaptec Storage Manager software, ore, more often,
through experience, such as, example, a server suffering repeated freezes or
hangs when nothing in the make up of the server has changed for some time.
r
If the hard disk you are replacing is the master hard disk from Port 0, then switch
the hard disk that is staying, from Port 1 to Port 0, so that, for consistency of
procedure, you PC/server always boots from Port 0.
r
Replace the faulty hard disk with a new hard disk of a size equal or greater than
the remaining hard disk. This replacement hard disk should be going on Port 1.
Tip : A good practice to have is to make sure before this step that the drive you intend to use as mirror
hard disk is actually empty, just in case you have picked up a drive which “someone” forgot to label
appropriately and that drive is a drive you really do not want to overwrite !!
Page 8 of 10
© Copyright AnswersThatW ork.com, 16-Apr-2010.
AnswersThatWorkTM How to set up a RAID1 mirror with a drive which already has Windows installed
r
Boot your server and watch out for
Press <Ctrl><A> for Adaptec RAID
Configuration Utility. When the message appears, press Ctrl+A to go into your
Adaptec controller BIOS (also called the “Configuration Utility”). Keep pressing
Ctrl+A until you get a message confirming that “Ctrl+A was pressed”.
r
Once inside your Adaptec controller’s BIOS, choose Disk Utilities.
r
Inside Disk Utilities check that both your hard disks are showing properly, that
the new hard disk is of the correct size, and make sure both the hard disks show
up as SATA-II (SATA-2) just in case your hard disks have jumpers which
configure them as SATA-1 (SATA-2 shows up as 3.0Gb/s transfer speed).
r
Escape back to the Main Menu.
r
This time choose Array Configuration Utility.
r
Next, choose Add / Delete Host Spare
r
Press the INS (Insert) key to select the new hard disk you installed. This will
move the new drive to “Assigned Hotspare Drives” in the top right-hand
corner.
r
Press Enter.
r
At this point you will get a warning saying :
(Yes/No) :”
r
Enter Y for Yes.
r
Your are now back at the Main Menu.
r
Next, choose Manage Arrays.
r
In the “List of Arrays” in the top right corner of the screen press Enter on your
current RAID 1 array.
“Do you want to create a spare ?
You should now see the “Array Properties” screen which tells you you have a
Missing Member and that your Array Status is DEGRADED.
r
Press Esc.
r
Press Ctrl+R to Rebuild your RAID 1 array.
r
The screen will change and you will now get the Array Building Progress
Screen showing. On it you should see the Array Status showing BUILDING
and the BLOCK number increasing.
Page 9 of 10
© Copyright AnswersThatW ork.com, 16-Apr-2010.
AnswersThatWorkTM How to set up a RAID1 mirror with a drive which already has Windows installed
r
Once the building process reaches 1% turn off your PC/server with the ON/OFF
button, restart it into Windows, log in to Windows, and then start the Adaptec
Storage Manager software to monitor the progress of the rebuilding process
(Remember : Adaptec Storage Manager will in any case email you of the progress
of this rebuilding process!).
r
Once the rebuilding is complete your system is back up and running but this time
with one of the hard disks having just been replaced.
Some interesting findings on
Performance issues
Adaptec have always been considered as the kings of RAID, with LSI Logic, formerly
BusLogic, not far behind.
Intel, because they are Intel (!), have always been highly regarded for anything from
motherboards, network cards, graphics chipsets, to onboard hard disk controllers.
NVidia’s onboard controllers have demonstrably faster onboard SATA-II controllers than
VIA and AMD.
Quite separately the general wisdom is that RAID performed through good onboard RAID
hard disk controllers will always outperform RAID done through PCI or PCI-E RAID
controllers.
Well, we too at AnswersThatWork subscribed to all the above, until we ran tests with
Adaptec’s latest affordable SATA-II RAID controllers, and we were in for a major shock :
all Adaptec SATA-II RAID controllers, such as the low-cost 1220SA, or 1225SA, or
the more expensive 1420SA, 1430SA, 2420SA, and 2820SA,
all thoroughly
outperform all onboard Intel, NVidia, or Promise SATA-II controllers, by a minimum
of 50% to 150%. It was staggering – we were so stunned by the first batch of results
we had to run the tests again and, Yes, Adaptec is the undisputed king of SATA-II
performance. As a general rule it outperforms onboard NVidia controllers by about
50% and pulverises onboard Intel controllers by anything from 70% to 100%.
Wow !
Enjoy ………..
oooooooOOOOOOOooooooo
Page 10 of 10
© Copyright AnswersThatW ork.com, 16-Apr-2010.