1
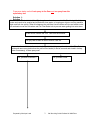
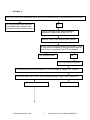
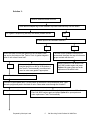
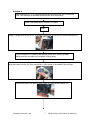
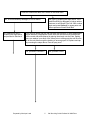
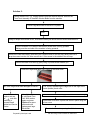
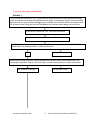
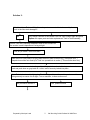
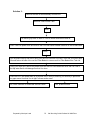
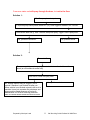
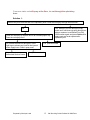
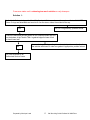
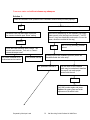
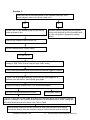
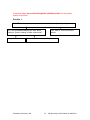
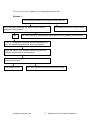
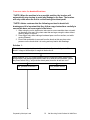
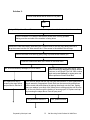
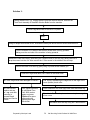
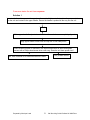
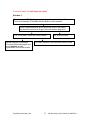
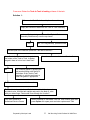
Troubleshooting
Bissell ProHeat 2X Select BS-9400F
CONTENTS PAGE
Consumer states unit will not spray to the floor and no spray
from the upholstery tool…………………………………………………….Page 2
Consumer states no or low suction…………………….…………………..Page 8
Consumer states unit will spray through the hose, but not to
the floor…………………………………………………………………………Page 11
Consumer states unit will spray at the floor, but not through the
upholstery hose………………………………………………………………Page 12
Consumer states unit is releasing too much solution or only
Shampoo……………………………………………………………………….Page 13
Consumer states unit will not release any shampoo…………………….Page 14
Consumer states no suction through the upholstery hose but does
have suction at the floor…………………………………..………………......Page 16
Consumer states the water that is sprayed out is not hot…………....…Page 17
Consumer states the brush roller will not turn…………………………...Page 18
Consumer states the unit has no power……………………………………Page 21
Consumer states the unit drags on carpet………………………………..Page 22
Consumer States the Tank-In-Tank is leaking at base of the
tank……………………………………………………………………...………Page 23
Consumer states unit is very noisy…………………………………….….Page 24
Consumer states unit will not spray to the floor and no spray from the
upholstery tool
Solution 1:
1: inside lid of 2-in-1 Tank may have closed as a result of the Tank being full of dirty
The Solution
Red float door
water and needs to be emptied and refilled with clean water, or bumping an object or moving machine
back and forth too quickly. When this happens the red Water Level Indicator will rise and create a shut
off mechanism over the hole where red Lint Filter Basket sits to prevent water getting into motor area.
If this occurs, remove the 2-in1 Tank from the machine.
Lift grey latch at back of tank to remove Tank Lid
Ensure that the red Water Indicator inside the Tank Lid is sitting away from the red Lint Filter Basket
inside and remove any debris from the red lint filter basket (it can be removed and rinsed in hot tap
water if necessary). Is there spray now?
No, proceed to Solution 2
Prepared by Monique Lania
Yes, problem solved
2
Call Servicing Guide ProHeat 2X 9400F.doc
Solution 2:
Has Tank-in-tank been emptied and refilled and has the SmartMix (solution) bottle been filled with solution?
Yes
No, empty and refill water tank and
fill SmartMix bottle (solution bottle)
with Bissell Solution, problem solved
Tank-in-Tank may not be seated in machine
completely. Switch power switch OFF (O).
Remove Tank-in-Tank Assembly from machine.
Ensure Tank Lid is securely hooked into grove on front lip
of Tank and lock into place by lifting grey latch located on
back of Tank over and down until it ‘clicks’ into place.
Yes, problem solved
No
The Pump may have lost prime
To re-prime pump switch power switch OFF (O). Hold Trigger on handle in for 1 minute.
Turn machine back ON (l). Wait 1 minute, then press Spray Trigger. Does it spray now?
No, process to Solution 3
Prepared by Monique Lania
Yes, problem solved
3
Call Servicing Guide ProHeat 2X 9400F.doc
Solution 3:
Remove SmartMix bottle from unit
Is the black o-shaped ring on the SmartMix cap insert fitted securely over the straw?
No, tighten o-shaped ring securely over straw, problem solved
Yes
Is there liquid in the SmartMix reservoir?
Yes
No
Check the black and red tank gasket on the SmartMix bottle
cap and on the bottom of the Tank-in-Tank. Is gasket lodged in
base of unit or has it been lost?
No
Yes, reattach gasket by pushing the red
rounded portion over the lip of the bottom of
the Tank-in-Tank assembly or solution tank
insert or order new gasket if appropriate.
The neck of the SmartMix bottle may be
undersized, therefore the cap will not make
proper contact with the unit.
Advise customer to call Bissell Free
Call 1800 number again and press
Option 4 for spare parts and order
replacement SmartMix bottle
Remove tank-in-tank assemble from unit.
Turn tank-in tank upside down. On the bottom of tank there is a red and black valve. Hold
the tank upright and push in the black X valve. Does water come through the X valve?
Yes, proceedSolution
to solution
2:4
Prepared by Monique Lania
No, X valve may be blocked internally. Advise customer to call Bissell
Free Call 1800 number again and press Option 4 for spare parts and
order replacement Tank-Tank assembly
4
Call Servicing Guide ProHeat 2X 9400F.doc
Solution 4:
Switch machine OFF (O). Unplug machine from the outlet at the wall. Remove the
Tank-Tank Assembly & SmartMix Solution Bottle from the machine
Check Small Brush Belt to ensure it is in place
How?
Using a Phillips Head Screw Driver, unscrew the screw just above the front nozzle and remove it.
Turn the machine on its side so that the belt access area is facing upwards.
Making sure the cord side of the machine is facing down
Remove the clear end cap by unscrewing the 2 black screws on the end cap, taking care not to
drop the screws into the unit. Also remove the 1 Silver screw in the middle of the end cap.
Remove the black Pivot Arm by gently lifting it up-and-across towards you
Prepared by Monique Lania
5
Call Servicing Guide ProHeat 2X 9400F.doc
Locate the Small Brush Belt, has it come off the Brush end?
No, is Brush Assembly damaged, or full of debris?
No, replace end cap by
reversing the steps above
and proceed to Solution 4
Yes, refit by reversing the steps above. If the
small Brush Belt is damaged or broken advise
customer to call Bissell Free Call 1800 number
again and press Option 4 for spare parts and
order replacement small Brush Belt
Yes, remove debris and hair with soft cloth and scissors or order replacement
brush assembly if appropriate. Brush Rolls can be removed by pulling them
off the metal rods and replaced by placing them back onto the rods, making
sure one washer is on each of the rollers prior to sliding onto the rod. Be sure
to let the rod slide through the bushing to ensure proper fit. Replace end cap
by reversing the steps above, Does is spray now?
No, proceed to Solution 5
Prepared by Monique Lania
Yes, problem solved
6
Call Servicing Guide ProHeat 2X 9400F.doc
Solution 5:
Switch machine OFF (O). Unplug machine from the outlet at the wall. Remove the
Tank-Tank Assembly & SmartMix Solution Bottle from the machine
Check Large Brush Belt to ensure it is in place
How?
Using a Phillips Head Screw Driver, unscrew the screw just above the front nozzle and remove it.
Turn the machine on its side so that the belt access area is facing upwards.
Making sure the cord side of the machine is facing upwards.
Remove the clear end cap by unscrewing the 2 black screws on the end cap, taking care not to
drop the screws into the unit. Also remove the 1 Silver screw in the middle of the end cap.
Remove the black Pivot Arm by gently lifting it up-and-across towards you
Locate the Large Brush Belt, has it come off the Brush end?
No, is the Large Brush Belt damaged or broken?
Yes, refit by re-attaching the Large belt on the cogs of the
lower (bottom) brush roller.
No, refit belt and
replace end cap
as
and refer
customer to
nearest Bissell
Authorised Service
Centre
Place Small belt over front (top) brush roller and metal cog.
Yes, Advise customer
to call Bissell Free
Call 1800 number
again and press
Option 4 for spare
parts and order
replacement large
Brush Belt
Prepared by Monique Lania
Place black Pivot Arm in place and screw in place using the
silver screw
Re-attach clear end cap using the 2 black screws
7
Call Servicing Guide ProHeat 2X 9400F.doc
Consumer states no or low suction
Solution 1:
The Red float door inside lid of 2-in-1 Tank may have closed as a result of the Tank being full of dirty
water and needs to be emptied and refilled with clean water, or bumping an object or moving machine
back and forth too quickly. When this happens the red Water Level Indicator will rise and create a shut
off mechanism over hole where red Lint Filter Basket sits to prevent water getting into motor area.
If this occurs, remove the 2-in1 Tank from the machine.
Lift grey latch at back of tank to remove Tank Lid
Ensure that the red Water Indicator inside the Tank Lid is sitting away from the red Lint Filter Basket
inside Tank Lid as mentioned above. Is there suction now?
No
Yes, problem solved
Ensure Diverter Knob located on Tank is switched to the correct setting ‘Hose Attachments if you
are using the upholstery hose or ‘Floor Cleaning’ if you are cleaning the floor. Is there suction now?
No, proceed to Solution 2
Prepared by Monique Lania
Yes, problem solved
8
Call Servicing Guide ProHeat 2X 9400F.doc
Solution 2:
Grab handle on Tank and lift/pull towards you to remove tank-in-tank assembly from
unit. Is the lid or tank damaged?
No
Yes, advise customer to call Bissell Free Call 1800 number again and press
Option 4 for spare parts and order replacement Tank-in-Tank Assembly
Ensure Tank Lid is securely attached to tank as this is where all
the suction is and it depends on it being air tight
How do you attach Tank Lid to tank?
Start with lid off (may need to lift grey latch at back of tank to remove lid). Then place front ‘T’
shaped clear nozzle onto front lip of Tank in a upward-lock-in motion (**This must be done first).
Once the lid is in a secure locked-in position, Lift grey latch on back of tank up and over clear
knob and push down on grey latch till it ‘clicks’ and is securely locked into place
Once Tank is closed and air tight, place Tank into its position on the machine and ensure it is
sitting securely to ensure it is air tight. Turn on machine, is there suction now?
No, proceed to solution 3
Prepared by Monique Lania
Yes, problem solved
9
Call Servicing Guide ProHeat 2X 9400F.doc
Solution 3:
Remove the tank-in-tank assembly from the unit
Remove Tank Lid from Tank
How?
Pull and lift grey latch on back of Tank to unlatch and remove tank lid.
Place Tank Lid upside down and remove red Lint Filter basket located inside lid on the left hand side
How?
Pull red plastic flap up and hold it away from red Lint Filter with one hand. Then with your other hand
lift small tab on the side of the red Lint Filter Basket to remove red Lint Filter Basket from Tank Lid
Using your finger tips, remove any debris from the red Lint Filter Basket and rinse red Lint Filter in
hot tap water and a mild detergent so that it is clean
Place red Lint Filter Basket back in its position in the Tank Lid, ensuring it is securely in place with
no gaps around it so that it is air tight. Is there suction now?
No, Refer customer to Authorised Service Centre
Prepared by Monique Lania
10
Yes, problem solved
Call Servicing Guide ProHeat 2X 9400F.doc
Consumer states unit will spray through the hose, but not to the floor.
Solution 1:
The Pump may have lost prime
To re-prime pump switch power switch OFF (O). Hold Trigger on handle in for 1 minute.
Turn machine back ON (l). Wait 1 minute, then press Spray Trigger. Does it spray now?
No, process to Solution 2
Yes, problem solved
Solution 2:
Turn unit off
Remove any debris on the spray tips located at bottom of unit with a soft
brush (an old toothbrush works well).
Turn unit on. Does unit spray now?
Yes, problem solved
No, heating element may be clogged. This is
caused if machine is not flushed out after use.
When solution is not flushed out and is left to sit in
machine it turns into a powder like substance and
clogs machine. Send consumer a Service &
Maintenance CD ROM or hard copy and refer
them to nearest Bissell authorized service centre
Prepared by Monique Lania
11
Call Servicing Guide ProHeat 2X 9400F.doc
Consumer states unit will spray at the floor, but not through the upholstery
hose.
Solution 1:
Remove any tools from the end of the upholstery hose. Does the unit spray through the hose now?
No
Clean out the spray tip with the end of an unfolded paper clip.
Does the unit spray now?
No, stretch the hose out and give it a few
light tugs to release any kinks in the internal
water supply hose. Does it spray now?
No, refer customer to an
Authorized Service Centre
Yes, Advise to run tool through hot tap
water and if still does not spray through too
advise customer to call Bissell Free Call
1800 number again and press Option 4 for
spare parts and order replacement
upholstery tool
Yes, problem solved
Yes, problem solved
Prepared by Monique Lania
12
Call Servicing Guide ProHeat 2X 9400F.doc
Consumer states unit is releasing too much solution or only shampoo.
Solution 1:
Is the black O shaped ring on the SmartMix Cap Insert fitted securely over the cap insert & straw? ** NOTE:
Some O rings are detachable and need to fit over the straw; others are molded to the cap
Yes
No, Fit O ring securely, problem solved
Check the black and red tank gasket on the SmartMix bottle cap and
on the bottom of the Tank-in-Tank. Is gasket lodged in base of unit
or has it been lost?
No
Yes, reattach gasket by pushing the red rounded portion over the lip of
the solution tank insert or order new gasket if appropriate, problem solved
No, refer customer to an
Authorized Service Centre
Prepared by Monique Lania
13
Call Servicing Guide ProHeat 2X 9400F.doc
Consumer states unit will not release any shampoo
Solution 1:
Does the SmartMix Knob (located next to SmartMix solution bottle) function properly?
No
Yes, remove SmartMix bottle (solution tank) from unit
SmartMix knob may have been forced too
far counter-clockwise past “Rinse” setting
Is the red O shaped ring on the SmartMix Cap Insert
fitted securely over the cap insert & straw? ** NOTE:
Some O rings are detachable and need to fit over the
straw, others are molded to the cap).
Remedy
Yes
Force the knob clockwise past hi traffic. This
should reset the knob. Turn unit on. Does it
release shampoo now?
No, Refer customer to an
Authorized service centre
No, Fit O ring securely, problem
solved
Is there liquid in the SmartMix reservoir (where the
SmartMix bottle sits in the unit)?
Yes, problem solved
No, proceed to solution 2
Yes, the neck of the SmartMix
bottle may be undersized, therefore
the cap will not make proper
contact with the unit
Remedy
Advise customer to call Bissell Free
Call 1800 number again and press
Option 4 for spare parts and order
replacement SmartMix bottle
Prepared by Monique Lania
14
Call Servicing Guide ProHeat 2X 9400F.doc
Solution 2:
Check the black and red tank gasket on the SmartMix bottle cap. Is the
gasket lodged in base of unit or has it been lost?
No
Yes
Reattach gasket by pushing the red rounded
portion over the black lip of the SmartMix bottle
or order new gasket if appropriate, problem
solved
Fill the Tank- in-Tank Assembly with hot (not boiling)
water and place in unit
Remove the SmartMix bottle from the unit
Set the SmartMix dial to “Rinse” setting
Turn the unit on
Press the trigger and flip the SmartMix knob back and forth from “Rinse”
setting to “High Traffic” 4 times. Stop on ‘High Traffic’ setting
Firmly install the SmartMix bottle and continue to press the trigger for 1minute
**Note: If the units stopped spraying, turn off the unit, press trigger for 30
seconds, turn unit back on, and it should spray again.
Does the unit spray shampoo now? (You should see bubbles)
No, refer to an Authorized Service Center
Yes, problem solved
** NOTE: If consumer is in the middle of cleaning the carpet and unit is still not releasing shampoo
replace the shampoo in the SmartMix bottle with water, set SmartMix knob on “Rinse” setting and
add 120ml Bissell formula to the water in the Tank-in-Tank.
When finished cleaning fill the tank-in-tank with water only and flush out the system.
This can be done by using the machine to clean a flat hard surface such as concrete.
Prepared by Monique Lania
15
Call Servicing Guide ProHeat 2X 9400F.doc
Consumer states no suction through the upholstery hose but does have
suction at the floor.
Solution 1:
On the Turbo brush attachment, is the black slider flicked to ‘Suction’ setting?
No, Flick it backwards towards you from ‘Brush’
setting to ‘Suction’ setting. Is there suction now?
Yes, problem solved
Yes, refer to ‘Low or no suction’
above
No, refer to ‘Low or no suction’ above
Prepared by Monique Lania
16
Call Servicing Guide ProHeat 2X 9400F.doc
Consumer reports the water that is sprayed out is not hot.
Solution 1:
Is the machine switched on at the power outlet in the wall?
Yes, is the power switch and red heater switch on the unit
switched to ON (l) position?
Yes
No, switch the power on, problem solved
No, switch the power switch and red heater switch to ON (l) position, problem solved
** NOTE: The heater will increase the water temperature by
25°f. You should start with hot tap water in the bladder.
Empty the Tank-in-Tank assembly with hot tap water (Not
boiling or water heated in the microwave).
Allow heater to warm up for about 2 minutes. Is the water
spraying out hot now?
Yes, problem solved
No, refer customer to an Authorized Service Centre
Prepared by Monique Lania
17
Call Servicing Guide ProHeat 2X 9400F.doc
Consumer states the brush will not turn.
**NOTE: When the machine is in an upright position, the brushes will
automatically stop turning to avoid any damage to the floor. The brushes
will only rotate when the unit is reclined using the detent pedal
**NOTE: Advise customer that the following can lead to brush belt
breakage and it is important that they follow usage instructions carefully to
ensure this does not occur again in the future:
1. When using the unit to clean mats, take care to ensure machine does not catch
on the edge of the mat. Only clean mats that are large enough to clean without
catching edges of the mat.
2. Press trigger only while making a backward pass over floor surface, not while
moving forwards.
3. Ensure hair and debris is removed from the brush as this can place extra
pressure on the brush while it is turning and may lead to belt breakage.
Solution 1:
The machine is equipped with a circuit breaker that will automatically shut off the
brush if a large or loose object is caught in the brush roll.
Switch machine OFF (O). Unplug machine from the outlet at the wall. Remove any
foreign object, and then plug the machine back in to reset the circuit breaker. Switch
the power switch ON (I), and push the detent pedal, does the brush turn now?
No, proceed to Solution 2
Prepared by Monique Lania
Yes, problem solved
18
Call Servicing Guide ProHeat 2X 9400F.doc
Solution 2:
Check Small Brush Belt to ensure it is in place
How?
Using a Phillips Head Screw Driver, unscrew the screw just above the front nozzle and remove it.
Turn the machine on its side so that the belt access area is facing upwards.
Making sure the cord side of the machine is facing down
Remove the clear end cap by unscrewing the 2 black screws on the end cap, taking care not to
drop the screws into the unit. Also remove the 1 Silver screw in the middle of the end cap.
Remove the black Pivot Arm by gently lifting it up-and-across towards you
Locate the Small Brush Belt, has it come off the Brush end?
No, is Brush Assembly damaged, or full of debris?
No, replace end cap by
reversing the steps above
and proceed to Solution 4
Yes, refit by reversing the steps above. If the
small Brush Belt is damaged or broken advise
customer to call Bissell Free Call 1800 number
again and press Option 4 for spare parts and
order replacement small Brush Belt
Yes, remove debris and hair with soft cloth and scissors or order replacement
brush assembly if appropriate. Brush Rolls can be removed by pulling them
off the metal rods and replaced by placing them back onto the rods, making
sure one washer is on each of the rollers prior to sliding onto the rod. Be sure
to let the rod slide through the bushing to ensure proper fit. Replace end cap
by reversing the steps above, Does is spray now?
No, proceed to Solution 3
Prepared by Monique Lania
19
Yes, problem solved
Call Servicing Guide ProHeat 2X 9400F.doc
Solution 3:
Switch machine OFF (O). Unplug machine from the outlet at the wall. Remove the
Tank-Tank Assembly & SmartMix Solution Bottle from the machine
Check Large Brush Belt to ensure it is in place
How?
Using a Phillips Head Screw Driver, unscrew the screw just above the front nozzle and remove it.
Turn the machine on its side so that the belt access area is facing upwards.
Making sure the cord side of the machine is facing upwards.
Remove the clear end cap by unscrewing the 2 black screws on the end cap, taking care not to
drop the screws into the unit. Also remove the 1 Silver screw in the middle of the end cap.
Remove the black Pivot Arm by gently lifting it up-and-across towards you
Locate the Large Brush Belt, has it come off the Brush end?
No, is the Large Brush Belt damaged or broken?
Yes, refit by re-attaching the Large belt on the cogs of the
lower (bottom) brush roller.
No, refit belt and
replace end cap
as
and refer
customer to
nearest Bissell
Authorised Service
Centre
Place Small belt over front (top) brush roller and metal cog.
Yes, Advise customer
to call Bissell Free
Call 1800 number
again and press
Option 4 for spare
parts and order
replacement large
Brush Belt
Prepared by Monique Lania
Place black Pivot Arm in place and screw in place using the
silver screw
Re-attach clear end cap using the 2 black screws
20
Call Servicing Guide ProHeat 2X 9400F.doc
Consumer states the unit has no power.
Solution 1
In order for the unit to operate the upper handle must be fully inserted into unit as the power switches
for the unit are located in the upper handle. Ensure the handle is pushed all the way into the unit
How?
Slide upper handle firmly onto lower handle until screw holes are completely aligned
Align upper handle screw holes and top half of tool caddy holes
Place screws into back of machine in the holes marked with an arrow and tighten
screws with a Phillips head screw driver until snug. Does the unit have power now?
No, refer customer to an Authorized Service Centre
Prepared by Monique Lania
21
Yes, problem solved
Call Servicing Guide ProHeat 2X 9400F.doc
Consumer states the unit drags on carpet
Solution 1:
Switch machine OFF (O). Unplug machine from the outlet at the wall. Remove the
Tank-Tank Assembly & SmartMix Solution Bottle from the machine
With a Phillips head screw driver ensure the screw in the middle
just above the front nozzle is tight. Does the machine drag now?
Yes, Is the plastic around the screw cracked?
Advise customer to call Bissell
Free Call 1800 number again and
press Option 4 to order
replacement front window nozzle.
Prepared by Monique Lania
No, problem solved
No, refer customer to an Authorized Service Centre
22
Call Servicing Guide ProHeat 2X 9400F.doc
Consumer States the Tank-In-Tank is leaking at base of the tank.
Solution 1:
Remove the Tank-Tank Assembly from the machine
Empty the contents of water from the Tank-In-Tank Assembly
Is the red O shaped ring on bottom of the Tank-in-Tank
Assembly fitted securely over the cap insert?
Yes
No, Fit O ring securely, problem solved
Is there liquid in the reservoir (where the Tank sits in the unit)?
Yes, Check the black and red tank gasket on
the bottom of the Tank-in-Tank. Is gasket
lodged in base of unit or has it been lost?
No
No, refer customer to Authorised Service Centre
Yes, reattach gasket by pushing the
red rounded portion over the lip of
the bottom of the Tank-in-Tank
assembly or solution tank insert or
order new gasket if appropriate.
Remove tank-in-tank assemble from unit.
Turn tank-in tank upside down. On the bottom of tank there is a red
and black valve. Hold the tank upright and push in the black X valve
with your index finger. Does water come through the X valve?
Yes, refer customer to
Authorised Service Centre
Prepared by Monique Lania
Advise customer to call Bissell Free Call 1800 number again and
press Option 4 for spare parts and order replacement Tank
23
Call Servicing Guide ProHeat 2X 9400F.doc
Consumer states unit is very noisy
Solution 1:
This is quite normal as the unit requires a lot of power to get deep down and extract
all the deeply embedded dirt out of your carpet.
Prepared by Monique Lania
24
Call Servicing Guide ProHeat 2X 9400F.doc