1
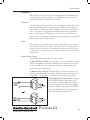
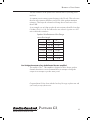
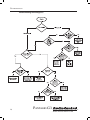
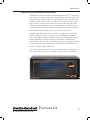
Home Theater system Pantages g3 Home Theater Premium Power Amplifier Professional Installer’s Guide For those who consider perfection possible ® 22410 70th Avenue West • Mountlake Terrace, WA 98043 USA Phone 425-775-8461 • Fax 425-778-3166 www.audiocontrol.com ©2009. All Rights Reserved ® Home Theater system Pantages g3 Home Theater Premium Power Amplifier Professional Installer’s Guide For those who consider perfection possible ® 22410 70th Avenue West • Mountlake Terrace, WA 98043 USA Phone 425-775-8461 • Fax 425-778-3166 www.audiocontrol.com ©2009. All Rights Reserved ® Important Information Dealer Name____________________________________________________________ Date Installed___________________________________________________________ Serial Number___________________________________________________________ Pantages G3 ™ www.audiocontrol.com ® Table of Contents Contents Introduction. . . . . . . . . . . . . . . . . . . . . . . . . . . . . . . . . . . . . . . . 1 Product Highlights. . . . . . . . . . . . . . . . . . . . . . . . . . . . . . . . . . . 8 Guided Tour. . . . . . . . . . . . . . . . . . . . . . . . . . . . . . . . . . . . . . . . 9 Pantages G3 Front Panel . . . . . . . . . . . . . . . . . . . . . . . . . 9 Pantages G3 Rear Panel. . . . . . . . . . . . . . . . . . . . . . . . . 10 Installation. . . . . . . . . . . . . . . . . . . . . . . . . . . . . . . . . . . . . . . . 11 Remote Turn On. . . . . . . . . . . . . . . . . . . . . . . . . . . . . . . . . . . . 8 Troubleshooting. . . . . . . . . . . . . . . . . . . . . . . . . . . . . . . . . . . . 15 Plug for other products . . . . . . . . . . . . . . . . . . . . . . . . . . . . . . 16 Appendix. . . . . . . . . . . . . . . . . . . . . . . . . . . . . . . . . . . . . . . . . 17 Warranty . . . . . . . . . . . . . . . . . . . . . . . . . . . . . . . . . . . . . . . . . 18 Specifications. . . . . . . . . . . . . . . . . . . . . . . . . . . . . . . . . . . . . . 21 www.audiocontrol.com ® Pantages G3 ™ Another page left intentionally blank. Pantages G3 ™ www.audiocontrol.com ® Introduction Introduction Greetings from the rainforests of the Pacific Northwest, the home of AudioControl. Since are reading this manual it is safe to say you are in the process of installing a high performance AudioControl theater amplifier. You will be pleased to note that this amplifier was designed and manufactured at the AudioControl factories located in the U.S.A. For over 30 years, our company has been designing and manufacturing high performance components that allow enthusiasts to truly enjoy their audio systems. It should provide your customers with years of enjoyment and trouble-free service. We truly feel that this theater amplifier will enhance the performance of any system. This manual was written to assist with the installation of this new amplifier. Whether you are a seasoned veteran or this is the first amplifier you have ever heard, we encourage you to set aside some time to review this not-so-weighty prose. While reading a manual can be as exciting as watching a slug race, we have included lots of useful information, carefully concealed within a minimum of technical jargon. Not only will you learn how to get the most from this AudioControl home theater power amplifier, you might have a smile or two. Anything as capable as this amp deserves all the explanation it can get. We also encourage you to visit the AudioControl web site, conveniently located at www.audiocontrol.com. While we have tried to anticipate any installation issues in this manual, there are sometimes new applications and ideas that come to mind. Therefore our web site will always have the most current information. Needless to say, if you have any real challenging questions, feel free to call us or e-mail us at [email protected]. Your Friends At AudioControl www.audiocontrol.com ® Pantages G3 ™ Product Highlights Product Highlights Built For The Long Haul – “Bulletproof” is the phrase that best describes The Pantages G3. Everything about this amplifier says that it is in there for the long haul. This amplifier has been designed with durability in mind. The cool running Class H design minimizes component damaging heat while the Lightdrive system protects your speakers from harmful harAudioControl Class H Amplifier Energy Savings monics caused by clipping. AudioControl amplifiers have an innovative power supply that acts as a transmission, shifting up and down. This keeps them running cool and energy efficient. Typical Amplifier Design Excess Heat A typical amplifier wastes a lot of energy as heat Class H Design – Most amplifiers have one speed, all on. That means that during most of music up to 90% of the amps power is just going up in heat. The Class H design takes care of this problem by automatically and intelligently adjusting the power supply to fit the power demands of the moment. The result is much cooler operation without the need for bulky heatsinks or fans. Lightdrive Protection System – The Lightdrive protection circuitry defends this amplifier and speakers against clipping, distortion, damage, and annoying teenage beach party movies. Even if the movie festival lasts all weekend. Each channel is independently protected so a problem in one channel will not affect the rest of the system. High Definition BiMOS Output Design – Home Theatre audio systems place terrific demands on power amplifiers. The high current drive capabilities of our BiMOS outputs cleanly delivers a minimum of 230 watts while maintaining a cool head. Unparalleled energy efficiency – Whether from the point of view of saving electricity or from the viewpoint of less heat in the rack, this amplifier has no equal. It is VERY energy efficient during operation. Made in the Northwest Rainforest The AudioControl Pantages G3 begin their existence at our factory in Mountlake Terrace, Washington, a few miles north of Seattle. Here, we also build precision test instruments, equalizers and analyzers and a totally awesome line of car stereo components. AudioControl started in 1977 and has won so many audio industry awards for design and engineering excellence that our reception room wall is starting to sag. But enough about us. Let’s start getting the most from the home theatre system so we can get the popcorn ready! (remember though, these amps runs really cool, so you’ll have to use the microwave to melt your butter) Pantages G3 ™ www.audiocontrol.com ® Guided Tour A Guided Tour Of The Pantages G3 ④ ① ② ⑤ ③ Front Panel 1. Power Standby Button - The infamous “Off” light. This button manually toggles the main power on The Pantages G3 between normal operation and stand-by. This button will over-ride the rear panel remote 12 volt trigger, but normal operation will resume when the trigger input is cycled. 2. Display Button - Shuts off the bouncing blue channel level indicators for those easily distracted movie goers. 3. Channel Status LED’s - These cool blue LED’s show when the corresponding channel is active and operating normally. They turn red if something has caused that channel to go into protection. 4. Channel Level Indicators - Each channel has a ladder of LEDs to bounce along with the music and show the relative audio signal levels. If you find them too distracting, the DISPLAY button turns these lights off. 5. Protection Indicator - This indicator turns red when one of the internal protection circuits (thermal, short-circuit, offset) have come into use. All the protection circuits automatically reset themselves when the problem causing the fault has been fixed. 6. Rack Mounting (not shown, optional) - If your installations is in a 19” world; an optional rack mounting kit is available for The Pantages G3. These rugged steel brackets securely embrace the sides of this amplifier to mount it in a 5.25” (3U) rack space. www.audiocontrol.com ® Pantages G3 ™ Guided Tour ⑤ ② ③ ① ④ ⑥ Rear Panel 1. Remote Power Control - This three pin connector allows you to remotely turn on The Pantages G3 via an automation system. You can either use a contact closure between the Trigger In and the +12V output or an external 12 volt trigger between the Trigger In and Ground terminals. The +12 volt output is not designed to power other pieces of equipment; it is a current-limited output for controlling The Pantages G3 only. 2. Inputs - The Pantages G3 features both unbalanced RCA and balanced XLR inputs to connect your preamplifier’s outputs. Any standard line level audio signal should be connected to these inputs. 3. Speaker Outputs - These high-current terminal blocks are designed to make any custom installer sit up and smile. Their solid construction and gold-plated connection surfaces will accept large gauge audiophile speaker wiring, pin, fork and of course, standard 0.75” spaced banana plugs. 4. AC Power Fuse - The Pantages G3 is designed with several layers of protection circuitry. This power fuse is here just in case something really awful goes wrong. 5. Master Power Switch - This switch shuts off the main AC power. Normally the only time you need to turn the master power switch off is if the system is going to be shut down for an extended period of time. 6. Power Inlet - The Pantages G3 draws an average of 700 watts with typical source material. Make certain that it is plugged directly into the wall outlet, or surge protector power strip with sufficient power rating. Since The Pantages G3 has remote power switching, you can plug the unit into an outlet that is always active. 10 Pantages G3 ™ www.audiocontrol.com ® Installation Installation What follows is a step-by-step guide to integrating this new amplifier into a home theater system. If it seems overly detailed, please forgive us. We would rather tell you too much than too little. Placement The AudioControl Pantages G3 is a very cool running amplifier, but it does need some breathing room to operate properly. Make certain that the air vents on the top and bottom of the amplifier are not blocked and have at least ½” of air space. Also make certain that heat sensitive components such as cable boxes or DVD players are not directly on top of The Pantages G3. Just as a reminder, you should also avoid putting any leaky potted plants on the audio equipment stack. Power Don’t plug it into a switched outlet on your system unless you are certain that it can handle the power rating. Also, please don’t cut off the ground pin on the power connector. It is an important safety feature. If you need to plug it into a two prong outlet, use a ground adapter (and connect the ground on it). Remote Power Control The Pantages G3 has three levels of power control: 1) Main AC Power switch- This is the master control and must be turned ON for the amplifier to function. Normally the only time that you would need to turn the AC power switch off is when the system is going to be unused for an extended period. 2) Remote Power Control- This removable 3-pin remote connector on the rear panel allows simple interfacing with external control systems. It accepts either a contact closure or external +12 volts DC. (see diagram) 3) The third level of power control is the front panel STANDBY button. When there is AC power and the rear panel AC MAIN switch is on, this button lights blue. When the amplifier is turned on, either by pressing the STANDBY button or with the remote power trigger input, the blue led on this button turns off. www.audiocontrol.com ® Pantages G3 ™ 11 Hooking up Your System Audio hook-up If you’re an installation veteran, this may seem repetitive, but some things can never be repeated too many times. 1) Turn off ALL components before making any connections. 2) When making connections, designate RED RCA plugs as RIGHT and WHITE, BLACK, or GREY plugs as LEFT. In fact, this is a good idea for ALL signal connections made in your audio system. The key is consistency. Stick with the same color-coding and you’ll reduce possible problems. 3) Whenever possible, keep power cords away from signal cables to prevent induced hum. This is especially important if you bundle the cables to keep the installation neat looking. 4) Use quality interconnect cables. We’re not going to get into the debate about whether $100/meter cables improve the sound, but we know from experience that really, REALLY cheap cables can cause a multitude of problems. They tend to break inside or corrode, causing a loss of signal or hum. They also have poor shielding. 5) If you need to run the audio cables more than 20 feet you should consider using the balanced XLR inputs. This will provide better noise rejection against nasty things like hum, spikes, local talk radio, etc. If your surround processor doesn’t have balanced outputs, the AudioControl BLD-10 balanced line driver is an excellent way to convert unbalanced RCA audio outputs to a balanced signal (see the appendix for details). Speaker Hook-up The same rule applies to the speaker wires as the audio connections. Establish a standard connection color code and stick with it. One conductor of the speaker wire is normally marked by a different color (silver versus copper) or there is a ribbing on one side. Typically this marked conductor is used for the positive (+) speaker leads. Of course the really good wire has Positive and Negative printed right onto the wire jacket. Your choice of speaker wire gauge and the length of the runs also affects the speaker impedance load presented to the amplifiers. As you can see in this table, even fairly short speaker runs can have a very significant resistance if you use a smaller wire gauge. The downside of this resistance in the wire is that you waste the total power available to the speakers. 12 Pantages G3 ™ www.audiocontrol.com ® Hooking up Your System All that resistance in the speaker wire will turn some of your amp power into heat. A common practice among system designers is the 5% rule. This rule states that the wire resistance should not exceed 5% of the speakers minimum resistance. This keeps the volume level change due to line losses to less than 0.5dB. As an example, on an 8 ohm speaker the wire resistance should be less than 0.4 ohms (5% x 8 = 0.4). You will need to use at least 14 ga wire on a 100’ run to obtain this resistance. Speaker Wire Resistance Wire Gauge versus Run Length 24 GA 22 GA 20 GA 18 GA 16 GA 25’ 1.3 Ω 0.8 Ω 0.5 Ω 0.3 Ω 0.2 Ω 50’ 2.6 Ω 1.6 Ω 1.0 Ω 0.6 Ω 0.4 Ω 14 GA 0.1 Ω 0.25 Ω 12 GA 0.08 Ω 0.16 Ω Can I bridge the outputs of my AudioControl theater amplifier? The answer is “No”. This amplifier is designed to drive discrete speaker channels therefore it is not recommend that you attempt to bridge the outputs in an attempt to produce more power Congratulations! You’re done with the hook up. Now pop up that corn and you’re ready to enjoy the movies. www.audiocontrol.com ® Pantages G3 ™ 13 Troubleshooting Troubleshooting The Pantages G3 14 Pantages G3 ™ www.audiocontrol.com ® Brazen Plug A Brazen Plug For Other AudioControl Products AudioControl started out making audio components in 1977. Our heritage and design experience grew from a background in professional audio, so we were never quite satisfied with what was available for the consumer audio market. Since that time, we have continued to expand our product offerings to become a key part of home theater systems. We supply the audio components that can make a greater improvement in the sound of your system than almost any other addition or upgrade. More bass, better bass, less harshness and the ability to hear music the way you want it. AudioControl also manufacturers a theater pre-amp processor, the Maestro M3, which is a perfect companion for our home theater amplifiers. This very stylish processor provides decoding for all hi-definition surround formats like Dolby Tru HD and DTS theater master. In addition it is equipped with over 120 video and audio inputs and outputs that work with all of today’s sophisticated source units, including those with HDMI connections. Okay, enough commercials. Once again, we thank you for choosing an AudioControl components in this system and hope you enjoy a lifetime of performance and reliability. AudioControl www.audiocontrol.com ® Pantages G3 ™ 15 Appendix & If You Need Service Appendix - Going the Distance and Getting Balanced When you need to run a line level audio signal more than 20 feet; balanced is the best way to go. It provides greater noise and ground loop rejection than normal RCA connections. What do you do if your preamp doesn’t have XLR outputs? No problem, just whip out a couple of the handiest items to have around: The AudioControl BLD-10 balanced line driver. These little boxes provide a clean and accurate means of converting unbalanced to balanced. What to do if you need service First, contact AudioControl, either by phone 425/775-8461 or FAX 425/778-3166 or by e-mail at [email protected]. We’ll verify if there is anything wrong that you can fix yourself, or arrange to have it sent back to our factory for repair. Please include the following items with the returning unit: 1. A copy of your proof of purchase (that sales receipt we’ve been harping about). No originals please. We cannot guarantee returning them to you. 2. A brief explanation of the trouble you are having with the Pantages G3. (You’d be surprised how many people forget this.) 3. A return street address. (No PO Boxes, please) 4. A daytime phone number in case our technician has a question about the problem you are having. You’re responsible for the freight charges to us, but we’ll pay the return freight back. We match whatever shipping method you send it to us, so if you return the unit overnight freight, we send it back overnight. We recommend UPS for any shipments. And now a word from the legal department... 16 Pantages G3 ™ www.audiocontrol.com ® Warranty Legalese Section This is the only warranty given by AudioControl. This warranty gives you specific legal rights, and you may also have rights that vary from state to state. Promises of how well your Pantages G3 will work are not implied by this warranty. Other than what we’ve said we’ll do in this warranty, we have no obligation, express or implied. We make no warranty of merchantability or fitness for any particular purpose. Also neither we nor anyone else who has been involved in the development or manufacture of the unit will have any liability of any incidental, consequential, special or punitive damages, including but not limited to any lost profits or damage to other parts of your system by hooking up to the unit (whether the claim is one for breach of warranty, negligence of other tort, or any other kind of claim). Some states do not allow limitations of consequential damages. Failure to register a proper warranty information negates any service claims. The warranty included with the unit shall supersede this plain-text version if there is any inconsistency between the two. www.audiocontrol.com The WARRANTY People are scared of warranties. Lots of fine print. Months of waiting around. Well, fear no more. This warranty is designed to make you rave about us to your friends. It’s a warranty that looks out for you and helps you resist the temptation to have the friend, who’s “good with electronics”, try to repair your AudioControl product. So go ahead, read this warranty, then take a few days to enjoy your new home theater system amplifier before logging onto the our web site at www.audiocontrol.com and register your purchases. “Conditional” doesn’t mean anything ominous. The Federal Trade Commission tells all manufacturers to use the term to indicate that certain conditions have to be met before they’ll honor the warranty. If you meet all of these conditions, we will warrant all materials and workmanship on your amplifier for five (5) years from the date your customer bought it, and we will fix or replace it, at our option, during that time. Here are the conditional conditions: 1. You need to register your purchase with us by going to the AudioControl web site (www.audiocontrol.com), click on the “Home Theater” tab and then go to the warranty registration department and follow the directions. 2. Your customer must keep their sales receipt for proof of purchase showing when and from whom the unit was bought. We’re not the only ones who require this, so it’s a good habit to get into with any major purchase. 3. Your AudioControl amplifier must have originally been purchased from an authorized AudioControl dealer. You do not have to be the original owner, but you do need a copy of the original sales receipt or invoice. 4. You cannot let anybody who isn’t: (A) the AudioControl factory; (B) somebody authorized in writing by AudioControl to service the Pantages G3. If anyone other than (A) or (B) messes with your amplifier, that voids your warranty. 5. The warranty is also void if the serial number is altered or removed, or if your amplifier has been used improperly. Now that sounds like a big loophole, but here is all we mean by it: Unwarranted abuse is: (A) physical damage (don’t use it to level your projection TV); (B) improper connections (120 volts into the RCA jacks can fry the poor thing); (C) sadistic things. This is the best product we know how to build, but if you strap it to the front bumper of your Range Rover, something will break. Assuming you conform to 1 through 5 (and it really isn’t all that hard to do) we get the option of fixing your original unit or replacing it with a new one. ® Pantages G3 ™ 17 Block Diagram Block Diagram 18 Pantages G3 ™ www.audiocontrol.com ® Specifications The Pantages G3 Specifications Number of Channels . . . . . . . . . . . . . . . . . . . . . . . . . . . . . . . . . . . . . . . . . . . . . . . 5 Output Power . . . . . . . . . . . . . . . . . . . . . 230 Wrms@8 ohms (all channels driven) Minimum Speaker Load . . . . . . . . . . . . . . . . . . . . . . . . . . . . . . . . . . . . . . . . 4 ohms Damping Factor. . . . . . . . . . . . . . . . . . . . . . . . . . . . . . . . . . . . . . . Greater than 250 Frequency Response (10 Hz - 100 Hz). . . . . . . . . . . . . . . . . . . . . . . . . . . . . . ±3dB S/N ratio . . . . . . . . . . . . . . . . . . . . . . . . . . . . . . . >110dB , A-wtd, ref. Full Output Total Harmonic Distortion. . . . . . . . . . . . . . 0.05% (230 watts @ 8 ohms 20-20K) Input Sensitivity . . . . . . . . . . . . . . . . . . . . . . . . . . . . . . . . 1.42 Vrms for full output Input Impedance . . . . . . . . . . . . . . . . . . . . . . . . . . . . . . . . . . . . . . . . . . 30 Kilohms Protection. . . . . . . . . . . . . . . . . . . . . . Clipping, Thermal, Short Circuit, DC offset Peak AC Power Draw . . . . . . . . . . . . . . . . . . .1430 watts (full output into 8 ohms) Typical AC Power Draw . . . . . . . . . . . . . . . . . 150-250 watts (all channels driven) Weight . . . . . . . . . . . . . . . . . . . . . . . . . . . . . . . . . . . . . . . . . . . . . . . . . . . 46 pounds Dimensions. . . . . . . . . . . . . . . . . . . . . . . . . . . . . . . . . . .17”W x 15.75”D x 5.25”H Country of Origin. . . . . . . . . . . . . . . . . . . . . . . . . . . . . . . . . . . . . . . . . . . . . .U.S.A. ©2009 AudioControl, All Rights Reserved. www.audiocontrol.com ® Pantages G3 ™ 19 This manual was written, designed, printed, folded and stuffed into the box in the U.S.A. Probably on a really soggy day considering where we live. ® 22410 70th Avenue West Mountlake Terrace, WA 98043 USA Phone 425/775-8461 - FAX 425/778-3166 Email: [email protected] P/N 913-101-0