1
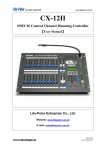
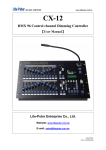
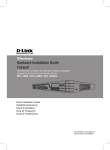
This product can be set up using any
current web browser, i.e., Internet
Explorer 6x, Netscape Navigator 4x.
D-Link DFL-900
VPN/Firewall Router
Before You Begin
It’s best to use a computer with an Ethernet adapter for configuring the DFL-900. The
default IP address for the DFL-900 is 192.168.1.254 (LAN1 at the port number 2) with a
Subnet Mask of 255.255.255.0. You will need to assign your computer a Static IP
address within the same range as the DFL-900’s IP address, say 192.168.1.2 to
configure the DFL-900. See the Appendix if you need assistance in assigning a Static
IP address for your network adapter.
These are the items included with your DFL-900 V.A1 purchase:
• DFL-900 VPN/Firewall Router
• CD-ROM (containing Manual and Warranty)
• Console Cable (RS232)
• Ethernet Cable (RJ45)
•Power Cord
If any of the above items are missing, please contact your reseller.
1
ENGLISH
Check Your Package Contents
©2003 D-Link Systems, Inc. All rights reserved. Trademarks or registered trademarks are the property of their respective holders.
Software and specifications are subject to change without notice. DFL-900 VA1.10282003
System Architecture
DFL-900 is an integrated all-in-one solution that can facilitate the maximum security
and the best resource utilization for the enterprises. It contains a high-performance
stateful packet inspection (SPI) Firewall (400Mbps at 3000 rules), policy-based NAT,
wire-speed VPN (simultaneous 2000 tunnels), upgradeable Intrusion Detection System,
Dynamic Routing, Content Filtering, Bandwidth Management, WAN Load Balancer,
and other solutions in a single box. It is one of the most cost-effective all-in-one
solutions for enterprises.
Organization_2
(Private LANs)
Organization_1
(Private LANs)
DMZ_1
(10.1.1.1~253)
WebServer1
10.1.1.1
FtpServer1 DHCP Server1
10.1.1.5
10.1.1.10
DMZ1_IP
10.1.1.254
WebServer2
10.1.1.1
DMZ2_IP
10.1.1.254
ISP2
ISP1
Internet
LAN1_IP
192.168.1.254
PC1_5
DHCP Client
WebServer3
140.112.1.4
MailServer
140.112.1.3
LAN_1
(192.168.1.1~253)
DHCP Server3
10.1.1.10
switch
VPN Tunnel
DFL-1
PC1_1
192.168.1.1
WAN2_IP
210.2.1.1
WAN1_IP
61.2.1.1
switch
switch
DMZ_2
(10.1.1.1~253)
DHCP Server2
140.114.179.84
FtpServer2
140.112.1.5
DFL-2
LAN2_IP
192.168.88.254
PC2_1
192.168.88.1
switch
PC2_2
192.168.88.2
LAN_2
(192.168.88.1~253)
2
Connecting the DFL-900
A. First, connect the power cord to the Power Socket at the back panel of
the DFL-900 and then plug the other end of the power adapter to a wall
outlet or power strip. The Power LED will turn ON to indicate proper
operation.
A. Power Socket
B. Using an Ethernet cable, insert one end of the cable to the WAN port
on the front panel of the DFL-900 and the other end of the cable to a
DSL / Cable modem or other internet access devices.
C. Computers with an Ethernet adapter can be directly connected to any
of the LAN ports using a cross-over Ethernet cable.
D. Computers that act as servers to provide Internet services should be
connected to the DMZ port using an Ethernet Cable.
Console Port
For managing the
DFL-900 with CLI
commands.
C. LAN1 Port
For connecting computers
and network devices to your
LAN.
B. WAN1 Port
For connecting the DFL-900 to a
DSL or Cable Modem supplied by
your ISP to access the Internet.
3
D. DMZ1 Port
For connecting computers that
act as servers for Internet users
to access.
Using the Setup Wizard
A computer on your LAN1 must be assigned an IP address and Subnet Mask from the
same range as the IP address and Subnet Mask assigned to the DFL-900 in order to be
able to make an HTTPS connection using a web browser. The DFL-900 is assigned an
IP address of 192.168.1.254 with a Subnet Mask of 255.255.255.0 by default. The
computer that will be used to configure the DFL-900 must be assigned an IP address
between 192.168.1.1 and 192.168.1.253 with a Subnet Mask of 255.255.255.0 to be
able to connect to the DFL-900. This address range can be changed later. There are
instructions in the DFL-900 User’s Guide, if you do not know how to set the IP address
and Subnet Mask for your computer.
Step 1 - Login
Connect to https://192.168.1.254
Type “admin” in the account
field, “admin” in the Password
field and click Login.
Step 2 - Run Setup
Wizard
After login to https://192.168.1.254
BASIC SETUP > Wizard
Click the Run Setup Wizard.
Step 3 - System Name
BASIC SETUP > Wizard
Enter the Host Name and the
Domain Name, followed by
clicking the Next.
4
Step 4 - WAN
Connectivity
BASIC SETUP > Wizard > Next
Choose the type of IP Address
Assignment provided by your
ISP to access the Internet. Here
we have four types to select.
This will determine how the IP
address of WAN1 is obtained.
Click Next to proceed.
Step 4.a —
client
DHCP
BASIC SETUP > Wizard > Next > DHCP
If Get IP Automatically
(DHCP) is selected, DFL-900
will request for IP address,
netmask, and DNS servers from
your ISP. You can use your
preferred DNS by clicking the
DNS IP Address and then
completing the Primary DNS
and Secondary DNS server IP
addresses. Click Next to
proceed.
Step 4.b —
Fixed IP
BASIC SETUP > Wizard > Next > Fixed IP
If Fixed IP Address is
selected, enter the ISP-given IP
Address,
Subnet
Mask,
Gateway IP, Primary DNS
and Secondary DNS IP. Click
Next to proceed.
5
Step 4.c —
client
PPPoE
BASIC SETUP > Wizard > Next > PPPoE
If PPP over Ethernet is
selected, enter the ISP-given
User Name, Password and the
optional Service Name. Click
Next to proceed.
Step 5 - System Status
BASIC SETUP > Wizard > Next > Next
Here we select Fixed IP
Address method in WAN1 port.
Then the DFL-900 provides a
short summary of the system.
Please check if anything
mentioned above is properly set
into the system. Click Finish
to close the wizard.
6
Basic Setup
Setting up a VPN and configuring the Firewall on the DFL-900 requires a deeper
understanding of the protocols and security features of the DFL-900 than can be
presented here. If you need additional information about setting up a VPN or
configuring the Firewall, please consult your DFL-900 User’s Guide or your Network
Administrator.
Please Note:
Each configuration page has buttons on the bottom labeled Apply and Reset. When
you configure any page, you must press the Apply button to make the configuration
effective. You CANNOT configure multiple pages, and then press Apply. Each page
must have the configuration information ‘applied’ before going on to the next page.
WAN Settings
The WAN Settings page allows you to modify the protocol that the DFL-900 will use to
connect to your ISP and obtain the necessary network address information.
The usage of these pages is essentially the same as those introduced in the wizard
pages. The ISP Settings page allows you to modify the way that the DFL-900 obtains
its network settings from your Internet Service Provider (ISP). The entry fields on the
page will change depending upon which of the following options you choose: Fixed IP
Address, Get IP Automatically, and PPPoE.
1. Fixed IP Address
If your ISP has assigned you an IP address that will never change, choose this option.
When this option is chosen, the following fields appear to allow you to enter the network
address information. The example shows that the ISP assigns an IP 192.168.17.204, a
netmask 255.255.255.0, a default gateway 192.168.17.254, and two DNS (168.95.1.1
and 1.1.1.1).
7
2. Get IP Automatically
If your ISP uses the Dynamic Host Configuration Protocol (DHCP) to assign an IP
address, subnet mask, default gateway and DNS addresses, choose this option.
8
3. PPPoE
If your ISP uses Point-to-Point Protocol over Ethernet (PPPoE), choose this option.
When this option is chosen, the following fields appear to allow you to enter the network
address information:
LAN Settings
The LAN Settings page allows you to modify the IP address and subnet mask that will
identify the DFL-900 on your LAN. This is the IP address you will enter in the URL field
of your web browser to connect to the DFL-900. It is also the IP address that all of the
computers and devices on your LAN will use as their Default Gateway.
9
IP Address − this is the IP address that will be assigned to the LAN port. The default is
192.168.1.254 with a subnet mask of 255.255.255.0.
Subnet Mask − this is the subnet mask corresponding to the LAN port’s IP address,
above. The default is 255.255.255.0.
The IP address assigned to the DFL-900 here, must be on the same subnet (be within
the same IP address range) specified on the DHCP Servers. The DHCP Server fields
allow you to configure the DFL-900 to be a DHCP Server on your LAN. The DFL-900
can then automatically assign IP addresses, subnet masks, default gateway and DNS
server addresses to computers on your LAN. The computers on your LAN must have a
DHCP client enabled to get their network address information from the DFL-900.
IP Pool Starting Address − the first IP address of the range from which the DFL-900
will assign to each of the computers on your LAN.
Pool Size − the number of IP addresses which the DFL-900 will assign to the
computers on you LAN.
DMZ Settings
The DFL-900 has one DMZ port for connecting servers that are exposed to the public
Internet for accesses. The DMZ port is assigned an IP address of 10.1.1.254 with a
subnet mask of 255.255.255.0 by default. Note that the DMZ IP address is on the
10.1.1.x subnet while the LAN ports are on the 192.168.x.x subnet by default.
10
IP Address − this is the IP address that will be assigned to the DMZ port. The default is
10.1.1.254 with a subnet mask of 255.255.255.0.
Subnet Mask − this is the subnet mask corresponding to the DMZ port’s IP address,
above. The default is 255.255.255.0.
The IP address assigned to the DFL-900 here, must be on the same subnet (be within
the same IP address range) specified on the DHCP Servers. The DHCP Server fields
allow you to configure the DFL-900 to be a DHCP Server on your DMZ. The DFL-900
can then automatically assign IP addresses, subnet masks, default gateway and DNS
server addresses to computers on your LAN. The computers on your DMZ must have a
DHCP client enabled to get their network address information from the DFL-900.
IP Pool Starting Address − the first IP address of the range from which the DFL-900
will assign to each of the computers on your DMZ.
Pool Size − the number of IP addresses which the DFL-900 will assign to the
computers on you DMZ.
Virtual Server Settings
Virtual Servers are computers connected using the DMZ port. They act as servers to
provide services to your LAN port or other Internet users on the WAN port. The Virtual
Server setting page maps one global IP address − an IP address that is valid on the
Internet, usually assigned by your ISP − to one local IP address from the IP address
range assigned to the DFL-900’s DMZ port. The default DMZ IP address is 10.1.1.254,
so the servers’ IP must range from 10.1.1.1 to 10.1.1.253, with a subnet mask of
255.255.255.0.
11
An example virtual server: Customize the rule name as the ftpServer. For any
packets with its destination IP equaling to the WAN1 IP (61.2.1.1) and destination port
equaling to 44444, ask DFL-900 to translate the packet’s destination IP/port into
10.1.1.5/21. Check the Passive FTP at this port to maximize the compatibility of the
FTP protocol. This is useful if you want to provide connectivity to passive FTP clients.
For passive FTP clients, the server will return them the private IP address and the port
number for them to connect back to do data transmissions. Since the private IP from
them cannot be routed to our zone, the data connections would fail. After enabling this
feature, the DFL-900 will translate the private IP/port into an IP/port of its own. Thus the
problem is gracefully solved. Click Apply to proceed.
Dest. IP− a unique, global IP address that is valid in the Internet. This will be one of the
IP addresses assigned by your ISP, or the single IP address assigned by your ISP, if
your ISP assigns you only one IP address. Use Netmask to specify a range of the dest.
IP (see the example above).
Service − TCP or UDP or Any of them. Choose a port number (range) to explicitly
indicate which application traffic to redirect.
Translated Destination IP − the IP address of the computer that will act as a server for
this application you are setting up.
12
APPENDIX
To assign a Static IP address to the
Ethernet adapter, please do the following
steps. The examples below are using a
DFE-530TX+ in Microsoft Windows XP,
and Mac OS X.
Note: Screens in other Operating
Systems will look a bit different, but the
steps are the same.
For Microsoft Windows XP:
Go to Start > right click on
My Network Places >
select Properties > Double-click on
the Network Connection associated
with the Ethernet adapter (i.e.,
D-Link DFE-530TX+).
Click Internet Protocol (TCP/IP)
Click Properties
Select Use the following IP address
Enter the following:
IP address: 192.168.1.1
Subnet mask: 255.255.255.0
Click OK
13
Setting a Static IP address for
Apple Macintosh OS X:
Go to the Apple Menu
and Select System
Preferences.
Click on
Network
Select Built-in
Ethernet in the Show
pull-down menu
Select Manually in
the Configure
pull-down menu
14
Enter the following:
IP address: 192.168.1.1
Subnet mask: 255.255.255.0
Enter the IP address information,
the Subnet Mask and the
Router’s IP address.
Click on
Apply Now
15
NOTES
Technical Support
Software updates and documentation are available on
the D-Link website.
D-Link provides free technical support for customers
within the United States for the duration of the
warranty period on this product.
U.S. customers can contact D-Link technical support
through our web site or by phone.
D-Link Technical Support over the Telephone:
(877) 453-5465
24 hours a day, seven days a week
D-Link Technical Support over the Internet:
http://support.dlink.com
email: [email protected]
16