1
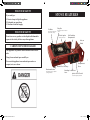
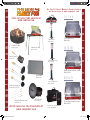
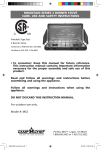
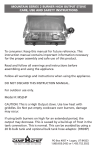
Mountain Series 1 Burner Butane Stove
Care, Use and SAFETY INSTRUCTIONS
3165937
Portable Type Gas
2 Burner Stove
Conforms to ANSI STD Z21.72b-2002
Certified to CSA STD 11.2b-2002
•To consumer: Keep this manual for future reference.
This instruction manual contains important information
necessary for the proper assembly and safe use of this
product.
Read and follow all warnings and instructions before
assembling and using the appliance.
Follow all warnings and instructions when using the
appliance.
DO NOT DISCARD THIS INSTRUCTION MANUAL.
For outdoor use only.
Model #: BDZ-138
For use with Net Weight 8oz Canister.
PO Box 4057 • Logan, UT 84323
1.800.650.2433 or 1.435.752.3922
0610-BDZ-138-Instructions.indd 1
7/22/10 7:51:55 AM
FOR YOUR SAFETY
STOVE FEATURES
If you smell gas:
1. Do not attempt to light the appliance.
2. Extinguish any open flame.
3. Disconnect from fuel supply.
FOR YOUR SAFETY
Pot Grate
Keep small to medium pots
in place while cooking
Drip Pan
Prevents spill overs from interior
of stove
Electric Ignitor
Do not store or use gasoline or other liquids with flammable
vapors in the vicinity of this or any other appliance.
Ignition point for fuel
Fuel Cartridge
Compartment
Bottom
Guide
CARBON MONOXIDE HAZARD
This appliance can produce carbon monoxide which has no
odor.
Using it in an enclosed space can kill you.
Never use this appliance in an enclosed space such as a
camper, tent, car or home.
Compartment
Durable Steel Housing
Aluminum Burner
Spreads flame evenly for optimum
cooking performance
Cover
Cartridge Lock/Release
Lever
Ignitor & Fuel Control
Control the height of your flame
0610-BDZ-138-Instructions.indd 2-3
7/22/10 7:52:01 AM
1. DO NOT leave this appliance unattended while in use. The
user must remain in the immediate area of the product
and have a clear view of the product at all times during
operation.
2. Keep children and pets away from burner at all times.
3. T
he use of alcohol, prescription or non-prescription drugs
may impair your ability to properly assemble or safely
operate this appliance.
4. F or OUTDOOR use only. Do NOT use in a building,
garage or any other enclosed area. Do NOT use in or on
recreational vehicles or boats. NEVER use this appliance as
a heater. Use only in well ventilated areas.
5. D
o not operate appliance under ANY overhead
construction. Keep a minimum clearance of 1 foot (0.3
m) from the sides, front and back of appliance to ANY
construction. Keep the area clear of all combustible
material and flammable liquids, including wood, dry
plants and grass, brush, paper, and canvas. Never use this
appliance within 25 ft. (7.5 m) of any flammable liquid.
6. U
se ONLY on a level, stable surface. Do not use this
appliance on plastic case. Keep bottom away from dirt and
sand. Do not use in direct sunlight
7. D
O NOT place an empty cooking vessel on burner while
in operation. Use caution when placing anything in the
cooking vessel while burner is in operation.
8. D
o NOT move the appliance when in use. Allow unit to
cool to 115°F (45°C) before moving or storing.
9. T
his appliance will be hot during and after use. Use
insulated oven mitts or gloves for protection from hot
surfaces or splatter from cooking liquids.
10. In case there is a fire, call the local fire department or dial
911. Stay clear from flames. Do not attempt to extinguish
an oil or grease fire with water.
11. Do not obstruct the flow of combustion and
ventilation air.
12. Do not transport the stove with fuel cartridges inserted
in stove.
13. Do not let grease or other materials accumulate in the
drip pan.
NOTE: This appliance is set to use 8 oz. disposable
butane cartridges. Use only cartridges marked butane.
Disposable butane cartridges must be disconnected from
the stove when it is in storage.
The LP-gas cartridge(s) used with this stove must
be constructed and marked in accordance with the
specifications for LP-gas cylinders of the U.S. Department
of Transportation or Transport Canada, CAN/CSA B339.
Dispose of empty fuel cartridges in approved containers in
accordance with local codes. Do Not incinerate.
14. Do not modify this appliance. Modifications will result in
a safety hazard. Questions regarding certification in other
areas may be addressed to 1-435-752-3922.
15. Apartment Dwellers: Check with management to learn the
requirements and fire codes for using an LP Gas appliance
at an apartment. If allowed, use outside on the ground
floor with a 10 foot clearance from walls or rails.
16. Do not block holes in bottom or sides of appliance.
17. Storage of an appliance indoors is permissible only if
the fuel cartridge is disconnected and removed from the
appliance.
18. To avoid overheating never use two stoves
side by side. Do not use pots or pans that
overhang the gas cartridge.
0610-BDZ-138-Instructions.indd 4-5
2. If ignition does not occur in 5 seconds, turn the burner
control(s) off, wait 5 minutes, and repeat lighting
procedure. If built-in ignitor will not light follow the
preceding steps and hold a lit long igniter or match next to
the burner when opening the control valve.
1. DRIP PAN INSTALLATION
Unpack stove and place on firm
level surface. Clear area of all
packing materials. Install drip pan
properly by making sure the
grooved Pot Grates are facing
up and the pan is placed securely
on the stove.
3. OPERATING THE STOVE
Use the Flame Height Control
Knob to adjust flame height to
desired heat setting.
CATION: Never allow the flame
to wash up the sides of a cooking
vessel
NOTE: Improper installation may result in a hazardous situation.
2. INSTALLING FUEL CARTRIDGE
Control knob must be in OFF
position or cartridge will not
install. Insert finger into round
hole of compartment cover to
pull open. Insert fuel cartridge by
sliding the cartridge fuel nozzle
into the stove nozzle receptacle.
Make sure the opposite end of
fuel cartridge is aligned properly
to fit into the notch in the
bottom guide.
4. EXTINGUISH THE FLAME
Twist Flame Height Control knob
clockwise all the way to the OFF
position.
NOTE: Make sure you twist knob
fully until it cannot be pushed any
further.
If the flame is accidentally
extinguished, turn the appliance
valves OFF and WAIT 5 minutes
before attempting to ignite.
3. FUEL COLLAR ALIGNMENT
Burner Flame Check
Gently rotate the fuel
cartridge until the notch flap is
seated completely into the fuel
collar notch.
• Light burner; rotate
knob(s) from HIGH to
LOW. You should see
a smaller flame in LOW
position than seen on
HIGH. Always check
flame prior to each use.
A good flame should
be blue with minimal
yellow tip. Some yellow tips on flames are acceptable as long
as no carbon or soot deposits appear.
4. LOCK IN FUEL CARTRIDGE
Slide lock-in/release lever all the
way down until you feel a
firm click.
CAUTION: Forcing the lever down
when the cartridge is not positioned
properly may result in a hazardous
situation.
Removing Cartridge
NOTE: The lever will not push all the
way down if:
• Make sure control knob is in OFF
position Raise release lever until
it is positioned at the top of the
slot. Insert finger into round hole
of compartment cover to pull
open. Grip fuel cartridge towards
its bottom and pull up. Dispose
of empty can or reuse remaining
fuel later. Close fuel cartridge
compartment cover.
1) The collar flap is not seated
properly into the notched fuel collar
2) The flame control knob is not in
the OFF position
Close fuel cartridge compartment cover.
Make sure the gas cartridge is installed correctly to avoid
leaks.
Soapy water may be used to check for leaks. Do not use an
open flame to check for leaks.
CAUTION
WARNING
All cleaning and maintenance should only be done when
the appliance is cool and with the fuel cartridge removed.
DO NOT clean any part in a self-cleaning oven. The
extreme heat will damage the finish. Never Remove safety
devices or gas components.
• Do not put hands or any other body parts over the burner
during lighting or when in use to prevent burns.
Lighting Stove Instructions:
• REPACKING THE STOVE FOR STORAGE OR TRANSPORTATION
1. STOVE IGNITION
CAUTION: Wait until all parts of the
stove have completely cooled and
the fuel cartridge is removed before
repacking into carry case.
Twist flame height control
knob firmly counter-clockwise
toward the ON position until
you hear a loud click. Blue flame
should appear up from the
aluminum burner.
NOTE: This step may be repeated a
few times if the ignition is not instant however, make sure to
return knob fully to OFF position after each attempt is made.
CAUTION: Leaving the control knob in any position other
than OFF when the cartridge is installed but not in use will
cause gas to escape from the fuel nozzle and may result in
a hazardous situation. The stove must not be exposed to
flammable vapors or liquids during lighting.
0610-BDZ-138-Instructions
WARNING
Combustion by-products produced when using this
product contain chemicals known to the State of
California to cause cancer, birth defects, or other
reproductive harm.
Setup Instructions:
Clean the drip pan to prevent free
liquids or food from leaking into the
internal stove mechanisms. Invert
the drip pan and replace it carefully
into the base. Place stove into carry
case, close lid and lock tabs.
Cleaning The Burner
NOTE: Spiders and small insects can spin webs and build nests
inside the burner. This especially occurs in late summer and
fall before frost when spiders are most active. These nests can
obstruct gas flow and cause a fire in and around the burner
and orifice. Such a fire can cause operator injury and serious
damage to the appliance. To help prevent a blockage and
ensure full heat output, clean and inspect burner tube often
(once or twice a month). NOTE: Water or air pressure will not
normally clear a spider web.
Cleaning and Maintenance
Correct care and maintenance will keep your appliance
operating smoothly. Clean regularly as determined by the
amount of use. NOTE: Clean the entire appliance each year
and tighten all hardware on a regular basis (1-2 times a year
or more depending on usage). Cleaning should be done
where detergents won’t harm patio, lawn, or the like. Keep
appliance area clear and free from combustible materials,
gasoline and other flammable vapors and liquids. Keep the
ventilation opening(s) of the cylinder enclosure free and clear
from debris.
Suggested Cleaning Materials
• Mild dish washing liquid detergent
• Wire brush
• Nylon cleaning pad
• Hot water
• Paper clip
• Soft brass bristled brush
Component Cleaning:
• Burner should be wiped clean. Hot soapy water and a soft
bristle brush can be used to clean the burner surfaces. Clean
clogged gas port holes with an opened paper clip. Replace
corroded or damaged burners that would emit excess gas.
• COOKING SURFACES, POTS AND PANS: Clean the cooking
surface with soapy water and a nylon cleaning pad.
• After appliance has cooled, wipe areas where paint and
finish have burned off to minimize rusting.
LIMITED WARRANTY
To activate warranty, register on-line at:
www.CampChef.com
The manufacturer warrants stove components (except
paint and finish) to be free from defect in materials and
workmanship for 1 year from the date of purchase. All
accessories (included with stove or purchased separately)
are warranted from defect in materials and workmanship
for 90 days from the original purchasing date. Within these
periods, the manufacturer will replace or repair defective
parts deemed unusable from its original intent by making
available the parts thereof FOB Logan, UT 84321
Product paint and finish is not warranted. The exterior
finish of the product will wear down over time.
Clean the unit after each use to maintain the finish and
prolong the life of your product. Wipe away all grease and
ashes. Keep metal products free of moisture, salts, acids and
harsh fluctuations in temperatures.
Warranty does not cover normal wear of parts or damage
caused by misuse, abuse, overheating and alteration.
Repairs or alterations made by anyone other than Camp
Chef are not covered in this Warranty. Manufacturer
will not be held liable for any losses due to neglectful
operation. Furthermore, this Warranty does not cover
damaged caused by natural disasters such as earthquakes,
hurricanes, tornadoes, floods, lightning, fires, etc.
Upon the expiration of this warranty all such liability will
terminate. No other warranties are expressed or implied.
Keep all original sales receipts. Proof of purchase is required
to obtain Warranty services. Prior written approval and
a Return Authorization Number must be obtained and
accepted for repair or replacement only. Returns must be
shipped prepaid. Collect shipment or shipments without a
Return Authorization Number will not be accepted.
To obtain Warranty services call 1.800.650.2433.
*Warranty applies to the contiguous US states only.
7/22/10 7:52:08 AM
f u n
f a m i l y
See the full line of Mountain Series Products
and Accessories at www.campchef .com
t e t o n
C h e c k O u t t h e s e i t e ms a n d M o r e a t
w w w . campc h e f . com
m o u n t a i n
2 Mantle Lantern
Model: MSL2
Propane Fire Ring
Model #: GCLOG
s e r i e s
Teton 2 Burner Stove
Model: MS2
rainier
Camp/Stove Table
Model #: CT38
m o u n t a i n
s e r i e s
Popcorn Popper
Model #: CCP
Deluxe 2 Mantle Lantern
Model: MSL2D
Steel Griddle
d e n a l i
Model #: FG20
Deluxe 3 Mantle Lantern
Model: MSL3D
m o u n t a i n
s e r i e s
Cast Iron Cooking Irons
Model #: DSPI / SSPI / RPI
Extendable Roasting Sticks
Model #: SRS4E
10” Dutch Oven
Model #: SDO10
All Accessories Are Available At
www.campchef.com
0610-BDZ-138-Instructions.indd 6-7
Denali 3 Burner Grill/Stove Combo
Model: MS3G
Mountain Series Carry Bags
Model: CBMS/CBMSL
s e r i e s
Rainier 2 Burner Grill/Stove Combo
Model: MS2G
m o u n t a i n
c a m p f i r e
TM
7/22/10 7:52:53 AM
To see the whole line of Family Fun Camp Chef gear and
accessories go to
www.campchef.com
3 Burner Stoves
&
Grills
2 Burner Stoves
&
Griddles
Smokers
TANK SOLD
SEPARATELY
Single Burner
Stoves
Ovens
Cast Iron
0610-BDZ-138-Instructions.indd 8
7/22/10 7:54:01 AM