1
NetIQ® eDirectory™ 8.8 SP8
Installation Guide
December 2014
Legal Notice
THIS DOCUMENT AND THE SOFTWARE DESCRIBED IN THIS DOCUMENT ARE FURNISHED UNDER AND ARE
SUBJECT TO THE TERMS OF A LICENSE AGREEMENT OR A NON-DISCLOSURE AGREEMENT. EXCEPT AS EXPRESSLY
SET FORTH IN SUCH LICENSE AGREEMENT OR NON-DISCLOSURE AGREEMENT, NETIQ CORPORATION PROVIDES
THIS DOCUMENT AND THE SOFTWARE DESCRIBED IN THIS DOCUMENT "AS IS" WITHOUT WARRANTY OF ANY
KIND, EITHER EXPRESS OR IMPLIED, INCLUDING, BUT NOT LIMITED TO, THE IMPLIED WARRANTIES OF
MERCHANTABILITY OR FITNESS FOR A PARTICULAR PURPOSE. SOME STATES DO NOT ALLOW DISCLAIMERS OF
EXPRESS OR IMPLIED WARRANTIES IN CERTAIN TRANSACTIONS; THEREFORE, THIS STATEMENT MAY NOT APPLY
TO YOU.
For purposes of clarity, any module, adapter or other similar material ("Module") is licensed under the terms and conditions of
the End User License Agreement for the applicable version of the NetIQ product or software to which it relates or
interoperates with, and by accessing, copying or using a Module you agree to be bound by such terms. If you do not agree to
the terms of the End User License Agreement you are not authorized to use, access or copy a Module and you must destroy all
copies of the Module and contact NetIQ for further instructions.
This document and the software described in this document may not be lent, sold, or given away without the prior written
permission of NetIQ Corporation, except as otherwise permitted by law. Except as expressly set forth in such license
agreement or non-disclosure agreement, no part of this document or the software described in this document may be
reproduced, stored in a retrieval system, or transmitted in any form or by any means, electronic, mechanical, or otherwise,
without the prior written consent of NetIQ Corporation. Some companies, names, and data in this document are used for
illustration purposes and may not represent real companies, individuals, or data.
This document could include technical inaccuracies or typographical errors. Changes are periodically made to the
information herein. These changes may be incorporated in new editions of this document. NetIQ Corporation may make
improvements in or changes to the software described in this document at any time.
U.S. Government Restricted Rights: If the software and documentation are being acquired by or on behalf of the U.S.
Government or by a U.S. Government prime contractor or subcontractor (at any tier), in accordance with 48 C.F.R. 227.7202-4
(for Department of Defense (DOD) acquisitions) and 48 C.F.R. 2.101 and 12.212 (for non-DOD acquisitions), the government’s
rights in the software and documentation, including its rights to use, modify, reproduce, release, perform, display or disclose
the software or documentation, will be subject in all respects to the commercial license rights and restrictions provided in the
license agreement.
© 2013 NetIQ Corporation and its affiliates. All Rights Reserved.
For information about NetIQ trademarks, see https://www.netiq.com/company/legal/.
Contents
About this Book and the Library
About NetIQ Corporation
7
9
1 Install and Upgrade Features
1.1
1.2
1.3
1.4
1.5
1.6
1.7
1.8
11
Multiple Package Formats for Installing eDirectory 8.8 SP 8 . . . . . . . . . . . . . . . . . . . . . . . . . . . . . . . 12
Installing eDirectory 8.8 in a Custom Location . . . . . . . . . . . . . . . . . . . . . . . . . . . . . . . . . . . . . . . . . . 12
1.2.1
Specifying a Custom Location for Application Files . . . . . . . . . . . . . . . . . . . . . . . . . . . . . . . 12
1.2.2
Specifying a Custom Location for Data Files . . . . . . . . . . . . . . . . . . . . . . . . . . . . . . . . . . . . 13
1.2.3
Specifying a Custom Location for Configuration Files . . . . . . . . . . . . . . . . . . . . . . . . . . . . . 13
Non-root Install . . . . . . . . . . . . . . . . . . . . . . . . . . . . . . . . . . . . . . . . . . . . . . . . . . . . . . . . . . . . . . . . . . 14
Standards Compliance . . . . . . . . . . . . . . . . . . . . . . . . . . . . . . . . . . . . . . . . . . . . . . . . . . . . . . . . . . . . 14
1.4.1
FHS Compliance . . . . . . . . . . . . . . . . . . . . . . . . . . . . . . . . . . . . . . . . . . . . . . . . . . . . . . . . . 14
1.4.2
LSB Compliance . . . . . . . . . . . . . . . . . . . . . . . . . . . . . . . . . . . . . . . . . . . . . . . . . . . . . . . . . 15
Server Health Checks . . . . . . . . . . . . . . . . . . . . . . . . . . . . . . . . . . . . . . . . . . . . . . . . . . . . . . . . . . . . 15
1.5.1
Need for Health Checks. . . . . . . . . . . . . . . . . . . . . . . . . . . . . . . . . . . . . . . . . . . . . . . . . . . . 16
1.5.2
What Makes a Server Healthy? . . . . . . . . . . . . . . . . . . . . . . . . . . . . . . . . . . . . . . . . . . . . . . 16
1.5.3
Performing Health Checks . . . . . . . . . . . . . . . . . . . . . . . . . . . . . . . . . . . . . . . . . . . . . . . . . . 16
1.5.4
Types of Health Checks. . . . . . . . . . . . . . . . . . . . . . . . . . . . . . . . . . . . . . . . . . . . . . . . . . . . 17
1.5.5
Categorization of Health . . . . . . . . . . . . . . . . . . . . . . . . . . . . . . . . . . . . . . . . . . . . . . . . . . . 18
1.5.6
Log Files . . . . . . . . . . . . . . . . . . . . . . . . . . . . . . . . . . . . . . . . . . . . . . . . . . . . . . . . . . . . . . . 18
SecretStore Integration with eDirectory . . . . . . . . . . . . . . . . . . . . . . . . . . . . . . . . . . . . . . . . . . . . . . . 19
eDirectory Instrumentation Installation . . . . . . . . . . . . . . . . . . . . . . . . . . . . . . . . . . . . . . . . . . . . . . . . 20
For More Information . . . . . . . . . . . . . . . . . . . . . . . . . . . . . . . . . . . . . . . . . . . . . . . . . . . . . . . . . . . . . 20
2 Installing or Upgrading NetIQ eDirectory on Linux
2.1
2.2
2.3
2.4
2.5
2.6
21
System Requirements . . . . . . . . . . . . . . . . . . . . . . . . . . . . . . . . . . . . . . . . . . . . . . . . . . . . . . . . . . . . 21
Prerequisites . . . . . . . . . . . . . . . . . . . . . . . . . . . . . . . . . . . . . . . . . . . . . . . . . . . . . . . . . . . . . . . . . . . 22
Hardware Requirements . . . . . . . . . . . . . . . . . . . . . . . . . . . . . . . . . . . . . . . . . . . . . . . . . . . . . . . . . . 24
Forcing the Backlink Process to Run . . . . . . . . . . . . . . . . . . . . . . . . . . . . . . . . . . . . . . . . . . . . . . . . . 24
Upgrading eDirectory . . . . . . . . . . . . . . . . . . . . . . . . . . . . . . . . . . . . . . . . . . . . . . . . . . . . . . . . . . . . 24
2.5.1
Server Health Checks . . . . . . . . . . . . . . . . . . . . . . . . . . . . . . . . . . . . . . . . . . . . . . . . . . . . . 25
2.5.2
Upgrading on Linux Servers Other Than OES . . . . . . . . . . . . . . . . . . . . . . . . . . . . . . . . . . 25
2.5.3
Unattended Upgrade of eDirectory on Linux . . . . . . . . . . . . . . . . . . . . . . . . . . . . . . . . . . . . 26
2.5.4
Upgrading eDirectory on Existing OES . . . . . . . . . . . . . . . . . . . . . . . . . . . . . . . . . . . . . . . . 27
2.5.5
Upgrading the Tarball Deployment of eDirectory 8.8. . . . . . . . . . . . . . . . . . . . . . . . . . . . . . 27
2.5.6
Upgrading Multiple Instances . . . . . . . . . . . . . . . . . . . . . . . . . . . . . . . . . . . . . . . . . . . . . . . 28
Installing eDirectory . . . . . . . . . . . . . . . . . . . . . . . . . . . . . . . . . . . . . . . . . . . . . . . . . . . . . . . . . . . . . . 29
2.6.1
Using SLP with eDirectory . . . . . . . . . . . . . . . . . . . . . . . . . . . . . . . . . . . . . . . . . . . . . . . . . . 29
2.6.2
Using the nds-install Utility to Install eDirectory Components . . . . . . . . . . . . . . . . . . . . . . . 30
2.6.3
Non-root User Installing eDirectory 8.8 . . . . . . . . . . . . . . . . . . . . . . . . . . . . . . . . . . . . . . . . 32
2.6.4
Using the ndsconfig Utility to Add or Remove the eDirectory Replica Server . . . . . . . . . . . 36
2.6.5
Using ndsconfig to Configure Multiple Instances of eDirectory 8.8 . . . . . . . . . . . . . . . . . . . 40
2.6.6
Using ndsconfig to Install a Linux Server into a Tree with Dotted Name Containers. . . . . . 47
2.6.7
Using the nmasinst Utility to Configure NMAS . . . . . . . . . . . . . . . . . . . . . . . . . . . . . . . . . . 48
2.6.8
Non-root user SNMP configuration . . . . . . . . . . . . . . . . . . . . . . . . . . . . . . . . . . . . . . . . . . . 49
3 Installing or Upgrading NetIQ eDirectory on Windows
3.1
51
System Requirements . . . . . . . . . . . . . . . . . . . . . . . . . . . . . . . . . . . . . . . . . . . . . . . . . . . . . . . . . . . . 51
Contents
3
3.2
3.3
3.4
3.5
3.6
Prerequisites . . . . . . . . . . . . . . . . . . . . . . . . . . . . . . . . . . . . . . . . . . . . . . . . . . . . . . . . . . . . . . . . . . . 52
Hardware Requirements . . . . . . . . . . . . . . . . . . . . . . . . . . . . . . . . . . . . . . . . . . . . . . . . . . . . . . . . . . 53
Forcing the Backlink Process to Run . . . . . . . . . . . . . . . . . . . . . . . . . . . . . . . . . . . . . . . . . . . . . . . . . 54
Disk Space Check on Upgrading to eDirectory SP8 or later . . . . . . . . . . . . . . . . . . . . . . . . . . . . . . . 54
Installing NetIQ eDirectory on Windows. . . . . . . . . . . . . . . . . . . . . . . . . . . . . . . . . . . . . . . . . . . . . . . 54
3.6.1
Installing or Updating NetIQ eDirectory 8.8 on a Windows Server . . . . . . . . . . . . . . . . . . . 55
3.6.2
Server Health Checks . . . . . . . . . . . . . . . . . . . . . . . . . . . . . . . . . . . . . . . . . . . . . . . . . . . . . 56
3.6.3
Communicating with eDirectory through LDAP . . . . . . . . . . . . . . . . . . . . . . . . . . . . . . . . . . 57
3.6.4
Installing NMAS Server Software . . . . . . . . . . . . . . . . . . . . . . . . . . . . . . . . . . . . . . . . . . . . 58
3.6.5
Installing NMAS Client Software . . . . . . . . . . . . . . . . . . . . . . . . . . . . . . . . . . . . . . . . . . . . . 59
3.6.6
Installing into a Tree with Dotted Name Containers . . . . . . . . . . . . . . . . . . . . . . . . . . . . . . 59
3.6.7
Unattended Install and Configure to eDirectory 8.8 SP8 on Windows . . . . . . . . . . . . . . . . 60
4 Installing eDirectory on Linux and Windows with IPv6 Addresses
4.1
4.2
Configuring eDirectory on Linux with IPv6 . . . . . . . . . . . . . . . . . . . . . . . . . . . . . . . . . . . . . . . . . . . . . 72
4.1.1
Creating a New eDirectory Tree . . . . . . . . . . . . . . . . . . . . . . . . . . . . . . . . . . . . . . . . . . . . . 72
4.1.2
Adding a Server to an Existing eDirectory Tree. . . . . . . . . . . . . . . . . . . . . . . . . . . . . . . . . . 72
4.1.3
Enabling IPv6 Addresses on Existing or Upgraded eDirectory Servers . . . . . . . . . . . . . . . 72
4.1.4
Adding LDAP URLS for IPV6 on the LDAP Server Object . . . . . . . . . . . . . . . . . . . . . . . . . 73
Installing or Upgrading eDirectory on Windows with IPv6 . . . . . . . . . . . . . . . . . . . . . . . . . . . . . . . . . 73
4.2.1
Enabling IPv6 While Installing or Upgrading eDirectory . . . . . . . . . . . . . . . . . . . . . . . . . . . 73
4.2.2
Enabling IPv6 for Existing Servers . . . . . . . . . . . . . . . . . . . . . . . . . . . . . . . . . . . . . . . . . . . 73
4.2.3
Accessing iMonitor. . . . . . . . . . . . . . . . . . . . . . . . . . . . . . . . . . . . . . . . . . . . . . . . . . . . . . . . 73
5 Relocating the DIB
5.1
5.2
7.2
7.3
4
91
Migrating to eDirectory 8.8 SP8 While Upgrading the Operating System . . . . . . . . . . . . . . . . . . . . . 91
Migrating to eDirectory 8.8 SP8 Without Upgrading the Operating System. . . . . . . . . . . . . . . . . . . . 92
9 Migrating eDirectory from NetWare to OES 2 Linux
9.1
83
Configuration Utilities . . . . . . . . . . . . . . . . . . . . . . . . . . . . . . . . . . . . . . . . . . . . . . . . . . . . . . . . . . . . 83
7.1.1
The ndsconfig Utility . . . . . . . . . . . . . . . . . . . . . . . . . . . . . . . . . . . . . . . . . . . . . . . . . . . . . . 83
7.1.2
Using LDAP Tools to Configure the LDAP Server and LDAP Group Objects . . . . . . . . . . . 84
7.1.3
Using the nmasinst Utility to Configure NetIQ Modular Authentication Service. . . . . . . . . . 84
7.1.4
Customizing eDirectory . . . . . . . . . . . . . . . . . . . . . . . . . . . . . . . . . . . . . . . . . . . . . . . . . . . . 84
Configuration Parameters . . . . . . . . . . . . . . . . . . . . . . . . . . . . . . . . . . . . . . . . . . . . . . . . . . . . . . . . . 85
Security Considerations . . . . . . . . . . . . . . . . . . . . . . . . . . . . . . . . . . . . . . . . . . . . . . . . . . . . . . . . . . . 90
8 Migrating to eDirectory 8.8 SP8
8.1
8.2
77
Reference Changes in 8.8 SP1 or Later Versions . . . . . . . . . . . . . . . . . . . . . . . . . . . . . . . . . . . . . . . 77
Upgrade Process in 8.8 SP8 . . . . . . . . . . . . . . . . . . . . . . . . . . . . . . . . . . . . . . . . . . . . . . . . . . . . . . . 78
Performing a Dry Run before Upgrading eDirectory . . . . . . . . . . . . . . . . . . . . . . . . . . . . . . . . . . . . . 80
6.3.1
Common Problems Encountered during the Upgrade Process . . . . . . . . . . . . . . . . . . . . . . 80
7 Configuring NetIQ eDirectory on Linux
7.1
75
Linux. . . . . . . . . . . . . . . . . . . . . . . . . . . . . . . . . . . . . . . . . . . . . . . . . . . . . . . . . . . . . . . . . . . . . . . . . . 75
Windows. . . . . . . . . . . . . . . . . . . . . . . . . . . . . . . . . . . . . . . . . . . . . . . . . . . . . . . . . . . . . . . . . . . . . . . 76
6 Upgrade Requirements of eDirectory 8.8
6.1
6.2
6.3
71
95
Planning Your Migration . . . . . . . . . . . . . . . . . . . . . . . . . . . . . . . . . . . . . . . . . . . . . . . . . . . . . . . . . . . 95
9.1.1
System Requirements . . . . . . . . . . . . . . . . . . . . . . . . . . . . . . . . . . . . . . . . . . . . . . . . . . . . . 95
NetIQ eDirectory 8.8 SP8 Installation Guide
9.2
9.3
9.4
9.1.2
Prerequisites . . . . . . . . . . . . . . . . . . . . . . . . . . . . . . . . . . . . . . . . . . . . . . . . . . . . . . . . . . . . 95
9.1.3
Supported Platforms . . . . . . . . . . . . . . . . . . . . . . . . . . . . . . . . . . . . . . . . . . . . . . . . . . . . . . 96
9.1.4
Considerations . . . . . . . . . . . . . . . . . . . . . . . . . . . . . . . . . . . . . . . . . . . . . . . . . . . . . . . . . . . 96
Migration Tools. . . . . . . . . . . . . . . . . . . . . . . . . . . . . . . . . . . . . . . . . . . . . . . . . . . . . . . . . . . . . . . . . . 96
Migration Procedure . . . . . . . . . . . . . . . . . . . . . . . . . . . . . . . . . . . . . . . . . . . . . . . . . . . . . . . . . . . . . . 96
After the Migration . . . . . . . . . . . . . . . . . . . . . . . . . . . . . . . . . . . . . . . . . . . . . . . . . . . . . . . . . . . . . . . 98
10 Deploying eDirectory on High Availability Clusters
10.1
10.2
10.3
10.4
99
Clustering eDirectory Services on Linux . . . . . . . . . . . . . . . . . . . . . . . . . . . . . . . . . . . . . . . . . . . . . 100
10.1.1 Prerequisites . . . . . . . . . . . . . . . . . . . . . . . . . . . . . . . . . . . . . . . . . . . . . . . . . . . . . . . . . . . 100
10.1.2 Installing and Configuring eDirectory . . . . . . . . . . . . . . . . . . . . . . . . . . . . . . . . . . . . . . . . . 100
10.1.3 Configuring SNMP Server in Clustered Linux Environments. . . . . . . . . . . . . . . . . . . . . . . 102
Clustering eDirectory Services on Windows . . . . . . . . . . . . . . . . . . . . . . . . . . . . . . . . . . . . . . . . . . 102
10.2.1 Prerequisites . . . . . . . . . . . . . . . . . . . . . . . . . . . . . . . . . . . . . . . . . . . . . . . . . . . . . . . . . . . 102
10.2.2 Installing and Configuring eDirectory . . . . . . . . . . . . . . . . . . . . . . . . . . . . . . . . . . . . . . . . . 103
10.2.3 Configuring SNMP Server in Clustered Windows Environments. . . . . . . . . . . . . . . . . . . . 104
Troubleshooting Clustered Environments . . . . . . . . . . . . . . . . . . . . . . . . . . . . . . . . . . . . . . . . . . . . 105
10.3.1 Repairing or Upgrading eDirectory on Clustered Nodes . . . . . . . . . . . . . . . . . . . . . . . . . . 105
10.3.2 Creating Windows Registry Keys . . . . . . . . . . . . . . . . . . . . . . . . . . . . . . . . . . . . . . . . . . . 105
Configuration Utility Options. . . . . . . . . . . . . . . . . . . . . . . . . . . . . . . . . . . . . . . . . . . . . . . . . . . . . . . 105
11 Uninstalling NetIQ eDirectory
11.1
11.2
11.3
11.4
107
Uninstalling eDirectory on Windows. . . . . . . . . . . . . . . . . . . . . . . . . . . . . . . . . . . . . . . . . . . . . . . . . 107
11.1.1 Uninstalling eDirectory, ConsoleOne, and SLP DA . . . . . . . . . . . . . . . . . . . . . . . . . . . . . . 107
11.1.2 Unattended Uninstallation of eDirectory . . . . . . . . . . . . . . . . . . . . . . . . . . . . . . . . . . . . . . 108
11.1.3 Uninstalling NICI . . . . . . . . . . . . . . . . . . . . . . . . . . . . . . . . . . . . . . . . . . . . . . . . . . . . . . . . 111
11.1.4 Uninstalling Microsoft Visual C++ 2005 and Visual C++ 2012 Runtime Libraries . . . . . . . 111
Uninstalling eDirectory on Linux. . . . . . . . . . . . . . . . . . . . . . . . . . . . . . . . . . . . . . . . . . . . . . . . . . . . 111
Unattended Uninstallation of eDirectory on Linux . . . . . . . . . . . . . . . . . . . . . . . . . . . . . . . . . . . . . . 112
Caveats for Uninstalling eDirectory . . . . . . . . . . . . . . . . . . . . . . . . . . . . . . . . . . . . . . . . . . . . . . . . . 113
A Linux Packages for NetIQ eDirectory
115
B eDirectory Health Checks
119
B.1
B.2
B.3
B.4
B.5
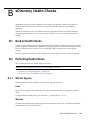
Need for Health Checks . . . . . . . . . . . . . . . . . . . . . . . . . . . . . . . . . . . . . . . . . . . . . . . . . . . . . . . . . . 119
Performing Health Checks . . . . . . . . . . . . . . . . . . . . . . . . . . . . . . . . . . . . . . . . . . . . . . . . . . . . . . . . 119
B.2.1
With the Upgrade. . . . . . . . . . . . . . . . . . . . . . . . . . . . . . . . . . . . . . . . . . . . . . . . . . . . . . . . 119
B.2.2
As a Standalone Utility. . . . . . . . . . . . . . . . . . . . . . . . . . . . . . . . . . . . . . . . . . . . . . . . . . . . 120
Types of Health Checks . . . . . . . . . . . . . . . . . . . . . . . . . . . . . . . . . . . . . . . . . . . . . . . . . . . . . . . . . . 120
B.3.1
Basic Server Health . . . . . . . . . . . . . . . . . . . . . . . . . . . . . . . . . . . . . . . . . . . . . . . . . . . . . . 120
B.3.2
Partitions and Replica Health . . . . . . . . . . . . . . . . . . . . . . . . . . . . . . . . . . . . . . . . . . . . . . 121
Categorization of Health. . . . . . . . . . . . . . . . . . . . . . . . . . . . . . . . . . . . . . . . . . . . . . . . . . . . . . . . . . 121
B.4.1
Normal . . . . . . . . . . . . . . . . . . . . . . . . . . . . . . . . . . . . . . . . . . . . . . . . . . . . . . . . . . . . . . . . 121
B.4.2
Warning . . . . . . . . . . . . . . . . . . . . . . . . . . . . . . . . . . . . . . . . . . . . . . . . . . . . . . . . . . . . . . . 121
B.4.3
Critical . . . . . . . . . . . . . . . . . . . . . . . . . . . . . . . . . . . . . . . . . . . . . . . . . . . . . . . . . . . . . . . . 121
Log Files. . . . . . . . . . . . . . . . . . . . . . . . . . . . . . . . . . . . . . . . . . . . . . . . . . . . . . . . . . . . . . . . . . . . . . 122
C Configuring OpenSLP for eDirectory
C.1
C.2
123
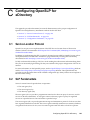
Service Location Protocol . . . . . . . . . . . . . . . . . . . . . . . . . . . . . . . . . . . . . . . . . . . . . . . . . . . . . . . . 123
SLP Fundamentals. . . . . . . . . . . . . . . . . . . . . . . . . . . . . . . . . . . . . . . . . . . . . . . . . . . . . . . . . . . . . . 123
C.2.1
NetIQ Service Location Providers . . . . . . . . . . . . . . . . . . . . . . . . . . . . . . . . . . . . . . . . . . . 124
C.2.2
User Agents . . . . . . . . . . . . . . . . . . . . . . . . . . . . . . . . . . . . . . . . . . . . . . . . . . . . . . . . . . . . 124
Contents
5
C.3
6
C.2.3
Service Agents. . . . . . . . . . . . . . . . . . . . . . . . . . . . . . . . . . . . . . . . . . . . . . . . . . . . . . . . . . 125
Configuration Parameters . . . . . . . . . . . . . . . . . . . . . . . . . . . . . . . . . . . . . . . . . . . . . . . . . . . . . . . . 125
NetIQ eDirectory 8.8 SP8 Installation Guide
About this Book and the Library
The Installation Guide describes how to install eDirectory 8.8. It is intended for network
administrators.
For the most recent version of the NetIQ eDirectory 8.8 SP8 Installation Guide, see the NetIQ eDirectory
8.8 online documentation (https://www.netiq.com/documentation/edir88/) Web site.
Intended Audience
The guide is intended for network administrators.
Other Information in the Library
The library provides the following information resources:
XDASv2 Administration Guide
Describes how to configure and use XDASv2 to audit eDirectory and NetIQ Identity Manager.
Administration Guide
Describes how to manage and configure eDirectory.
What’s New Guide
Describes the new features of eDirectory.
Troubleshooting Guide
Describes how to resolve eDirectory issues.
Tuning Guide for Linux Platforms
Describes how to analyze and tune eDirectory on Linux platforms to yield superior performance
in all deployments.
These guides are available at the NetIQ eDirectory 8.8 documentation Web site (https://
www.netiq.com/documentation/edir88/).
For information about the eDirectory management utility, see the NetIQ iManager 2.7 Administration
Guide (https://www.netiq.com/documentation/imanager/).
About this Book and the Library
7
8
NetIQ eDirectory 8.8 SP8 Installation Guide
About NetIQ Corporation
We are a global, enterprise software company, with a focus on the three persistent challenges in your
environment: Change, complexity and risk—and how we can help you control them.
Our Viewpoint
Adapting to change and managing complexity and risk are nothing new
In fact, of all the challenges you face, these are perhaps the most prominent variables that deny
you the control you need to securely measure, monitor, and manage your physical, virtual, and
cloud computing environments.
Enabling critical business services, better and faster
We believe that providing as much control as possible to IT organizations is the only way to
enable timelier and cost effective delivery of services. Persistent pressures like change and
complexity will only continue to increase as organizations continue to change and the
technologies needed to manage them become inherently more complex.
Our Philosophy
Selling intelligent solutions, not just software
In order to provide reliable control, we first make sure we understand the real-world scenarios
in which IT organizations like yours operate — day in and day out. That's the only way we can
develop practical, intelligent IT solutions that successfully yield proven, measurable results.
And that's so much more rewarding than simply selling software.
Driving your success is our passion
We place your success at the heart of how we do business. From product inception to
deployment, we understand that you need IT solutions that work well and integrate seamlessly
with your existing investments; you need ongoing support and training post-deployment; and
you need someone that is truly easy to work with — for a change. Ultimately, when you succeed,
we all succeed.
Our Solutions
Identity & Access Governance
Access Management
Security Management
Systems & Application Management
Workload Management
Service Management
About NetIQ Corporation
9
Contacting Sales Support
For questions about products, pricing, and capabilities, contact your local partner. If you cannot
contact your partner, contact our Sales Support team.
Worldwide:
www.netiq.com/about_netiq/officelocations.asp
United States and Canada:
1-888-323-6768
Email:
[email protected]
Web Site:
www.netiq.com
Contacting Technical Support
For specific product issues, contact our Technical Support team.
Worldwide:
www.netiq.com/support/contactinfo.asp
North and South America:
1-713-418-5555
Europe, Middle East, and Africa:
+353 (0) 91-782 677
Email:
[email protected]
Web Site:
www.netiq.com/support
Contacting Documentation Support
Our goal is to provide documentation that meets your needs. If you have suggestions for
improvements, click Add Comment at the bottom of any page in the HTML versions of the
documentation posted at www.netiq.com/documentation. You can also email [email protected]. We value your input and look forward to hearing from you.
Contacting the Online User Community
Qmunity, the NetIQ online community, is a collaborative network connecting you to your peers and
NetIQ experts. By providing more immediate information, useful links to helpful resources, and
access to NetIQ experts, Qmunity helps ensure you are mastering the knowledge you need to realize
the full potential of IT investments upon which you rely. For more information, visit http://
community.netiq.com.
10
NetIQ eDirectory 8.8 SP8 Installation Guide
1
Install and Upgrade Features
1
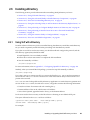
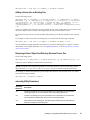
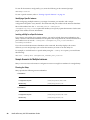
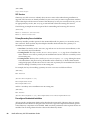
This chapter discusses the features of NetIQ eDirectory 8.8 installation and upgrade.
The following table lists the new features and specifies the platforms they are supported on.
Feature
Linux
Windows
Multiple package formats for installing eDirectory 8.8
Custom location install for application files
Custom location install for data files
Custom location install for configuration files
Non-root install
Improved support for installations on high availability clusters
FHS compliance
LSB compliance
Server health checks
SecretStore integration
eDirectory Instrumentation Installation
This chapter includes the following information:
Section 1.1, “Multiple Package Formats for Installing eDirectory 8.8 SP 8,” on page 12
Section 1.2, “Installing eDirectory 8.8 in a Custom Location,” on page 12
Section 1.3, “Non-root Install,” on page 14
Section 1.4, “Standards Compliance,” on page 14
Section 1.5, “Server Health Checks,” on page 15
Section 1.6, “SecretStore Integration with eDirectory,” on page 19
Section 1.7, “eDirectory Instrumentation Installation,” on page 20
Section 1.8, “For More Information,” on page 20
Install and Upgrade Features
11
1.1
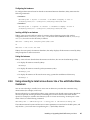
Multiple Package Formats for Installing eDirectory 8.8 SP 8
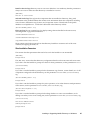
On Linux, you have an option to choose from various file formats while installing eDirectory 8.8 on
your host. The file formats are listed in the table below.
Type of User and Installation Location
Linux
Root user
Default location
RPM
Custom location
Tarball
Non-root user
Custom location
Tarball
For more information on installing using tarballs, refer to Section 2.5.5, “Upgrading the Tarball
Deployment of eDirectory 8.8,” on page 27.
1.2
Installing eDirectory 8.8 in a Custom Location
eDirectory 8.8 gives you the flexibility to install the application, data, and configuration files in a
location of your choice.
One of the scenarios for installing eDirectory 8.8 in a custom location is when you already have an
earlier version of eDirectory installed on your host and you want to test eDirectory 8.8 before
upgrading to it. This way, you can have your existing eDirectory setup undisturbed and also test this
new version. You can then decide whether you want to retain your existing version or want to
upgrade to eDirectory 8.8.
NOTE: SLP and the SNMP subagent are installed in the default locations.
This section explains how to install the various files in a custom location:
Section 1.2.1, “Specifying a Custom Location for Application Files,” on page 12
Section 1.2.2, “Specifying a Custom Location for Data Files,” on page 13
Section 1.2.3, “Specifying a Custom Location for Configuration Files,” on page 13
1.2.1
Specifying a Custom Location for Application Files
While installing eDirectory, you can install your application files in a location of your choice.
Linux
To install eDirectory 8.8 in a custom location, you can use the tarball installation file and untar
eDirectory 8.8 in a location of your choice.
Windows
You were able to specify a custom location for the application files during the installation Wizard
even prior to eDirectory 8.8.
12
NetIQ eDirectory 8.8 SP8 Installation Guide
1.2.2
Specifying a Custom Location for Data Files
While configuring eDirectory, you can save the data files in a location of your choice. The data files
include the data, dib, and log directories.
Linux
To configure the data files in a custom location, you can use either the -d or -D option of the
ndsconfig utility.
Option
Description
-d custom_location
Creates the DIB (the eDirectory database) directory in the path mentioned.
NOTE: This option was present prior to eDirectory 8.8 also.
-D custom_location
Creates the data (contains data such as the pids and socket IDs), dib, and
log directories in the path mentioned.
Windows
On Windows you would be prompted to enter the DIB path during the installation. Enter a path of
your choice.
1.2.3
Specifying a Custom Location for Configuration Files
While configuring eDirectory, you can select the path where you want to save your configuration
files.
Linux
To configure the nds.conf configuration file to a different location, use the --config-file option of
the ndsconfig utility.
To install the other configuration files (such as modules.conf, ndsimon.conf, and ice.conf) to a
different location, do the following:
1 Copy all the configuration files to the new location.
2 Set the new location by entering the following:
ndsconfig set n4u.nds.configdir custom_location
Windows
You cannot specify a custom location for the configuration files on Windows.
Install and Upgrade Features
13
1.3
Non-root Install
eDirectory 8.8 and higher supports installation and configuration of eDirectory servers by a non-root
user. Earlier versions of eDirectory could be installed and configured only by a root user with only a
single instance of eDirectory running on a host.
With eDirectory 8.8 or higher, any non-root user can use a tarball build to install eDirectory. There
can be multiple instances of eDirectory binary installs by the same or different users. However, even
for non-root user installs, the system-level services such as the Novell International Cryptographic
Infrastructure (NICI), SNMP and SLP can be installed only with the root privileges. NICI is a
mandatory component, and SNMP and SLP are optional components for eDirectory functionality.
Also, with a package install, only a single instance can be installed by the root user.
After the install, a non-root user can configure eDirectory server instances using his or her individual
tarball installation, or by using a binary installation. This means that there can be multiple instances
of eDirectory servers running on a single host because any user, either root or non-root, can configure
different eDirectory server instances on a single host by using either a package or tarball installation.
For more details on the Multiple Instances feature, see Section 2.5.6, “Upgrading Multiple Instances,”
on page 28.
Non-root installation and configuration is applicable to Linux platforms only. For more information
on non-root installation and configuration, see Section 2.6.3, “Non-root User Installing eDirectory
8.8,” on page 32.
1.4
Standards Compliance
eDirectory 8.8 is compliant with the following standards:
Section 1.4.1, “FHS Compliance,” on page 14
Section 1.4.2, “LSB Compliance,” on page 15
1.4.1
FHS Compliance
To avoid file conflicts with other product application files, eDirectory 8.8 follows the Filesystem
Hierarchy Standard (FHS). This feature is available only on Linux.
eDirectory follows this directory structure only if you have chosen to install it in the default location.
If you have chosen a custom location, the directory structure would be custom_location/default_path.
For example, if you choose to install in the eDir88 directory, the same directory structure would be
followed in the eDir88 directory, like the man pages would be installed in the /eDir88/opt/
novell/man directory.
The following table lists the change in the directory structure:
14
Types of Files Stored in the Directory
Directory Name and Path
Executable binaries and static shell scripts
/opt/novell/eDirectory/bin
Executable binaries for root use
/opt/novell/eDirectory/sbin
Static or dynamic library binaries
/opt/novell/eDirectory/lib
Configuration files
/etc/opt/novell/eDirectory/conf
Read/Write, run-time dynamic data like the DIB
/var/opt/novell/eDirectory/data
NetIQ eDirectory 8.8 SP8 Installation Guide
Types of Files Stored in the Directory
Directory Name and Path
Log files
/var/opt/novell/eDirectory/log
Linux man pages
/opt/novell/man
Export Environmental Variables
With the FHS implementation in eDirectory 8.8, you need to update the path environmental variables
and export them. This creates the following problems:
You need to remember all the paths exported, so that whenever you open a shell, you need to
export these paths and start using the utilities.
When you want to use more than one set of binary, you have to open more than one shell or have
to unset and set the paths to the different set of binaries frequently.
To resolve the above issue, you can use the /opt/novell/eDirectory/bin/ndspath script as
follows:
Prefix the ndspath script to the utility and run the utility you want as follows:
custom_location/opt/novell/eDirectory/bin/ndspath utility_name_with_parameters
Export the paths in the current shell as follows:
. custom_location/opt/novell/eDirectory/bin/ndspath
After entering the above command, run the utilities as you would normally do. Call the script in
your profile, bashrc, or similar scripts. Therefore, whenever you log in or open a new shell, you
can start using the utilities directly.
1.4.2
LSB Compliance
eDirectory 8.8 is now Linux Standard Base (LSB) compliant. LSB also recommends FHS compliance.
All the eDirectory packages in Linux are prefixed with novell. For example, NDSserv is now novellNDSserv.
1.5
Server Health Checks
NetIQ eDirectory includes server health checks that help you determine whether your server health
is safe before upgrading.
The server health checks run by default with every upgrade and occur before the actual package
upgrade. However, you can also run the diagnostic tool ndscheck to do the health checks.
For more information about performing routine health check procedures, see Maintaining NetIQ
eDirectory in the NetIQ eDirectory 8.8 SP8 Administration Guide (https://www.netiq.com/
documentation/edir88/edir88/data/bookinfo.html)
Install and Upgrade Features
15
1.5.1
Need for Health Checks
In earlier releases of eDirectory, the upgrade did not check the health of the server before proceeding
with the upgrade. If the heath was unstable, the upgrade operation would fail and eDirectory would
be in an inconsistent state. In some cases, you probably could not roll back to the pre-upgrade
settings.
This new health check tool resolves this, letting you to ensure that your server is ready to upgrade.
1.5.2
What Makes a Server Healthy?
The server health check utility performs certain health checks to ensure that the tree is healthy. The
tree is declared healthy when all these health checks are completed successfully.
1.5.3
Performing Health Checks
You can perform server health checks in two ways:
“With the Upgrade” on page 16
“As a Standalone Utility” on page 16
NOTE: You need administrative rights to run the health check utility. The minimal right that can be
set to run the utility is the Public right. However, with the Public right some of the NetWare Core
Protocol (NCP) objects and partition information are not available.
With the Upgrade
The health checks are run by default every time you upgrade eDirectory.
Linux
Every time you upgrade, the health checks are run by default before the actual upgrade operation
starts.
To skip the default health checks, you can use the -j option with the nds-install utility.
Windows
The server health checks happen as part of the installation wizard. You can enable or disable the
health checks when prompted to do so.
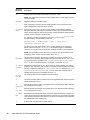
As a Standalone Utility
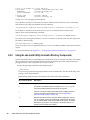
You can run the server health checks as a standalone utility any time you want. The following table
explains the health check utilities.
16
NetIQ eDirectory 8.8 SP8 Installation Guide
Table 1-1 Health Check Utilities
Platform
Utility Name
Linux
ndscheck
Syntax:
ndscheck -h hostname:port -a admin_FDN -F
logfile_path --config-file
configuration_file_name_and_path
NOTE: You can specify either -h or --config-file, but not both
options.
Windows
1.5.4
ndscheck
Types of Health Checks
When you upgrade or run the ndscheck utility, the following types of health checks are done:
Basic Server Health
Partitions and Replica Health
If you run the ndscheck utility, the results from the health checks are displayed on the screen and
logged in to ndscheck.log. For more information on log files, refer to Section 1.5.6, “Log Files,” on
page 18.
If the health checks are done as part of the upgrade, then after the health checks, based on the
criticality of the error, either you are prompted to continue the upgrade process or the process is
aborted. The details of the errors are described in Section 1.5.5, “Categorization of Health,” on
page 18.
Basic Server Health
This is the first stage of the health check.The health check utility checks for the following:
1. The eDirectory service is up. The DIB is open and able to read some basic tree information such
as the tree name.
2. The server is listening on the respective port numbers.
For LDAP, it gets the TCP and the SSL port numbers and checks if the server is listening on these
ports.
Similarly, it gets the HTTP and HTTP secure port numbers and checks if the server is listening on
these ports.
Partitions and Replica Health
After checking the basic server health, the next step is to check the partitions and replica health as
follows:
1. Checks the health of the replicas of the locally held partitions.
Install and Upgrade Features
17
2. Reads the replica ring of each and every partition held by the server and checks whether all
servers in the replica ring are up and all the replicas are in the ON state.
3. Checks the time synchronization of all the servers in the replica ring. This shows the time
difference between the servers.
1.5.5
Categorization of Health
Based on the errors found while checking the health of a server, there can be the three categories of
health. The status of the health checks is logged in to a log file. For more information, refer to
Section 1.5.6, “Log Files,” on page 18.
The three categories of health Normal, Warning, and Critical.
Normal
The server health is normal when all the health checks were successful.
The upgrade proceeds without interruption.
Warning
The server health is in the warning category when minor errors are found while checking the health.
If the health check is run as part of the upgrade, you are prompted to either abort or continue.
Warnings normally occur in the following scenarios:
1. Server not listening on LDAP and HTTP ports, either normal or secure or both.
2. Unable to contact any of the nonmaster servers in the replica ring.
3. Servers in the replica ring are not in sync.
Critical
The server health is critical when critical errors were found while checking the health.
If the health check is run as part of the upgrade, the upgrade operation is aborted.
The critical state normally occurs in the following cases:
1. Unable to read or open the DIB. The DIB might be locked or corrupt.
2. Unable to contact all the servers in the replica ring.
3. Locally held partitions are busy.
4. Replica is not in the ON state.
1.5.6
Log Files
Every server health check operation, whether it is run with the upgrade or as a standalone utility,
maintains the status of the health in a log file.
The content of the log file is similar to the messages displayed on the screen when the checks are
happening.
18
NetIQ eDirectory 8.8 SP8 Installation Guide
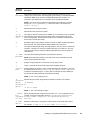
The health check log file contains the following:
Status of the health checks (normal, warning, or critical).
URLs to the NetIQ support site.
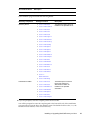
The following table gives you the locations for the log file on the various platforms:
Table 1-2 Health Check Log File Locations
Platform
Log File Name
Log File Location
Linux
ndscheck.log
Depends on the location you specified with the
ndscheck -F utility.
If you did not use the -F option, the location of
the ndscheck.log file is determined by the
other options you used at the ndscheck
command line as follows:
1. If you used the -h option, the
ndscheck.log file is saved in the user’s
home directory.
2. If you used the --config-file option,
the ndscheck.log file is saved in the
server instance’s log directory. You can
also select an instance from the multiple
instances list.
Windows
1.6
ndscheck.log
install_directory
SecretStore Integration with eDirectory
eDirectory 8.8 gives you an option to configure Novell SecretStore 3.4 during eDirectory
configuration. Prior to eDirectory 8.8, you had to manually install SecretStore.
SecretStore is a simple and secure password management solution. It enables you to use a single
authentication to eDirectory to access most Linux, Windows, Web, and mainframe applications.
After you've authenticated to eDirectory, SecretStore-enabled applications store and retrieve the
appropriate login credentials. When you use SecretStore, you eliminate the need to remember or
synchronize all the multiple passwords required for accessing password-protected applications, Web
sites, and mainframes.
To configure SecretStore 3.4 along with eDirectory, you can do the following:
Linux:
Use the ndsconfig add -m ss parameter. Here, ss denotes SecretStore and is an optional
parameter. If you do not mention the module name, all the modules are installed. If you do not
want to configure SecretStore, you can pass the no_ss value to this option by specifying -m
no_ss.
Windows:
While installing eDirectory, there is an option to specify whether to configure the SecretStore
module. By default, this option is selected.
Install and Upgrade Features
19
For more information on the SecretStore usage, refer to the Novell SecretStore 3.4 Administration Guide
(https://www.netiq.com/documentation/secretstore34/).
1.7
eDirectory Instrumentation Installation
Earlier eDirectory Instrumentation was a part of Novell Audit. From eDirectory 8.8 SP3 version
onwards, eDirectory Instrumentation must be installed separately.
For detailed information on installing, configuring, and uninstalling eDirectory Instrumentation, see
Auditing eDirectory Events in the NetIQ eDirectory 8.8 SP8 Administration Guide (https://
www.netiq.com/documentation/edir88/edir88/data/bookinfo.html).
1.8
For More Information
For more information on any of the features discussed in this chapter, see the following
documentation:
NetIQ eDirectory 8.8 SP8 Administration Guide
On Linux: nds-install, ndsconfig, and ndscheck man pages
20
NetIQ eDirectory 8.8 SP8 Installation Guide
2
Installing or Upgrading NetIQ eDirectory
on Linux
2
Use the following information to install or upgrade NetIQ eDirectory 8.8 on a Linux server:
Section 2.1, “System Requirements,” on page 21
Section 2.2, “Prerequisites,” on page 22
Section 2.3, “Hardware Requirements,” on page 24
Section 2.4, “Forcing the Backlink Process to Run,” on page 24
Section 2.5, “Upgrading eDirectory,” on page 24
Section 2.6, “Installing eDirectory,” on page 29
2.1
System Requirements
You must install eDirectory on one of the following 64-bit platforms.
SLES 11 SP1, SP2, and SP3
SLES 10 SP4
SLES 12
RHEL 5.10, 5.9, 5.8, and 5.7
RHEL 6.5, 6.4, 6.3, and 6.2
RHEL 7
You can run these operating systems in a virtual mode on the following hypervisors:
VMware ESXi
Xen (on SLES 10, SLES 11, and their Support Packs)
NOTE: eDirectory 8.8 SP8 is supported on SLES 10 XEN virtualization service that runs the
SLES 10 guest OS. The following updates are available at the Novell Update Web site (https://
update.novell.com):
SUSE-Linux-Enterprise-Server-X86_64-10-0-20061011-020434
SLES10-Updates
For registering and updating SUSE Linux Enterprise 10, refer to Registering SUSE Linux
Enterprise with the NetIQ Customer Center (http://www.suse.com/products/register.html).
After installing the latest update, ensure that the minimum patch level of the installed update is
3.0.2_09763-0.8.
Windows Server 2008 R2 Virtualization with Hyper-V
KVM Hypervisor (on RHEL 6.4)
Installing or Upgrading NetIQ eDirectory on Linux
21
To determine the version of SUSE Linux you are running, see the /etc/SuSE-release file.
Ensure that the latest glibc patches are applied from Red Hat Errata (http://rhn.redhat.com/errata)
on Red Hat systems. The minimum required version of the glibc library is version 2.4.
eDirectory also requires the following:
A minimum of 1 GB RAM for eDirectory
300 MB of disk space for the eDirectory server
150 MB of disk space for every 50,000 users
2.2
Prerequisites
IMPORTANT: Check the currently installed NetIQ and Third Party applications to determine if
those products are supported on eDirectory 8.8 before upgrading your existing eDirectory
environment. The prerequisites for other NetIQ products can be found on the NetIQ Documentation
site (http://www.netiq.com/documentation/). We also recommend you back up an eDirectory
instance before performing any upgrades on that instance.
(Conditional) Novell International Cryptographic Infrastructure (NICI) 2.7 and eDirectory 8.8
support key sizes up to 4096 bits. If you want to use a 4 KB key size, every server must be
upgraded to eDirectory 8.8. In addition, every workstation using the management utilities, for
example, iManager must have NICI 2.7 installed on it.
When you upgrade your Certificate Authority (CA) server to eDirectory 8.8, the key size will not
change but will still be 2 KB. The only way to create a 4 KB key size is recreate the CA on an
eDirectory 8.8 server. In addition, you would have to change the default from 2 KB to 4 KB for
the key size, during the CA creation.
When you install eDirectory, the nds-install utility automatically installs NICI. For more
information about installing eDirectory, see Section 2.6.2, “Using the nds-install Utility to Install
eDirectory Components,” on page 30. However, if you need to install only NICI, and not
eDirectory itself, on a workstation that has the management utilities installed, you must install
NICI manually. For more information about manually installing NICI, see “Installing NICI” on
page 33.
Service Location Protocol (SLP) installed and configured
With eDirectory 8.8, SLP does not get installed as part of the eDirectory installation.
Only a root user can install SLP.
For more information on installing SLP, refer to “Using SLP with eDirectory” on page 29.
The Linux host enabled for multicast routing
To check if the host is enabled for multicast routing, enter the following command:
/bin/netstat -nr
The following entry should be present in the routing table:
224.0.0.0 0.0.0.0
If the entry is not present, log in as root and enter the following command to enable multicast
routing:
route add -net 224.0.0.0 netmask 240.0.0.0 dev interface
22
NetIQ eDirectory 8.8 SP8 Installation Guide
The interface could be a value such as eth0, hme0, hme1, or hme2, depending on the NIC that is
installed and used.
For more information on multicast and broadcast routes, refer to the OpenSLP Web site (http://
www.openslp.org/doc/html/UsersGuide/Installation.html).
Network server time synchronized
Use Network Time Protocol's (NTP) ntp to synchronize time across all network servers.
(Conditional) If you are installing a secondary server, all the replicas in the partition that you
install the product on should be in the On state.
(Conditional) If you are installing a secondary server into an existing tree as a non-administrator
user, create a container and then partition it. Ensure that you have the following rights:
Supervisor rights to this partition.
All Attributes rights: read, compare, and write rights over the W0.KAP.Security object.
Entry rights: browse rights over Security container object.
All Attributes rights: read and compare rights over Security container object.
(Conditional) If you are installing a secondary server into an existing tree as a non-administrator
user, ensure that at least one of the servers in the tree has the same or higher eDirectory version
as that of the secondary being added as container admin. In case the secondary being added is of
later version, then the schema needs to be extended by the administrator of the tree before
adding the secondary using container admin.
While configuring eDirectory, you must enable SLP services and a NetWare Core Protocol (NCP)
port (the default is 524) in the firewall to allow the secondary server addition. Additionally, you
can enable the following service ports based on your requirements:
LDAP clear text - 389
LDAP secured - 636
HTTP clear text - 8028
HTTP secured - 8030
In case, if you have enabled user-defined ports, you must mention these ports while configuring
eDirectory.
NOTE: This step is required only if you have SLP configured in your system.
Do not set the user-defined ports to 8008 and 8010 while upgrading eDirectory 8.8 SP2 or later
versions to 8.8 SP8. If the ports are set to 8008 or 8010, ndsconfig assumes that the server is a
pre-eDirectory 8.8x server and automatically resets them to 8028 and 8030 respectively.
During eDirectory upgrade, if SecretStore has not already been configured with the previous
versions, or you do not want to configure SecretStore, use the -m no_ss option with the ndsinstall utility.
Configuring Static IP Address
Static IP address must be configured on the server for the eDirectory to perform efficiently.
Configuring eDirectory on the servers with DHCP address can lead to unpredictable results.
Installing or Upgrading NetIQ eDirectory on Linux
23
2.3
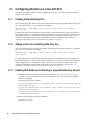
Hardware Requirements
Hardware requirements depend on the specific implementation of eDirectory. Two factors increase
performance: more cache memory and faster processors. For best results, cache as much of the
Directory Information Base (DIB) Set as the hardware allows.
eDirectory scales well on a single processor. However, NetIQ eDirectory 8.8 takes advantage of
multiple processors. Adding processors improves performance in some areas — for example, logins
— and having multiple threads active on multiple processors also improves performance. eDirectory
itself is not processor intensive, but it is I/O intensive.
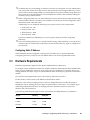
The following table illustrates typical system requirements for eDirectory for Linux:
2.4
Objects
Memory
Hard Disk
100,000
2+ GB
300 MB
1 million
4 GB
1.5 GB
10 million
4+ GB
15 GB
Forcing the Backlink Process to Run
Because the internal eDirectory identifiers change when upgrading to NetIQ eDirectory, the backlink
process must update backlinked objects for them to be consistent.
Backlinks keep track of external references to objects on other servers. For each external reference on
a server, the backlink process ensures that the real object exists in the correct location and verifies all
backlink attributes on the master of the replica. The backlink process occurs two hours after the
database is open, and then every 780 minutes (13 hours). The interval is configurable from 2 minutes
to 10,080 minutes (7 days).
After migrating to eDirectory, start the DSTrace process by issuing the ndstrace -l>log& command,
which runs the process at the background. This allows you to properly analyze the results of the
backlinker process, which takes 4 to 10 minutes. Then force the backlink process to run by issuing the
ndstrace -c 'set ndstrace=*B' command from the DSTrace OS command prompt. Review the
results of the log file created in the first step. Then you can unload the DSTrace process by issuing the
ndstrace -u command. Running the backlink process is especially important on servers that do not
contain a replica.
2.5
Upgrading eDirectory
When upgrading eDirectory, you can use one of the following upgrade paths:
Upgrade from an existing 32-bit version to a new 32-bit version
Upgrade from an existing 32-bit version to a new 64-bit version
Upgrade from an existing 64-bit version to a new 64-bit version
NOTE: There are no special steps to upgrade from a 32-bit version of eDirectory to a 64-bit version of
eDirectory. You can follow the same procedure as you would to upgrade from a 32-bit version to a
new 32-bit version.
24
NetIQ eDirectory 8.8 SP8 Installation Guide
The following sections provide information to help you upgrade your existing eDirectory installation
to the current version.
Section 2.5.1, “Server Health Checks,” on page 25
Section 2.5.2, “Upgrading on Linux Servers Other Than OES,” on page 25
Section 2.5.3, “Unattended Upgrade of eDirectory on Linux,” on page 26
Section 2.5.4, “Upgrading eDirectory on Existing OES,” on page 27
Section 2.5.5, “Upgrading the Tarball Deployment of eDirectory 8.8,” on page 27
Section 2.5.6, “Upgrading Multiple Instances,” on page 28
NOTE: The ndsconfig upgrade command is used to upgrade the necessary configuration of the
individual components such as HTTP, LDAP, SNMP, SAS, and NetIQ Modular Authentication
Service (NMAS).
2.5.1
Server Health Checks
With eDirectory 8.8, when you upgrade eDirectory, a server health check is conducted by default to
ensure that the server is safe for the upgrade:
Section B.3.2, “Partitions and Replica Health,” on page 121
Based on the results obtained from the health checks, the upgrade will either continue or exit as
follows:
If all the health checks are successful, the upgrade will continue.
If there are minor errors, the upgrade will prompt you to continue or exit.
If there are critical errors, the upgrade will exit.
See Appendix B, “eDirectory Health Checks,” on page 119 for a list of minor and critical error
conditions.
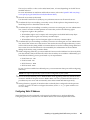
Skipping Server Health Checks
To skip server health checks, run nds-install -j or ndsconfig upgrade -j from the installation
folder.
For more information, see Appendix B, “eDirectory Health Checks,” on page 119.
2.5.2
Upgrading on Linux Servers Other Than OES
eDirectory upgrade is supported from eDirectory 8.8 SP2 onwards. If you have eDirectory 8.8 SP2 or
later versions installed, you can directly upgrade to eDirectory 8.8 SP8.
To upgrade, use the nds-install utility. This utility is located in the Setup directory of the downloaded
file for Linux platform. Enter the following command from the Setup directory:
./nds-install
After the upgrade to eDirectory 8.8, the default location of the configuration files, data files, and log
files are changed to /etc/opt/novell/eDirectory/conf, /var/opt/novell/eDirectory/data,
and /var/opt/novell/eDirectory/log, respectively.
Installing or Upgrading NetIQ eDirectory on Linux
25
The new directory /var/opt/novell/eDirectory/data uses a symbolic link to the /var/nds
directory.
The old configuration file /etc/nds.conf is migrated to /etc/opt/novell/eDirectory/conf
directory. The old configuration file /etc/nds.conf and the old log files under /var/nds are
retained for reference.
NOTE: Run ndsconfig upgrade after nds-install, if the upgrade of the DIB fails and nds-install asks
to do so.
NOTE: Health check fails due to time sync. To resolve this issue, perform a time sync between the
instances. You can ignore this warning message during upgrade.
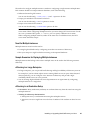
2.5.3
Unattended Upgrade of eDirectory on Linux
On Linux, eDirectory provides switches and options along with the install script and configuration
utility that facilitates the unattended upgrade. The following sections discuss various steps for
unattended eDirectory upgrade on Linux:
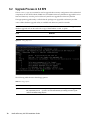
1 Perform the health check of eDirectory:
Health check of all the root instances planned for upgrade is manually done by using ndscheck
utility.
1a export LD_LIBRARY_PATH to the <untarred location of eDirectory>/eDirectory/
setup/utils
1b Run ndscheck using one of the below commands:
<untarred location of eDirectory>/eDirectory/setup/utils/ndscheck -a <user
name> -w passwd --config-file <nds.conf with absolute path>
Passing the password through environment variable: <untarred location of 88SP8>/
eDirectory/setup/utils/ndscheck -a <user name> -w env:<environment
variable> --config-file <nds.conf with absolute path>
Passing the password through file: <untarred location of 88SP8>/eDirectory/
setup/utils/ndscheck -a <user name> -w file:<filename> --config-file
<nds.conf with absolute path>
Any one of the above can be used in the automated script for the health check. For example:
/Builds/eDirectory/utils/ndscheck -a admin.novell -w n
/Builds/eDirectory/utils/ndscheck -a admin.novell -w env:ADM_PASWD
/Builds/eDirectory/utils/ndscheck -a admin.novell -w file:adm_paswd
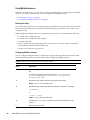
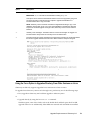
2 Upgrade the eDirectory 8.8 packages:
2a Run the nds-install script to upgrade the packages as below:
nds-install -u -i -j
3 Update the following environment variables:
PATH=/opt/novell/eDirectory/bin:/opt/novell/eDirectory/sbin:$PATH
LD_LIBRARY_PATH=/opt/novell/eDirectory/lib:/opt/novell/eDirectory/lib/ndsmodules:/opt/novell/lib:$LD_LIBRARY_PATH
MANPATH=/opt/novell/man:/opt/novell/eDirectory/man:$MANPATH
TEXTDOMAINDIR=/opt/novell/eDirectory/share/locale
4 Upgrade eDirectory by using the ndsconfig utility for all the root instances by using the
following commands:
26
NetIQ eDirectory 8.8 SP8 Installation Guide
ndsconfig upgrade -a <user name> -w passwd -c --config-file <nds.conf with absolute
path>
Passing the password through environment variable: ndsconfig upgrade -a <user name>
-w env:<environment variable> -c --config-file <nds.conf with absolute path>
Passing the password through file: ndsconfig upgrade -a <user name> -w
file:<filename with absolute/relative path> -c --config-file <nds.conf with
absolute path>
Any of the above can be used in the automated script for the eDirectory upgrade. For example:
ndsconfig upgrade -a admin.novell -w n -c -–config-file /etc/opt/novell/
eDirectory/conf/nds.conf
ndsconfig upgrade -a admin.novell -w env:ADM_PASWD -c --config-file /etc/opt/
novell/eDirectory/conf/nds.conf
ndsconfig upgrade -a admin.novell -w file:/Builds/88SP8/adm_paswd -c --configfile /etc/opt/novell/eDirectory/conf/nds.conf
2.5.4
Upgrading eDirectory on Existing OES
This version is not supported on OES. For more information on upgrading eDirectory on an existing
OES installation, refer to the Updating (Patching) an OES 11 SP2 Server (https://www.novell.com/
documentation/oes11/inst_oes_lx/data/bxlu3xc.html) section in the OES Installation Guide.
2.5.5
Upgrading the Tarball Deployment of eDirectory 8.8
If you want to upgrade the tarball deployment from eDirectory 8.8 to eDirectory 8.8 SP8, perform the
following steps:
1 Download the tarball build.
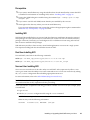
2 Take backup of the following configuration files:
$NDSHOME/eDirectory/etc/opt/novell/eDirectory/conf/ndsimon.conf
$NDSHOME/eDirectory/etc/opt/novell/eDirectory/conf/ice.conf
$NDSHOME/eDirectory/etc/opt/novell/eDirectory/conf/ndsimonhealth.conf
$NDSHOME/eDirectory/etc/opt/novell/eDirectory/conf/ndssnmp/ndssnmp.cfg
$NDSHOME is the location where eDirectory is installed.
3 For upgrade of eDirectory versions lower than 8.8 SP1, do the following:
Perform disk space check using ndscheck -D --config-file conf_file_path
Create an empty file upgradeDIB under the DIB location of each server instance.
The list of instances can be obtained using the ndsmanage utility.
4 Run pre upgrade health check for the all instances using ndscheck and check the ndscheck.log
file for any errors before proceeding with the upgrade.
5 Stop all instances using ndsmanage.
6 Untar the tarball in the same location ($NDSHOME) where eDirectory is installed. By untarring the
tarball in the same location, you are overwriting the binaries and libraries.
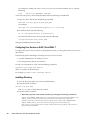
7 Upgrade the following package if necessary.
Installing or Upgrading NetIQ eDirectory on Linux
27
Platform
Command
Linux
Packages
novell-NOVLsubag-8.8.8x.x86_64.rpm
nici64-2.7.7x.x.x86_64.rpm
NOTE: For more information on
installing 64-bit NICI, refer to the
“Installing NICI” on page 33.
8 Restore the configuration files.
9 Run the $NDSHOME/eDirectory/opt/novell/eDirectory/bin/ndspath for setting all
environment variables.
10 Run ndsconfig upgrade -j for all instances. While running ndsconfig upgrade follow the
order in which the master replica is the first and followed by Read/Write and others.
2.5.6
Upgrading Multiple Instances
This section contains the following information:
“Root User has Multiple Instances” on page 28
“Non Root User's Instances” on page 28
“Order of Upgrade” on page 28
Root User has Multiple Instances
If you run nds-install after upgrading the package, it prompts you to upgrade the DIB files of all the
eDirectory server instances, which might take a long time to complete. If you wish to perform the DIB
upgrade in parallel, you can do it manually. For information about manually upgrading the DIB,
refer to the eDirectory Readme (https://www.netiq.com/documentation/edir88/
edir888_unix_readme/data/edir888_unix_readme.html). If you upgrade the DIB for all the active
instances one by one, it runs the ndsconfig upgrade command separately for each instance. If you
have a larger DIB, you can select No and run the ndsconfig upgrade in parallel in separate shells,
which can reduce the upgrade time of each instance.
Non Root User's Instances
If you have non root users’ instances which are using root users’ binaries, before doing the package
upgrade you need to run ndscheck for such instances and make sure that their health is proper by
referring the ndscheck.log file. If you run nds-install, it stops all the instances, including the non
root user's instances. After doing the package upgrade, the nds-install command does not call
ndsconfig upgrade for non-root user's instances. You need to manually run ndsconfig upgrade for
all non-root user's instances to start these instances.
Order of Upgrade
While running ndsconfig upgrade, it is recommended to follow the order in which master replica
comes first and then Read/Write or other replicas.
28
NetIQ eDirectory 8.8 SP8 Installation Guide
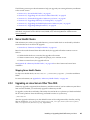
2.6
Installing eDirectory
The following sections provide information about installing NetIQ eDirectory on Linux:
Section 2.6.1, “Using SLP with eDirectory,” on page 29
Section 2.6.2, “Using the nds-install Utility to Install eDirectory Components,” on page 30
Section 2.6.3, “Non-root User Installing eDirectory 8.8,” on page 32
Section 2.6.4, “Using the ndsconfig Utility to Add or Remove the eDirectory Replica Server,” on
page 36
Section 2.6.5, “Using ndsconfig to Configure Multiple Instances of eDirectory 8.8,” on page 40
Section 2.6.6, “Using ndsconfig to Install a Linux Server into a Tree with Dotted Name
Containers,” on page 47
Section 2.6.7, “Using the nmasinst Utility to Configure NMAS,” on page 48
Section 2.6.8, “Non-root user SNMP configuration,” on page 49
2.6.1
Using SLP with eDirectory
In earlier releases of eDirectory, SLP was installed during the eDirectory install. But with eDirectory
8.8, you need to separately install SLP before proceeding with the eDirectory install.
If you plan to use SLP to resolve tree names, you should install and configure the protocol, and the
SLP directory agents (DAs) should be stable.
1 Install OpenSLP, if it is not already installed.
2 Follow the on-screen instructions to complete the SLP installation.
3 Start SLP manually as follows:
/etc/init.d/slpd start
For more information, refer to Appendix C, “Configuring OpenSLP for eDirectory,” on page 123.
Similarly, when you uninstall the SLP package, you need to stop SLP manually, as follows:
/etc/init.d/slpd stop
If you don't want to (or cannot) use SLP, you can use the flat file hosts.nds to resolve tree names to
server referrals. The hosts.nds file can be used to avoid SLP multicast delays when SLP DA is not
present in the network.
hosts.nds is a static lookup table used by eDirectory applications to search eDirectory partition and
servers. In the hosts.nds file, for each tree or server, a single line contains the following information:
Tree/Server Name: Tree names end with a trailing dot (.).
Internet Address: This can be a DNS name or IP address.
Server Port: Optional, appended with a colon (:) to the Internet address.
Local server need not have an entry in this file unless it is listening on non-default NCP port.
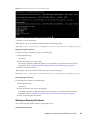
The syntax followed in the hosts.nds file is as follows:
<[partition name.]tree name>. <host-name/ip-addr>[:<port>]
<server name> <dns-addr/ip-addr>[:<port>]
For example:
Installing or Upgrading NetIQ eDirectory on Linux
29
# This is an example of a hosts.nds file:
# Tree name
Internet address/DNS Resolvable Name
CORPORATE.
myserver.mycompany.com
novell.CORPORATE.
1.2.3.4:524
# Server name
CORPSERVER
Internet address
myserver.mycompany.com
See the hosts.nds man page for more details.
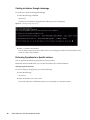
If you decide to use SLP to resolve the tree name to determine if the eDirectory tree is advertised,
after eDirectory and SLP are installed, enter the following:
/usr/bin/slptool findattrs services:ndap.novell///(svcname-ws==[treename or *])"
For example, to search for the services whose svcname-ws attribute match with the value
SAMPLE_TREE, enter the following command:
/usr/bin/slptool findattrs services:ndap.novell///(svcname-ws==SAMPLE_TREE)/"
If you have a service registered with its svcname-ws attribute as SAMPLE_TREE, then the output will
be similar to the following:
service:ndap.novell:///SAMPLE_TREE
If you do not have a service registered with its svcname-ws attribute as SAMPLE_TREE, there will be no
output.
For more information, see Appendix C, “Configuring OpenSLP for eDirectory,” on page 123.
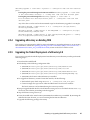
2.6.2
Using the nds-install Utility to Install eDirectory Components
Use the nds-install utility to install eDirectory components on Linux systems. This utility is located in
the Setup directory of the downloaded file for the Linux platform. The utility adds the required
packages based on what components you choose to install.
1 Enter the following command at the setup directory:
./nds-install
If you do not provide the required parameters in the command line, the nds-install utility will
prompt you for the parameters.
The following table provides a description of the nds-install utility parameters:
30
nds-install Parameter
Description
-h or --help
Displays help for nds-install.
-i
Prevents the nds-install script from invoking the ndsconfig upgrade
command if a DIB is detected at the time of the upgrade.
-j
Jumps or overrides the health check option before installing eDirectory.
For more information about health checks, refer to Appendix B,
“eDirectory Health Checks,” on page 119.
-m
Specifies the module name to configure. While configuring a new tree,
you can configure only the ds module. After configuring the ds module,
you can add the NMAS, LDAP, SAS, SNMP, HTTP services, and NetIQ
SecretStore (ss) using the add command. If the module name is not
specified, all the modules are installed.
NetIQ eDirectory 8.8 SP8 Installation Guide
nds-install Parameter
Description
-u
Specifies the option to use in an unattended install mode.
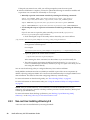
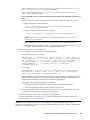
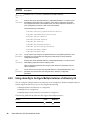
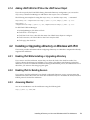
The installation program installs the following RPMs:
eDirectory Component
eDirectory Server
Packages Installed
novell-NDSbase
novell-NDScommon
Description
The eDirectory replica server is
installed on the specified server.
novell-NDSmasv
novell-NDSserv
novell-NDSimon
novell-NDSrepair
novell-NDSdexvnt
novell-NOVLsubag
novell-NOVLsnmp
novell-NOVLpkit
novell-NOVLpkis
novell-NOVLpkia
novell-NOVLembox
novell-NOVLlmgnt
novell-NOVLxis
novell-NLDAPsdk
novell-NLDAPbase
novell-NOVLsas
novell-NOVLntls
novell-NOVLnmas
novellNOVLldif2dib
novell-NOVLncp
Administration Utilities
novell-NOVLice
novell-NDSbase
novell-NLDAPbase
novell-NLDAPsdk
The NetIQ Import Conversion
Export and LDAP Tools
administration utilities are
installed on the specified
workstation.
novell-NOVLpkia
novell-NOVLxis
novell-NOVLlmgnt
2 If you are prompted, enter the complete path to the license file.
You will be prompted to enter the complete path to the license file only if the installation
program cannot locate the file in the default location. The default location is the /var, the
mounted license diskette, or the current directory.
Installing or Upgrading NetIQ eDirectory on Linux
31
If the path you entered is not valid, you will be prompted to enter the correct path.
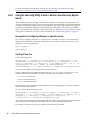
3 After the installation is complete, you need to update the following environment variables and
export them. You can either do it manually or use a script.
Manually export the environment variables by entering the following commands:
export LD_LIBRARY_PATH=/opt/novell/eDirectory/lib64:/opt/novell/
eDirectory/lib64/nds-modules:/opt/novell/lib64:$LD_LIBRARY_PATH
export MANPATH=/opt/novell/man:/opt/novell/eDirectory/man:$MANPATH
export TEXTDOMAINDIR=/opt/novell/eDirectory/share/locale:$TEXTDOMAINDIR
Use the ndspath script to export the environment variables by performing the following
steps:
If you do not want to export the paths manually, you can use the /opt/novell/
eDirectory/bin/ndspath script as follows:
Prefix the ndspath script to the utility and run the utility you want as follows:
/opt/novell/eDirectory/bin/ndspath utility_name_with_parameters
NOTE: When you prefix the ndspath script to the commands with arguments, specify
the arguments in double quotes.
For example:
/opt/novell/eDirectory/bin/ndspath ldapconfig "-s ldapTLSRequired=yes"
Export the paths in the current shell as follows:
. /opt/novell/eDirectory/bin/ndspath
After entering the above command, run the utilities as you would normally do.
The path exporting instructions should be placed at the end of /etc/profile or ~/
bashrc or similar scripts. Therefore, whenever you log in or open a new shell, you can
start using the utilities directly.
You can use the ndsconfig utility to configure eDirectory Server after installation.
NetIQ Modular Authentication Service (NMAS) is installed as part of the server component. By
default, ndsconfig configures NMAS. You can also use the nmasinst utility to configure NMAS server
after installation. This must be done after configuring eDirectory with ndsconfig.
For more information on the ndsconfig utility, see “The ndsconfig Utility” on page 83.
For more information on the nmasinst utility, see “Using the nmasinst Utility to Configure NMAS”
on page 48.
NOTE: After you install eDirectory, we recommend you exclude the DIB directory on your
eDirectory server from any antivirus or backup software processes. Use the eDirectory Backup Tool
to back up your DIB directory.
For more information about backing up eDirectory, see “Backing Up and Restoring NetIQ
eDirectory,” in the NetIQ eDirectory 8.8 SP8 Administration Guide.
2.6.3
Non-root User Installing eDirectory 8.8
A non-root user can install eDirectory 8.8 using the tarball.
32
NetIQ eDirectory 8.8 SP8 Installation Guide
Prerequisites
If you want to install eDirectory using the tarball and not the nds-install utility, ensure that NICI
is installed. For information on installing NICI, refer to “Installing NICI” on page 33.
Ensure that SNMP subagent is installed using the command rpm
--nodeps <path of snmp
subagent rpm>.
If you want to use SLP and SNMP, ensure that they are installed by the root user.
Write rights to the directory where you want to install eDirectory.
If you are a non-administrator user, ensure that you have the appropriate rights as mentioned in
the Section 2.2, “Prerequisites,” on page 22 section.
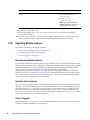
Installing NICI
NICI should be installed before you proceed with the eDirectory installation. Because the required
NICI packages are used system-wide, we recommend you use the root user to install the necessary
packages. However, if necessary you can delegate access to a different account using sudo and use
that account to install the NICI packages.
With eDirectory 8.8 SP3 or later versions, 32 and 64-bit applications can coexist in a single system.
This requires installing both the 32 and 64-bit versions of NICI.
Root User Installing NICI
To install NICI, enter both of the following commands:
32-bit: rpm -ivh NICI_rpm_absolute_path/nici-2.7.7-0.02.i586.rpm
64-bit: rpm -ivh NICI_rpm_absolute_path/nici64-2.7.7-0.02.x86_64.rpm
Non-root User Installing NICI
Non-root users can make use of the sudo utility to install NICI. sudo (superuser do) allows a root
user to give certain users the ability to run some commands as root. A root user can do this by editing
the /etc/sudoers configuration file and adding appropriate entries in it.
For more information, refer to the sudo Website (http://www.sudo.ws/).
WARNING: sudo enables you to give limited root permissions to non-root users. Therefore, you
must understand the security implications before proceeding.
A root user needs to complete the following procedure to enable a non-root user (for example, john)
to install NICI:
1 Log in as root.
2 Edit the /etc/sudoers configuration file using the visudo command.
NOTE: There is no space between vi and sudo in the command.
Make an entry with the following information:
Username
hostname=(root) NOPASSWD: /bin/rpm
Installing or Upgrading NetIQ eDirectory on Linux
33
For example, to enable user “john” to run /bin/rpm as root on the hostname “lnx-2,” type the
following:
john
lnx-2=(root) NOPASSWD: /bin/rpm
A non-root user (“john,” in this example) needs to do the following to install NICI:
1 Log in as “john” and execute the following command:
sudo rpm -ivh nici_rpm_file_name_with_path
For example:
sudo rpm -ivh /88/Linux/Linux/setup/nici-2.7.7-5.i386.rpm
2 To initialize NICI, enter the following:
ln -sf /var/opt/novell/nici /var/novell/nici
To ensure that NICI is set to server mode, enter the following:
/var/opt/novell/nici/set_server_mode
NICI gets installed in the server mode.
Configuring User Service on SLES 12 and RHEL 7
To support services for non-root users on these platforms, start systemd specific to the user as a onetime activity.
The following are the advantages of starting services as a non-root user:
A system administrator can monitor a service.
The computer starts the service on reboot.
To start systemd specific to a user, run the following command:
systemctl start user@<uid>.service
where uid is the User ID of the user.
For example, systemctl start [email protected]
Installing eDirectory
1 Go to the directory where you want to install eDirectory.
2 Untar the tar file as follows:
tar xvf /tar_file_name
The etc, opt, and var directories are created.
3 Export the paths as follows:
Manually export the environment variables by entering the following commands:
export LD_LIBRARY_PATH=custom_location/eDirectory/opt/novell/eDirectory/
lib64:custom_location/eDirectory/opt/novell/eDirectory/lib64/ndsmodules:custom_location/eDirectory/opt/novell/lib64:$LD_LIBRARY_PATH
export PATH=custom_location/eDirectory/opt/novell/eDirectory/
bin:custom_location/eDirectory/opt/novell/eDirectory/sbin:/opt/novell/
eDirectory/bin:$PATH
34
NetIQ eDirectory 8.8 SP8 Installation Guide
export MANPATH=custom_location/eDirectory/opt/novell/man:custom_location/
eDirectory/opt/novell/eDirectory/man:$MANPATH
export TEXTDOMAINDIR=custom_location/eDirectory/opt/novell/eDirectory/
share/locale:$TEXTDOMAINDIR
Use the ndspath script to export the environment variables by performing the following
steps:
If you do not want to export the paths manually, prefix the ndspath script to the utility.
Run the utility you want as follows:
custom_location/eDirectory/opt/novell/eDirectory/bin/ndspath
utility_name_with_parameters
Export the paths in the current shell as follows:
. custom_location/eDirectory/opt/novell/eDirectory/bin/ndspath
NOTE: Ensure that you enter the above commands from the custom_location/
eDirectory/opt directory.
After entering the above commands, run the utilities as you would normally do.
Call the script in your profile, bashrc, or similar scripts. Therefore, whenever you log
in or open a new shell, you can start using the utilities directly.
4 Configure eDirectory in the usual manner.
You can configure eDirectory in any of the following ways:
Use the ndsconfig utility as follows:
ndsconfig new [-t <treename>] [-n <server_context>] [-a <admin_FDN>] [-w
<admin password>] [-i] [-S <server_name>] [-d <path_for_dib>] [-m <module>]
[e] [-L <ldap_port>] [-l <SSL_port>] [-o <http_port>] -O <https_port>] [-p
<IP address:[port]>] [-c] [-b <port_to_bind>] [-B <interface1@port1>,
<interface2@port2>,..] [-D <custom_location>] [--config-file
<configuration_file>]
For example:
ndsconfig new -t mary-tree -n novell -a admin.novell -S linux1 -d /home/
mary/inst1/data -b 1025 -L 1026 -l 1027 -o 1028 -O 1029 -D /home/mary/
inst1/var --config-file /home/mary/inst1/nds.conf
The port numbers you enter need to be in the range 1024 to 65535. Port numbers lesser than
1024 are normally reserved for the super-user and standard applications. Therefore, you
cannot assume the default port 524 for any eDirectory applications.
This might cause the following applications to break:
The applications that don't have an option to specify the target server port.
The older applications that use NCP, and run as root for 524.
Use the ndsmanage utility to configure a new instance. For more information, refer to the
“Creating an Instance through ndsmanage” on page 44.
Follow the on-screen instructions to complete the configuration.
For more information, see Section 2.6.4, “Using the ndsconfig Utility to Add or Remove the
eDirectory Replica Server,” on page 36.
NOTE: After you install eDirectory, we recommend you exclude the DIB directory on your
eDirectory server from any antivirus or backup software processes. Use the eDirectory Backup Tool
to back up your DIB directory.
Installing or Upgrading NetIQ eDirectory on Linux
35
For more information about backing up eDirectory, see “Backing Up and Restoring NetIQ
eDirectory,” in the NetIQ eDirectory 8.8 SP8 Administration Guide.
2.6.4
Using the ndsconfig Utility to Add or Remove the eDirectory Replica
Server
After installing eDirectory, configure the eDirectory replica server using the ndsconfig utility. You
must have Administrator rights to use the ndsconfig utility. When this utility is used with arguments,
it validates all arguments and prompts for the password of the user having Administrator rights. If
the utility is used without arguments, ndsconfig displays a description of the utility and available
options. This utility can also be used to remove the eDirectory Replica Server and change the current
configuration of eDirectory Server. For more information, see “The ndsconfig Utility” on page 83.
Prerequisite for Configuring eDirectory in a Specific Locale
If you want to configure eDirectory in a specific locale, you need to export LC_ALL and LANG to
that particular locale before eDirectory configuration. For example, to configure eDirectory in the
Japanese locale, enter the following:
export LC_ALL=ja
export LANG=ja
Creating A New Tree
Use the following syntax:
ndsconfig new [-t <treename>] [-n <server context>] [-a <admin FDN>] [-i] [-S
<server name>] [-d <path for dib>] [-m <module>] [e] [-L <ldap port>] [-l <SSL
port>] [-o <http port>] [-O <https port>] [-p <IP address:[port]>] [-R] [-c] [-w
<admin password>] [-b <port to bind>] [-B <interface1@port1>,
<interface2@port2>,..] [-D <custom_location>] [--config-file <configuration_file>]
A new tree is installed with the specified tree name and context.
There is a limitation on the number of characters in the tree_name, admin FDN and server FDN
variables. The maximum number of characters allowed for these variables is as follows:
tree_name: 32 characters
admin FDN: 255 characters
server FDN: 255 characters
If the parameters are not specified in the command line, ndsconfig prompts you to enter values for
each of the missing parameters.
Or, you can also use the following syntax:
ndsconfig def [-t <treename>] [-n <server context>] [-a <admin FDN>] [-w <admin
password>] [-c] [-i] [-S <server name>] [-d <path for dib>] [-m <module>] [-e] [-L
<ldap port>] [-l <SSL port>] [-o <http port>] [-O <https port>] [-D
<custom_location>] [--config-file <configuration_file>]
A new tree is installed with the specified tree name and context. If the parameters are not specified in
the command line, ndsconfig takes the default value for each of the missing parameters.
For example, to create a new tree, you could enter the following command:
36
NetIQ eDirectory 8.8 SP8 Installation Guide
ndsconfig new -t corp-tree -n o=company -a cn=admin.o=company
Adding a Server into an Existing Tree
Use the following syntax:
ndsconfig add [-t <treename>] [-n <server context>] [-a <admin FDN>] [-w <admin
password>] [-e] [-P <LDAP URL(s)>][-L <ldap port>] [-l <SSL port>] [-o <http port>]
[-O <https port>] [-S <server name>] [-d <path for dib>] [-m <module>] [-p <IP
address:[port]>] [-R] [-c] [-b <port to bind>] [-B <interface1@port1>,
<interface2@port2>,..] [-D <custom_location>] [--config-file <configuration_file>]
[-E]
A server is added to an existing tree in the specified context. If the context that the user wants to add
the Server object to does not exist, ndsconfig creates the context and adds the server.
LDAP and security services can also be added after eDirectory has been installed into the existing
tree.
For example, to add a server into an existing tree, you could enter the following command:
ndsconfig add -t corp-tree -n o=company -a cn=admin.o=company -S srv1
You can enable encrypted replication in the server you want to add using the -E option. For more
information on encrypted replication, see “Encrypted Replication” in the NetIQ eDirectory 8.8 SP8
Administration Guide.
Removing a Server Object And Directory Services From a Tree
Use the following syntax:
ndsconfig rm [-a <admin FDN>] [-w <admin password>] [-p <IP address:[port]>] [-c]
eDirectory and its database are removed from the server.
NOTE: The HTML files created using iMonitor will not be removed. You must manually remove
these files from /var/opt/novell/eDirectory/data/dsreports before removing eDirectory.
For example, to remove the eDirectory Server object and directory services from a tree, you could
enter the following command:
ndsconfig rm -a cn=admin.o=company
ndsconfig Utility Parameters
ndsconfig
Parameter
Description
new
Creates a new eDirectory tree. If the parameters are not specified in the command line,
ndsconfig prompts you to enter values for each of the missing parameters.
def
Creates a new eDirectory tree. If the parameters are not specified in the command line,
ndsconfig takes the default value for each of the missing parameters.
add
Adds a server into an existing tree. Also adds LDAP and SAS services, after eDirectory
has been configured in the existing tree.
Installing or Upgrading NetIQ eDirectory on Linux
37
ndsconfig
Parameter
Description
rm
Removes the Server object and directory services from a tree.
NOTE: This option does not remove the key material objects. These objects must be
removed manually.
upgrade
Upgrades eDirectory to a later version.
-i
While configuring a new tree, ignores checking whether a tree of the same name
exists. Multiple trees of the same name can exist.
-S server
name
Specifies the server name. The server name can also contain dots (for example,
netiq.com). Because ndsconfig is a command line utility, using containers with dotted
names requires that those dots be escaped out, and the parameters containing these
contexts must be enclosed in double quotes.
For example, to install a new eDirectory tree on a Linux server using netiq.com as
the name of the O, use the following command:
ndsconfig new -a "admin.novell\\.com" -t netiq_tree -n
"OU=servers.O=netiq\\.com"
The Admin name and context and the server context parameters are enclosed in
double quotes, and only the '.' in netiq.com is escaped using the '\\' (backslash)
character. You can also use this format when installing a server into an existing tree.
NOTE: You cannot start a name with a dot. For example, you cannot install a server
that has the name “.novell”, because it starts with a dot ('.').
38
-t
treename
The tree name to which the server has to be added. It can have a maximum of 32
characters. If not specified, ndsconfig takes the tree name from the n4u.nds.treename parameter that is specified in the /etc/opt/novell/eDirectory/conf/
nds.conf file. The default treename is $LOGNAME-$HOSTNAME-NDStree.
-n server
context
Specifies the context of the server in which the server object is added. It can have a
maximum of 64 characters. If the context is not specified, ndsconfig takes the context
from the configuration parameter n4u.nds.server-context specified in the /etc/
opt/novell/eDirectory/conf/nds.conf file. The server context should be
specified in the typed form. The default context is org.
-d path
for dib
The directory path where the database files will be stored.
-r
This option forcefully adds the replica of the server regardless of the number of servers
already added to the server.
-L
ldap_port
Specifies the TCP port number on the LDAP server. If the default port 389 is already in
use, it prompts for a new port.
-l
ssl_port
Specifies the SSL port number on the LDAP server. If the default port 636 is already in
use, it prompts for a new port.
-a admin
FDN
Specifies the fully distinguished name of the User object with Supervisor rights to the
context in which the server object and Directory services are to be created. The admin
name should be specified in the typed form. It can have a maximum of 64 characters.
The default admin name is admin.org.
-e
Enables clear text passwords for LDAP objects.
NetIQ eDirectory 8.8 SP8 Installation Guide
ndsconfig
Parameter
Description
Specifies the module name to configure. While configuring a new tree, you can
-m
modulename configure only the ds module. After configuring the ds module, you can add the NMAS,
LDAP, SAS, SNMP, HTTP services, and NetIQ SecretStore (ss) using the add
command. If the module name is not specified, all the modules are installed.
NOTE: If you do not want to configure the SecretStore during eDirectory upgrade
through nds-install, pass the no_ss value to this option. For example, ndsinstall '-m no_ss'.
-o
Specifies the HTTP clear port number.
-O
Specifies the HTTP secure port number.
-p <IP
This option is used for secondary server addition (add command) to a tree. It specifies
address:[p the IP address of the remote host that holds a replica of the partition to which this
server is being added. The default port number is 524. This helps in faster lookup of
ort]>
the tree since it avoids SLP lookup.
-R
By default a replica of the partition to which the server is added would be replicated to
the local server. This option disallows adding replicas to the local server.
-c
This option avoids prompts during ndsconfig operation, such as yes/no to continue the
operation, or prompt to re-enter port numbers when there is a conflict, etc. The user
receives prompts only for entering mandatory parameters if they are not passed on
command line.
-w <admin
password>
This option allows passing the admin user password in clear text.
-E
Enables encrypted replication for the server you are trying to add.
-j
Jumps or overrides the health check option before installing eDirectory.
-b port to
bind
Sets the default port number on which a particular instance should listen on. This sets
the default port number on n4u.server.tcp-port and n4u.server.udp-port. If
an NCP port is passed using the -b option, then it is assumed to be the default port
and the TCP and UDP parameters are updated accordingly.
NOTE: Since password is passed in clear text, this is not recommended as a safe
option owing to password insecurity.
NOTE: -b and -B are exclusively used.
Specifies the port number along with the IP address or interface. For example:
-B
interface1
-B eth0@524
@port1,
interface2 or
@port2,...
-B 100.1.1.2@524
NOTE: -b and -B are mutually exclusive.
--configfile
configurat
ion file
Specify the absolute path and file name to store the nds.conf configuration file. For
example, to store the configuration file in the /etc/opt/novell/eDirectory/
directory, enter --config-file /etc/opt/novell/eDirectory/
nds.conf.
-P <LDAP
URL(s)>
Allows the LDAP URLs to configure the LDAP interface on the LDAP Server object.
For example: -P ldap://1.2.3.4:1389,ldaps://1.2.3.4:1636
Installing or Upgrading NetIQ eDirectory on Linux
39
ndsconfig
Parameter
Description
-D
Creates the data, dib, and log directories in the path mentioned.
path_for_d
ata
set
valuelist
Sets the value for the specified eDirectory configurable parameters. It is used to set the
bootstrapping parameters before configuring a tree. When configuration parameters
are changed, ndsd needs to be restarted for the new value to take effect. However, for
some configuration parameters, ndsd need not be restarted.
These parameters are listed below:
n4u.nds.inactivity-synchronization-interval
n4u.nds.synchronization-restrictions
n4u.nds.janitor-interval
n4u.nds.backlink-interval
n4u.nds.drl-interval
n4u.nds.flatcleaning-interval
n4u.nds.server-state-up-threshold
n4u.nds.heartbeat-schema
n4u.nds.heartbeat-data
get help
paramlist
Use to view the help strings for the specified eDirectory configurable parameters. If the
parameter list is not specified, ndsconfig lists the help strings for all the eDirectory
configurable parameters.
set
valuelist
Sets the value for the specified eDirectory configurable parameters. It is used to set the
bootstrapping parameters before configuring a tree.
When configuration parameters are changed, ndsd needs to be restarted for the new
value to take effect.
get
paramlist
2.6.5
Use to view the current value of the specified eDirectory configurable parameters. If the
parameter list is not specified, ndsconfig lists all the eDirectory configurable
parameters.
Using ndsconfig to Configure Multiple Instances of eDirectory 8.8
You can configure multiple instances of eDirectory 8.8 on a single host. With the multiple instances
feature support in eDirectory 8.8, you can configure the following:
Multiple instances of eDirectory on a single host
Multiple trees on a single host
Multiple replicas of the same tree or partition on a single host
The following table lists the platforms that support the multiple instances:
Feature
Multiple instances support
40
NetIQ eDirectory 8.8 SP8 Installation Guide
Linux
Windows
The method to configure multiple instance is similar to configuring a single instance multiple times.
Each instance should have unique instance identifiers, such as the following:
Different data and log file location
You can use the ndsconfig --config-file, -d, and -D options to do this.
Unique port number for the instance to listen to
You can use the ndsconfig -b and -B options to do this.
Unique server name for the instance
You can use the ndsconfig -S server name option to do this.
IMPORTANT: During eDirectory configuration, the default NCP server name is set as the host
server name. When configuring multiple instances, you must change NCP server name. Use the
ndsconfig command line option, -S <server_name> to specify a different server name.
When configuring multiple instances, either on the same tree or on different trees, the NCP
server name should be unique.
Need for Multiple Instances
Multiple instances arose from the need to:
Leverage high-end hardware by configuring more than one instance of eDirectory.
Pilot your setup on a single host before investing on the required hardware.
Sample Scenarios for Deploying Multiple Instances
Multiple instances that belong to the same or multiple trees can be used in the following scenarios
effectively.
eDirectory in a Large Enterprise
In large enterprises, you can provide load balancing and high availability of eDirectory services.
For example, if you have three replica servers running LDAP services on ports 1524, 2524, and
3524, respectively, you can configure a new instance of eDirectory and provide a highavailability LDAP service on a new port 636.
You can leverage high-end hardware across departments in an organization by configuring
multiple instances on a single host.
eDirectory in an Evaluation Setup
Universities: Many enthusiasts (students) can evaluate eDirectory from the same host using the
multiple instances.
Training for eDirectory administration:
Participants can try out administration using the multiple instances.
Instructors can use a single host to teach a class of students. Each student can have his own
tree.
Installing or Upgrading NetIQ eDirectory on Linux
41
Using Multiple Instances
eDirectory 8.8 makes it very easy for you to configure multiple instances. To effectively use multiple
instances, you need to plan the setup and then configure the multiple instances.
“Planning the Setup” on page 46
“Configuring Multiple Instances” on page 42
Planning the Setup
To use this feature effectively, we recommend that you plan the eDirectory instances and ensure that
each instance has definite instance identifiers like the hostname, port number, server name, or the
configuration file.
While configuring multiple instances, you need to ensure that you have planned for the following:
Location of the configuration file
Location of the variable data (like log files)
Location of the DIB
NCP™ interface, unique identifying port for every instance, and ports of other services (like
LDAP, LDAPS, HTTP, and HTTP secure port)
Unique server name for every instance
Configuring Multiple Instances
You can configure multiple instances of eDirectory using the ndsconfig utility. The following table
lists the ndsconfig options you need to include when configuring multiple instances.
NOTE: All the instances share the same server key (NICI).
Option
Description
--config-file
Specifies the absolute path and filename to store the nds.conf configuration
file.
For example, to store the configuration file in the /etc/opt/novell/
eDirectory/ directory, use --config-file /etc/opt/novell/
eDirectory/nds.conf.
-b
Specifies the port number where the new instance should listen.
NOTE: -b and -B are exclusively used.
-B
Specifies the port number along with the IP address or interface. For example:
-B eth0@524
or
-B 100.1.1.2@524
NOTE: -b and -B are exclusively used.
42
-D
Creates the data, dib, and log directories in the path specified for the new
instance.
S
Specifies the server name.
NetIQ eDirectory 8.8 SP8 Installation Guide
Using the above-mentioned options, you can configure a new instance of eDirectory.
You can also configure a new instance using the ndsmanage utility. For more information, refer to
“Creating an Instance through ndsmanage” on page 44.
Managing Multiple Instances
This section includes the following information:
“The ndsmanage Utility” on page 43
“Identifying a Specific Instance” on page 46
“Invoking a Utility for a Specific Instance” on page 46
The ndsmanage Utility
The ndsmanage utility enables you to do the following:
List the instances configured
Create a new instance
Do the following for a selected instance:
List the replicas on the server
Start the instance
Stop the instance
Run DSTrace (ndstrace) for the instance
Deconfigure the instance
Start and Stop all instances
Listing the Instances
The following table describes how to list the eDirectory instances.
Table 2-1 ndsmanage Usage for Listing the Instances
Syntax
Description
ndsmanage
Lists all the instances configured by you.
ndsmanage -a|--all
List instances of all the users who are using a particular installation of eDirectory.
ndsmanage
username
List the instances configured by a specific user
The following fields are displayed for every instance:
Configuration file path
Server FDN and port
Status (whether the instance is active or inactive)
NOTE: This utility lists all the instances configured for a single binary.
Refer to Figure 2-1 on page 44 for more information.
Installing or Upgrading NetIQ eDirectory on Linux
43
Creating an Instance through ndsmanage
To create a new instance through ndsmanage:
1 Enter the following command:
ndsmanage
If you have two instances configured, the following screen is displayed:
Figure 2-1 ndsmanage Utility Output Screen
2 Enter c to create a new instance.
You can either create a new tree or add a server to an existing tree. Follow the instructions on the
screen to create a new instance.
Performing Operations for a Specific Instance
You can perform the following operations for every instance:
Other than the ones listed below, you can also run DSTrace for a selected instance.
Starting a Specific Instance
To start an instance configured by you, do the following:
1 Enter the following:
ndsmanage
2 Select the instance you want to start.
The menu expands to include the options you can perform on a specific instance.
44
NetIQ eDirectory 8.8 SP8 Installation Guide
Figure 2-2 ndsmanage Utility Output Screen with Instance Options
3 Enter s to start the instance.
Alternatively, you can also enter the following at the command prompt:
ndsmanage start --config-file configuration_file_of_the_instance_configured_by_you
Stopping a Specific Instance
To stop an instance configured by you, do the following:
1 Enter the following:
ndsmanage
2 Select the instance you want to stop.
The menu expands to include the options you can perform on a specific instance. For more
information, refer to ndsmanage Utility Output Screen with Instance Options (page 45).
3 Enter k to stop the instance.
Alternatively, you can also enter the following at the command prompt:
ndsmanage stop --config-file configuration_file_of_the_instance_configured_by_you
Deconfiguring an Instance
To deconfigure an instance, do the following:
1 Enter the following:
ndsmanage
2 Select the instance you want to deconfigure.
The menu expands to include the options you can perform on a specific instance. For more
information, refer to ndsmanage Utility Output Screen with Instance Options (page 45).
3 Enter d to deconfigure the instance.
Starting and Stopping All Instances
You can start and stop all the instances configured by you.
Starting all the Instances
Installing or Upgrading NetIQ eDirectory on Linux
45
To start all the instances configured by you, enter the following at the command prompt:
ndsmanage startall
To start a specific instance, refer to “Starting a Specific Instance” on page 44.
Identifying a Specific Instance
While configuring multiple instances, you assign a hostname, port number, and a unique
configuration file path to every instance. This hostname and port number are the instance identifiers.
Most of the utilities have the -h hostname:port or --config-file
configuration_file_location option that enables you to specify a particular instance. See the man
pages of the utilities for more information.
Invoking a Utility for a Specific Instance
If you want to run a utility for a specific instance, you need to include the instance identifier in the
utility command. The instance identifiers are the path of the configuration file, and the hostname and
port number. You can use the --config-file configuration_file_location or the -h
hostname:port to do so.
If you do not include the instance identifiers in the command, the utility displays the various
instances you own and prompts you to select the instance you want to run the utility for.
For example, to run DSTrace for a specific utility using the --config-file option, you would enter
the following:
ndstrace --config-file configuration_filename_with_location
Sample Scenario for Multiple Instances
Mary is a non-root user who wants to configure two trees on a single host machine for a single binary.
Planning the Setup
Mary specifies the following instance identifiers.
Instance 1:
Port number the instance should listen on
1524
Configuration file path
/home/maryinst1/nds.conf
DIB directory
/home/mary/inst1/var
Instance 2:
46
Port number the instance should listen on
2524
Configuration file path
/home/mary/inst2/nds.conf
DIB directory
/home/mary/inst2/var
NetIQ eDirectory 8.8 SP8 Installation Guide
Configuring the Instances
To configure the instances based on the above mentioned instance identifiers, Mary must enter the
following commands.
Instance 1:
ndsconfig new -t mytree -n o=novell -a cn=admin.o=company -b 1524 -D
/home/mary/inst1/var --config-file /home/mary/inst1/nds.conf
Instance 2:
ndsconfig new -t corptree -n o=novell -a cn=admin.o=company -b 2524 -D
/home/mary/inst2/var --config-file /home/mary/inst2/nds.conf
Invoking a Utility for an Instance
If Mary wants to run the DSTrace utility for instance 1 that is listening on port 1524, with its
configuration file in /home/mary/inst1/nds.conf location and its DIB file located in /home/mary/
inst1/var, then she can run the utility as follows:
ndstrace --config-file /home/mary/inst1/nds.conf
or
ndstrace -h 164.99.146.109:1524
If Mary does not specify the instance identifiers, the utility displays all the instances owned by Mary
and prompts her to select an instance.
Listing the Instances
If Mary wants to know details about the instances in the host, she can run the ndsmanage utility.
To display all instances owned by Mary:
ndsmanage
To display all instances owned by John (username is john):
ndsmanage john
To display all instances of all users that are using a particular installation of eDirectory:
ndsmanage -a
2.6.6
Using ndsconfig to Install a Linux Server into a Tree with Dotted Name
Containers
You can use ndsconfig to install a Linux server into an eDirectory tree that has containers using
dotted names (for example, novell.com).
Because ndsconfig is a command line utility, using containers with dotted names requires that those
dots be escaped out, and the parameters containing these contexts must be enclosed in double
quotes. For example, to install a new eDirectory tree on a Linux server using “O=netiq.com” as the
name of the O, use the following command:
ndsconfig new -a 'admin.netiq.com' -t netiq_tree -n 'OU=servers.O=netiq.com'
The Admin name and context and the server context parameters are enclosed in double quotes, and
only the dot (’.’) in novell.com is escaped using the ’\’ (backslash) character.
Installing or Upgrading NetIQ eDirectory on Linux
47
You can also use this format when installing a server into an existing tree.
NOTE: You should use this format when entering dotted admin name and context while using
utilities such as DSRepair, Backup, DSMerge, DSLogin, and ldapconfig.
2.6.7
Using the nmasinst Utility to Configure NMAS
By default, ndsconfig configures NMAS. You can also use nmasinst to configure NMAS.
ndsconfig only configures NMAS and does not install the login methods. To install these login
methods, you can use nmasinst.
IMPORTANT: You must configure eDirectory with ndsconfig before you install the NMAS login
methods. You must also have administrative rights to the tree.
“Configuring NMAS” on page 48
“Installing Login Methods” on page 48
Configuring NMAS
By default, ndsconfig configures NMAS. You can also use nmasinst for the same.
To configure NMAS and create NMAS objects in eDirectory, enter the following at the server console
command line:
nmasinst -i admin.context tree_name
nmasinst prompts you for a password.
This command creates the objects in the Security container that NMAS needs, and installs the LDAP
extensions for NMAS on the LDAP Server object in eDirectory.
The first time NMAS is installed in a tree, it must be installed by a user with enough rights to create
objects in the Security container. However, subsequent installs can be done by container
administrators with read-only rights to the Security container. nmasinst will verify that the NMAS
objects exist in the Security container before it tries to create them.
nmasinst does not extend the schema. The NMAS schema is installed as part of the base eDirectory
schema.
Installing Login Methods
To install login methods using nmasinst, enter the following at the server console command line:
nmasinst -addmethod admin.context tree_name config.txt_path
The last parameter specifies the config.txt file for the login method that is to be installed. A
config.txt file is provided with each login method.
Here is an example of the -addmethod command:
nmasinst -addmethod admin.netiq MY_TREE ./nmas-methods/novell/Simple Password/
config.txt
If the login method already exists, nmasinst will update it.
48
NetIQ eDirectory 8.8 SP8 Installation Guide
For more information, see “Managing Login and Post-Login Methods and Sequences” (https://
www.netiq.com/documentation/edir88/nmas88/data/bookinfo.html) in the NetIQ Modular
Authentication Services 3.3 Administration Guide.
2.6.8
Non-root user SNMP configuration
NICI and NOVLsubag should be installed as root user.
1 Root User Installing NICI. Refer to “Root User Installing NICI” on page 33
2 Root User Installing NOVLsubag.
To install NOVLsubag, complete the following procedure:
Enter the following command:
rpm -ivh --nodeps NOVLsubag_rpm_file_name_with_path
For example:
rpm -ivh --nodeps novell-NOVLsubag-8.8.1-5.i386.rpm
3 Export the paths as follows:
Manually export the environment variables.
export LD_LIBRARY_PATH=custom_location/opt/novell/eDirectory/lib64:/opt/
novell/eDirectory/lib64/nds-modules:/opt/novell/lib64:$LD_LIBRARY_PATH
export
PATH=/opt/novell/eDirectory/bin:$PATH
export MANPATH=/opt/novell/man:$MANPATH
Installing or Upgrading NetIQ eDirectory on Linux
49
50
NetIQ eDirectory 8.8 SP8 Installation Guide
3
Installing or Upgrading NetIQ eDirectory
on Windows
3
Use the following information to install or upgrade NetIQ eDirectory 8.8 on a Windows platform:
Section 3.1, “System Requirements,” on page 51
Section 3.2, “Prerequisites,” on page 52
Section 3.3, “Hardware Requirements,” on page 53
Section 3.4, “Forcing the Backlink Process to Run,” on page 54
Section 3.5, “Disk Space Check on Upgrading to eDirectory SP8 or later,” on page 54
Section 3.6, “Installing NetIQ eDirectory on Windows,” on page 54
IMPORTANT: NetIQ eDirectory 8.8 lets you install eDirectory for Windows without the Novell
Client. If you install eDirectory 8.8 on a computer already containing the Novell Client, eDirectory
uses the existing Client. For more information, see “Installing or Updating NetIQ eDirectory 8.8 on a
Windows Server” on page 55.
3.1
System Requirements
You must install eDirectory on one of the following platforms.
Windows Server 2008 (x64) (Standard/Enterprise/Data Center Edition) and its service packs
Windows Server 2008 R2 (Standard/Enterprise/Data Center Edition) and its service packs
Windows 2012 Server
Windows Server 2012 R2
IMPORTANT
You must use an account that has administrative rights to install eDirectory 8.8 SP8 on Windows
Server 2008 R2.
Windows desktop versions are not supported.
eDirectory also requires the following:
An assigned IP address
Administrative rights to the Windows server and to all portions of the eDirectory tree that
contain domain-enabled User objects. For an installation into an existing tree, you need
administrative rights to the Tree object so that you can extend the schema and create objects.
Refer to the OS recommended hardware requirements for your Windows server.
Installing or Upgrading NetIQ eDirectory on Windows
51
3.2
Prerequisites
IMPORTANT: Check the currently installed NetIQ and Third Party applications to determine if
eDirectory 8.8 is supported before upgrading your existing eDirectory environment. You can find out
the current status for NetIQ products in the TID 7003446 (http://www.novell.com/support/kb/
doc.php?id=7003446) It is also highly recommended to back up eDirectory prior to any upgrades.
Because NTFS provides a safer transaction process than a FAT file system provides, you can
install eDirectory only on an NTFS partition. Therefore, if you have only FAT file systems, do
one of the following:
Create a new partition and format it as NTFS.
Use Disk Administrator. Refer to the Windows Server documentation for more information.
Convert an existing FAT file system to NTFS, using the CONVERT command.
Refer to the Windows Server documentation for more information.
If your server only has a FAT file system and you forget or overlook this process, the installation
program prompts you to provide an NTFS partition.
(Conditional) NICI 2.7 and eDirectory 8.8 support key sizes up to 4096 bits. If you want to use a
4 KB key size, every server must be upgraded to eDirectory 8.8. In addition, every workstation
using the management utilities, for example, iManager and ConsoleOne, must have NICI 2.7
installed on it.
When you upgrade your Certificate Authority (CA) server to eDirectory 8.8, the key size will not
change but will still be 2 KB. The only way to create a 4 KB key size is recreate the CA on an
eDirectory 8.8 server. In addition, you would have to change the default from 2 KB to 4 KB for
the key size, during the CA creation.
NOTE: The Windows Silent Installer requires NICI installed on the system.
If you are upgrading to eDirectory 8.8, make sure you have the latest eDirectory patches
installed on all non-eDirectory 8.8 servers in the tree. You can get eDirectory patches from the
NetIQ Support (http://support.novell.com) Web site.
Make sure you have the latest Windows 2003 or 2008 Server Service Packs installed. The latest
updated Windows Service Pack needs to be installed after the installation of the Windows
SNMP service.
If you are upgrading from a previous version of eDirectory, it must be eDirectory 8.7.3 or later.
(Conditional) If you are installing a secondary server into an existing tree as a non-administrator
user, ensure that you have the following rights:
Supervisor rights to the container the server is being installed into.
Supervisor rights to the partition where you want to add the server.
NOTE: This is required for adding the replica when the replica count is less than 3.
All Attributes rights: read, compare, and write rights over the W0.KAP.Security object.
Entry rights: browse rights over Security container object.
All Attributes rights: read and compare rights over Security container object.
52
NetIQ eDirectory 8.8 SP8 Installation Guide
(Conditional) If you are installing a secondary server into an existing tree as a non-administrator
user, ensure that at least one of the servers in the tree has the same or higher eDirectory version
as that of the secondary being added as container admin. In case the secondary being added is of
later version, then the schema needs to be extended by the admin of the tree before adding the
secondary using container admin.
While configuring eDirectory, you must enable SLP services and an NCP port (the default is 524)
in the firewall to allow the secondary server addition. The NCP port must be configured to allow
both inbound and outbound traffic.
Additionally, you can enable the following service ports, based on your requirements:
LDAP clear text - 389
LDAP secured - 636
HTTP clear text - 8028
HTTP secured - 8030
If you have enabled user-defined ports, you must specify these ports while configuring
eDirectory.
If you are installing eDirectory on a virtual machine having a DHCP address or on a physical or
virtual machine in which SLP is not broadcast, ensure that the Directory Agent is configured in
your network.
Configuring Static IP Address
Static IP address must be configured on the server for the eDirectory to perform efficiently.
Configuring eDirectory on the servers with DHCP address can lead to unpredictable results.
3.3
Hardware Requirements
Hardware requirements depend on the specific implementation of eDirectory.
For example, a base installation of eDirectory with the standard schema requires about 74 MB of disk
space for every 50,000 users. However, if you add a new set of attributes or completely fill in every
existing attribute, the object size grows. These additions affect the disk space, processor, and memory
needed.
Two factors increase performance: more cache memory and faster processors.
For best results, cache as much of the DIB Set as the hardware allows.
eDirectory scales well on a single processor. However, NetIQ eDirectory 8.8 takes advantage of
multiple processors. Adding processors improves performance in some areas—for example, logins
and having multiple threads active on multiple processors. eDirectory itself is not processor
intensive, but it is I/O intensive.
The following table illustrates typical system requirements for NetIQ eDirectory for Windows:
Objects
Memory
Hard Disk
10,000
384 MB
144 MB
1 million
2 GB
1.5 GB
10 million
2+ GB
15 GB
Installing or Upgrading NetIQ eDirectory on Windows
53
Requirements for processors depend on additional services available on the computer as well as the
number of authentications, reads, and writes that the computer is handling. Processes such as
encryption and indexing can be processor intensive.
3.4
Forcing the Backlink Process to Run
Because the internal eDirectory identifiers change when upgrading to eDirectory, the backlink
process must update backlinked objects for them to be consistent.
Backlinks keep track of external references to objects on other servers. For each external reference on
a server, the backlink process ensures that the real object exists in the correct location and verifies all
backlink attributes on the master of the replica. The backlink process occurs two hours after the
database is open and then every 780 minutes (13 hours). The interval is configurable from 2 minutes
to 10,080 minutes (7 days).
After migrating to eDirectory, we recommend that you force the backlink to run by completing the
following procedure. Running the backlink process is especially important on servers that do not
contain a replica.
1 Click Start > Settings > Control Panel > NetIQ eDirectory Services
2 In the Services tab, select ds.dlm.
3 Click Configure.
4 In the Trigger tab, click Backlinker.
For more information about the backlink process, see “Understanding WAN Traffic Manager” in the
NetIQ eDirectory 8.8 SP8 Administration Guide.
3.5
Disk Space Check on Upgrading to eDirectory SP8 or later
When eDirectory server is upgraded from 8.7.x and 8.8 to eDirectory 8.8 SP8 or later, the disk space
check for the DIB upgrade would be performed. The free disk space necessary in the file system,
where the DIB resides would be equal to that of the DIB size. The messages of the disk space check
would be updated in the ni.log and <Install Path>/novell/nds/ndscheck.log.
NOTE: The disk space check is required only during the DIB upgrade process. For more information,
refer to Chapter 6, “Upgrade Requirements of eDirectory 8.8,” on page 77.
3.6
Installing NetIQ eDirectory on Windows
This section contains the following information:
Section 3.6.1, “Installing or Updating NetIQ eDirectory 8.8 on a Windows Server,” on page 55
Section 3.6.2, “Server Health Checks,” on page 56
Section 3.6.3, “Communicating with eDirectory through LDAP,” on page 57
Section 3.6.4, “Installing NMAS Server Software,” on page 58
Section 3.6.5, “Installing NMAS Client Software,” on page 59
Section 3.6.6, “Installing into a Tree with Dotted Name Containers,” on page 59
Section 3.6.7, “Unattended Install and Configure to eDirectory 8.8 SP8 on Windows,” on page 60
54
NetIQ eDirectory 8.8 SP8 Installation Guide
3.6.1
Installing or Updating NetIQ eDirectory 8.8 on a Windows Server
You can install eDirectory 8.8 for Windows without the Novell Client. If you install eDirectory 8.8 on
a machine already containing the Novell Client, eDirectory will use the existing Client, or update it if
it is not the latest version.
1 At the Windows server, log in as Administrator or as a user with administrative privileges.
2 To resolve tree names, make sure that SLP is correctly configured on your network and that SLP
DAs are stable.
For more information, see one of the following:
Appendix C, “Configuring OpenSLP for eDirectory,” on page 123.
DHCP Options for Service Location Protocol (http://www.openslp.org/doc/rfc/rfc2610.txt)
OpenSLP Documentation (http://www.openslp.org/documentation.html)
3 If you have Autorun turned off, run setup.exe from the windows folder in the eDirectory 8.8
SP8 CD or from the downloaded file.
4 Click Install.
The installation program checks for the following components before it installs eDirectory. If a
component is missing or is an incorrect version, the installation program automatically launches
an installation for that component.
NICI 2.7
For more information on the Novell International Cryptographic Infrastructure (NICI), see
the Novell International Cryptographic Infrastructure 2.7 Administration Guide (http://
www.novell.com/documentation/nici27x/index.html).
You might have to reboot the server after the NICI installation. If the installer displays a
message saying that you need to reboot your server before continuing, click OK to reboot.
The eDirectory installation will continue after the reboot.
Novell Client for Windows
IMPORTANT: The Novell Client is updated automatically if you have an older version of
the Client already installed on the machine. For more information on the Client, see the
Novell Client for Windows (http://www.novell.com/documentation/lg/noclienu/
index.html) online documentation.
5 Click Next.
6 View the license agreement, then click I Accept.
7 Select a language for the installation, then click Next.
8 Specify or confirm the installation path, then click Next.
9 If the installation folder does not already exist, and you want the installer to create the folder for
you, click Yes.
10 Specify or confirm the DIB path, then click Next.
11 If the DIB folder does not already exist, and you want the installer to create the folder for you,
click Yes.
12 (New installations only) Select an eDirectory installation type, then click Next.
Install eDirectory into an Existing Tree incorporates this server into your eDirectory
network. The server can be installed into any level of your tree.
Create a New eDirectory Tree creates a new tree. Use this option if this is the first server to
go into the tree or if this server requires a separate tree. The resources available on the new
tree will not be available to users logged in to a different tree.
Installing or Upgrading NetIQ eDirectory on Windows
55
13 Provide information in the eDirectory Installation screen, then click Next.
If you are installing a new eDirectory server, specify a Tree name, Server object context, and
Admin name and password for the new tree.
If you are installing into an existing tree, specify the Tree name, Server object context, and
Admin name and password of the existing tree.
If you want to use IPv6 addresses, select Enable IPv6.
NOTE: If you do not enable IPv6 addresses during the installation process, and then decide
to use them later, you must run the setup program again.
If you are upgrading an eDirectory server, specify the Admin password.
NOTE: In eDirectory 8.8 and later, you can have case sensitive passwords for all the
utilities. For more information, see the NetIQ eDirectory 8.8 SP8 What’s New Guide.
For information on using dots in container names, see “Installing into a Tree with Dotted Name
Containers” on page 59.
14 (New installations only) In the HTTP Server Port Configuration page, specify the ports to use for
the eDirectory administrative HTTP server, then click Next.
IMPORTANT: Make sure that the HTTP stack ports you set during the eDirectory installation
are different than the HTTP stack ports you have used or will use for NetIQ iManager. For more
information, see the iManager 2.7 Administration Guide (https://www.netiq.com/documentation/
imanager/imanager_admin/data/bookinfo.html).
15 (New installations only) In the LDAP Configuration page, specify which LDAP ports to use,
then click Next.
For more information, see “Communicating with eDirectory through LDAP” on page 57.
16 Specify whether to configure the SecretStore module. By default, the Configure SecretStore option
is selected.
17 Select the NMAS login methods you want to install.
See “Installing NMAS Server Software” on page 58 and “Installing NMAS Client Software” on
page 59 for more information.
18 Click Next.
19 Click Finish to complete the eDirectory installation.
20 When the installer completes the installation, click Done.
NOTE: After you install eDirectory, we recommend you exclude the DIB directory on your
eDirectory server from any antivirus or backup software processes. Use the eDirectory Backup Tool
to back up your DIB directory.
For more information about backing up eDirectory, see “Backing Up and Restoring NetIQ
eDirectory,” in the NetIQ eDirectory 8.8 SP8 Administration Guide.
3.6.2
Server Health Checks
With eDirectory 8.8, when you upgrade eDirectory, a server health check is conducted by default to
ensure that the server is safe for the upgrade.
Section B.3.2, “Partitions and Replica Health,” on page 121
56
NetIQ eDirectory 8.8 SP8 Installation Guide
Based on the results obtained from the health checks, the upgrade will either continue or exit as
follows:
If all the health checks are successful, the upgrade will continue.
If there are minor errors, the upgrade will prompt you to continue or exit.
If there are critical errors, the upgrade will exit.
See Appendix B, “eDirectory Health Checks,” on page 119 for a list of minor and critical error
conditions.
Skipping Server Health Checks
To skip server health checks, disable server health checks when prompted in the installation wizard
For more information, see Appendix B, “eDirectory Health Checks,” on page 119.
3.6.3
Communicating with eDirectory through LDAP
When you install eDirectory, you must select a port that the LDAP server monitors so that it can
service LDAP requests. The following table lists options for various installations:
Installation
Option
Result
eDirectory 8.8
Clear text (port 389)
Selects port 389.
eDirectory 8.8
Encrypted (port 636)
Selects port 636.
eDirectory 8.8
Require TLS for simple bind
Keeps (on the LDAP Group object) a
parameter asked about during
installation.
Port 389, the Industry-Standard LDAP Clear-Text Port
The connection through port 389 is not encrypted. All data sent on a connection made to this port is
clear. Therefore, a security risk exists. For example, LDAP passwords can be viewed on a simple bind
request.
An LDAP Simple Bind requires only a DN and a password. The password is in clear text. If you use
port 389, the entire packet is in clear text. By default, this option is disabled during the eDirectory
installation.
Because port 389 allows clear text, the LDAP server services Read and Write requests to the Directory
through this port. This openness is adequate for environments of trust, where spoofing doesn't occur
and no one inappropriately captures packets.
To disallow clear passwords and other data, select the Require TLS for Simple Bind with Password
option during installation. As part of default configuration, the ports numbers for clear text and SSL
are set to 389 and 636.
Scenario: Require TLS for Simple Bind with Password Is Enabled: Olga is using a client that asks
for a password. After Olga enters a password, the client connects to the server. However, the LDAP
server does not allow the connection to bind to the server over the clear-text port. Everyone is able to
view Olga's password, but Olga is unable to get a bound connection.
Installing or Upgrading NetIQ eDirectory on Windows
57
The Require TLS for Simple Bind with Password discourages users from sending observable passwords.
If this setting is disabled (that is, not checked), users are unaware that others can observe their
passwords. This option, which does not allow the connection, only applies to the clear-text port.
If you make a secure connection to port 636 and have a simple bind, the connection is already
encrypted. No one can view passwords, data packets, or bind requests.
Port 636, the Industry-Standard Secure Port
The connection through port 636 is encrypted. TLS (formerly SSL) manages the encryption. By
default, the eDirectory installation selects this port.
A connection to port 636 automatically instantiates a handshake. If the handshake fails, the
connection is denied.
IMPORTANT: This default selection might cause a problem for your LDAP server. If a service
already loaded on the host server (before eDirectory was installed) uses port 636, you must specify
another port.
Installations earlier than eDirectory 8.7 treated this conflict as a fatal error and unloaded nldap.nlm.
The eDirectory 8.7.3 onwards installation loads nldap.nlm, places an error message in the
dstrace.log file, and runs without the secure port.
Scenario: Port 636 Is Already Used: Your server is running Active Directory. Active Directory is
running an LDAP program, which uses port 636. You install eDirectory. The installation program
detects that port 636 is already used and doesn't assign a port number for the NetIQ LDAP server.
The LDAP server loads and appears to run. However, because the LDAP server does not duplicate or
use a port that is already open, the LDAP server does not service requests on any duplicated port.
If you are not certain that port 389 or 636 is assigned to the NetIQ LDAP server, run the ICE utility. If
the Vendor Version field does not specify NetIQ, you must reconfigure LDAP Server for eDirectory
and select a different port. For more information, see “Verifying That the LDAP Server Is Running” in
the NetIQ eDirectory 8.8 SP8 Administration Guide.
Scenario: Active Directory Is Running: Active Directory is running. Clear-text port 389 is open. You
run the ICE command to port 389 and ask for the vendor version. The report displays Microsoft*.
You then reconfigure the NetIQ LDAP server by selecting another port, so that the eDirectory LDAP
server can service LDAP requests.
NetIQ iMonitor can also report that port 389 or 636 is already open. If the LDAP server isn't working,
use NetIQ iMonitor to identify details. For more information, see “Verifying That the LDAP Server Is
Running” in the NetIQ eDirectory 8.8 SP8 Administration Guide.
3.6.4
Installing NMAS Server Software
NetIQ Modular Authentication Service (NMAS) server components are installed automatically when
you run the eDirectory installation program. You will need to select the login methods you want to
install.
Select the login methods that you want to install into eDirectory by checking the appropriate check
boxes. When you select a login method, a description of the component appears in the Description
box. For more information on login methods, see “Managing Login and Post-Login Methods and
Sequences” (https://www.netiq.com/documentation/edir88/nmas88/data/bookinfo.html) in the NetIQ
Modular Authentication Services 3.3 Administration Guide.
58
NetIQ eDirectory 8.8 SP8 Installation Guide
Click Select All if you want to install all the login methods into eDirectory. Click Clear All if you want
to clear all selections.
The NDS login method is installed by default.
3.6.5
Installing NMAS Client Software
The NMAS client software must be installed on each client workstation where you want to use the
NMAS login methods.
1 At a Windows client workstation, insert the eDirectory 8.8 CD.
2 From the NMAS directory, run nmasinstall.exe.
3 Select the NMAS Client Components check box.
Optionally, you can select the NICI check box if you want to install this component.
4 Click OK, then follow the on-screen instructions.
5 Reboot the client workstation after the installation completes.
3.6.6
Installing into a Tree with Dotted Name Containers
You can install a Windows server into an eDirectory tree that has containers with dots in the names
(for example, O=netiq.com or C=u.s.a). Using containers with dotted names requires that those dots
be escaped with the backslash character. To escape a dot, simply put a backslash in front of any dot in
a container name.
You cannot start a name with a dot. For example, you cannot create a container named “.netiq”
because it starts with a dot (‘.’).
IMPORTANT: If your tree has containers with dotted names, you must escape those names when
logging into utilities such as iMonitor, iManager, and DHost iConsole. For example, if your tree has
“netiq.com” as the name of the O, enter username.netiq\.com in the Username field when logging in
to iMonitor (see Figure 3-1).
Figure 3-1 iMonitor Login Screen
Installing or Upgrading NetIQ eDirectory on Windows
59
3.6.7
Unattended Install and Configure to eDirectory 8.8 SP8 on Windows
eDirectory 8.8 SP8 automates the eDirectory installation and upgrade so that eDirectory is installed
or upgraded silently on Windows servers without human intervention.
On Windows, the unattended installation of eDirectory uses predefined text files that facilitate the
unattended installation or upgrade. You can perform either of the following setup using the
unattended installation of eDirectory:
Standalone installation or upgrade of eDirectory depending on whether it is a complete
installation of eDirectory or not. The standalone upgrade process upgrades only the installed
files.
Configuration of installed eDirectory. If you install eDirectory, a complete configuration of
eDirectory is performed. Otherwise, when you upgrade eDirectory, the installer only configures
the upgraded files.
A combination of both installation or upgrade and configuration of eDirectory. It can either be
installation and configuration of eDirectory or an upgrade and configuration of only the
required files.
For more information on how to mention the setup for unattended installation, refer to the section
“Adding Features to the Automated Installation” on page 61.
Prerequisites
Ensure Microsoft Visual C++ 2005 and Microsoft Visual C++ 2012 Redistributable Packages are
installed. Install them manually from the vcredist_x86.exe, vcredist_x64.exe, and
vcredist2k12_x64.exe files located at eDirectory\Windows\x64\redist_pkg.
Ensure NICI is installed:
32-bit: eDirectory/Windows/x64/nici/NICI_w32.exe
64-bit: eDirectory/Windows/x64/nici/NICI_w64.exe
Set to program mode:
Run Windows/SysWOW64/novell/nici/set_server_mode.bat
The following sections discuss various features that can be used to configure the unattended
installation, including the install location, no display of splash screens, port configurations,
additional NMAS methods, stopping and starting SNMP services, etc.
“Response Files” on page 60
“Adding Features to the Automated Installation” on page 61
“Controlling Automated Installation” on page 65
“Unattended Installation of eDirectory using Response File” on page 68
Response Files
Installing or upgrading to eDirectory 8.8 SP8 on Windows operating system can be made silent and
more flexible by using a response file for the following:
Complete unattended installation with all required user inputs
Default configuration of components
Bypassing all prompts during the installation
60
NetIQ eDirectory 8.8 SP8 Installation Guide
A response file is a text file containing sections and keys, similar to a Windows.ini file. You can create
and edit a response file using any ASCII text editor. The eDirectory upgrade reads the installation
parameters directly from the response file and replaces the default installation values with response
file values. The installation program accepts the values from the response file and continues to install
without prompts.
Response.ni File Sections and Keys
The eDirectory 8.8 SP8 installation requires changes to the sections in the response file to add
information about the eDirectory instance to be installed, including the tree name, administrator
context, administrator credentials (including user name and passwords), installation locations, etc. A
full list of the keys and their default values is available in the sample response.ni file that is
delivered with the eDirectory installation.
NOTE: You should use the provided response.ni file available at
eDirectory\windows\x64\NDSonNT\response.ni in the eDirectory installation.There are essential
parameters and set by default in this file. When editing the response.ni file, ensure that there are
no blank spaces between the key and the values along with the equals sign ("=") in each key-value
pair.
Installation Syntax
You can also use a response file for two scenarios in an upgrade:
To provide the values of the tree parameters and to configure an unattended installation.
To input values during an upgrade.
IMPORTANT: You provide the administrator user credentials in the response.ni file for an
unattended installation. Therefore, you should permanently delete the file after the installation to
prevent the administrator credentials from being compromised.
Adding Features to the Automated Installation
Most details for configuring the eDirectory Installer have default setting for the manual installation.
However, during unattended installation, each configuration parameter must be explicitly
configured. This section discusses the basic settings to be configured, irrespective of any sequence of
installation or additional features.
eDirectory Server Details
Regardless of whether it is an upgrade or a primary/secondary server installation, the details of the
server being installed or upgraded must be provided to the Installer. Most of this information is
configured in two tags, [NWI:NDS] and [Initialization].
[NWI:NDS]
Upgrade Mode: This key applies only to a server upgrade. Though not essential, set this
parameter to False for fresh installations. For an upgrade, you can either set it to True or to
Copy.
Server Context: This is the complete DN of the server object (server name), along with the
container object. For example, if the server being installed is EDIR-TEST-SERVER, the value for
this parameter will be EDIR-TEST-SERVER.Netiq if the Server container is “Netiq”.
Installing or Upgrading NetIQ eDirectory on Windows
61
mode: The type of setup on eDirectory. The three types of setup are:
install: Performs installation of eDirectory or an upgrade of the required files.
configure: Configures eDirectory. If you only perform an upgrade of the required files, then
the installer only configures the upgraded files.
full: Performs both installation and configuration of eDirectory. This type of installation can
either be installation and configuration of eDirectory or an upgrade and configuration of
only the required files.
By default, the mode key is set to full.
NOTE: If you opt for the full setup mode, then while uninstalling eDirectory you cannot opt for
individual deconfiguration and uninstallation option.
Tree Name: For a primary server installation, this is the name of the tree that needs to installed.
For a secondary server installation, this is the tree to which this server must be added.
Server Name: The name of the server that is being installed.
Server Container: Any server added to a tree has a server object containing all the configuration
details specific to the server. This parameter is the container object in the tree to which the server
object will be added. For primary server installations, this container will be created with the
server object.
Admin Login Name: The name (RDN) of the Administrator object in the tree that has full rights,
at least to the context to which this server is added. All operations in the tree will be performed
as this user.
Admin Context: Any user added to a tree has a user object that contains all the user-specific
details. This parameter is the container object in the tree to which the Administrator object will
be added. For primary server installations, this container will be created with the server object.
Admin password: The password for the Administrator object created in the previous
parameters. This password will be configured to the Administrator object during primary server
installations. For secondary server installations, this needs to be the password of the
Administrator object in the primary server that has rights to the context to which the new server
is added.
NDS Location: The eDirectory install location in the local system where the libraries and
binaries are copied. By default, eDirectory is installed into C:\Novell\NDS unless it is changed
in the response file.
DataDir: Until eDirectory version 8.8, the DIB was installed inside the NDS location as a
subfolder. Later, administrators were given the option to provide a different DIB location,
because there might be too much data stored in the DIB to fit into the NDS location. Currently,
by default the DIB is installed in the Files subfolder inside the NDS location, but administrators
can change this parameter and provide a different location.
The following is a sample of text in the response file for all the basic parameters described above:
[NWI:NDS]
Upgrade Mode=copy
Tree Name=SLP-TEST
Server Name=NDS-LDAP-P2-NDS
Server Container=Netiq
Server Context=NDS-LDAP-P2-NDS.Netiq
Admin Context=Netiq
Admin Login Name=Admin
62
NetIQ eDirectory 8.8 SP8 Installation Guide
Admin Password=netiq
NDS Location=E:\Novell\NDS
DataDir=E:\Novell\NDS\Files
You can also configure two additional parameters:
Installation Location: This is the same as the NDS Location configured in the previous section.
This location is used by the Installer while copying files to the install location, and the other
location is used by the components to refer to the base eDirectory installation while they are
configured. The default value is C:\Novell\NDS, if not specified in the response file.
For example:
[Novell:DST:1.0.0_Location]
Path=file:/C:\Novell\NDS
System Location: The eDirectory Installer requires access to the system folder to copy DLLs and
to access system-specific files during installation. This parameter must be configured with the
path to the system folder of the machine where the server is installed.
For example:
[Novell:SYS32_DST:1.0.0_Location]
Path=file:/C:\Windows\system32
Adding NMAS Methods
eDirectory supports installation of multiple NMAS methods, both during install and upgrade.
During manual installations, you can select the NMAS methods to install and configure. This can also
be achieved in automated installations.
The NMAS-related configuration settings are provided inside the [NWI:NMAS] tag. The tag has two
keys to be configured, and both are mandatory:
Choices: This key informs the eDirectory installation component on the number of NMAS
methods that need to be installed.
Methods: This key lists the NMAS method options that need to be installed. Currently, there are
12 supported NMAS methods. The method names and their types are as follows:
Table 3-1 NMAS Methods
Method Name
Method Type
CertMutual
Certificate mutual login method
Challenge Response
The NetIQ challenge response NMAS method
DIGEST-MD5
Digest MD5 login method
GSSAPI
SASL GSSAPI mechanism for eDirectory. Authentication to eDirectory through
LDAP using a Kerberos ticker
NDS
NDS login method (default)
Simple Password
Simple password NMAS login method
Installing or Upgrading NetIQ eDirectory on Windows
63
NOTE: The method names should exactly match those listed in the above table, as options to the
Methods key. The Installer matches the exact string (with case) for choosing the NMAS methods to
install.
The NDS NMAS method is mandatory and will be installed automatically if no NMAS methods list
is provided. However, if you are creating an explicit list, do not remove this method from the list.
If the NMAS methods are configured using this methodology in the response file, eDirectory shows a
status message while installing, without prompting for user input.
The following is sample text in the response file for choosing the NMAS methods:
[NWI:NMAS]
Choices=12
Methods=X509 Advanced Certificate,CertMutual,Challenge Response,DIGESTMD5,Enhanced Password,Entrust,GSSAPI,NDS,NDS Change Password,Simple
Password,Universal Smart Card,X509 Certificate
HTTP Ports
eDirectory listens on preconfigured HTTP ports for access through the Web. For example, iMonitor
accesses eDirectory through Web interfaces. They need to specify certain in order to access the
appropriate applications. There are two keys that can be set prior to installation to configure
eDirectory on specific ports:
Clear Text HTTP Port: The port number for the HTTP operations in clear text.
SSL HTTP Port: HTTP port number for operations on the secure socket layer.
The following is sample text in the response file for configuring HTTP port numbers:
[eDir:HTTP]
Clear Text HTTP Port=8028
SSL HTTP Port=8030
LDAP Configuration
eDirectory supports LDAP operations. It listens for LDAP requests in clear text and SSL, on two
different ports. These ports can be configured in the response file prior to installation so that when
eDirectory is started, it listens on these configured ports.
There are three keys in the [NWI:NDS] tag that configure the LDAP ports:
LDAP TLS Port: The port on which eDirectory should listen for LDAP requests in clear text.
LDAP SSL Port: The port on which eDirectory should listen for LDAP requests in SSL. You can
also use a key to configure whether eDirectory should mandate secure connections when bind
requests send the password in clear text.
Require TLS: Whether eDirectory should mandate TLS when receiving LDAP requests in clear
text.
The following is sample text in the response file for LDAP configuration:
[NWI:NDS]
Require TLS=No
LDAP TLS Port=389
LDAP SSL Port=636
64
NetIQ eDirectory 8.8 SP8 Installation Guide
Language Settings
The eDirectory Installer language settings configure the locale and set the display language.
There are currently three locale options that can be set during installation: English, French and
Japanese. Each has a specific key in the [Novell:Languages:1.0.0] tag that can be set to True/False
prior to the start of installation.
LangID4: English. Setting this to True configures the English locale during installation.
LangID6: French. Setting this to True configures the French locale during installation.
LangID9: Japanese. Setting this to True configures the Japanese locale during installation.
These options are mutually exclusive, which is easily enforced in manual installation via radio
buttons. In unattended installations, you need to ensure only one of them is set to True.
The following is sample text in the response file for configuring an English locale:
[Novell:Languages:1.0.0]
LangID4=true
LangID6=false
LangID9=false
Status messages about the configuration of each component are displayed in message boxes
throughout the installation. By default, these messages are in English. You can also change the
display language during installation by using the DisplayLanguage key in the [Initialization]
tag.
DisplayLanguage: This key is in the [Initialization] section. Its parameters configure
languages.The following is sample text in the response file for configuring English as the display
language:
[Initialization]
DisplayLanguage=en_US
Configuration Mode Settings
If the setup mentioned in the mode key is configure, then ensure that you do not change the
RestrictNodeRemove value of the ConfigurationMode key in the [Initialization] section.
Controlling Automated Installation
The response file can also be edited to control the flow of automated installation.
Stopping SNMP services
This feature is specific to an eDirectory installation on Windows. Most Windows servers have SNMP
configured and running. When eDirectory installs, the SNMP services need to be brought down and
restarted after the installation. With manual installations, the Installer prompts the user on-screen to
stop the SNMP services before continuing the installation. This prompt can be avoided during
automation by setting the key in the[NWI:SNMP] tag:
Stop service: Set the value to Yes to stop the SNMP services without prompting. The status of is
displayed on-screen.
The following is sample text in the response file for stopping SNMP services:
Installing or Upgrading NetIQ eDirectory on Windows
65
[NWI:SNMP]
Stop service=yes
SLP Services
eDirectory uses SLP services to identify other servers or trees in the subnet during installation or
upgrade. If SLP services are already installed on your server, and you want to replace them with the
version that ships with the current version of the eDirectory (or use your own SLP services), you can
set appropriate keys in the [NWI:SLP] tag to uninstall and remove the existing SLP services.
The following is sample text in the response file for uninstalling and removing SLP services:
[EDIR:SLP]
Need to uninstall service=true
Need to remove files=true
Primary/Secondary Server Installation
eDirectory Installer provides options for the unattended install of a primary or a secondary server,
into a network. There are three keys that help the Installer decide whether it is a primary or a
secondary server installation.
New Tree: Use this key in the [NWI:NDS] tag and set it to Yes for a new tree installation, or No
for a secondary server installation.
ExistingTreeYes: This key is in the [Novell:ExistingTree:1.0.0] tag. Set it to True/false. Set
this to False for a new tree or primary server installation and set it to True for a secondary server
in an existing tree.
ExistingTreeNo: This key also is in the [Novell:ExistingTree:1.0.0] tag. Although it seems
to be redundant to the previous key, the Installer refers to both keys, so both of them must be
configured properly. Set this one to True for a new tree or primary server installation and set it to
False for adding a secondary server in an existing tree.
For example, the keys for installing a primary server in a new tree would be as follows:
[NWI:NDS]
New Tree=Yes
[Novell:ExistingTree:1.0.0]
ExistingTreeYes=false
ExistingTreeNo=true
and for a secondary server installation into an existing tree:
[NWI:NDS]
New Tree=No
[Novell:ExistingTree:1.0.0] ExistingTreeYes=true ExistingTreeNo=false
Preconfigured Unattended Installation
All user-specific configuration details can be edited in the response file. However, there are certain
parameters that should not be changed. These are for file copy and component information specific
to the eDirectory components to be installed. Make sure these parameters in the response file are not
modified. Do not change them from the values in the eDirectory release.
66
NetIQ eDirectory 8.8 SP8 Installation Guide
Install as Service Tag: eDirectory runs as a service in Windows. It is mandatory that this parameter is
always set to Yes to make sure that eDirectory is installed as a service.
[NWI:NDS]
Install as Service=Yes
Selected Nodes Tag: This tag lists the components that are installed in eDirectory, along with
information in the profile database that contains more information about the component, including
source location, destination copy location, and component version. These details in the profile
database are compiled into a .db file that is delivered in the eDirectory release.
[Novell:NOVELL_ROOT:1.0.0]
File Copy Tag: This tag contains keys for display settings that are handled in the next section,
including the file copy profile information:
overWriteNewerFile=false
overWriteNewerFilePrompt=true
copyToRemoteDestination=true
These options specify the response from the eDirectory Installer in scenarios such as file write
conflicts, file copying decisions, etc.
Silent Installation Parameters
This section describes parameters that need to be set for the Installer to run unattended.
[NWI:NDS]
Prompt=false
The [NWI:NDS] section describes eDirectory configuration details such as tree name and server name.
If you don't want the Installer to prompt for values for these parameters, set this parameter to False.
[Selected Nodes]
Prompt=false
If you don’t want the Installer to prompt for the destination copy location, version details, etc. for all
components configured with the eDirectory, set this parameter to False in the [Selected Nodes]
tag.
[Novell:NOVELL_ROOT:1.0.0]
Prompt=false
If you don’t want the Installer to prompt for yes/no questions, or for other decisions with parameters
in this section, set this parameter to False in the [Selected Nodes] tag.
[Novell:ExistingTree:1.0.0]
Prompt=false
If you don’t want the Installer to prompt for deciding whether is it a new tree installation, or for
adding a secondary server to an existing tree, set this parameter False in the [Selected Nodes] tag.
[Initialization]
InstallationMode=silent
SummaryPrompt=false
prompt=false
Installing or Upgrading NetIQ eDirectory on Windows
67
The InstallationMode key must always be explicitly set to Silent for unattended installations.
Status and Image Displays
During installation, there are various images and status information displayed. Most images contain
information on what version of eDirectory is installed, what components are installed, a welcome
screen, license files, customization options, a status message indicating the component currently
being installed, percentage complete, etc. Some applications that intend to embed eDirectory might
not want eDirectory displaying these images.
All image and status display details are configured in the [Novell:NOVELL_ROOT:1.0.0] tag,
including configuration information for the welcome page, close page, summary page, license
agreement page, language page, custom choices page, wizard page, welcome page. There are
corresponding on/off parameters for each of these configurations.
For example:
The welcomeScreen parameter is controlled by showWelcomeScreen=true/false.
The summaryScreen parameter is controlled by allowSummary=true/false.
The licenseAgreementScreen parameter is controlled by allowLicenseAgreement=true.
If the progress bar shouldn't be displayed, use allowStatusBar=false.
If the final page that reports successful installation is not required, set
[eDirCloseScreen]Silent=true.
Most of the details are preconfigured in the response file that ships with eDirectory. If you need
modifications, change the parameters in this tag.
Unattended Installation of eDirectory using Response File
Launching the eDirectory Installer on Windows is easy. The install.exe delivered in the
eDirectory release is invoked in the command line with a few additional parameters.
Depending on the setup mode you have mentioned, use either of the following commands:
NOTE: The nopleasewait option used in the commands ensures that the status window for
installation, upgrade, or configuration is not displayed.
Install
<Unzipped Location>\windows\x64\NDSonNT>install.exe /silent /nopleasewait /
template=<Response file>
For example, D:\builds\eDirectory\windows\x64\NDSonNT>install.exe /silent /
nopleasewait /template=D:\builds\eDirectory\windows\x64\NDSonNT\response.ni
Configure
<Windows Drive>\Program Files\Common Files\novell>install.exe /silent /
restrictnoderemove /nopleasewait /template=<Response file>
For example, c:\Program Files\Common Files\novell>install.exe /silent /
restrictnoderemove /nopleasewait /
template=D:\builds\eDirectory\windows\x64\NDSonNT\response.ni
68
NetIQ eDirectory 8.8 SP8 Installation Guide
A combination of installation or upgrade and configuration of eDirectory
<Unzipped Location>\windows\x64\NDSonNT>install.exe /silent /nopleasewait /
template=<Response file>
For example, D:\builds\eDirectory\windows\x64\NDSonNT>install.exe /silent /
nopleasewait /template=D:\builds\eDirectory\windows\x64\NDSonNT\response.ni
Installing or Upgrading NetIQ eDirectory on Windows
69
70
NetIQ eDirectory 8.8 SP8 Installation Guide
4
Installing eDirectory on Linux and
Windows with IPv6 Addresses
4
eDirectory 8.8 SP8 supports both IPv4 and IPv6 addresses. You can enable IPv6 addresses during the
eDirectory installation process. If you are upgrading from a previous version, you must manually
enable IPv6 addresses.
eDirectory 8.8 SP8 supports Dual IP stack, Tunneling, and Pure IPv6 transition methods. It supports
only the global IP addresses. For example,
[2015::12]
[2015::12]:524
There is no change in the eDirectory functionality on IPv6 addresses from IPv4 addresses except that
you must specify IPv6 addresses within square braces [ ]. Also, you can use hostname instead of an
IP address. If you are using the hostname, you must specify it in the etc\hosts file and associate it
with the IPv6 address.
The following are examples of some of the eDirectory utilities with IPv6 addresses:
ndsstat -h [6015:abc:def:123:456:12:0:123]
ndsstat -h [6015:abc:def:123:456:12:0:123]:524
ndslogin -h [2015::4] admin.organization
ndscheck -h [6015:abc:def:123:456:12:0:123] -a admin.organization -w password
ldapadd -h [2015::4] -p 389 -D cn=admin,o=organization -w password -f adduser.ldif
ldapdelete -h [6015:abc:def:123:456:12:0:123] -p 389 -D cn=admin,o=organization -w
password cn=user21,o=organization
ldapmodify -h [2015::4] -p 389 -D cn=admin,o=organization -w password -f
modify.ldif
ldapsearch -h [6015:abc:def:123:456:12:0:123] -p 389 -D cn=admin,o=organization -w
password -b o=organization objectclass=inetorgperson
http://[2015::3]:8028/nds
eDirectory 8.8 SP8 does not support Link local, IPv4-mapped IPv6, and IPv4-compatible IPv6
address types.
The following sections describe how to install and configure NetIQ eDirectory 8.8 SP8 on Linux and
Windows where IPv6 is already configured:
Section 4.1, “Configuring eDirectory on Linux with IPv6,” on page 72
Section 4.2, “Installing or Upgrading eDirectory on Windows with IPv6,” on page 73
For information about the differences in the Linux and Windows platforms for IPv6, see “Listeners
for Unspecified IPv6 Addresses in Linux and Windows” in the NetIQ eDirectory 8.8 SP8
Troubleshooting Guide.
Installing eDirectory on Linux and Windows with IPv6 Addresses
71
4.1
Configuring eDirectory on Linux with IPv6
This section provides information about configuring eDirectory on a Linux computer that already
supports IPv6 addresses:
4.1.1
Creating a New eDirectory Tree
You can configure a new eDirectory tree with an IPv6 address by passing the IPv6 address along with
the -B option in the ndsconfig command. For example:
ndsconfig new -t CORP-TREE -B [2015::3]@524 -P ldap://[2015::3]:389,ldaps://
[2015::3]:636
For the LDAP listeners to automatically start listening on the IPv6 addresses, you must specify the
LDAP URLs with the -P option while configuring eDirectory. If you do not specify them during the
initial configuration, you can add them in the ldapInterfaces attribute using the ldapconfig
command or iManager after the initial configuration. For more information, see Section 4.1.4,
“Adding LDAP URLS for IPV6 on the LDAP Server Object,” on page 73.
4.1.2
Adding a Server to an Existing eDirectory Tree
You can add a server to an existing tree with IPv6 by passing the IPv6 address with the -B option in
the ndsconfig command. For example:
ndsconfig add -t CORP-TREE -B [2015::4]@524 -P ldap://[2015::4]:389,ldaps://
[2015::4]:636
For the LDAP listeners to automatically start listening on the IPv6 addresses, you must specify the
LDAP URLs with the -P option while configuring eDirectory. If you do not specify them during the
initial configuration, you can add them in the ldapInterfaces attribute using the ldapconfig
command or iManager after the initial configuration. For more information, see Section 4.1.4,
“Adding LDAP URLS for IPV6 on the LDAP Server Object,” on page 73.
4.1.3
Enabling IPv6 Addresses on Existing or Upgraded eDirectory Servers
1 Add the IPv6 interface address with the port number in the /etc/opt/novell/eDirectory/
conf/nds.conf file. You must add it in each configuration file, if the computer has multiple
instances configured.
The following are some examples:
n4u.server.interfaces=164.99.90.148@524,[2015::4]@524,[2015:1234:2345:3456:abc
d:bcde:cdef:aaaa]@524
http.server.interfaces=164.99.90.148@8028,[2015::4]@8028,[2015:1234:2345:3456:
abcd:bcde:cdef:aaaa]@8028
https.server.interfaces=164.99.90.148@8030,[2015::4]@8030,[2015:1234:2345:3456
:abcd:bcde:cdef:aaaa]@8030
2 Restart ndsd using the following commands:
ndsmanage stopall
ndsmanage startall
72
NetIQ eDirectory 8.8 SP8 Installation Guide
4.1.4
Adding LDAP URLS for IPV6 on the LDAP Server Object
If you do not specify the LDAP URLs during the initial eDirectory configuration, you can use the
ldapconfig command or iManager to add them in the ldapInterfaces attribute.
The following are examples for using the ldapconfig set and the ldapconfig -s command:
ldapconfig set "ldapInterfaces=ldap://[2015::3]:389,ldaps://[2015::3]:636"
ldapconfig -s
"ldapInterfaces=ldap://[2015::3]:389,ldapInterfaces=ldaps://[2015::3]:636"
To add LDAP URLs in iManager:
1 In NetIQ iManager, click Roles and Tasks.
2 Click LDAP > LDAP Options.
3 Click View LDAP Server, then click the name of an LDAP Server object to configure.
4 Click Connections, add LDAP URLS in the LDAP Interfaces field.
5 Click Apply, then click OK.
4.2
Installing or Upgrading eDirectory on Windows with IPv6
This section provides information about configuring eDirectory on a Windows computer that already
supports IPv6 addresses.
4.2.1
Enabling IPv6 While Installing or Upgrading eDirectory
If you want to use IPv6 addresses, ensure that you select the Enable IPv6 check box under IPv6
Preference during the eDirectory installation. If you select it, the DHost starts listening on the IPv6
addresses. If you do not enable IPv6 addresses during the installation process, and then decide to use
them later, you must run the setup program again.
4.2.2
Enabling IPv6 for Existing Servers
If you want to use IPv6 addresses for an already configured eDirectory server, you must rerun the
installation and select the Enable IPv6 check box under IPv6 Preference. It enables the NCP, HTTP, and
HTTPS protocols for the IPv6 addresses.
4.2.3
Accessing iMonitor
You can access iMontior over IPv6 addresses using the following link:
http://[2015::3]:8028/nds
Installing eDirectory on Linux and Windows with IPv6 Addresses
73
74
NetIQ eDirectory 8.8 SP8 Installation Guide
5
Relocating the DIB
5
After installing and configuring NetIQ eDirectory, if there is a need to relocate the DIB, you can do it.
You might want to relocate your DIB for multiple reasons, such as, if the number of objects in the tree
is expected to grow but the current file system where the DIB exists does not have sufficient space.
5.1
Linux
Complete the following procedure to relocate your DIB:
1 Check the server status by entering the following command at the command line:
ndscheck
2 Stop the eDirectory service using ndsmanage as follows:
2a Enter ndsmanage at the command prompt.
2b Select the instance you want to stop.
The menu expands to include the options you can perform on a specific instance.
2c Enter k to stop the instance.
3 Get the current DIB location using the following command:
ndsconfig get n4u.nds.dir
NOTE: In eDirectory 8.8, by default the DIB is located at /var/opt/novell/eDirectory/data/
and on pre-eDirectory 8.8 servers, it is located at /var/nds/.
4 Copy the DIB to the new location as follows:
cp -rp current__location new__location
For example, to copy the DIB to /home/nds/, enter the following:
cp -rp /var/opt/novell/eDirectory/data//* /home/nds//
5 Edit the instance-specific nds.conf configuration file and change the parameter value of
n4u.nds.dir as follows:
n4u.nds.dir=new__location
For example, if you are changing the DIB from /var/nds/ to /home/nds/, type the following:
n4u.nds.dir=/home/nds/
6 Start the eDirectory service as follows
6a Enter ndsmanage at the command prompt.
6b Select the instance you want to start.
The menu expands to include the options you can perform on a specific instance.
6c Enter s to start the instance.
Relocating the DIB
75
7 Check the server status as follows:
ndscheck
5.2
Windows
DIB relocation is currently not supported. However, you can locate the DIB in a custom location
during the eDirectory installation.
76
NetIQ eDirectory 8.8 SP8 Installation Guide
6
Upgrade Requirements of eDirectory 8.8
6
One of the unique features of eDirectory is its ability to maintain the tight referential integrity. Any
object Classes derived from Top will have a reference attribute in its class definition. This is a hidden
attribute added to all the referenced objects that are internally maintained by eDirectory. Background
processes keep running to check the links between the referenced object and the referencing objects.
If the referenced object is from a different partition than the one held locally in the server, an external
reference to that object will be created locally in the external reference partition. An external reference
is a representation of an object existing in the eDirectory tree. However, it is not a copy of the object
and its assigned attributes.
Though we can remove the Reference attribute from eDirectory, currently, the class definitions are
untouched to maintain the backward compatibility in the tree.
This chapter explains the changes and possible upgrade scenarios in eDirectory 8.8.
Section 6.1, “Reference Changes in 8.8 SP1 or Later Versions,” on page 77
Section 6.2, “Upgrade Process in 8.8 SP8,” on page 78
Section 6.3, “Performing a Dry Run before Upgrading eDirectory,” on page 80
6.1
Reference Changes in 8.8 SP1 or Later Versions
The reference attribute is a hidden attribute and is maintained on each referenced object. This is
created and maintained by DS. The new referencing code in DS is based on a Flexible Adaptable
Information Manager (FLAIM) index called LocalEntryIDIndex that DS creates. Though FLAIM
maintains the index, the usage is determined by DS. FLAIM automatically updates the index when a
DN value is added or deleted. Each key in the index is a compound key, i.e, DN of the object being
referenced + Entry ID of the referencing object. For example, if there is an object with Entry ID 343,
and it has a “member” value that points to object #899, FLAIM will automatically generate a key in
the index of 899+343. DS can now do lookups in the index to find all the objects pointing to object
#899. Object #899 does not have to keep a reference attribute on itself to remember all the objects
referencing it. Actually, FLAIM maintains the index without knowing how it is used, but DS has the
code that knows how to use the index.
However, the new way of maintaining references requires a database upgrade when the existing
eDirectory instance is upgraded to 8.8 SP1 or later versions. The upgrade requires the creation of a
new index, which will require traversing each entry in the database. It also requires the removal of all
of the “reference” attributes from each entry in the database. In addition, some internal octet string
attributes used by DS that had embedded DNs would need to generate some new DN values to store
alongside the octet string value. All this would be a time consuming process on a large database.
Since DS is changed to do referential integrity using new FLAIM feature, and that depends on the
new index, there is no way DS can really operate until the conversion is complete. Therefore, the first
time an existing database is opened, all reference attributes need to be changed to a new index. It
could take hours before it actually opens and is ready for use by applications for a large database.
Upgrade Requirements of eDirectory 8.8
77
6.2
Upgrade Process in 8.8 SP8
The ndsconfig upgrade command is used to upgrade the necessary configuration of the individual
components such as HTTP, LDAP, SNMP, SAS, and NMAS. eDirectory database is upgraded to a new
format if eDirectory versions prior to eDirectory 8.8 SP1 are upgraded to eDirectory 8.8 SP8.
The appropriate upgrade utility is called after the packages are upgraded to eDirectory 8.8 SP8.
A new offline database upgrade utility is available with eDirectory 8.8 SP1 onwards.
NOTE: In case the administrator wants to run the utility and find out the status of the upgrade, this
database upgrade tool can be used with a copy of the database or with -d option
Linux
Windows
ndsupg
ndsupg.exe
Figure 6-1 ndsupg Help Screen
The following table discusses the ndsupg options.
Table 6-1 ndsupg Options
78
Option
Description
-q
Quiet mode. There will not be any messages in quiet mode. Messages will be logged to log
file (if provided) even in -q mode. It is recommended that you always provide a log file
name for troubleshooting purpose.
NetIQ eDirectory 8.8 SP8 Installation Guide
Option
Description
-d
Dry run. Upgrade will be performed on a copy of the actual database.
IMPORTANT: ds.nlm should be unloaded before loading dsup.nlm.
This option can be used if the administrator wants to know if the upgrade is going to be
successful and also to estimate the time required to upgrade the database. It is
recommended to take a copy of the DIB.
NOTE: eDirectory service should be unloaded or stopped before taking a copy of the
database. ndsupg utility can be run on the copied database to estimate the downtime
required for the actual upgrade. During this time, eDirectory service can be loaded or
restarted.
-v
Verbosity of the messages. The default value is 3 where all messages are logged. It is
recommended to always leave the verbosity level to its default value.
-l
Provide a log file name where messages are logged during upgrade. The log file will indicate
the time the upgrade started and the end time. Given below is a snapshot of log file.
Using the Force Option to Upgrade eDirectory From Older Versions on Linux
eDirectory 8.8 SP8 only supports upgrades from version 8.8.2 or later on Linux.
To upgrade from eDirectory versions 8.7.3 through 8.8.1, perform any one of the following steps:
First, upgrade to eDirectory 8.8.7 and then upgrade to eDirectory 8.8.8.
or
Upgrade directly by using the force switch -f command.
With this option, some of the checks such as the health check and disk space check for DIB
upgrade will not occur. Additionally, older RPMs are removed and new RPMs are installed.
Upgrade Requirements of eDirectory 8.8
79
6.3
Performing a Dry Run before Upgrading eDirectory
ndsupg can be used to perform a dry run before upgrading the packages. This utility alone can be
used against a copied database on all the supported platforms. The advantage is that eDirectory
services will still be available when the dry run is being performed.
Here, the -d option can be used where the upgrade utility itself takes a copy of the DIB and performs
the upgrade on the copy. ds.nlm should be unloaded while copying the database to ensure the
integrity of the database. Upgrade will require twice the size of the database since a copy needs to be
taken.
6.3.1
Common Problems Encountered during the Upgrade Process
The following FAQ section discusses the common problems faced while upgrading from the
previous versions of eDirectory to eDirectory 8.8.
Question: I am upgrading from eDirectory 8.7.x to eDirectory 8.8. The upgrade
process failed with an error. My eDirectory 8.7.x server no longer comes up.
Answer: While upgrading from 8.7.x to eDirectory 8.8, the database goes through a two phase
upgrade. In the first phase, a key pair is created for encrypted attributes support which was
introduced in eDirectory 8.8. In the second phase, DIB upgrade happens for reference changes. Incase
the second phase fails after the first phase, the existing binaries (eDirectory 8.7.x) will not be able to
open the database as database is already upgraded to 8.8 level and the database version is changed to
reflect that. We recommend taking a backup of the database before proceeding with upgrading to
eDirectory 8.8. Please refer to Section 8.2, “Migrating to eDirectory 8.8 SP8 Without Upgrading the
Operating System,” on page 92 for further details.
Question: The upgrade process seems to be taking a lot of time.
Answer: The upgrade scans the entire database and checks for reference attributes on all the objects.
This process might take a while depending on the number of the objects in the database. It may take
hours for a database with 5 million objects with reference attributes on all the objects.
Question: The upgrade process seems to be taking a lot of space in the storage.
Answer: Since the entire reference upgrade has to be done in a single transaction and transaction
rollback is required in case the upgrade fails, FLAIM keeps the changed blocks in its nds.db file. As a
result of this, you might observe the nds.db growing during the upgrade process. This is quite
normal. The file might spill over to nds.00v, nds.002, etc. The upgrade process will require as much as
100% of existing disk space depending on the number of objects to be upgraded. For e.g, a DIB size of
15Gig might require another 15Gig free space, if all objects in the DIB has reference attributes.
Question: The eDirectory database upgrade proceeds even if I provide a wrong
password and admin user.
Answer: eDirectory package upgrade and database upgrade happens based on your file system
rights. The eDirectory administrator password will not be used for this. It has a side effect that the
login might fail once the upgrade begins. The next attempt to use the ndsconfig upgrade command
will always go through.
80
NetIQ eDirectory 8.8 SP8 Installation Guide
Question: I provided a wrong password for administrator. My upgrade failed, and
I started the upgrade again with the correct password. The upgrade is again
taking long time (as long as 1 hour for a 5 million objects with reference
attributes on all) to bring up the initial display.
Answer: eDirectory maintains the reference attributes in a separate container in the database. The
delay in the initial display is due to the time it takes FLAIM to delete the database container that
holds the “Reference” attribute records.
Upgrade Requirements of eDirectory 8.8
81
82
NetIQ eDirectory 8.8 SP8 Installation Guide
7
Configuring NetIQ eDirectory on Linux
7
NetIQ eDirectory includes configuration utilities that simplify the configuration of various
eDirectory components on Linux computers. The following sections provide information about
functionality and usage of eDirectory configuration components:
Section 7.1, “Configuration Utilities,” on page 83
Section 7.2, “Configuration Parameters,” on page 85
Section 7.3, “Security Considerations,” on page 90
7.1
Configuration Utilities
This section provides information about using the following eDirectory configuration utilities:
Section 7.1.1, “The ndsconfig Utility,” on page 83
Section 7.1.2, “Using LDAP Tools to Configure the LDAP Server and LDAP Group Objects,” on
page 84
Section 7.1.3, “Using the nmasinst Utility to Configure NetIQ Modular Authentication Service,”
on page 84
Section 7.1.4, “Customizing eDirectory,” on page 84
7.1.1
The ndsconfig Utility
You can use the ndsconfig utility to configure eDirectory. This utility can also be used to add the
eDirectory Replica Server into an existing tree or to create a new tree. For more information, see
Section 2.6.4, “Using the ndsconfig Utility to Add or Remove the eDirectory Replica Server,” on
page 36.
NOTE: Ensure that the NCP server name is unique in the network.
To change the current configuration of the installed components, use the following syntax:
ndsconfig {set value_list | get [parameter_list] | get help [parameter_list]}
Refer to Section 7.2, “Configuration Parameters,” on page 85 for a description of ndsconfig
parameters.
IMPORTANT: After installation, ensure that you run the ndsconfig utility from the installed location
on the server, which is /opt/novell/eDirectory/bin by default. Do not run ndsconfig from the
installation package.
Configuring NetIQ eDirectory on Linux
83
7.1.2
Using LDAP Tools to Configure the LDAP Server and LDAP Group
Objects
You can use the LDAP tools included with eDirectory on Linux computers to modify, view, and
refresh the attributes of LDAP Server and Group objects.
For more information, see “Using LDAP Tools on Linux” in the NetIQ eDirectory 8.8 SP8
Administration Guide.
7.1.3
Using the nmasinst Utility to Configure NetIQ Modular Authentication
Service
For eDirectory 8.8, by default, ndsconfig configures NMAS. You can also use nmasinst to configure
NMAS.
ndsconfig only configures NMAS and does not install the login methods. To install these login
methods, you can use nmasinst. For more information, see “Using the nmasinst Utility to Configure
NMAS” on page 48.
7.1.4
Customizing eDirectory
“Using the ndsd init Script” on page 84
“Using eDirectory on SLES 12 and RHEL 7 Platforms” on page 85
Using the ndsd init Script
The ndsd init script starts the daemon when the system starts with the configuration parameters
from the default configuration file, /etc/opt/novell/eDirectory/conf/nds.conf.
NOTE: You should not use the /etc/init.d/ndsd script in the systemd environment . Systemd is
currently supported with SLES 12 and RHEL 7 platforms only. For more information, see “Using
eDirectory on SLES 12 and RHEL 7 Platforms” on page 85.
Before starting ndsd, ensure that any SLP (Service Location Protocol) agent is running on the host.
You can install OpenSLP, any native SLP available with your operating system, or NetIQ SLP.
NOTE: To start eDirectory, use the ndsmanage utility.
To start ndsd, run /etc/init.d/ndsd start.
To stop ndsd, run /etc/init.d/ndsd stop.
The eDirectory configuration creates the following shell scripts in the /opt/novell/eDirectory/
sbin location:
pre_ndsd_start
post_ndsd_start
pre_ndsd_stop
post_ndsd_stop
84
NetIQ eDirectory 8.8 SP8 Installation Guide
As the name indicates, the pre_ndsd_start script is executed before the ndsd binary is started by the
/etc/init.d/ndsd script. The post_ndsd_start script is executed after the ndsd binary is started
by the /etc/init.d/ndsd script. Similarly, the pre_ndsd_stop and post_ndsd_stop scripts are
executed before and after stopping the ndsd process, respectively.
You can add commands of your choice to these scripts to get them executed. By default, the
post_ndsd_start script has commands to ensure that /etc/init.d/ndsd comes out after ensuring
that the LDAP services are up and running.
NOTE: You must add all the environment variables required for the eDirectory service in the
pre_ndsd_start_custom script. Exporting of environment variables on terminals or /etc/init.d/
ndsd script is not used by eDirectory.
Using eDirectory on SLES 12 and RHEL 7 Platforms
eDirectory starts the daemon when the system starts with the configuration parameters from the
default configuration file, /etc/opt/novell/eDirectory/conf/nds.conf.
Before starting ndsd, ensure that any SLP (Service Location Protocol) agent is running on the host.
You can install OpenSLP, any native SLP available with your operating system, or NetIQ SLP.
To start or stop eDirectory, use the ndsmanage utility.
The eDirectory configuration creates the following shell scripts in the /opt/novell/eDirectory/
sbin location:
pre_ndsd_start_custom: Use this script for custom addition of commands before executing
eDirectory.
post_ndsd_start_custom: Use this script for custom addition of commands after executing
eDirectory.
post_ndsd_stop_custom: Use this script for custom addition of commands after stopping
eDirectory.
NOTE: Do not use any of the factory scripts from the /opt/novell/eDirectory/sbin / location. The
eDirectory configuration will use the factory scripts. To include additional commands of your choice,
use custom scripts.
7.2
Configuration Parameters
The eDirectory configuration parameters are stored in the nds.conf file.
When configuration parameters are changed, ndsd needs to be restarted for the new value to take
effect. You should use ndsmanage to restart ndsd.
However, for some configuration parameters, ndsd need not be restarted. These parameters are listed
below:
n4u.nds.inactivity-synchronization-interval
n4u.nds.synchronization-restrictions
n4u.nds.janitor-interval
n4u.nds.backlink-interval
n4u.nds.drl-interval
Configuring NetIQ eDirectory on Linux
85
n4u.nds.flatcleaning-interval
n4u.nds.server-state-up-thresholdn4u.nds.heartbeat-scheman4u.nds.heartbeatdata
The following table provides a description of all the configuration parameters.
Parameter
Description
n4u.nds.preferred-server
The host name of the machine that hosts the eDirectory
service.
Default = null
n4u.base.tree-name
The tree name that Account Management uses. This is
a mandatory parameter set by the Account
Management Installer. This parameter cannot be set.
n4u.base.dclient.use-udp
DClient can use UDP in addition to TCP for
communicating with the eDirectory servers. This
parameter enables the UDP transport feature.
Default = 0
Range = 0, 1
n4u.base.slp.max-wait
The Service Location Protocol (SLP) API calls timeout.
Default = 30
Range = 3 to 100
This value is in seconds.
This option is supported only by NetIQ SLP and not
OpenSLP.
n4u.nds.advertise-life-time
eDirectory reregisters itself with the Directory Agent
after this time period.
Default = 3600
Range = 1 to 65535
This value is in seconds.
n4u.server.signature-level
Determines the level of enhanced security support.
Increasing this value increases security, but decreases
performance.
Default = 1
Range = 0 to 3
n4u.nds.dir
The eDirectory directory information database.
Default:
/var/opt/novell/eDirectory/data/
This parameter cannot be set using the ndsconfig
set command. You can manually change this
parameter if you want to relocate your DIB. However,
we do not recommend you do so.
86
NetIQ eDirectory 8.8 SP8 Installation Guide
Parameter
Description
n4u.nds.server-guid
A globally unique identifier for the eDirectory server.
Default = null
n4u.nds.server-name
The name of the eDirectory Server.
Default = null
n4u.nds.bindery-context
The Bindery context string.
Default = null
n4u.nds.server-context
The context that the eDirectory server is added to. This
parameter cannot be set or changed.
n4u.nds.external-referencelife-span
The number of hours unused external references are
allowed to exist before being removed.
Default = 192
Range = 1 to 384
n4u.nds.inactivitysynchronization-interval
The interval (in minutes) after which full synchronization
of the replicas is performed, following a period of no
change to the information held in the eDirectory on the
server.
Default = 60
Range = 2 to 1440
n4u.nds.synchronizationrestrictions
The Off value allows synchronization with any version
of the eDirectory. The On value restricts
synchronization to version numbers you specify as
parameters. For example, ON,420,421.
Default = Off
n4u.nds.janitor-interval
The interval (in minutes) after which the eDirectory
Janitor process is executed.
Default = 2
Range = 1 to 10080
n4u.nds.backlink-interval
The interval (in minutes) after which the eDirectory
backlink consistency is checked.
Default = 780
Range = 2 to 10080
n4u.nds.drl-interval
The interval (in minutes) after which the eDirectory
distributed reference link consistency is checked.
Default = 780
Range = 2 to 10080
Configuring NetIQ eDirectory on Linux
87
Parameter
Description
n4u.nds.flatcleaning-interval
The interval (in minutes) after which the flatcleaner
process automatically begins purging and deleting
entries from the database.
Default = 720
Range = 1 to 720
n4u.nds.server-state-upthreshold
The server state up threshold, in minutes. This is the
time after which the eDirectory checks the server state
before returning -625 errors.
Default = 30
Range = 1 to 720
n4u.nds.heartbeat-schema
The heartbeat base schema synchronization interval in
minutes.
Default = 240
Range = 2 to 1440
n4u.nds.heartbeat-data
The heartbeat synchronization interval in minutes.
Default = 60
Range = 2 to 1440
n4u.nds.dofsync
Setting this parameter to 0 increases update
performance significantly for large databases, but there
is a risk of database corruption if the system crashes.
n4u.server.configdir
The eDirectory configuration files are placed here.
Default = /etc
n4u.server.vardir
The eDirectory and utilities log files are placed here.
Default = /var/opt/novell/eDirectory/log
n4u.server.libdir
The eDirectory specific libraries are placed here in the
nds-modules directory.
Default = /opt/novell/eDirectory/lib
n4u.server.sid-caching
Enables SSL session ID caching. Refer to the SSL v3.0
RFC for more details about session ID caching in SSL.
n4u.server.tcp-port
The default port used if the port number is not specified
in the n4u.server.interfaces parameter.
n4u.server.interfaces
The IP address and port number that eDirectory server
should listen on for client connections. The value can
be a comma-separated list specifying more than one
combination of possible settings. For example:
n4u.server.interfaces=101.1.2.3@524,100.
1.2.3@1524
88
NetIQ eDirectory 8.8 SP8 Installation Guide
Parameter
Description
n4u.server.max-interfaces
This parameter specifies maximum number of
interfaces that eDirectory will use.
Default = 128
Range = 1 to 2048
n4u.server.max-openfiles
This parameter specifies the maximum number of file
descriptors that eDirectory can use.
Default = maximum allowed by the administrator
n4u.server.max-threads
The maximum number of threads that will be started by
the eDirectory server. This is the number of concurrent
operations that can be done within the eDirectory
server.
Default = 64
Range = 32 to 512
Refer to the NetIQ eDirectory 8.8 SP8 Tuning Guide to
set an optimum value.
n4u.server.idle-threads
The maximum number of idle threads that are allowed
in the eDirectory server.
Default = 8
Range = 1 to 128
n4u.server.start-threads
Initial number of threads to be started up.
Default = 8
n4u.server.log-levels
This parameter helps to configure the error logging
settings for the server-side messages. It sets the
message log level to LogFatal, LogWarn, LogErr,
LogInfo, or LogDbg.
n4u.server.log-file
This parameter specifies the log file location where the
messages would be logged. By default, the messages
are logged into the ndsd.log file.
n4u.ldap.lburp.transize
Number of records that are sent from the NetIQ Import/
Export client to the LDAP server in a single LBURP
packet. You can increase the transaction size to ensure
that multiple add operations can be performed in a
single request.
Default = 25
Range = 1 to 250
n4u.server.listen-on-loopback
It is a boolean parameter, and enabled by default. In a
few recent Linux distributions, the hostname in the /
etc/hosts file is associated with the loopback
address. Though the common address given in the
SLES systems is 127.0.0.2, it can be anything from
127.0.0.0 to 127.255.255.255 (valid loopback
addresses).
Configuring NetIQ eDirectory on Linux
89
Parameter
Description
http.server.interfaces
Comma-separated list of interfaces that HTTP server
should use.
http.server.request-io-buffersize
Default IO buffer size.
http.server.request_timeoutseconds
Server request timeout.
http.server.keep-timeoutseconds
Number of seconds to wait for the next request from the
same client on the same connection.
http.server.threads-perprocessor
HTTP thread pool size per processor.
http.server.session-exp-seconds Session expiration time in seconds.
http.server.sadmin-passwd
Session administrator password.
http.server.module-base
HTTP server webroot.
https.server.cached-cert-dn
HTTPS server cached certificate DN.
https.server.cached-server-dn
HTTPS server cached DN.
http.server.trace-level
Diagnostic trace level of HTTP server.
http.server.auth-req-tls
HTTP server authentication requires TLS.
http.server.clear-port
Server port for the HTTP protocol.
http.server.tls-port
Server port for the HTTPS protocol.
NOTE: For more details information on the eDirectory configuration parameters, refer to the
nds.conf man page.
7.3
Security Considerations
The following security considerations are recommended:
Make sure that only authenticated users have browse rights to the tree. To limit this, do the
following:
Remove browse rights of [Public] on tree root.
Assign [Root] browse rights on tree root.
Set the ldapBindRestrictions attribute on the LDAP server object to Disallow anonymous
Simple Bind. This prevents the clients from doing anonymous binds.
By default, the cipher is set to Export. Make LDAP more secure by setting the cipher to HIGH. To
do this, change the bind restrictions attribute of the LDAP Server object to Use Higher Cipher
(greater than 128 bit).
90
NetIQ eDirectory 8.8 SP8 Installation Guide
8
Migrating to eDirectory 8.8 SP8
8
This document guides you to migrate your NetIQ eDirectory 8.7.3.x server to eDirectory 8.8 SP8
when you have to upgrade your operating system also.
With the change in the operating systems supported in eDirectory 8.8 SP8, there are certain versions
that eDirectory 8.8 SP8 does not support that were earlier supported with eDirectory 8.7.3.x.
There are two scenarios while migrating to eDirectory 8.8 SP8:
Migrating to eDirectory 8.8 SP8 when platform upgrade is possible
In this scenario, you upgrade your operating system to a supported version and then upgrade
eDirectory to eDirectory 8.8 SP8.
Migrating to eDirectory 8.8 SP8 when platform upgrade is not possible
In this scenario, you cannot upgrade your operating system to a supported version as the
operating system migration path is not possible.
8.1
Migrating to eDirectory 8.8 SP8 While Upgrading the
Operating System
In this scenario, you can migrate to eDirectory 8.8 SP8 after upgrading the operating system. For
example, you can upgrade from a 32-bit operating system to a 64-bit operating system. The table
below describes the migration path.
IMPORTANT: Ensure that you have upgraded eDirectory 8.7.3 with the latest set of patches.
Table 8-1 Migration Path
Operating
System
Windows
Starting State
Intermediate State
Desired State
Windows 2008 SP2 +
eDirectory 8.8 SP5
Windows 2008 SP2 +
eDirectory 8.8 SP8
Windows 2012 SP1 +
eDirectory 8.8 SP8
Precautions: Before upgrading eDirectory on Linux, ensure that the hostname is configured
to a valid IP address and not to loopback address in the /etc/hosts file.
Linux
SLES 10 + eDirectory 8.7.3.x SLES 10 SP4 + eDirectory
8.8 SP8
SLES 11 SP2 + eDirectory
8.8 SP8
Migrating to eDirectory 8.8 SP8
91
Recommendations
1 Backup your eDirectory 8.7.3.x files before upgrading the operating system. Stop eDirectory and
back up the following files:
dib directory
nds.rfl directory (by default this directory is present under the dib directory)
nds.conf file
nici directory
log files
2 Do not perform any operations on the intermediate state other than upgrading eDirectory, if the
eDirectory version is not supported on a particular operating system in the intermediate state.
For example, eDirectory 8.7.3.x on SLES 9.
8.2
Migrating to eDirectory 8.8 SP8 Without Upgrading the
Operating System
This method is used in scenarios where there is no operating system upgrade path to supported
eDirectory 8.8 SP8 version.
For example, eDirectory 8.7.3.x is installed on SLES 9. A customer using SLES 9 wants to upgrade to
eDirectory 8.8 SP8. eDirectory 8.8 SP8 is supported on SLES 11 and there is no upgrade path from
SLES 9 to SLES 11.
Complete the following steps to migrate to eDirectory 8.8 SP8:
1 Stop the eDirectory server
2 Take a backup of the following eDirectory 8.7.3.x files:
dib directory
nds.rfl directory (by default, this directory is present under the dib directory)
nds.conf file
nici directory
log files
3 Install the operating system
4 Remove the nici directory from /var/novell and restore the nici directory to /var/opt/
novell
5 Ensure that /var/novell/nici is pointing to /var/opt/novell/nici
6 Install eDirectory 8.8 SP8 on the server (a new install)
7 Restore the dib and nds.rfl directories
8 Restore the nds.conf to the user-specified location
9 Edit /etc/opt/novell/eDirectory/conf/.edir/instances.0 and put the absolute path to
nds.conf file.
10 Edit the nds.conf file and add the following.
n4u.nds.dir=_file_location
n4u.server.libdir=/opt/novell/eDirectory/lib
n4u.server.vardir=var_directory
n4u.server.configdir=/etc/opt/novell/eDirectory/conf
http.server.module-base=http_server_module_base_directory
92
NetIQ eDirectory 8.8 SP8 Installation Guide
11 Set the path as follows:
Use /opt/novell/eDirectory/bin/ndspath utility.
12 Run ndsconfig upgrade after setting the path.
Migrating to eDirectory 8.8 SP8
93
94
NetIQ eDirectory 8.8 SP8 Installation Guide
9
Migrating eDirectory from NetWare to
OES 2 Linux
9
eDirectory migration from NetWare requires the migration of eDirectory data and server identity to
provide seamless accessibility after migration.The eDirectory migration utility performs all of the
pre-migration tasks, health validations and server backups, server migration tasks, and postmigration tasks for you.
The following sections give you more details on the migration procedure for eDirectory. For more
information, see the Novell Open Enterprise Server Migration Web site (http://www.novell.com/
products/openenterpriseserver/migrate.html) and the OES 2 SP3: Upgrading to OES - Best Practices
Guide (http://www.novell.com/documentation/oes2/upgrade_to_oes_lx/data/front.html).
Section 9.1, “Planning Your Migration,” on page 95
Section 9.2, “Migration Tools,” on page 96
Section 9.3, “Migration Procedure,” on page 96
Section 9.4, “After the Migration,” on page 98
9.1
Planning Your Migration
This section lists the important requirements that must be verified before attempting eDirectory
migration.
Section 9.1.1, “System Requirements,” on page 95
Section 9.1.2, “Prerequisites,” on page 95
Section 9.1.3, “Supported Platforms,” on page 96
9.1.1
System Requirements
The target server must run OES 2 and should have the eDirectory 8.8 SP8 RPMs already
installed.
If the target OES 2 server has a default eDirectory 8.8 SP8 instance already configured, this
instance should be active. This instance will be overwritten after the migration.
OES 2 does not support multiple instances of eDirectory on the same server, so any non-default
instances should not be running during migration.
The source NetWare server should be running and should not be part of any partition operation.
9.1.2
Prerequisites
The eDirectory migration utility will run only on the target server and must be able to access the
NetWare server remotely.
Migrating eDirectory from NetWare to OES 2 Linux
95
9.1.3
Supported Platforms
The eDirectory migration utility is designed to run on the Linux version of OES 2, which is the target
platform for migration. The following table lists the compatible eDirectory versions at source and the
corresponding target servers:
Table 9-1 eDirectory Versions at Source and Target Servers
9.1.4
Source Server
Target Server
NetWare 5.1 SP8 + eDirectory 8.7.3.6
Physical or Virtualized OES2 Linux 32 or 64
NetWare 5.1 SP8 + eDirectory 8.7.3.7
Physical or Virtualized OES2 Linux 32 or 64
NetWare 6.5 SP6 + eDirectory 8.7.3.9
Physical or Virtualized OES2 Linux 32 or 64
NetWare 6.5 SP6 + eDirectory 8.8
Physical or Virtualized OES2 Linux 32 or 64
NetWare 6.5 SP6 + eDirectory 8.8 SP1
Physical or Virtualized OES2 Linux 32 or 64
NetWare 6.5 SP6 + eDirectory 8.8 SP3
Physical or Virtualized OES2 Linux 32 or 64
Considerations
IP address and DNS migrations are not performed by this migration utility.
Only the eDirectory instance will be migrated. Applications depending on eDirectory will not be
migrated.
You should not use this migration methodology if you want both the servers to be available
during the migration operation.
NOTE: Only the target server will be available after the migration.The source server will be
locked. Other service migrations cannot be performed after completing eDirectory migration.
9.2
Migration Tools
The eDirectory migration is performed independently of the OES migration framework. The
complete migration task is performed by invoking the migedir command line utility.
9.3
Migration Procedure
1 Run the migedir utility by entering the following command on the target server:
migedir -s <IP address> [-A <log directory name>] [-t] [-v] [-h]
The utility takes the following command line options:
Option
Description
-s
Specifies the IP address of the source server containing the eDirectory instance to
be migrated.
IP address
IMPORTANT: -s is a mandatory parameter.
96
NetIQ eDirectory 8.8 SP8 Installation Guide
Option
Description
-A directory
name
Enables auditing. directory name specifies the directory in which log files
should be created.
-t
Tests the validity of the input parameters.
NOTE: This option verifies the IP address. However, it does not perform the actual
migration.
-v
Enables the verbose mode.
-h
Prints help about using this utility.
2 Follow the on-screen instructions as the utility performs the migration.
The migration utility does some pre-migration checks, performs the migration, then does some
post-migration tasks.
“Pre-migration” on page 97
“Migration” on page 97
“Post-migration” on page 97
“Handling Failures” on page 98
Pre-migration
The utility performs the following checks:
The health and state of the replicas in the ring are verified.
Configuration information for the server being migrated is collected and written to a
configuration file to be used by other operations during the migration.
Time synchronization is verified between the source and target servers.
The target server is checked for any existing eDirectory instances.
If the instance exists, the user is prompted and the existing instance is removed before
proceeding with the migration.
If the instance does not exist, a new instance is configured and used.
Migration
The utility performs the migration of the eDirectory instance from the collected configuration
information. This involves backing up the source server data, locking the eDirectory instance in the
source server, migrating data to the target server, and restoring the eDirectory instance on the target
server. The dependent NICI files are also migrated.
The utility also configures the local instance in the target server with the source server details
obtained during the previous checks.
Post-migration
After migration, the following tasks are performed by the utility:
The nds.conf configuration file is modified with the source server eDirectory instance
information, such as tree name and server name.
Migrating eDirectory from NetWare to OES 2 Linux
97
The eDirectory instance in the target server is restarted so it can use the new data.
Network address repair is performed to start the synchronization of the new IP address in the
replica ring.
Handling Failures
During migration, the database in the source server is locked to avoid multiple copies of the instance
running on the source and target servers. Multiple copies of the same instance can lead to data
inconsistency. If the process fails and if you intend to bring up the source server again, you need to
perform the following tasks:
1 Remove the partially migrated eDirectory instance on the target server.
For more information on how to remove the eDirectory instance from a server, see Section 2.6.4,
“Using the ndsconfig Utility to Add or Remove the eDirectory Replica Server,” on page 36.
2 Restore and unlock the database in the source server.
For more information on how to unlock and restore the database, see “Using the eMBox Client
for Backup and Restore” in the NetIQ eDirectory 8.8 SP8 Administration Guide.
The database backup is saved in the sys:ni/data folder.
9.4
After the Migration
After migration, the target eDirectory instance listens on the IP address of the target server and not
on the source server’s address. It requires additional time after migration for the eDirectory instance
to synchronize the new IP address in the replica ring. Successful eDirectory migration can be verified
by performing eDirectory operations on the new IP address.
IMPORTANT: If you want to use the existing security certificates, you must change the IP address of
the target server to that of the source server. If you don’t want to do this, you must issue new
certificates.
NOTE: If you change the IP address of the target server after migration, you must modify the
nds.conf file, restart the eDirectory instance, and repair the network address and partitions replica
manually. For more information on repairing eDirectory instance, refer to “DSRepair Options” in the
NetIQ eDirectory 8.8 SP8 Administration Guide.
98
NetIQ eDirectory 8.8 SP8 Installation Guide
10
Deploying eDirectory on High
Availability Clusters
10
The primary method through which NetIQ eDirectory supports high availability is by configuring
multiple servers through synchronization. However, clustering may be a more viable alternative for
achieving high availability in some environments.
This section provides guidelines for configuring eDirectory on high availability clusters by using
shared storage. The information in this section is generalized for shared storage high availability
clusters on supported Windows and Linux platforms, and the information is not specific to a
particular cluster manager.
State data for eDirectory must be located on the shared storage so that it is available to the cluster
node that is currently running the services. This means that the eDirectory DIB must be located on
the cluster shared storage. The root eDirectory instance on each of the cluster nodes must be
configured to use the DIB on the shared storage.
In addition to the DIB, it is also necessary to share NICI (NetIQ International Cryptographic
Infrastructure) data so that server-specific keys are replicated among the cluster nodes. NICI data
used by all cluster nodes must be located on the cluster shared storage.
Other eDirectory configuration and log data should also reside on shared storage.
eDirectory 8.8 SP8 includes a utility for both Linux and Windows servers that automatically
configures eDirectory in your clustered environment, including copying data to a specified shared
storage location, updating the appropriate configuration parameters, and setting up eDirectory
services on cluster nodes other than the primary node.
The procedures in the following sections are based on the following assumptions:
You are familiar with eDirectory installation procedures.
You are using a two-node cluster.
NOTE: A two-node cluster is the minimum configuration used for high availability. However,
the concepts in this section can easily be extended to a cluster with additional nodes. Note that
eDirectory does not support load balancing by using multiple cluster nodes.
This section covers the following topics:
Section 10.1, “Clustering eDirectory Services on Linux,” on page 100
Section 10.2, “Clustering eDirectory Services on Windows,” on page 102
Section 10.3, “Troubleshooting Clustered Environments,” on page 105
Section 10.4, “Configuration Utility Options,” on page 105
Deploying eDirectory on High Availability Clusters
99
10.1
Clustering eDirectory Services on Linux
This section describes how to configure eDirectory 8.8 by using high availability clustering on Linux.
Section 10.1.1, “Prerequisites,” on page 100
Section 10.1.2, “Installing and Configuring eDirectory,” on page 100
Section 10.1.3, “Configuring SNMP Server in Clustered Linux Environments,” on page 102
10.1.1
Prerequisites
Two or more Linux servers with clustering software
External shared storage supported by the cluster software, with sufficient disk space to store all
eDirectory and NICI data
Virtual IP address
NetIQ eDirectory 8.8 SP8 or later
NOTE: The nds-cluster-config utility only supports configuring the root eDirectory instance.
eDirectory does not support configuring multiple instances and non-root installations of
eDirectory in a cluster environment.
10.1.2
Installing and Configuring eDirectory
1 Install and configure eDirectory on the server you want to use as the primary cluster node. For
more information on installation and configuration procedures, refer to the Section 2.6.2, “Using
the nds-install Utility to Install eDirectory Components,” on page 30.
NOTE
When configuring eDirectory, the default NCP server name is the host server name of the
computer on which you installed eDirectory. Because eDirectory is hosted on multiple hosts
in a clustered environment, however, you should specify an NCP server name that is
unique to the cluster instead of using the default name. For example, you can specify the
name clusterserver for the NCP server when you configure eDirectory on the primary
cluster node.
During the configuration process, ensure you set the virtual IP address for your eDirectory
installation. In a clustered environment, eDirectory only listens on the virtual IP address,
not on the system IP address.
2 After you install and configure eDirectory, navigate to the nds.conf file, which is located in the
/etc/opt/novell/eDirectory/conf.
3 Edit the nds.conf file to set the value of the n4u.nds.preferred-server setting to the virtual
IP address of the clustered installation, then save and close the file.
4 Verify the eDirectory installation by using the ndsstat command.
eDirectory must be up and running on the primary cluster node.
5 Mount the shared file system by using the cluster manager.
6 Back up all data in the following directories before running the configuration utility:
/var/opt/novell/nici
/var/opt/novell/eDirectory/data (n4u.server.vardir)
/var/opt/novell/eDirectory/data/ (n4u.nds.dir)
100
NetIQ eDirectory 8.8 SP8 Installation Guide
/etc/opt/novell/eDirectory/conf (n4u.server.configdir)
/var/opt/novell/eDirectory/log
NOTE: If you install eDirectory in a non-default location, you can use the ndsconfig get
command to find the vardir, dir paths used in your installation. nds.conf should be in the
default location, which is /etc/opt/novell/eDirectory/conf/nds.conf.
7 On the primary cluster node server, open a terminal and run the following command to stop the
eDirectory service:
ndsmanage stopall
8 In the terminal, navigate to the location of the configuration utility, nds-cluster-config. The
utility is located in the /opt/novell/eDirectory/bin directory.
9 Run the following command:
nds-cluster-config -s /<sharedfilesystem>
Where <sharedfilesystem> is the location you want to use for the eDirectory shared cluster
data.
NOTE: You can also run the utility in unattended mode by using the -u option. If you use this
option, the utility does not ask for confirmation when configuring eDirectory on a cluster.
If you use the unattended option, you must also use the -s option and specify the shared cluster
file system.
10 After the utility verifies the cluster shared storage is valid, click y to continue with configuration
on the cluster.
The configuration utility moves the data in the directories above to the following locations on
the shared file system:
<sharedfilesystem>/nici
<sharedfilesystem>/data
<sharedfilesystem>/data/
<sharedfilesystem>/conf
<sharedfilesystem>/log
11 Start eDirectory services by running the following command:
ndsmanage startall
12 Check the status of eDirectory by using ndsstat. eDirectory services should be up and running.
13 Stop eDirectory services by running the following command:
ndsmanage stopall
14 Log in to the server you want to use as the secondary node of the cluster.
15 Use the cluster manager to move the shared storage to the secondary node.
16 Install the same version of eDirectory on the secondary cluster node that you installed on the
primary cluster node, but do not configure eDirectory.
17 In the terminal, navigate to the location of the configuration utility on the secondary node. The
utility is located in the /opt/novell/eDirectory/bin directory.
18 Open a terminal and run the following command:
nds-cluster-config -s /<sharedfilesystem>
Deploying eDirectory on High Availability Clusters
101
Where <sharedfilesystem> is the cluster shared storage. The path of the <sharedfilesystem>
should be same as the path location specified when the primary node was configured.
The nds-cluster-config utility links the secondary cluster node to the shared eDirectory data
located on the shared cluster file system.
19 Start eDirectory services by running the following command:
ndsmanage startall
Verify the status of eDirectory by using the ndsstat command.
20 Stop eDirectory services on the secondary node by running the ndsmanage stopall command.
21 After successfully configuring eDirectory on both nodes of the cluster, you must also change the
startup mode of the ndsd service on each node by using the following command:
chkconfig -d ndsd
22 After the configuration utility finishes configuring the secondary node, you can use the cluster
manager to add the eDirectory services in the cluster.
IMPORTANT: Ideally, the cluster manager checks that the same DIB is not accessed by two or more
nodes simultaneously. However, you must ensure that ndsd does not run from two or more cluster
nodes simultaneously. This is because accessing the same DIB through two or more nodes leads to
DIB corruption.
10.1.3
Configuring SNMP Server in Clustered Linux Environments
1 On all the nodes, modify the snmpd.conf file. For more information, see “Installing and
Configuring SNMP Services for eDirectory” in the NetIQ eDirectory 8.8 SP8 Administration Guide.
2 Start ndssnmpsa.
3 Select Yes as the Remember password option.
4 To start the snmp service, perform either of the following:
Add /etc/init.d/ndssnmpsa start to the post_ndsd_start script and /etc/init.d/
ndssnmpsa stop to the pre_ndsd_stop script.
Add ndssnmpsa as a cluster resource with a dependency on eDirectory resource.
NOTE: Because eDirectory is listening on a virtual IP address, traps have the IP address of the host,
which is the Agent IP address.
10.2
Clustering eDirectory Services on Windows
This section describes how to configure eDirectory 8.8 by using high availability clustering on
Windows.
Section 10.2.1, “Prerequisites,” on page 102
Section 10.2.2, “Installing and Configuring eDirectory,” on page 103
Section 10.2.3, “Configuring SNMP Server in Clustered Windows Environments,” on page 104
10.2.1
Prerequisites
Two or more Windows servers with clustering software
102
NetIQ eDirectory 8.8 SP8 Installation Guide
External shared storage supported by the cluster software
Virtual IP address
NetIQ eDirectory 8.8 SP8 or later
10.2.2
Installing and Configuring eDirectory
1 Install and configure eDirectory on the server you want to use as the primary cluster node. For
more information on installation and configuration procedures, refer to the Section 3.6.1,
“Installing or Updating NetIQ eDirectory 8.8 on a Windows Server,” on page 55.
2 Mount the shared volume by using the cluster manager.
3 Back up all DIB files and NICI data before running the configuration utility.
4 On the primary cluster node, open a terminal and navigate to the NDSCons.exe utility. The
utility is located in the <eDirectory installation folder> folder by default.
5 In the terminal, run the following command:
NDSCons.exe
6 In the NDSCons utility, click Shutdown to stop all eDirectory services.
7 Click Yes to confirm.
8 In the terminal, navigate to the location of the configuration utility, dsclusterconfig.exe. The
utility is located in the <eDirectory installation folder> folder by default.
9 Run the following command:
dsclusterconfig.exe -s /<sharedfilesystem>
Where <sharedfilesystem> is the location you want to use for the eDirectory shared cluster
data.
NOTE
You can also run the utility in unattended mode by using -s with -u option.
You must specify a folder within a shared drive mounted on the primary cluster node. You
cannot specify only a drive name. For example, instead of specifying E:, you must specify
E:\Novell.
10 After the utility verifies the cluster shared storage is valid, click y to continue with configuration
on the cluster.
The configuration utility moves the data in the directories above to the following locations on
the shared file system:
<sharedfilesystem>/nici
<sharedfilesystem>/Files
In addition to moving eDirectory data to the shared file system, the utility copies the eDirectory
service registry key to the shared volume, saving the key as the file ndsConfigKey.
The utility also changes the Startup Type of the NDS Server service on the primary node
computer from Automatic to Manual.
11 In the NDSCons utility, click Startup to start all eDirectory services.
12 Verify that all eDirectory services are running, then use the NDSCons utility to stop services
again.
13 Close the NDSCons utility.
14 Log in to the server you want to use as the secondary node of the cluster.
Deploying eDirectory on High Availability Clusters
103
15 Use the cluster manager to move the shared storage to the secondary node.
16 Use the eDirectory installer to perform an unattended installation of eDirectory on the
secondary node. Ensure that the mode of installation is install.
17 In the terminal, navigate to the location of the configuration utility on the secondary node. The
utility is located in the eDirectory installation folder by default.
18 Run the following command:
dsclusterconfig.exe -s /<sharedfilesystem>
Where <sharedfilesystem> is the cluster shared storage. The path of the <sharedfilesystem>
should be same as the path location specified when the primary node was configured.
19 The dsclusterconfig utility updates registry on the secondary cluster node to the shared
eDirectory data located on the shared cluster file system.
20 After the configuration utility finishes configuring the secondary node, open the NDSCons
utility.
21 In the NDSCons utility, click Startup.
22 Click Yes to confirm.
23 When NDSCons starts all eDirectory services, verify eDirectory, then click Shutdown.
24 Click Yes to confirm.
25 To configure eDirectory in the Cluster Resource group, create a new resource in the Resource
Group to be used for eDirectory.
You must provide the following details:
Resource type - Generic Service
Dependent on - IP address and shared disk in the Resource Group
Service name - NDS Server0
No start parameters
Registry keys - SYSTEM\CurrentControlSet\Services\NDS Server0
NOTE: Ideally, the cluster manager checks that the same DIB is not accessed by two or more nodes
simultaneously. However, you must ensure that ndsd does not run from two or more cluster nodes
simultaneously. This is because accessing the same DIB through two or more nodes leads to DIB
corruption.
10.2.3
Configuring SNMP Server in Clustered Windows Environments
1 On the primary cluster node, configure the master agent and set the startup type to automatic.
For more information, see “Installing and Configuring SNMP Services for eDirectory” in the
NetIQ eDirectory 8.8 SP8 Administration Guide.
2 Save the eDirectory password when it prompts for the password.
3 Start the sub-agent.
4 Perform Step 1 to Step 3 on the other nodes.
104
NetIQ eDirectory 8.8 SP8 Installation Guide
10.3
10.3.1
Troubleshooting Clustered Environments
Repairing or Upgrading eDirectory on Clustered Nodes
While you perform a repair or upgrade on any of the cluster nodes, the other cluster nodes must be
paused or on standby to ensure that automatic failover does not occur.
10.3.2
Creating Windows Registry Keys
As part of the configuration process in clustered Windows environments, the configuration utility
automatically creates a registry key,
HKEY_LOCAL_MACHINE\SYSTEM\CurrentControlSet\Services\NDS Server0\ImagePath, on the
cluster shared file system. eDirectory needs the registry key in order to start the x86 NDS Server
service on the cluster nodes.
If the utility cannot create the registry key and returns an error message during configuration, you
must use the Registry Editor to manually create the registry key on all cluster nodes, even if the
configuration utility appears to have successfully completed the configuration.
Create the following registry key on all nodes:
HKEY_LOCAL_MACHINE\SYSTEM\CurrentControlSet\Services\NDS Server0\ImagePath
Assign the following value to the ImagePath key:
"<primarynodeinstallfolder>\NDS\ndsserv.exe" /DataDir="<sharedstorage>\Files" ds
Where <primarynodeinstallfolder> is the folder where you installed eDirectory on the primary
node and <sharedstorage> is the path to the shared file system location.
10.4
Configuration Utility Options
The options available for use in the configuration utility are as follows:
<configuration utility> [-h] [-u] [-s /<sharedfilesystem>]
Where <configuration utility> is either nds-cluster-config or dsclusterconfig.exe,
depending on the platform, and <sharedfilesystem> is the location you want to use for the
eDirectory shared cluster data.
Parameter
Description
-h
Displays the configuration utility help.
-s
Specifies the shared directory path for the cluster.
-u
Enables the utility to configure eDirectory on the
cluster in unattended mode.
If you run the utility by using the -u option, you must
also use the -s option and specify the shared directory
path. For example:
nds-cluster-config -u -s
<sharedfilesystem>
Deploying eDirectory on High Availability Clusters
105
106
NetIQ eDirectory 8.8 SP8 Installation Guide
11
Uninstalling NetIQ eDirectory
1
This chapter contains the following information:
Section 11.1, “Uninstalling eDirectory on Windows,” on page 107
Section 11.2, “Uninstalling eDirectory on Linux,” on page 111
Section 11.3, “Unattended Uninstallation of eDirectory on Linux,” on page 112
Section 11.4, “Caveats for Uninstalling eDirectory,” on page 113
11.1
Uninstalling eDirectory on Windows
Use the Windows Control Panel to remove eDirectory, ConsoleOne, SLP DA, and NICI from
Windows servers.
IMPORTANT: Removing eDirectory also removes the roll-forward log directory and all the logs in it.
If you want to be able to use the logs for restoring eDirectory on this server in the future, before
removing eDirectory you must first copy the roll-forward logs to another location. For information
about roll-forward logs, see “Using Roll-Forward Logs” in the NetIQ eDirectory 8.8 SP8 Administration
Guide.
Section 11.1.1, “Uninstalling eDirectory, ConsoleOne, and SLP DA,” on page 107
Section 11.1.2, “Unattended Uninstallation of eDirectory,” on page 108
Section 11.1.3, “Uninstalling NICI,” on page 111
Section 11.1.4, “Uninstalling Microsoft Visual C++ 2005 and Visual C++ 2012 Runtime Libraries,”
on page 111
NOTE: The HTML files created using iMonitor are not removed. You must manually remove these
files from <install directory>\novell\NDS\ndsimon\dsreports before removing eDirectory.
11.1.1
Uninstalling eDirectory, ConsoleOne, and SLP DA
1 On the Windows server where eDirectory is installed, click Start > Settings > Control Panel > Add/
Remove Programs.
2 Select eDirectory, ConsoleOne, or the SLP Directory Agent from the list, then click Add/Remove.
3 Confirm that you want to remove your selection by clicking Yes.
The Installation Wizard removes the program from the server.
Uninstalling NetIQ eDirectory
107
11.1.2
Unattended Uninstallation of eDirectory
On Windows, the unattended uninstallation of eDirectory uses predefined text files that facilitate the
unattended uninstallation.You can perform the following actions by using the unattended
uninstallation mode of eDirectory:
Deconfiguration of the installed eDirectory.
Standalone uninstallation of eDirectory.
Both uninstallation and deconfiguration of eDirectory.
The following sections discuss various features of unattended eDirectory uninstallation:
“Response Files” on page 108
“remove.rsp File Sections and Keys” on page 108
“Add Features to the Automated Uninstallation” on page 109
“Remove Configuration File Changes” on page 110
“Unattended Uninstallation of eDirectory using Response File” on page 110
Response Files
Uninstalling eDirectory on Windows operating system can be made silent and more flexible by using
a response file (remove.rsp) to complete the following tasks:
Complete unattended uninstallation with all required user inputs
Default configuration of components
Bypass all prompts during the installation
A response file is a text file containing sections and keys, similar to a Windows.ini file. You can create
and edit a response file by using any ASCII text editor. The eDirectory reads the uninstallation
parameters directly from the response file and replaces the default uninstallation values with
response file values. The uninstallation program accepts the values from the response file and
continues to uninstall without prompts.
remove.rsp File Sections and Keys
The eDirectory uninstallation requires changes to the sections in the response file to add information
about including the tree name, administrator context, administrator credentials (including user name
and passwords), etc. A full list of the keys and their default values is available in the sample
remove.rsp file that is delivered with the eDirectory installation.
NOTE: You should use the provided remove.rsp file available at
eDirectory\windows\x64\NDSonNT\remove.rsp in the eDirectory installation. Essential
parameters are set by default in this file. When editing the remove.rsp file, ensure there are no blank
spaces between the key and the values along with the equals sign ("=") in each key-value pair.
You provide the administrator user credentials in the remove.rsp file for an unattended
uninstallation. Therefore, you must permanently delete the file after the uninstallation to prevent the
administrator credentials from being compromised.
108
NetIQ eDirectory 8.8 SP8 Installation Guide
Add Features to the Automated Uninstallation
Most details for configuring the eDirectory Uninstaller have default setting for the manual
uninstallation. However, during unattended uninstallation, each configuration parameter must be
explicitly configured. This section discusses the basic settings to be unconfigured.
eDirectory Server Details
The details of the server being uninstalled must be provided to the Uninstaller. Most of this
information is configured in three tags, [Novell:NDSforNT:1.0.0], [Initialization], and
[Selected Nodes].
Take all the values mentioned in [Initialization] and [Selected Nodes] in remove.rsp as it
they are.
[Novell:NDSforNT:1.0.0]
Tree Name: The name of the tree from which the server will be uninstalled.
Admin Login Name: The name (RDN) of the Administrator object in the tree that has full rights, at
least to the context to which this server is added. All operations in the tree will be performed as this
user.
Admin Context: Any user added to a tree has a user object that contains all the user-specific details.
This parameter is the container object in the tree to which the Administrator object will be added. For
primary server installations, this container will be created with the server object.
Admin Password: The password for the Administrator object created in the previous parameters.
This password will be configured to the Administrator object during primary server installations. For
secondary server installations, this needs to be the password of the Administrator object in the
primary server that has rights to the context to which the new server is added.
NDS Location: The eDirectory install location in the local system where the libraries and binaries are
copied. By default, eDirectory is installed into C:\Novell\NDS unless it is changed in the response
file.
DataDir: Until eDirectory version 8.8, the DIB was installed inside the NDS location as a subfolder.
Later, administrators were given the option to provide a different DIB location, because there might
be too much data stored in the DIB to fit into the NDS location. Currently, by default the DIB is
installed in the Files subfolder inside the NDS location, but administrators can change this
parameter and provide a different location
mode: The type of setup on eDirectory. The three types of setup are:
deconfigure: Performs the deconfiguration of eDirectory.
uninstall: Performs uninstallation of eDirectory.
full: Performs both deconfiguration and uninstallation of eDirectory.
NOTE: If you opt for the full setup mode during unattended install, then while uninstalling
eDirectory you cannot opt for individual deconfiguration and uninstallation option.
ConfigurationMode: If the setup mentioned in the mode key is deconfigure, then ensure that you do
not change the RestrictNodeRemove value of the ConfigurationMode key
Prompt: The type of the uninstallation mode should be mentioned in this variable. It will be set by
default to 'silent' for unattended uninstallation. If any value other than 'silent' is set then it will do
normal uninstallation
Uninstalling NetIQ eDirectory
109
The following is a sample of text in the response file for all the basic parameters described above:
[Novell:NDSforNT:1.0.0]
Tree Name=SILENTCORP-TREE
Admin Context=Novell
Admin Login Name=Admin
Admin Password=novell
prompt=silent
Remove Configuration File Changes
In the remove.cfg file residing in <Windows Install Drive>\Program Files\Common
Files\novell\ni\bin, change
[PARAMETERS]0/OUTPUT_TO_FILE
to
[PARAMETERS]0/OUTPUT_TO_FILE /SILENT
Unattended Uninstallation of eDirectory using Response File
Copy the above edited file remove.rsp into <Windows Install Drive>\Program Files\Common
Files\novell\ni\data.
The install.exe installed in the eDirectory is invoked in the command line with a few additional
parameters. Depending on the required setup, you must use either of the following commands:
Deconfigure
<Windows Installed Drive>\Program Files\Common Files\novell\ni\bin>install.exe remove /restrictnoderemove /nopleasewait ..\data\ip.db ..\data\remove.rsp
Novell:NDSForNT:1.0.0 0 NDSonNT
Uninstall
1 Rename the ip.db file present in the <Windows Drive>\Program Files\Common
Files\novell\ni\data directory to another name.
2 Copy the ip_conf.db file in the <Windows Drive>\Program Files\Common
Files\novell\ni\data folder to ip.db.
3 Run the following command:
<Windows Installed Drive>\Program Files\Common Files\novell\ni\bin>install.exe
-remove /nopleasewait ..\data\ip.db ..\data\remove.rsp Novell:NDSForNT:1.0.0 0
NDSonNT
Deconfiguration and Uninstallation of eDirectory
<Windows Installed Drive>\Program Files\Common Files\novell\ni\bin>install.exe remove /nopleasewait ..\data\ip.db ..\data\remove.rsp Novell:NDSForNT:1.0.0 0
NDSonNT
110
NetIQ eDirectory 8.8 SP8 Installation Guide
After performing an uninstallation of eDirectory or combination setup, delete the following folders:
C:\Novell\NDS (default location, or else from the eDirectory installed directory)
C:\Novell\NDS\Files (default location, or else from the eDirectory DIB location)
<Windows Installed Drive>:\Program Files\Common Files\Novell\ni
<Windows Installed Drive>:\Windows\system32\NDScpa.cpl
11.1.3
Uninstalling NICI
1 On the Windows server where eDirectory is installed, click Start > Settings > Control Panel > Add/
Remove Programs.
2 Select NICI from the list, then click Add/Remove.
3 Confirm that you want to remove NICI by clicking Yes.
The Installation Wizard removes NICI from the server.
After uninstalling NICI, if you want to completely remove NICI from your system, delete the
C:\Windows\system32\novell\nici (32-bit) and C:\Windows\SysWOW64\novell\nici (64-bit)
subdirectory. You might need to take ownership of some of the files and directories to delete them.
WARNING: After the nici subdirectory has been removed, any data or information that was
previously encrypted with NICI will be lost.
11.1.4
Uninstalling Microsoft Visual C++ 2005 and Visual C++ 2012 Runtime
Libraries
If Microsoft Visual C++ 2005 and Visual C++ 2012 Runtime Libraries are not used by any other
products other than eDirectory, uninstall them by using the following procedure:
1 Navigate to Add/Remove Programs or Programs and Features on the Windows server where
eDirectory is installed.
2 Remove the following redistribution package:
Microsoft Visual C++ 2005 Redistributable and Microsoft Visual C++ 2012
Redistributable (x64)
11.2
Uninstalling eDirectory on Linux
Use the nds-uninstall utility to uninstall eDirectory components from Linux computers. This
utility uninstalls eDirectory from the local host. You must deconfigure eDirectory server before
running nds-uninstall. Run ndsconfig rm -a <admin FDN> to remove the eDirectory server. This
utility is available at /opt/novell/eDirectory/sbin/nds-uninstall.
Note that you must not run ndsconfig rm on an OES server.
Uninstalling NetIQ eDirectory
111
IMPORTANT: Removing eDirectory also removes the roll-forward log directory and all the logs in it.
If you want to be able to use the logs for restoring eDirectory on this server in the future, before
removing eDirectory you must first copy the roll-forward logs to another location. For information
about roll-forward logs, see “Using Roll-Forward Logs” in the NetIQ eDirectory 8.8 SP8 Administration
Guide.
1 Execute the nds-uninstall command.
2 Use the following syntax:
nds-uninstall [-s][-h]
If you do not provide the required parameters in the command line, the nds-install utility will
prompt for the parameters.
Paramet
er
Description
-h
Displays the help strings.
-s
Removes the eDirectory packages and binaries even when instances are configured.
However, this option does not remove the DIB directory and the NDS configuration file.
IMPORTANT: Ensure that using this option is not affecting other services for a long
period.
nds-uninstall does not uninstall the following packages:
Package
Reasons for Not Removing
NICI package
NICI could be used by any of the following:
Any other product
eDirectory installed in a custom location
eDirectory installed by a non-root user
NOVLsubag
NOVLsubag could be used by any of the following:
eDirectory installed in a custom location
eDirectory installed by a non-root user
11.3
Unattended Uninstallation of eDirectory on Linux
1 Remove the instances of eDirectory:
ndsconfig rm -a <user name> -w passwd -c
2 Use either of the following in the automated script for the de-configuration of eDirectory:
Passing the password through environment variable: ndsconfig rm -a <user name> -w
env:<environment variable> -c
Passing the password through file: ndsconfig rm -a <user name> -w file:<filename
with absolute/relative path> -c
3 (Optional) In case of multiple instances, run the following command for individual instances:
112
NetIQ eDirectory 8.8 SP8 Installation Guide
ndsconfig rm -a <user name> -w passwd
configuration file>
--config-file <absolute path for
For example:
ndsconfig rm -a admin.novell -w n -c
ndsconfig rm -a admin.novell -w env:ADM_PASWD -c
ndsconfig rm -a admin.novell -w file:/Builds/88SP8/adm_paswd -c
4 To uninstall the eDirectory packages, run the nds-uninstall script to remove the eDirectory
packages:
nds-uninstall -u
11.4
Caveats for Uninstalling eDirectory
When you uninstall eDirectory and install it again, the eDirectory server cannot be accessible to the
other servers in the network. All the distributed operations such as synchronization and obituary
processing do not take place on the partitions whose replicas are present in the eDirectory server. If
this state persists for a while, it might impact all the servers and the processes running on them.
Avoid uninstalling a newer version of eDirectory and install an earlier version, because:
Does not revert the schema related upgrades.
eDirectory might not be functional if DIB is upgraded to the newer version.
Removes all the existing configuration files, except for the nds.conf.
However, consider the following when you uninstall a newer version of eDirectory and install an
earlier version:
Upgrade the DIB to the newer version. Else, eDirectory might not be functional.
Back up the existing configuration files, except for the nds.conf, and restore when eDirectory is
installed again.
Does not revert the schema related upgrades.
Uninstalling NetIQ eDirectory
113
114
NetIQ eDirectory 8.8 SP8 Installation Guide
A
Linux Packages for NetIQ
eDirectory
A
NetIQ eDirectory includes a Linux package system, which is a collection of tools that simplify the
installation and uninstallation of various eDirectory components. Packages contain makefiles that
describe the requirements to build a certain component of eDirectory. Packages also include
configuration files, utilities, libraries, daemons, and man pages that use the standard Linux tools
installed with the OS.
The following table provides information about the Linux packages that are included with NetIQ
eDirectory.
NOTE: On Linux, all the packages are prefixed with novell-. For example, NDSserv is novellNDSserv.
Package
Description
NOVLice
Contains the NetIQ Import Convert Export utility and is dependent on the
NOVLlmgnt, NOVLxis, and NLDAPbase packages.
NDSbase
Represents the Directory User Agent. This package is dependent on the NICI
package.
The NDSbase package contains the following:
Authentication toolbox containing the RSA authentication needed for eDirectory
Platform-independent system abstraction library, a library containing all the
defined Directory User Agent functions, and the schema extension library
Combined configuration utility and the Directory User Agent test utility
eDirectory configuration file and manual pages
NDScommon
Contains the man pages for the eDirectory configuration file, install, and uninstall
utilities. This package is dependent on the NDSbase package.
NDSmasv
Contains the libraries required for mandatory access control (MASV).
Linux Packages for NetIQ eDirectory
115
Package
Description
NDSserv
Contains all the binaries and libraries needed by the eDirectory Server. It also
contains the utilities to manage the eDirectory Server on the system. This package is
dependent on the NDSbase, NDScommon, NDSmasv, NLDAPsdk, NOVLpkia and
NOVLpkit packages.
The NDSserv package contains the following:
NDS install library, FLAIM library, trace library, NDS library, LDAP server library,
LDAP install library, index editor library, DNS library, merge library, and LDAP
extension library for LDAP SDK
eDirectory Server daemon
Binary for DNS and a binary to load or unload LDAP
The utility needed to create the MAC address, the utility to trace the server and
change some of the global variables of the server, the utility to back up and
restore eDirectory, and the utility to merge eDirectory trees
Startup scripts for DNS, NDSD, and NLDAP
Man pages
NDSimon
Contains the runtime libraries and utilities used to search and retrieve data from
eDirectory services. This package is dependent on the NDSbase package.
NDSrepair
Contains the runtime libraries and the utility that corrects problems in the eDirectory
database. This package is dependent on the NDSbase package.
NLDAPbase
Contains LDAP libraries, extensions to LDAP libraries, and the following LDAP tools:
ldapdelete
ldapmodify
ldapmodrdn
ldapsearch
This package is dependent on the NLDAPsdk package.
116
NOVLnmas
Contains all the NMAS libraries and the nmasinst binaries needed for NMAS server.
This package is dependent on the NICI and NDSmasv packages.
NLDAPsdk
Contains NetIQ extensions to LDAP runtime and Security libraries (Client NICI).
NOVLsubag
Contains the runtime libraries and utilities for the eDirectory SNMP subagent. This
package is dependent on the NICI, NDSbase, and NLDAPbase packages.
NOVLpkit
Provides PKI Services which do not require eDirectory. This package is dependent
on the NICI and NLDAPsdk packages.
NOVLpkis
Provides PKI Server Service. This package is dependent on the NICI, NDSbase,
and NLDAPsdk packages.
NOVLsnmp
The runtime libraries and utilities for SNMP. This package is dependent on the NICI
package.
NDSdexvnt
Contains the library that manages events generated in NetIQ eDirectory to other
databases.
NOVLpkia
Provides PKI services. This package is dependent on the NICI, NDSbase, and
NLDAPsdk packages.
NOVLembox
Provides the eMBox infrastructure and eMTools.
NetIQ eDirectory 8.8 SP8 Installation Guide
Package
Description
NOVLlmgnt
Contains runtime libraries for NetIQ Language Management.
NOVLxis
Contains the runtime libraries for NetIQ XIS.
NOVLsas
Contains the NetIQ SAS libraries.
NOVLntls
Contains NetIQ TLS library.
This package is identified as ntls on Linux.
NOVLldif2
Contains the NetIQ Offline Bulkload utility and is dependent on the NDSbase,
NDSserv, NOVLntls, NOVLlmgnt, and NICI packages.
NOVLncp
Contains the NetIQ Encrypted NCP Services for Linux. This package is dependent
on the NDScommon package.
Linux Packages for NetIQ eDirectory
117
118
NetIQ eDirectory 8.8 SP8 Installation Guide
B
eDirectory Health Checks
B
NetIQ eDirectory 8.8 provides a diagnostic tool to help you determine whether your eDirectory
health is safe. The primary use of this tool is to check if the health of the server is safe before
upgrading.
eDirectory health checks are run by default with every upgrade and they occur before the actual
package upgrade. However, you can run the diagnostic tool, ndscheck, to do the health checks at
anytime.
B.1
Need for Health Checks
In earlier releases of eDirectory, the upgrade did not check the health of the server before proceeding
with the upgrade. If the heath was unstable, the upgrade operation would fail and eDirectory would
be in an inconsistent state. In some cases, you probably could not roll back to the pre-upgrade
settings.
This new health check tool resolves this, letting you to ensure that your server is ready to upgrade.
B.2
Performing Health Checks
You can perform eDirectory health checks in two ways:
NOTE: You need administrative rights to run the health check utility.
Section B.2.1, “With the Upgrade,” on page 119
Section B.2.2, “As a Standalone Utility,” on page 120
B.2.1
With the Upgrade
The health checks are run by default every time you upgrade eDirectory.
Linux
Every time you upgrade, the health checks are run by default before the actual upgrade operation
starts.
To skip the default health checks, you can use the -j option with nds-install.
Windows
The eDirectory health checks happen as part of the installation wizard. You can enable or disable the
health checks when prompted to do so.
eDirectory Health Checks
119
B.2.2
As a Standalone Utility
You can run the eDirectory health checks as a standalone utility anytime you want. The following
table lists the health check utility names for each platform.
Table B-1 Health Check Utilities
Platform
Utility Name
Linux
ndscheck
Syntax:
ndscheck [--help | -?] Display command usage
ndscheck [--version | -v] Display version
information ndscheck [-h <hostname port]>] [-a
<admin FDN>] [-F <log file>] [-D] [-q] [--configfile <file name>]
Windows
ndscheck
Syntax:
ndscheck [--help | -?] Display command usage
ndscheck [--version | -v] Display version
information ndscheck [-h <hostname port]>] [-a
<admin FDN>] [-F <log file>] [-D] [-q] [--configfile <file name>]
B.3
Types of Health Checks
When you run the ndscheck utility or upgrade, the following types of health checks are done:
Basic Server Health
Partitions and Replica Health
When you run the ndscheck utility, the results are displayed on the screen and logged in
ndscheck.log. For more information on log files, refer to Section B.5, “Log Files,” on page 122.
If the health checks are done as part of the upgrade, you are either prompted to continue the upgrade
process or the process is aborted, depending on the types of errors found (if any). Error types are
described in Section B.4, “Categorization of Health,” on page 121.
B.3.1
Basic Server Health
This is the first stage of the health check, where the health check utility checks for the following:
1. The eDirectory service is up. The DIB is open and able to read some basic tree information such
as tree name.
2. The server is listening on the respective port numbers.
For LDAP, it gets the TCP and the SSL port numbers and checks if the server is listening on these
ports.
Similarly, it gets the HTTP and HTTP secure port numbers and checks if the server is listening on
these ports.
120
NetIQ eDirectory 8.8 SP8 Installation Guide
B.3.2
Partitions and Replica Health
After checking the basic server health, it then checks the partitions and replica health as follows:
1. Checks the health of the replicas of the locally held partitions.
2. Reads the replica ring of every partition held by the server and checks whether all servers in the
replica ring are up and all the replicas are in the ON state.
3. Checks the time synchronization of all the servers in the replica ring, showing any time
difference between the servers.
B.4
Categorization of Health
There are three possible categories of health, based on the errors found while checking the health of
an eDirectory server:
Normal (page 121)
Warning (page 121)
Critical (page 121)
The status of the health checks is logged into a log file. For more information, refer to Section B.5,
“Log Files,” on page 122.
B.4.1
Normal
All the health checks were successful and the server health is normal.
The upgrade proceeds without an interruption.
B.4.2
Warning
Minor errors were found while checking the server health.
If the health check is run as part of the upgrade, you are prompted to either abort or continue.
Warnings normally occur in the following scenarios:
Server not listening on LDAP and HTTP ports (normal, secure, or both).
Unable to contact any of the non-master servers in the replica ring.
Servers in the replica ring are not in sync.
B.4.3
Critical
Critical errors were found while checking the eDirectory health.
If the health check is run as part of the eDirectory upgrade, the upgrade operation is aborted.
The critical state normally occurs in the following scenarios:
Unable to read or open the DIB (might be locked or corrupt).
Unable to contact all the servers in the replica ring.
eDirectory Health Checks
121
Locally held partitions are busy.
Replica is not in the ON state.
B.5
Log Files
Every eDirectory health check operation, whether it is run with the upgrade or as a standalone utility,
maintains the status of the health in a log file.
The content of the log file is similar to the messages displayed on the screen when the checks are
happening.
The health check log file contains the following:
Status of the health checks (normal, warning, or critical).
URLs where possible solutions can be found.
Support forums (http://forums.novell.com/netiq/netiq-product-discussion-forums/
edirectory/)
Troubleshooting Documentation (https://www.netiq.com/documentation/edir88/
edir88tshoot/data/bookinfo.html)
Error Codes (http://www.novell.com/documentation/nwec/)
Patches (http://support.novell.com/patches.html)
Cool Solutions (http://www.novell.com/communities/coolsolutions/edirectory)
The following table gives the default log file location on various platforms:
Table B-2 Health Check Log File Location
Platform
Log Filename
Linux
ndscheck.log
Location
1. If you use the -h option, the ndscheck.log file is saved in
the user’s home directory.
2. If you use the --config-file option, the ndscheck.log
file is saved in the server instance’s log directory. You can
also select an instance from the multiple instances list.
Windows
nsdcheck.log
The log file will be saved at install_directory\novell
nds\.
NOTE: install_directory is user specified.
122
NetIQ eDirectory 8.8 SP8 Installation Guide
C
Configuring OpenSLP for
eDirectory
C
This appendix provides information for network administrators on the proper configuration of
OpenSLP for NetIQ eDirectory installations without the Novell Client.
Section C.1, “Service Location Protocol,” on page 123
Section C.2, “SLP Fundamentals,” on page 123
Section C.3, “Configuration Parameters,” on page 125
C.1
Service Location Protocol
OpenSLP is an open-source implementation of the IETF Service Location Protocol Version 2.0
standard, which is documented in IETF Request-For-Comments (RFC) 2608 (http://www.ietf.org/rfc/
rfc2608.txt?number=2608).
In addition to implementing the SLP v2 protocol, the interface provided by OpenSLP source code is
an implementation of another IETF standard for programmatically accessing SLP functionality,
documented in RFC 2614 (http://www.ietf.org/rfc/rfc2614.txt?number=2614).
To fully understand the workings of SLP, it is worth reading these documents and internalizing them.
They are not necessarily light reading, but they are essential to the proper configuration of SLP on an
intranet.
For more information on the OpenSLP project, see the OpenSLP (http://www.OpenSLP.org) Web site
and the SourceForge (http://sourceforge.net/projects/openslp) Web site. The OpenSLP Web site
provides several documents that contain valuable configuration tips. Many of these are incomplete at
the time of this writing.
C.2
SLP Fundamentals
Service Location Protocol specifies three components:
The user agent (UA)
The service agent (SA)
The directory agent (DA)
The user agent’s job is to provide a programmatic interface for clients to query for services, and for
services to advertise themselves. A user agent contacts a directory agent to query for registered
services of a specified service class and within a specified scope.
The service agent’s job is to provide persistent storage and maintenance points for local services that
have registered themselves with SLP. The service agent essentially maintains an in-memory database
of registered local services. In fact, a service cannot register with SLP unless a local SA is present.
Configuring OpenSLP for eDirectory
123
Clients can discover services with only a UA library, but registration requires an SA, primarily
because an SA must reassert the existence of registered services periodically in order to maintain the
registration with listening directory agents.
The directory agent’s job is to provide a long-term persistent cache for advertised services, and to
provide a point of access for user agents to look up services. As a cache, the DA listens for SAs to
advertise new services, and caches those notifications. Over a short time, a DA’s cache will become
more complete. Directory agents use an expiration algorithm to expire cache entries. When a
directory agent comes up, it reads its cache from persistent storage (generally a hard drive), and then
begins to expire entries according to the algorithm. When a new DA comes up, or when a cache has
been deleted, the DA detects this condition and sends out a special notification to all listening SAs to
dump their local databases so the DA can quickly build its cache.
In the absence of any directory agents, the UA will resort to a general multicast query that SAs can
respond to, building a list of the requested services in much the same manner that DAs use to build
their cache. The list of services returned by such a query is an incomplete and much more localized
list than that provided by a DA, especially in the presence of multicast filtering, which is done by
many network administrators, limiting broadcasts and multicasts to only the local subnet.
In summary, everything hinges on the directory agent that a user agent finds for a given scope.
C.2.1
NetIQ Service Location Providers
The NetIQ version of SLP takes certain liberties with the SLP standard in order to provide a more
robust service advertising environment, but it does so at the expense of some scalability.
For example, in order to improve scalability for a service advertising framework, you can limit the
number of packets that are broadcast or multicast on a subnet. The SLP specification manages this by
imposing restrictions on service agents and user agents regarding directory agent queries. The first
directory agent discovered that services the desired scope is the one that a service agent (and
consequently, local user agents) will use for all future requests on that scope.
The NetIQ SLP implementation actually scans all of the directory agents it knows about looking for
query information. It assumes a 300-millisecond round trip time is too long, so it can scan 10 servers
in about 3 to 5 seconds. This doesn't need to be done if SLP is configured correctly on the network,
and OpenSLP assumes the network is in fact configured correctly for SLP traffic. OpenSLP’s response
timeout values are greater than that of NetIQ’s SLP service provider, and it limits the number of
directory agents to the first one that responds, whether or not that agent’s information is accurate and
complete.
C.2.2
User Agents
A user agent takes the physical form of a static or dynamic library that is linked into an application. It
allows the application to query for SLP services.
User agents follow an algorithm to obtain the address of a directory agent to which queries will be
sent. Once they obtain a DA address for a specified scope, they continue to use that address for that
scope until it no longer responds, at which time they obtain another DA address for that scope. User
agents locate a directory agent address for a specified scope by:
1. Checking to see if the socket handle on the current request is connected to a DA for the specified
scope. If the request happens to be a multipart request, there may already be a cached
connection present on the request.
2. Checking its local known DA cache for a DA matching the specified scope.
124
NetIQ eDirectory 8.8 SP8 Installation Guide
3. Checking with the local SA for a DA with the specified scope (and adding new addresses to the
cache).
4. Querying DHCP for network-configured DA addresses that match the specified scope (and
adding new addresses to the cache).
5. Multicasting a DA discovery request on a well-known port (and adding new addresses to the
cache).
The specified scope is “default” if not specified. That is, if no scope is statically defined in the SLP
configuration file, and no scope is specified in the query, then the scope used is the word “default”. It
should also be noted that eDirectory never specifies a scope in its registrations. That’s not to say the
scope always used with eDirectory is “default.” In fact, if there is a statically configured scope, that
scope becomes the default scope for all local UA requests and SA registrations in the absence of a
specified scope.
C.2.3
Service Agents
Service agents take the physical form of a separate process on the host machine. In the case of
Windows, slpd.exe runs as a service on the local machine. User agents query the local service agent
by sending messages to the loop-back address on a well-known port.
A service agent locates and caches directory agents and their supported scope list by sending a DA
discovery request directly to potential DA addresses by:
1. Checking all statically configured DA addresses (and adding new ones to the SA’s known DA
cache).
2. Requesting a list of DA’s and scopes from DHCP (and adding new ones to the SA’s known DA
cache).
3. Multicasting a DA discovery request on a well-known port (and adding new ones to the SA’s
known DA cache).
4. Receiving DA advertising packets that are periodically broadcast by DAs (and adding new ones
to the SA’s known DA cache).
Since a user agent always queries the local service agent first, this is important, as the local service
agent’s response will determine whether or not the user agent continues to the next stage of
discovery (in this case DHCP-- see steps 3 and 4 in “User Agents” on page 124.).
C.3
Configuration Parameters
Certain configuration parameters in the %systemroot%/slp.conf file control DA discovery as well:
net.slp.useScopes = <comma delimited scope list>
net.slp.DAAddresses = <comma delimited address list>
net.slp.passiveDADetection = <"true" or "false">
net.slp.activeDADetection = <"true" or "false">
net.slp.DAActiveDiscoveryInterval = <0, 1, or a number of seconds>
The useScopes option indicates which scopes the SA will advertise into, and which scopes queries
will be made to in the absence of a specific scope on the registration or query made by the service or
client application. Because eDirectory always advertises into and queries from the default scope, this
list will become the default scope list for all eDirectory registrations and queries.
The DAAddresses option is a comma-delimited list of dotted decimal IP addresses of DAs that should
be preferred to all others. If this list of configured DAs does not support the scope of a registration or
query, then SAs and UAs will resort to multicast DA discovery, unless such discovery is disabled.
Configuring OpenSLP for eDirectory
125
The passiveDADetection option is True by default. Directory agents will periodically broadcast
their existence on the subnet on a well-known port if configured to do so. These packets are termed
DAAdvert packets. If this option is set to False, all broadcast DAAdvert packets are ignored by the
SA.
The activeDADetection option is also True by default. This allows the SA to periodically broadcast
a request for all DAs to respond with a directed DAAdvert packet. A directed packet is not broadcast,
but sent directly to the SA in response to these requests. If this option is set to False, no periodic DA
discovery request is broadcast by the SA.
The DAActiveDiscoveryInterval option is a try-state parameter. The default value is 1, which is a
special value meaning that the SA should only send out one DA discovery request upon
initialization. Setting this option to 0 has the same effect as setting the activeDADetection option to
false. Any other value is a number of seconds between discovery broadcasts.
These options, when used properly, can ensure an appropriate use of network bandwidth for service
advertising. In fact, the default settings are designed to optimize scalability on an average network.
126
NetIQ eDirectory 8.8 SP8 Installation Guide