1
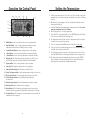
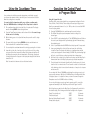
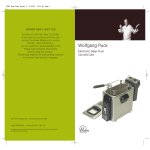
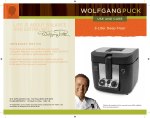
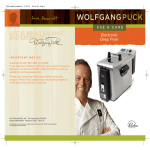
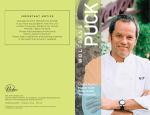
PUCK
If you have any problems with this unit,
contact Consumer Relations for service
PHONE: 1- 800 -275 - 8273.
Please read operating instructions
before using this product.
Please keep original box and packing materials
in the event that service is required.
WOLFGANG
IMPORTANT NOTICE
Electronic
Deep Fryer
manual
W.P. APPLIANCES, INC.
Toll Free (800) 275-8273 Email address: [email protected]
Website: www.wolfgangpuck-kitchenware.com
Model BDFR0020
Printed in China
REV 1.0
All trademarks, service marks and trade names (collectively the “Marks”) are proprietary
to Wolfgang Puck World Wide.
Important Safeguards
When using electrical appliances, basic safety precautions should always be
followed, including the following:
1
Read all instructions carefully.
2
Do not touch hot surfaces. Use handles or knobs.
3
To protect against risk of electric shock, do not immerse the control panel
or plug in water or any other liquid.
4
Close supervision is necessary when any appliance is used by or
near children.
5
Unplug from outlet when not in use and before cleaning. Allow to cool before
putting on or taking off parts, and before cleaning the appliance.
6
Do not operate any appliance with a damaged cord or plug or after the
appliance malfunctions or is dropped or damaged in any manner. Return the
appliance to an authorized service facility for examination, repair, or
electrical or mechanical adjustment.
7
The use of accessory attachments not recommended or sold by the appliance
manufacturer may cause fire, electric shock, or injury.
8
Do not use outdoors.
9
Do not let cord hang over edge of table or counter or touch hot surfaces,
including the stove.
10 Do not place on or near a hot gas or electric burner or in a heated oven.
11 Extreme caution must be used when moving an appliance containing hot oil
or other hot liquids.
12 Be sure the handle is properly assembled to the basket and locked in place.
See detailed assembly instructions.
13 Always attach plug to appliance first, then plug cord into wall outlet.
To disconnect, remove plug from wall outlet.
14 Do not use this appliance for other than intended use.
This appliance is for household use only.
Save These Instructions
1
Table of Contents
Wolfgang Puck,
owner of the famous
Spago restaurants and
one of the most influential
chef-restauranteurs in
America, is credited with
reviving California’s rich
culinary heritage. His cooking
innovations, a result of
blending fresh California
ingredients with his classical French techniques, are enjoyed by world leaders,
stars and fellow chefs alike. He established other trend-setting restaurants
like Postrio in San Francisco, Chinois on Main in Santa Monica, Granita,
Vert and Trattoria del Lupo. Home chefs can also share Mr. Puck’s talents
through his cookbooks and, of course, through his appliances!
2
Important Safeguards
1
About Wolfgang Puck
2
Warning
4
Before Your First Use
5
Know Your Deep Fryer
6
Operating the Control Panel
8
Setting the Temperature
9
Using the Countdown Timer
10
Operating the Control Panel
11
Frying Guide
12
Guidelines for Deep Frying
13
Preparing for Frying
14
Care and Cleaning
15
Troubleshooting Guide
16
Recipes
17
Limited Warranty
35
Warning
1
This Fryer has a polarized plug (one blade is wider than the other). As a
safety feature, this plug will fit in a polarized outlet only one way. If the plug
does not fit fully in the outlet, reverse the plug. If it still does not fit, contact
a qualified electrician. Do not attempt to defeat this safety feature. A short
power-supply cord is provided to reduce the hazards resulting from entanglement or tripping over a longer cord. Do not use this appliance with an
extension cord.
2
Do not use the Fryer without oil. The Fryer will be severely damaged if heated
dry. Only use oil in your Deep Fryer. Fat that is not melted will cause your
Deep Fryer to overheat.
3
This Fryer is equipped with a safety reset button in order to prevent operation
of the appliance in the event of improper use, or irregular operation. Once
your Deep Fryer has completely cooled press the Reset button on the back of
the control panel. If your Deep Fryer does not operate after using the reset
button contact our customer service department for repair.
4
Before using your Fryer for the first time wash the oil pot, lid, and frying
basket in warm soapy water and dry thoroughly. It is important that your Fryer
is completely dry prior to use as water will cause the hot oil to spatter. Do not
immerse the control panel or power cord in water. Wipe with damp cloth only.
5
Prior to use ensure that your tap is in the closed position (See figure 10
on page 15). With the tap in the closed position ensure that your Fryer is not
leaking from the tap by placing a small amount of water in the pan. Empty
water from the pan after checking the tap and dry the oil pan thoroughly
prior to adding oil. Should the tap leak immediately stop use and contact
our customer service center for repair.
6
Do not place oversized foods or utensils not recommended by the
manufacturer in the Fryer.
7
This product should never be used unsupervised by children or
infirm persons.
8
To prevent burns do not touch any metal parts of the Deep Fryer as they are
very hot. Always use heat resistant gloves
9
DO NOT OPEN THE OIL DRAIN SYSTEM WHEN THE OIL IS HOT.
Before Your First Use
Carefully unpack the Deep Fryer and remove all packaging materials. Remove the Deep
Fryer lid, oil pan, frying basket and control panel. Wash the Fryer lid, basket, oil pan
and housing in warm soapy water. Never immerse the Control Panel and Power Cord,
simply wipe with a damp cloth. Do not use harsh or abrasive cleansers on any part of the
Deep Fryer. Always ensure all components are completely dry prior to first use as water
will cause severe spattering of the oil.
Warning: Do not clean the Deep Fryer by heating soapy water in it because there is
danger that the water could overflow. Do not immerse the control panel or power cord
in water. Reassemble the unit after cleaning.
10 Always disconnect the power cord when not in use or when cleaning
your Fryer.
11 This Deep Fryer is designed with a Magnetic Release Power Cord that will
break away from the Fryer base if the power cord is pulled. This safety
feature will prevent the appliance from tipping and the hazardous spillage of
hot oil.
a.
WARNING: Always attach the cord to the Fryer first, then plug into the proper
wall receptacle. Never leave the Magnetic Release Power Cord plugged into
the wall without having it plugged into the appliance.
12 Do not use an extension cord with this appliance.
4
5
Know Your Deep Fryer
Using Your Deep Fryer
Assembling your Deep Fryer for Use
1
Place the Deep Fryer housing on a stable, level surface.
2
Ensure that all components of your Deep Fryer are
completely dry prior to use to avoid risk of injury due
to spattering.
3
Insert the oil pot into the Deep Fryer housing ensuring
that the front of the pot (the front is indicated by the
tap) is placed at an angle into the housing.
(See figure 1).
4
Line up the control panel into the grooves on the rear
of the Deep Fryer housing. Your Deep Fryer is equipped
with a safety microswitch which will not allow the control
panel to work unless it is properly seated into both
grooves in the housing. (See figure 2).
5
Add the appropriate amount of oil to the oil pot.
Do not fill with oil above the maximum level or below
the minimum level marked on the inside of the Deep
Fryer pot. (See figure 3).
figure 3
6
Attach the Magnetic Release Power Cord into the
receptacle on the back of the housing. Only use the
approved receptacle marked TA-35P in your unit.
To attach the receptacle ensure that the nubs on the
magnetic end of the cord are on the right side of
the plug (TA-35P) in order to line up with the plug
receptacle on the Control Panel. (See figure 4).
figure 4
7
Unfold the basket handle and ensure that it is locked
into place. (See figure 5).
8
Place the basket into the basket holder inside the pot.
(See figure 6)
• Lid with viewing window and permanent filter
• Oil pot with drain tap
figure 1
• Control Panel
• Heating Element
figure 2
• Drain Lock
• Oil Pan Front
• Housing
• Basket clip with
• Magnetic Release Power Cord
MAX food level
• Frying Basket with folding handle
figure 5
Assembled Fryer in
cooking position
Basket in elevated position for
loading or food draining
figure 6
6
7
Operating the Control Panel
14 •
15 •
16 •
•8
•7
1
Add the appropriate amount of oil to the oil pot. Do not fill with oil above the
maximum level or below the minimum level marked on the inside of the Deep
Fryer pot.
2
When the unit if first plugged in the blue backlight will illuminate and the
temperature will display.
•2
3
Press the Temp/Time button once and the temperature will blink. You cannot
change the temperature unless it is blinking.
•1
4
While blinking Press +/– to adjust temperature.
5
Press ON/OFF to start preheating the oil. The HEATING indicator will blink on
the control panel indicating the preheating cycle.
6
The temperature will display the current oil temperature and will continue to
rise until it reaches your set temperature.
7
Your oil is ready when the READY indicator blinks and 5 beeps sound.
8
Place your food in the basket ensuring that you do not exceed the MAX line
indicated on the basket near the handle.
9
To fry without using the optional timer, simply lower the food into the Fryer
while the READY indicator is blinking and visually track the cooking process.
•4
10 •
11 •
12 •
13 •
•9
•6
•3
Setting the Temperature
•5
1
On/Off Button. Used to start preheat function and countdown timer.
2
Temp/Time Button. Used to change temperature and timer settings.
Temperature and time must be blinking in order to change.
3
Celsius/Fahrenheit Button. Used to change display to either setting.
4
+ (plus) Button. Used to increase temperature or time while blinking.
5
– (minus) Button. Used to decrease temperature or time while blinking.
6
Heating Light. Will illuminate during the preheating cycle. Will cycle on
and off during Ready and Cooking to maintain the set temperature.
7
Program Button. Press to change between 4 preset programs.
8
Power Light. Will illuminate whenever the unit is plugged in.
9
Temperature/Time Display. Will display the selected function
10 The Fryer will maintain the temperature displayed as long as the READY
light is blinking. The yellow heating light will cycle on/off indicating that
the thermostat is maintaining the displayed temperature.
10 French Fry Progam Indicator. Preset time/temperature setting for french fries.
11 Fish Program Indicator. Preset time/temperature setting for fish fillets.
12 Chicken Program Indicator. Preset time/temperature setting for
chicken breast.
13 Shrimp Program Indicator. Preset time/temperature setting for shrimp.
14 Heating Indicator. Will blink while unit is preheating.
15 Ready Indicator. Will blink when preset temperature has been reached.
Fryer will maintain temperature displayed when ready indicator is blinking.
16 Cooking Indicator. Will blink when preset temperature has been reached and
countdown timer is being used.
8
9
Using the Countdown Timer
Once you have selected the appropriate temperature as indicated on page 9,
you can use the automatic timer to turn the Fryer off and sound a notification
when the cooking time is completed.
You cannot adjust the temperature while you are in timer countdown mode.
Once the COOKING indicator is blinking the Time / Temp button is disabled.
Operating the Control Panel
in Program Mode
Using the Program Function
Your Deep Fryer comes equipped with four pre-programmed settings for French
Fries, Chicken, Fish, & Shrimp. These settings are based upon frying no more
than the recommended volume of food, i.e. 3.0 lbs, and not to exceed the MAX
line on the frying basket.
1
The countdown timer will not start until the oil is preheated. The display
must be blinking READY before setting the timer.
1
Press the PROGRAM button to switch among the pre-set functions
2
Press the Temp/Time button twice and the time will blink. You cannot change
the time unless it is blinking.
2
The LCD will display the preset temperature value according to the
chosen figure.
3
While blinking, press +/– to adjust the timer, then press the on/off to begin
the timer.
3
4
The panel will display a blinking COOKING indicator and will remain in
Timer mode while the countdown timer is working.
Press ON/OFF to start preheating the oil. The HEATING indicator will blink on
the control panel display and the yellow heating light will illiminate during
the preheating cycle.
4
Your oil is preheated when the READY indicator displays and 5 beeps sound.
5
You can adjust the countdown timer while cooking by pressing the +/– button.
5
6
Lower the food into the oil and place lid on top. At the end of the cooking
cycle you will hear five beeps and the Deep Fryer’s thermostat will turn off
and display the previously selected temperature. The Heating, Ready, and
Cooking indicators will not appear in the display indicating that the unit has
turned itself off.
Lower your basket with food into the Fryer and press the on/off button
to start the Timer. The display will change to a countdown timer and the
control panel display will show a blinking COOKING. The yellow heating light
will cycle on and off during cooking to maintain the set temperature.
6
At the end of the cooking cycle you will hear five beeps and the Deep Fryer’s
thermostat will turn off and display the previously selected temperature.
7
Place the basket into the basket clip which will allow the excess oil to drain
from the food for a minute or two. Do not leave the cooked food in the basket
in the draining position for more than five minutes or it may lose its crispness
and become soft.
Note: You must be in timer mode to use the timer function.
You can adjust the Time in PROGRAM mode during the cooking process to suit
your personal preference. While the COOKING indicator is blinking and the Time
is displayed, press +/– to adjust the time up or down. You cannot change the
Temperature once the COOKING indicator is blinking.
You can stop the frying process at any time by pressing on/off to cancel the
program and manually set the Time/Temp as outlined on Pages 9 and 10.
Note: Every time you switch on the Deep Fryer, the Programs will revert back to
the default setting. The following are the default settings for the Programs:
French Fries (crinkle cut)
Fish (batter dipped)
Boneless Chicken Breast (breaded)
Shrimp (batter dipped)
10
350º
350º
350º
350º
11
F
F
F
F
12
10
12
4
minutes
minutes
minutes
minutes
Frying Guide
Guidelines for Deep-frying
Cooking times are suggestions. Adjust them according to your own preference
and the amount of food being cooked. Do not cook more than 3.0 lbs of food and
not to exceed the MAX line as indicated on the frying basket
Food
Temperature
Time (minutes)
Chicken breasts
350° F
15 to 20
Chicken drumsticks
350° F
12 to 15
Chicken fingers
350° F
12 to 15
Doughnuts
350° F
2 to 4
Eggplant
350° F
5 to 7
Fish filets, breaded
350° F
5 to 6
Fish in batter
325° F
6 to 8
French fries
375° F
5 to 7
Fries, steak
375° F
5 to 7
Mushrooms
350° F
3 to 5
Onion rings
350° F
5 to 7
Pork chops, breaded
350° F
7 to 10
Potato chips
375° F
5 to 8
Shrimp
350° F
2 to 4
Veal cutlets
340° F
7 to 10
WARNING: Do not add water, wet foods or icy frozen foods to cooking oil,
because this will cause the oil to splatter and may result in injury. Do not move
the Deep Fryer while cooking, or at any time when the oil is hot. Do not attempt
to drain the oil while the oil is hot. To check food during frying, look through the
viewing window or you may carefully open the lid by using the black handle only.
Do not touch any metal surfaces of your Deep Fryer as they are hot and can
cause burns. Do not place your hands above the filter vent on the lid while
cooking, as the steam is hot and can cause burns.
1
Always fry food between the temperatures of 350-375° unless recipe
specifies otherwise. Cooking at lower temperatures allows for more oil
absorption, which makes the food taste greasy.
2
Make sure READY indicator or COOKING indicator is blinking before lowering
food into oil.
3
Never fill the basket greater than the MAX line as indicated on the basket
near the handle. Too much food will prevent the food from moving around
and browning evenly. In addition, it may slow down the cooking time.
Fry in smaller batches for faster, crispier fried food.
4
When selecting oil to use in your Deep Fryer, choose a high quality brand
of peanut oil, canola oil, or vegetable oil. These fats can withstand high
temperatures well. Do not use butter, margarine, animal fats or olive oil
because these smoke at lower temperatures. Do not mix different oils. Do not
use shortening or lumps of fat as your Deep Fryer thermostat will overheat.
5
To extend the frying life of your oil, always add 15 - 20% new oil or fat each
time you fry. This translates to approximately 1/2 to 1 cup new oil each time
you fry.
6
Cover and refrigerate the oil or fat between uses to maintain freshness.
7
Change oil often and dispose of responsibly. Do not pour down the sink drain.
Check with local regulations for proper disposal.
8
Keep oil for frying seafood and fish separate from oil used for potatoes and
other milder items.
9
Before Deep frying any foods, remove excess moisture by blotting well with a
paper towel.
10 Do not add water, wet foods, or icy frozen foods to hot oil, because this will
cause the oil to spatter, which may result in injury.
11 When frying battered foods, shake off any excess batter or coating before
putting in the oil.
12 Never pour salt into the oil. Instead, salt the food while it is hot and draining
on a paper towel.
13 Frozen foods can be cooked in the basket. Follow directions on food package.
Use caution when lowering the basket in the oil, as the ice crystals can cause
spattering. Always lower slowly into the oil.
14 After cutting potatoes for French fries or potato chips, wash in cold water
to remove starch. This will keep them from sticking together. Dry completely
before frying.
15 Never place any plastic utensils into hot oil. Do not pour hot oil into
plastic containers.
16 Never drain hot oil from the spout, always unplug your Fryer and allow it
to completely cool before draining
12
13
Preparing for Frying
Many deep-fried foods are coated with a breading or batter before frying. This
helps to retain the moisture and flavor of the food and protects the food from
absorbing too much fat. Batters can also add appetizing texture, flavor and
appearance to the food to be fried.
Following are general guidelines for breading and battering foods, including a
variety of coatings you may not have thought of before. Quantities will vary
according to the amount of foods you are frying. Following these tips will help
prevent coatings from separating and falling off into the Fryer.
Breading Foods For Frying
1 Set up three bowls or plates.
2
Place flour in the first bowl.
3
In the second bowl, make an egg wash by mixing eggs and either water
or milk.
4
In the last bowl, place the breading of your choice, like bread crumbs or
cornmeal. Try one of the following suggestions: fine dry bread crumbs, fresh
bread crumbs, crushed corn flakes, cracker meal, corn meal, panko - rice
bread crumbs, instant potato flakes, and rice flour
5
Clean the food to be fried and shake off any excess water. If desired, season
the food with salt and pepper.
6
Dip the food in the flour and shake off the extra flour.
7
Dip the food in the egg wash; let the extra drain off so that the crumb coating
will be even.
8
Lastly, dip the food in the crumbs, pressing gently and making sure it is
coated completely. Shake off excess.
9
Have a pan handy to hold the breaded food until ready to fry.
Tip: While breading food, occasionally remove any lumps from the flour and
crumbs for even coverage.
Battering Foods For Frying
Batters are semi-liquid mixtures containing flour or starch. They are used in deep
frying to give a crisp, flavorful coating. They are great on seafood and vegetables,
such as broccoli or shrimp.
Care and Cleaning
Warning: Do not attempt to clean your Fryer or drain the oil while either the Fryer
or the oil is hot. Allow unit to completely cool.
Before cleaning, unplug the cord from the wall outlet first, and then from your
Deep Fryer and wait for the Deep Fryer to cool completely. Remove the Control
Panel with heating element from the base by lifting vertically. Never immerse the
control panel in any liquid. Clean the heating element with hot, soapy water,
being careful not to wet the control panel. Wash the lid, frying basket, and
cooking pot in warm, soapy water and dry thoroughly. Clean the exterior of the
control panel with a slightly damp cloth. Wipe the Deep Fryer housing with a
damp cloth.
Draining the oil
The oil must be completely cool to avoid the risk of a burn injury. Ensure
that the drain tap has clearance to drain directly into the storage container.
Place a storage container under the drain tap. When moving the Fryer to drain
oil, ensure that all four feet of the Fryer housing stay on the countertop. It is
recommended that you use a screen strainer to catch food particles in the oil
from entering your storage container.
Ensure that your storage container is placed below the tap before attempting to
drain the oil. Push the black safety lock up while simultaneously pulling the tap
drain lever down to drain the oil (see figures 7, 8 and 9). When oil has completely
drained press the drain latch up into the closed position (see figure 10). Wash
the oil pot in warm soapy water and dry thoroughly before use. The tap can be
cleaned by allowing warm soapy water to flow through the tap, followed by rinsing
with clear water.
Cover and refrigerate used oil for up to two weeks. Discard oil if it becomes thick
or rancid. Change the oil when it is a dark color, smells bad or there is a bad taste
in the food.
Important: Do not immerse the Deep Fryer control panel or power cord in water
or other liquid. Do not place any parts of the Deep Fryer in your dishwasher.
Always hand wash as described above and dry thoroughly. Reassemble the Deep
Fryer for storage by folding the handle into the basket and placing the lid on top.
• Many different liquids may be used: milk, beer, water, sake.
• Eggs may not be used.
• Too thick of a batter is not as palatable as a light one.
• For lighter results, use a leavening agent, such as baking powder,
beaten egg whites, beer or seltzer.
14
figure 7
figure 8
figure 9
15
figure 10
Troubleshooting Guide
Recipes
Deep Fryer has no power
The unit is not plugged in
Plug the unit into a 120 volt AC outlet
The magnetic cord is not
properly fastened
See figure 4 on Page 7 for proper
installation of the breakaway cord
The control panel is not
properly seated
See figure 2 on page 7 for proper
placement of the control panel
Cannot Change Settings
Cannot set the temperature
Ensure that the temperature is blinking
first before attempting to set.
See page 9.
You have already started the Countdown
timer. Cancel by pressing the On/Off
button and change settings
Cannot set the countdown timer
Ensure that the time is blinking first
before attempting to set. See page 10.
Oil is overflowing
Too much oil has been placed
in the Fryer pot
Do not exceed the MAX line as indicated
into Fryer pot
Too much food has been placed
in the frying basket
Do not exceed the MAX line as indicated
in the frying basket
Using two different oils
Empty oil and clean the pot once cooled
down. Use only one type of oil in the
Fryer. See page 14, section 4.
The food is wet or covered with ice
Remove excess ice crystals from the food
and dry wet foods thoroughly OR lower
the basket very slowly into the oil
Food is not browning
Foods are excessively thick, or
contain a lot of water / ice
Try a longer cooking time
The temperature of the oil is too low
Increase temperature according to the
cooking chart on page 12.
Too much food is being added
to the basket
Do not exceed the MAX line of the
frying basket. You can also try frying
smaller batches.
Unpleasant Odor
The oil is overused
Do not use the oil more than 8 times
Oil has been used in different foods
Do not use the same oil for fish as you
do for other food items
Recommended oil is not being used
Only use oils recommended on page 14.
16
17
Fried Chicken
Spring Rolls
In Vienna, fried chicken is always served with a salad of mixed greens,
cucumbers, tomatoes, potatoes, etc. I must say, as a kid, I preferred
mashed potatoes.
4 servings
4 servings
Filling:
1 large onion, julienned
1 medium carrot, julienned
1/4 pound shiitake mushrooms, discard stems, julienned
1 large red bell pepper, julienned
1 large yellow bell pepper, julienned
1 small green cabbage, julienned
Peanut oil, for stir-frying
Salt and pepper
1/4 pound glass noodles, soaked in water for 10 minutes,
chopped into smaller strands
1/4 cup mushroom soy sauce
2 tablespoons chili paste
1 tablespoon sesame oil
1 bunch cilantro leaves, chopped
Cooked aromatic mixture, recipe follows on page 20
INGREDIENTS
1 (2 1/2 pound) chicken
Salt and pepper
Vegetable oil, for frying
2 cups flour
3 eggs
4 cups panko (rice bread crumbs) or bread crumbs
1 cup parsley leaves
2 lemons
METHOD
INGREDIENTS
1
Cut each chicken into 8 pieces. Remove the skin but not the bones. Season
generously with salt and pepper.
2
Preheat the Deep Fryer to 350°. On three separate soup plates, put the flour,
eggs and bread crumbs, and dip chicken pieces one at a time, first in flour,
then eggs, and finally bread crumbs. Shake off excess crumbs.
3
Fry chicken pieces for about 12 to 14 minutes until nice and brown. Turn
after 7 minutes. Drain on paper towels.
Spring rolls:
Spring roll wrappers
1 egg with 1 tablespoon each water and cornstarch,
beaten together for egg wash
Peanut oil, for deep-frying
4
Fry the parsley for about 30 seconds. Remove, drain on paper towels, and
sprinkle over chicken.
METHOD
1
Prepare the filling. In a wok, stir-fry each vegetable separately in peanut oil.
Season with salt and pepper. Drain and transfer to a mixing bowl. Stir in
noodles, mushroom soy sauce, chili paste, sesame oil, and cilantro. Season
with salt and pepper. Set aside to cool completely. When cool, blend the
filling mixture with the aromatic mixture. When ready to form the spring rolls,
squeeze out all the excess liquid.
2
Make the spring rolls. Place about 1/2 cup of prepared filling per spring roll
wrapper. Roll and seal edges with the egg wash. Repeat the process until all
filling is used.
3
In your Deep Fryer, heat the peanut oil to 350°. Deep-fry in batches of 2
until golden, about 2 to 3 minutes. Drain on paper towels. Trim off the ends
and slice diagonally. Drizzle top with Hot Chinese Mustard Sauce (see recipe,
page 21). Serve immediately.
PRESENTATION
Divide onto 4 plates. Sprinkle with parsley and serve with half a lemon.
18
19
Aromatics
Hot Chinese Mustard Sauce
4 servings
4 servings
INGREDIENTS
INGREDIENTS
1 (2-inch piece) fresh ginger, peeled
3 large cloves garlic
2 green onions
Pinch red pepper flakes
1/2 cup peanut oil
Pinch salt
Pinch black pepper
Pinch sugar
METHOD
1
In a food processor, combine the ginger, garlic, green onions and red pepper
flakes. Turn on machine, slowly add oil and process mixture to a puree.
2
Sauté mixture for 1 to 2 minutes. Season with salt, pepper and sugar. Set
aside.
20
4 tablespoons Chinese dry mustard
2 tablespoons water
2 tablespoons rice vinegar
4 tablespoons pickled ginger liquid
1 lemon, juiced
Pinch turmeric
1 tablespoon sugar
1 egg yolk
1 tablespoon chili oil
1 tablespoon sesame oil
1 cup peanut oil
METHOD
1
In a bowl, combine all the ingredients except the oil. Stir until well blended.
2
Slowly whisk in the peanut oil until emulsified. Refrigerate, covered
until needed.
21
Shrimp Tempura with Cilantro
Fried Spinach Leaves
4 servings
4 servings
INGREDIENTS
INGREDIENTS
16 large shrimp, peeled, cleaned and deveined, with tail intact
1 large or 2 small jalapeno peppers, seeded and minced
4 or 5 sprigs cilantro leaves chopped
2 medium limes, juiced
Salt
1 bunch spinach leaves
Peanut oil
Salt
Tempura Batter:
1 cup all-purpose flour
1 tablespoon baking powder
1 1/4 cups water
2 tablespoons sesame seeds
1/2 cup cilantro leaves, chopped fine
1 to 1 1/2 teaspoons cayenne pepper
Salt
Peanut oil, for frying
Fried Spinach Leaves, recipe follows on page 23
METHOD
1
In your Deep Fryer, heat the peanut oil to 375°. Clean the spinach leaves
well, trim and dry thoroughly. Fry until crisp and translucent, about 2
minutes. Remove with a slotted spoon and drain on clean toweling.
Season with salt to taste and serve immediately,
Note: As a single leaf garnish, you can substitute the Japanese oba leaf, which
you can purchase in Japanese markets. The procedure is the same for small or
large quantities of spinach. However, if cooking a large amount of spinach, fry in
batches and keep warm in a low oven.
METHOD
1
Arrange the shrimp on a large platter. Sprinkle with the minced jalapeno and
the chopped cilantro. Pour the lime juice over and let marinate for at least
30 minutes, refrigerated. When ready to cook, season lightly with salt.
2
In a small bowl, sift together the flour and baking powder. Whisk in the water
until the batter is smooth (do not overbeat), and then add the remaining
ingredients, seasoning with cayenne and salt to taste. If made earlier in the
day, set the bowl into an ice bath.
3
At serving time, in your Deep Fryer, heat the oil to 350º. Dip each shrimp
into the batter and coat well. Carefully place no more than 6 shrimp into the
oil with the basket already lowered and cook until golden brown, about 2
minutes. Remove with a slotted spoon or a flat strainer and drain on paper or
clean toweling. Keep warm while preparing the remaining shrimp and the
spinach.
PRESENTATION
Arrange a few fried spinach leaves on half of each of 4 plates.
Place 4 shrimps on the other half and serve immediately.
22
23
Fritter Batter
Enough batter for 1 pound of apples or bananas
INGREDIENTS
1
1
1
1
1
1
1
1
1
Vegetable Chips
INGREDIENTS
1 pound parsnips, peeled and trimmed
1 pound carrots, peeled and trimmed
1 pound beets, peeled and trimmed
1/2 pound baking potato, scrubbed clean, but not peeled
1/2 pound sweet onion, peeled
Peanut oil for frying
1/2 cup all-purpose flour
salt
fresh ground pepper
cup all-purpose flour
tablespoon baking powder
pinch salt
pinch fresh ground white pepper
pinch cinnamon
pinch freshly grated nutmeg
large egg
cup buttermilk
pound apples or bananas
METHOD
METHOD
1
In a small bowl, sift together the flour, baking powder, salt, pepper,
cinnamon and nutmeg. In a small bowl whisk together the egg and
buttermilk. Whisk egg mixture into flour mixture. Let rest for 30 minutes
before using.
2
Heat oil in Deep Fryer to 350°.
3
Peel and core apples (or peel bananas, if using). Cut into sticks about 1/4
inch wide by 2 1/2 - 3 inches long. Drop into batter. Carefully drop into hot
oil with the basket lowered and fry until golden.
24
1
Slice the parsnips and carrots very thin lengthwise. Set aside on a paper
towel. Slice the beets, potato, and onion into very thin round slices.
Place the beets and potatoes into separate bowls of cold water. Be sure to
dry them thoroughly before you deep fry them. Heat the Deep Fryer to 350°.
Starting with the parsnips, drop a few at a time into Fryer basket and cook
until lightly brown. Make sure both sides are brown,
turning them if needed.
2
Lift basket and drain. Remove to clean paper towels. Season while still hot.
Repeat with remaining vegetables.
3
For onion slices, dredge the onions in flour. Shake off excess flour. Fry and
drain as above. For even browning, fry in small batches.
25
Crispy Shrimp or Calamari
with Chinese Noodles and
Spicy Garlic Sauce
4 servings
INGREDIENTS
Oil for deep-frying
2 tablespoons peanut oil
3/4 cup (4 ounces) sliced Double-Blanched Garlic, recipe follows page 28
2 tablespoons sugar
1 cup rice wine
1/4 cup rice wine vinegar
2 tablespoons plus 1 teaspoon dark soy sauce
4 ounces carrots, peeled, trimmed, and cut into julienne (about 1 cup)
4 ounces haricots verts (young thin french style string beans), trimmed,
blanched, and refreshed (about 1 cup)
4 ounces green onions, trimmed and cut into strips (about 1 cup)
2 teaspoons Vietnamese chile sauce
12 ounces fresh Chinese egg noodles or thin spaghetti
1 pound large shrimp, cleaned and tails removed, or, 1 pound calamari, cleaned
and cut into 1/4-inch rings
Kosher salt and freshly ground black pepper
About 1/2 cup flour
1/4 teaspoon sesame oil
METHOD
1
Bring a large stockpot of water to a boil.
2
Make the sauce: In a large skillet or sauté pan, heat the 2 tablespoons
of peanut oil. Over medium-high heat, sauté the garlic just until golden,
2 to 3 minutes. Stir in the sugar and continue to sauté until the garlic begins
to caramelize, 1 or 2 minutes longer. Deglaze the pan with the rice wine,
rice wine vinegar, and soy sauce. Add the carrots, haricots verts, and
2 ounces of the green onion, reserving 1 ounce as garnish. Stir in the chili
sauce and continue to cook until the sauce is reduced by half.
3
Meanwhile, add salt to the boiling water and cook the noodles until they
are al dente. Drain the noodles well and stir them into the sauce until
they are well coated.
4
Season the shrimp or calamari with salt and pepper and toss with the flour
to coat lightly.
5
Deep fry the shrimp or calamari at 375º in small batches until golden,
1 or 2 minutes. (Place the shrimp or calamari in the basket and gently ease
the basket into the oil.) Drain on clean paper towels.
PRESENTATION
To serve, divide the noodles and vegetables among 4 large warm plates.
Arrange the shrimp or calamari over and around each portion and garnish with
the remaining green onions. Drizzle a little sesame oil over the noodles
and serve immediately.
26
27
Double Blanched Garlic
Apple Spring Rolls
4 servings
4 servings
INGREDIENTS
INGREDIENTS
3 heads garlic
Kosher salt
6 small Granny Smith apples, 4 oz. each
1/3 cup sugar
6 tablespoons butter
1/8 teaspoon ground cinnamon
1/8 teaspoon ground ginger
1/8 teaspoon nutmeg
1/2 vanilla bean
2 tablespoons Calvados brandy (optional substitute apple juice)
1 tablespoon sugar
1 teaspoon lemon juice
pinch salt
1/2 cup raisins
1 package spring roll wrappers
METHOD
1
Prepare an ice bath.
2
Separate the garlic into cloves and remove the ends of each clove. Fill a
small saucepan with water. Salt lightly and bring to a boil. Carefully drop the
whole cloves into the water and blanch for 30 seconds. Remove with a
slotted spoon and immediately plunge into the ice water to stop the cooking
process. Repeat the process. Drain the garlic and dry it well. The peels
should slip off easily.
3
Cut the garlic into slices and use as needed. (Yield: 3/4 to 1 cup)
METHOD
28
1
Peel, core and cut apples into 1/2-inch squares.
2
In a 1-quart sauté pan over medium-high heat add 1/3 cup sugar; stir until
caramelized. Add apples, butter, cinnamon, ginger, nutmeg, scraped 1/2
vanilla bean, and brandy. Cook for 2 minutes, until tender. Remove from heat
and add 1 tablespoon sugar, the lemon juice and pinch of salt.
3
Scoop out half of the apples with all of the liquid. Place in a food processor
and process until fairly smooth. Add raisins. Remove “apple puree” from
food processor and combine with remaining apples. Fold together and reserve
until ready to assemble spring rolls.
4
Place the spring roll wrappers on a flat surface with the point facing you.
Spoon 3 tablespoons of apple compote in a line 2 inches from the bottom
point. Fold up the spring roll.
5
Deep fry 2-3 rolls in 350° oil for 2 minutes. Remove from oil, place on paper
towels to drain. Dust with powdered sugar. Serve with Cranberry Caramel
Dipping Sauce (recipe on page 30).
29
Cranberry Caramel Dipping Sauce
Funnel Cakes
4 servings
INGREDIENTS
INGREDIENTS
1 large egg, room temperature
3/4 cup milk, room temperature
1 1/2 cups Bisquick® baking mix
2 tablespoons sugar
Powdered sugar, for dusting
Oil, for frying
1 cup sugar
4 tablespoons water
1 teaspoon lemon
1/4 cup orange
8 oz. cranberry juice
1 star anise
METHOD
METHOD
1
Preheat oil in Deep Fryer to 375°.
1
In a quart saucepot combine the sugar, water, and lemon juice. Stir until
dissolved.
2
Beat egg and milk together. Add the Bisquick and sugar to egg mixture,
beating until smooth.
2
Place over a medium heat cook until blond in color. Meanwhile, pour the
cranberry juice and star anise in a small saucepot.
3
When the temperature in the Fryer is 375°, open lid. The basket should be in
the lowered position.
3
Place over medium heat and stir, reducing to 1/2 cup. When the sugar
mixture reaches blond color, remove from heat and add the reduced
cranberry juice.
4
Pour batter into a funnel while your thumb is covering the bottom opening.
Remove thumb and drop batter into hot oil using a circular motion to form
spirals about 4 inches in diameter per cake. Make one funnel cake at a time.
IMPORTANT: To avoid the risk of burn from spattering, wear heavy plastic
gloves during this procedure. Use extreme caution at all times.
30
5
Remove cake when golden brown. Drain on paper towel and sprinkle with
powdered sugar while still warm.
6
Repeat until all batter is used.
31
Pot Stickers
Dipping Sauce:
100 to 120 pot stickers
approximately 1 1/2 cups sauce)
INGREDIENTS
INGREDIENTS
Filling:
1/4 cup garlic cloves
1-inch piece fresh ginger, peeled
2 tablespoons peanut oil
1/4 cup dried fruits (apricots, cherries or raisins)
1/2 bunch cilantro leaves, minced
1/2 bunch green onions, minced
Salt and pepper
Pinch sugar
1/4 cup oyster sauce
1 tablespoon chile paste
1 tablespoon sesame oil
2 pounds pork butt, cubed
Round wonton wrappers
1 egg beaten with 1 tablespoon water, for egg wash
Peanut oil, for frying
Dipping sauce (recipe on page 33)
1/2 cup rice wine vinegar
1 cup sesame oil
2 tablespoons minced scallions or green onions
large pinch sugar
METHOD
Combine all ingredients and whisk together.
METHOD
1
In a blender, combine garlic and ginger. Turn on machine and slowly pour the
2 tablespoons peanut oil and process to a puree. Transfer to a bowl and add
the remaining filling ingredients (fruits through pork butt). Stir together and
marinate for 1 hour. Pass mixture through medium dye in a meat grinder.
Transfer to an electric stand mixer and, using the paddle on slow speed, mix
until emulsified.
2
Make the pot stickers. Separate the wonton wrappers and brush edges with
eggwash. Place a generous spoonful of the filling and seal the edges, making
small folds in the rounded side, starting from the center, and folding down to
each end to create a half moon shape. Continue until you have used up the
filling. Refrigerate until ready to cook.
3
Cook pot stickers in small batches in boiling, salted water. Drain. Heat the
peanut oil to 375° in your Deep Fryer. Fry for two minutes until golden
brown. Remove and serve with dipping sauce.
32
33
Panko Scallops
Limited Warranty
This warranty covers all defects in workmanship or materials in the mechanical
and electrical parts, arising under normal usage and care, in this product for a
period of 12 months from the date of purchase provided you are able to present
a valid proof-of-purchase. A valid proof-of-purchase is a receipt specifying
item, date purchased, and cost of item. A gift receipt with date of purchase
and item is also an acceptable proof-of-purchase. Product is intended for household
use only. Any commercial use voids the warranty.
4 servings
INGREDIENTS
1 pound fresh sea scallops
1/2 cup all-purpose flour
2 large eggs, beaten
1/4 cup milk
1 cup panko (rice bread crumbs)
Peanut oil, for frying
1
Preheat oil in Deep Fryer to 375°.
This warranty covers the original retail purchaser or gift recipient. During the
applicable warranty period within normal household use,we will repair or replace,
at our discretion, any mechanical or electrical part which proves defective, or
replace unit with a comparable model.
2
Season the scallops with salt and pepper if you like.
To obtain service under the terms of this warranty, call Toll Free (800) 275-8273.
3
Set up your coating ingredients. Place the flour on a plate. Beat the eggs and
milk together in a bowl. Place the panko on a plate. Have a plate prepared to
place scallops after breading.
METHOD
4
Coat the scallops. Dredge the scallops in the flour. Shake off all extra flour.
Dip the scallop into the eggwash. Let the excess egg slide off. Dip the scallop
into the panko, pressing lightly to insure the crumbs adhere. Shake off all
extra coating. Place breaded scallop on clean plate and repeat procedure
until all of the scallops are coated.
5
When all scallops are coated and temperature in the Fryer has reached 375°,
place about 6 scallops at a time in hot oil. Fry for approximately 2 minutes or
until golden brown. Open Fryer lid and raise basket to the upright position.
Let scallops drain in this position for several minutes. Remove scallops onto
clean paper towels. Sprinkle lightly with salt while still hot.
34
THIS LIMITED WARRANTY COVERS UNITS PURCHASED AND USED WITHIN
THE UNITED STATES AND DOES NOT COVER:
•
Damages from improper installation.
•
Defects other than manufacturing defects.
•
Damages from misuse, abuse, accident, alteration, lack of proper care and
maintenance, or incorrect current or voltage.
•
Damage from service by other than an authorized dealer or service center.
This warranty gives you special legal rights and you may also have other rights to
which you are entitled which may vary from state to state.
35