1
XG-SV100W
XG-SV200X
Setup
Connections
OPERATION MANUAL
Easy Start
MODEL
Introduction
DATA PROJECTOR
Basic
Operation
Useful
Features
Appendix
IMPORTANT
• For your assistance in reporting the loss
or theft of your Projector, please record
the Model and Serial Number located on
the bottom of the projector and retain this
information.
• Before recycling the packag ing, please
ensure that you have checked the contents of the carton thoroughly against the
list of “Supplied accessories” on page 11.
ii
Model No.:
Serial No.:
SPECIAL NOTE FOR USERS IN THE U.K.
The mains lead of this product is fitted with a non-rewireable (moulded) plug incorporating
a 10A fuse. Should the fuse need to be replaced, a BSI or ASTA approved BS 1362 fuse
marked or
and of the same rating as above, which is also indicated on the pin face
of the plug, must be used.
Always refit the fuse cover after replacing the fuse. Never use the plug without the fuse
cover fitted.
In the unlikely event of the socket outlet in your home not being compatible with the plug
supplied, cut off the mains plug and fit an appropriate type.
DANGER:
The fuse from the cut-off plug should be removed and the cut-off plug destroyed immediately and disposed of in a safe manner.
Under no circumstances should the cut-off plug be inserted elsewhere into a 13A socket
outlet, as a serious electric shock may occur.
To fit an appropriate plug to the mains lead, follow the instructions below:
WARNING:
THIS APPARATUS MUST BE EARTHED.
IMPORTANT:
The wires in this mains lead are coloured in accordance with the following code:
Green-and-yellow : Earth
Blue
: Neutral
Brown
: Live
As the colours of the wires in the mains lead of this apparatus may not correspond with
the coloured markings identifying the terminals in your plug proceed as follows:
x The wire which is coloured green-and-yellow must be connected to the terminal in the
or coloured green
plug which is marked by the letter E or by the safety earth symbol
or green-and-yellow.
x The wire which is coloured blue must be connected to the terminal which is marked
with the letter N or coloured black.
x The wire which is coloured brown must be connected to the terminal which is marked
with the letter L or coloured red.
IF YOU HAVE ANY DOUBT, CONSULT A QUALIFIED ELECTRICIAN.
Authorized representative responsible for the European Union Community Market
SHARP ELECTRONICS (Europe) GmbH
Sonninstraße 3, D-20097 Hamburg
E.U. ONLY
iii
The supplied CD-ROM contains operation instructions in English, German, French, Spanish,
Italian, Dutch, Swedish, Portuguese, Chinese, Korean and Arabic. Carefully read through the
operation instructions before operating the projector.
Die mitgelieferte CD-ROM enthält Bedienungsanleitungen in Englisch, Deutsch, Französisch,
Spanisch, Italienisch, Niederländisch, Schwedisch, Portugiesisch, Chinesisch, Koreanisch
und Arabisch. Bitte lesen Sie die Bedienungsanleitung vor der Verwendung des Projektors
sorgfältig durch.
Le CD-ROM fourni contient les instructions de fonctionnement en anglais, allemand, français,
espagnol, italien, néerlandais, suédois, portugais, chinois, coréen et arabe. Veuillez lire attentivement ces instructions avant de faire fonctionner le projecteur.
El CD-ROM suministrado contiene instrucciones de operación en inglés, alemán, francés,
español, italiano, holandés, sueco, portugués, chino, coreano y árabe. Lea cuidadosamente
las instrucciones de operación antes de utilizar el proyector.
Il CD-ROM in dotazione contiene istruzioni per l’uso in inglese, tedesco, francese, spagnolo,
italiano, olandese, svedese, portoghese, cinese, coreano e arabo. Leggere attentamente le
istruzioni per l’uso prima di usare il proiettore.
De meegeleverde CD-ROM bevat handleidingen in het Engels, Duits, Frans, Spaans,
Italiaans, Nederlands, Zweeds, Portugees, Chinees, Koreaans en Arabisch. Lees de
handleiding zorgvuldig door voor u de projector in gebruik neemt.
Den medföljande CD-ROM-skivan innehåller bruksanvisningar på engelska, tyska, franska,
spanska, italienska, holländska, svenska, portugisiska, kinesiska, koreanska och arabiska.
Läs noga igenom bruksanvisningen innan projektorn tas i bruk.
O CD-ROM fornecido contém instruções de operação em Inglês, Alemão, Francês,
Espanhol, Italiano, Holandês, Sueco, Português, Chinês, Coreano e Árabe. Leia
cuidadosamente todas as instruções de operação antes de operar o projetor.
iv
Introduction
Introduction
Before using the projector, please read this operation manual carefully.
ENGLISH
There are two important reasons for prompt warranty registration of your new
SHARP Projector, using the REGISTRATION CARD packed with the projector.
1. WARRANTY
This is to assure that you immediately receive the full benefit of the parts,
service and labor warranty applicable to your purchase.
2. CONSUMER PRODUCT SAFETY ACT
To ensure that you will promptly receive any safety notification of inspection,
modification, or recall that SHARP may be required to give under the 1972
Consumer Product Safety Act, PLEASE READ CAREFULLY THE IMPORTANT
“LIMITED WARRANTY” CLAUSE.
U.S.A. ONLY
WARNING:
High brightness light source. Do not stare into the beam of light, or view
directly. Be especially careful that children do not stare directly into the
beam of light.
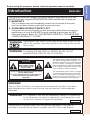
WARNING: To reduce the risk of fire or electric shock, do not
expose this product to rain or moisture.
See bottom of projector.
CAUTION
RISK OF ELECTRIC SHOCK.
DO NOT REMOVE SCREWS
EXCEPT SPECIFIED USER
SERVICE SCREW.
CAUTION: TO REDUCE THE RISK OF ELECTRIC SHOCK,
DO NOT REMOVE COVER.
NO USER-SERVICEABLE PARTS EXCEPT LAMP UNIT.
REFER SERVICING TO QUALIFIED SERVICE
PERSONNEL.
The lightning flash with arrowhead symbol, within an equilateral triangle, is intended to alert the user to the presence
of uninsulated “dangerous voltage”
within the product's enclosure that may
be of sufficient magnitude to constitute
a risk or electric shock to persons.
The exclamation point within a triangle
is intended to alert the user to the presence of important operating and maintenance (servicing) instructions in the
literature accompanying the product.
WARNING:
This is a Class A product. In a domestic environment this product may cause
radio interference in which case the user may be required to take adequate
measures.
WARNING:
FCC Regulations state that any unauthorized changes or modifications
to this equipment not expressly approved by the manufacturer could
void the user's authority to operate this equipment.
U.S.A. ONLY
The enclosed computer cable must be used with the device. The cable is
provided to ensure that the device complies with FCC Class A verification.
U.S.A. ONLY
1
INFORMATION
This equipment has been tested and found to comply with the limits for a Class A
digital device, pursuant to Part 15 of the FCC Rules. These limits are designed to
provide reasonable protection against harmful interference when the equipment is
operated in a commercial environment. This equipment generates, uses, and can
radiate radio frequency energy and, if not installed and used in accordance with
the operation manual, may cause harmful interference to radio communications.
Operation of this equipment in a residential area is likely to cause harmful
interference, in which case the user will be required to correct the interference at
his own expense.
U.S.A. ONLY
PRODUCT DISPOSAL
This product utilizes lamp containing a small amount of mercury.
Disposal of these materials may be regulated due to environmental
considerations. For disposal or recycling information, please contact
your local authorities, the Electronics Industries Alliance: www.eiae.org,
the lamp recycling organization www.lamprecycle.org, or Sharp at
1-800-BE-SHARP.
U.S.A. ONLY
Caution Concerning Lamp Replacement
■ This projector utilizes a pressurized mercury lamp. A loud sound may indicate lamp failure. Lamp
failure can be attributed to numerous sources such as: excessive shock, improper cooling, surface
scratches or deterioration of the lamp due to a lapse of usage time.
The period of time up to failure largely varies depending on the individual lamp and/or the condition
and the frequency of use. It is important to note that failure can often result in the bulb cracking.
■ When the lamp replacement indicator and on-screen display icon are illuminated, it is recommended
that the lamp be replaced with a new one immediately, even if the lamp appears to be operating
normally.
■ Should the lamp break, there is also a possibility that glass particles may spread inside of the
projector. In such a case, it is recommended you contact your nearest Sharp Authorized Projector
Dealer or Service Center to assure safe operation.
■ Should the lamp break, the glass particles may spread inside the lamp cage or gas contained in the
lamp may be vented into the room from the exhaust vent. Because the gas in this lamp includes
mercury, ventilate the room well if the lamp breaks and avoid all exposure to the released gas. In
case of exposure to the gas, consult a doctor as soon as possible.
Caution
• Do not remove the lamp unit from the projector right after use. The lamp will be very hot and may
cause burns or injury.
• Wait at least one hour after the power cord is disconnected to allow the surface of the lamp unit to
fully cool before removing the lamp unit.
• Do not touch the glass surface of the lamp unit or the inside of the projector.
• Do not loosen other screws except for the lamp unit cover and lamp unit.
• Make sure to reset the lamp timer only when replacing the lamp. If you reset the lamp timer and
continue to use the same lamp, this may cause the lamp to become damaged or explode.
■ Carefully change the lamp by following the instructions described on pages 72 to 74.
* If you wish, you may have the lamp replaced at your nearest Sharp Authorized Projector
Dealer or Service Center.
* If the new lamp does not light after replacement, take your projector to the nearest Sharp Authorized
Projector Dealer or Service Center for repair.
2
Introduction
How to Read this Operation Manual
■ The specifications are slightly different, depending on the model. However, you can connect
and operate all models in the same manner.
• In this operation manual, the illustration and the screen display are simplified for explanation, and
may differ slightly from the actual display.
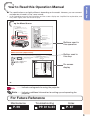
Using the Menu Screen
RETURN button
• Press RETURN to return to the
previous screen when the menu is
displayed.
ENTER button
Adjustment buttons
(P/R/O/Q)
MENU button
MENU button
ENTER button
Adjustment buttons
(P/R/O/Q)
RETURN button
• Press RETURN to return
to the previous screen
when the menu is
displayed.
Buttons used in
this operation
Menu Selections (Adjustments)
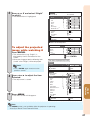
Example: Adjusting “Bright”.
• This operation can also be performed by using the buttons on the projector.
1
Press MENU.
• The “Picture” menu screen for the selected
input mode is displayed.
Example: “Picture” screen menu
Menu item
Picture
2
Press Q or O and select
“Picture” to adjust.
Audio
Picture Mode
Contrast
Bright
Color
Tint
Sharp
Red
Blue
CLR Temp
BrilliantColor TM
C.M.S.1
C.M.S.2
DNR
Eco+Quiet
Reset
SIG
SCR
PRJ
Button used in
this step
Net.
Standard
0
0
0
0
0
0
0
0
1
On-screen
display
Off
Off
Level 2
Off
SEL./ADJ.
RETURN
ENTER
END
46
Info .........Indicates safeguards for using the projector.
Note ....... Indicates additional information for setting up and operating the
projector.
For Future Reference
Maintenance
P. 69
Troubleshooting
PP. 81 to 83
Index
P. 87
3
Contents
Preparing
Introduction
How to Read this Operation Manual ......3
Contents .................................................4
IMPORTANT SAFEGUARDS ..................6
How to Access the PDF Operation
Manuals..............................................10
Accessories ..........................................11
Part Names and Functions ...................12
Side View ............................................... 12
Top View ................................................ 12
Front View .............................................. 12
Rear View (Terminals) .............................. 13
Inserting the Batteries ............................. 15
Usable Range ......................................... 15
Easy Start
Easy Start .............................................16
Setup and Projection .............................. 16
Setup
Setting Up the Projector .......................18
Video Setup............................................ 18
Setting Up the Projector ......................... 18
Standard Setup (Front Projection) ........... 18
Screen Size and Projection Distance ...... 19
Projection (PRJ) Mode ............................ 21
Ceiling-Mount Setup ............................... 21
Connections
Connecting the Projector to
Other Equipment ................................22
Controlling the Projector by
a Computer ........................................25
Connecting the Power Cord .................26
Using
Basic Operation
Displaying the Black Screen and
Turning Off the Sound Temporarily ....... 35
Resize Mode .......................................... 36
Useful Features
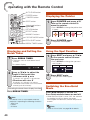
Operating with the Remote Control......40
Displaying and Setting the
Break Timer ......................................... 40
Displaying the Pointer ............................. 40
Using the Spot Function ......................... 40
Switching the Eco+Quiet Mode .............. 40
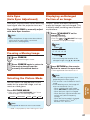
Auto Sync (Auto Sync Adjustment) ......... 41
Freezing a Moving Image ........................ 41
Selecting the Picture Mode ..................... 41
Displaying an Enlarged Portion of
an Image ............................................. 41
Using the Remote Control as the
Wireless Computer Mouse ................... 42
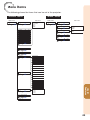
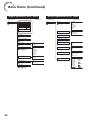
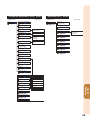
Menu Items...........................................43
Using the Menu Screen ........................46
Menu Selections (Adjustments) ............... 46
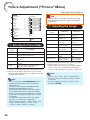
Picture Adjustment (“Picture” Menu) ....48
Selecting the Picture Mode ..................... 48
Adjusting the Image ................................ 48
Adjusting the Color Temperature............. 49
Adjusting the Colors ............................... 49
Reducing Image Noise (DNR) ................. 50
Eco+Quiet .............................................. 50
Audio Adjustment (“Audio” Menu)........51
Speaker Setting ...................................... 51
Audio Input ............................................. 51
Audio Output Type Setting ...................... 51
Adjusting the Audio ................................ 51
Signal Adjustment (“SIG” Menu) ..........52
Adjusting the Computer Image ............... 52
Resolution Setting .................................. 52
Auto Sync Adjustment ............................ 52
Signal Type Setting ................................. 52
Setting the Video System ....................... 53
Setting the Video Setup .......................... 53
Selecting the Dynamic Range ................. 53
Checking the Input Signal ....................... 53
Turning the Projector On/Off ................27
Screen Adjustment (“SCR” Menu)........54
Turning the Projector On ......................... 27
Turning the Power Off (Putting the
Projector into Standby Mode) .............. 27
Setting the Resize Mode......................... 54
Selecting the Wall Color .......................... 54
Setting the Overscan .............................. 54
Setting the On-screen Display ................ 54
Closed Caption ...................................... 55
Selecting a Startup and Background
Image .................................................. 55
Reversing/Inverting Projected Images ..... 55
Selecting the On-screen Display Language ... 55
Image Projection ..................................28
Shifting the Lens ..................................... 28
Using the Adjustment Feet...................... 29
Adjusting the Focus ................................ 30
Adjusting the Projected Image Size......... 30
Correcting Trapezoidal Distortion ............ 31
Switching the Input Mode ....................... 34
Adjusting the Volume .............................. 35
Helpful Functions Set during
Installation (“PRJ” menu) ...................56
Auto Power Off Function ........................ 56
4
Introduction
Auto Restart Function ............................. 56
COMPUTER2 Select .............................. 56
STANDBY Mode ..................................... 56
Selecting the Transmission Speed
(RS-232C) ........................................... 56
Fan Mode Setting ................................... 57
System Lock Function ............................ 57
Keylock Function .................................... 58
DLP® LinkTM ............................................ 58
DLP® LinkTM Invert .................................. 58
Memory Menu ........................................ 59
Rotate Indicator ...................................... 59
Returning to the Default Settings ............ 60
Checking the Lamp Life Status ............... 60
Setting Up the Projector Network
Environment (“Net.” Menu) ................61
Setting a Password ................................ 61
DHCP Client Setting ............................... 62
TCP/IP Setting........................................ 62
Returning to Default Settings (Network) .. 62
Restart Network Function ....................... 62
Confirming the Projector Information....... 63
Viewing Stereoscopic 3D Images.........64
Precautions on Viewing Stereoscopic
3D Images ........................................... 64
Information on the 3D Projection
Function .............................................. 66
Using 3D Viewing Mode ......................... 67
Appendix ................................................ 68
Reference
Appendix
Maintenance .........................................69
Maintenance Indicators ........................70
Regarding the Lamp .............................72
Lamp...................................................... 72
Caution Concerning the Lamp ................ 72
Replacing the Lamp ............................... 72
Removing and Installing the
Lamp Unit ............................................ 73
Resetting the Lamp Timer ...................... 74
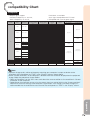
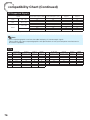
Compatibility Chart ..............................75
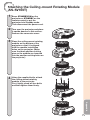
Attaching the Ceiling-mount
Rotating Module (AN-SV100T) ...........77
Attaching the Terminal Cover to the
Module ...............................................78
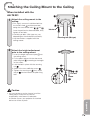
Attaching the Ceiling Mount to the
Ceiling ................................................79
Troubleshooting ....................................81
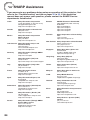
For SHARP Assistance .........................84
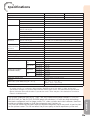
Specifications .......................................85
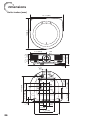
Dimensions ...........................................86
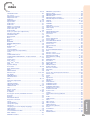
Index .....................................................87
5
IMPORTANT SAFEGUARDS
CAUTION: Please read all of these instructions before you operate this
product and save these instructions for later use.
Electrical energy can perform many useful functions. This product has been engineered
and manufactured to assure your personal safety. BUT IMPROPER USE CAN RESULT IN
POTENTIAL ELECTRICAL SHOCK OR FIRE HAZARDS. In order not to defeat the
safeguards incorporated in this product, observe the following basic rules for its
installation, use and servicing.
1. Read Instructions
All the safety and operating instructions
should be read before the product is
operated.
2. Retain Instructions
The safety and operating instructions
should be retained for future reference.
3. Heed Warnings
All warnings on the product and in the
operating instructions should be adhered to.
4. Follow Instructions
All operating and use instructions should
be followed.
5. Cleaning
Unplug this product from the wall outlet before
cleaning. Do not use liquid cleaners or aerosol
cleaners. Use a damp cloth for cleaning.
6. Attachments
Do not use attachments not recommended by the
product manufacturer as they may cause hazards.
7. Water and Moisture
Do not use this product near water–for
example, near a bath tub, wash bowl, kitchen
sink, or laundry tub; in a wet basement; or
near a swimming pool; and the like.
8. Accessories
Do not place this product on an unstable
cart, stand, tripod, bracket, or table. The
product may fall, causing serious injury to a
child or adult, and serious damage to the
product. Use only with a cart, stand, tripod,
bracket, or table recommended by the
manufacturer, or sold with the product. Any
mounting of the product should follow the
manufacturer's instructions, and should use a
mounting accessory recommended by the
manufacturer.
9. Transportation
A product and cart
combination should be
moved with care. Quick
stops, excessive force, and
uneven surfaces may
cause the product and cart
combination to overturn.
6
10. Ventilation
Slots and openings in the cabinet are provided
for ventilation to ensure reliable operation of
the product and to protect it from overheating,
and these openings must not be blocked or
covered. The openings should never be
blocked by placing the product on a bed, sofa,
rug, or other similar surface. This product
should not be placed in a built-in installation
such as a bookcase or rack unless proper
ventilation is provided or the manufacturer's
instructions have been adhered to.
11. Power Sources
This product should be operated only from
the type of power source indicated on the
marking label. If you are not sure of the
type of power supply to your home, consult
your product dealer or local power
company. For products intended to operate
from battery power, or other sources, refer
to the operating instructions.
12. Grounding or Polarization
This product is provided with one of the
following types of plugs. If the plug should
fail to fit into the power outlet, please contact
your electrician.
Do not defeat the safety purpose of the plug.
a. Two-wire type (mains) plug.
b. Three-wire grounding type (mains) plug
with a grounding terminal.
This plug will only fit into a grounding
type power outlet.
13. Power-Cord Protection
Power-supply cords should be routed so
that they are not likely to be walked on or
pinched by items placed upon or against
them, paying particular attention to cords
at plugs, convenience receptacles, and the
point where they exit from the product.
14. Lightning
For added protection for this product during
a lightning storm, or when it is left
unattended and unused for long periods of
time, unplug it from the wall outlet and
disconnect the cable system. This will
prevent damage to the product due to
lightning and power-line surges.
Do not overload wall outlets, extension cords,
or integral convenience receptacles as this
can result in a risk of fire or electric shock.
16. Object and Liquid Entry
Never push objects of any kind into this
product through openings as they may touch
dangerous voltage points or short-out parts
that could result in a fire or electric shock.
Never spill liquid of any kind on the product.
17. Servicing
Do not attempt to service this product
yourself as opening or removing covers
may expose you to dangerous voltage or
other hazards. Refer all servicing to
qualified service personnel.
18. Damage Requiring Service
Unplug this product from the wall outlet
and refer servicing to qualified service
personnel under the following conditions:
a. When the power-supply cord or plug is
damaged.
b. If liquid has been spilled, or objects
have fallen into the product.
c. If the product has been exposed to rain
or water.
d. If the product does not operate normally
by following the operating instructions.
Adjust only those controls that are
covered by the operating instructions,
as an improper adjustment of other
controls may result in damage and will
often require extensive work by a
qualified technician to restore the
product to normal operation.
e. If the product has been dropped or
damaged in any way.
f. When the product exhibits a distinct
change in performance, this indicates a
need for service.
Introduction
15. Overloading
19. Replacement Parts
When replacement parts are required, be
sure the service technician has used
replacement parts specified by the
manufacturer or have the same
characteristics as the original part.
Unauthorized substitutions may result in
fire, electric shock, or other hazards.
20. Safety Check
Upon completion of any service or repairs
to this product, ask the service technician
to per form safety checks to determine that
the product is in proper operating
condition.
21. Wall or Ceiling Mounting
This product should be mounted to a wall
or ceiling only as recommended by the
manufacturer.
22. Heat
This product should be situated away from
heat sources such as radiators, heat
registers, stoves, or other products
(including amplifiers) that produce heat.
• DLP® and the DLP logo are registered trademarks of Texas Instruments and
BrilliantColorTM and DLP® LinkTM are trademarks of Texas Instruments.
• Microsoft® and Windows® are registered trademarks of Microsoft Corporation in the
United States and/or other countries.
• PC/AT is a registered trademark of International Business Machines Corporation in the
United States.
• Adobe® Reader® is a trademark of Adobe Systems Incorporated.
• Macintosh® is a registered trademark of Apple Computer, Inc. in the United States and/or
other countries.
• HDMI, the HDMI logo and High-Definition Multimedia Interface are trademarks or
registered trademarks of HDMI Licensing LLC.
• PJLink is a registered trademark or an application trademark in Japan, the United States,
Canada, E.U., China and/or other countries/regions.
• All other company or product names are trademarks or registered trademarks of their
respective companies.
• Some IC chips in this product include confidential and/or trade secret property belonging
to Texas Instruments. Therefore you may not copy, modify, adapt, translate, distribute,
reverse engineer, reverse assemble or discompile the contents thereof.
7
Observe the following safeguards when setting up your
projector.
Caution concerning the lamp unit
■ Potential hazard of glass particles if lamp
ruptures. In case of lamp rupture, contact
your nearest Sharp Authorized Projector
Dealer or Service Center
for replacement.
See “Regarding the Lamp”
on page 72.
Caution concerning the setup of the
projector
■ For minimal servicing and to maintain high
image quality, SHARP recommends that
this projector be installed in an area free
from humidity, dust and cigarette smoke.
When the projector is subjected to these
environments, the vents and lens must be
cleaned more often. As long as the
projector is regularly cleaned, use in these
environments will not reduce the overall
operation life of the unit. Internal cleaning
should only be performed by a Sharp
Authorized Projector Dealer or Service
Center.
Rest your eyes occasionally.
■ Continuously watching the screen for long
hours will cause eye strain. Take regular
breaks to rest your eyes.
Do not set up the projector in places
exposed to direct sunlight or bright light.
■ Position the screen so that it is not in direct
sunlight or room light. Light falling directly
on the screen washes out the colors,
making viewing difficult. Close the curtains
and dim the lights when setting up the
screen in a sunny or bright room.
Caution regarding placing of the projector
■ Place the projector on a level site within the
adjustment range (9 degrees) of the
adjustment foot.
■ After the projector is purchased, a faint
smell from the vent may appear when the
power is first turned on. This is normal and
is not a malfunction. It will disappear after
the projector is used for a while.
8
When using the projector in highaltitude areas such as mountains (at
altitudes of approximately 1,500
meters (4,900 feet) or more)
■ When you use the projector in high-altitude
areas with thin air, set “Fan Mode” to
“High”. Neglecting this can affect the
longevity of the optical system.
■ Use the projector at altitudes of 2,300
meters (7,500 feet) or less.
Warning about placing the projector in
a high position
■ When placing the projector in a high
position, make certain it is carefully secure
to avoid personal injury caused by the
projector falling down.
Do not subject the projector to hard
impact and/or vibration.
■ Protect the lens so as not to hit or damage
the surface of the lens.
Avoid locations with extremes of
temperature.
■ The operating temperature of the projector
is from 41°F to 95°F (+5°C to +35°C).
■ The storage temperature of the projector is
from –4°F to 140°F (–20°C to +60°C).
Do not block the exhaust and intake
vents.
■ Allow at least 11 13/16 inches (30 cm) of
space between the exhaust vent and the
nearest wall or obstruction.
■ Ensure that the intake vent and the exhaust
vent are not obstructed.
■ If the cooling fan becomes obstructed, a
protection circuit will automatically put the
projector into Standby mode to prevent
overheat damage. This does not indicate a
malfunction. (See pages 70 and 71.)
Remove the projector power cord from the
wall outlet and wait at least 10 minutes.
Place the projector where the intake and
exhaust vents are not blocked, plug the
power cord back in and turn on the
projector. This will return the projector to
the normal operating condition.
■ If you are not to use the projector for a long
time or before moving the projector, make
certain you unplug the power cord from the
wall outlet, and disconnect any other
cables connected to it.
■ Do not carry the projector by holding the
lens.
■ When storing the projector, ensure you
attach the lens cover to the projector.
■ Do not expose the projector to direct
sunlight or place next to heat sources.
Doing so may affect the cabinet color or
cause deformation of the plastic cover.
Other connected equipment
■ When connecting a computer or other
audio-visual equipment to the projector,
make the connections AFTER unplugging
the power cord of the projector from the
AC outlet and turning off the equipment to
be connected.
■ Please read the operation manuals of the
projector and the equipment to be
connected for instructions on how to make
the connections.
Using the projector in other countries
Introduction
Caution regarding usage of the projector
■ The power supply voltage and the shape of
the plug may vary depending on the region
or country you are using the projector in.
When using the projector overseas, make
sure you use an appropriate power cord for
the country you are in.
Temperature monitor function
■ If the temperature inside the projector
increases, due to blockage of the air vents,
or the setting location, the temperature
warning indicator will blink. And if the
temperature keeps on rising, “
” will
illuminate in the lower left corner of the
picture with the temperature warning
indicator blinking. If this state continues,
the lamp will turn off, the cooling fan will
run and then the projector will enter
Standby mode. Refer to “Maintenance
Indicators” on pages 70 and 71 for details.
Info
• The cooling fan regulates the internal
temperature, and its performance is automatically
controlled. The sound of the fan may change
during projector operation due to changes in the
fan speed. This does not indicate malfunction.
Closed Caption uses Bitstream Vera fonts
Copyright (c) 2003 by Bitstream, Inc. All Rights Reserved. Bitstream Vera is a trademark of Bitstream, Inc.
Permission is hereby granted, free of charge, to any person obtaining a copy of the fonts accompanying this
license (“Fonts”) and associated documentation files (the “Font Software”), to reproduce and distribute the
Font Software, including without limitation the rights to use, copy, merge, publish, distribute, and/or sell
copies of the Font Software, and to permit persons to whom the Font Software is furnished to do so, subject
to the following conditions:
The above copyright and trademark notices and this permission notice shall be included in all copies of one
or more of the Font Software typefaces.
The Font Software may be modified, altered, or added to, and in particular the designs of glyphs or
characters in the Fonts may be modified and additional glyphs or characters may be added to the Fonts,
only if the fonts are renamed to names not containing either the words “Bitstream” or the word “Vera”.
This License becomes null and void to the extent applicable to Fonts or Font Software that has been
modified and is distributed under the “Bitstream Vera” names.
The Font Software may be sold as part of a larger software package but no copy of one or more of the Font
Software typefaces may be sold by itself.
THE FONT SOFTWARE IS PROVIDED “AS IS”, WITHOUT WARRANTY OF ANY KIND, EXPRESS OR
IMPLIED, INCLUDING BUT NOT LIMITED TO ANY WARRANTIES OF MERCHANTABILITY, FITNESS FOR A
PARTICULAR PURPOSE AND NONINFRINGEMENT OF COPYRIGHT, PATENT, TRADEMARK, OR OTHER
RIGHT. IN NO EVENT SHALL BITSTREAM OR THE GNOME FOUNDATION BE LIABLE FOR ANY CLAIM,
DAMAGES OR OTHER LIABILITY, INCLUDING ANY GENERAL, SPECIAL, INDIRECT, INCIDENTAL, OR
CONSEQUENTIAL DAMAGES, WHETHER IN AN ACTION OF CONTRACT, TORT OR OTHERWISE, ARISING
FROM, OUT OF THE USE OR INABILITY TO USE THE FONT SOFTWARE OR FROM OTHER DEALINGS IN
THE FONT SOFTWARE.
Except as contained in this notice, the names of Gnome, the Gnome Foundation, and Bitstream Inc., shall
not be used in advertising or otherwise to promote the sale, use or other dealings in this Font Software
without prior written authorization from the Gnome Foundation or Bitstream Inc., respectively. For further
information, contact: fonts at gnome dot org.
9
How to Access the PDF Operation Manuals
PDF operation manuals in several languages are included in the CD-ROM. To
utilize these manuals, you need to install Adobe® Reader ® on your computer
(Windows® or Macintosh®).
Please download Adobe® Reader ® from the Internet (http://www.adobe.com).
Accessing the PDF Manuals
For Windows®:
Insert the CD-ROM in the CD-ROM drive.
Double click the “My Computer” icon.
Double click the “CD-ROM” drive.
When you want to view the operation
manual
1) Double click the “MANUALS” folder.
2) Double click the language (name of the
folder) that you want to view.
3) Double click the pdf file to access the
projector manuals.
When you want to view the SETUP
MANUAL
1) Double click the “SETUP” folder.
2) Double click the language (name of the
folder) that you want to view.
3) Double click the pdf file to access the
SETUP MANUAL.
For Macintosh®:
Insert the CD-ROM in the CD-ROM drive.
Double click the “CD-ROM” icon.
When you want to view the operation
manual
1) Double click the “MANUALS” folder.
2) Double click the language (name of the
folder) that you want to view.
3) Double click the pdf file to access the
projector manuals.
When you want to view the SETUP
MANUAL
1) Double click the “SETUP” folder.
2) Double click the language (name of the
folder) that you want to view.
3) Double click the pdf file to access the
SETUP MANUAL.
Note
• If the desired pdf file cannot be opened by double clicking the mouse, start Adobe® Reader ® first,
then specify the desired file using the “File”, “Open” menu.
SETUP MANUAL
Refer to the “SETUP MANUAL” contained on the supplied CD-ROM for details.
Connecting Pin Assignments ······················································· 2
RS-232C Specifications and Commands ····································· 4
Operating the Projector Using the PJLinkTM Protocol·················· 10
Setting up the Projector Network Environment ·························· 11
Controlling the Projector via LAN ··············································· 17
Resetting the Lamp Timer of the Projector via LAN···················· 22
Troubleshooting·········································································· 24
10
Introduction
Accessories
Supplied accessories
Two R-6 batteries
(“AA” size, UM/SUM-3,
HP-7 or similar)
RGB cable
(10' (3.0 m))
<QCNWGA161WJPZ>
Remote control
<RRMCGA960WJSA>
Terminal cover
<CCOVAE119WEF0>
Power cord*
(1)
(2)
For Europe,
For U.S. and
except U.K.
Canada, etc.
(6' (1.8 m))
(6' (1.8 m))
<QACCDA082WJPZ> <QACCVA024WJPZ>
(3)
(4)
For U.K. and
Singapore
(6' (1.8 m))
<QACCBA104WJPZ>
For Australia, New
Zealand and Oceania
(6' (1.8 m))
<QACCLA055WJPZ>
* Which power cords are supplied along with your projector depends on the region. Use the power
cord that corresponds to the wall outlet in your country.
• Operation manuals (this manual <TINS-F099WJZZ> and CD-ROM <UDSKAA132WJZZ>)
Note
• Codes in “< >” are Replacement parts codes.
Optional accessories
■ Lamp unit
■ Ceiling-mount rotating module
■ Ceiling-mount adaptor
■ Ceiling-mount bracket
■ Ceiling-mount unit
■ Ceiling-mount extension tube
AN-SV10LP
AN-SV100T
AN-60KT
AN-XGCM55 (for U.S.A. only)
AN-TK201 <for AN-60KT>
AN-TK202 <for AN-60KT>
AN-EP101B <for AN-XGCM55>
(for U.S.A. only)
Note
• Some of the optional accessories may not be available depending on the region. Please check with
your nearest Sharp Authorized Projector Dealer or Service Center.
11
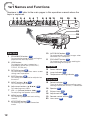
Part Names and Functions
Numbers in Z refer to the main pages in this operation manual where the
topic is explained.
1
2
3
4
5
6
7
8
9 10 11
12
13
14
19
15
16
17 18 19
Side View
10
AUTO SYNC button 41
For automatically adjusting images when
connected to a computer.
11
ECO+QUIET button 40
For lowering the noise of the cooling fan
and extending the lamp life.
1 STANDBY/ON button 27
For turning the power on and putting the
projector into Standby mode.
2 LENS button
For toggling the menu screens for
adjustments of the lens (LENS SHIFT,
FOCUS, ZOOM, etc.).
3 RETURN button 46
For returning to the previous menu screen
during menu operations.
4 ENTER button 46
For setting items selected or adjusted on
the menu.
5 INPUT buttons (R/P) 34
For switching Input mode.
Top View
12
13
14
For selecting menu items.
For adjusting the speaker sound level.
8 MENU button 46
For displaying adjustment and setting
screens.
9 KEYSTONE button 31
For entering the Keystone Correction
mode.
12
Power indicator 70
Lamp indicator 70
Temperature warning indicator 70
Front View
15
Rotate indicator 59
Turns on or blinks when the ceiling-mount
rotating module (AN-SV100T) is connected.
16
17
18
19
20
Speaker 51
6 Adjustment buttons (P/R/O/Q) 46
7 VOL –/+ (Volume) buttons (O/Q) 35
20
Exhaust vent 69
Adjustment foot 29
Remote control sensor 15
Lens cover 69
2
10
3
4
5
6
7
8
Introduction
1
9
11
12
13 14 15
16
17
Rear View (Terminals)
1 LAN terminal 26
Terminal for controlling the projector using a
computer via network.
2 USB terminal 42
Terminal connecting with the USB terminal
on the computer for using the supplied
remote control as the computer mouse.
3 S-VIDEO input terminal 23
Terminal for connecting video equipment
with an S-video terminal.
4 AUDIO 2 input terminal 24
5 AUDIO 1 input terminal 24
6 COMPUTER/COMPONENT 1 input
terminal 22, 23
Terminal for computer RGB and component
signals.
7 AUDIO OUT terminal 24
9 HDMI terminal 22, 23
Terminal for HDMI input.
10 RS-232C terminal 25
Terminal for controlling the projector using
a computer.
11 VIDEO input terminal 23
Terminal for connecting video equipment.
12
13
14
15
Exhaust vent 69
Rear adjustment foot 29
Intake vent 69
Kensington Security Standard
connector
16 Remote control sensor 15
17 AC socket 26
Connect the supplied power cord.
Audio output terminal of equipment
connected to the audio input terminal.
8 MONITOR OUT* terminal 24
(Output terminal for computer RGB and
component signals)
Terminal for connecting a monitor.
COMPUTER/COMPONENT 2* input
terminal 22, 23
Terminal for computer RGB and component
signals.
Using the Kensington Lock
• This projector has a Kensington Security
Standard connector for use with a
Kensington MicroSaver Security System.
Refer to the information that came with the
system for instructions on how to use it to
secure the projector.
* You must switch the setting depending on
whether you are using the terminal for MONITOR
OUT or COMPUTER/COMPONENT 2 input.
13
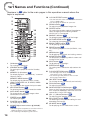
Part Names and Functions (Continued)
Numbers in Z refer to the main pages in this operation manual where the
topic is explained.
1
10 L-CLICK/EFFECT button 42, 40
2
3
11 ZOOM buttons 30
• For the Left click when with the USB connection
(using a USB cable).
• For changing the pointer or spot area.
For adjusting the projected image size.
4
5
6
7
8
9
10
11
12
13
14
15
1
2
3
12 ROTATE button
16
17
18
19
20
21
22
23
24
25
26
27
ON button 27
For turning the power on.
STANDBY button 27
For putting the projector into the Standby
mode.
MEMORY (1-8) buttons 59
For displaying each “Load Memory” screen of
“Memory Menu”.
4
MEMORY MENU button 59
For displaying the Memory Menu screen.
HDMI, COMPUTER 1/2, S-VIDEO, VIDEO
buttons 34
For switching to the respective input modes.
5
KEYSTONE button 31
For entering the Keystone Correction mode.
6
AUTO SYNC button 41
For automatically adjusting images when
connected to a computer.
7
FREEZE button 41
For freezing images.
8
POINTER button 40
For displaying the pointer.
9
MOUSE/Adjustment buttons (P/R/O/Q)
42, 46
• For moving the computer cursor when with the
USB connection (using a USB cable).
• For selecting and adjusting menu items.
14
13
14
15
16
17
18
19
20
For setting the rotation angle of the projector
when the ceiling-mount rotating module
(AN-SV100T) is connected.
MAGNIFY buttons 41
For enlarging/reducing part of the image.
PICTURE MODE button 41
For selecting the appropriate picture.
BREAK TIMER button 40
For displaying the break time.
RESIZE button 36
For switching the picture size (NORMAL, 16:9,
etc.).
MENU button 46
For displaying adjustment and setting screens.
AV MUTE button 35
For temporarily displaying a black screen and
turning off the sound.
SPOT button 40
For displaying the spotlight.
ENTER button 46
For setting items selected or adjusted on the
menu.
21 R-CLICK/RETURN button 42, 46
• For the Right click when with the USB
connection (using a USB cable).
• For returning to the previous menu screen
during menu operations.
22 H&V SHIFT button 29
For shifting the lens horizontally and vertically.
23 FOCUS buttons 30
For adjusting the focus.
24 PAGE UP/PAGE DOWN buttons 42
Same as the [Page Up] and [Page Down] keys
on a computer keyboard, when with the USB
connection (using a USB cable).
25 VOL +/– (Volume) buttons 35
For adjusting the speaker sound level.
26 ECO+QUIET button 40
For lowering the noise of the cooling fan and
extending the lamp life.
27 3D MODE button 67
For displaying the 3D mode menu screen.
Introduction
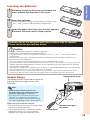
Inserting the Batteries
1
Pull down the tab on the cover and remove the
cover towards the direction of the arrow.
2
Insert the batteries.
3
Insert the upper tab of the cover into the opening,
and lower the cover until it clicks in place.
• Insert the batteries making sure the polarities correctly match
the m and n marks inside the battery compartment.
Incorrect use of the batteries may cause them to leak or explode.
Please follow the precautions below
Caution
• Danger of explosion if battery is incorrectly replaced.
Replace only with alkaline or manganese batteries.
• Insert the batteries making sure the polarities correctly match the m and n marks inside the battery
compartment.
• Batteries of different types have different properties, therefore do not mix batteries of different types.
• Do not mix new and old batteries.
This may shorten the life of new batteries or may cause old batteries to leak.
• Remove the batteries from the remote control once they have run out, as leaving them in can cause them to leak.
Battery fluid from leaked batteries is harmful to skin, therefore ensure you wipe them first and then
remove them using a cloth.
• The batteries included with this projector may run down in a short period, depending on how they are kept.
Be sure to replace them as soon as possible with new batteries.
• Remove the batteries from the remote control if you will not be using the remote control for a long time.
• Comply with the rules (ordinance) of each local government when disposing of worn-out batteries.
Remote control sensor
Usable Range
The remote control can be used to control the
projector within the ranges shown in the
illustration.
Note
• Other remote control sensors are
located on the rear and the top of the
projector. (See pages 12 and 13.)
• The signal from the remote control can be
reflected off a screen for easy operation.
However, the effective distance of the signal
may differ depending on the screen material.
30°
30°
When using the remote control
• Ensure that you do not drop it or expose it to
moisture or high temperature.
• The remote control may malfunction under a
fluorescent lamp. In this case, move the
projector away from the fluorescent lamp.
33 n (10 m)
Remote control signal
transmitters
Remote control
15
Easy Start
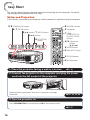
This section shows the basic operation (projector connecting with the computer). For details,
see the page described below for each step.
Setup and Projection
In this section, connection of the projector and the computer is explained using one example.
3, 8 STANDBY/ON button
6, 7 ENTER button
6 R/P buttons, 7 INPUT buttons
6 O/Q buttons
6 KEYSTONE
button
8 STANDBY button
3 ON button
7 HDMI,
COMPUTER 1/2,
S-VIDEO, VIDEO
buttons
4, 6 Adjustment
buttons
(P/R/O/Q)
ENTER button
6
3 H&V SHIFT button
5 FOCUS buttons
5 ZOOM buttons
1. Place the projector facing a wall or a screen
BP. 18
2. Connect the projector to the computer and plug the power
cord into the AC socket of the projector
When connecting equipment other than a computer, see pages
23 and 24.
BPP. 22, 25, 26
3. Turn the projector on
Press STANDBY/ON on the projector or ON on the remote control.
BP. 27
16
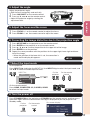
4. Adjust the angle
Adjust the projector angle:
• Shift the lens horizontally and vertically.
1 Press H&V SHIFT on the remote control.
2 Press P, R, O or Q on the remote control.
• Adjust the projector angle by rotating the
adjustment feet.
Easy Start
BP. 29
5. Adjust the focus and the zoom
1
2
Press FOCUS +/– on the remote control to adjust the focus.
Press ZOOM +/– on the remote control to adjust the zoom.
BP. 30
6. Correcting the image distortion due to the projection angle
1 Press KEYSTONE on the projector or on the remote control.
2 Press ENTER on the projector or on the remote control.
3 Press P, R, O or Q to move the position for the upper left of the image.
4 Press ENTER to set the position.
5 Repeat the same procedure with the positions for the upper right, lower right and lower
left of the image.
• When the position of the lower left is set, the correction is
made and the display disappears.
BP. 31
7. Select the Input mode
On the projector
Press INPUT R/P to display the INPUT list. Use INPUT R/P to select the Input mode, and
use O/Q to select the audio input terminal.
INPUT list
INPUT
Audio
On the
projector
On the remote
control
1 COMPUTER1
2 MONITOR OUT
H
HDMI
On the remote control
Press HDMI, COMPUTER 1/2, S-VIDEO, VIDEO
to select the Input mode.
BP. 34
8. Turn the power off
Press STANDBY/ON on the projector or STANDBY on the remote control, and then press
the button again while the confirmation message is displayed to put the projector into
Standby mode.
On-screen display
On the remote
On the
control
projector
BP. 27
17
Setting Up the Projector
Video Setup
If using this projector outside the U.S.A., please change setting to “0 IRE” in Video Setup. (See
page 53.)
Setting Up the Projector
For optimal image quality, position the projector perpendicular to the screen with the projector's
feet flat and level. Doing so will eliminate the need for Keystone correction and provide the best
image quality. (See pages 31 to 33.)
Standard Setup (Front Projection)
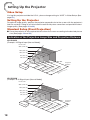
■ Place the projector at the required distance from the screen according to the desired picture
size. (See pages 19 and 20.)
Indication of the Projection Image Size and Projection Distance
XG-SV200X
(Example: 4:3 Signal Input (Normal Mode))
Picture Size
500" (1270 cm)
200" (508 cm)
100" (254 cm)
80" (203 cm)
60" (152cm)
400
"
(101 ×300"
6 cm
× 76
160
2 cm
"×
(406 120"
)
c
80"×
m×
305
6
(203 0"
c
m)
64"×
c
48" m × 152
cm)
(1
48"× 63 cm × 1
22 cm
3
)
(122 cm 6"
× 91 cm
)
5'
(1 11
.8 "m 11
7'
– '11
3. "
(2 11
6
.4 "m
m 15
)
– '10
9'
4. "
1
8
(3 1
m
.0 "m 19 )
'
– 10
19
6. "
0
(6 '1
m
.0 0"
)
m -3
– 9'8
12 "
49
.1
(1 '6
5. "m
1 99
)
m '2
– "
30
.2
m
)
Projection
Distance
XG-SV100W
(Example: 16:10 Signal Input (Normal Mode))
Picture Size
500" (1270 cm)
200" (508 cm)
100" (254 cm)
80" (203 cm)
Projection
Distance
6'
(1 5".9 12
m '1
– 0"
3.
8'
9
m
(2 6"
)
.6 -1
7
m '1
"
–
10
5.
(3 '8
2
.2 "m
2
)
m 1
– '4"
21
6.
5
(6 '4
m
.5 ")
m 42
'
– 8"
13
53
.0
(1 '3
m
6. "2 10
)
m 6
'
8
– "
32
.5
m
)
60" (152cm)
424
"
(107 ×265"
7 cm
× 67
170
3 cm
"×
(431 106"
)
cm
85"×
× 26
53"
9 cm
(215
)
68"×
cm ×
4
135
(17 2"
cm)
51"× 2 cm × 10
3
8 cm
(129 c 2"
)
m × 81
cm)
18
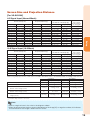
Screen Size and Projection Distance
[For XG-SV200X]
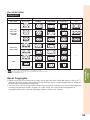
4:3 Signal Input (Normal Mode)
Picture (Screen) size
Diagonal [F]
(1270 cm)
(1016 cm)
(762 cm)
(635 cm)
(508 cm)
(381 cm)
(305 cm)
(254 cm)
(203 cm)
(178 cm)
(152 cm)
(102 cm)
Width
1016 cm
813 cm
610 cm
508 cm
406 cm
305 cm
244 cm
203 cm
163 cm
142 cm
122 cm
81 cm
(400")
(320")
(240")
(200")
(160")
(120")
(96")
(80")
(64")
(56")
(48")
(32")
Height
762 cm
610 cm
457 cm
381 cm
305 cm
229 cm
183 cm
152 cm
122 cm
107 cm
91 cm
61 cm
Minimum [L1] Maximum [L2]
(300") 15.1 m (49' 6")
(240") 12.1 m (39' 7")
(180") 9.1 m (29' 8")
(150") 7.5 m (24' 9")
(120") 6.0 m (19' 10")
(90")
4.5 m (14' 10")
(72")
3.6 m (11' 11")
(60")
3.0 m (9' 11")
(48")
2.4 m (7' 11")
(42")
2.1 m (6' 11")
(36")
1.8 m (5' 11")
(24")
1.2 m (4' 0")
30.2 m
24.2 m
18.1 m
15.1 m
12.1 m
9.1 m
7.3 m
6.0 m
4.8 m
4.2 m
3.6 m
2.4 m
(99' 2")
(79' 4")
(59' 6")
(49' 7")
(39' 8")
(29' 9")
(23' 10")
(19' 10")
(15' 10")
(13' 11")
(11' 11")
(7' 11")
Lower [H1]
-762 cm
-610 cm
-457 cm
-381 cm
-305 cm
-229 cm
-183 cm
-152 cm
-122 cm
-107 cm
-91 cm
-61 cm
(-300")
(-240")
(-180")
(-150")
(-120")
(-90")
(-72")
(-60")
(-48")
(-42")
(-36")
(-24")
Upper [H2]
0 cm
0 cm
0 cm
0 cm
0 cm
0 cm
0 cm
0 cm
0 cm
0 cm
0 cm
0 cm
(0")
(0")
(0")
(0")
(0")
(0")
(0")
(0")
(0")
(0")
(0")
(0")
Setup
500"
400"
300"
250"
200"
150"
120"
100"
80"
70"
60"
40"
Distance from the
lens center
to the center of
the image[W]
±254 cm (±100")
±203 cm (±80")
±152 cm (±60")
±127 cm (±50")
±102 cm (±40")
±76 cm (±30")
±61 cm (±24")
±51 cm (±20")
±41 cm (±16")
±36 cm (±14")
±30 cm (±12")
±20 cm (±8")
Distance from the lens center to
the bottom of the image [H]
Projection distance [L]
16:9 Signal Input (16:9 Mode)
Picture (Screen) size
Diagonal [F]
500"
400"
300"
250"
200"
150"
120"
100"
80"
60"
40"
(1270 cm)
(1016 cm)
(762 cm)
(635 cm)
(508 cm)
(381 cm)
(305 cm)
(254 cm)
(203 cm)
(152 cm)
(102 cm)
Width
1107 cm
886 cm
664 cm
553 cm
443 cm
332 cm
266 cm
221 cm
177 cm
133 cm
89 cm
(436")
(349")
(261")
(218")
(174")
(131")
(105")
(87")
(70")
(52")
(35")
Distance from the lens center to
the bottom of the image [H]
Projection distance [L]
Height
623 cm
498 cm
374 cm
311 cm
249 cm
187 cm
149 cm
125 cm
100 cm
75 cm
50 cm
Minimum [L1] Maximum [L2]
(245") 16.4 m (53' 11")
(196") 13.2 m (43' 2")
(147") 9.9 m (32' 4")
(123") 8.2 m (27' 0")
(98")
6.6 m (21' 7")
(74")
4.9 m (16' 2")
(59")
3.9 m (12' 11")
(49")
3.3 m (10' 9")
(39")
2.6 m (8' 8")
(29")
2.0 m (6' 6")
(20")
1.3 m (4' 4")
32.9 m
26.4 m
19.8 m
16.5 m
13.2 m
9.9 m
7.9 m
6.6 m
5.3 m
4.0 m
2.6 m
(108' 1")
(86' 5")
(64' 10")
(54' 0")
(43' 3")
(32' 5")
(25' 11")
(21' 7")
(17' 3")
(13' 0")
(8' 8")
Lower [H1]
-726 cm
-581 cm
-436 cm
-363 cm
-291 cm
-218 cm
-174 cm
-145 cm
-116 cm
-87 cm
-58 cm
(-285 62/63")
(-228 25/32")
(-171 19/32")
(-143")
(-114 25/64")
(-85 51/64")
(-68 41/64")
(-57 13/64")
(-45 3/4")
(-34 5/16")
(-22 7/8")
Upper [H2]
104 cm
83 cm
62 cm
52 cm
42 cm
31 cm
25 cm
21 cm
17 cm
12 cm
8 cm
(40 6/7")
(32 11/16")
(24 33/64")
(20 27/64")
(16 11/32")
(12 1/4")
(9 13/16")
(8 11/64")
(6 17/32")
(4 29/32")
(3 17/64")
Distance from the
lens center
to the center of
the image[W]
±277 cm (±108 20/21")
±221 cm (±87 5/32")
±166 cm (±65 3/8")
±138 cm (±54 15/32")
±111 cm (±43 37/64")
±83 cm (±32 11/16")
±66 cm (±26 9/64")
±55 cm (±21 51/64")
±44 cm (±17 7/16")
±33 cm (±13 5/64")
±22 cm (±8 23/32")
When using the projector with screen sizes not listed in the above charts, calculate the values according to the formulas.
[m/cm]
4:3 Signal
[Feet/inches]
[m/cm]
16:9 Signal
[Feet/inches]
0.03018F
0.06047F
0.03018F / 0.3048
0.06047F / 0.3048
0.03288F
0.06588F
0.03288F / 0.3048
0.06588F / 0.3048
H1: Lower distance from the lens center to the
bottom of the image (cm/in)
-1.524F
-1.524F / 2.54
-1.45281F
-1.45281F / 2.54
H2: Upper distance from the lens center to the
bottom of the image (cm/in)
0F
0F / 2.54
0.20754F
0.20754F / 2.54
±0.508F
±0.508F / 2.54
±0.55345F
±0.55345F / 2.54
L1: Minimum projection distance (m/ft)
L2: Maximum projection distance (m/ft)
W: Distance from the lens center to the center of the
image (cm/in)
F : Picture diagonal size : 40"-500"
Note
• Allow a margin of error in the value in the diagrams above.
• When the distance from the lens center to the bottom of the image [H] is a negative number, this indicates
that the bottom of the image is below the lens center.
19
Setting Up the Projector (Continued)
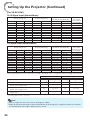
[For XG-SV100W]
16:10 Signal Input (Normal Mode)
Picture (Screen) size
Diagonal [F]
500"
400"
300"
250"
200"
150"
120"
100"
80"
60"
40"
(1270 cm)
(1016 cm)
(762 cm)
(635 cm)
(508 cm)
(381 cm)
(305 cm)
(254 cm)
(203 cm)
(152 cm)
(102 cm)
Width
1077 cm
862 cm
646 cm
538 cm
431 cm
323 cm
258 cm
215 cm
172 cm
129 cm
86 cm
(424")
(339")
(254")
(212")
(170")
(127")
(102")
(85")
(68")
(51")
(34")
Distance from the lens center to
the bottom of the image [H]
Projection distance [L]
Height
673 cm
538 cm
404 cm
337 cm
269 cm
202 cm
162 cm
135 cm
108 cm
81 cm
54 cm
Minimum [L1] Maximum [L2]
(265") 16.2 m (53' 3")
(212") 13.0 m (42' 7")
(159") 9.7 m (32' 0")
(132") 8.1 m (26' 8")
(106") 6.5 m (21' 4")
(79")
4.9 m (16' 0")
(64")
3.9 m (12' 9")
(53")
3.2 m (10' 8")
(42")
2.6 m (8' 6")
(32")
1.9 m (6' 5")
(21")
1.3 m (4' 3")
32.5 m
26.0 m
19.5 m
16.3 m
13.0 m
9.8 m
7.8 m
6.5 m
5.2 m
3.9 m
2.6 m
(106' 8")
(85' 4")
(64' 0")
(53' 4")
(42' 8")
(32' 0")
(25' 7")
(21' 4")
(17' 1")
(12' 10")
(8' 6")
Lower [H1]
-673 cm
-538 cm
-404 cm
-337 cm
-269 cm
-202 cm
-162 cm
-135 cm
-108 cm
-81 cm
-54 cm
(-265")
(-212")
(-159")
(-132 1/2")
(-106")
(-79 1/2")
(-63 19/32")
(-53")
(-42 13/32")
(-31 51/64")
(-21 13/64")
Upper [H2]
0 cm
0 cm
0 cm
0 cm
0 cm
0 cm
0 cm
0 cm
0 cm
0 cm
0 cm
(0")
(0")
(0")
(0")
(0")
(0")
(0")
(0")
(0")
(0")
(0")
Distance from the
lens center
to the center of
the image[W]
±255 cm (±100 7/16")
±204 cm (±80 23/64")
±153 cm (±60 17/64")
±128 cm (±50 7/32")
±102 cm (±40 11/64")
±77 cm (±30 9/64")
±61 cm (±24 7/64")
±51 cm (±20 3/32")
±41 cm (±16 5/64")
±31 cm (±12 3/64")
±20 cm (±8 1/32")
4:3 Signal Input (Normal Mode)
Picture (Screen) size
Diagonal [F]
500"
400"
300"
250"
200"
150"
120"
100"
80"
70"
60"
40"
(1270 cm)
(1016 cm)
(762 cm)
(635 cm)
(508 cm)
(381 cm)
(305 cm)
(254 cm)
(203 cm)
(178 cm)
(152 cm)
(102 cm)
Width
1016 cm
813 cm
610 cm
508 cm
406 cm
305 cm
244 cm
203 cm
163 cm
142 cm
122 cm
81 cm
(400")
(320")
(240")
(200")
(160")
(120")
(96")
(80")
(64")
(56")
(48")
(32")
Distance from the lens center to
the bottom of the image [H]
Projection distance [L]
Height
762 cm
610 cm
457 cm
381 cm
305 cm
229 cm
183 cm
152 cm
122 cm
107 cm
91 cm
61 cm
Minimum [L1] Maximum [L2]
(300") 18.4 m (60' 4")
(240") 14.7 m (48' 3")
(180") 11.0 m (36' 2")
(150") 9.2 m (30' 2")
(120") 7.4 m (24' 1")
(90")
5.5 m (18' 1")
(72")
4.4 m (14' 6")
(60")
3.7 m (12' 1")
(48")
2.9 m (9' 8")
(42")
2.6 m (8' 5")
(36")
2.2 m (7' 3")
(24")
1.5 m (4' 10")
36.8 m
29.5 m
22.1 m
18.4 m
14.7 m
11.0 m
8.8 m
7.4 m
5.9 m
5.2 m
4.4 m
2.9 m
(120' 9")
(96' 8")
(72' 6")
(60' 5")
(48' 4")
(36' 3")
(29' 0")
(24' 2")
(19' 4")
(16' 11")
(14' 6")
(9' 8")
Lower [H1]
-762 cm
-610 cm
-457 cm
-381 cm
-305 cm
-229 cm
-183 cm
-152 cm
-122 cm
-107 cm
-91 cm
-61 cm
(-300")
(-240")
(-180")
(-150")
(-120")
(-90")
(-72")
(-60")
(-48")
(-42")
(-36")
(-24")
Upper [H2]
0 cm
0 cm
0 cm
0 cm
0 cm
0 cm
0 cm
0 cm
0 cm
0 cm
0 cm
0 cm
(0")
(0")
(0")
(0")
(0")
(0")
(0")
(0")
(0")
(0")
(0")
(0")
Distance from the
lens center
to the center of
the image[W]
±289 cm (±113 5/7")
±231 cm (±90 31/32")
±173 cm (±68 7/32")
±144 cm (±56 55/64")
±116 cm (±45 31/64")
±87 cm (±34 7/64")
±69 cm (±27 19/64")
±58 cm (±22 47/64")
±46 cm (±18 3/16")
±40 cm (±15 59/64")
±35 cm (±13 41/64")
±23 cm (±9 3/32")
When using the projector with screen sizes not listed in the above charts, calculate the values according to the formulas.
[m/cm]
16:10 Signal
[Feet/inches]
[m/cm]
4:3 Signal
[Feet/inches]
0.03247F
0.06504F
0.03247F / 0.3048
0.06504F / 0.3048
0.03676F
0.07363F
0.03676F / 0.3048
0.07363F / 0.3048
H1: Lower distance from the lens center to the
bottom of the image (cm/in)
-1.3462F
-1.3462F / 2.54
-1.524F
-1.524F / 2.54
H2: Upper distance from the lens center to the
bottom of the image (cm/in)
0F
0F / 2.54
0F
0F / 2.54
±0.51026F / 2.54
±0.57765F
±0.57765F / 2.54
L1: Minimum projection distance (m/ft)
L2: Maximum projection distance (m/ft)
W: Distance from the lens center to the center of the
±0.51026F
image (cm/in)
F : Picture diagonal size : 40"-500"
Note
• Allow a margin of error in the value in the diagrams above.
• When the distance from the lens center to the bottom of the image [H] is a negative number, this indicates
that the bottom of the image is below the lens center.
20
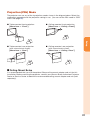
Projection (PRJ) Mode
The projector can use any of the 4 projection modes shown in the diagram below. Select the
mode most appropriate for the projection setting in use. (You can set the PRJ mode in “SCR”
menu. See page 55.)
■ Ceiling mounted, front projection
[Menu item ➞ “Ceiling + Front”]
■ Table mounted, rear projection
(with a translucent screen)
[Menu item ➞ “Rear”]
■ Ceiling mounted, rear projection
(with a translucent screen)
[Menu item ➞ “Ceiling + Rear”]
Setup
■ Table mounted, front projection
[Menu item ➞ “Front”]
a Ceiling-Mount Setup
It is recommended that you use the optional Sharp ceiling-mount adaptor and unit for this
installation. Before mounting the projector, contact your nearest Sharp Authorized Projector
Dealer or Service Center to obtain the recommended ceiling-mount adaptor and unit (sold
separately).
21
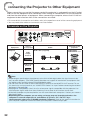
Connecting the Projector to Other Equipment
Before connecting, ensure that the power cord of the projector is unplugged from the AC outlet
and turn off the equipment to be connected. After making all connections, turn on the projector
and then the other pieces of equipment. When connecting a computer, ensure that it is the last
equipment to be turned on after all the connections are made.
• For more details of connection and cables, refer to the operation manual of the connecting equipment.
• You may need other cables or connectors not listed below.
Terminals on the Projector
Equipment
Terminal on
connected equipment
Computer
Cable
RGB cable (supplied)
COMPUTER/
COMPONENT 1, 2
HDMI cable (commercially available)
HDMI
RGB
output
terminal
HDMI output
terminal
Terminal on the
projector
Note
• Depending on specifications of equipment or the DVIÙHDMI digital cable, the signal transmission
may not work property. (The HDMI specification does not support all connections to equipment that
has digital output terminal using a DVIÙHDMI digital cable.)
• You can also use the COMPUTER/COMPONENT 2 terminal as the MONITOR OUT terminal. To use
this terminal as an input terminal, set “COMPUTER2 Select” to “Input” before connecting the external
equipment. (See page 56.)
• See page 75 “Compatibility Chart” for a list of computer signals compatible with the projector. Use
with computer signals other than those listed may cause some of the functions to not work.
• A Macintosh adaptor may be required for use with some Macintosh computers. Contact your nearest
Macintosh Dealer.
• Depending on the computer you are using, an image may not be projected unless the
computer's external output port is switched on (e.g. Press “Fn” and “F5” keys
simultaneously when using a SHARP notebook computer). Refer to the specific instructions in
your computer's operation manual to enable your computer's external output port.
22
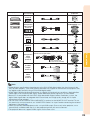
Equipment
Video equipment
Terminal on
connected equipment
HDMI output
terminal
Cable
HDMI cable (commercially available)
3 RCA to mini D-sub 15 pin cable
Component
video output
terminal
Terminal on the
projector
HDMI
COMPUTER/
COMPONENT 1, 2
S-video output S-video cable (commercially available)
terminal
S-VIDEO
Video output Video cable (commercially available)
terminal
VIDEO
Camera/Video game
Cables for a camera or a video game/3 RCA to COMPUTER/
mini D-sub 15 pin cable
COMPONENT 1, 2
Connections
Component
video
output
terminal
RCA adaptor plug
(commercially available)
Cables for a camera or a video game
S-VIDEO
Cables for a camera or a video game
VIDEO
S-video
output
terminal
Video
output
terminal
Note
• Depending on specifications of equipment or the DVIÙHDMI digital cable, the signal transmission
may not work property. (The HDMI specification does not support all connections to equipment that
has digital output terminal using a DVIÙHDMI digital cable.)
• HDMI (High-Definition Multimedia Interface) is a digital AV interface that can deliver a high-definition
video signal, multi-channel audio signal, and bi-directional control signal all in just one cable.
• Because it is compatible with the HDCP (High-bandwidth Digital Content Protection) system, the
digital video signal does not degrade when transmitted, and a high-quality image with a simple
connection can be enjoyed.
• You can also use the COMPUTER/COMPONENT 2 terminal as the MONITOR OUT terminal. To use
this terminal as an input terminal, set “COMPUTER2 Select” to “Input” before connecting the external
equipment. (See page 56.)
• When you connect video equipment with a 21-pin RGB output (Euro-scart) to the projector, use a
commercially available cable that fits in the projector terminal you want to connect.
• The projector does not support RGBC signals via the Euro-scart.
23
Connecting the Projector to Other Equipment (Continued)
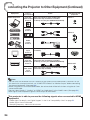
Equipment
Audio equipment
Terminal on
connected equipment
Cable
ø3.5 mm
audio output
terminal
ø3.5 mm stereo or mono audio cable
(commercially available or available
as Sharp service part QCNWGA038WJPZ)
RCA audio
output
terminal
RCA audio cable (commercially available)
Terminal on the
projector
AUDIO 1
AUDIO 2
Cables for a camera or a video game
Audio
output
terminal
Monitor
RGB
input
terminal
Amplifier
ø3.5 mm
audio input
terminal
RCA audio
input
terminal
RGB cable (supplied or commercially
available)
MONITOR OUT
ø3.5 mm stereo or mono audio cable
(commercially available or available
as Sharp service part QCNWGA038WJPZ)
AUDIO OUT
ø3.5 mm stereo minijack to RCA audio cable
(commercially available)
Note
• You can also use the MONITOR OUT terminal as the COMPUTER/COMPONENT 2 terminal. To use
this terminal as an output terminal, set “COMPUTER2 Select” to “Monitor Output” before connecting
the external equipment. (See page 56.)
• When using the ø3.5 mm mono audio cable, the volume level will be half of when using the ø3.5 mm
stereo audio cable.
• You can select “Audio 1”, “Audio 2” or “HDMI” for “Audio Input” in the “Audio” menu. (See page 51.)
• RGB signals and Component signals can be output to the monitor.
This projector is able to process the following signals when connected to HDMI
equipment:
• Video signal: For details, see “Digital Support” in the list of “Compatibility Chart” on page 75.
• Audio signal: Linear PCM audio
• Sampling frequency: 48kHz/44.1kHz/32kHz
24
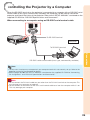
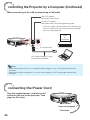
Controlling the Projector by a Computer
When the RS-232C terminal on the projector is connected to a computer with an RS-232C serial
control cable (cross type, commercially available), the computer can be used to control the
projector and check the status of the projector. Refer to the “SETUP MANUAL” contained on the
supplied CD-ROM for “RS-232C Specifications and Commands”.
When connecting to a computer using an RS-232C serial control cable
To RS-232C terminal
Computer
To RS-232C terminal
Connections
RS-232C serial control cable (cross type, commercially available)
Note
• The RS-232C function may not operate if your computer terminal is not correctly set up. Refer to the
operation manual of the computer for details.
• Refer to pages 2 to 9 of the “SETUP MANUAL” contained on the supplied CD-ROM for “Connecting
Pin Assignments” and “RS-232C Specifications and Commands”.
Info
• Do not connect the RS-232C cable to a port other than the RS-232C terminal on the computer. This
may damage your computer or projector.
• Do not connect or disconnect an RS-232C serial control cable to or from the computer while it is on.
This may damage your computer.
25
Controlling the Projector by a Computer (Continued)
When connecting to the LAN terminal using a LAN cable
LINK LED (green)
Illuminates when linked.
TX/RX LED (yellow)
Illuminates when transmitting/receiving data.
* To ensure safety, do not connect the LAN terminal
with any cables that may cause excessive voltage
such as a telephone line.
Hub
or
Computer
To LAN terminal
LAN cable (Category 5 type,
commercially available)
Note
• When connecting to a hub, use a straight-through Category 5 (CAT.5) type cable (commercially
available).
• When connecting to a computer, use a cross-over Category 5 (CAT.5) type cable (commercially
available).
Connecting the Power Cord
Plug the supplied power cord into the AC
socket on the rear of the projector. Then
plug into AC outlet.
AC socket
Power cord (supplied)
To AC outlet
26
Turning the Projector On/Off
Info
Turning the Projector On
Note that the connections to external
equipment and power outlet should be
done before performing the operations
written below. (See pages 22 to 26.)
Press STANDBY/ON on the projector
or ON on the remote control.
• The power indicator illuminates green.
• After the lamp indicator illuminates, the projector
is ready to start operation.
• When “Auto Restart” is set to “On”:
If the power cord is unplugged from the outlet
or the breaker switch is turned off when the
projector is on, then the projector
automatically turns on when the power cord
is plugged into the AC outlet or the breaker
switch is turned on. (See page 56.)
• English is the factory default language. If you
want to change the on-screen display to
another language, change the language
according to the procedure on page 55.
STANDBY/ON button
Power indicator
Note
Lamp indicator
STANDBY
button
ON button
Basic
Operation
• About the Lamp Indicator
The lamp indicator illuminates to indicate the
status of the lamp.
Green: The lamp is on.
Blinking in green: The lamp is warming up.
Red: The lamp is shut down
abnormally or the lamp should be
replaced.
• When switching on the projector, a slight
flickering of the image may be experienced
within the first minute after the lamp has been
illuminated. This is normal operation as the
lamp's control circuitry is stabilising the lamp
output characteristics. It should not be
regarded as faulty operation.
• If the projector is put into Standby mode and
immediately turned on again, the lamp may
take some time to start projection.
• When System Lock is set, the keycode input
box appears. To cancel the keycode setting,
input the keycode that you have already set.
See page 57 for details.
On-screen display (confirmation message)
Turning the Power Off (Putting
the Projector into Standby Mode)
Press STANDBY/ON on the projector
or STANDBY on the remote control,
then press that button again while the
confirmation message is displayed, to
put the projector into Standby mode.
• The projector cannot be turned on while cooling.
Info
• Direct Power Off function:
You can unplug the power cord from the AC
outlet even if the cooling fan is still running.
27
Image Projection
Shifting the Lens
In addition to the zoom function and adjustment of projection angle using the
adjustment feet, you can adjust the position of the projection using the lens shift
function. This is a useful function in cases such as when the screen cannot be moved.
When moving upward or downward
When moving in the left and right direction
ge
le ran
ge Adjustab
Adjustable ran
Adjustable
range
Adjustable range
• The adjustable range is shown below.
Horizontal range: ±25% (XG-SV200X)/±23% (XG-SV100W)
Vertical range: ±50%
The adjustable range has limitations even within the range shown above.
• The image can be adjusted as shown on the diagram.
• Allow a margin of error in the value.
XG-SV100W
XG-SV200X
Position of the image when the image is
centered, both vertically and horizontally,
in lens shift
Position of the image when the image is
centered, both vertically and horizontally,
in lens shift
0.5V
0.5V
1V
1V
0.5V
0.23H
0.5V
0.25H
V : Height of the image
H : Width of the image
28
1H
0.25H
V : Height of the image
H : Width of the image
1H
0.23H
1
Press H&V SHIFT on the remote
control.
• Pressing ENTER on the projector or on
the remote control displays the test
pattern. Checking the test pattern is useful
for more accurate adjustment.
ROn-screen display
ENTER button
LENS SHIFT
END
Adjustment buttons
(P/R/O/Q)
LENS SHIFT
TESTPATTERN
LENS CENTER
RETURN button
2
H&V SHIFT button
Press P, R, O or Q on the
projector or the remote control
to adjust the image position.
Note
• When RETURN is pressed, the lens shift
reset screen is displayed. Lens shift can be
reset to factory default with this screen.
Using the Adjustment Feet
Basic
Operation
• When the position of the projected image cannot be
adjusted with the lens shift function, use the
adjustment feet to adjust the projected angle.
• The height of the projector can be adjusted using the
adjustment feet when the screen is located higher
than the projector, the screen is inclined or when the
installation site is slightly inclined.
• Install the projector so that it is as perpendicular to
the screen as possible.
1
Rotate the adjustment feet to
adjust the projected angle.
• The projector is adjustable up to
approximately 9 degrees (front) and
approximately ±2 degrees (rear) from the
standard position.
Warning!
• Do not hold the lens and lens cover when
projector angle is adjusted.
• Use caution not to pinch your finger in the
space between the adjustment foot and the
projector when the projector angle is lowered.
Adjustment feet
Down
Up
Up
Down
29
Image Projection (Continued)
Adjusting the Focus
Press FOCUS +/– on the remote
control to adjust the focus.
ROn-screen display
FOCUS
TESTPATTERN
Info
• It is recommended that the focus be adjusted
after the projector has warmed up for at least
30 minutes.
ZOOM buttons
FOCUS buttons
Adjusting the Projected
Image Size
Press ZOOM +/– on the remote
control to adjust the projected image
size.
ROn-screen display
ZOOM
TESTPATTERN
Note
• After you have pressed FOCUS or ZOOM on
the remote control, you can display the test
pattern by pressing ENTER. The test pattern
is useful for making more accurate
adjustments.
• For fine adjustments, when H&V SHIFT,
FOCUS or ZOOM is pressed, the projected
image moves a small amount in the desired
direction for approximately one second. Hold
down the buttons to move the projected
image quickly.
30
Correcting Trapezoidal Distortion
When the image is projected either from the top or from the bottom towards the
screen at an angle, the image becomes distorted trapezoidally.
The function for correcting trapezoidal distortion is called Keystone Correction.
There are the two types of the Keystone Correction.
1) “GEOMETRIC ADJUSTMENT” for correcting an image designating the corner
of the projected image
2) “H&V KEYSTONE” for designating the correction of the horizontal and
vertical axes
KEYSTONE button
Selecting the Type of the Correction
ENTER button
Select the type of the keystone
correction.
Adjustment buttons
(P/R/O/Q)
Press KEYSTONE on the projector or
on the remote control.
RETURN button
• “GEOMETRIC ADJUSTMENT” will be displayed.
• Each time KEYSTONE is pressed, the display
toggles as follows:
GEOMETRIC
ADJUSTMENT
H&V KEYSTONE
The display disappears.
For correcting an image
designating the corner of
the projected image
H&V KEYSTONE
For correcting an image
designating the
horizontal or vertical
axes
ENTER button
Adjustment buttons
(P/R/O/Q)
KEYSTONE button
Basic
Operation
GEOMETRIC
ADJUSTMENT
RETURN button
31
Image Projection (Continued)
GEOMETRIC ADJUSTMENT
1
Press KEYSTONE on the
projector or on the remote
control repeatedly until
“GEOMETRIC ADJUSTMENT” is
displayed.
2
Press P, R, O or Q to move the
position for the upper left of the
image.
3
Press ENTER to set the position.
4
Repeat the same procedure with
the positions for the upper right,
lower right and lower left of the
image.
ROn-screen display
GEOMETRIC ADJUSTMENT
H&V KEYSTONE
ADJUST
NEXT
RESET
Geometric Adjustment
Upper Left
Upper Right
• At this time, pressing RETURN on the
projector or on the remote control returns
to the previous screen.
• When the position of the lower left is
set, the correction is made and the
display disappears.
Lower Left
32
Lower Right
H&V KEYSTONE
1
Press KEYSTONE on the
projector or on the remote
control repeatedly until “H&V
KEYSTONE” is displayed.
ROn-screen display
H&V KEYSTONE
H:0
END
ADJUST
EXIT TEST PTRN
RESET
V:0
Press P or R to parallelize the
left and right sides of the
projected image.
Vertical Keystone Correction
(Adjustment with ' / ")
3
Press O or Q to parallelize the
upper and lower sides of the
projected image.
Horizontal Keystone Correction
(Adjustment with \ / |)
4
Press KEYSTONE to set the
position.
Basic
Operation
2
33
Image Projection (Continued)
Switching the Input Mode
Select the appropriate input mode for the
connected equipment.
Press HDMI, COMPUTER 1/2,
S-VIDEO or VIDEO on the remote
control to select the input mode.
■ When you select the input mode with
INPUT R/P on the projector:
• When R/P is pressed, the Input list
appears. While the Input list is displayed,
follow the procedure below to switch the
input mode.
INPUT list
INPUT
Audio
1 COMPUTER1
2 MONITOR OUT
H
HDMI
S
S-VIDEO
V
VIDEO
– Press R/P to select the desired input
mode and then press ENTER.
• If ENTER is not pressed, the projector
switches to the selected input mode in a
few seconds.
Note
• When no signal is received, “NO SIGNAL” will
be displayed. When non-supported signal is
received, “NOT REG.” is displayed.
34
HDMI, COMPUTER 1/2,
S-VIDEO, VIDEO buttons
Adjusting the Volume
Press VOL +/– on the remote control
or on the projector to adjust the
volume.
Note
• Pressing VOL– will lower the volume.
• Pressing VOL+ will raise the volume.
• When the projector is connected to external
equipment, the volume level of the external
equipment changes in accordance with the
volume level of the projector. Set the projector's
volume to the lowest level when turning the
projector on/off or when changing the input signal.
• When you do not want to output the sound
from the projector's speaker while the
projector is connected to external equipment,
set “Speaker” in the “Audio” menu to “Off”.
(See page 51.)
AV MUTE button
VOL +/– (Volume)
buttons
On-screen display
Basic
Operation
Displaying the Black Screen
and Turning Off the Sound
Temporarily
Press AV MUTE on the remote control
to temporarily display a black screen
and turn off the sound.
On-screen display
Note
• Pressing AV MUTE again will turn the
projected image back on.
35
Image Projection (Continued)
Resize Mode
This function allows you to modify or customize the Resize mode to enhance the input
image. Depending on the input signal, you can choose a desired image.
Press RESIZE.
• See page 54 for setting on menu screen.
RESIZE
button
[For XG-SV200X]
COMPUTER
Main resolution
NORMAL
FULL
SVGA (800 × 600)
4:3 aspect ratio
XGA (1024 × 768)
SXGA (1152 × 864)
1024 × 768
—
UXGA (1600 × 1200)
Other aspect ratios
BORDER
16:9
—
1152 × 864
768 × 576
1024 × 576
1600 × 1200
SXGA (1280 × 1024)
968 × 768
1280 × 1024
1280 × 720
1024 × 576
1280 × 720
—
—
1360 × 768
1024 × 578
1360 × 768
—
—
1366 × 768
1024 × 576
1366 × 768
—
—
1280 × 768
1024 × 614
1280 × 768
960 × 576
1280 × 800
1024 × 640
1280 × 800
922 × 576
Input signal
Computer
NATIVE
800 × 600
Image type
1024 × 768
For 4:3 screen
NORMAL
720 × 576
1024 × 576
For 16:9 screen
FULL
NATIVE
—*1
—*1
BORDER
16:9
—*1
—*1
Resolution
lower than
XGA
XGA
Resolution
higher than
XGA
4:3 aspect ratio
SXGA (1280 × 1024)
5:4 aspect ratio
1280 × 720
1360 × 768
1366 × 768
16:9 aspect ratio
1280 × 768
1280 × 800
16:10 aspect ratio
: Cutout area on which images cannot be projected
: Area where the signals are off screen
*1 Same as NORMAL mode
36
[For XG-SV200X]
VIDEO/DTV
Input signal
Video/DTV
Image type
For 4:3 screen
NORMAL
AREA ZOOM
For 16:9 screen
V-STRETCH
BORDER
16:9
—*1
—*1
4:3 aspect ratio
480I, 480P,
576I, 576P,
NTSC, PAL,
SECAM
Squeeze
Letter box
720P, 1035I,
1080I, 1080P
16:9 aspect ratio
16:9 aspect ratio
540P
(4:3 aspect ratio in 16:9)
Basic
Operation
: Cutout area on which images cannot be projected
: Area on which the image is not included in the original signals
*1 Same as NORMAL mode.
37
Image Projection (Continued)
[For XG-SV100W]
COMPUTER
Main resolution
NORMAL
FULL
4:3 aspect ratio
XGA (1024 × 768)
SXGA (1152 × 864)
16:9
1024 × 768
1068 × 800
1152 × 864
SXGA+ (1400 × 1050)
1000 × 800
1280 × 720
1280 × 720
—
1360 × 768
1280 × 722
1360 × 768
1366 × 768
1280 × 720
1366 × 768
1280 × 768
1280 × 768
1280 × 800
1280 × 800
Input signal
Image type
1280 × 720
1400 × 1050
SXGA (1280 × 1024)
Other aspect ratios
Computer
NATIVE
800 × 600
SVGA (800 × 600)
1280 × 800
1280 × 1024
—
—
—
1280 × 720
Output screen image
NORMAL
FULL
NATIVE
16:9
Resolution
XGA and below
Resolution
higher than
XGA
*2
4:3 aspect ratio
SXGA
(1280 × 1024)
5:4 aspect ratio
1280 × 720
—*1
16:9 aspect ratio
1360 × 768
1366 × 768
—*1
16:9 aspect ratio
1280 × 768
15:9 aspect ratio
1280 × 800
—*1
16:10 aspect ratio
: Cutout area on which images cannot be projected
: Area where the signals are off screen
*1 Same as NORMAL mode.
*2 In case SXGA+ input.
38
—*1
[For XG-SV100W]
VIDEO/DTV
Input signal
Video/DTV
Image type
Output screen image
NORMAL
AREA ZOOM
V-STRETCH
16:9
4:3 aspect ratio
480I, 480P,
576I, 576P,
NTSC, PAL,
SECAM
Squeeze
Letter box
720P, 1035I,
1080I, 1080P
16:9 aspect ratio
16:9 aspect ratio
—*1
16:9 aspect ratio
540P
16:9 aspect ratio
(4:3 aspect ratio in 16:9)
About Copyrights
• When using the Resize function to select an image size with a different aspect ratio to a TV
program or video image, the image will look different from its original appearance. Keep this
in mind while choosing an image size.
• The use of the Resize or Keystone Correction function to compress or stretch the image for
commercial purposes/public displays in a café, hotel, etc. may be an infringement of
copyright protected by law for copyright holders. Please use caution.
Basic
Operation
: Cutout area on which images cannot be projected
: Area on which the image is not included in the original signals
*1 Same as NORMAL mode.
39
Operating with the Remote Control
AUTO SYNC button
FREEZE button
POINTER button
SPOT button
Displaying the Pointer
1
Adjustment buttons
(P/R/O/Q)
Press POINTER and press P/R/
O/Q on the remote control to
move the pointer.
• Press EFFECT to change the pointer icon
(5 types).
RETURN button
Star
EFFECT button
Finger1
Finger2
Heart
Underline
MAGNIFY buttons
PICTURE MODE button
ECO+QUIET button
2
Press POINTER again.
• The pointer will disappear.
BREAK TIMER button
Displaying and Setting the
Break Timer
1
Press BREAK TIMER.
Using the Spot Function
1
• The timer starts to count down from 5
minutes.
• Press EFFECT to change the spot area
size (3 types).
On-screen display
2
Press P/R/O/Q to adjust the
length of the break time.
• Increases with P or Q
5 minutes ➞ 6 minutes ➞ 60 minutes
Press SPOT and press P/R/O/Q
on the remote control to move
the spot area.
1/9
2
1/25
1/8
Press SPOT again.
• The spot area will disappear.
• Shortens with O or R
4 minutes ➞ 3 minutes ➞1 minute
• The break time can be set in units of one
minute (up to 60 minutes).
Canceling the break timer display function
Press BREAK TIMER.
Note
• The Break Timer is not available while the
projector is operating the following functions.
- Auto Sync
- Freeze
- AV Mute
Switching the Eco+Quiet
Mode
Press ECO+QUIET to switch the
Eco+Quiet mode between on and off.
• When the Eco+Quiet is set to “ON”, the sound of
the cooling fan will turn down, the power
consumption will decrease, and the lamp life will
extend.
Note
• Refer to “Eco+Quiet” on page 50 for details.
40
Auto Sync
(Auto Sync Adjustment)
Displaying an Enlarged
Portion of an Image
Auto Sync function works when detecting
input signal after the projector turns on.
Graphs, tables and other portions of
projected images can be enlarged. This
is helpful when providing more detailed
explanations.
Press AUTO SYNC to manually adjust
with Auto Sync function.
1
Note
Press
MAGNIFY on the
remote control.
• Enlarges the image.
• Pressing
or
MAGNIFY enlarges
or reduces the projected image.
• When the optimum image cannot be achieved
with Auto Sync adjustment, use manual
adjustments. (See page 52.)
Note
Press
×1 ×2 ×3 ×4 ×9
Freezing a Moving Image
Press
1
Press FREEZE.
2
Press FREEZE again to return to
the moving image from the
currently connected device.
.
.
• You can change the location of the
enlarged image using P, R, O and Q.
• The projected image is frozen.
2
Press RETURN on the remote
control to cancel the operation.
• The magnification then returns to u1.
Note
Selecting the Picture Mode
Press PICTURE MODE.
• When pressing PICTURE MODE, the Picture
mode changes in the following order:
STANDARD
PRESENTATION
MOVIE
GAME
sRGB*
Note
Useful
Features
You can select the appropriate Picture
mode for the projected image, such as
movie or video game.
• The selectable magnifications differ
depending on the input signal.
• This function is not available for the 3D
mode.
• In the following cases, the image will
return to the normal size (u1).
- When switching the Input mode.
- When RETURN has been pressed.
- When the input signal is changed.
- When the input signal resolution and
refresh rate (vertical frequency)
change.
- When the Resize mode is changed.
- When switching “DLP® LinkTM”
between “On” and “Off”.
• See page 48 for details on the Picture mode.
* “sRGB” is displayed only when RGB signal is input.
41
Operating with the Remote Control (Continued)
Using the Remote Control as the Wireless Computer Mouse
When connecting the projector and the computer with a USB cable, you can use the
remote control as the computer mouse.
Connecting with a USB cable
Computer
To USB terminal
To USB terminal
USB cable
(commercially available or available as
Sharp service part QCNWGA014WJPZ)
The mouse pointer can be
operated in the following way
after it is connected.
MOUSE/Adjustment
buttons (
//?/_)
■ When moving the cursor
Press MOUSE/Adjustment buttons (P/R/O/Q).
■ When left-clicking
Press L-CLICK.
R-CLICK button
■ When right-clicking
Press R-CLICK.
■ When your computer supports only a
one-click mouse (such as Macintosh)
L-CLICK button
Press L-CLICK or R-CLICK.
L-CLICK and R-CLICK have common function.
■ When using [Page Up] or [Page Down]
Same as the [Page Up] and [Page Down] keys
on a computer keyboard.
Press PAGE UP or PAGE DOWN.
PAGE UP/
PAGE DOWN buttons
Note
• This function only works with the Microsoft® Windows® OS and Mac OS® that support USB.
• You cannot use this function when displaying the menu screen.
• Confirm that the computer recognizes the USB connection.
42
Menu Items
The following shows the items that can be set in the projector.
“Picture” menu
“Audio” menu
Main menu
Picture
Page 48
Sub menu
Standard
Presentation
Movie
Game
sRGB
Picture Mode
Page 48
Main menu
Audio
Page 51
Sub menu
Speaker [On/Off]
Page 51
Audio Input
Audio1
Audio2
HDMI
Page 51
Contrast
-30
+30
Bright
-30
+30
Color
-30
+30
Tint
-30
+30
Sharp
-30
+30
Red
-30
+30
Blue
-30
+30
Audio Out
FAO
VAO
Page 51
Treble
-30
+30
Page 51
Bass
-30
+30
Page 51
Page 48
CLR Temp
-2
+2
Page 49
BrilliantColor™
0
2
Page 48
C.M.S.1
Page 49
Select Color
Hue
Saturation
Value
Effect
C.M.S.1 [On/Off]
Reset
Return
C.M.S.2
Page 49
Select Color
Hue
Saturation
Value
Effect
C.M.S.2 [On/Off]
Reset
Page 50
Eco+Quiet [On/Off]
Off
Level 1
Level 2
Level 3
Useful
Features
Return
DNR
Page 50
Reset
43
Menu Items (Continued)
“Signal adjustment (SIG)” menu
Main menu
SIG
Page 52
Sub menu
Clock
-150
+150
Phase
-30
+30
H-Pos
-150
+150
V-Pos
-60
+60
“Screen adjustment (SCR)” menu
Main menu
SCR
Page 54
Sub menu
Resize
Page 54
Reset
Page 52
Wall Color
Page 54
Resolution
Page 54
Auto Sync [On/Off]
OSD Display [On/Off]
Page 52
Page 52
Video System
Page 53
Video Setup
Page 53
Dynamic Range
Page 53
Signal Info
Page 53
44
Off
Blackboard
Whiteboard
Overscan [On/Off]
Page 52
Signal Type
Normal
Full
Native
Area Zoom
V-Stretch
Border
16:9
Page 54
Auto
RGB
YPbPr
Closed Caption
Auto
PAL
SECAM
NTSC4.43
NTSC3.58
PAL-M
PAL-N
PAL-60
Background
0 IRE
7.5 IRE
Auto
Standard
Enhanced
Page 55
Page 55
PRJ Mode
Page 55
Language
Page 55
Off
CC1
CC2
Logo
Blue
None
Front
Ceiling + Front
Rear
Ceiling + Rear
English
Deutsch
Español
Nederlands
Français
Italiano
Svenska
Português
polski
Magyar
Türkçe
Tiếng Việt
“Projector adjustment (PRJ)” menu
Main menu
PRJ
Page 56
Sub menu
Auto Power Off [On/Off]
“Network (Net.)” menu
Page 56
Sub menu
Main menu
Net.
Page 61
Password
[Enable/Disable]
Auto Restart [On/Off]
Page 61
Page 56
DHCP Client [On/Off]
COMPUTER2 Select
Page 56
STANDBY Mode
Page 56
RS-232C
Page 56
Fan Mode
Page 57
Input
Monitor Output
Standard
Eco
Page 62
TCP/IP
Page 62
IP Address
Subnet Mask
Gateway
Reset Network Setting
9600bps
38400bps
115200bps
Normal
High
Page 62
Restart Network
Page 62
IP Address
Page 63
System Lock
[Enable/Disable]
MAC Address
Page 57
Page 63
DLP® Link™ [On/Off]
Projector
Page 58
Page 63
DLP® Link™ Invert
Page 58
Memory Menu
Page 59
Rotate Indicator [On/Off]
Page 59
All Reset
Page 60
Lamp Timer (Life)
Page 60
Load Memory
Page 59
Save Memory
Page 59
Memory Name
Page 59
Page 59
Mute [On/Off]
Page 59
Memory Lock [On/Off]
Memory2
Memory3
Memory4
Memory5
Memory6
Memory7
Memory8
Useful
Features
Clear Memory
Memory1
Page 59
Return
45
Using the Menu Screen
RETURN button
• Press RETURN to return to the
previous screen when the menu is
displayed.
ENTER button
Adjustment buttons
(P/R/O/Q)
MENU button
MENU button
ENTER button
Adjustment buttons
(P/R/O/Q)
RETURN button
• Press RETURN to return
to the previous screen
when the menu is
displayed.
Menu Selections (Adjustments)
Example: Adjusting “Bright”.
• This operation can also be performed by using the buttons on the projector.
1
Press MENU.
2
Press Q or O and select
“Picture” to adjust.
• The “Picture” menu screen for the selected
input mode is displayed.
Example: “Picture” screen menu
Menu item
Picture
Audio
Picture Mode
Contrast
Bright
Color
Tint
Sharp
Red
Blue
CLR Temp
BrilliantColor TM
C.M.S.1
C.M.S.2
DNR
Eco+Quiet
Reset
SEL./ADJ.
RETURN
46
SIG
SCR
PRJ
Standard
0
0
0
0
0
0
0
0
1
Off
Off
Level 2
Off
ENTER
END
Net.
3
Press P or R and select “Bright”
to adjust.
• The selected item is highlighted.
Picture
Audio
SIG
SCR
Picture Mode
Contrast
Bright
Color
Tint
Sharp
Red
Blue
CLR Temp
BrilliantColor TM
C.M.S.1
C.M.S.2
DNR
Eco+Quiet
Reset
PRJ
Net.
Standard
0
0
0
0
0
0
0
0
1
Off
Off
Level 2
Off
SEL./ADJ.
RETURN
ENTER
END
Items to be adjusted
Picture
To adjust the projected
image while watching it
Press ENTER.
• The selected item (e.g. “Bright”) is
displayed by itself at the bottom of the
screen.
• When pressing P or R, the following item
(“Color” after “Bright”) will be displayed.
Note
• Press ENTER again to return to the
previous screen.
4
Press O or Q to adjust the item
selected.
• The adjustment is stored.
Press MENU.
• The menu screen will disappear.
SIG
SCR
PRJ
Net.
0
0
0
0
Press ENTER.
The item displayed by itself
Picture
Bright
0
SEL./ADJ.
RETURN
Picture
Audio
Picture Mode
Contrast
Bright
Color
Tint
Sharp
Red
Blue
CLR Temp
BrilliantColor TM
C.M.S.1
C.M.S.2
DNR
Eco+Quiet
Reset
SEL./ADJ.
RETURN
ENTER
END
SIG
SCR
PRJ
Net.
Standard
0
15
0
0
0
0
0
0
1
Off
Off
Level 2
Off
Useful
Features
5
Audio
Clock
Phase
H-Pos
V-Pos
Reset
ENTER
END
Note
• The MENU button is not available while the projector is operating:
- Auto Sync/Break Timer/Freeze/AV Mute
47
Picture Adjustment (“Picture” Menu)
Menu operation n Page 46
Picture
Audio
Picture Mode
Contrast
Bright
Color
Tint
Sharp
Red
Blue
CLR Temp
BrilliantColor TM
C.M.S.1
C.M.S.2
DNR
Eco+Quiet
Reset
SEL./ADJ.
RETURN
SIG
SCR
PRJ
Net.
• When “sRGB” is selected, the projected image
may become dark, but this does not indicate a
malfunction.
2 Adjusting the Image
Off
Off
Level 2
Off
ENTER
END
1 Selecting the Picture Mode
Selectable
items
Standard
Presentation
Movie
Game
*sRGB
Adjustment
items
Contrast
Bright
Color*1
Tint*1
Sharp
Description
For standard image
Brightens portions of image for more
enhanced presentations.
Gives natural tint to the projected
image.
Gives sharpness to the projected
image.
For high fidelity reproduction of
images from a computer.
• “sRGB” is displayed only when RGB signal is input.
• You can set or adjust each item in the “Picture”
menu to your preference. Any changes you make
are retained in memory.
Note
• You can also press PICTURE MODE on the
remote control to select the picture mode.
(See page 41.)
*sRGB is an international standard of color
reproduction regulated by the IEC
(International Electrotechnical Commission).
As the fixed color area has been decided by
the IEC, the images are displayed in a natural
tint based on an original image, when “sRGB”
is selected.
For additional information about the sRGB
function, visit “http://www.srgb.com/”.
You cannot set the items, “Red”, “Blue”, “CLR
Temp”, “Brilliant ColorTM”, “C.M.S.1” and
“C.M.S.2”, when “sRGB” is selected.
48
Info
Standard
0
0
0
0
0
0
0
0
1
Red*1
Blue*1
1 2
BrilliantColor™* *
O button
Q button
For less
contrast.
For less
brightness.
For less color
intensity.
For making skin
tones purplish.
For less
sharpness.
For weaker red.
For more
contrast.
For more
brightness.
For more color
intensity.
For making skin
tones greenish.
For more
sharpness.
For stronger
red.
For stronger
blue.
For making the
effect stronger.
For weaker
blue.
For making the
effect weaker.
*1 Not adjustable/selectable when selecting “sRGB”.
*2 BrilliantColor™ uses Texas Instruments'
BrilliantColor™ technology. As the BrilliantColor™
level is increased, the image becomes brighter
while the color reproduction is kept at a high level.
Note
• “Color”, “Tint”, “Red”, “Blue”, “BrilliantColorTM”
and “CLR Temp” cannot be set when “sRGB”
is selected.
• To reset all adjustment items, select “Reset”
and press ENTER.
Menu operation n Page 46
• If there is data for the stored corrected
color, the C.M.S. color adjustment screen
is displayed. (Go to step 3.)
Adjusting the Color
Temperature
Selectable
items
–2
C.M.S.1
Select Color
Hue
Saturation
Value
Effect
C.M.S.1
Reset
Return
Description
On
For lower color temperature for
warmer, reddish incandescent-like
images.
SEL./ADJ.
RETURN
0
+2
0
0
0
0
ENTER
END
For higher color temperature for
cooler, bluish, fluorescent-like images.
2
Note
• Values on “CLR Temp” are only for general
standard purposes.
• “CLR Temp” cannot be set when “sRGB” is
selected.
4 Adjusting the Colors
You can select the color of the projected
image to correct and then adjust it to the
desired color by setting “Hue”, “Saturation”,
“Value”, and “Effect”.
Use the picker and select the
color of the projected image to
correct. The picker can be
operated by adjustment buttons
(P/R/O/Q) on the remote control.
• By enlarging the projected image using
or
MAGNIFY, more fine
adjustment can be performed.
Picker
Note
• Before performing this adjustment, prepare
the image to be adjusted.
• You can perform this adjustment easier in the
still image than in the moving image.
1
Select “C.M.S.1” or “C.M.S.2”
(C.M.S.: Color Management
System), and press ENTER.
After selecting the color of the projected
image to correct, press ENTER. The
C.M.S. color adjustment screen is
displayed. (Go to step 3.)
Useful
Features
• If there is no data for the stored corrected
color, the color selection screen and the
picker is displayed. (Go to step 2.)
• By continuing to press the adjustment
buttons (P/R/O/Q), the picker moves
rapidly.
Picker
49
Picture Adjustment (“Picture” Menu) (Continued)
Menu operation n Page 46
3
Set or adjust each item in the
C.M.S. color adjustment screen.
C.M.S.1
Select Color
Hue
Saturation
Value
Effect
C.M.S.1
Reset
Return
SEL./ADJ.
RETURN
On
Note
ENTER
END
Description
• The C.M.S. color adjustment can be made to
one color each in “C.M.S.1” and “C.M.S.2”.
• “C.M.S.1” and “C.M.S.2” cannot be set when
“sRGB” is selected.
5 Reducing Image Noise (DNR)
Video digital noise reduction (DNR) provides
high quality images with minimal dot crawl
and cross color noise.
Select Color
Starts over the selection of
the color to be corrected.
Hue
Sets the hue of the main
colors.
Saturation
Sets the saturation of the
main colors.
Off
Value
Sets the value of the main
colors.
Level 2
Effect*1
Specifies the range of color
correction.
C.M.S.1*2
(or C.M.S.2)
Checks the appearance of
the projected image after
above correction.
Reset
Sets “Hue”, “Saturation”,
“Value”, and “Effect” to their
default values.
Return
Completes the correction
and closes the C.M.S. color
adjustment screen.
*1 To specify the range of color correction,
select “Effect” and press O or Q button.
O button
Specifies smaller range.
Q button
Specifies larger range.
*2 To check the appearance of the projected
image, select “C.M.S.1” (or “C.M.S.2”) and
set to “On” or “Off”.
50
To complete the C.M.S. color
adjustment, select “Return” and
press ENTER.
0
0
0
0
C.M.S. color adjustment screen:
Selectable items
4
On
The appearance of the
projected image after above
color adjustment reflected
can be checked.
Off
The appearance of the projected image in former color
adjustment can be checked.
Selectable
items
Description
The DNR function is not activated.
Level 1
Sets the DNR level for viewing a
clearer picture.
Level 3
Note
Set “DNR” to “Off” in the following cases:
• When the image is blurry.
• When the contours and colors of moving
images drag.
• When TV broadcasts with weak signals are
projected.
6 Eco+Quiet
Selectable
Brightness
items
On
Approx. 80%
Fan
Sound
Low
Off
Normal
100%
Lamp life
Approx.
2,500
hours
Approx.
1,500
hours
Note
• You can also use ECO+QUIET on the remote
control or on the projector to switch the
Eco+Quiet mode. (See page 40.)
Audio Adjustment (“Audio” Menu)
Menu operation n Page 46
Picture
Audio
SIG
SCR
Speaker
Audio Input
Audio Out
Treble
Bass
PRJ
Net.
On
Audio1
FAO
0
0
3 Audio Output Type Setting
This function determines whether the audio
level output from the AUDIO output terminal is
fixed or variable by linking with VOLUME.
Selectable
items
SEL./ADJ.
RETURN
ENTER
END
1 Speaker Setting
This function allows you to set the audio
output of the internal speaker to “On” or “Off”
such as when the projector is connected to an
external amplifier.
Selectable
items
Description
On
The audio signal is output from the
internal speaker.
Off
The audio signal is not output from the
internal speaker.
2 Audio Input
Description
FAO
(Fixed Audio
Output)
Audio output that does not vary in
strength with the volume level of
the source projector.
VAO
(Variable Audio
Output)
Audio output that varies in strength
with the volume level of the source
projector.
Info
• When “Audio Out” has been set to “VAO”, first
make sure to lower the volume of the projector
before turning the power on or off and when
switching the input.
4 Adjusting the Audio
This function allows you to adjust the
projector’s audio.
Selectable
items
O button
Q button
Treble
For weaker treble
For stronger treble
Bass
For weaker bass
For stronger bass
This function allows you to select an
appropriate combination of audio input
terminals for each input mode.
Selectable
items
Description
The AUDIO 1 input terminal is used as
an audio input terminal
Audio 2
The AUDIO 2 input terminal is used as
an audio input terminal.
HDMI
HDMI terminal is used as an audio
input terminal. (This item is available
with HDMI input.)
Useful
Features
Audio 1
51
Signal Adjustment (“SIG” Menu)
Menu operation n Page 46
Picture
Audio
Clock
Phase
H-Pos
V-Pos
Reset
Resolution
Auto Sync
Signal Type
Video System
Video Setup
Dynamic Range
SIG
SCR
PRJ
0
0
0
0
3 Auto Sync Adjustment
Used to automatically adjust a computer
image.
1024 x 768
On
Auto
Auto
0 IRE
Standard
Signal Info : 1024 x 768
H
48.3 kHz / V
Net.
SEL./ADJ.
RETURN
60.0
Selectable
items
Description
On
Auto Sync adjustment will occur when
the projector is turned on or when the
input signals are switched, when
connected to a computer.
Off
Auto Sync adjustment is not
automatically performed.
Hz
ENTER
END
Note
1 Adjusting the Computer Image
If the optimum image cannot be obtained with
Auto Sync adjustment, use the SIG function.
Selectable
items
Description
Clock
Adjusts vertical noise.
Phase
Adjusts horizontal noise (similar to
tracking on your VCR).
H-Pos
Centers the on-screen image by
moving it to the left or right.
V-Pos
Centers the on-screen image by
moving it up or down.
Note
• To reset all adjustment items, select “Reset”
and press ENTER.
• The adjustable range of “H-Pos” (H-Position)
and “V-Pos” (V-Position) may vary depending
on the screen resolution of the computer.
2 Resolution Setting
Ordinarily, the type of input signal is detected
and the correct Resolution mode is
automatically selected. However, for some
signals, the optimal Resolution mode in
“Resolution” may need to be selected to
match the computer display mode.
Note
• See “Checking the Input Signal” on page 53
for information on the currently selected input
signal.
52
• Auto Sync adjustment is also performed by
pressing AUTO SYNC on the projector or on
the remote control.
• The Auto Sync adjustment may take some
time to complete, depending on the image of
the computer connected to the projector.
4 Signal Type Setting
This function allows you to select the input
signal type RGB or Component for
COMPUTER/COMPONENT 1, 2.
Selectable
items
Description
Auto
Input signals are automatically
recognized as RGB or component.
RGB
Set when RGB signals are received.
YPbPr
Set when Component signals are
received.
Menu operation n Page 46
5 Setting the Video System
7 Selecting the Dynamic Range
The video input system mode is factory preset
to “Auto”; however, a clear picture from the
connected audio-visual equipment may not be
received, depending on the Video signal
difference. In that case, switch the Video
signal.
An optimum picture may not be displayed if an
HDMI capable device’s output signal type and
the projector’s input signal type do not match.
If this should occur, switch “Dynamic Range”.
Selectable items
Auto
PAL
SECAM
*NTSC4.43
NTSC3.58
PAL-M
PAL-N
PAL-60
* When reproducing NTSC signals in PAL video
equipment.
Selectable
items
Auto
Standard
Enhanced
Description
When the black levels of the image
show banding or appear faded, select
the item that results in the best picture
quality. (In most circumstances,
“Standard” should be selected.)
Note
• The Dynamic Range can be selected only
when “HDMI” input mode is selected.
8 Checking the Input Signal
Note
• The Video signal can only be set in VIDEO or
S-VIDEO mode.
• When “Video System” is set to “Auto”, you
may not receive a clear picture due to signal
differences. Should this occur, switch to the
video system of the source signal.
This function allows you to check the current
input signal information.
6 Setting the Video Setup
Selectable
items
Description
0 IRE
Sets the black level to 0 IRE.
7.5 IRE
Sets the black level to 7.5 IRE.
Useful
Features
Note
• This function is available for the following
signals.
With COMPUTER/COMPONENT 1 or 2 input:
- 480I
With S-VIDEO or VIDEO input:
- NTSC3.58
53
Screen Adjustment (“SCR” Menu)
Menu operation n Page 46
Picture
Audio
Resize
Wall Color
Overscan
OSD Display
Closed Caption
Background
PRJ Mode
Language
SIG
SCR
PRJ
Net.
Normal
Off
On
On
Off
Logo
Front
English
3 Setting the Overscan
This function allows you to set the overscan
area (display area).
Selectable
items
Description
On
The input area is displayed without the
screen edges.
Off
The whole input area is displayed.
Note
SEL./ADJ.
RETURN
ENTER
END
1 Setting the Resize Mode
Note
• For details of the Resize mode, see pages 36
to 39.
• You can also press RESIZE on the remote
control to set the resize mode. (See page 36.)
2 Selecting the Wall Color
This function allows you to project the image
to a colored (white or dark green) surface or
wall without using a screen.
Selectable items
Off
Blackboard
Whiteboard
54
• This function is available for the following
signals.
With COMPUTER/COMPONENT 1 or 2 input:
- 480P
- 540P
- 576P
- 720P
- 1035I
- 1080I/1080P
• If noise appears at the screen edges when
“Off” is selected, set the function to “On”.
• Also see “About Copyrights” on page 39.
4Setting the On-screen
Display
This function allows you to turn the on-screen
messages on or off.
Description
The Wall Color function is not
activated.
Projects images onto a
blackboard (dark green).
Projects images onto a
whiteboard.
Selectable
items
Description
On
All On-screen Displays are displayed.
Off
INPUT/VOLUME/AV MUTE/FREEZE/
AUTO SYNC/RESIZE/PICTURE MODE/
ECO+QUIET/MAGNIFY/ “An invalid
button has been pressed.” are not
displayed.
Menu operation n Page 46
5 Closed Caption
<For Americas only>
Selectable
items
Info
• This function is available for NTSC3.58 signal.
• This function may not work depending on the
resize mode.
• “Closed Caption” is a system which allows
conversations, narration, and sound effects in TV
programs (Limited regions) and home videos to
be viewed as captions on the screen.
• Not all programs and videos will offer closed
captioning. Please look for the
symbol to
ensure that captions will be shown.
• Two channels are available: CC1 and CC2.
Selectable
items
Off
6Selecting a Startup
and Background Image
Description
—
CC1
Closed Caption mode for CH1 data
CC2
Closed Caption mode for CH2 data
Note
• Closed Caption may malfunction (white blocks,
strange characters, etc.) if signal conditions are
poor or if there are problems at the broadcast
source. This does not necessarily indicate a
problem with the projector.
Logo
Description
SHARP default image
Blue
Blue screen
None
Black screen
7Reversing/Inverting
Projected Images
This projector is equipped with a reverse/
invert image function that allows you to
reverse or invert the projected image for
various applications.
Selectable
items
Description
Front
Normal image (Projected from the
front of the screen)
Ceiling + Front
Inverted image (Projected from the
front of the screen with an inverted
projector)
Rear
Reversed image (Projected from
the rear of the screen or with a
mirror)
Ceiling + Rear
Reversed and inverted image
(Projected with a mirror)
Note
• Refer to “Projection (PRJ) Mode” on page 21
for details.
The projector can switch the on-screen
display language among 18 languages.
Useful
Features
8Selecting the On-screen
Display Language
55
Helpful Functions Set during Installation (“PRJ” menu)
Menu operation n Page 46
Picture
Audio
T
Z
Auto Power Off
Auto Restart
COMPUTER2 Select
STANDBY Mode
RS-232C
Fan Mode
Sysem Lock
DLP® Link™
DLP® Link™ Invert
Memory Menu
Rotate Indicator
All reset
H
Lamp Timer (Life)
SEL./ADJ.
RETURN
SIG
SCR
PRJ
Net.
On
On
Monitor Output
Standard
9600bps
Normal
Disable
Off
3 COMPUTER2 Select
You can also use the MONITOR OUT terminal
as the COMPUTER/COMPONENT 2 terminal.
Select whether to use the terminal as an input
terminal or output terminal.
Selectable items
The terminal can be used as an
input terminal (COMPUTER/
COMPONENT 2).
Monitor Output
The terminal can be used as an
output terminal (MONITOR OUT).
On
[
0]h
[
0] min ( 100%)
Description
Input
ENTER
END
Note
1 Auto Power Off Function
Selectable
items
On
Description
The projector automatically enters
the standby mode when no input
signal is detected for 15 minutes or
longer.
Off
The Auto Power Off function will
be disabled.
Note
• When the Auto Power Off function is set to
“On”, 5 minutes before the projector enters the
standby mode, the message “Enter STANDBY
mode in X min.” will appear on the screen to
indicate the remaining minutes.
2 Auto Restart Function
Selectable
items
On
Off
56
• Set this before connecting the external
equipment.
• The setting cannot be changed when Input
mode is “COMPUTER 2”.
Description
4 STANDBY Mode
When set to “Eco”, power consumption is
reduced in Standby mode.
Selectable items
Description
Eco
The monitor output, RS-232C and
Network functions are switched off in
Standby mode.
Standard
The monitor output, RS-232C and
Network functions are activated even
if the projector is in Standby mode.
5Selecting the Transmission
Speed (RS-232C)
Make sure that both the projector and computer are set for the same baud rate.
Selectable items
Description
Transmission speed is slow.
If the power cord is unplugged
from the outlet or the breaker
switch is turned off when the
projector is on, then the projector
automatically turns on when the
power cord is plugged into the AC
outlet or the breaker switch is
turned on.
9600 bps
The projector does not turn on
automatically when the power
cord is plugged into the AC outlet
or the breaker switch is turned on.
• Refer to the “SETUP MANUAL” contained on
the supplied CD-ROM for RS-232C
Specifications and Command Settings.
• Refer to the computer’s operation manual for
instructions for setting the computer’s baud rate.
38400 bps
115200 bps
Transmission speed is rapid.
Note
Menu operation n Page 46
6 Fan Mode Setting
3
This function changes the fan rotation speed.
Selectable
items
Normal
High
Press the 4 buttons on the remote
control or on the projector to enter
the preset keycode in “Old Code”.
• When setting the keycode for the first time,
press R on the projector for four times.
Description
PRJ
Suitable for normal environments.
Setting the System Lock
Select this when using the
projector at altitudes of
approximately 1,500 meters (4,900
feet) or more.
Old Code
New Code
Reconfirm
– – – –
– – – –
– – – –
When “Fan Mode” is set to “High”, the fan rotation
speeds up, and the fan noise becomes louder.
Note
7 System Lock Function
• If you input a wrong keycode, the
cursor returns to the first point of the
“Old Code”.
• The preset keycode is 4 R buttons on
the projector. When you press the R
button four times, the keycord input
screen disappears.
This function prevents unauthorized use of the
projector. Once this function is activated,
users must enter the correct keycode each
time the projector is turned on. We suggest
you record the keycode in a safe place
where only authorized users have access.
Info
• If you lose or forget your keycode, contact your
nearest Sharp Authorized Projector Dealer or
Service Center (see page 84). Even if the product
warranty is valid, the keycode reset will incur a
charge.
a Setting/Changing the keycode
1
Select “Next”, then press ENTER.
• The screen for entering the keycode
appears.
Press the 4 buttons on the remote
control or on the projector to enter
the new keycode in “New Code”.
Note
• You cannot use the following buttons
for keycode: STANDBY/ON, ON,
STANDBY, ENTER, L-CLICK/EFFECT,
R-CLICK/RETURN, MENU,
ECO+QUIET, BREAK TIMER, ZOOM,
FOCUS, H&V SHIFT, ROTATE, LENS,
MEMORY MENU and MEMORY (1-8)
• System lock function recognizes
each button on the remote control
or on the projector as an individual
button, even if they share the
same button name. If you used the
buttons on the projector in setting
your keycode, the keycode cannot
be canceled with the remote
control.
Useful
Features
2
Select “System Lock”, then press
ENTER or Q.
4
PRJ
Setting the System Lock
Old Code
New Code
Reconfirm
****
– – – –
– – – –
57
Helpful Functions Set during Installation (“PRJ” menu)
(Continued)
Menu operation n Page 46
5
Enter the same keycode in “Reconfirm”.
Taking the Keylock Off
Hold down ENTER on the projector for about
5 seconds.
On-screen display
Note
To cancel the keycode that you have
already set
• Press R on the projector for four times in
steps 4 and 5 above.
When the System Lock is set
• When System Lock is set, the keycode input
screen appears after the power is turned on.
When it appears, enter the right keycode to
start projection.
Input screen for keycode
System Lock
– – – –
Keylock Function
Use this function to lock the operation buttons
on the projector.
Locking the Operation Buttons
1
Hold down ENTER on the
projector for about 5 seconds
while the projector is being
turned on.
• The Keylock function screen is displayed.
Use this function to lock the operation buttons
on the projector.
(Except STANDBY/ON button)
Note: You can release the keylock by holding
down ENTER on the projector for about 5 seconds.
Return
On
SEL./ADJ.
RETURN
2
ENTER
END
Select “On”, then press ENTER.
On-screen display
• The Keylock function does not affect the
operation with the remote control buttons.
• You cannot use the Keylock function while the
projector is warming up.
58
Info
• Even when Keylock function is set to “On”,
STANDBY/ON on the projector can be used
to turn on and off the power.
• Keylock cannot be set while the projector is:
displaying the “Menu” screens, in Standby
mode, warming up, changing input signals,
operating the Auto Sync function, in Freeze
mode or on the “System Lock” screen during
warming up.
®
TM
8 DLP Link
See “Using 3D Viewing Mode” on page 67 for
details.
®
TM
9 DLP Link Invert
See “Using 3D Viewing Mode” on page 67 for
details.
Menu operation n Page 46
0 Memory Menu
You can store the settings of the projector's
lens shift (ZOOM, FOCUS) and others (such as
INPUT, PICTURE MODE, RESIZE, Wall Color,
PRJ Mode and KEYSTONE), or activate the
stored settings.
You can also store the rotation angle when
attaching the ceiling-mount rotating module
(AN-SV100T) to the projector.
The Memory Menu screen can also be
displayed by pressing MEMORY MENU on
the remote control.
a Load Memory
To activate the desired settings, select the
item where the settings are stored.
a Clear Memory
Select the item where the settings you want to
erase are stored. In this case, the memory
name you have changed returns to the default
setting.
Note
• Selecting “All Clear” erases all the stored
settings.
a Mute
Selectable
items
On
Does not display images while the
projector is in the process of
activating the “Load Memory”
function.
Off
Displays images while the projector
is in the activation process.
Note
• Pressing any button while the projector is in
the process of activating the “Load Memory”
function will display messages:
– “STOP”: stops the activation of the “Load
Memory” function.
– “CONTINUE”: allows the projector to the
already set position.
– “Return to the initial position.”: let the
projector go back to the initial position.
• The confirmation screen of “Load Memory”
will also be displayed by pressing MEMORY
(1-8) on the remote control. Press MEMORY
(1-8) again to perform the “Load Memory”
function.
• The memory has a margin of error of
approximately ±2% (When the ceiling-mount
rotating module (AN-SV100T) is attached,
allow a margin of error of approximately ±1.5
degrees). Use the remote control to make fine
adjustments.
a Memory Lock
Selectable
items
On
Protects the stored memories.
Off
Does not protect the stored
memories.
Rotate Indicator
This function turns On/Off the Rotate indicator
on the projector.
Selectable
items
The Rotate indicator lights up when
the ceiling-mount rotating module
(AN-SV100T) is connected. While
the projector is rotating, the
indicator blinks.
Off
The Rotate indicator does not light
up.
• When you select an item where some setting
has been stored, the stored setting will be
overwritten and erased.
a Memory Name
Select the item name you want to change. Use
O/Q to choose the characters to change, and
P/R to select the characters to enter.
Description
On
Select an item where you want to store the
setting.
Note
Description
Useful
Features
a Save Memory
Description
Note
• This function only works when attaching the
ceiling-mount rotating module to the projector.
59
Helpful Functions Set during Installation (“PRJ” menu)
(Continued)
Menu operation n Page 46
Returning to the Default
Settings
This function allows you to initialize the settings you have made in the projector.
Note
The following items or menu cannot be
initialized.
• “SIG” menu
Resolution
• “SCR” menu
Language
• “PRJ” menu
Lamp Timer (Life)
System Lock
COMPUTER2 Select
Memory Menu
Checking the Lamp
Life Status
You can confirm the cumulative lamp usage
time and the remaining lamp life (percentage).
Lamp usage condition
“Life”
Remaining lamp life
100%
5%
Operated exclusively
while “Eco+Quiet” is
“On”.
Approx.
2,500 hours
Approx.
125 hours
Operated exclusively
while “Eco+Quiet” is
“Off”.
Approx.
1,500 hours
Approx.
75 hours
Note
• It is recommended that the lamp be changed
when the remaining lamp life becomes 5%.
• The lamp life may vary depending on the
usage condition.
60
Setting Up the Projector Network Environment (“Net.” Menu)
Menu operation n Page 46
Picture
Audio
SIG
Password
DHCP Client
TCP/IP
Reset Network Setting
Restart Network
IP Address
MAC Address
Projector
SCR
PRJ
Net.
Disable
Off
XXX.XXX.XXX.XXX
XX:XX:XX:XX:XX:XX
XX-XXXX
SEL./ADJ.
RETURN
ENTER
END
1 Setting a Password
If you do not want others to change the setting
for the “Net.” menu, set a password.
a Setting a Password
1
• The screen for entering the password
appears.
Net.
Setting the Password
– – – –
– – – –
– – – –
Select “Password”, then press Q.
2
Enter the password in “Old
Password” using P, R, Q and O,
then press ENTER.
3
Enter the password in “New
Password” using P, R, Q and O,
then press ENTER.
4
Enter the same password again
in “Reconfirm” using P, R, Q and
O, then press ENTER.
• The screen for entering the password
appears.
Press P or R to set the first digit
in “New Password”, then press Q.
3
Enter the remaining 3 digits, then
press ENTER.
• To return to the previous digit, press O.
Enter the same password in
“Reconfirm”, then press ENTER.
• The status for “Password” changes to
“Enable”.
• If you do not need the password protection for
the “Net.” menu settings anymore, press
ENTER without entering new password in
steps 3 and 4.
• To cancel the password settings, press
RETURN.
If you forget the password
If you forget the password, perform the
following procedure to delete it, then set a
new password.
On the projector, press
.
Note
• If ENTER is held down for more than 5
seconds, the operation buttons on the
projector will be locked. (See page 58.)
• You cannot use the buttons on the
remote control to delete the password.
Useful
Features
2
4
1
Note
Select “Password”, then press Q.
Old Password
New Password
Reconfirm
a Changing the Password
Note
• Once after the password is set, you must
enter the password to change the “Net.” menu
settings.
61
Setting Up the Projector Network Environment (“Net.” Menu)
(Continued)
Menu operation n Page 46
2 DHCP Client Setting
Selectable items
Factory default setting:
192.168.150.002
Enter an IP address appropriate
for the network.
Subnet Mask
Factory default setting:
255.255.255.000
Set the subnet mask to the same
as that of the computer and
equipment on the network.
Gateway
Factory default setting: 000. 000.
000. 000
* When not in use, set to “000.
000. 000. 000”.
Connect the LAN cable before turning the
projector on. If not, the DHCP Client function
does not work.
Selectable items
Description
On
Obtains configuration
parameters for TCP/IP network
automatically.
Off
Sets the TCP/IP manually.
Select “On” for “DHCP Client”. “Obtaining IP
Address...” appears, then the menu screen
appears. Confirm the parameters of IP
Address, Subnet Mask and Gateway on the
TCP/IP screen.
If the DHCP server is not available, “Could not
obtain IP Address.” appears.
In this case, set the TCP/IP manually. (See the
item 3.)
3 TCP/IP Setting
Set the TCP/IP manually.
1
Select “Off” for “DHCP Client”,
then press ENTER.
2
Select “TCP/IP”, then press
ENTER.
3
Enter “IP Address” using P, R, Q
and O, then press ENTER.
Net.
Setting the TCP/IP
IP Address
Subnet Mask
Gateway
4
5
62
1 9 2 . 1 6 8 . 1 5 0 . 0 0 2
2 5 5 . 2 5 5 . 2 5 5 . 0 0 0
0 0 0 . 0 0 0 . 0 0 0 . 0 0 0
Enter “Subnet Mask” using P, R,
Q and O, then press ENTER.
Enter “Gateway” using P, R, Q
and O, then press ENTER.
Description
IP Address
Note
• Confirm the existing network’s segment (IP
address group) to avoid setting an IP address
that duplicates the IP addresses of other
network equipment or computers. If
“192.168.150.002” is not used in a network
with an IP address of “192.168.150.XXX”, you
don’t have to change the projector IP address.
• For details about each setting, consult your
network administrator.
4 Returning to Default
Settings (Network)
This function allows you to initialize the
Network settings you have made in the
projector.
Note
• If the values for IP Address, Subnet Mask or
Gateway of the projector have been returned
to the default settings, the computer cannot
be connected to the projector depending on
the computer’s network settings.
5 Restart Network Function
Restarts the network function.
Perform this function when the projector
cannot be controlled via the network.
Menu operation n Page 46
6 Confirming the
Projector Information
You can confirm the following items.
Selectable
items
IP Address
Description
The IP address of the projector is
displayed.
MAC Address The MAC address of the projector is
displayed.
Projector
The projector name is displayed.
Note
• For information on how to change the
projector name, see “SETUP MANUAL”
contained in the supplied CD-ROM.
Useful
Features
63
Viewing Stereoscopic 3D Images
Precautions on Viewing Stereoscopic 3D Images
Before viewing stereoscopic 3D images, please read this section carefully.
WARNING
■ Under normal conditions, viewing stereoscopic 3D images is safe for any duration that you
would normally view your screen. However, some people may experience discomfort. The
following precautions are recommended to minimize the potential for experiencing visual
problems or any adverse symptoms.
■ Take regular breaks, at least 5 to 15 minutes after every 30 to 60 minutes of stereoscopic 3D
viewing.
* Based on the guidelines issued by the 3D Consortium revised December 10, 2008.
■ Maintain an appropriate distance from the screen. Viewing from too close a distance can
strain your eyes. If you experience eye strain, immediately discontinue viewing.
If you experience any of the following symptoms during viewing:
– nausea
– queasiness/dizziness
– headache
– blurry vision or double vision that lasts longer than few seconds
Do not engage in any potentially hazardous activity (for example, driving a vehicle) until your
symptoms have completely gone away. If symptoms persist, discontinue use and do not
resume stereoscopic 3D viewing without discussing your symptoms with a physician.
• As you get more comfortable viewing stereoscopic 3D:
• Adjust the parallax on the 3D-video playback equipment. (You may not be able to adjust
the parallax on some models of equipment.)
• Adjust the projected image to the most comfortable viewing size by zooming.
(Projecting images on the smallest or largest screen size possible may eliminate the
stereoscopic effect and strain your eyes.)
• Use the DLP® Link™ Invert function to properly set the video for your left and right eyes.
(For details on using “DLP® Link™ Invert”, see the section on its operation in this operation
manual.)
64
WARNING
■ The following people should limit stereoscopic 3D viewing:
– Children under 6 years of age (to protect the eye growth process)
– People with a history of photosensitivity
– People with heart disease
– People in poor health
– People who are sleep deprived
– People who are physically tired
– People under the influence of drugs or alcohol
■ Epilepsy
A small percentage of the population may experience epileptic seizures when viewing
certain types of images that contain flashing patterns of light.
IF YOU OR ANY MEMBER OF YOUR FAMILY HAS A HISTORY OF EPILEPSY
The following people should consult a physician before viewing stereoscopic 3D images.
– Anyone with a history of epilepsy, or who has a family member with a history of
epilepsy
– Children under 6 years of age
– Anyone who has ever experienced epileptic seizures or sensory disturbances triggered
by flashing light effects
SOME LIGHT PATTERNS MAY INDUCE SEIZURES IN PERSONS WITH NO PRIOR
HISTORY OF EPILEPSY
Discontinue use if you experience any of the following symptoms while viewing
stereoscopic 3D images.
– Involuntary movements, eye or muscle twitching
– Muscle cramps
– Nausea, dizziness, or queasiness
– Convulsions
– Disorientation, confusion, or loss of awareness of your surroundings
Useful
Features
65
Viewing Stereoscopic 3D Images (Continued)
Information on the 3D Projection Function
• To display 3D images, this projector requires:
WHAT YOU WILL NEED
1) Source devices that support the field sequential format
– For details on the supported signals, see the Compatibility Chart in this operation
manual.
2) 3D LCD shutter glasses that support the DLP® Link™* system
– Contact your nearest Sharp Authorized Projector Dealer for purchasing details.
* DLP® Link™ is a trademark of Texas Instruments.
• The projected image may become dark when using the 3D projection function (with “DLP®
Link™ ” set to “On”).
• When “DLP® Link™” is set to “On”, the following functions may not work fully or may not be
available at all.
– Keystone
– Resize
– Magnify
• 3D formats except for the field sequential method, such as ones used for Blu-ray 3D or DVD
prepackaged media, are not compatible with this projector. (As of February 2011)
• If the power of your left and right eyes greatly differs and you primarily use one eye for
viewing the images, the images will not appear in 3D.
In addition, images may be difficult to view in 3D or images may not be able to be viewed in
3D depending on the individual or the content being displayed.
The stereoscopic effect varies with the individual.
• 3D viewing is possible within the range that the 3D LCD shutter glasses are able to receive
light signals reflected by the screen. However, most 3D images are manufactured to be
viewed from directly in front of the screen, so 3D viewing is recommended directly in front of
the screen as much as possible.
– The range for receiving signals varies depending on the 3D LCD shutter glasses. For
details, see the operation manual of your 3D LCD shutter glasses.
• 3D images may not be able to be played back correctly on your computer.
66
Using 3D Viewing Mode
6
Press 3D MODE on the remote
control to display the 3D MODE
menu.
Info
Use the following procedure to project
3D images.
For operation of the 3D LCD shutter
glasses and the 3D-video playback
equipment, see the corresponding
operation manual.
• If “An invalid button has been pressed.”
is displayed, a 3D-compatible signal is
not being input. Check the output signal
on the playback equipment.
7
Press Q to set “DLP® Link™” to
“On”.
8
Press ENTER to switch the mode
and enable more natural 3D
image viewing.
O/Q buttons
ENTER button
Warning!
• If the projector, 3D-video playback
equipment, and 3D LCD shutter
glasses are not properly set, you may
experience eye strain in addition to not
being able to view the images in 3D.
3D MODE button
Projecting 3D images
1
2
Turn the projector on.
Turn the 3D-video playback
equipment on.
• Set the 3D-video playback equipment so
that it outputs one of the signals listed in
the Compatibility Chart in this operation
manual.
3
9
Note
• If the images are not displayed in 3D, repeat
steps 6 to 8.
• You can also use “DLP® Link™” and “DLP®
Link™ Invert” on the menu screen to change
the 3D setting.
Ending 3D projection
4
Operate the 3D-video playback
equipment and play back the 3D
content.
1
Press 3D MODE on the remote
control to display the 3D MODE
menu.
5
Turn the 3D LCD shutter glasses
on and place them over your eyes.
2
Press O to set “DLP® Link™” to
“Off”.
3
Press 3D MODE.
Useful
Features
Switch the Input mode of the
projector to enable input of 3D
video signals.
Press 3D MODE.
• The 3D MODE menu will disappear.
• The 3D MODE menu will disappear.
67
Viewing Stereoscopic 3D Images (Continued)
Appendix
■ How the 3D Projection Function (DLP Link™ ) Works
The 3D projection function of this projector is compatible with the DLP® Link™ system. To
watch 3D images, you use a pair of 3D LCD shutter glasses that alternately display the
projected images for the left and right eyes and are synchronized with a control (light) signal.
Shutter glasses
control light signal*
* The control light signal is transmitted from the lens of the projector, reflected by the screen,
and received by the light reception sensor on the 3D LCD shutter glasses. Therefore, the
range of 3D viewing varies depending on the specifications of the 3D LCD shutter glasses
(light signal receiving sensitivity).
For details, see the operation manual of your 3D LCD shutter glasses.
■ For more information on the 3D projection function
Future information on the 3D projection function will be posted on the following web site.
http://www.sharp-world.com/projector/
68
Maintenance
Cleaning the projector
■ Ensure that you have unplugged the power
cord before cleaning the projector.
■ The cabinet as well as the operation panel is
made of plastic. Avoid using benzene or
thinner, as these can damage the finish on
the cabinet.
■ Do not use volatile agents such as
insecticides on the projector.
Do not attach rubber or plastic items to the
projector for long periods.
The effects of some of the agents in the
plastic may cause damage to the quality or
finish of the projector.
■ Wipe off dirt gently with a soft flannel cloth.
Using a chemical cloth (wet/dry sheet type
cloth, etc.) may deform the components of
the cabinet or cause cracking.
■ Wiping with a hard cloth or using strong
force may scratch the cabinet surface.
■ When the dirt is hard to remove, soak a cloth
in a mild detergent diluted with water, wring
the cloth well and then wipe the projector.
Strong cleaning detergents may discolor,
warp or damage the coating on the projector.
Make sure to test on a small, inconspicuous
area on the projector before use.
Cleaning the lens or lens cover
■ Use a commercially available blower or lens
cleaning paper (for glasses and camera
lenses) for cleaning the lens or lens cover. Do
not use any liquid type cleaning agents, as
they may wear off the coating film on the
surface of the lens or lens cover.
■ As the surface of the lens or lens cover can
easily get damaged, be careful not to scrape
or hit the lens or lens cover.
Cleaning the exhaust and intake vents
■ Use a vacuum cleaner to clean dust from the
exhaust vent and the intake vent.
ete
dd
Mil
nt
rge
Mild detergent diluted
with water
Info
• If you want to clean the air vents during
projector operation, ensure you press
STANDBY/ON on the projector or
STANDBY on the remote control and put the
projector into Standby mode. After the
cooling fan has stopped, clean the vents.
Wax
Thinner
Appendix
69
Maintenance Indicators
■ The warning lights (power indicator, lamp indicator and temperature warning indicator) on the
projector indicate problems inside the projector.
■ If a problem occurs, either the temperature warning indicator or the lamp indicator will
illuminate red, and the projector will enter Standby mode. After the projector has entered
Standby mode, follow the procedures given below.
Top View
Temperature warning indicator
Lamp indicator
Power indicator
About the temperature warning indicator
If the temperature inside the projector increases, due to blockage of the air vents, or the setting
location, the temperature warning indicator will blink. And if the temperature keeps on rising,
“
” will illuminate in the lower left corner of the picture with the temperature warning
indicator blinking. If this state continues, the lamp will turn off, the cooling fan will run and then
the projector will enter Standby mode. When you find the temperature warning indicator
blinking, be sure to perform the measures described on page 71.
About the lamp indicator
■ When the remaining lamp life becomes 5% or less, (yellow) and “Change The Lamp.” will
be displayed on the screen. When the percentage becomes 0%, it will change to (red), the
lamp will automatically turn off and then the projector will automatically enter Standby mode.
At this time, the lamp indicator will illuminate in red.
■ If you try to turn on the projector a fourth time without replacing the lamp, the
projector will not turn on.
Indicators on the Projector
Power indicator
Normal (Standby)
Normal (Power on)
Abnormal (See page 71.)
Normal (Cooling)
Lamp indicator
Normal
The lamp is warming up.
The lamp is shut down abnormally or requires to be
changed. (See page 71.)
Temperature
Off
Normal
warning indicator Red on/Red blinks The internal temperature is abnormally high. (See page 71.)
70
Red on
Green on
Red blinks
Green blinks
Green on
Green blinks
Red on
Maintenance indicator
Normal
Temperature
warning
indicator
Lamp
indicator
Power
indicator
Off
Green on
(Green
blinks
when the
lamp is
warming
up.)
Green on/
Red on
Green
blinks
(Cooling)
Abnormal
Problem
Cause
Possible Solution
• Temperatures
around the projector
are high.
• Blocked air intake
• Use the projector in an
area with a temperature of
lower than 95°F (+35ºC).
• Relocate the projector to
an area with proper
ventilation. (See page 8.)
• Cooling fan
breakdown
• Internal circuit failure
• Clogged air intake
• Take the projector to your
nearest Sharp Authorized
Projector Dealer or Service
Center (see page 84) for
repair.
The lamp does
not illuminate.
• The lamp is shut
down abnormally.
• Disconnect the power cord
from the AC outlet, and
then connect it again.
Time to change
the lamp.
• Carefully replace the lamp.
• Remaining lamp life
becomes 5% or less.
(See page 72.)
• Take the projector to your
• Burnt-out lamp
nearest Sharp Authorized
• Lamp circuit failure
Projector Dealer or Service
Center (see page 84) for
repair.
• Please exercise care when
replacing the lamp.
• Securely install the cover.
Red blinks The internal
(On)/
temperature is
Red on
abnormally high.
(Standby)
Red on
Red on
(Standby)
The lamp does
not illuminate.
Red blinks The power
• The lamp unit cover
indicator blinks in
is open.
red when the
projector is on.
• If the power indicator blinks
in red even when the lamp
unit cover are securely
installed, contact your
nearest Sharp Authorized
Projector Dealer or Service
Center (see page 84) for
advice.
Info
• If the temperature warning indicator illuminates, and the projector enters Standby mode, follow the
possible solutions above and then wait until the projector has cooled down completely before
plugging in the power cord and turning the power back on. (At least 10 minutes.)
• If the power is turned off for a brief moment due to power outage or some other cause while using
the projector, and the power supply recovers immediately after that, the lamp indicator will illuminate
in red and the lamp may not be lit. In this case, unplug the power cord from the AC outlet, replace
the power cord in the AC outlet and then turn the power on again.
• The cooling fan keeps the internal temperature of the projector constant and this function is
controlled automatically. The sound of the cooling fan may change during operation because the fan
speed may change and this is not a malfunction.
Appendix
71
Regarding the Lamp
Lamp
■ It is recommended that the lamp (sold separately) be replaced when the remaining lamp life becomes
5% or less, or when you notice a significant deterioration in the picture and color quality. The lamp life
(percentage) can be checked with the on-screen display. (See page 60.)
■ Purchase a replacement lamp of type AN-SV10LP from your place of purchase, nearest Sharp
Authorized Projector Dealer or Service Center.
IMPORTANT NOTE TO U.S. CUSTOMERS:
The lamp included with this projector is backed by a 90-day parts and labor limited
warranty. All service of this projector under warranty, including lamp replacement,
must be obtained through a Sharp Authorized Projector Dealer or Service Center.
For the name of the nearest Sharp Authorized Projector Dealer or Service Center,
please call toll-free: 1-888-GO-SHARP (1-888-467-4277).
Hg LAMP CONTAINS MERCURY For State Lamp Disposal
Information
www.lamprecycle.org or 1-800-BE-SHARP
U.S.A ONLY
Caution Concerning the Lamp
■ This projector utilizes a pressurized mercury lamp. A loud sound may indicate lamp failure. Lamp failure
can be attributed to numerous sources such as: excessive shock, improper cooling, surface scratches
or deterioration of the lamp due to a lapse of usage time.
The period of time up to failure largely varies depending on the individual lamp and/or the condition and
the frequency of use. It is important to note that failure can often result in the bulb cracking.
■ When the lamp replacement indicator and on-screen display icon are illuminated, it is recommended
that the lamp be replaced with a new one immediately, even if the lamp appears to be operating
normally.
■ Should the lamp break, there is also a possibility that glass particles may spread inside of the projector.
In such a case, it is recommended you contact your nearest Sharp Authorized Projector Dealer or
Service Center to assure safe operation.
■ Should the lamp break, the glass particles may spread inside the lamp cage or gas contained in the
lamp may be vented into the room from the exhaust vent. Because the gas in this lamp includes
mercury, ventilate the room well if the lamp breaks and avoid all exposure to the released gas. In case of
exposure to the gas, consult a doctor as soon as possible.
Replacing the Lamp
Caution
• Do not remove the lamp unit from the projector right after use. The lamp will be very hot and may cause
burns or injury.
• Wait at least one hour after the power cord is disconnected to allow the surface of the lamp unit to fully
cool before removing the lamp unit.
■ Carefully change the lamp by following the instructions described in this section.
* If you wish, you may have the lamp replaced at your nearest Sharp Authorized Projector
Dealer or Service Center.
* If the new lamp does not light after replacement, take your projector to the nearest Sharp Authorized Projector
Dealer or Service Center for repair.
72
Removing and Installing the
Lamp Unit
Warning!
• Do not remove the lamp unit from the
projector right after use. The lamp and parts
around the lamp will be very hot and may
cause burns or injury.
Lamp unit
AN-SV10LP
Optional
accessory
Info
• Do not touch the glass surface of the lamp
unit or the inside of the projector.
• To avoid injury to yourself and damage to the
lamp, make sure you carefully follow the
steps below.
• Do not loosen other screws except for the
lamp unit cover and lamp unit.
1
2
3
Press STANDBY/ON on the
projector or STANDBY on the
remote control to put the
projector into Standby mode.
STANDBY/ON
button
Disconnect the power cord.
• Unplug the power cord from the AC
socket.
• Leave the lamp until it has fully cooled
down (about 1 hour).
AC socket
Remove the lamp unit cover.
• Loosen the user service screw (1) that
secures the lamp unit cover. Remove the
lamp unit cover (2).
Appendix
User service screw
(for lamp unit cover)
73
Regarding the Lamp (Continued)
4
Remove the lamp unit.
5
Insert the new lamp unit.
6
Replace the lamp unit cover.
Securing screws
• Loosen the securing screws from the lamp
unit. Hold the lamp unit by the handle and
pull it in the direction of the arrow. At this
time, keep the lamp unit horizontal and do
not tilt it.
Handle
• Press the lamp unit firmly into the lamp unit
compartment. Fasten the securing screw.
• Align the tab on the lamp unit cover (1)
and close it (2). Be careful not to get the
strap caught in the cover. Then tighten the
user service screw (3) to secure the lamp
unit cover.
Info
• If the lamp unit and lamp unit cover
are not correctly installed, the power
will not turn on, even if the power
cord is connected to the projector.
Resetting the Lamp Timer
Reset the lamp timer after replacing the lamp.
Info
• Make sure to reset the lamp timer only when
replacing the lamp. If you reset the lamp timer
and continue to use the same lamp, this may
cause the lamp to become damaged or
explode.
74
1
Connect the power cord.
2
Reset the lamp timer.
• Plug the power cord into the AC socket of
the projector.
• While simultaneously holding down
MENU, ENTER and R on the projector,
press STANDBY/ON on the projector and
keep all four buttons pressed down until
the lamp indicator starts blinking green.
• “LAMP 0000H” is displayed, indicating
that the lamp timer is reset.
AC socket
STANDBY/ON button
ENTER button
R button
MENU button
Compatibility Chart
Computer
• Multiple signal support
Horizontal Frequency: 15-110 kHz,
Vertical Frequency: 45-85 Hz,
PC/MAC
Mode
Resolution
Horizontal
frequency [kHz]
Vertical
frequency[Hz]
Analog
Support
50
60
70
72
75
85
50
56
60
70
72
75
85
50
60
70
75
85
60
60
60
75
60
60
60
60
70
75
60
75
60
75
60
60
60
60
67
75
75
✔
✔
✔
✔
✔
✔
✔
✔
✔
✔
✔
✔
✔
✔
✔
✔
✔
✔
✔
✔
✔
✔
✔
✔
✔
✔
✔
✔
✔
✔
✔
✔
✔
✔
✔
✔
✔
✔
✔
75
✔
SXGA+
1400 × 1050
MAC 13"
MAC 16"
MAC 19"
WSXGA+
UXGA
VGA
SVGA
XGA
1680 × 1050
1600 × 1200
640 × 480
832 × 624
1024 × 768
26.2
31.5
34.7
37.9
37.5
43.3
31.3
35.2
37.9
46.6
48.1
46.9
53.7
40.3
48.4
56.5
60.0
68.7
45.0
47.8
49.7
62.8
47.7
47.8
55.9
55.0
66.2
67.5
60.0
75.0
64.0
80.0
64.0
65.3
65.3
75.0
34.9
49.7
60.2
MAC 21"
SXGA
1152 × 870
68.7
VGA
640 × 480
SVGA
800 × 600
XGA
1024 × 768
WXGA
1280 × 800
WXGA+
1360 × 768
1366 × 768
1440 × 900
PC
1280 × 720
1280 × 768
1152 × 864
SXGA
1280 × 960
1280 × 1024
Pixel Clock: 12-165 MHz
Sync signal: Compatible with TTL level
• Compatible with sync on green signal
Digital
Support
Display
XG-SV100W
XG-SV200X
✔
✔
✔
Upscale
✔
✔
Upscale
✔
✔
✔
✔
✔
✔
✔
✔
TRUE
TRUE
✔
✔
Intelligent
Compression
✔
Intelligent
Compression
✔
✔
✔
✔
Upscale
Intelligent
Compression
Upscale
TRUE
Intelligent
Compression
Note
• Optimum image quality will be achieved by matching your computer's output resolution to the
resolution that corresponds to “TRUE” in the “Display” column shown above.
• When “Screen resolution” of the computer is different from the resolution displayed on the projected
image, follow the procedures shown below.
– Refer to “Resolution” on the “SIG” menu and select the same resolution as the resolution in “Screen
resolution” of the computer.
– Depending on the computer you are using, the output signal may not be faithful to the “Screen resolution”
adjustment. Check the settings of the computer's signal output. If the settings cannot be changed, it is
recommended that the resolution be set to the one that corresponds to “TRUE” in the “Display” column.
Appendix
75
Compatibility Chart (Continued)
3D Supported Signals
Signal
Horizontal Frequency (kHz)
SVGA
800 × 600
XGA
1024 × 768
1280 × 800
WXGA
1280 × 720
37.9
77.1
48.4
98.6
49.7
101.6
45.0
92.6
Vertical Frequency (Hz)
60
120
60
120
60
120 *1
60
120
Analog
Support
✔
Digital
Support
✔
✔
✔
✔
✔
✔
✔
✔
✔
✔
✔
*1 Reduced Blanking
Note
• Your computer graphics card must be able to display 3D stereoscopic signals.
Please check with your computer/graphic card specifications or call your computer manufacturer to
ensure this capability.
DTV
Horizontal
Signal Frequency
(kHz)
15.7
480I
480P
31.5
540P
33.8
15.6
576I
576P
31.3
720P
37.5
720P
45.0
33.8
1035I
76
Vertical
Frequency (Hz)
60
60
60
50
50
50
60
60
Analog
Support
✔
✔
✔
✔
✔
✔
✔
✔
Digital
Support
✔
✔
✔
✔
Horizontal
Signal Frequency
(kHz)
28.1
1080I
33.8
1080I
1080P
27.0
1080P
28.1
1080P
33.8
1080P
56.3
1080P
67.5
Vertical
Frequency (Hz)
50
60
24
25
30
50
60
Analog
Support
✔
✔
✔
✔
Digital
Support
✔
✔
✔
✔
✔
✔
✔
Attaching the Ceiling-mount Rotating Module
(AN-SV100T)
1
Press STANDBY/ON on the
projector or STANDBY on the
remote control to put the
projector into Standby mode.
Then disconnect the power cord.
2
Turn over the projector and place
it upside down on a flat surface.
Remove the connector cover.
3
Place the ceiling-mount rotating
module on the bottom of the
projector so that it is aligned
with the module installation
holes on the projector. (Make
sure the three position-setting
pins on the module are inserted
into the position-setting holes on
the projector.)
4
Using the supplied bolts, attach
the ceiling-mount rotating
module to the projector.
First, lightly screw all four bolts
and then tighten them firmly.
Appendix
77
Attaching the Terminal Cover to the Module
78
1
Fix the hooks of the terminal
covers ( ) and fit the small
protrusions on the covers into the
slots on the ceiling-mount
rotating module (AN-SV100T) ( ).
2
Fasten the terminal covers at the
two points with the supplied
screws.
Screws
Attaching the Ceiling Mount to the Ceiling
When installed with the
AN-TK201
1
Attach the ceiling mount to the
ceiling.
• First, lightly screw an installation bolt into
the smallest hole
and then proceed,
doing the same for the holes ,
and .
Once the position has been decided, firmly
tighten all four bolts.
• Use M8-type bolts. (Bolt type may vary
depending on the method of installation.)
• Use the washers supplied with the
Washer
Mounting bolt (M8-type)
ceiling mount.
2
Attach the height-adjustment
pole to the ceiling mount.
1. Insert the height-adjustment pole
into
the ceiling mount.
2. Fix the pole in place with the sleeve and
pole-fixing bolt , according to the height
of the screen.
3. Lock the bolt in place with the securing
nut .
4. Screw in the two stabilizing screws .
5. Tighten the securing nut
firmly and fit
the pin
into the hole on the pole-fixing
bolt.
Pin hole
Sleeve
Caution
• Ask your dealer or service shop to install the
ceiling mount. Sharp will assume no
responsibility whatsoever if inadequate
installation causes your projector or attached
devices to fall out of place.
Appendix
79
Attaching the Ceiling Mount to the Ceiling (Continued)
When installed with the
AN-TK202
1
Attach the ceiling mount to the
ceiling.
• First screw a bolt into the hole
(smallest
hole) and tighten it enough to keep the
mount in place. Then, do the same for the
holes ,
and .
Position the four corners correctly, and
then tighten all bolts firmly.
• Use M8-type bolts. (Bolt type may vary
depending on the method of installation.)
• Use the washers supplied with the ceiling
mount.
Caution
• Ask your dealer or service shop to install the
ceiling mount. Sharp will assume no
responsibility whatsoever if inadequate
installation causes your projector or attached
devices to fall out of place.
80
Troubleshooting
Problem
•
•
•
•
•
•
No picture and no sound •
or projector does not
•
start.
•
•
•
Check
Projector power cord is not plugged into the wall outlet.
Power to the external connected devices is off.
The selected Input mode is wrong.
The AV Mute function is working.
Cables are incorrectly connected to the projector.
Remote control battery has run out.
External output has not been set when connecting a notebook computer.
The lamp unit cover is not installed correctly.
Page
26
–
34
35
22–26
15
22
73, 74
Cables are incorrectly connected to the projector.
“Bright” is set to minimum position.
Depending on the computer you are using, an image may not be
projected unless the signal output setting of the computer is switched
to the external output. Refer to the computer's operation manual for
how to switch its signal output settings.
• Is “On” selected in “DLP® LinkTM”?
22–26
48
–
• Check that “Wall Color” is configured correctly.
54
67
Sound is heard but no
picture appears
(or picture is dark).
Dark or bluish image
• Image adjustments are incorrectly set.
48
• Make adjustments of “Color” and “Tint” in “Picture Mode” and lower the
TM
“BrilliantColor ” value.
(S-Video, Video Input only)
• Video input system is incorrectly set.
53
(COMPUTER/COMPONENT 1, 2 Input only)
• Input signal type (RGB/Component) is incorrectly set.
52
Color is faded or poor.
Picture is blurred;
noise appears.
• Adjust the focus.
• The projection distance exceeds the focus range.
• There is fog on the lens. If the projector is carried from a cold room into a
warm room, or if it is suddenly heated, condensation may form on the surface
of the lens and the image will become blurred. Set up the projector at least
one hour before it is to be used. If condensation should form, remove the
power cord from the wall outlet and wait for it to clear.
(Computer Input only)
• Perform “SIG” Adjustments (“Clock” and “Phase” Adjustment)
• Noise may appear depending on the computer.
• Cables are incorrectly connected to the projector.
• Volume is set to minimum.
• When the projector is connected to an external device and the volume
is set to minimum, the sound is not output even if you turn up the
volume of the external device.
30
19, 20
–
• “Speaker” is set to “Off”.
51
52
–
22–26
35
Picture appears but no
sound is heard.
52
• Make the necessary adjustments of each item in the “SIG” menu.
• Depending on the computer you are using, the output resolution signal –
may be different from the one you have set. For details, refer to the
operation manual of the computer.
• If the picture is normal, the sound is due to cabinet shrinkage caused
–
An unusual sound is
by room temperature changes. This will not affect operation or
occasionally heard from
performance.
the cabinet.
Appendix
Data image is not
centered.
81
Troubleshooting (Continued)
Problem
Check
Maintenance indicator on • See “Maintenance Indicators”.
the projector illuminates
or blinks in red.
• Change the input signal type setting.
Picture is green on
COMPUTER (YPbPr)
Page
70
52
Picture is pink
(no green) on
COMPUTER (RGB)
Picture is too bright and
whitish.
• Image adjustments are incorrectly set.
The cooling fan becomes • When temperature inside the projector increases, the cooling fan runs
faster.
noisy.
•
The lamp indicator is illuminating in red.
The lamp does not light
Replace the lamp.
up even after the
projector turns on.
48
8, 9
69, 70, 71
70, 73, 74
The lamp suddenly turns
off during projection.
The image sometimes
flickers.
The lamp needs much
time to turn on.
• Cables are incorrectly connected to the projector or the connected
equipment works improperly.
• If this happens frequently, replace the lamp.
• The lamp will eventually need to be changed.
While the remaining lamp life draws to a close, replace the lamp.
22–26
73
73
Picture is dark.
• Operate the remote control while pointing it at the projector's remote
control sensor.
• The remote control may be too far away from the projector.
• When using the ceiling-mount rotating module (AN-SV100T) and
rotating the projector, the signal transmission to the sensor may not
work depending on the rotation angle of the projector.
• If direct sunlight or a strong fluorescent lamp is shining on the
projector's remote control sensor, place the projector where it will not
be affected by strong light.
• The batteries may be depleted or inserted incorrectly. Make sure the
batteries are inserted correctly or insert new ones.
The Rotate indicator does • Is “Off” selected in “Rotate Indicator” ?
• Check the connection of the ceiling-mount rotating module (AN-SV100T)
not light up.
and projector.
The lens shift function • The lens cover is not attached correctly.
does not work.
The remote control
cannot be used.
82
15
–
15
59
–
12
Problem
Check
• Images may appear to flicker when fluorescent light or ambient light
enters your vision.
– Turn off the lights.
– Block any ambient light.
Ghosting (a double image) • Check that you are using 3D LCD shutter glasses that support the
®
occurs without the image DLP Link™ system.
– Be sure to use 3D LCD shutter glasses that support the DLP® Link™
appearing in 3D.
system.
• Check that the shutters on the 3D LCD shutter glasses are working
properly.
– Turn the 3D LCD shutter glasses off and then on again.
– Check the batteries of the 3D LCD shutter glasses.
– Check that the 3D LCD shutter glasses are set to 3D viewing mode.
Some 3D LCD shutter glasses are equipped with a special viewing
mode (such as “dual view mode”) in addition to the normal 3D
viewing mode. See the operation manual of your 3D LCD shutter
glasses.
• Check the settings of the projector.
– Turn the DLP® Link™ function “On”.
– Use “DLP® Link™ Invert” to change the setting.
• Check whether a signal that is not supported is being input.
– Configure your 3D application at the correct resolution and refresh
rate.
Make sure you are running your 3D application in resolutions that
support 3D. To support 3D, your 3D application must be configured
to run at the correct settings for this projector.
For details on the supported signals, see “3D Supported Signals” of
the Compatibility Chart.
• If the projector is connected to a computer for 3D image playback,
check that a stereoscopically-enabled application is being used.
– Use the applicable software.
– Set the applicable software to the field sequential format.
• Check that there are no obstructions between the screen and the 3D
LCD shutter glasses.
– Remove any obstructions.
Any obstructions may cause the glasses not to function properly
causing the lenses to flicker or turn off. Do not place your hand or
other objects in front of the 3D control signal sensor on the glasses.
• Check whether there is a source of high intensity lighting nearby.
– Block the light or turn it off.
High intensity lighting can interfere with communication between the
3D LCD shutter glasses and the screen resulting in some flicker.
• Check whether two or more projectors are projecting 3D images at the
same time.
– Use only one projector at a time.
3D images flicker when
watching in a room.
Page
–
–
–
–
76
–
–
–
–
This unit is equipped with a microprocessor. Its performance could be adversely affected by incorrect
operation or interference. If this should happen, unplug the Unit and plug it in again after more than 5
minutes.
Appendix
83
For SHARP Assistance
If you encounter any problems during setup or operation of this projector, first
refer to the “Troubleshooting” section on pages 81 to 83. If this operation
manual does not answer your question, please contact the SHARP Service
departments listed below.
U.S.A.
Sharp Electronics Corporation
1-888-GO-SHARP (1-888-467-4277)
[email protected]
http://www.sharpusa.com
Canada
Sharp Electronics of Canada Ltd.
(905) 568-7140
http://www.sharp.ca
Mexico
Sharp Electronics Corporation
Mexico Branch
(525) 716-9000
http://www.sharp.com.mx
Latin America Sharp Electronics Corp. Latin
American Group
(305) 264-2277
[email protected]
http://www.sharpla.com
Benelux
SHARP Electronics Benelux BV
0900-SHARPCE (0900-7427723)
Nederland
9900-0159 Belgium
http://www.sharp.nl
http://www.sharp.be
http://www.sharp.lu
Australia
Sharp Corporation of Australia Pty.
Ltd.
1300-135-022
http://www.sharp.net.au
New Zealand
Sharp Corporation of New Zealand
Phone: (09) 573-0111
Fax: (09) 573-0112
http://www.sharp.net.nz
Singapore
Sharp-Roxy Sales (S) Pte. Ltd.
65-226-6556
[email protected]
http://www.sharp.com.sg
Hong Kong
Sharp-Roxy (HK) Ltd.
(852) 2410-2623
[email protected]
http://www.sharp.com.hk
Germany
Sharp Electronics (Europe) GMBH
01805-234675
http://www.sharp.de
U.K.
Sharp Electronics (U.K.) Ltd.
08705 274277
http://www.sharp.co.uk/customersupport
Italy
Sharp Electronics (Italy) S.P.A.
(39) 02-89595-1
http://www.sharp.it
Taiwan
Sharp Corporation (Taiwan)
0800-025111
http://www.sharp-scot.com.tw
France
Sharp Electronics France
01 49 90 35 40
[email protected]
http://www.sharp.fr
Malaysia
Sharp-Roxy Sales & Service Co.
(60) 3-5125678
U.A.E.
Spain
Sharp Electronica Espana, S.A.
93 5819700
[email protected]
http://www.sharp.es
Sharp Middle East Fze
971-4-81-5311
[email protected]
Thailand
Sharp Thebnakorn Co. Ltd.
02-236-0170
[email protected]
http://www.sharp-th.com
Korea
Sharp Electronics Incorporated of
Korea
(82) 2-3660-2002
[email protected]
http://www.sharpkorea.co.kr
India
Sharp Business Systems (India)
Limited
(91) 11- 6431313
[email protected]
Switzerland
Sharp Electronics (Schweiz) AG
0041 1 846 63 11
[email protected]
http://www.sharp.ch
Sweden
Sharp Electronics ( Nordic ) AB
(46) 8 6343600
[email protected]
http://www.sharp.se
Austria
Sharp Electronics (Europe) GMBH
Branch Office Austria
0043 1 727 19 123
[email protected]
http://www.sharp.at
84
Specifications
Model
Display devices
Resolution
Lens
Input terminals
Output
terminals
Control and
communication
terminals
F number
Zoom
Focus
HDMI
Computer/Component
(mini D-sub 15 pin)
S-Video (mini DIN 4 pin)
Video (RCA)
Audio (ø3.5 mm stereo minijack)
Audio (RCA)
Computer/Component
(mini D-sub 15 pin)
Audio (ø3.5 mm stereo minijack)
LAN (RJ-45)
USB (Type B)
RS-232C (mini DIN 9 pin)
Speaker
Projection lamp
Rated voltage
Rated frequency
Input current
Power consumption
Eco+Quiet
Off
Eco+Quiet
On
Power consumption
(STANDBY Mode)
Standard
Eco
Operation temperature
Cabinet
Dimensions (main body only) [W × H × D]
Weight (approx.)
AC 100 V
AC 240 V
AC 100 V
AC 240 V
AC 100 V
AC 240 V
AC 100 V
AC 240 V
XG-SV100W
XG-SV200X
0.65" DLP® Chip ×1
0.7" DLP® Chip ×1
WXGA (1280 × 800)
XGA (1024 × 768)
F 2.5 – 3.7
Power, ×2.0 (f = 21.2 – 42.0 mm)
Power
×1
×2
×1
×1
×1
×1 (L/R)
×1
(Shared with COMPUTER/COMPONENT 2; switchable)
×1 (variable audio output)
×1
×1
×1
10 W (Mono)
400 W
AC 100 – 240 V
50/60 Hz
5.2 A
516 W
495 W
396 W
383 W
12.2 W
12.8 W
0.35 W
0.70 W
41ºF to 95ºF (+5ºC to +35ºC)
Plastic
15 61/64" × 4 33/64" × 16"
(405 × 114.5 × 406.5 mm)
16.5 lbs. (7.5 kg)
As a part of policy of continuous improvement, SHARP reserves the right to make design and
specification changes for product improvement without prior notice. The performance specification
figures indicated are nominal values of production units. There may be some deviations from these
values in individual units.
Appendix
This SHARP projector uses a DLP® chip. This very sophisticated panel contains 1,024,000
(XG-SV100W) or 786,432 (XG-SV200X) pixels (micromirrors). As with any high technology
electronic equipment such as large screen TVs, video systems and video cameras, there are
certain acceptable tolerances that the equipment must conform to.
This unit has some inactive pixels within acceptable tolerances which may result in inactive dots
on the picture screen. This will not affect the picture quality or the life expectancy of the unit.
85
86
1 1/ 2
(38)
4 11/32 (110)
6
3 1/2 (89)
13 5/16 (338)
21/64 (160.5)
M4
M4
M4
M4
M4
M4
M4
1 5/ 8
(41.25)
2 61/64
(75)
3 3/4 (95)
11 63/64 (304)
7 31/64 (190)
7 31/64 (190)
2 9/64
(54)
(10)
25/64
5 5/16 (134.5)
4 33/64 (114.5)
2 25/64
(60.5)
7 63/64 (202.5)
3 3/4 (95)
2 59/64
(74)
16 (406.5)
Dimensions
Units: inches (mm)
15 61/64 (405)
ø68
M4
Index
MEMORY (1-8) buttons ····················································59
Memory Menu ··································································59
MEMORY MENU button ···················································59
MENU button····································································46
MONITOR OUT terminal···················································24
MOUSE/Adjustment buttons ······································42, 46
NATIVE········································································36, 38
Network ············································································61
NORMAL ···································································· 36-39
ON button ·········································································27
Optional accessories ························································11
OSD Display ····································································54
Overscan ··········································································54
PAGE DOWN button·························································42
PAGE UP button ·······························································42
Password··········································································61
PDF···················································································10
Phase················································································52
Picture Adjustment ··························································48
Picture Mode ······························································41, 48
PICTURE MODE button ···················································41
POINTER button ·······························································40
Power cord ·······································································26
Power indicator ································································70
PRJ ···················································································56
PRJ Mode···································································21, 55
R-CLICK/RETURN button ··········································42, 46
Red ···················································································48
Remote control ·································································14
Remote control sensor ·····················································15
Replacing the lamp·····················································72, 73
Reset Network Setting ·····················································62
Resize ·········································································36, 54
RESIZE button ··································································36
Resolution·········································································52
Restart Network ·······························································62
RGB cable ········································································22
ROTATE button ·································································14
Rotate Indicator ································································59
RS-232C terminal ·····························································25
Saturation ·········································································50
SCR ··················································································54
Screen Size and Projection Distance ·························19, 20
Select Color ······································································50
Sharp ················································································48
SIG····················································································52
Signal Info·········································································53
Signal Type ·······································································52
Speaker ············································································51
SPOT button·····································································40
STANDBY button ······························································27
STANDBY Mode ·······························································56
STANDBY/ON button ·······················································27
Supplied accessories ·······················································11
S-VIDEO terminal ·····························································23
System Lock·····································································57
TCP/IP ··············································································62
Temperature warning indicator ·········································70
Tint····················································································48
Treble ················································································51
USB terminal ····································································42
Value ·················································································50
Video Setup ······································································53
Video System ···································································53
VIDEO terminal ·································································23
VOL (Volume) buttons·······················································35
V-Pos ················································································52
V-STRETCH ································································37, 39
Wall Color ·········································································54
ZOOM buttons ·································································30
87
Appendix
16:9············································································· 36-39
3D MODE button ······························································67
AC socket ·········································································26
Adjustment buttons ··························································46
Adjustment foot ································································29
All Reset ···········································································60
AREA ZOOM ······························································37, 39
Aspect ratio ································································36, 38
Audio Input ·······································································51
Audio Out ·········································································51
AUDIO 1, 2 terminals ························································24
AUDIO OUT terminal ························································24
Auto Power Off ·································································56
Auto Restart ·····································································56
Auto Sync (Auto Sync adjustment) ····························41, 52
AUTO SYNC button··························································41
AV MUTE button ·······························································35
Background ······································································55
Bass··················································································51
Batteries ···········································································15
Blue ··················································································55
BORDER ·····································································36, 37
BREAK TIMER button ······················································40
Bright ················································································48
BrilliantColorTM ··································································48
Clock ················································································52
Closed Caption·································································55
CLR Temp (Color Temperature) ········································49
C.M.S. ··············································································49
Color ·················································································48
COMPUTER2 Select ························································56
COMPUTER/COMPONENT1, 2 input terminals ·········22, 23
Contrast ············································································48
DHCP Client ·····································································62
DLP® LinkTM ······································································67
DLP® LinkTM Invert ····························································67
DNR ··················································································50
Dynamic Range ································································53
Eco+Quiet···································································40, 50
ECO+QUIET button ··························································40
Effect ················································································50
ENTER button···································································46
Exhaust vent ··························································12,13, 69
Fan Mode ·········································································57
FREEZE button ·································································41
FOCUS buttons ································································30
FULL ···········································································36, 38
Geometric adjustment ······················································32
H-Pos ···············································································52
H&V KEYSTONE·······························································33
H&V SHIFT button ····························································29
HDMI terminal·····························································22, 23
Hue ···················································································50
INPUT modes ···································································34
Intake vent ··································································13, 69
IP Address ········································································63
Kensington Security Standard connector ························13
Keycode ··········································································57
Keylock ············································································58
KEYSTONE button ··························································31
Keystone Correction·························································31
Lamp ················································································72
Lamp indicator ·································································70
Lamp Timer (Life) ······························································60
Lamp unit ·········································································73
Language (on-screen display language) ··························55
LAN terminal ·····································································26
LENS button ·····································································12
L-CLICK/EFFECT button ············································42, 40
MAC Address ···································································63
MAGNIFY buttons ····························································41