1
Ultra Go Par7X
Operating Instructions
Operating Power:
There are two ways to supply power to this unit; battery power or AC
power.
• AC Power - To run the unit using AC power, plug the unit into a
power source, and put the Load Switch into the ON position. When
using AC power make sure the Battery Switch is in the OFF position.
• Battery Power - To run the unit using Battery power, put the Load
and Battery Switches in the ON position.
Operating Modes:
The Ultra Go Par7X has five operating modes:
• DMX control mode - This function will allow you to control each
individual fixtures traits with a standard DMX 512 controller such as
as the ADJ Show Designer.
• RGB Mode - Choose one of the three colors to remain static or adjust the intensity of each color to make your own color.
• Sound-Active mode - The unit will react to sound, chasing through the built in programs.
• Auto Mode - There are 17 Auto Modes to choose from. 8 color fade modes, 8 color change modes, and 1 random mode.
• Static Color Mode - There are 35 colors to choose from.
DMX Mode:
Operating through a DMX controller gives the user the freedom to
create their own programs tailored to their own individual needs. This
function also allows you to use your fixtures as spot lights. The Ultra
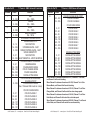
Go Par7X has 8 DMX modes: 1 Channel mode, 2 Channel mode,
3 Channel mode, a second 3 Channel mode, 4 Channel mode, 5
Channel mode, 6 Channel mode, and a 7 Channel mode. See pages
17-21 for each modes’ DMX traits.
1. This function will allow you to control each individual fixture’s traits with a standard DMX 512 controller.
2. To run your fixture in DMX mode press the MODE button until “dXXX” is displayed. “XXX” represents the current displayed address. Use the UP or DOWN buttons to select your desired DMX address, then press the SETUP button to select your DMX
Channel mode.
3. Use the UP or DOWN buttons to scroll through the DMX Channel ADJ Products, LLC - www.adj.com - Ultra Go Par7X User Manual Page 10
Ultra Go Par7X
Operating Instructions
modes. The Channel modes are listed below:
• To run the 1 Channel Mode, press the MODE button until “Ch01” is displayed. This is the 1 Channel DMX Mode.
• To run the 2 Channel Mode, press the MODE button until “Ch02” is displayed. This is the 2 Channel DMX Mode.
• To run the 3 Channel Mode, press the MODE button until “Ch03” is displayed. This is the 3 Channel DMX Mode.
• To run the other 3 Channel Mode, press the MODE button until “Ch3A” is displayed. This is the other 3 Channel DMX Mode.
• To run the 4 Channel Mode, press the MODE button until “Ch04” is displayed. This is the 4 Channel DMX Mode.
• To run the 5 Channel Mode, press the MODE button until “Ch05” is displayed. This is the 5 Channel DMX Mode.
• To run the 6 Channel Mode, press the MODE button until “Ch06” is displayed. This is the 6 Channel DMX Mode.
• To run the 7 Channel Mode, press the MODE button until “Ch07” is displayed. This is the 7 Channel DMX Mode.
4. Please see pages 17-21 for DMX values and traits.
5. After you have chosen your desired DMX Channel mode plug in the fixture via the XLR connections to any standard DMX control-
ler.
RGB Dimmer Mode:
1. Plug the fixture in and press the MODE button until:
2. When “r.XXX” is displayed you are in Red dimming mode. Press the UP and DOWN buttons to adjust intensity. After you have finished adjusting the intensity, or you would like to skip to the next color, press the SET UP button.
3. When “G.XXX” is displayed you are in Green dimming mode. Press the UP and DOWN buttons to adjust intensity.
4. When “b.XXX” is displayed you are in Blue dimming mode. Press the UP and DOWN buttons to adjust intensity.
5. After you have adjusted the RGB colors to make your desired color you can then activate strobing by pressing the SET UP but-
ton to enter the Flash (strobe) mode.
6. “FS.XX” will be displayed, this is Flash mode. The Flash can be
adjusted between “FS.00” (flash off) to “FS.15” (fastest flash).
ADJ Products, LLC - www.adj.com - Ultra Go Par7X User Manual Page 11