1
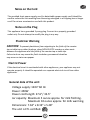
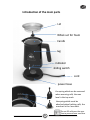
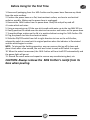
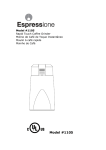
Model No.: CREMA 03
After Sales Service
Electra Craft
41 Woodbine Street
Bergenfield, NJ 07621
Phone 201 439 1700
Fax 201 439 1701
[email protected]
Cremaccino is the best way to have a perfect
foamy cappuccino after pouring the
perfect espresso coffee with your
Meseta capsule system.
Meseta Cremaccino is a trademark of Co.ind s.c.
Via Saliceto 22/h – 40013 Castel Maggiore (BO) Italy
We invite you to visit the following websites for further information:
www.mesetacoffeecapsules.it
www.mesetashop.it
www.meseta.it
www.coind.it
2
IMPORTANT SAFEGUARDS
WARNING: WHEN USING ELECTRICAL APPLIANCES, BASIC SAFETY PRECAUTIONS SHOULD
ALWAYS BE FOLLOWED, INCLUDING THE FOLLOWING:
Read all instructions carefully.
1. Do not touch hot surfaces. Use handles or knobs.
2. To protect against fire, electric shock, and injury to persons, do not immerse cord, plug, or
non-stick carafe or base in water or other liquid.
3. Close supervision is necessary when any appliance is used by or near children.
4. Unplug from outlet when not in use and before cleaning. Allow to cool before putting on or
taking off parts,and before cleaning.
5. Do not operate any appliance with a damaged cord or plug or after the appliance
malfunctions or has been damaged in any manner. Bring it to a qualified technician for
examination, repair or electrical or mechanical adjustment.
6. The use of accessory attachments not recommended by the appliance manufacturer may
result in fire, electric shock or injury.
7. Do not use outdoors.
8. Do not let the cord hang over the edge of a table or counter or touch hot surfaces.
9. Do not place on or near a hot gas or electric burner, or in a heated oven.
10. Do not use the Milk Frother other than for heating milk .
11. Milk can remain hot for some considerable time. Do not touch the carafe while heating as
it is hot.
12. Do not remove the lid during heating or frothing or while the Milk Frother is in operation
as scalding may occur.
ADDITIONAL IMPORTANT SAFEGUARDS
1. Do not use the Milk Frother to heat oil, or to melt butter.
2. Use the Milk Frother for heating milk or half-and-half ONLY. Do not use it to
cook, whisk or heat any other foods. Use water to clean as described in the Care &
Cleaning Instructions in this instruction manual.
3. Do not place any container inside the Milk Frother — milk must be removed
from the packaging, container, can, etc. before being put into the carafe.
4. Before serving, or removing contents, remove carafe from base and unplug cord
from electrical outlet.
FOR HOUSEHOLD USE ONLY
SAVE THESE INSTRUCTIONS
3
Key to Symbols
CAUTION
This is the safety warning symbol. It is used to call your
attention to possible risks of personal injury.
To avoid possible injury or death, always follow all
procedures outlined in this Instruction Book.
IMPORTANT! READ THESE INSTRUCTIONS.
Not dishwasher safe.
4
Notes on the Cord
The provided short power-supply cord (or detachable power-supply cord) should be
used to reduce the risk resulting from becoming entangled in or tripping over a longer
cord. Do not use an extension cord with this product.
Notes on the Plug
This appliance has a grounded 3-prong plug. Connect to a properly grounded
outlet only. Do not attempt to modify the plug in any way.
Plasticizer Warning
CAUTION: To prevent plasticizers from migrating to the finish of the counter
top or table top or other furniture, place NON-PLASTIC coasters or place mats
between the appliance and the finish of the counter top or table top.
Failure to do so may cause the finish to darken; permanent blemishes
may occur or stains can appear.
Electric Power
If the electrical circuit is overloaded with other appliances, your appliance may not
operate properly. It should be operated on a separate electrical circuit from other
appliances.
General data of the unit:
Voltage supply: 120V˜60 Hz
Power: 450W
Power cord length: 27.6”/ 33.5”
Jar capacity: Maximum 5 ounce approx. for milk frothing.
Maximum 10 ounce approx. for milk warming.
Dimensions: 7.63” x 8.19” x 5.28”
The unit is ETL certified.
5
Introduction of the main parts
Lid
Whisk set for foam
Carafe
Jug
indicator
sliding switch
cord
power base
the spring whisk can be removed
when warming milk, the max
level is the top mark.
the spring whisk must be
attached when frothing milk, the
max level is the low mark.
6
Do not fill milk over the max.
line to prevent from overflow.
Before Using for the First Time
1. Remove all packaging from the Milk Frother and its power base. Remove any labels
from the outer surfaces.
2. Position the power base on a flat, heat-resistant surface, as close to an electrical
outlet as possible. Make sure the power base is unplugged.
3. Remove the Milk Frother from its power base. Grasp lid and pull up and off.
4. Locate whisk and mixer.
5. Using a measuring cup, fill the non-stick carafe with water up to the top MAX fill line.
6. Gently position the carafe over the electrical connector and center on the power base.
7. To avoid spillage, make sure the lid is in position before turning the Milk Frother ON.
8. Plug the power cord into the electrical outlet.
9. Slide the ON/OFF switch from left to right direction to turn on the milk frother,
release the switch to come back its original position when the indicator is illuminated
and the whisk begins to rotate.
NOTE: To interupt the frothing operation, user can remove the jug off its base and
place it back after a few second, the unit won’t start to work until switch it on again.
10. When the water has warmed, the Milk Frother will turn itself OFF automatically and
the power light will go out.
11. Discard the warm water and repeat to remove any manufacturing dust, etc.
CAUTION: Always remove the Milk Frother’s carafe from its
base when pouring.
7
Operating Instructions
1. Position the power base on a flat, heat-resistant surface, as close to an electrical outlet
as possible. Make sure the power base is unplugged.
2. Remove the Milk Frother’s carafe from its power base. Remove lid.
3. Attach the appropriate whisk. Use the mixer without the metal whisk to warm milk. Use
the wire whisk to froth milk. Place the whisk over the center pin. Press down until it locks
into position.
NOTE: The mixer with whisk attachment may be easily removed by pulling up and off the
center pin.
4. Add milk to the non-stick carafe, making sure not to exceed the appropriate MAX line.
(See Figure 1.)
NOTE: The maximum capacity when warming milk using the mixer is 3/4 cup. When
frothing milk using the mixer with whisk attachment, use 1/3 cup; liquid should barely
cover the whisk. (See Figure 1.)
NOTE: Do not exceed the MAX fill lines. Over-filling could cause heated/frothed milk to
overflow and cause damage to the unit.
WARNING: Always make sure there is milk in the carafe before plugging the unit in and
pressing the ON/OFF button. If the Milk Frother is accidentally turned ON when the
carafe is empty, damage may be caused and the unit will not operate.
5. Gently position the carafe over the electrical connector and center on the power base.
6. Replace lid. To avoid spillage, make sure the lid is secure and in position before turning
the Milk Frother ON.
7. Plug the power cord into the electrical outlet.
8. Slider the ON/OFF switch. The indicator will illuminate and the Milk Frother will turn
ON; the whisk will begin to rotate rapidly.
NOTE: To interupt the frothing operation, user can remove the jug off its base and place it
back after a few second, the unit won’t start to work until switch it on again.
9. When the Frother operation is complete, the unit will turn itself OFF automatically and
the indicator light will go out.
8
Operating Instructions
10. After heating milk, remove lid and pour into cup. After frothing, spoon froth
onto espresso or beverage of your choice
CAUTION: Always remove the Milk Frother from its base when pouring.
11. To froth or warm a second pot of, allow to cool for at least 5 minutes
between uses.
User Maintenance Instructions
This appliance requires little maintenance. It contains no user serviceable
parts. Do not try to fix it yourself.
Refer it to a qualified appliance repair technician if servicing is needed.
Care & Cleaning Instructions
NOTE: To reduce build-up of milk residues, always empty any residual milk and clean
immediately after frothing. Never leave liquid in the carafe overnight.
1. Unplug the power base from the electrical outlet and let the carafe cool down
completely before cleaning.
2. Clean carafe, inside and out, with a damp clean, soft cloth or sponge. If necessary,
attach the whisk attachment, use a spouted cup to pour fresh clean water to the
mixer MAX fill line; then add a couple drops of mild liquid soap. Turn the Milk Frother
ON and allow the soapy water to clean the carafe. After the Milk Frother turns itself
OFF, discard soapy water. Pour fresh clean water back into the carafe and
discard; repeat until soap residue is completely removed. Wipe clean with damp cloth.
WARNING: DO NOT SUBMERGE CARAFE OR THE POWER BASE IN WATER
OR ANY OTHER LIQUID. NEVER PLACE THE CARAFE UNDER RUNNING
WATER TO CLEAN.
DO NOT PLACE INTO DISHWASHER.
9
Make sure that all connectors and sockets are kept dry.
3. Rinse lid and whisks in clean water and dry thoroughly.
Storing Instructions
Unplug unit and allow to cool. Store in its box or in a cool, dry place. Never store
unit while it is still plugged in.
Never wrap cord tightly around the appliance. Do not put any stress on the cord
where it enters the appliance as it may cause the cord to fray and break.
10