1
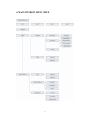
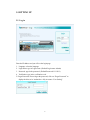
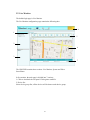
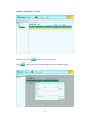
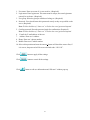
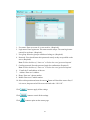
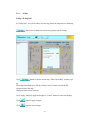
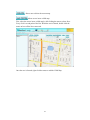
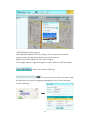
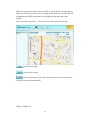
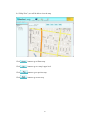
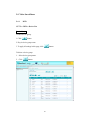
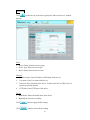
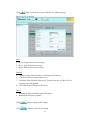
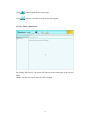
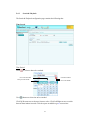
ECMS
User’s Manual
Copyright © EverFocus Electronics Corp,
Release: Oct. 2009 Rev.0
About this document
This manual should be retained for future reference. The information in this manual
was current when published. The manufacturer reserves the right to revise and
improve its products. All specifications are therefore subject to change without
notice.
Terms and Trademark
Ethernet, Internet Explorer, Linux, Microsoft, Windows, WWW are registered
trademarks of the respective holders. Other product names appearing in this User's
Guide may be trademarks or registered trademarks of their respective holders.
Java™ and all Java-related logos and trademarks are trademarks or registered
trademarks of Sun Microsystems, Inc. in the United States and other countries.
2
TABLE OF CONTENTS
1. INTRODUCTION………………………………………………………………..4
2. FEATURES……………………………………………………………………….4
3. SYSTEM REQUIREMENTS…………………………………………………….6
3.1 Minimum System requirements………………………………………………6
3.2 Recommended System requirements…………………………………………6
3.3 Notes about using CMS………………………………………………………7
4. MAIN WINDOW MENU TREE…………………………………………………8
5. SETTING UP……………………………………………………………………..9
5.1 Log in………………………………………………………………………….9
5.2 Live Monitor………………………………………………………………….10
5.3 System………………………………………………………………………..14
5.3.1 Authority……………………………………………………………….15
5.3.2 E-Map…………………………………………………………………..23
5.4 Video Surveillance……………………………………………………………28
5.4.1 DVR……………………………………………………………………28
5.4.2 Search & Playback……………………………………………………..32
5.4.3 Display & Live…………………………………………………………39
6. SPECIFICATIONS………………………………………………………………43
3
1. INTRODUCTION
ECMS is the sate-of-the-art network video management software that supports
EverFocus Paragon, Paragon264, ECOR, ECOR264 and EDR/EDVR series DVRs.
Its web browser based architecture and built-in database engine deliver powerful
video management functions such as unlimited device tree entries, customizable user
access rights, and advanced event search. It also features an advanced E-map function
that allows users to visualize all devices on a geographic region at different zoom
levels. Working with the included EverFocus TV Wall software, it can control a
monitor wall (local or remote) containing multiple video displays. With powerful and
flexible function sets, the ECMS software delivers the most comprehensive remote
video management applications to meet your surveillance needs.
2. FEATURES
z
Overview
1. Compatible with MPEG-4 and H.264 video formats
2. Support Paragon, Paragon 264, ECOR, ELR and EDR/EDVR DVR
3. Unlimited devices / maps / Monitors / live view screens / playback screens
supported
4. Internet Explorer Browser based
z
Live Video
1. Support configurable view layout and display presets for custom split screens
with assigned DVR
2. Support remote viewing
3. User grouping tree, device tree and map tree with filtered views
4. Support device drag and drop function on layout setting and device
configuration
5. Support PTZ control, including control of presets and patterns, tours
z
Live Monitor
1. Multi-monitor support Video TV Wall via display terminal setting
2. Support multiple monitors to display separate information
3. View real-time alarms and alarm history
z
Playback and Search
4
1. Support multiple concurrent video and audio playback from DVR
2. Searching can be queried based on channel; date and time and event type
3. Support several playback speeds in fast forward and fast reverse playback.
4. Support multiple video and audio archive
z
E-Map
1. Support Google Map and E-map function
2. Insert Map-Link and DVR
z
User Management
1. User database with login, password and contact details
2. Support user authentication and permission
3. Support user grouping. One user can be assigned to one group and inherit the
privileges of the group.
4. User privileges can be assigned per DVR, per E-map and function.
5
3. SYSTEM REQUIREMENTS
3.1 Minimum System requirements
•
•
•
•
•
•
•
•
•
•
•
No existing SQL server system installed
Intel Pentium 4 531 3.0 GHz, 1 MB Cache, 800 MHz FSB
Microsoft Windows XP Professional SP2, Microsoft Windows Vista. Window7
Microsoft Internet Explorer Version 7.0.
1.0 GB of RAM
10 GB of free hard disk space or more
Display adapter with 256 MB or better
1024 x 768 or higher screen resolution
10/100/1000 Ethernet Network adapter
Microsoft DirectX 9.0c or better
AppServ 2.5.10 (Apache 2.2.8, PHP 5.2.6, MySQL 5.0.51b,
phpMyAdmin-2.10.3) or later
3.2 Recommended System requirements
a) When more than 16 channels are enabled in live view and playback mode together,
it is recommended that the client PC meets below system requirements for optimal
performance.
•
•
•
•
•
•
•
•
•
•
Intel Core2 Duo E7400 2.8 GHz or higher, 3 MB Cache, 1066 MHz FSB
Microsoft Windows XP Professional SP3, or Microsoft Windows Vista.
Microsoft Internet Explorer Version 7.0.
2.0 GB of RAM
10 GB of free hard disk space or more
Graphics card with 512 MB memory or better
1024 x 768 or higher screen resolution
10/100/1000 Ethernet Network adapter
Microsoft DirectX 9.0c or better
AppServ 2.5.10 (Apache 2.2.8 ,PHP 5.2.6 ,MySQL
5.0.51b ,phpMyAdmin-2.10.3) or later
6
b) When more than 64 channels are enabled in live view and playback mode together,
it is recommended that the client PC meets below system requirements for optimal
performance.
•
•
•
•
•
•
•
•
•
•
Intel Core2 Quad Q9400 2.66 GHz or higher, 6 MB Cache, 1333 MHz FSB
Microsoft Windows XP Professional SP3, or Microsoft Windows Vista.
Microsoft Internet Explorer Version 7.0.
4.0 GB of RAM
10 GB of free hard disk space or more
Graphics card with 1 GB memory or better
1024 x 768 or higher screen resolution
10/100/1000 Ethernet Network adapter
Microsoft DirectX 9.0c or better
AppServ 2.5.10 (Apache 2.2.8, PHP 5.2.6, MySQL 5.0.51b,
phpMyAdmin-2.10.3) or later
3.3 Notes about using CMS
1. Client PC’s performance (mostly CPU speed, size of RAM, and graphics card) and
network bandwidth may affect live view and playback quality and the amount of time
it takes to archive video.
2. Please use a dedicated or clean PC to install CMS.
7
4. MAIN WINDOW MENU TREE
8
5. SETTING UP
5.1 Log in
Enter the IP address and you will see the login page.
1. Language: select the language
2. Login name: type in Login name. (Default Login name: Admin)
3. Password: type in the password. (Default Password: 11111111)
4. Verification: type in the verification code.
5. Forget Password: If user forgot the password, click on “Forget Password” to
display the hint set in “Authorities=>My Account=>User Setting”.
9
5.2 Live Monitor
The default login page is Live Monitor.
The Live Monitor configuration page contains the following tabs:
4
1
5
2
6
3
7
The CMS-DVR contains three sections: Live Monitor, System and Video
Surveillance.
In live monitor, the main page is divided into 7 sections:
1. Click to draw back the left panel. Click again to unfold it.
2. Device list:
Select device group first, all the devices will be shown under device group.
10
3. Mapview list: all the maps will be shown.
4. Status/Logout: displays user, current date and time. Click “Logout” button to logout
of the system.
5. Display Terminals: When you click on one of displays Device show on the bar of
Displays terminal, it will term in the screen as follow.
Select either full screen view
or 4-displays view
Drag and drop the DVR from left panel to the screen to view it, but this view cannot
be saved.
Use the Left/Right arrows to go to previous/next 4 monitors.
11
Display terminal is a client PC. After this Display terminal has installed Everfocus
Wall AP, ECMS can control it and show the view via this Display terminal. Everfocus
Wall AP can support max. 4 monitors for each Display terminal client PC.
Click
to go back to the map page.
To delete a monitor, drag and drop the device to recycle bin
.
Display terminal information will be shown at right-hand side.
6. Map: Google map is the default map used for ECMS.
Double click at one point, that point will be the center point of map.
Click “Map”, “Satellite” or “Hybrid” for different display methods of the map.
Navigating in Google Maps
You can navigate (move your view) in two dimensions in any Google Map. To pan
(move the map), do one of the following:
Click and drag the map
Click the up arrow on your keyboard to move north
Click the down arrow on your keyboard to move south
Click the right arrow on your keyboard to move east
Click the left arrow on your keyboard to move west
Additionally, you can zoom in or out by clicking the + or - keys. Move the cursor
over a location and use the mouse scroll button to zoom in or out on that location. To
center and zoom in on a location, double click the location.
12
Using the Navigation Controls
The navigation controls you see at maps.google.com are shown
on the left. Navigation controls include:
1. Arrows - Click the appropriate arrow buttons to move
the view north, south, east or west.
2. Zoom - Click + to zoom in on the center of the map.
Click - to zoom out.
3. Zoom slider - Drag the zoom slider up or down to
zoom in or out incrementally.
Other web pages with embedded Google Maps may not have all
or any of these navigation controls. For example, embedded
maps may show navigation controls that look like those below:
7. Event list: Event list will be showing with event information.
Note:
is the refresh button. Click this button to refresh the current page.
13
5.3 System
This section describes the functions of the System.
In “System”, there are two main sections: “Authorities” and “E-Map”.
In Authority, there are 3 sub-sections: My Account, User Groups and User List.
14
5.3.1
Authority
Authority => My Account => User Setting
In this section, user can configure user’s settings.
User List is displayed at left panel.
The icon with 2 persons means a group, and the icon with only 1 person means a user.
Group
User
1. User Name: Input user name.
2. Login Name: Input login name.
3.
4.
5.
6.
User Group: Select user group.
Old Password: Enter old password.
New Password: Enter new password.
Confirm Password: Enter password again for confirmation.
7. Email: Input user’s e-mail address.
8. Address: Input user’s mailing address.
9. Phone: Enter user’s phone number.
15
10. Mobile: Enter user’s mobile number.
11. Select a hint question and enter the answer. System will check the answer first, if
it is correct, the password will be reset to default value “11111111”.
Click
button to apply changes.
Click
button to reset settings.
Authority => My Account => My Authority
It displays authority for system setting and CCTV.
These settings are not editable.
System Setting
My Account, User Group, User List, E-Map Edit, E-Map View
CCTV
Device List, Edit/Delete, Time Search, Event Search, Archive, Live View, View
Layouts, Display/Terminal
16
System=> Authorities=> User Groups
The User Group configuration page contains the following sections
Authorities Setting:
This section is used to edit group’s authority. There are two default groups:
Administrator Group and Guest Group.
Users in the same group share the same Authorities, Device Permission and Map
Permission.
1. Administrator Group has all the authorities and Device/map permission.
Administrator Group and its authorities cannot be deleted by anyone.
Administrator User cannot be deleted by anyone.
2.
Guest Group: If a user group has been deleted, all the users belong to this group
will switch to guest group and inherit the authority of Guest group. The default
authority for Guest group is “Live View”.
Select a group first. To create a new group, click “
click “
” button. To print out the page, click “
17
” button; to delete a group,
” button.
System
In system, select system’s authority setting that the group is allowed to do by ticking
the item. To select all the items, tick “System”.
CCTV
In CCTV, select CCTV’s authority setting that the group is allowed to do by ticking
the item. To select all the items, tick “CCTV”.
Device Permission
Select a group first. To create a new group, click “
click “
” button. Click “
” button; to delete a group,
” button to print out the page.
All the devices will be listed and tick the checkbox to select which device user is
allowed to configure.
Note: Wherever there is a table, user can sort the items by clicking on the title of that
column.
18
Map Permission
Select a group first. To create a new group, click “
click “
” button. Click “
” button; to delete a group,
” button to print out the page.
All the maps will be listed, tick the checkbox to select which map user is allowed to
configure.
19
System=> Authorities=> Users list
Show all users. Click
Click
button to delete a selected user.
button to add a new user and “add a new user” window pops up.
20
1. User name: Enter user name. It is case sensitive. (Required!)
2. Login name: Enter login name. This name must be unique; the same login name
can only be used once. (Required!)
3. User group: Select the group to which user belongs to. (Required!)
4. Password: Users should enter their passwords exactly as they are specified on the
server. (Required!)
Note: Tick the checkbox of “show text” will show the text of password inputted.
5. Confirm password: Enter the password again for confirmation. (Required!)
Note: Tick the checkbox of “show text” will show the text of password inputted.
6. E-mail: the E-mail address of the user.
7. Address: Enter user’s address.
8. Phone: Enter user’s phone number.
9. Mobile: Enter user’s mobile number.
10. Select a hint question and enter the answer. System will check the answer first, if
it is correct, the password will be reset to default value “11111111”.
Click
button to apply all the settings.
Click
button to cancel all the settings.
Click
button to edit user information and “Edit user” window pops up.
21
1. User name: Enter user name. It is case sensitive. (Required!)
2. Login name: Enter login name. This name must be unique. The same login name
can only be used once. (Required!).
3. User group: Select the group to which user belongs to. (Required!)
4. Password: Users should enter their passwords exactly as they are specified on the
server. (Required!)
Note: Tick the checkbox of “show text” will show the text of password inputted.
5. Confirm password: Enter the password again for confirmation. (Required!)
6.
7.
8.
9.
Note: Tick the checkbox of “show text” will show the text of password inputted.
E-mail: the E-mail address of the user.
Address: Enter user’s address.
Phone: Enter user’s phone number.
Mobile: Enter user’s mobile number.
10. Select a hint question and enter the answer. System will check the answer first, if
it is correct, the password will be reset to default value “11111111”.
Click
button to apply all the settings.
Click
button to cancel all the settings.
Click
button to print out the current page.
22
5.3.2
E-Map
E-Map=>E-Map Edit
In “E-Map Edit”, user will be able to edit the map, delete the map and set a child map.
: allows user to change the current map (google map or E-map).
Click
button to edit the current map. “Edit Current Map” window pops
up.
Select Map from Database or File by clicking “Select” button to locate the file.
Assign a name to the map.
Change the map scale if necessary.
Click “Apply” button to apply the changes or “Cancel” button to cancel the changes.
Click
button to apply changes.
Click
button to reset settings.
23
: allows user to delete the current map.
: allows user to insert a child map.
First, select the area to insert a child map by left clicking the mouse to draw lines.
Every click is an end point of the line. When the area is formed, double click the
mouse to have all the lines connected.
Once the area is formed, right-click the mouse to add the Child Map.
24
“Edit Child Map” window pops up.
Select Map from Database or File by clicking “Select” button to locate the file.
Assign a name to the map and change the map scale if necessary.
Map preview will be displayed at lower part of window.
Click “Apply” button to apply the changes or “Cancel” button to cancel the changes.
: allows user to delete a child map.
User can insert a device icon to the map, to make
the map clear for all users by dragging and dropping the device icon to the proper
location of the map.
25
Right click on the device icon to select the DVR. A “Select Device” window pops up.
Select one DVR from the device list by clicking on that DVR. The selected DVR will
be highlighted and DVR information will be displayed at the upper part of the
window.
There are totally 4 map levels.
Only one device can be inserted in each map.
: Apply all the settings.
: Cancel all the settings.
: Set the current map as home map. Next time when user enters the system,
it will go to home map automatically.
E-Map=>E-Map View
26
In “E-Map View”, user will be able to view the map.
Click
button to go to Home map.
Click
button to go to e-map’s upper level.
Click
button to go to previous step.
Click
button to go to next step.
27
5.4 Video Surveillance
5.4.1
DVR
CCTV=> DVR=> Device List
Device Group
To add a device group:
1. Click
button.
2. Key-in device group name.
3. To apply all settings in this page, click
button.
To delete a device group:
1. Select device group name.
2. Click
button.
28
Device List
Click
to add a device to the device group and “Add a new device” window
pops up.
Basic
1. Device Group: Select the device group.
2. Device Type: Select the device type.
3. Device Name: Enter the device name.
Network
1. IP address/name: Enter IP address or DNS name of the device.
2.
3.
4.
User name: Enter User name of the device.
Password: Enter Password of the device. Tick the check box of “Show Text” to
show the password inputted.
HTTP Port: Enter HTTP port of the device.
Device
1. Brand Name: Shows the brand name of the device.
2. Brand Mode: Select device model.
Click
button to apply all the settings.
Click
button to cancel all the settings.
29
Click
button to edit device list and “Edit Device” window pops up.
Select a device to edit first.
Basic
4. Device Group: Select the device group.
5. Device Type: Select the device type.
6. Device Name: Enter the device name.
Network
5. IP address/name: Enter IP address or DNS name of the device.
6. User name: Enter User name of the device.
7.
8.
Password: Enter Password of the device. Tick the check box of “Show Text” to
show the password inputted.
HTTP Port: Enter HTTP port of the device.
Device
3. Brand Name: Shows the brand name of the device.
4. Brand Mode: Select device model.
Click
button to apply all the settings.
Click
button to cancel all the settings.
30
Click
button to print out the current page.
Click
to delete a selected device from the device group.
CCTV=> DVR=> Edit Device
By clicking “Edit Device”, the system will lead you to the remote page of the selected
DVR.
Double click left tree node to enter the DVR edit page.
31
5.4.2
Search & Playback
The Search & Playback configuration page contains the following tabs:
Time Search
Time Period:
Click
to select a date to be searched.
Go to current month
Close the window
Go to previous month
Use
Go to next month
button to select time to be searched.
Click Up/Down arrows to decrease/increase value. Click Left/Right arrows to switch
between hour/minute/seconds. Click the square at middle to go to current time.
32
Record Period:
Start Time: Starting recording time will be shown.
End Time: Ending recording time will be shown.
When a selected DVR had been found after query, start/end recording period will be
shown here.
Device:
Model: Select device model.
Group: Select device group.
Name: Input name of device to be searched.
Click
button to start search the parameters set.
Click
button to start search all devices.
Click
button to start playback.
Note: The system can only playback one DVR.
33
2
1
3
4
1. Audio: Speaker out on / off.
2. Device information: displays DVR name and its IP address.
3. DVR Layout: Select DVR display layout from full screen, 4-displays, 9-displays
and 16-displays.
4. Playback control keys:
Playback speed
Fast Rewind
Pause
Playback
Play reverse
34
Fast Forward
CCTV=> DVR=> Event Search
Time Period
Click
to select start/end date to be searched.
Go to current month
Close the window
Go to previous month
Use
Go to next month
button to select start/end time to be searched.
Click Up/Down arrows to decrease/increase value. Click Left/Right arrows to switch
between hour/minute/seconds. Click the square at middle to go to current time.
Event Type
Select the event by ticking the check box of the event type.
35
Device
Model: Select device’s model.
Group: Select device’s group.
Name: Enter device’s name.
Click
button to search the device.
Click
button to search all devices.
Click
button to start search the event.
36
CCTV=> DVR=> Archive
Disk Recording Time
Start Time and End Time of the recorded data in disk. (Not selectable)
Time Period
Click
to select start/end date to be archived.
Go to current month
Close the window
Go to previous month
Use
Go to next month
button to select start/end time to be archived.
Click Up/Down arrows to decrease/increase value. Click Left/Right arrows to switch
between hour/minute/seconds. Click the square at middle to go to current time.
37
Camera
Select the camera for the data to be archived.
Device
Model: Select device’s model.
Group: Select device’s group.
Name: Enter device’s name.
Click
button to search the device.
Click
button to search all events.
Click
button to start archiving.
38
5.3.3
Display & Live
CCTV=>Display & Live => Live View
Click “Live View” for Live View of the DVR.
5
6
7
8
1
9
2
3
4
1. Audio: Speaker out on / off
2. Device List: Select device group first, all the devices will be shown under device
group.
3. Layout View List
4. PTZ Control: PTZ control panel: If a speed dome is installed and connected to the
system, user can control it through this PTZ control panel. Click the “+” sign to
unfold PTZ control panel.
39
Focus Far/Focus Near
Zoom Out/Zoom In
Iris Close/Iris Open
Pattern/Tour
Auto Pan
Set Preset
Pan Speed (Faster, Fast, Normal, Slow, Slower)
5. Remove One: Click to remove one DVR from the view layout.
6. Remove All: Click to remove all DVR from the view layout.
7. Device information: It displays DVR name and its IP address.
8. DVR Layout: Select each DVR display layout from 1-display, 4- displays, 9displays and 16- displays.
9. View Layout: Select viewing layout, either 1-DVR view or 4-DVR view.
40
CCTV=>Display Live=>View Layouts
button to remove one view.
Click
Click
button to remove all views.
button to view layout live image.
Click
Select view layout by clicking
for full screen mode (1-DVR view) or
for 4-displays view (4-DVR view).
To add a view layout:
1. Click
button.
2. Key-in view name.
3. Drag and drop the DVRs from left panel to view layout. Maximum 4 DVRs can be
drop to the screen. To apply all settings in this page, click
41
button and this
view layout will be saved to view list.
To delete a view layout:
1. Select view name.
2. Click
button.
CCTV=> Display Live=> Display Terminal
Terminal information is displayed.
1.
2.
3.
4.
Display Terminal Type
Display Terminal Name
IP Address/Name: Enter IP Address or DNS name.
HTTP Port: Enter HTTP port.
5. Monitor Number: Select monitor number.
6. Show on control interface
Click
button to apply all the settings.
Click
button to reset settings.
42
6. SPECIFI
Support Devic
Max. Client A
Max. Device A
Max. DVR per
Operation UI
Headquarter Of
12F, No.79 Sec.1
Hsi-Chi, Taipei, T
Tel: +886-2-2698
Fax: +886-2-2698