1
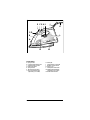
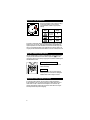
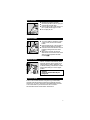
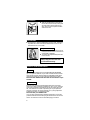
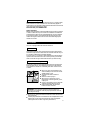
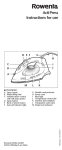
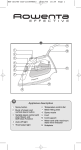
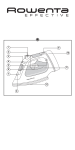
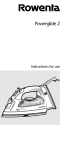
Professional Luxe
Instructions for Use
IMPORTANT SAFETY
INSTRUCTIONS
When using your iron, basic safety precautions should
always be followed, including the following:
Read all instructions before using the iron.
1. Use iron only for its intended use.
2. To protect against a risk of electric shock, do not
immerse the iron in water or other liquids.
3. The iron should always be turned to Minimum (Min)
before plugging or unplugging from outlet. Never
yank cord to disconnect from outlet, instead grasp
plug and pull to disconnect.
4. Do not allow cord to touch hot surfaces. Let iron
cool completely before putting away. Loop cord
loosely around iron when storing.
5. Always disconnect iron from electrical outlet when
filling iron with water, emptying iron or when not in
use.
6. Do not operate iron with a damaged cord or if the
iron has been dropped or damaged. To avoid the
risk of electric shock, do not disassemble the iron,
ship it to the nearest authorized Rowenta Appliance
Service Center for examination and repair. Incorrect
reassembly can cause a risk of electric shock when
the iron is used.
7. Close supervision is necessary for any appliance
being used by or near children. Do not leave iron
unattended while plugged in or on an ironing board.
8. Burns can occur from touching hot metal parts, hot
water or steam. Use caution when you turn a steam
iron upside down there may be hot water in the
reservoir.
9. The use of accessory attachments is not recommended
by Rowenta Appliance Company and may result in fire,
electric shock or personal injury.
2
SPECIAL INSTRUCTIONS
1. This is a 1400 watt appliance. To avoid a circuit
overload, do not operate another high wattage
appliance on the same circuit.
2. If an extension cord is absolutely necessary,
a 12-ampere cord should be used. Cords rated for
less amperage may overheat. Care should be taken
to arrange the cord so that it cannot be pulled or
tripped over.
3. Your Rowenta appliance is intended for household
use only.
SAVE THESE INSTRUCTIONS
3
E F GHI
J
K
C/D
L
B
A
N
■
A
B
C
D
E
F
G
4
Description:
Spray nozzle
Covered water filling inlet
Variable steam control
Self clean system
Spray button
Burst of steam button
Auto-off indicator light
(depending on model)
M
H
I
J
K
L
M
Pilot light
Temperature control dial
Flexible cord protector
Power cord
Transparent water tank
Stainless steel soleplate
(depending on model)
N Water level indicator
BEFORE USE
왎
왎
왎
Please read the instructions for use and the Important Safeguards
carefully.
Remove the transparent soleplate protector.
It is normal for a small amount of smoke to be produced the first
time the iron is used. This will quickly disappear.
3-WAY AUTO-OFF (depending on model)
30 sec.
8 min.
30 sec.
If the iron is not moved while it is plugged
in, an internal safety switch will turn it off.
It will turn off in 8 minutes if left vertically
or in 30 seconds if left on its soleplate or
tipped over. A red flashing light indicates
that the auto-off has been activated.
To switch the iron on again, move the iron
or gently shake it.
Wait until iron is fully reheated before
use.
STEAM IRONING
Filling with water
왎
왎
왎
왎
Ensure the iron is unplugged.
Slide the variable steam control completely to the left.
Open the water filling inlet cover.
Hold the appliance upright so that the
water inlet is horizontal. Fill with water
(containing no additives) to the max.
water level mark and close the lid.
Adding water
왎
왎
왎
If you need to add water during ironing.
UNPLUG the iron and repeat above
steps.
Ensure iron is fully reheated after filling
(temperature indicator light goes out)
before ironing.
To avoid damage to clothes from dust
or dirt that may collect in the iron, we
recommend that for the first use or after
the iron has been stored for some time
that you first iron an old cloth, testing
both the steam and burst of steam
feature.
5
SELECTING THE TEMPERATURE
Set the temperature control dial according
to the type of fabric you are ironing.
Check the fabric's label for appropriate
setting.
Laundry
label
Fabric
Temperature
setting
synthetics
e.g. viscose,
polyester
●
silk,
wool
●●
cotton,
linen
●●●
To avoid an automatic switch off while the iron is heating up, always
keep the iron on its heel. Start at low temperature and graduate to
high temperature. For delicate fabrics we recommend carrying out a
test on an unobstrusive part of the garment (inner seam). Steam can
only be produced when the thermostat is in the red cotton/linen zone.
SETTING VARIABLE STEAM CONTROL
Set the variable steam control to required steam volume. Steam can
only be produced when the thermostat is aligned to ●●● or max.
(red zone). Allow iron to heat up (light goes out) before activating the
variable steam control.
Iron ready for steam ironing
Steam is produced as soon as the iron is
held horizontally.
min
Self
max Clean
Steam off
Steam generation can be interrupted by
standing the iron on its heel or sliding the
variable steam control fully to the left.
ANTI-DRIP SYSTEM (depending on model)
In order to produce steam, all irons require a high temperature.
If the soleplate is not hot enough some of the water will not turn to
steam and can spit or leak from the soleplate. The new anti-drip
system automatically reduces the volume of steam when ironing at
low temperatures to prevent dripping.
6
SPRAY SETTING
왎
왎
왎
왎
Ensure there is water in the tank.
Moistening the fabric with the spray will
make wrinkle removal easier.
Press the spray button down slowly for a
jet or quickly and strongly for a mist.
Do not spray silk, etc.
BURST OF STEAM
왎
왎
왎
왎
To remove stubborn wrinkles or press in
a sharp crease, use the burst of steam
button.
Press the button firmly, a strong burst of
steam penetrates deep into the fabric.
Leave an interval of at least four seconds
between pressing the burst of steam
button.
With water in the tank, the burst of
steam button can be used as soon as the
steam ironing temperature has been
reached (●●●).
VERTICAL STEAM
The iron can also be used vertically. This is
especially useful for getting creases out of
hanging clothes, curtains, tapestries, etc.
To steam vertically, press the burst of steam
button while holding iron in the upright
position.
Warning:
Never iron clothes while they are
being worn.
POINTS TO NOTE
If the iron has not been used for a long time (e.g. several weeks)
the steam channels should be cleaned and any deposits removed
from the iron. To do this, hold the iron horizontally before you start
to use it and allow it to produce steam for about 1 minute.
Also activate the burst of steam button several times.
7
DRY IRONING
Slide the variable steam control fully to
the left. We recommend dry ironing with
an empty tank to be sure there are no
drips, but it can also be performed with
water in the tank.
왎
min
Self
max Clean
AFTER IRONING
왎
Unplug the iron. Set the variable steam control to max. and empty
any water left in tank. Then set the variable steam control to min.
and leave the iron to cool down.
Integrated cord wrap
왎
왎
For easy storage, the cord can be wound
loosely around the heel once the iron has
cooled down completely.
To protect the soleplate always store the
iron on its heel.
Important:
Always empty the water tank when
you have finished ironing.
WATER TO USE IN ROWENTA IRONS
Tap water
Rowenta irons are designed to be used with REGULAR TAP WATER
(up to 12 grains of hardness). If your water is harder than this, Rowenta recommends mixing half tap water with half distilled water which
reduces the hardness; or just use inexpensive bottled spring water.
Never use 100% distilled water since this can cause the iron to spit
and leak.
Softened water
There are many types of household water softeners and the water
from many of them is perfectly acceptable for use in an iron. However,
some types of softeners, particularly those that use chemicals such as
salt, can cause the iron to leak or spit during use. If you experience
this type of problem, we recommend that you try using inexpensive
bottled spring water or untreated tap water.
Never use 100% pure distilled water.
Once you have changed water it will take several uses to correct the
problem. Rowenta recommends trying the steam function for the first
time on an old towel or cloth to avoid damaging your clothes.
8
Iron and other impurities
If your water supply contains large amounts of iron or organic matter,
these minerals can collect inside the iron and eventually appear as
brown stains. If you experience these problems Rowenta recommends
using inexpensive bottled spring water.
Never use 100% pure distilled water.
Always remember:
Battery water and water containing additives (such as starch, perfume
or fabric conditioner) may not be used. Such additives can affect the
properties of the stean and, at high temperatures, can form deposits
in the steam chamber, which will mark the laundry when they are
emitted through the steam vents. For this reason descaling liquids
should not be used.
SELF CLEANING
Your iron is equipped with two self clean functions.
Vapodur Valve
The patented Vapodur valve ensures that the opening which allows
the water to drip from the water tank into the steam chamber of your
iron remains unaffected by hard water deposits.
To ensure your iron continues to steam efficiently the valve MUST be
opened and closed a few times. This is done by moving the variable
steam control left to right a few times each time you finish ironing.
Steam Chamber Cleaning Function
This function allows loose mineral deposits and other impurities that
build up inside the iron to be flushed out. This type of self cleaning
only needs to be carried out occasionally and never more than once
a month.
왎
min
Self
max Clean
왎
왎
왎
왎
왎
Fill the iron with cold tap water so the
water is halfway to the max line and set
variable steam to min.
Set thermostat dial to maximum
position.
Stand on heel and plug in.
When the iron reaches the correct
temperature, indicator light will go out,
unplug iron.
Hold iron horizontally over the sink with
soleplate pointing away from body.
Press and hold down the self clean
button for about 1 minute.
WARNING: Doing this will cause steam and hot water to be
ejected from the soleplate. Take all proper precautions and hold
iron away from body.
왎
왎
Move the iron gently back and forth and side to side until all water
has run through.
Carefully wipe all water and material from the soleplate with an old
folded towel, as the water and minerals can stain the soleplate
(although this has no effect on glide or performance).
9
WARNING: Iron and soleplate may still be hot, exercise care while
wiping.
왎
왎
Place iron on heel and leave to cool.
IMPORTANT: before using the iron after self cleaning, test steam
and burst of steam on an old towel or cloth to ensure all loose
material has been removed from the iron.
CLEANING AND MAINTENANCE
왎
When cold and unplugged, the iron can be cleaned with a damp
cloth and wiped dry. Never use household cleaners or solvents.
Cleaning the soleplate
Rowenta soleplates have excellent non-stick properties and can be
simply wiped clean when cold.
왎 In normal use a draggy coating may build up on the soleplate
(starch, detergent buildup, burnt synthetic fibers). This can be easily
removed by using the Rowenta Soleplate Cleaning Kit or a quality
hot iron soleplate cleaner available at most stores.
왎 Do not use abrasive household cleaners or abrasive cleaning pads.
왎 The soleplate of your iron makes ironing easier. To prevent scratching of the soleplate, do not iron over sharp objects (zippers, etc.).
Do not place the iron on rough surfaces, e.g. metal iron support,
which may scratch the soleplate.
10
IRON TROUBLESHOOTING
Problem
Possible cause
Solution
Iron is leaking.
DISTILLED WATER
DO NOT use 100% pure distilled
water, use tap water. In very hard
water areas mix half tap water with
half distilled to reduce hardness; or
use inexpensive bottled spring water.
SOFTENED WATER
Most softened water is alright, but
if you experience leaks or spitting,
change to untreated tap water or
inexpensive bottled spring water.
DO NOT use 100% distilled water.
Iron won’t heat.
Auto-off activated?
Move iron or gently shake.
Overuse of burst of
steam.
Allow more time between each
burst.
Is iron plugged in?
Check plug is in socket.
Thermostat set too
low?
Turn thermostat higher.
Auto-off activated?
Move iron or gently shake.
Ready light goes This is normal.
on and off.
The light goes on and off showing
the thermostat is switching the heat
on and off to maintain the correct
temperature.
Iron does not
steam.
Iron is not hot
enough.
If the iron is not hot enough the
anti-drip system will activate and
stop the iron's steam production. Set
thermostat to the (●● ●) position.
Always allow iron sufficient time to
heat up (indicator light goes out)
before activating the variable steam
control.
Is variable steam
control correctly set?
If iron is fitted with a variable steam
control, turn it to a higher setting.
Steam valve is
clogged.
Move variable steam controm from
min to max several times to clear
blockage.
STORE IRON ON HEEL (VERTICALLY) WITH STEAM CONTROL
AT MIN.
For more information refer to the full use instructions.
If after using the trouble shooting guide you are still experiencing
problems, do not return the iron to the store, but contact Rowenta
Consumer Service who will be pleased to assist you.
In line with a policy of continuous product improvement Rowenta
reserves the right to change product specifications without prior
notice.
11