1
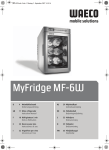
QUICK START GUIDE
Connect the appliance to the water supply and power
supply (see Installation manual).
Read the user handbook carefully before using the
appliance.
6th Sense (Sixth Sense Function)
This activates automatically to signal that the appliance is working to
reach optimal storage conditions.
GB
Child Lock (Child Safety)
To lock/unlock the buttons on the control panel and the water/ice
dispenser, press the "Reset filter/alarm" and "Vacation mode"
buttons at the same time until the symbol is displayed and the acoustic
signal sounds.
Eco Mode
This function enables you to save energy. To enable/disable the function,
press the "Reset filter/alarm" and "Ice mode" buttons at the same
time for 5 seconds until the acoustic signal sounds. When the function is
enabled, the display only lights up when you use the appliance or the
control panel, otherwise only the
symbol is shown.
Remember that this operation does not disconnect the appliance from
the power supply.
Reset Filter Alarm (alarm
mute button)
Press the "Reset Filter/Alarm"
button to stop the acoustic
alarm.
Water filter (where provided)
The colour of the symbol indicates the condition of
the filter.
Green: new filter
Blue: filter in good condition.
Red (fixed): filter running out.
Red (blinking): filter needs replacing.
After replacing the filter, press the "Reset
filter/alarm" button until the symbol becomes
green.
Malfunction Alarm
See section "What to do if...".
Blackout Alarm
See section "What to do if...".
For Europe only 00800-40088400 www.whirlpool.eu/myfridge
For Europe only 00800-40088400 www.whirlpool.eu/myfridge
Freezer compartment
P. Automatic ice maker
Q. Inside light
R. Glass shelves / racks (depending on the model)
S. Drawer / top basket (depending on the model)
T. Drawer / bottom basket (depending on the model)
U. Ice bucket
V. Door trays
Refrigerator compartment
A. Inside light
B. Shelves
C. Shelf - drawer lid
D. Snack drawer (depending on the model)
E. Crisper drawer
F. Crisper drawer moisture control (where provided)
G. Meat / crisper drawer
H. Meat / crisper drawer temperature control (where
provided)
I. Rating plate
J. Dairy compartment
K. Door trays
L. Fresh control and Nature fresh compartment (where
provided)
M. 2 litre door tray with bottle holder (depending on the
model)
N. 0.75 litre door tray.
O. Water filter (depending on the model)
Freezer compartment temperature
Press the "Freezer temp" button to change the
temperature setting.
Refrigerator compartment temperature
Press the "Fridge temp" button to change the
temperature setting.
Freezer compartment door open
Fast freezing
To be activated several hours before the food to be
frozen is placed in the freezer compartment (24
hours before freezing large quantities of food).
To activate this function, press the "Fast freezing"
button: the
symbol will appear on the display.
The function disables automatically after 24 hours or
can be switched off manually by pressing the button
again.
The maximum ice production can be acheived when
this function is enabled (1.3 KG/24H).
Refrigerator compartment door open
Ice mode (type of ice)
Press the "Ice mode" button to select the
desired type of ice and to enable/disable the
automatic ice maker.
-
= ice cubes
-
= crushed ice
Extracting the water dispenser (on some models
only)
The water dispenser features a swivel spout for easy
filling of bottles, jugs and other large receptacles.
Extract the spout with a simple click (press and
release) as shown in figure A. To return the spout to
the initial position, manually rotate the swivel as
shown in figure B.
- no symbol shown = automatic ice maker
disabled
Important: if the appliance is not connected
to the water supply, the automatic ice maker
must be disabled.
Turn the ice maker off before removing
the ice bucket to stop ice cubes being
dispensed accidentally.
Specifications, technical data and images may vary
from model to model.
Figure A
D
GB
F
NL
E
Antibacterial filter (if installed)
Change the filter when the symbol blinks.
After replacing the filter, press the "Reset
filter/alarm" button until the symbol remains
permanently on.
P
I
GR
S
N
DK
FIN
PL
CZ
SK
H
RUS BG
Figure B
RO UKR
Vacation Mode
This function can be used during extended absences.
Press the "Vacation mode" button to enable/disable
the function. When the function is enabled, the
related symbol lights up and the refrigerator
compartment becomes much less cold. After
activating this function, remove all perishable
foodstuffs from the compartment and leave the door
closed: the refrigerator will maintain the right
temperature to prevent odours from forming.
The freezer compartment remains enabled: it is
therefore possible to continue to use it as usual.
Water
The symbol is always displayed and when the
appliance is connected to the mains water supply,
water delivery is always available.
QUICK START GUIDE
Solutions
What to do if…
Possible causes
The appliance is excessively
noisy
The control panel is off and/or
the appliance is not working
If the motor seems to run too
much
Excessive moisture inside the
compartments.
It is not cold enough inside the
compartments
Noises from appliances are normal since the fans and compressors
for controlling its operation switch on and off automatically, for
example:
• hissing when the appliance is switched on the first time or after a
long period.
• gurgling when the refrigerant enters the pipes.
• humming when the water valve or fan are activated.
• rattling when the compressor starts up or when the ice drips in
the bucket.
• a sudden thud when the compressor starts up or stops.
Some noises can be reduced by:
• levelling the appliance and installing it on a flat surface,
• separating and preventing contact of the appliance with the
cabinets,
• making sure the inside parts are correctly positioned,
• making sure the bottles and containers are not touching each
other.
There may be a problem with the power supply to the appliance
Blackout Alarm. This alarm activates when there has been an
Press the mute alarm button to switch off the acoustic signal. Check
extended power failure causing the freezer compartment
temperature to rise. The value flashing on the freezer display is the the state of foodstuffs before consuming them.
highest temperature reached during the power failure.
The red Blackout Alarm LED
and the freezer temperature
display are blinking, and the
acoustic signal is sounding (if
provided).
Press the mute alarm button to switch off the acoustic signal. The
This alarm may be activated when the appliance is used for the first
appliance needs approximately 2-3 hours to reach the correct
time.
temperature to store a normal fridge load of food.
The "Anti-bacterial filter" symbol
Anti-bacterial filter exhausted (if installed).
is red and/or is blinking.
Replace the filter (see the Quick Start Guide).
Check that:
• there has not been a power failure.
• the plug is inserted properly into the power socket and the
bipolar mains switch is in the right position (i.e. power supplied to
the appliance).
• the safety protection devices in the domestic electrical system are
working.
• the power cable isn't broken.
• the voltage is correct.
The "Water filter" symbol has
changed colour.
Replace the filter (see the Quick Start Guide). To replace the filter,
refer to the Instructions for Use.
The "Standby" (depending on the model) or "Eco mode" function
may have been enabled.
• Disable the function (see the Quick Start Guide).
The automatic ice-maker does
not work.
On hot days or if the room is warm, the motor naturally runs
longer. Furthermore, if the appliance door has been left open for a
while or if large amounts of food have been stored, the motor will
run longer in order to cool down the interior of the appliance.
Avoid locations in direct sunlight or near a source of heat.
There may be dust or fluff in the condenser.
Remove the front plinth (see installation manual) and clean the
condenser using a vacuum cleaner.
The doors may not be closed properly or the seals may not be
intact.
Check that the doors are closed properly and that the door seals
do not allow any air infiltration.
If the room is very humid, it is normal for moisture to build up
inside the appliance.
Install the appliance in a dry, well-ventilated place.
The air ducts may be blocked.
Make sure the air ducts inside the compartments are not blocked, as
this prevents the circulation of cold air.
There could be various causes
Check that:
• the doors close properly.
• the appliance is not near a heat source.
• the air ducts inside the compartments are not blocked, as this
prevents the circulation of cold air.
• the “Vacation mode” function is not enabled (see Quick Start Guide
for certain models only). If necessary, lower the temperature.
Water filter running out/exhausted (where provided).
If the appliance has a water and ice dispenser:
A new appliance takes about a night to reach the ideal temperature Wait for the time required for the temperature inside the freezer to
for producing ice.
reach the set value.
The internal light is not working.
The control panel will not do
anything: every time a button is
pressed, the acoustic signal
sounds.
Clean the seals.
The appliance may not be level.
If necessary, level the appliance (see Installation manual).
The "Standby" function may have been enabled (depending on the
model).
Disable the function (see the Quick Start Guide).
The bulb may be burnt out.
Replace the bulb (see Instructions for Use, section "Maintenance
and Cleaning").
The "Compartment door open" Open door alarm.
symbols blinks and an acoustic The alarm is activated when the doors are left open for more than
2 minutes.
signal sounds (if present)
There are letters on the display, Malfunction Alarm
and an acoustic signal is sounding The alarm indicates that a technical component has malfunctioned.
(if provided and not previously
disabled).
The "Eco mode" function may have been enabled.
E
P
I
Refer to the filter installation instructions to ensure that the filter
was installed correctly and is not clogged. If installation or clogging
is not a problem, call qualified personnel.
GR
S
N
Wait for the time required for the system to fill.
Since the appliance is equipped with an automatic ice-maker, you
may hear a humming sound (coming from the water valve), water
trickling and the sound of ice falling into the bucket.
PL
CZ
SK
Shake the ice bucket to separate the cubes and increase the holding
capacity. It is advisable to throw away the old ice and make new ice.
During the first delivery, there will be a delay of 15 to 20 seconds
due to the system needing to fill with water.
The automatic ice maker
FIN
Change the ice selection from "ice cubes" to "crushed ice" or vice
versa (in some models only), so as to remove any ice blocks. If the
dispenser continues not to dispense ice, wait for two minutes and
then repeat this operation.
Wait about 3 minutes for the dispenser motor to reset
The door anti-condensation function may have been disabled
(depending on the model)
DK
Disable the function (see the Quick Start Guide).
The ice dispenser lever may have been pressed for too long (only
on certain models).
There is condensation on the
door.
Disable the function (see the Quick Start Guide).
NL
The water filter may be clogged or installed incorrectly.
There is condensation in the ice The dispenser anti-condensation device may have been disabled
and water dispenser area.
(depending on the model)
Call an authorized After-Sales Service. Press the mute alarm button
to switch off the acoustic signal.
F
Check that the product is connected to the mains water supply and
that the water tap is open.
The dispenser does not
dispense water when the lever The "Child Safety" or "Ice/water dispenser lock" function may have
is pressed (or when the "water" been enabled.
button is pressed, on models
without an ice lever).
The water filter may be clogged or installed incorrectly.
Close the doors or press the mute alarm button to switch off the
acoustic signal.
GB
Water may not reach the automatic ice maker.
The dispenser does not
dispense ice when the lever is
pressed (or when the "ice"
Ice cubes may be stuck because the ice dispenser has not been used
button is pressed, on models for some time: The dispenser may not have been used for extended
without an ice lever).
periods, causing the ice cubes to stick together.
Disable the function (see the Quick Start Guide).
D
Refer to the Quick Start Guide to enable the automatic ice maker
again (on some models only).
The "Child Safety" or "Ice/water dispenser lock" function may have
been enabled.
The door seals may be dirty or sticky.
The "Child Safety", "Key Lock" or "Ice/water dispenser lock"
function may have been enabled.
The automatic ice maker may not be enabled (in some models it
can be disabled).
This is normal when the freezer door is open, or if the ice bucket is Close the freezer door and/or check that the ice bucket is installed
not installed correctly.
correctly.
The area in contact with the seal
This is normal in hot weather and when the compressor is running. No action is required.
is hot.
If the doors do not open and
close properly.
Solutions
H
RUS BG
RO UKR
Disable the function (see the Quick Start Guide).
Refer to the filter installation instructions to ensure that the filter
was installed correctly and is not clogged. If installation or clogging
is not a problem, call qualified personnel.
Reactivate the function by pressing the anti-condensation switch in
the ice/water dispenser area (marked with an arrow in the figure),
depending on the model.
Reactivate the function by pressing the anticondensation switch in the ice/water dispenser
area (marked with an arrow in the figure),
depending on the model.
Disable the automatic ice maker if you do not need it (see the
Quick Start Guide), depending on the model.
05/11 - Whirlpool® Registered trademark/TM Trademark of Whirlpool group of companies - © Copyright Whirlpool Europe s.r.l. 2011. All rights reserved - http://www.whirlpool.eu
Possible causes
Before contacting the After-sales Service, try to solve the problem by following the advice below.
Subject to change - Printed in Italy
What to do if…
GB
5019 315 01055