1
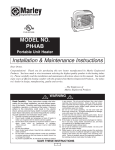
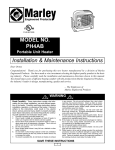
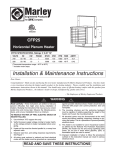
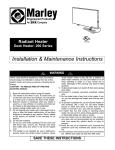
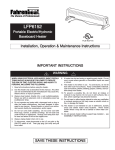
FILE #E21609
MODEL NO.
PH4AB
Portable Unit Heater
Installation & Maintenance Instructions
Dear Owner,
Congratulations! Thank you for purchasing this new heater manufactured by Marley Engineered
Products. You have made a wise investment selecting the highest quality product in the heating industry. Please carefully read the installation and maintenance directions shown in this manual. You should
enjoy years of efficient heating comfort with this product from Marley Engineered Products... the industry’s leader in design, manufacturing, quality and service.
... The Employees of
Marley Engineered Products
!
WARNING
Read Carefully - These instructions contain vital information for the proper installation, use and efficient operation of the heater. Carefully read these instructions before
installation, operation, or cleaning of the heater. Failure to
adhere to the instructions could result in fire, electric
shock, serious personal injury, death or property damage.
Save these instructions and review frequently for continuing safe operation and instruction future users.
1.
2.
3.
4.
5.
6.
7.
8.
9.
Connect to properly grounded outlets only.
Check heater voltage and amperage on back of heater to
make sure it agrees with the electric service supplied.
Ground fault circuit protection is required if heater is used in
damp areas such as basements or garages. This is not suitable for use in wet or very humid locations.
Do not use outdoors.
Never locate heater where it may fall into a bathtub or other
water container.
Do not insert or allow foreign objects to enter any ventilation
or exhaust opening as this may cause an electric shock, fire,
or damage the heater.
To prevent a possible fire, do not block air intakes or exhaust
10.
11.
12.
13.
in any manner. Do not use soft surfaces, like a bed, where
openings may become blocked. Clean as often as necessary to prevent dust from clogging the grilles or element fins.
Keep all electrical cords, drapes, paper, plastics and other
combustibles away from heater.
Do not run cord under carpeting. Do not cover cord with
throw rugs, runners, etc. To prevent entanglement or damage,
route cord away from high traffic areas.
A heater has hot and arcing or sparking parts inside. Do not
use it in areas where gasoline, paint, or flammable liquids are
repaired by a reputable repair service.
If this heater or its power cord become damaged or malfunction in any way, unplug heater, discontinue use, and have
unit repaired by a reputable repair service.
Do not operate heater without stand.
Do not use an extension cord with this heater. Do not cut off
plug and wire heater directly.
When heater is to be wall or ceiling mounted, the anchoring
provisions must be of sufficient strength to support the total
weight of the heater plus the weight of the mounting provisions. Failure to properly secure the supporting members of
the building structure could allow the heater to fall.
SAVE THESE INSTRUCTIONS
1
GENERAL
Prior to operating heating, make sure the electrical outlet is of the configuration and capacity appropriate for the heater.
CIRCULAR
HOLE
When heater is wall or ceiling mounting, provisions must be made to bundle or otherwise prevent excess power cord from draping loose.
USE CIRCULAR
HOLES FOR
CEILING
MOUNTING.
DO NOT USE
KEYHOLES.
In workshops, locate heater away from sources of wood dust.
FLOOR APPLICATION
The heater, as received, is set up for floor mounting. Place the heater on
floor or other flat surface and insert the plug into the proper wall outlet.
Replace the heater in the stand and tighten knobs to lock in place. Two
large rubberwashers go between heater and stand, one on either side.
The heater can be adjusted to redirect the airstream. To do this, simply
loosen the knob on either side of the heater, then pivot heater to desired
position and re-tighten both knobs.
WARNING
REMEMBER: The electrical outlet must be within reach of the six foot
cord. Be sure to provide enough clearance to pivot heater and reach
adjustment knobs.
!
HEATER OPERATION
To operate the heater, first select either high or low position on the heat
selector switch, then turn the thermostat knob as far as it will go in the
clockwise direction. The indicator light will come on and remain on as long
as the heater is in the operating mode. when the room temperature reaches the desired level, slowly turn the thermostat knob counterclockwise until
the thermostat clicks. The heater off, turn thermostat knob as far as it will
go in the counterclockwise direction until the indicator light is off.
BE CAREFUL NOT TO DIRECT THE AIRSTREAM AT DRAPERIES,
FURNITURE, OR OTHER OBJECTS THAT COULD BE DAMAGED BY
HEAT. DO NOT USE HEATER ON FLOOR WITHOUT STAND IN
PLACE. DO NOT SUE THE HEATER WHERE A SMALL CHILD MAY
FALL OVER THE HEATER. DO NOT PLACE THE HEATER WHERE
THE POWER CORD MAY BE WALKED ON, TRIPPED OVER, OR OTHERWISE SUBJECTED TO HARD USAGE.
The fan selector switch allows continuous or cycling fan operation by
selecting either the “ON” or “Auto” position, respectively.
CLEANING AND STORAGE
WALL MOUNT
SEE WARNING NO. 13.
This heater may be mounted on any wall that will support the weight of the
heater. First remove the mounting stand from the heater, then remove four
rubber grommets from stand. Secure stand to structural members of wall
with four 1/4” dia. X 1-1/2” long lag bolts (not provided). In masonry walls
use metal expansion shields or toggle bolts. Never use bolts smaller 1/4”
diameter.
Replace the heater in the stand and tighten knobs to lock in place. Two
HEAT SW. 1
HI
ELEMENTS FRONT
2
MIDDLE
3
LOW
REAR
1
FAN SW.
2
AUTO
MOTOR
ON
3
KEYHOLE
SLOT
6
MOUNTING
HOLES
ARE 16” O.C.
TERMINAL BLOCK
4
INDICATOR LIGHT
L1
OFF
THERMOSTAT
L2
USE
KEYHOLES
FOR WALL
MOUNTING
CYL
MANUAL RESET
THERMAL UNIT
Turn thermostat off, then remove plug from electrical outlet before cleaning
heater. Use a soft cloth for dusting. For cleaning use only a damp rag and
nonabrasive dish detergent. Do not use abrasive or chemical cleaners as
these may harm the finish.
large rubber washers go between heater and stand, one on either side.
REMEMBER: The electrical outlet must be within reach of the six foot
cord. Be sure to provide enough clearance to pivot heater and reach
adjustment knobs.
If heater is used in a very dusty location, use a vacuum cleaner dust brush
to remove dust and other foreign material from the grilles.
Always unplug cord and wrap around heater when not in use. Move floor
mounted heaters to a safe location for storage.
CEILING MOUNT
This heater may be mounted to any ceiling that will support the weight of
the heater.
First remove the mounting stand from the heater, then remove four rubber
WARNING
SERVICE
This heater does not require any routine maintenance other than occasional cleaning to prevent clogging of intake grille opening. To clean air
intake grille, use vacuum with brush attachment or high pressure air. The
motor is permanently lubricated.
!
TO PREVENT HEATER FROM POSSIBLY FALLING, DO NOT USE
KEYHOLE SLOTS FOR CEILING MOUNT APPLICATION. SEE ALSO
WARNING NO. 13.
Do not operate the heater with a damaged cord or plug or if the heater malfunctions or has been damaged in any manner. Return heater to authorized service facility for examination, electrical, or mechanical adjustment,
or repair.
grommets from stand. Secure stand to structural members of ceiling with
four 1/4” diameter bolts (not provided). In wood joist use 1-1/2” long lag
bolts. In steel beams use machine bolts secured with nuts and lockwashers. Never use bolts smaller than 1/4” diameter.
Call the toll-free number listed for assistance in locating the Marley authorized service center in your area.
2
TO RESET SAFETY THERMAL LIMIT CONTROL
Your heater is equipped with a manual reset safety thermal limit control
that will automatically turn the heater off to prevent a fire if the heater overheats. This control is located on front of the heater just above the thermostat and is marked “PUSH TO RESET”. To reset, allow the heater to cool
then simply push the red button in until it snaps. The heater should immediately return to normal operation.
CAUTION
!
OPERATION OF THE SAFETY THERMAL LIMIT CONTROL INDICATES THE HEATER HAS BEEN SUBJECTED TO SOME ABNORMAL
CONDITION. IT IS RECOMMENDED THAT THE HEATER BE
CHECKED BY A REPUTABLE ELECTRICIAN OR REPAIR SERVICE
TO INSURE THE HEATER HAS NOT BEN DAMAGED.
NAMEPLATE
MODEL NO.
PH4AB
DATE CODE
0207
PORTABLE HEATER
VOLTS AC
60 HZ
240
220
208
WATTS
HI
LO
4000 2660
3360 2240
3000 2000
AMPS
HI
16.7
15.3
14.4
LO
11.1
10.2
9.6
2F68 LISTED
MOVABLE HEATER
CAUTION: UNPLUG BEFORE SERVICING.
CAUTION: DO NOT OPERATE WITHOUT STAND.
ATTENTION: NE FAITES PAS FONCTIONNER
ATTENTION: LE RADIATEUR SANS SOCLE.
MARLEY ENGINEERED PRODUCTS
BENNETTSVILLE, SC 29512
4104-2099-002
LIMITED WARRANTY
All products manufactured by Marley Engineered Products are warranted against defects in workmanship and materials for one year
from date of installation, except heating elements which are warranted against defects in workmanship and materials for five years
from date of installation. This warranty does not apply to damage from accident, misuse, or alteration; nor where the connected voltage is more than 5% above the nameplate voltage; nor to equipment improperly installed or wired or maintained in violation of the product’s installation instructions. All claims for warranty work must be accompanied by proof of the date of installation.
The customer shall be responsible for all costs incurred in the removal or reinstallation of products, including labor costs, and shipping
costs incurred to return products to Marley Engineered Products Service Center.Within the limitations of this warranty, inoperative units
should be returned to the nearest Marley authorized service center or the Marley Engineered Products Service Center, and we will
repair or replace, at our option, at no charge to you with return freight paid by Marley. It is agreed that such repair or replacement is
the exclusive remedy available from Marley Engineered Products.
THE ABOVE WARRANTIES ARE IN LIEU OF ALL OTHER WARRANTIES EXPRESSED OR IMPLIED. AND ALL IMPLIED WARRANTIES OF MERCHANTABILITY AND FITNESS FOR A PARTICULAR PURPOSE WHICH EXCEED THE AFORESAID
EXPRESSED WARRANTIES ARE HEREBY DISCLAIMED AND EXCLUDED FROM THIS AGREEMENT. MARLEY ENGINEERED
PRODUCTS SHALL NOT BE LIABLE FOR CONSEQUENTIAL DAMAGES ARISING WITH RESPECT TO THE PRODUCT,
WHETHER BASED UPON NEGLIGENCE, TORT, STRICT LIABILITY, OR CONTRACT.
Some states do not allow the exclusion or limitation of incidental or consequential damages, so the above exclusion or limitation may
not apply to you. This warranty gives you specific legal rights, and you may also have other rights which vary from state to state.
For the address of your nearest authorized service center, contact Marley Engineered Products in Bennettsville, SC, at 1-800-6424328. Merchandise returned to the factory must be accompanied by a return authorization and service identification tag, both available
from Marley Engineered Products. When requesting return authorization, include all catalog numbers shown on the products.
HOW TO OBTAIN WARRANTY SERVICE AND
WARRANTY PARTS PLUS GENERAL INFORMATION
1. Warranty Service or Parts
2. Purchase Replacement Parts
3. General Product Information
1-800-642-4328
1-800-654-3545
www.marleymep.com
Note: When obtaining service always have the following:
1. Model number of the product
2. Date of manufacture
3. Part number or description
5200-2195-003
470 Beauty Spot Rd. East
Bennettsville, SC 29512 USA
ECR 37166
2/07
3
Notes:
4
REGISTRO Nº E21609
Unidad de calefacción
portátil
Modelo PH4AB
Instrucciones de instalación y mantenimiento
Estimado propietario:
¡Felicitaciones! Gracias por comprar este nuevo calefactor fabricado por Marley Engineered Products. Al seleccionar el producto de más alta calidad de la industria de calefacción, usted ha hecho una sabia inversión. Por
favor, lea cuidadosamente las instrucciones de instalación y mantenimiento incluidas en este manual. Así podrá
disfrutar de años de calefacción confortable y eficiente con este producto de Marley Engineered Products... el
líder de la industria en diseño, fabricación, calidad y servicio.
... Los empleados de
Marley Engineered Products
!
ADVERTENCIA
7.
Lea cuidadosamente: estas instrucciones contienen información
vital para la instalación y uso correctos y el funcionamiento eficiente
del calefactor. Léalas cuidadosamente antes de proceder a la instalación, operación o limpieza del calefactor. Si no se observan estas
instrucciones existe riesgo de incendio, choque eléctrico, lesiones personales graves y muerte, así como de daños materiales. Guarde estas
instrucciones y revéalas con frecuencia, para garantizar un funcionamiento seguro continuado e instruir a futuros usuarios.
1.
2.
3.
4.
5.
6.
8.
Conecte el equipo únicamente a tomacorrientes que tengan una adecuada conexión a tierra.
Verifique la tensión y corriente del calefactor en el dorso del mismo, para
asegurarse de que sean compatibles con el suministro de servicio eléctrico.
Si el calefactor se utiliza en zonas húmedas como sótanos o garajes, se
necesita usar una protección circuital de falla a tierra. Esto no es adecuado para utilizar en lugares mojados o muy húmedos.
No use el equipo en exteriores.
Nunca coloque el calefactor en un lugar desde el que pueda caer en una
bañera u otro recipiente con agua.
No inserte ni permita que entren objetos extraños en ninguna abertura de
ventilación o de descarga, porque esto puede ser causa de choque eléctrico, incendio o daño al calefactor.
9.
10.
11.
12.
13.
Para evitar un posible incendio, no bloquee de ningún modo las entradas
o la descarga de aire. No utilice superficies blandas, como una cama, en
la que las aberturas puedan quedar bloqueadas. Limpie tan frecuentemente como sea necesario, para impedir que el polvo obstruya las rejillas
o las aletas de los elementos calefactores. Conserve todos los cordones
eléctricos, cortinados, papeles, plásticos y otros materiales combustibles
alejados del calefactor.
No tienda el cordón por debajo de las alfombras. No cubra el cordón con
alfombrillas, caminos protectores de alfombra, etc. Para evitar enredos o
daños, encamine el cordón lejos de los sitios muy transitados.
Un calefactor tiene en su interior piezas calientes, y piezas en donde se
producen arcos o chispas. No lo utilice en áreas en las que se utilice o
almacene gasolina, pintura o líquidos inflamables.
Si este calefactor o su cordón de alimentación eléctrica resultan dañados
o tienen fallas de funcionamiento desenchufe el calefactor, descontinúe su
uso y envíe la unidad a un servicio de reparación de calidad reconocida.
No haga funcionar el calefactor sin su base.
No utilice con este calefactor un cordón de extensión. No corte el enchufe
para conectar el calefactor en forma directa.
Cuando el calefactor va a montarse en la pared o en el cielorraso, los
anclajes deben tener la resistencia suficiente para soportar el peso total
del calefactor más el peso de los elementos de montaje. Si no se sujetan
correctamente los elementos de soporte a la estructura del edificio, el calefactor podría caerse.
GUARDE ESTAS INSTRUCCIONES
1
GENERALIDADES
Antes de hacer funcionar el calefactor, asegúrese de que el tomacorriente
eléctrico sea de la configuración y capacidad apropiadas.
AGUJERO
CIRCULAR
Cuando el calefactor se monta en la pared o en el cielorraso deben
tomarse medidas impedir que la longitud excedente del cordón de alimentación eléctrica cuelgue suelta, atándola o de algún otro modo.
USE LOS AGUJEROS
CIRCULARES PARA EL
MONTAJE EN EL
CIELORRASO. NO USE
LAS RANURAS TIPO
BOCALLAVE.
En talleres, coloque el calefactor lejos de las fuentes de generación de
aserrín.
APLICACIÓN EN EL PISO
El calefactor, cuando se recibe, está ya configurado para montaje en el
piso. Colóquelo sobre el piso u otra superficie plana, e inserte el enchufe
en un tomacorriente de pared adecuado.
Vuelva a colocar el calefactor en su base y apriete las perillas para fijarlo
en su posición. Entre el calefactor y su base se colocan dos arandelas
grandes de caucho, una en cada lado.
El calefactor puede ajustarse para redireccionar la corriente de aire. Para
hacerlo, sólo debe aflojar la perilla que hay en cada costado del calefactor,
hacerlo girar hasta la posición deseada y volver a ajustar ambas perillas.
RECUERDE: el tomacorriente eléctrico debe estar al alcance del cordón
de 1.83 m (6 pies) de longitud. Asegúrese de dejar un espacio libre suficiente para poder hacer girar el calefactor y alcanzar las perillas de ajuste.
ADVERTENCIA
!
OPERACIÓN DEL CALEFACTOR
Para hacer funcionar el calefactor, seleccione primero la posición de calor
alto o bajo en el selector de calor, y luego lleve la perilla del termostato
hasta su posición extrema en sentido horario. La luz indicadora se encenderá y permanecerá encendida mientras el calefactor esté en el modo
operativo. Cuando la temperatura de la habitación alcance el nivel deseado, haga girar lentamente la perilla del termostato en sentido antihorario
hasta oír un ‘clic’. Con el calefactor apagado, haga girar la perilla del termostato en sentido antihorario hasta que la luz indicadora se apague.
CUIDE DE NO DIRIGIR LA CORRIENTE DE AIRE A CORTINADOS, MUEBLES U OTROS OBJETOS QUE PODRÍAN DAÑARSE POR EL CALOR. NO
UTILICE EL CALEFACTOR EN EL PISO SIN TENER COLOCADA SU BASE.
NO UTILICE EL CALEFACTOR EN LUGARES EN LOS QUE UN NIÑO
PEQUEÑO PUEDA CAER SOBRE ÉL. NO COLOQUE EL CALEFACTOR EN
LUGARES EN LOS QUE SE PUEDA CAMINAR SOBRE EL CORDÓN DE
ALIMENTACIÓN ELÉCTRICA, TROPEZAR CON ÉL O SOMETERLO DE
ALGÚN MODO A UN TRATO RIGUROSO.
El selector del ventilador permite el funcionamiento continuo o cíclico del
ventilador, seleccionando la posición ‘Encendido’ (‘ON’) o ‘Auto’, respectivamente.
LIMPIEZA Y ALMACENAMIENTO
MONTAJE EN LA PARED
VEA LA ADVERTENCIA Nº 13.
Este calefactor puede montarse en cualquier pared que pueda soportar su
peso. Primero retire del calefactor la base de montaje, y luego quite de la
base las cuatro arandelas de caucho. Sujete la base a los elementos
estructurales de la pared con cuatro tirafondos de 6,4 mm (1/4”) de
diámetro x 38,1 mm (1-1/2”) de longitud (no provistos). En paredes de
mampostería utilice escudos ensanchadores metálicos o pernos acodillados. Nunca use pernos de diámetro menor de 6.4 mm (1/4”).
Vuelca a colocar el calefactor en su base y apriete las perillas para fijarlo
SELECTOR DE
CALOR
HEAT
SW.
HI (HI)
1 ALTO
ELEMENTOS
CALEFACTORES
ELEMENTS
FRONT
2
INTERMEDIO
MIDDLE
3
BAJO
LOW
(LOW)
TRASERO
REAR
SELECTOR DEL
VENTILADOR
FAN
SW.
1
AUTO
2
MOTOR
MOTOR
ENCENDIDO
ON
3
RANURA TIPO
BOCALLAVE
6
LOS AGUJEROS DE
MONTAJE ESTÁN
ESPACIADOS A
40,6 cm (16”) ENTRE
CENTROS
BLOQUE
DE TERMINALES
TERMINAL
BLOCK
4
LUZ INDICADORA
INDICATOR
LIGHT
L1
APAGADO OFF
TERMOSTATO
THERMOSTAT
L2
USE LAS RANURAS
TIPO BOCALLAVE
PARA EL MONTAJE
EN LA PARED
CYL
CICLO
LÍMITE TÉRMICO
CON
MANUAL
RESET
REPOSICIÓN MANUAL
THERMAL UNIT
en su posición. Entre el calefactor y su base se colocan dos arandelas
grandes de caucho, una en cada lado.
Antes de limpiar el calefactor apague el termostato, y luego desconecte el
enchufe del tomacorriente eléctrico. Quite el polvo mediante un paño
suave. Para la limpieza, use únicamente un trapo húmedo y un detergente
no abrasivo para vajilla. No use limpiadores abrasivos o químicos, ya que
pueden dañar el acabado.
RECUERDE: el tomacorriente eléctrico debe estar al alcance del cordón
de 1,83 m (6 pies) de longitud. Asegúrese de dejar un espacio libre suficiente para poder hacer girar el calefactor y alcanzar las perillas de ajuste.
Si el calefactor se utiliza en un lugar muy polvoriento, elimine el polvo y
otros materiales extraños de las rejillas mediante el cepillo para polvo de
una aspiradora.
MONTAJE EN EL CIELORRASO
Este calefactor puede montarse en cualquier cielorraso que pueda soportar su peso.
Siempre desenchufe el cordón de alimentación y enróllelo alrededor del
calefactor cuando éste no esté en uso. Lleve los calefactores montados en
el piso a un lugar seguro para su almacenamiento.
ADVERTENCIA
SERVICIO
Este calefactor no requiere ningún mantenimiento de rutina más que una
limpieza ocasional para impedir la obstrucción de la abertura de la rejilla
de entrada. Para limpiar la rejilla de entrada de aire utilice una aspiradora
con accesorio de cepillo, o aire a alta presión. El motor está lubricado en
forma permanente.
!
PARA IMPEDIR POSIBLES CAÍDAS DEL CALEFACTOR, NO USE LAS
RANURAS TIPO BOCALLAVE EN APLICACIONES DE MONTAJE EN EL
CIELORRASO. VEA TAMBIÉN LA ADVERTENCIA Nº 13.
No haga funcionar el calefactor si el cordón o el enchufe están dañados,
o si el calefactor funciona mal o ha sido dañado de algún modo. Regrese
el calefactor a un establecimiento de servicio autorizado para su
revisación, ajuste eléctrico o mecánico, o reparación.
Primero retire del calefactor la base de montaje, y luego quite de la base
las cuatro arandelas de caucho. Sujete la base a los elementos estructurales del cielorraso con cuatro pernos de 6.4 mm (1/4”) de diámetro (no
provistos). En viguetas de madera use tirafondos de 38.1 mm (1-1/2”) de
longitud. En vigas de acero use pernos comunes (de máquina) asegurados mediante tuercas y arandelas de presión. Nunca use pernos de
diámetro menor de 6.4 mm (1/4”).
Llame sin cargo al número indicado para que le ayuden a localizar el centro de servicio autorizado Marley de su zona.
2
REPOSICIÓN DEL CONTROL DE LÍMITE TÉRMICO DE SEGURIDAD
Su calefactor está equipado con un límite térmico de seguridad de reposición
manual que lo apagará automáticamente para impedir su sobrecalentamiento, que podría provocar un incendio.
Este control está ubicado en el frente del calefactor, inmediatamente encima
del termostato, y está marcado con la leyenda ‘OPRIMA PARA REPONER’
(‘PUSH TO RESET’). Para efectuar la reposición espere a que el calefactor
se enfríe, y luego oprima simplemente el botón rojo hasta que haga un
chasquido. El calefactor debe volver inmediatamente a su funcionamiento
normal.
¡ATENCIÓN!
!
LA OPERACIÓN DEL CONTROL DE LÍMITE TÉRMICO DE SEGURIDAD INDICA QUE EL CALEFACTOR HA ESTADO SUJETO A ALGUNA
CONDICIÓN ANORMAL. SE RECOMIENDA HACER INSPECCIONAR
EL CALEFACTOR POR UN ELECTRICISTA O SERVICIO DE
REPARACIÓN DE CALIDAD RECONOCIDA, PARA ASEGURAR QUE
NO SE HAYA DAÑADO.
PLACA DE CARACTERÍSTICAS
MODEL NO.
PH4AB
DATE CODE
0207
PORTABLE HEATER
VOLTS AC
WATTS
60 HZ
HI
240
AMPS
LO
HI
LO
4000
2660
16.7
11.1
220
3360
2240
15.3
10.2
208
3000
2000
14.4
9.6
2F68 LISTED
MOVABLE HEATER
CAUTION: UNPLUG BEFORE SERVICING.
CAUTION: DO NOT OPERATE WITHOUT STAND.
ATTENTION: NE FAITES PAS FONCTIONNER
ATTENTION: LE RADIATEUR SANS SOCLE.
ATENCIÓN: DESENCHÚFELO ANTES DE PRESTAR SERVICIO.
ATENCIÓN: NO LO HAGA FUNCIONAR SIN SU BASE.
MARLEY ENGINEERED PRODUCTS
BENNETTSVILLE, SC 29512
4104-2099-002
GARANTÍA LIMITADA
Todos los productos fabricados por Marley Engineered Products están garantizados contra defectos de fabricación y de materiales por un año desde
la fecha de instalación, a excepción de los elementos calefactores, que están garantizados contra defectos de fabricación y de materiales por diez años
desde la fecha de instalación Esta garantía no se aplica a daños debidos a accidente, mal uso o alteración, ni a los casos en que la tensión eléctrica
conectada supere a la tensión nominal -indicada en la placa de características- en más de un 5 %, ni a equipos que hayan sido instalados o cableados incorrectamente, o mantenidos en forma violatoria de lo indicado en las instrucciones de instalación del producto. Todo reclamo por trabajos en garantía debe acompañarse con una prueba de la fecha de instalación.
El cliente será responsable de todos los costos incurridos en el retiro o reinstalación de productos, incluyendo los costos de mano de obra y los costos
de envío incurridos para regresar productos al Centro de Servicio de Marley Engineered Products. Dentro de las limitaciones de esta garantía, las
unidades que no funcionen deben regresarse al Centro de Servicio autorizado por Marley más cercano o al Centro de Servicio de Marley Engineered
Products, y nosotros los repararemos o reemplazaremos, a nuestra opción, sin cargo para usted, con el flete de retorno pagado por Marley. Se acuerda que tal reparación o reemplazo es el único recurso que Marley Engineered Products pone a su disposición.
LAS GARANTÍAS EXPUESTAS MÁS ARRIBA TOMAN EL LUGAR DE TODA OTRA GARANTÍA, EXPRESA O IMPLÍCITA, Y POR LA PRESENTE SE
DECLINA Y EXCLUYE DE ESTE ACUERDO TODA GARANTÍA IMPLÍCITA DE COMERCIABILIDAD Y ADECUACIÓN A UN PROPÓSITO PARTICULAR QUE EXCEDA LAS GARANTÍAS EXPRESAS ANTEDICHAS. MARLEY ENGINEERED PRODUCTS NO SE HARÁ RESPONSABLE POR
DAÑOS CONSIGUIENTES QUE SE PRODUZCAN CON RESPECTO AL PRODUCTO, EN BASE YA SEA A NEGLIGENCIA, AGRAVIO, RESPONSABILIDAD ESTRICTA, O CONTRATO.
Algunos estados o jurisdicciones no permiten la exclusión o limitación de daños incidentales o consiguientes, de modo que la exclusión o limitación
expresada más arriba puede no aplicarse a su caso.Esta garantía le da derechos legales específicos, y usted puede tener también otros derechos, que
varían de un estado o jurisdicción a otro.
Para obtener la dirección de su centro de servicio autorizado más cercano, comuníquese con Marley Engineered Products, en Bennettsville, SC,
Estados Unidos de América, llamando al 1-800-642-4328. Toda mercadería regresada a la fábrica debe ser acompañada por una autorización de retorno
y una etiqueta de identificación de servicio, disponibles ambas en Marley Engineered Products. Cuando solicite la autorización de retorno, incluya todos
los números de catálogo mostrados en los productos.
CÓMO OBTENER SERVICIO EN GARANTÍA, PIEZAS DE
REPUESTO E INFORMACIÓN GENERAL
1. Servicio o repuestos, en garantía:
2. Compra de piezas de repuesto:
3. Información general sobre productos:
1-800-642-4328
1-800-654-3545
www.marleymep.com
Nota: cuando solicite servicio, siempre dé la información que sigue:
1. Número de modelo del producto
2. Fecha de fabricación
3. Número de parte o descripción
5200-2195-003
470 Beauty Spot Rd. East
Bennettsville, SC 29512
E. U. de A.
ECR 37166
2/07
3
Notas:
4
FILE #E21609
Modèle PH4AB
Unité de chauffage
portable
Instructions d'installation et d'entretien
Cher client,
Félicitations ! Merci d'avoir acheté ce nouveau radiateur fabriqué par Marley Engineered Products. Vous avez
fait un sage investissement en sélectionnant un produit de la plus haute qualité dans l'industrie du chauffage.
Veuillez lire avec soin les recommandations d'installation et d'entretien données dans ce manuel. Vous devriez
bénéficier d'années de confort de chauffage efficace avec ce produit de Marley Engineered Products … le numéro
un de cette industrie en conception, fabrication, qualité et service.
... les employés de
Marley Engineered Products
!
AVERTISSEMENT
8.
À lire attentivement - Ces instructions contiennent des informations vitales pour une installation et une utilisation correctes et
un bon fonctionnement du chauffage. Étudiez soigneusement ces
instructions avant installation, utilisation ou nettoyage du
chauffage. Le non respect de ces instructions peut entraîner
incendie, commotion électrique, blessures graves, mort ou dégâts
matériels. Conservez ces instructions et révisez-les régulièrement
pour poursuivre un usage sûr et former de futurs utilisateurs.
1.
2.
3.
4.
5.
6.
7.
9.
Ne brancher que sur des prises secteurs bien reliées à la terre.
Vérifier tension et ampérage pour ce chauffage sur son arrière pour
s'assurer de la conformité avec l'alimentation secteur disponible.
Une protection avec détection de fuite à la terre est nécessaire si le
chauffage est utilisé dans des zones humides comme des sous-sols
ou des garages. L'appareil ne convient pas pour une utilisation en
zone très humide ou mouillée.
Ne pas utiliser à l'extérieur.
Ne jamais placer le chauffage à un endroit d'où il pourrait tomber dans
une baignoire ou autre récipient d'eau.
Ne pas insérer ou laisser pénétrer d'objets étrangers dans toute
ouverture de ventilation ou d'extraction, sous peine de causer commotion électrique, incendie ou dommages au chauffage.
Pour empêcher un possible incendie, ne pas obstruer d'une quelconque façon les bouches d'admission ou extraction d'air.
10.
11.
12.
13.
14.
Ne pas utiliser sur des surfaces molles, comme un dessus de lit, où
des ouvertures peuvent être bouchées. Nettoyez aussi souvent que
possible pour éviter l'accumulation de poussière sur grilles ou ailettes
d'élément de chauffe. Maintenir tous cordons électriques, draperies,
papiers, plastiques et autres combustibles à distance du chauffage.
Ne pas faire passer le cordon d'alimentation sous un tapis. Ne pas le
recouvrir par carpettes, tapis de passage, etc…Pour éviter trébuchement ou dommages, faire passer ce cordon à l'écart des zones de
passage.
Un chauffage comporte des parties brûlantes, formant un arc ou
générant des étincelles à l'intérieur. Ne pas le faire fonctionner dans
des zones où essence, peinture ou liquides inflammables sont utilisés
ou entreposés.
Si le chauffage ou son cordon secteur étaient endommagés ou en cas
de dysfonctionnement, débrancher le chauffage, ne pas le réutiliser
avant sa réparation par un service compétent.
Ne pas faire fonctionner ce chauffage sans son socle.
Ne pas utiliser de cordon rallonge avec ce chauffage. Ne pas couper
sa fiche pour le câbler directement sur le secteur.
Quand le chauffage doit se monter sur cloison ou au plafond, les
ancrages doivent être assez solides pour supporter le poids total du
chauffage plus son dispositif de montage. Une fixation insuffisante
peut causer la chute du chauffage.
CONSERVER CES INSTRUCTIONS
1
GÉNÉRALITÉS
Avant de faire fonctionner le chauffage, assurez-vous que configuration et
capacité de la prise électrique lui conviennent.
TROU
ROND
En cas de montage du chauffage sur cloison ou plafond, il vous faut prendre des précautions pour discipliner le cordon et éviter qu'un excès de
longueur pende librement.
UTILISEZ LES
TROUS
RONDS POUR LE
MONTAGE AU PLAFOND ET PAS LES
TROUS DE SERRURE.
En atelier, positionnez le chauffage à l'écart de toutes sources de poussière de bois.
APPLICATION AU SOL
Le chauffage tel que vous le recevrez est prévu pour un montage au sol.
Placez-le sur le plancher ou une autre surface plane et branchez sa fiche
de cordon dans une prise secteur appropriée.
Remettez le chauffage sur son socle et resserrez les boutons pour le verrouiller en place. Deux grosses rondelles en caoutchouc se placent entre
chauffage et socle, de chaque côté.
Le chauffage peut se régler pour rediriger le flux d'air. Pour cela il suffit de
desserrer le bouton de chaque côté du chauffage, de le pivoter dans la
direction voulue, et de resserrer ces deux boutons.
AVERTISSEMENT
N'OUBLIEZ PAS : La prise secteur doit être à la portée du cordon d'alimentation qui fait 1,8 m. Assurez-vous de fournir assez d'espace pour pouvoir pivoter le chauffage et atteindre ses boutons de réglage d'orientation.
!
FONCTIONNEMENT DE CHAUFFAGE
Pour utiliser le chauffage, sélectionnez d'abord la position faible ou forte au
commutateur de puissance de chauffe, puis tournez le bouton du thermostat à fond dans le sens horaire. Le voyant indicateur va s'allumer et rester
allumé aussi longtemps que le chauffage sera en marche. Quand la température ambiante atteint le niveau choisi, ramenez lentement le bouton du
thermostat en sens antihoraire jusqu'au déclic du thermostat. Le chauffage
étant arrêté, tournez ce bouton de thermostat en sens antihoraire jusqu'à
l'extinction du voyant indicateur.
ÉVITEZ DE DIRIGER LE FLUX D'AIR VERS DRAPERIES, MEUBLES
OU AUTRES OBJETS QUI POURRAIENT ÊTRE ABÎMÉS PAR LA
CHALEUR. N'UTILISEZ PAS LE CHAUFFAGE AU SOL SANS SOCLE
EN PLACE, OU À UN ENDROIT OÙ UN PETIT ENFANT POURRAIT
TOMBER DESSUS. NE LE PLACEZ PAS EN UN LIEU OÙ L'ON PEUT
MARCHER SUR SON CORDON, OÙ IL PUISSE FAIRE TRÉBUCHER
OU ÊTRE MALTRAITÉ.
Le commutateur de sélection du ventilateur permet un fonctionnement de
soufflage continu ou cyclique par sélection respective des positions ON ou
AUTO.
MONTAGE MURAL
VOIR L'AVERTISSEMENT N° 13 DE LA PAGE PRÉCÉDENTE.
Ce chauffage peut se monter sur toute cloison qui supportera son poids.
Enlevez d'abord le socle du chauffage puis les quatre rondelles en
caoutchouc du socle. Fixez le socle sur les éléments de structure de la
cloison avec quatre tire-fonds de diamètre 1/4” et de longueur 1-1/2” (non
fournis). Dans des murs en maçonnerie utilisez des boulons à coquille
d'expansion ou à ailettes. N'utilisez jamais de boulons de moins de 1/4” de
diamètre.
COM. DE
CHAUF.
HEAT
SW.
HI
1 HAUT
ÉLÉMENTS
DE FRONT
CHAUFFE
ELEMENTS
2
MILIEU
MIDDLE
3
BAS
LOW
ARRIÈRE
REAR
1
COM. DE
FANVENT.
SW.
AUTO
2
MOTEUR
MOTOR
ON
3
OUVERTURE EN
TROU DE SERRURE
6
TROUS DE
MONTAGE
ESPACÉS DE 16”
BORNIER
TERMINAL
BLOCK
4
VOYANT INDICATEUR
INDICATOR
LIGHT
L1
OFF
THERMOSTAT
THERMOSTAT
L2
UTILISEZ LES
TROUS DE SERRURE POUR LE
MONTAGE
MURAL
CYL
RESTAURATIO MANUELLE
MANUAL
RESET
DE PROTECTION
THERMIQUE
THERMAL
UNIT
NETTOYAGE ET ENTREPOSAGE
Coupez au thermostat, puis enlevez la fiche de la prise secteur avant de
nettoyer le chauffage. N'utilisez que des chiffons doux pour dépoussiérer.
Pour nettoyer n'utilisez qu'un chiffon humidifié avec du liquide pour vaisselle non abrasif. N'utilisez pas de nettoyants abrasifs ou chimiques qui
pourraient abîmer la finition.
Remettez le chauffage sur son socle et resserrez les boutons pour le verrouiller en place. Deux grosses rondelles en caoutchouc se placent entre
chauffage et socle, de chaque côté.
Si le chauffage est utilisé dans un emplacement très poussiéreux, utilisez
un aspirateur avec l'accessoire brosse pour éliminer la poussière et les
autres matières étrangères des grilles.
N'OUBLIEZ PAS : La prise secteur doit être à la portée du cordon d'alimentation qui fait 1,8 m. Assurez-vous de fournir assez d'espace pour pouvoir pivoter le chauffage et atteindre ses boutons de réglage d'orientation.
Débranchez toujours le cordon et enroulez-le autour de chauffage quand il
ne sert pas. Déplacez les chauffages montés au sol dans un endroit sûr
pour son entreposage.
MONTAGE AU PLAFOND
Ce chauffage peut se monter sur tout plafond qui supportera son poids.
Enlevez d'abord le socle du chauffage puis les quatre rondelles en
AVERTISSEMENT
!
DÉPANNAGE
Ce chauffage ne nécessite pas un entretien régulier autre qu'un nettoyage
occasionnel pour éviter l'obturation des ouvertures de grille d'admission
d'air. Pour nettoyer cette partie, utilisez un aspirateur équipé d'une brosse
à poussière ou un jet d'air comprimé. Le moteur est lubrifié à vie.
POUR ÉVITER UNE CHUTE ÉVENTUELLE DU CHAUFFAGE, N'UTILISEZ PAS LES OUVERTURES EN TROUS DE SERRURE POUR LA
FIXATION AU PLAFOND. VOIR AUSSI L'AVERTISSEMENT N° 13 DE
LA PAGE PRÉCÉDENTE
Ne faites pas fonctionner ce chauffage si son cordon est endommagé ou
en cas de dysfonctionnement ou de dégâts quelconques. Retournez le
chauffage à une entité de service agréée pour examen et réglage ou
dépannage mécanique.
caoutchouc du socle. Fixez le socle sur les éléments de structure du plafond avec quatre boulons de diamètre 1/4” (non fournis). Sur des solives
en bois utilisez des tire-fonds de longueur 1-1/2”. Sur des poutres d'acier
utilisez des boulons mécaniques avec contre-écrous. N'utilisez jamais de
boulons de moins de 1/4” de diamètre.
Appelez au numéro sans frais pour de l'aide afin de localiser un centre de
réparations près de chez vous.
2
RESTAURATION DE LA PROTECTION THERMIQUE DE SÉCURITÉ
Votre chauffage est équipé d'un contrôle de coupure thermique de sécurité
qui arrête immédiatement le chauffage pour empêcher un incendie en cas
de surchauffe. Ce contrôle est situé à l'avant du chauffage juste au-dessus
du thermostat, avec la mention “PUSH TO RESET” (appuyer pour restaurer). Pour relancer le chauffage après déclenchement, laissez-le refroidir
et appuyez simplement sur le bouton rouge jusqu'à réenclenchement. Le
chauffage doit immédiatement reprendre son fonctionnement normal.
ATTENTION
!
LE DÉCLENCHEMENT DE CE CONTRÔLE DE DÉPASSEMENT DE LA
LIMITE THERMIQUE INDIQUE QUE LE CHAUFFAGE A ÉTÉ SOUMIS
À DES CONDITIONS ANORMALES. IL EST RECOMMANDÉ DE LE
FAIRE EXAMINER PAR UN BON ÉLECTRICIEN OU SERVICE DE
RÉPARATIONS POUR S'ASSURER QU'IL N'EST PAS ENDOMMAGÉ
DE FAÇON PERMANENTE.
PLAQUE SIGNALÉTIQUE
MODEL NO.
PH4AB
DATE CODE
0207
PORTABLE HEATER
VOLTS AC
60 HZ
240
220
208
WATTS
HI
LO
4000 2660
3360 2240
3000 2000
AMPS
HI
16.7
15.3
14.4
LO
11.1
10.2
9.6
2F68 LISTED
MOVABLE HEATER
CAUTION: UNPLUG BEFORE SERVICING.
CAUTION: DO NOT OPERATE WITHOUT STAND.
ATTENTION: DÉBRANCHER AVANT TOUTE
INTERVENTION.
ATTENTION: NE FAITES PAS FONCTIONNER
LE RADIATEUR SANS SOCLE.
MARLEY ENGINEERED PRODUCTS
BENNETTSVILLE, SC 29512
4104-2099-002
GARANTIE LIMITÉE
Tous les produits fabriqués par Marley Engineered Products sont garantis contre les défauts de matériaux et de main d'œuvre pendant un an à compter
de la date d'installation, sauf pour les éléments de chauffe qui sont garantis contre les défauts de matériaux et de main d'œuvre pendant cinq ans à
compter de la date d'installation. Cette garantie ne s'applique pas à des dommages suite à accident, abus ou altération, ni au cas ou le secteur d'alimentation fait plus de 5% au-delà de la tension nominale, ni si l'équipement a été mal installé, mal câblé ou mal entretenu en violation des instructions
d'installation données. Toutes les réclamations au titre de la garantie doivent être accompagnées de la preuve de la date d'installation.
Le client prendra en charge tous les frais relatifs au démontage et remontage des produits, y compris les temps de main d'œuvre, et des coûts d'acheminement pour renvoyer les produits défectueux au centre de réparation de Marley Engineered Products. En tenant compte des restrictions énoncées de cette garantie, les unités en panne doivent être renvoyées au centre de service agréé Marley le plus proche, ou centre de Marley Engineered
Products, et nous les réparons ou les remplacerons, à notre choix, sans frais pour vous, avec les frais d'expédition en retour payés par Marley. Il est
entendu que cette réparation ou ce remplacement constituera la seule compensation fournie par Marley Engineered Products.
CETTE GARANTIE DÉCRITE TIENT LIEU DE TOUTES AUTRES GARANTIES EXPLICITES OU IMPLICITES. TOUTES LES GARANTIES
IMPLICITES DE VALEUR MARCHANDE ET D'ADÉQUATION À UN BUT SPÉCIFIQUE QUI EXCÉDERAIENT LA DITE GARANTIE SONT ICI
DÉCLINÉES ET EXCLUES DE CET AGRÉMENT. MARLEY ENGINEERED PRODUCTS NE PEUT PAS ÊTRE TENU POUR RESPONSABLE DES
DOMMAGES CONSÉCUTIFS SURVENANT DU FAIT DE CE PRODUIT, QU'ILS SOIENT FONDÉS SUR NÉGLIGENCE, TORT, RESPONSABILITÉ
STRICTE OU CONTRACTUELLE.
Certains états ne permettent pas l'exclusion ou la limitation pour les dommages annexes ou consécutifs, de ce fait l'exclusion ou limitation plus haut
peut n'est pas applicable pour vous. Cette garantie vous donne des droits légaux spécifiques, et vous pourriez avoir d'autres droits qui varient d'un
état à l'autre.
Pour obtenir l'adresse du centre de réparation agréé le plus proche de chez vous, contacter Marley Engineered Products à Bennettsville, SC, au
1-800-642-4328. Les marchandises qui nous sont retournées doivent être accompagnées d'une autorisation de retour et d'une étiquette d'identification de réparation, à obtenir de Marley Engineered Products. En formulant cette demande de renvoi, fournir tous les numéros de référence inscrits sur
l'appareillage.
COMMENT OBTENIR DU SERVICE ET DES PIÈCES DANS
LE CADRE DE LA GARANTIE ET DES INFORMATIONS
GÉNÉRALES SUR LES PRODUITS
1. Service et pièces sous garantie
1-800-642-4328
2. Pièces détachées achetées
1-800-654-3545
3. Informations générales sur les produits www.marleymep.com
Remarque - Pour obtenir le service sous garantie vous devez toujours
avoir préparé :
1. Référence de modèle du produit
2. Date de fabrication
3. Numéro ou description de pièce
5200-2195-003
470 Beauty Spot Rd. East
Bennettsville, SC 29512 USA
ECR 37166
2/07
3
Notes:
4