1
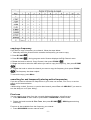
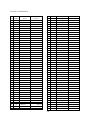
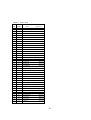
20-137
1,000-Channel Handheld Race Scanner
Contents
Thank you for purchasing your RadioShack 1000-Channel Handheld Race Scanner from
RadioShack. Your handheld scanner is one of a new generation of race scanners.
What’s Included
-
scanner
antenna : Long (1), Short (1)
belt clip
user’s guide
quick start guide
preprogrammed frequency guide
your scanner’s features
Func (Function) – has various functions in combination with other keys.
Press this key, then release it, and press the next key (described “F + xx” in this manual).
SEL/VOL/SQL – rotate this key to select next or previous channel, frequency or item, and to
change scan or search direction up or down. Push this key to enter Volume Control mode, or to
complete the entry of frequencies and text in Menu mode. Pressing after Func enter squelch
control mode.
-1-
Menu – enters Menu mode. In Menu mode, press to return to the previous menu, and press and
hold to exit Menu mode.
SCN/MAN – scans the stored channels or manually enter a channel.
CAR – selects cars manually and inputs car information.
SRCH/PSE (Pause) – display search select menu for selecting one of search. Pause or resumes
search or fine tune operation in Search mode. Go to Fine Tune Search mode with pause condition
directly.
/ KEYLOCK – press to turn the backlight on. Press and hold to turn the radio on or off.
1/PRI – Pressing after Func turn the priority function on or off.
2 ABC/DLY – Pressing after Func programs a 2-second delay for a selected channel or service.
3 DEF/WX – Pressing after Func starts weather scan.
0/
E PGM/
- Pressing after Func activates Signal StalkerⅠfunction.
- programs frequencies into channels. Pressing after Func turns SkyWarn I on.
・ CLR/ L/OUT – enter a decimal point, clears the incorrect entry, and lockout selected channels
or skip specified frequencies during a search.
PC/IF – connect and optional PC interface cable here to use the scanner with your computer.
6V 800mA – connect an external power source here (not included).
- connect an earphone or headphone here.
supplying power to your scanner
You can power your scanner with batteries or an AC adapter.
Warning: Only set the switch inside the battery compartment to NiMH for use with
nickel metal hydride (NiMH) rechargeable batteries. Never use non-rechargeable batteries when
the switch is set to NiMH.
Set the switch inside the battery compartment to the appropriate setting.
• ALKALINE when using alkaline batteries (not included).
Caution: You must use a Class 2 power source that supplies 6V DC and delivers at least 800mA.
Its center tip must be set to positive and its plug must fit the scanner’s DC 6V 800mA jack. Using
an adapter that does not meet these specifications could damage the scanner or the adapter.
• NiMH when using rechargeable (NiMH) AA batteries (not included). The scanner stops
charging automatically after at most14 hours when the DC jack is connected to power.
battery cautions
• Use only fresh batteries of the required size and recommended type.
-2-
• Always remove old or weak batteries. Batteries can leak chemicals that damage electronic
circuits.
• Do not mix old and new batteries, different types of batteries (standard, alkaline, or
rechargeable), or rechargeable batteries of different capacities.
flashes and the scanner beeps every 15 seconds, replace all
• When the battery icon
three batteries.
• Always dispose of old batteries promptly and properly. Do not bury or burn them.
Warning: Do not connect a charging adapter to the scanner if non-rechargeable batteries (such
as alkaline batteries) are installed in the scanner and the switch is set to NiMH, or if you are
unsure of the switch’s position. Non rechargeable batteries will get hot and can
even explode if you try to recharge them.
• Always connect the AC adapter to the scanner before you connect it to AC power. When you
finish, disconnect the adapter from AC power before you disconnect it from the scanner.
connecting the antenna
Attach the supplied antenna to the scanner by screwing it tightly onto the anchor post at the top
of the radio. When using an external antenna, always use 50-ohm, RG-58, or RG-8, coaxial
cable to connect to it. If the antenna is over 50 feet from the scanner, use RG-8 low-loss
dielectric coaxial cable. If your antenna’s cable does not have a SMA connector, your local
RadioShack store carries a variety of SMA adapters.
connecting an earphone/headphone
For private listening, you can plug headphones (not included) into the headphone jack on top of
your scanner. This automatically disconnects the internal speaker. Note that the sound is “mono”
and not stereo.
listening safely
To protect your hearing, follow these guidelines when you use an earphone or headphones.
• Do not listen at extremely high volume levels. Extended high-volume listening can lead to
permanent hearing loss.
• Set the volume to the lowest setting before you begin listening. After you begin listening, adjust
the volume to a comfortable level.
• Once you set the volume, do not increase it. Over time, your ears adapt to the volume level, so
a volume level that does not cause discomfort might still damage your hearing.
If you use an earphone or headphones with your scanner, be very careful. Do not listen
to a continuous broadcast. Even though some earphones/headphones let you hear
some outside sounds when listening at normal volume levels, they still can present
a traffic hazard.
attaching the belt clip
To attach the belt clip:
1. Rotate the belt clip so that the finger indentation is towards the top of the radio.
2. Align the center of the clip with the anchor post.
3. Place the clip on the post and slide the clip upwards until it clicks into place.
To remove the belt clip:
1. Rotate the clip so that the finger indentation is towards the bottom of the radio.
2. Slide the clip up until it comes free of the anchor post.
transferring data to or from another scanner or pc
You can transfer the programmed data to and from another 20-137 scanner using a connecting
-3-
cable which has 1/8-inch phone plugs on both ends (not supplied). Connect
the cable between each scanner’s PC/IF jacks. See “cloning your scanner”. You can
also upload or download the programmed data to or from a PC using an optional PC interface
cable and software available through your local RadioShack store. See
“wired programming.”
about your scanner
We use a few simple terms in this manual to explain the features of the scanner. Familiarize
yourself with these terms and the scanner’s features, and you can put the scanner to work for
you right away. Simply determine the type of communications you want to receive, then set the
scanner to scan those communications.
The scanner scans conventional frequencies and racing.
A frequency, expressed in kHz or MHz, is the tuning location of a station. To find active
frequencies, you use the search function.
Besides searching within a selected frequency range, you can also search your scanner’s
service banks. Service banks are preset groups of frequencies categorized by the type of
services that use those frequencies. For example, many amateur radio frequencies are located
in the HAM service bank.
When you search and find a desired frequency, you can store it into a programmable memory
location called a channel. Channels are grouped into channel-storage banks. The scanner has
10 channel-storage banks. Each bank contains 100-channel sets. So the scanner has 1,000
channels. You can scan the channel storage banks to see if there is activity on the frequencies
stored there.
Note: You search frequencies when you want to find your local frequencies and scan channels
after you programmed your found frequencies.
understanding banks
service banks
The scanner is preprogrammed with all the frequencies allocated to the Car Band, Marine,
Fire/Police, Aircraft, and Ham Band services. This helps you quickly find active
frequencies instead of doing a chain search (see “service bank search”).
channel storage banks
To make it easier to identify and select the channels you want to listen to, all the channels are
divided into 10 banks of 100 channels. Use each channel-storage bank to group frequencies,
such as those for the police department, fire department, ambulance services, or aircraft. For
example, the police department might use four frequencies in your town while the fire
department uses an additional four. You could program the four police frequencies starting with
Channel 0 (the first channel in bank 0), and program the fire department frequencies starting with
Channel 100 (the first channel in bank 1).
turning on the scanner
Make sure the scanner’s antenna is connected, then press and hold
scanner turns on.
setting the volume
1. Push the SEL/VOL/SQL knob.
-4-
/ KEYLOCK. The
2. Rotate the knob to select the volume level you want to set from 0 to 15.
setting the squelch
1. Press Func, then push the SEL/VOL/SQL knob.
2. Rotate the knob to select the squelch level you want to set from 0 to 15.
Using the Scanner at the Racetrack
You can hear drivers communicating with their pit crews, officials communicating with drivers
and crews, and track workers communicating with everybody.
Each user at the racetrack transmits and receives on one or more frequencies.
The scanner organizes racetrack frequencies by the name of the race you are scanning and by
car number. For example, you might hear drivers and their pit crews on the car number
frequencies and officials and the news media on the race frequencies. When you are scanning,
the scanner stops very briefly on each channel to see if there is activity. If there isn’t, the scanner
quickly moves to the next channel. If there is, then the scanner pauses on the transmission until
it is over. You can activate one racing system and as many conventional systems as you want at
the same time. Within a racing system, each driver can have multiple frequencies stored.
before you get to the track
Each driver’s team has several different frequencies they can use during a race. These
frequencies can change depending on local interference sources or other frequency issues. Your
scanner is preprogrammed with all of the drivers and their possible frequencies that were known
when it was manufactured.
Before you leave for the track, check the Internet to see if there are any frequency updates
available for your race. You can save time at the track by setting up as much as possible before
you leave.
when you get to the track
When you arrive at the race, get a list of the actual frequencies in use that race day. These are
normally available for sale on the way into the facility. This list will show the actual frequency
being used by each driver that day, as well as some other useful frequency information.
Then, follow the steps in the sections below to adjust the scanner settings.
loading the preset race frequency list
For your convenience, 6 exciting car race frequencies are pre-stored. You can use one of the
race frequencies by loading to channel banks. Follow these steps to load the race frequencies:
1.Press Menu.
2. Rotate the knob to select 1:Preset Race, then press E PGM/
3. Rotate the knob to select 1:Load Race, then press E PGM/
.
.
4. Rotate the knob to select one of the race, then press E PGM/
.
5. If you select race A to C, Load Bank X into Bank0 Yes=”1”/No=”3” appears. If you select
race D to F, Load Bank X into Bank0 and 1 Yes=”1”/No=”3” appears. Press 1/PRI to
program the race or press 3 DEF/WX to cancel.
storing the preset race frequency list
You can overwrite one of the race frequencies after you editing on the loaded bank. Follow these
steps to overwrite:
-5-
1.Press Menu.
2. Rotate the knob to select 1:Preset Race, then press E PGM/
.
.
3. Rotate the knob to select 2:Store Race, then press E PGM/
4. Rotate the knob to select one of the race, then press E PGM/
.
5. If you select race A to C, Store Bank0 into Bank X Yes=”1”/No=”3” appears. If you select
race D to F, Store Bank0 and 1 into BankX Yes=”1”/No=”3” appears. Press 1/PRI to
program the race or press 3 DEF/WX to cancel.
program driver frequencies
Follow these steps to select the appropriate frequency for each driver.
.
1. Press CAR, enter the driver’s number, then press E PGM/
2. If the car number is not stored, Car# XX is not stored. Program new car? Appears.
3. Enter the tag you want to assign to the car number such as driver’s name, then press
E PGM/
.
4. Enter the frequency of the car, then press E PGM/
.
5. If you want to input another frequency to the car, press E PGM/
.
monitoring a car
Follow these steps to monitoring a car within the currently selected racing system.
1. Press CAR, enter the car number, then press E PGM/
. Or press CAR then press E
. Select the car from the list by rotating the knob, then press E PGM/
PGM/
can select the car’s primary frequency.
. You
Primary frequency is the frequency which is selected first when a car has more than two
frequencies. Just after you have load the preset race frequency list, the frequency in the
smallest channel works as a primary frequency. If you want to change the primary frequency,
follow these steps:
1. Show the channel where the car number is programmed.
2. Press F then rotate the knob to select other frequency.
Note: Primary frequency is also changed automatically in the following situation:
- Select car channel by rotating the knob during manual mode
- Press SCAN/MAN when you monitor a car channel found by scan mode
storing known frequencies into channels
You can locate and store specific frequencies into channels for later use.
1. Press SCN/MAN to enter manual mode.
to put the scanner in programming mode. PGM appears.
2. Press E PGM/
3. Use the number keys to enter the channel number you want to assign to a frequency.
4. Press SCAN/MAN.
5. Use the number keys and •CLR / L/OUT to enter the frequency, including the decimal point
you want to store.
6. Press E PGM/
to store the frequency.
Notes:
-6-
• If you entered an invalid frequency in Step 5, Error appears and the scanner beeps error tones.
Enter a valid frequency.
• If you entered a frequency in Step 5, which already exists on another channel, the scanner
beeps an error tone and displays that channel. Press •CLR / L/OUT to clear the display, or press
to store the frequency in both channels.
E PGM/
• The scanner automatically rounds the entered number to the nearest valid frequency. For
example, if you enter 151.473 (MHz), your scanner accepts it as 151.475.
7. Press E PGM/
again. Edit Channel menu appears.
8. Rotate the knob to select 1: Edit Car# , then press E PGM/
.
9. Use the number keys to enter the car number in 3-digits, then press E PGM/
.
10. Rotate the knob to select 2: Edit Tag, then press E PGM/
.
11. Use the number keys to enter the tag referring to the next section, editing a tag , then press E
PGM/
12. To program the next channel in sequence, press Menu then repeat the Steps from 3.
editing a tag
Input a tag using the following functions:
Rotate clockwise to moves the cursor to the left, counterclockwise to the right.
Pressing Func toggle the input mode as follows: ABC à abc à 123àABC.
Press •CLR / L/OUT once to erase the character on which the cursor is put. Press and hold to
erase all the characters.
Press E PGM/
to save the tag and exit editing tag.
For example, to enter "Scanner":
1.Press [7 / PQRS] key 4 times to enter "S".
2.Press [FUNC] key to switch the capital letter to small letter.
3.Then press [2 / ABC / DLY] key 3 times to enter "c".
4.Turn [ROTARY KNOB] to move cursor.
5.Press [2 / ABC / DLY] key 1 times to enter "a".
6.Press [6 / MNO] key 2 times to enter "n".
7.Turn [ROTARY KNOB] to move cursor.
8.Press [6 / MNO] key 2 times to enter "n".
9.Press [3 / DEF / WX] key 2 times to enter "e".
10.Press [7 / PQRS] key 3 times to enter "r".
11.Press [E / PGM / SKYWARN] key to end the user’s text entry.
-7-
copying a frequency
If you want to copy a frequency to a channel, follow the steps below:
1. Manually select the channel which contains the frequency you want to copy.
2. Press E PGM/
3. Press E PGM/
.
during program mode. Scanner displays the Edit Channel menu.
.
4. Rotate the knob to select 4: Copy Channel, then press E PGM/
5. Rotate the knob to select the bank where you want to copy the frequency, then press E PGM/
.
6. Rotate the knob to select the channel you want to copy the frequency, then press E PGM/
. The frequency has been copied.
To cancel the copy, press Menu.
searching for and temporarily storing active frequencies
If you do not have a reference to frequencies in your area, use a chain, Fine Tune, or service
search to find a transmission.
Notes:
• While doing a chain, fine tune, or service bank search, press Func + 2 ABC/DLY if you want to
turn the delay on or off (see “delay”).
Fine tune
You can search up or down from the currently displayed frequency using fine tune.
1. Press SRCH/PSE in scan mode or press Func + SRCH/PSE in search mode.
2. Rotate the knob to select 0: Fine Tune, then press E PGM/
searching.
Fine tune is also available from the frequency you entered.
1. Press SCAN/MAN to enter manual mode.
-8-
. SRCH appears during
2. Use the number keys and •CLR / L/OUT to enter a frequency.
3. Press SRCH/PSE. Fine Tune appears.
4. Press SRCH/PSE again to start fine tune.
Note: If you enter an invalid frequency, the scanner displays Error. Press •CLR / L/OUT to clear.
service bank search
You can search for car band, marine, fire/police, aircraft and ham transmissions without knowing
the specific frequencies used in your area. The scanner is preprogrammed with all the
frequencies allocated to these services. To use this feature, press SRCH/PSE. Rotate the knob
to select a service bank, press E PGM/
The selected service starts to be searched.
.
Note: Because there are many different frequencies allocated to ham band, it can take several
minutes to search all the service frequencies.
chain search
This feature lets you search through preset frequency ranges. You can also preset a range. The
preset frequency ranges are:
BankNo.
0
1
2
3
4
5
6
7
8
9
Frequency (MHz)
25.0000 – 27.9950
28.0000 – 54.0000
108.0000 – 136.9875
137.0000 – 174.0000
216.0000 – 224.9950
400.0000 – 449.99375
450.0000 – 469.99375
470.0000 – 512.0000
806.0000 – 956.0000
1240.0000 – 1300.0000
Step (kHz)
5
5
12.5
5
5
6.25
6.25
6.25
12.5
12.5
starting chain search
1. Press SRCH/PSE.
2. Rotate the knob to select 6: Chain Search.
3. Press E PGM/
. SRCH appears.
4. Press 0 – 9 to enable or disable the search bank number being searched.
Note: At least one bank needs to be entered. If you disable all the banks, the error tone beeps.
5. Rotate the knob to search down or search up.
6. When the scanner stops on a transmission, quickly press SRCH/PSE to stop searching to
listen to the transmission. *PAUSE* appears.
7. To release the pause and continue searching, press SRCH/PSE.
Note: To step through the frequencies while *PAUSE* appears, rotate the knob.
storing found frequencies
You can store frequencies you find.
1. Press E PGM/
when you find a frequency. The bank list appears.
2. Rotate the knob to select the bank number you want to store the frequency, then press E
PGM/
. The smallest empty channel number and “0.0000” appears.
3. Rotate the knob to move to the channel where you wish to store the frequency.
4. Press E PGM/
to enter the frequency.
-9-
If you want to assign the car number and tag, see step 8 of “storing known frequencies into
channels” .
programming search ranges
You can define the search range during a chain search in each search bank.
1. Press Menu.
2. Rotate the knob to select 3: PGM Chain Srch.
.
3. Press E PGM/
4. Rotate the knob to select the bank number you want to change the range.
5. Rotate the knob to select 1:Edit limit, then press E PGM/
.
6. Using the number keys, enter the lower limit frequency, and then press E PGM/
.
7. Using the number keys, enter the upper limit frequency, and then press E PGM/
.
weather scan
You can also scan for weather transmissions. To start weather scan:
1. Press Func + 3 DEF/WX. WX Scan appears. You can change the scan direction by rotating
the knob.
2. If you want to stop the scan, press SRCH/PSE. *PAUSE* appears.
turning on the weather alert feature
1. Press Func + 3 DEF/WX and start weather scan. See “weather scan.”
2. Press Func + 3 DEF/WX. WX Alert Standby appears. This mutes the audio until the scanner
receives a weather alert signal. When the scanner receives a signal, WX ALERT! appears.
The scanner remains on the weather channel and the audio turns on so you can hear the
weather broadcast. Press any key to stop the siren.
search skip memory
You can skip up to 200 specified frequencies during a chain, service search, fine tune and Signal
Stalker I. This lets you avoid unwanted frequencies or those already stored in a channel.
Note: You cannot skip frequencies during WX scan.
To skip a frequency, press •CLR / L/OUT when the scanner stops on the frequency during a
chain, service search, fine tune and Signal Stalker I. The scanner stores the frequency in
memory and automatically resumes the search.
To clear a single frequency from skip memory so the scanner stops on it during a chain, fine tune
and service search and Signal Stalker I:
1. Press SRCH/PSE to stop the search.
2. Rotate the knob to select the skipped frequency. L/O appears.
3. Press •CLR / L/OUT. L/O disappears.
Or
1. Press Func + •CLR / L/OUT to see all the skipped frequency at a list.
2. Rotate the knob to select the frequency you want to clear from the skip frequency.
3. Press E PGM/
.
To clear all the skip frequencies at once while searching, press SRCH/PSE, then hold down
•CLR / L/OUT until the scanner beeps twice.
Notes:
- If you selected all frequencies to be skipped within the search range, All channels Locked
- 10 -
out! or All ranges Locked out! Appears. The scanner beeps 3 times and does not search.
- If you select more than 200 frequencies to skip, L/O List Full! appears. Please clear any
skipped frequency.
scanning the stored channels
To begin scanning channels, press SCAN/MAN. The scanner scans through all unlocked
channels in the activated banks. (See “locking out channels” and “turning channel-storage banks
on and off”). When the scanner finds a transmission, it stops on it. When the transmission ends,
the scanner resumes scanning.
Notes:
• If you have not stored frequencies into any channels, the scanner does not scan.
• If the scanner picks up unwanted partial, or very weak transmissions, press Func then push the
knob. SQL Level and current setting appears. Turn the knob to increase the number to
decrease the scanner’s sensitivity to these signals.
• To listen to a weak or distant station, turn the squelch level smaller.
• To ensure proper scanning, adjust the squelch until the audio mutes
manually selecting a channel
You can continuously monitor a single channel without scanning. This is useful if you hear an
emergency broadcast on a channel and do not want to miss any details —even though there
might be periods of silence — or if you want to monitor a specific channel.
Press SCAN/MAN to stop scanning, enter the channel number, and then press SCAN/MAN. The
selected channel appears.
Or, during scanning, if the radio stops at a channel you want to listen to, press SCAN/MAN.
Press SCAN/MAN to resume automatic scanning.
special features
delay
Sometimes a user might pause before replying to a transmission. To avoid missing a reply on a
specific channel, the scanner automatically programs a 2-second delay into any channel or
frequency. You can monitor the channel frequency for an additional 2 seconds after the
transmission stops before resuming scanning or searching.
Depending on the scanner operation, follow one of these steps to turn off or on a delay.
• To turn off the 2-second delay, press Func + 2 ABC/DLY while the scanner is monitoring a
channel or searching. DLY disappears.
• To turn on the 2-second delay to a channel again, select the channel and press Func + 2
ABC/DLY. DLY appears.
• To turn on the 2-second delay to search again, press Func + 2 ABC/DLY while the
scanner is searching. DLY appears and the scanner automatically adds a 2-second delay to
every frequency it stops on in that band.
Signal Stalker I also has a delay feature. It’s delay time is 10 seconds.
turning channel-storage banks on and off
You can turn each channel-storage bank on and off. When you turn off a bank, the scanner does
not scan any of the 100 channels in that bank.
While scanning, press the number key that corresponds to the bank you want to turn on or off.
Numbers appear at the top of the display, showing the currently selected banks. The scanner
- 11 -
scans all the channels within the displayed banks that are not locked out (see “locking out
channels”). The bank number flashes when the scanner scans a channel that belongs to the
bank.
Notes:
• You can manually select any channel within a bank, even if that bank is turned off.
• One bank must always be active. If you try to turn off all banks, error tone sounds.
locking out channels
You can increase the scanning speed by locking out channels that have a continuous
transmission, such as a weather channel. To lock out a channel, manually select the channel,
then press •CLR / L/OUT. L/O appears.
Note: You can still manually select locked-out channels.
To remove the lockout from a channel, manually select the channel, then press
•CLR / L/OUT. L/O disappears.
To unlock all channels in the banks that are turned on, press SCAN/MAN to stop
scanning, then hold down •CLR / L/OUT until the scanner beeps twice.
priority
The priority feature lets you scan through the channels and still not miss important or
interesting calls on specific channels. You can program any stored channels in each bank as a
priority channel. If the priority feature is turned on, as the scanner scans the bank, it checks that
bank’s priority channel for activity every 2 seconds.
Follow these steps to select a different channel in a bank as the priority channel.
1. Enter the channel number you want to select as a priority channel, then press SCAN/MAN.
2. Press E PGM/
.
3. Press E PGM/
again. Channel menu appears.
4. Rotate the knob to select 3: Priotiry CH, then press E PGM/
5. Rotate the knob to select 1: On, then press E PGM/
6. Press Menu to exit menu.
appears.
.
.
P
7. Repeat above steps for other channels you want to program as a priority channel.
To turn on the priority feature, press Func + 1/PRI in scan mode or manual mode. PRI appears.
Then the scanner checks the designated priority channel every 2 seconds.
To turn off the priority feature, press Func+ 1/PRI again.
Note: If you have locked out all priority channels, “Priority Scan No Channel” appears when you
activate the priority feature. Priority feature is cancelled. To unlock any desired priority channels,
see “locking out channels.”
using the keylock
To protect the scanner from accidental program changes, turn on the keylock feature. When the
scanner is locked, only the knob, Func and
/ KEYLOCK are available.
- 12 -
To turn on the keylock, press Func +
To turn off, press Func +
/ KEYLOCK. Keypad locked. appears.
/ KEYLOCK. Keypad unlocked. appears.
Note: Using keylock does not prevent the scanner from scanning channels.
wired programming
You can transfer programming data to your scanner using your PC and an optional interface
cable (available at your local RadioShack store) and software (available at your local
RadioShack or www.radioshack.com).
1. Make sure your scanner is turned off.
2. Connect the interface cable to your computer and then connect the other end of the cable to
PC/IF on the side of the scanner.
3. Install the software to your computer and run the program.
4. To set up the program, <please describe the details depends on the software which is being
developed in R/S>
5. Turn the scanner on. The scanner automatically goes into the wired programming mode.
6. WIRED PROGRAMMING MODE appears when the scanner receives data from the PC.
7. After completing the programming, turn the unit off, then remove the cable. Turn the unit on
again.
cloning your scanner
You can clone all the frequencies programmed in your PRO-137 to another PRO-137 using an
optional interface cable.
1. Make sure the scanners are turned off and then plug the cable into each scanner’s PC/IF jack.
of the master unit.
2. Turn on both scanners, then press E PGM/
3. Press 1/PRI to stat cloning. Sending data… appears on the master unit and Receiving
data… on the slave unit.
4. When the data transfer is completed, Finished. appears.
5. After the clone operation is complete, turn the slave unit off, then remove the cable. Turn the
unit on again.
If you want to clone another scanner, press •CLR / L/OUT of master unit, then repeat the step
from 2.
using the display backlight
To turn on the display light for easy viewing at night, press
lights for 15 seconds. If you press
scanner continue to light 15 seconds more.
/ KEYLOCK .The display
/ KEYLOCK again during the display lights, the
using the auto backlight display
You can set the scanner so the auto backlight turns on for about 5 seconds when the scanner
receives signals.
If you press a key within 5 seconds, the display remains lighted for more than 5 seconds.
To turn auto backlight display on or off:
1. Press Menu.
- 13 -
2. Rotate the knob to select 6:Settings, then press E PGM/
.
3. Rotate the knob to select 1: Back light, then press E PGM/
.
4. Rotate the knob to select 1: Auto Light, then press E PGM/
.
5. Rotate the knob to select 1: On or 2: Off, then press E PGM/
exit the menu mode.
. Press and hold Menu to
Using Power on light
You can set the scanner so the auto backlight turns on for about 5 seconds when the scanner is
turned on.
1. Press Menu.
.
2. Rotate the knob to select 6:Settings, then press E PGM/
.
3. Rotate the knob to select 1: Back light, then press E PGM/
4. Rotate the knob to select 2: Power On Light, then press E PGM/
.
5. Rotate the knob to select 1: On or 2: Off, then press E PGM/
exit the menu mode.
. Press and hold Menu to
turning the keytone off/on
Each time you press any of the scanner’s keys, the scanner sounds a tone. To turn the scanner’s
key tone off or on:
1. Press Menu.
2. Rotate the knob to select 6:Settings, then press E PGM/
.
.
3. Rotate the knob to select 2: Key Tone, then press E PGM/
4. Rotate the knob to select 1: On or 2: Off, then press E PGM/
exit the menu mode.
. Press and hold Menu to
Adjusting the LCD contrast
You can set the LCD contrast from level 1 to 8.
To adjust the LCD contrast:
1. Press Menu.
2. Rotate the knob to select 6:Settings, then press E PGM/
.
3. Rotate the knob to select 3: LCD Contrast, then press E PGM/
.
4. Rotate the knob to select the contrast level you want to set, then press E PGM/
and hold Menu to exit the menu mode.
. Press
turning the battery save function on/off
When the scanner is set to receive (monitor) a manually selected channel, and it is not actively
scanning, using the battery save feature conserves energy.
To turn the battery save function on or back off:
1. Press Menu.
2. Rotate the knob to select 6:Settings, then press E PGM/
- 14 -
.
3. Rotate the knob to select 4:Battery Save, then press E PGM/
4. Rotate the knob to select 1: On or 2: Off, then press E PGM/
exit the menu mode.
.
. Press and hold Menu to
search speeds
Note: Hypersearch applies only to the 5 kHz step bands (25–54 MHz, 137–174 MHz, and
216–224.9950 MHz). The scanner has two search speeds. Normal Search (90 steps/second )
Hypersearch (270 steps/second)
Skywarn
PRO-137 has 10 skywarn channels, and the Skywarn function lets you jump directly to the last
. The
channel in memory (Channel 999) from any mode by press and Func + E PGM/
scanner goes into Skywarn mode and starts receiving transmissions in the last channel. Rotate
the knob to select the skywarn channels you want to hear.
Before using this feature, enter the local Skywarn frequency for your area into Channel 990 to
999. If no frequency is programmed in the selected skywarn channel, Skywarn freq. is not
stored. appears and the scanner sounds an error tone.
about Skywarn
Skywarn is an organized group of trained weather observers. A Skywarn group exists in virtually
every US county with a significant population. During inclement weather, reports made by
Skywarn observers include information about:
• Pea-sized and larger hail
• Wind and wind gusts of 40 MPH and greater
• Heavy rainfall
• Lightning (cloud-to-cloud and especially cloud-to-ground)
• Wall clouds seen in severe thunderstorms (which spawn tornadoes)
• Severe lowering of a wall cloud
• Turbulence in a wall cloud
• Funnel clouds
• Tornadoes
• High water areas
• Downed power lines
• Other emergency conditions that affect life or property
Listen to NOAA for weather alerts and warnings, watch box notices, and weather forecasts.
Listen to Skywarn to hear trained observers in your vicinity call in official reports to a net control
station which relays those reports to NOAA and other emergency agencies.
Note: If you tune to a Skywarn frequency when the Skywarn net is not active, you may hear
nothing, or you may hear amateur radio operators talking on a local repeater system.
Signal Stalker I
Your scanner’ s Signal Stalker I feature lets you set the scanner so it detects and then displays
the frequency of a nearby strong radio transmission. You can set the scanner so Signal Stalker I
works “in the background” while you are scanning other frequencies; turn off normal scanning
while Signal Stalker I works; or turn off Signal Stalker I and use the scanner normally. You can
set the scanner so it alerts you when Signal Stalker I finds a frequency. You can also set the
frequency band where you want the scanner to look for transmissions.
- 15 -
Note: Signal Stalker I works well for locating the source of strong local transmissions, such as
mobile and handheld two way radios in areas with no other strong transmission sources. You
can screen unwanted transmissions by pressing •CLR / L/OUT to lock them out. See “search
skip memory” for more information. It might not correctly display frequency information for
transmitters using a highly directive antenna (such as an amateur radio beam antenna), if there
are many transmitters operating at the same time in the same area, or if the transmitter is a
broadcast television station.
setting the Signal Stalker I options
1. Press Menu.
. One of the following
2. Rotate the knob to select 4:Signal Stalker, then press E PGM/
Signal Stalker I options appears:
1:Only Mode: Lets you select the Signal Stalker I mode settings.
2:Voice Interrupt: Lets you select the Signal Stalker I voice interrupt settings.
While the Signal Stalker I is on and the scanner is receiving an audio signal (voice) in normal
scanning, the scanner checks the Signal Stalker I every 2 seconds and the audio signal
breaks at that moment. If you do not want the break, set this function to 2:Off. The scanner
does not check signals while receiving an audio signal. The scanner resumes checking
signals when the audio signal ends. If you want to keep the Signal Stalker I active despite the
interruption, set this function to 1:On.
3:Logging: Lets you select the Signal Stalker I logging setting.
When the scanner finds a strong signal, it automatically saves the signal to one of 10 log
channels. If the scanner finds a new frequency after the 10 log channels are fully stored
with frequencies, the oldest memory is deleted and the new frequency is stored in that channel.
You can scan the log channels along with the normal 1000 channels.
The 10 log channels are located after Channel 999 and you can manually access them by
selecting channels as S-00 to S-09.
You cannot program frequencies in the log channels.
You can lock out the log channels like normal channels.
Set 3: Logging to 1:On to scan the log channels along with the normal channels. If you do
not want to scan the channels, set it to 2:Off.
The scanner stores signals found by the Signal Stalker I even the 3:Logging function is
OFF. The frequencies in the log channels are deleted when the scanner is turned off.
4:Alert Beep: Lets you select the Signal Stalker I alert settings.
5:Alert Light: Lets you select the Signal Stalker I back light settings.
6: Band Switch: Lets you select the Signal Stalker I band.
25-54
: VHF Low Band
108-137
: AIR Band
137-225
: VHF High Band
400-512
: UHF Band
806-956
: 800MHz Band (without Cellular Band)
.
3. Rotate the knob to select the option you want, then press E PGM/
4. Rotate the knob to select 1:ON or 2:OFF, then press E PGM/
For 6:Band Switch setting, press E PGM/
.
to select On and Off.
5. Press Menu to exit the menu mode.
- 16 -
using Signal Stalker I
appears. Every 2 seconds, the scanner
To turn on Signal Stalker I, press Func + 0/
searches for frequencies in the range you specified in “Setting the Signal Stalker I Options.”
When the scanner finds a frequency, it sounds the alert you specified in “Setting
the Signal Stalker I Options”, and Found! Press any key. appears. Press any key to confirm the
displayed frequency. Rotate the knob to resume scanning.
To turn on Signal Stalker I and turn off normal scanning, turn 1:Only Mode of Signal
Stalker I options to on. flashes. See “setting the Signal Stalker I options.”
To turn off Signal Stalker I and turn on normal scanning, press Func + 0/
.
disappears.
band meter for Signal Stalker
This meter allows you to see which band Signal Stalker is searching for. When a strong and
consistent signal is detected, this meter will rise up to Max. And the scanner is tuned to the signal
and shows up the band where the signal is detected.
However, there is a case that the scanner might not be able to catch the signal even if this meter
rises to MAX. It is because the signal might be out of range or it might be a locked out frequency.
If you want to improve the performance when signal stalker is On (not in "ONLY Mode" ), disable
the band (see xx).
Note: This feature is different from so-called SIGNAL STRENGTH METER using RSSI.
frequently asked questions
These suggestions might help you locate the problem.
My scanner is on but will not scan, why?
• Squelch is not adjusted correctly; adjust squelch.
• Only one channel or no channels are stored.
• Store frequencies into more than one channel.
Why won’t my scanner work at all?
• Check the batteries or make sure the AC adapter is connected properly.
• Recharge the rechargeable batteries or replace the non-rechargeable batteries.
• The AC adapter is not connected.
• Be sure the adapter’s barrel plug is fully plugged into the 6V 800 mA jack.
Why doesn’t my keypad work?
The keylock function is activated. To turn off the keylock, press F+
Keypad unlocked appears.
Why is
/ KEYLOCK.
flashing?
Recharge the rechargeable batteries or replace the alkaline batteries.
Why am I getting poor or no reception?
Batteries are weak or completely discharged. Check the batteries or make sure the AC adapter
is connected properly. Make sure an antenna is connected to the
scanner.
Why does Error appear?
Programming error: re-enter the frequency or number correctly, including the decimal point.
How do I reset my scanner?
- 17 -
If the scanner’s display locks up or stops operating properly, you might need to reset the
scanner.
Caution: This procedure clears all the information you have stored in the scanner. Before you
reset the scanner, try turning it off and on to see if it begins working properly. Reset the scanner
only when you are sure it is not working properly.
1. Turn off the scanner. If you cannot turn off the scanner, remove the battery and install again.
2. While holding down 2, 9 and SCAN/MAN, turn on the scanner. Initializing…Please Wait. as
the scanner clears its memory.
Note:Do not turn off the scanner again until Initializing…Please Wait. disappears. Otherwise,
the scanner might not clear its memory properly.
FCC notice
Your scanner might cause radio or TV interference even when it is operating properly. To
determine whether your scanner is causing the interference, turn off your scanner. If the
interference goes away, your scanner is causing it. Try the following
methods to eliminate the interference:
• move your scanner away from the receiver
• connect your scanner to an outlet that is on a different electrical circuit from the
receiver
• contact your local RadioShack store for help
Note: Mobile use of this scanner is unlawful or requires a permit in some areas. Check the laws
in your area.
scanning legally
Your scanner covers frequencies used by many different groups including police and fire
departments, ambulance services, government agencies, private companies, amateur radio
services, military operations, pager services, and wireline (telephone and telegraph) service
providers. It is legal to listen to almost every transmission your scanner can receive. However,
there are some transmissions you should never
intentionally listen to. These include:
• telephone conversations (cellular, cordless, or other private means of telephone signal
transmission)
• pager transmissions
• any scrambled or encrypted transmissions
According to the Electronic Communications Privacy Act (ECPA), as amended, you are subject
to fines and possible imprisonment for intentionally listening to, using, or divulging the contents
of such a transmission unless you have the consent of a party to the
communication (unless such activity is otherwise illegal).
This scanner is designed to prevent reception of illegal transmissions, in compliance with the law
which requires that scanners be manufactured in such a way as to not be easily modifiable to
pick up those transmissions. Do not open your scanner’s case to make any modifications that
could allow it to pick up transmissions hat it is not legal to listen to. Doing so should subject you
to legal penalties.
We encourage responsible, legal scanner use.
care
Keep the scanner dry; if it gets wet, wipe it dry immediately. Use and store the scanner
only in normal temperature environments. Handle the scanner carefully; do not drop it. Keep the
scanner away from dust and dirt, and wipe it with a damp cloth occasionally to keep it looking
new.
- 18 -
service and repair
If your scanner is not performing as it should, take it to your local RadioShack store for
assistance. To locate your nearest RadioShack, use the store locator feature on RadioShack’s
website (www.radioshack.com), or call 1-800-The Shack(800-843-7422) and follow the menu
options. Modifying or tampering with the scanner’s internal components can cause a malfunction
and might invalidate its warranty and void your FCC authorization to operate it.
specifications
Frequency Coverage :
25.0000 – 27.9950 MHz (in 5 kHz steps)
28.0000 – 54.0000 MHz (in 5 kHz steps)
108.0000 – 136.9875 MHz (in 12.5 kHz steps)
137.0000 – 174.0000 MHz (in 5 kHz steps)
216.0000 – 224.9950 MHz (in 5 kHz steps)
400.0000 – 512.0000 MHz (in 6.25 kHz steps)
806.0000–823.9875 MHz (in 12.5 kHz steps)
849.0125–868.9875 MHz (in 12.5 kHz steps)
894.0125–956.0000 MHz (in 12.5 kHz steps)
1240.0000–1300.0000 MHz (in 12.5 kHz steps)
Number of Banks ..................................... 10
Sensitivity (AM/FM):
FM .................. 20 dB S/N at 3 kHz deviation
28–54 MHz.......................................... 0.3 µV
137–174 MHz ......................................0.3 µV
216–225 MHz ......................................0.4 µV
400–512 MHz ......................................0.4 µV
806–956 MHz ......................................0.4 µV
1240–1300 MHz ..................................0.5 µV
AM ................20 dB S/N at 60% modulation
25-28 MHz............................................1.0µV
108–136.9875 MHz .............................1.1 µV
IF Rejection (at 162.4 MHz) ............... 75 dB
Channels .............................................. 1000
Operating Temperature:
Normal ................–4° to 140°F (–20° to 60°C)
Signal Stalker I ...14° to 140°F (–10° to 60°C)
Scan Speed ................ 90 Channels/Second
Search Speed:
Normal ............................. 90 Steps/Second
Hypersearch ....................270 Steps/Second
Priority Sampling ........................ 2 Seconds
Delay Time .................................. 2 Seconds
IF Frequencies 380.75 MHz, 10.8 MHz, 450
kHz
Antenna Impedance .............................. 50O
Audio Output .................500 mW maximum
Built-in Speaker .......1&7/16 Inches (36 mm)
8O Dynamic Type
Power:
3 AA Alkaline Batteries (4.5 VDC),
or 3 AA Rechargeable Ni-MH Batteries (3.6VDC) or Optional AC Adapter
Current Drain:
- 19 -
Squelched ..........................................135 mA
Full Output ........................................ 370 mA
Specifications are typical; individual units might vary. Specifications and depictions are subject to
change and improvement without notice.
Limited One-year warranty
Printed in China
UBZZ01352ZZ(0)
REFERENCE: PRESET RECE FREQUENCY LIST
Bank A : Champ Car
CH
CAR#
Name
frequency
0
1
Bourdais
461.7125
1
1
Bourdais
468.5750
- 20 -
2
1
Bourdais
468.9500
48
42
Halliday
464.5000
3
2
Rahal
461.2875
49
42
Halliday
456.6500
42
4
2
Rahal
469.6250
50
Halliday
469.5500
5
2
Rahal
468.3625
51
Race Control
457.0125
6
2
Rahal
460.7625
52
Qualifying
464.8875
7
3
Servia
466.8875
53
Operations
457.1875
8
3
Servia
451.9500
54
Safety 1
451.1875
9
3
Servia
468.4875
55
Safety 2
451.8125
10
4
Clarke
452.7500
56
Safety 3
461.8125
11
4
Clarke
452.5000
57
Pace Car 1
451.5250
12
4
Clarke
451.4875
58
Pace Car 2
464.1500
13
5
Power
462.1375
59
Atlantic 1
457.5500
14
5
Power
466.3625
60
Bridgestone
464.1000
15
5
Power
463.2375
61
Cosworth 1
461.2500
16
5
Power
468.1250
62
Cosworth 2
464.2500
17
7
Dominguez
461.5375
63
TeamJasper
467.6375
18
7
Dominguez
460.9250
64
Radio A
455.9125
19
7
Dominguez
463.3875
65
Radio B
456.5250
20
8
Tagliani
468.3000
66
TV A
450.0125
21
8
Tagliani
463.5625
67
TV B
450.0250
22
8
Tagliani
461.8875
68
TV C
450.0375
23
8
Tagliani
464.0875
69
TV D
450.0875
24
8
Tagliani
464.9125
70
TV E
450.1250
25
9
Wilson
452.5375
71
TV F
450.1375
26
9
Wilson
466.7500
72
TV G
450.1875
27
9
Wilson
468.6500
73
TV H
450.2250
28
11
Legge
462.9625
74
TV I
450.2375
29
14
Doornbos
457.7500
75
TV J
450.2875
30
14
Doornbos
457.5000
76
TV K
450.3250
31
15
Pagenaud
461.0625
77
TV L
450.3375
32
15
Pagenaud
466.6375
78
TV M
450.3875
33
15
Pagenaud
463.4375
79
TV N
450.4250
34
19
Junqueira
467.1000
80
TV O
450.4375
35
19
Junqueira
463.6000
81
TV P
450.4875
36
19
Junqueira
461.7750
82
TV Q
450.5250
37
21
Jani
466.7625
83
TV R
450.5375
38
21
Jani
461.9375
84
TV S
450.5875
39
21
Jani
466.0000
85
TV T
450.6250
40
22
Gommendy
468.4625
86
TV U
450.7250
41
22
Gommendy
462.7625
87
TV V
450.8250
TV W
450.9250
TV X
461.0875
42
22
Gommendy
467.3500
88
43
22
Gommendy
465.9250
89
44
28
Dalziel
463.3750
45
29
Moreno
462.3750
46
42
Halliday
468.8375
47
42
Halliday
464.5500
Bank B : ARCA RE/MAX
CH
0
CAR#
0
Name
W. Peterson
frequency
461.8125
1
1
D. Casola
462.8875
2
2
M. Mcdowell
462.2875
3
3
J. Clements
464.8250
- 21 -
4
4
S. Lagasse
456.6500
55
99
Erik Damell
465.0250
5
5
B. Gerhart
465.7625
56
00
Ed Kennedy
464.5375
6
6
Dexter Bean
456.3875
57
02
B Santos III
467.3250
7
8
Dustin Boney
462.0750
58
03
S. Brafford
465.6875
8
9
C. Cockrum
461.3750
59
06
Tim Mitchell
459.0125
9
10
Adam Edwards
460.0125
60
08
468.6375
10
11
Bryan Silas
469.4625
11
12
M. Gosselin
463.3750
12
14
S. Marlin
464.5000
62
J. Hedlesky
RACE
CONTROL
TOWER
13
16
J. Allgaier
463.1125
63
SAFETY
451.2250
14
21
Todd Bowsher
461.3500
64
QUALIFY
451.5750
15
23
Josh Krug
463.9500
16
24
B. Chastain
463.5500
17
25
B. Venturini
468.9250
18
26
Brad Smith
461.1750
19
29
B.Keselowski
457.0875
20
30
Terry Jones
464.8125
21
31
Tim Peters
468.2500
22
32
J. Buescher
466.4125
23
34
D. Basham
466.2625
24
37
M. Theriault
461.0750
25
38
Mike Harmon
461.7500
26
39
R. Johns
463.5250
27
40
B. Clauson
456.6500
28
46
Frank Kimmel
464.6625
29
47
P. Mcgilton
467.4125
30
48
Nick Tucker
466.2625
31
50
Norris
468.3125
32
51
B. Whitt
451.6125
33
52
Ken Schrader
461.0875
34
55
Damon Lusk
469.1625
35
57
TBA
462.2875
36
59
Justin South
459.5875
37
60
P. Sheltra
467.8125
38
61
S. Wallace
464.1375
39
62
C. Mccumbee
452.2625
40
63
D. Bryan
451.5750
41
64
Josh Allison
457.1625
42
65
Justin Marks
466.9500
43
75
Billy Tanner
461.0375
44
79
Mike Koch
468.4375
45
82
J. Cobb
461.8125
46
84
Norm Benning
453.2375
47
87
Tony Weber
459.1000
48
89
Bryan Weber
469.5750
49
90
Gabi Dicarlo
463.9750
50
91
Mike Duncan
460.7250
51
93
W. Edwards
469.2875
52
94
Dugan Basham
465.8875
53
95
Blake Freese
456.8375
54
97
S. Cummings
456.1875
61
- 22 -
461.2000
464.6000
Bank C : Indy Racing
CH
0
CAR#
Name
2
T. Scheckter
frequency
465.9875
1
2
T. Scheckter
454.3250
2
3
H. Cstrnvs
464.6750
3
4
Victor Meira
468.5375
4
4
Victor Meira
466.4125
5
5
Sarah Fisher
463.2875
6
5
Sarah Fisher
461.7125
7
6
S. Hornish
464.9250
8
7
D. Patrick
463.3625
9
7
D. Patrick
465.8125
10
8
Scott Sharp
469.8750
11
8
Scott Sharp
468.7125
12
9
Scott Dixon
469.8875
13
9
Scott Dixon
461.6125
14
10
Dan Wheldon
467.0375
15
10
Dan Wheldon
461.6625
16
11
Tony Kanaan
466.2625
17
11
Tony Kanaan
467.8875
18
14
D. Manning
461.4625
19
14
D. Manning
463.6375
20
15
Buddy Rice
468.7125
21
15
Buddy Rice
464.9875
22
17
Jeff Simmons
466.9125
23
17
Jeff Simmons
468.8875
24
20
Ed Carpenter
468.2500
25
20
Ed Carpenter
468.9750
26
22
A.J. Foyt IV
466.9250
27
22
A.J. Foyt IV
469.2250
28
25
Marty Roth
469.4375
29
25
Marty Roth
466.7625
30
26
M. Andretti
464.1375
31
26
M. Andretti
469.7500
32
27
D. Frnchtt
466.5375
33
27
D. Frnchtt
468.3875
34
55
K. Matsuura
464.9750
35
55
K. Matsuura
456.1000
36
TV
455.4500
37
TV
450.2125
38
SAFETY
451.6875
39
IRL INSPCTRS
464.7750
40
IRL RC CNTRL
468.8250
41
IRL DRCTRS
464.1750
42
IRL OFFCLS
466.1250
43
IRL RADIO
450.4125
44
IRL RADIO
454.0000
45
IRL RADIO
455.8375
46
FIRESTONE
464.1000
- 23 -
Bank D : CrftsmnTruck
Name
Josh Wise
45
25
W. Racing
469.1625
frequency
451.4375
46
25
W. Racing
469.8125
47
28
Shane Sieg
461.3875
CH
0
CAR#
00
1
00
Josh Wise
451.6375
48
28
Shane Sieg
467.7875
2
06
B. Mallory
457.9125
49
29
Scott Lynch
461.0125
3
07
Tim Sauter
462.7125
50
29
Scott Lynch
462.1375
4
07
Tim Sauter
467.7125
51
30
Todd Bodine
451.5625
5
08
Eric Norris
466.3125
52
30
Todd Bodine
451.5125
6
08
Eric Norris
467.9125
53
31
TBA
451.9625
7
09
Joey Clanton
463.6875
54
31
TBA
469.7250
8
09
Joey Clanton
468.2875
55
33
R. Hornaday
467.2000
9
1
Aaron Fike
459.0125
56
33
R. Hornaday
456.4500
10
1
Aaron Fike
463.7375
57
36
Ryan Mathews
462.8625
11
2
K. Harvick
456.4500
58
36
Ryan Mathews
464.5125
12
2
K. Harvick
467.2000
59
40
Clay Rogers
460.6875
13
4
Joe Ruttman
461.5625
60
40
Clay Rogers
468.1875
14
4
Joe Ruttman
461.6625
61
44
Frank Kreyer
457.2000
15
5
Mike Skinner
469.4250
62
44
Frank Kreyer
456.7750
16
5
Mike Skinner
469.4187
63
46
T. Peters
462.0000
17
6
T. Kvapil
462.2500
64
46
T. Peters
461.9000
18
6
T. Kvapil
467.2500
65
47
Kraig Kinser
466.8000
19
7
Jason White
461.8125
66
47
Kraig Kinser
466.8250
20
7
Jason White
463.2750
67
50
TJ Bell
460.6625
21
8
B. Bjorklund
461.5125
68
50
TJ Bell
453.0750
22
8
B. Bjorklund
462.6125
69
51
Kelly Sutton
464.3375
23
9
Ted Musgrave
452.9875
70
51
Kelly Sutton
467.2875
24
9
Ted Musgrave
452.7125
71
59
Terry Cook
453.0375
25
10
David Starr
464.2750
72
59
Terry Cook
453.1375
26
10
David Starr
452.3500
73
60
Jack Sprague
468.6750
27
11
RedHourse RC
460.7750
74
60
Jack Sprague
468.7250
28
11
RedHourse RC
467.4250
75
62
TBA
468.9125
29
13
Willie Allen
468.6875
76
62
TBA
469.6750
30
13
Willie Allen
465.1875
77
63
TBA
469.5125
31
14
R. Crawford
465.6625
78
63
TBA
468.5125
32
14
R. Crawford
461.8750
79
64
J. Simpson
467.8750
33
15
Bill Lester
461.1125
80
64
J. Simpson
469.1250
34
15
Bill Lester
464.3375
81
75
D. Setzer
457.8125
35
16
Derrike Cope
468.4000
82
75
D. Setzer
460.9125
36
16
Derrike Cope
469.0250
83
76
Chris Wimmer
457.2625
37
18
Ken Schrader
468.7750
84
77
B. Gaughan
469.6750
38
18
Ken Schrader
457.0875
85
77
B. Gaughan
456.3375
39
21
S. Compton
461.7875
86
78
TBA
468.9375
40
21
S. Compton
456.9250
87
78
TBA
465.0000
41
23
J. Benson
461.2375
88
86
Dana White
461.1125
42
23
J. Benson
462.8375
89
86
Dana White
466.3375
43
24
TRD TEST
468.9375
90
88
Matt Crafton
467.2125
44
24
TRD TEST
460.1625
91
88
Matt Crafton
468.3750
- 24 -
92
91
J C Stout
463.0125
93
91
J C Stout
463.2125
94
95
W. Edwards
461.7500
95
95
W. Edwards
470.0000
96
98
E.. Racing
451.7375
97
98
E.. Racing
451.7125
98
99
Erik Darnell
462.3250
99
99
Erik Darnell
463.2500
100
Race Control
461.2000
101
BU RC CNTRL
464.6000
102
Safety
451.2250
103
Garage
451.4250
104
Qualifying
451.5750
105
Weather
467.8500
- 25 -
Bank E : Busch Series
CH
0
1
2
3
4
5
6
7
8
9
10
11
12
13
14
15
16
17
18
19
20
21
22
23
24
25
26
27
28
29
30
31
32
33
34
35
36
37
38
39
40
41
42
43
44
45
46
47
48
49
50
51
52
53
CAR#
05
05
06
06
08
08
0
0
1
1
2
2
4
4
5
5
6
6
7
7
8
8
9
9
10
10
11
11
12
12
13
13
14
14
15
15
16
16
17
17
18
18
19
19
20
20
21
21
22
22
23
23
24
24
Name
Brett Rowe
Brett Rowe
Roush
Roush
Jason White
Jason White
Eric McClure
Eric McClure
J.J. Yeley
J.J. Yeley
Clint Bowyer
Clint Bowyer
Regan Smith
Regan Smith
Kyle Busch
Kyle Busch
David Ragan
David Ragan
Mike Wallace
Mike Wallace
D. Earnhardt
D. Earnhardt
Kasey Kahne
Kasey Kahne
Dave Blaney
Dave Blaney
M. Truex
M. Truex
Kurt Busch
Kurt Busch
T. Roberts
T. Roberts
K. Krisiloff
K. Krisiloff
Paul Menard
Paul Menard
Greg Biffle
Greg Biffle
Matt Kenseth
Matt Kenseth
Kevin Conway
Kevin Conway
JGR
JGR
A. Almirola
A. Almirola
T. Peters
T. Peters
Mike Bliss
Mike Bliss
B. Kslwsk
B. Kslwsk
Casey Mears
Casey Mears
frequency
464.8750
469.4000
463.9500
464.8125
462.5750
462.6375
468.5125
469.4125
463.1250
458.1750
461.5125
461.5875
456.9750
452.8875
461.3375
466.3375
468.6937
463.4500
461.9375
456.3750
464.9250
451.3250
461.6250
461.7750
452.3375
468.3375
466.5250
462.9000
469.1500
456.2750
463.4750
462.0500
464.9000
465.9125
452.0500
464.8750
465.0250
468.4500
469.5125
463.7125
467.7625
466.0125
451.3000
451.9000
451.8500
451.9000
469.6375
462.6000
464.7000
464.6500
468.3625
461.4500
457.8875
464.1125
54
55
56
57
58
59
60
61
62
63
64
65
66
67
68
69
70
71
72
73
74
75
76
77
78
79
80
81
82
83
84
85
86
87
88
89
90
91
92
93
94
95
96
97
98
99
100
101
102
103
104
105
106
107
108
109
- 26 -
25
25
26
26
27
27
28
28
29
29
30
30
31
31
32
32
33
33
34
34
35
35
36
36
37
37
38
38
41
41
42
42
43
43
44
44
47
47
49
49
52
52
55
55
56
56
58
58
59
59
60
60
61
61
63
63
D. Gilliland
D. Gilliland
Roush
Roush
Ward Burton
Ward Burton
J. Sauter
J. Sauter
Scott Wimmer
Scott Wimmer
Mike Bliss
Mike Bliss
P. Sellers
P. Sellers
Chad Blount
Chad Blount
K. Harvick
K. Harvick
Jay Sauter
Jay Sauter
B. Hamilton
B. Hamilton
B. Sherman
B. Sherman
J. McMurray
J. McMurray
Greg Biffle
Greg Biffle
R. Sorenson
R. Sorenson
J. Montoya
J. Montoya
PJ Jones
PJ Jones
TBA
TBA
Jon Wood
Jon Wood
S. Grissom
S. Grissom
D. Nunbrgr
D. Nunbrgr
Robby Gordon
Robby Gordon
D. O'Quinn
D. O'Quinn
Chris Horn
Chris Horn
M. Ambrose
M. Ambrose
Carl Edwards
Carl Edwards
RWI
RWI
J. Goeters
J. Goeters
469.5750
456.6250
463.9500
464.8125
467.4125
461.5625
457.1500
463.2750
468.2500
464.5875
461.0375
452.3875
465.0125
469.2375
463.1125
463.4125
465.9875
469.5375
458.1750
459.7750
468.5625
466.3750
463.3125
461.8375
469.9375
469.5500
466.9250
463.0125
456.6500
456.7750
456.3250
452.4750
457.2000
456.7750
464.1750
450.6000
457.6500
463.8375
457.1500
461.2750
457.1500
461.2750
461.8500
466.3375
469.8750
463.7000
469.8750
463.7000
457.1125
456.6625
451.1375
461.3500
463.2125
467.1125
456.3875
459.3625
110
111
112
113
114
115
116
117
118
119
120
121
122
123
124
125
126
127
128
129
130
131
132
133
134
135
136
137
138
139
140
141
142
143
144
145
146
147
66
66
68
68
70
70
72
72
73
73
75
75
76
76
79
79
84
84
87
87
88
88
90
90
91
91
95
95
98
98
99
99
S. Wallace
S. Wallace
T. Kittleson
T. Kittleson
J. Dierks
J. Dierks
D.J. Knnngtn
D.J. Knnngtn
Brett Rowe
Brett Rowe
Caleb Holman
Caleb Holman
Ketus Davis
Ketus Davis
S. Howard
S. Howard
TBA
TBA
Joe Nemechek
Joe Nemechek
S. Huffman
S. Huffman
S. Leicht
S. Leicht
David Green
David Green
S. Barrett
S. Barrett
Alex Garcia
Alex Garcia
D. Reutimann
D. Reutimann
Race Control
BU RC CNTRL
Safety
Qualifying
MRN/PRN
Weather
464.1375
461.5375
462.5750
462.6250
461.0000
467.3875
454.2000
452.6500
464.8750
461.6500
462.0750
461.0000
467.9000
456.4500
457.5625
457.0875
459.0125
463.7375
464.2875
468.8375
464.2625
461.7875
467.3750
467.3500
464.5625
466.0875
456.8375
453.2875
464.0125
464.0250
464.6625
463.2375
461.2000
464.6000
451.2250
451.5750
454.0000
467.8500
- 27 -
Bank F : Nextel Cup
CH
0
CAR#
00
Name
H. Sadler
frequency
462.9500
1
00
H. Sadler
467.1625
2
01
Mark Martin
463.2875
3
01
Mark Martin
461.3250
4
02
Brandon Ash
461.1250
5
02
Brandon Ash
463.2500
6
04
Eric McClure
468.7750
7
07
Clint Bowyer
469.2375
8
07
Clint Bowyer
464.4625
9
09
Mike Wallace
469.3125
10
09
Mike Wallace
460.7375
11
1
M. Truex
466.6875
12
1
M. Truex
457.6000
13
2
Kurt Busch
451.8250
14
2
Kurt Busch
464.8250
15
4
Ward Burton
468.8500
16
4
Ward Burton
461.7500
17
5
Kyle Busch
468.2125
18
5
Kyle Busch
467.0375
19
6
David Ragan
460.9500
20
6
David Ragan
466.7500
21
7
Robby Gordon
469.4500
22
7
Robby Gordon
463.6500
23
8
D. Earnhardt
464.9500
24
8
D. Earnhardt
463.7250
25
9
Kasey Kahne
451.8500
26
9
Kasey Kahne
452.6500
27
10
Scott Riggs
462.7625
28
10
Scott Riggs
462.5875
29
11
Denny Hamlin
467.4750
30
11
Denny Hamlin
462.4250
31
12
Ryan Newman
457.7875
32
12
Ryan Newman
466.2125
33
13
Joe Nemechek
469.4625
34
13
Joe Nemechek
469.5875
35
13
Greg Sacks
469.3750
36
13
Greg Sacks
464.2375
37
14
S. Marlin
457.1750
38
14
S. Marlin
452.1250
- 28 -
39
15
Paul Menard
452.0500
40
15
Paul Menard
464.8750
41
16
Greg Biffle
468.4500
42
16
Greg Biffle
465.0250
43
17
Matt Kenseth
458.4750
44
17
Matt Kenseth
462.4500
45
18
J.J. Yeley
467.4500
46
18
J.J. Yeley
462.5000
47
19
E. Sadler
456.8500
48
19
E. Sadler
452.4500
49
20
Tony Stewart
462.5250
50
20
Tony Stewart
462.4750
51
21
Ken Schrader
452.0125
52
21
Ken Schrader
452.2000
53
22
Dave Blaney
468.9375
54
22
Dave Blaney
460.1625
55
24
Jeff Gordon
467.0625
56
24
Jeff Gordon
465.8625
57
25
Casey Mears
466.7875
58
25
Casey Mears
462.0625
59
26
J. McMurray
465.9750
60
26
J. McMurray
460.7250
61
27
K. Shlmrdn
459.3625
62
27
K. Shlmrdn
460.0125
63
29
K. Harvick
469.0125
64
29
K. Harvick
462.0250
65
30
Rick Ware RC
467.5250
66
30
Rick Ware RC
465.0125
67
31
Jeff Burton
468.5750
68
31
Jeff Burton
468.6000
69
33
Scott Wimmer
468.2500
70
33
Scott Wimmer
464.5875
71
34
Chad Chaffin
463.2125
72
34
Chad Chaffin
467.1125
73
36
J. Mayfield
460.1625
74
36
J. Mayfield
468.9375
75
37
Kevin Lepage
468.8125
76
37
Kevin Lepage
468.8250
77
38
D. Gilliland
466.9500
78
38
D. Gilliland
466.4500
79
39
Regan Smith
456.9750
80
39
Regan Smith
452.8875
81
40
D. Stremme
461.3750
- 29 -
82
40
D. Stremme
462.1000
83
41
R. Sorenson
466.1500
84
41
R. Sorenson
458.0000
85
42
J. Montoya
452.7000
86
42
J. Montoya
466.1000
87
43
B. Labonte
467.7750
88
43
B. Labonte
464.4500
89
44
Dale Jarrett
463.2125
90
44
Dale Jarrett
469.1125
91
44
HMS R&D
461.3375
92
44
HMS R&D
466.3375
93
45
Kyle Petty
461.2250
94
45
Kyle Petty
464.4000
95
47
Jon Wood
457.6500
96
47
Jon Wood
463.8375
97
48
J. Johnson
451.9875
98
48
J. Johnson
452.2375
99
49
Mike Bliss
461.4125
100
49
Mike Bliss
466.2875
101
55
M. Waltrip
452.8125
102
55
M. Waltrip
452.1125
103
60
Boris Said
462.2500
104
60
Boris Said
467.2500
105
61
Chad Chaffin
463.2125
106
61
Chad Chaffin
467.1125
107
66
Jeff Green
466.5000
108
66
Jeff Green
469.1375
109
70
J. Sauter
464.6375
110
70
J. Sauter
469.7375
111
71
J. Leffler
466.9250
112
71
J. Leffler
463.0125
113
72
B. Whitt
462.8125
114
72
B. Whitt
467.3125
115
74
Derrick Cope
464.4125
116
74
Derrick Cope
464.5500
117
78
K. Wallace
452.2625
118
78
K. Wallace
466.0250
119
80
A. Almirola
462.4250
120
80
A. Almirola
462.5000
121
83
B. Vickers
451.6125
122
83
B. Vickers
451.9750
123
84
AJ Allmndngr
452.0875
124
84
AJ Allmndngr
456.5625
- 30 -
125
88
Ricky Rudd
468.5250
126
88
Ricky Rudd
466.3750
127
89
M. Shepard
467.1375
128
89
M. Shepard
468.6500
129
92
Frnt Mtrsprt
463.8125
130
92
Frnt Mtrsprt
467.5500
131
95
S. Barrett
451.7125
132
95
S. Barrett
464.3500
133
96
Tony Raines
461.1625
134
96
Tony Raines
466.2625
135
99
Carl Edwards
466.2750
136
99
Carl Edwards
466.8625
137
Race Control
461.2000
138
BU RC CNTRL
464.6000
139
Safety
451.2250
140
Qualifying
451.5750
141
MRN/PRN
454.0000
142
TV
450.2375
143
TV
450.2750
144
TV
450.6875
145
TV
450.5875
146
TV
450.6250
147
TV
450.5625
148
TV
450.0875
- 31 -