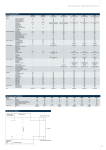
1
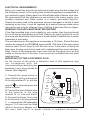
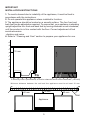
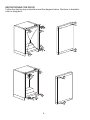
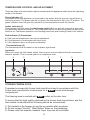
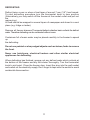
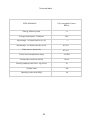
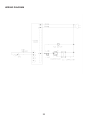
BE814
Fully Integrated Freezer
INSTALLATION AND USER INSTRUCTIONS
You must read these instructions prior to using the
appliance and retain them for future reference.
Contents
Introduction & safety warnings...........................................................................2
Electrical requirements ......................................................................................3
Transportation instructions.................................................................................4
Installation instructions.......................................................................................5
Repositioning the door .......................................................................................6
Starting...............................................................................................................8
Temperature control and adjustment .................................................................9
Storing frozen food.............................................................................................9
Freezing fresh food ..........................................................................................10
Defrosting .........................................................................................................11
Cleaning and care............................................................................................12
Do's and don'ts ................................................................................................13
Problem solving ...............................................................................................13
Installation instructions - detailed step by step ................................................14
Guarantee details.............................................................................................20
How to obtain service.......................................................................................21
Technical data ..................................................................................................22
Wiring diagram.................................................................................................23
Customer Care..................................................................................back cover
Please keep this handbook for future reference, or for
anyone else who may use the appliance.
1
Congratulations on your choice of a Belling quality Appliance which has been
designed to give you service for many years.
WARNING !
IMPORTANT !
DO NOT connect your appliance to the electricity supply until all packing and
transit protectors have been removed.
• Leave to stand for at least 4 hours before switching on to allow compressor
oil to settle if transported horizontally.
• If you are discarding an old refrigerator with a lock or latch fitted to the door,
disable the lock/latch, ensure that it is left in a safe condition to prevent the
entrapment of young children.
• This freezer must only be used for its intended purpose i.e the storing and
freezing of edible foodstuff.
• Do not dispose of the appliance on a fire. At Belling, the care and protection
of our environment is an ongoing commitment. This appliance which is among
the latest range introduced is particularly environment friendly. Your appliance
contains non CFC / HFC natural substances in the cooling system (Called
R600a) and in the insulation (Called cyclopentane) which are potentially
flammable if exposed to fire. Therefore, take care not to damage, the cooling
circuit / pipes of the appliance in transportation and in use. In case of a damage
do not expose the appliance to fire, potential ignition source and immediately
ventilate the room where the appliance is situated.
• We suggest you contact your local authority for disposal information and
facilities available.
• You may install your freezer in an unheated cold room (E.g.: garage,
conservatory, annex) provided it is protected from rain, moisture, excessive
heat.
• To obtain the best possible performance and trouble free operation from your
appliance it is very important to carefully read these instructions.
• On delivery, check to make sure that the product is not damaged and that all
the parts and accessories are in perfect condition.
• Ensure that the plug remains readily accessible. Do not use a multiple adapter
bar or extension cable.
• Failure to observe these instructions may invalidate your right to free service
during the guarantee period.
WARNING- Keep ventilation openings, in the appliance enclosure or in the
built-in structure, clear of obstruction.
WARNING- Do not use mechanical devices or other means to accelerate the
defrosting process, other than those recommended by the manufacturer.
WARNING- Do not damage the refrigerant circuit.
WARNING- Do not use electrical appliances inside the food storage
compartments of the appliance, unless they are of the type recommended by
the manufacturer.
• We suggest you keep these instructions in a safe place for easy reference.
2
ELECTRICAL REQUIREMENTS
Before you insert the plug into the wall socket make sure that the voltage and
the frequency shown in the rating plate inside the appliance corresponds to
your electricity supply. Rating label is on the left hand side of freezer inner liner.
We recommend that this appliance is connected to the mains supply via a
suitable switched and fused socket in a readily accessible position.
Should the mains lead of the appliance become damaged or should it need
replacing at any time, it must be replaced by a special purpose made mains
lead which can only be obtained from a Belling Authorised Service Agent.
WARNING! THIS APPLIANCE MUST BE EARTHED
If the fitted moulded plug is not suitable for your socket, then the plug should
be cut off and an appropriate plug fitted. Destroy the old plug which is cut off
as a plug with bared cord could cause a shock hazard if inserted into a socket
elsewhere in the house.
The moulded plug on this appliance incorporates a 13 A fuse. Should the fuse
need to be replaced an ASTABEAB approved BS 1362 fuse of the same rating
must be used. Do not forget to refit the fuse cover. In the event of losing the
fuse cover the plug must not be used until a replacement fuse cover has been
fitted. Colour of the replacement fuse cover must be the same colour as that
visible on the pin face of the plug. Fuse covers are available from any good
electrical store.
IMPORTANT! FITTING A DIFFERENT PLUG
As the colours of the wires in themains lead of this appliance may
not correspond with the
colouredmarkings identifying the
terminals in your plug proceed as
follows: (See diagram).
FUSE
L
BROWN
OR
RED
FITTED WITH
BS 1362 13A FUSE ALWAYS
FIT BS 1362 REPLACEMENT
CARTRIDGE FUSE
6mm.
6mm.
GREEN
&
YELLOW
OR
GREEN
32mm.
1. Connect the green-yellow or
green (Earth) wire to the terminal
in the plug marked 'E' or with the
symbol
or coloured green and
N
yellow or green.
BLUE
2. Connect the blue (Neutral) wire
OR
BLACK
to the terminal in the plug
marked 'N' or coloured black.
3. Connect the brown (Live) wire
CORD GRIP
to the terminal in the plug marked
'L' or coloured red. With alternative
plugs a 13 A fuse must be fitted
either in the plug or adaptor or in
the main fuse box.If in doubt contact a qualified electrician.
3
12mm.
6mm.
22mm.
TRANSPORTATION INSTRUCTIONS
1. The appliance should be transported only in a vertical upright position. The
packing as supplied must be intact during transportation.
2. If during the course of transport the appliance has to be transported
horizontally, it must only be laid on its left hand side when standing in the front
of the appliance. After bringing it to upright position,it must not be operated for
at least 4 hours to allow the system to settle.
3. Failure to comply with the above instructions could result in damage occuring
to the appliance. The manufacturer will not be held responsible if these
instructions are disregarded.
4. The appliance must be protected against rain, moisture and other atmospheric
influences.
5. When positioning your appliance take care not to damage your flooring,
pipes, wall coverings etc. Do not move the appliance by pulling by the door
or handle.
IMPORTANT : Care must be taken while cleaning / carrying the appliance to
avoid touching the bottom of the condenser metal support or pipework at the
back of the appliance as you might injure your fingers and hands or damage
your product.
IMPORTANT : This appliance is not designed for stacking with any other
appliance.
Do not attempt to sit or stand on top of your appliance as it is not designed for
such use. You could injure yourself or damage the appliance.
IMPORTANT : Make sure that mains cable is not caught under the appliance
during and after carrying / moving the appliance, to avoid the mains cable
becoming cut or damaged.
Do not allow children to play with the appliance or tamper with the controls.
Take care when installing your appliance and using it for the first time, during
normal daily use, while defrosting and cleaning the interior freezer compartments
not to damage cold panels and pipes and to avoid any injury. We recommend
the use of a pair of gloves when cleaning the cold panels as you might injure
your fingers and hands and/or damage the appliance beyond repair.
Belling declines to accept any liability should the instructions not be
followed.
4
IMPORTANT
INSTALLATION INSTRUCTIONS
1. To avoid a hazard due to instability of the appliance, it must be fixed in
accordance with the instructions.
2. Do not operate this appliance unless installed to furniture.
3. The appliance should be located on a smooth surface. The four front and
back feet can be adjusted as required. To ensure that, your appliance is standing
upright adjust the four front and back feet by turning clockwise or anti-clockwise,
until the product is in firm contact with the floor. Correct adjustment of feet
avoids excessive
vibration and noise.
4. Refer to "Cleaning and Care" section to prepare your appliance for use.
10 mm
To avoid any loss in performance, air suction channels should not be obstructed. (140 cm2)
Minimum distance between the wall and the appliance must be at least 10 mm.
40 mm
10 mm
40 mm
Wall
Appliance
5
REPOSITIONING THE DOOR
Follow the step by step instructions and the diagram below. Numbers in brackets
refer to diagrams.
1
1
3
2
2
4
5
8
8
6
7
7
6
1. Switch off at the socket outlet and pull out the mains plug.
2. Remove all food, loose items and fittings from inside the appliance and door
shelves.
3. Unscrew the bolts and remove the upper and bottom hinges from the cabinet and
door. (1) (2)
4. Remove stoppers. (3) (4)
5. Fit the stoppers on the opposite side. (5) (6)
6. Reposition the upper hinge on the opposite side as bottom hinge (7)
7. Reposition the bottom hinge on the opposite side as upper hinge. (8) Locate the
door and tighten the bolts fixing the door.
7
STARTING
Final Check
Before you start using the freezer check that:
1. The feet have been adjusted and the product is level.
2. The interior is dry and air can circulate freely at the rear.
3. Clean the interior as recommended under "CLEANING AND CARE."
4. Insert the plug into the wall socket and switch on the electricity supply. Avoid
accidental disconnection by taping over the switch.
5. You will hear a noise as the compressor starts up. The liquid and gases
sealed within the refrigeration system may also give rise to noise, whether the
compressor is running or not which is quite normal.
7. Front edges of the cabinet may feel warm. This is normal. These areas are
designed to be warm to avoid condensation.
9. Do not load the appliance immediately it is switched on. Wait until the correct
storage temperature has been reached. We recommend that you check the
temperature with an accurate thermometer (see; Temperature Control and
Adjustment).
Important Notes :
1. If there is a power failure do not open the door. Frozen food should not be
affected if the failure lasts for less than 19 hours. If the failure is longer, then
the food should be checked and either eaten immediately or cooked and then
re-frozen.
2. If you find the freezer door difficult to open just after you have closed it, don't
worry. This is due to the pressure difference which will equalise and allow the
door to open normally after a few minutes.
3. Always wrap food using a suitable packaging material before storing in your
appliance to avoid contact with the appliance surface and food remains for
hygiene reasons.
8
TEMPERATURE CONTROL AND ADJUSTMENT
There are three coloured indicator lights located inside the appliance which show the operating
mode of the freezer.
Green Indicator (1)
Illuminates when the appliance is connected to the mains and will glow as long as there is
electricity present. The green light will not glow if the thermostat is set in the 'O' position. The
green indicator does not give any indication of the temperature inside the freezer.
Amber Indicator (2)
This indicator will glow when the fast-freeze switch (4) is on and will continue to glow until
the fast-freeze switch is turned off. The compressor will run continuously whilst the fast-freeze
switch is on. Fast-freeze operation is for freezing fresh food (see Freezing Fresh Food, section).
Red Indicator (3) Illuminates:
a. If the pre-set temperature can not be maintained.
b. If the appliance is overloaded with fresh food.
c. If the appliance door is left open accidentally.
Thermostat knob (5)
The thermostat knob is located on the indicator light frame.
Important:
When you press the fast-freeze switch, there may be a short delay before the compressor
starts to operate. This is normal and not a compressor fault.
4
5
3
1
2
STORING FROZEN FOOD
Prepacked commercially frozen food should be stored in accordance with the
frozen food manufacturer's instructions for a
frozen food storage
compartment.
The freezing area is marked with
symbol on the door liner.
To ensure that the high quality achieved by the frozen food manufacturer and the
food retailer is maintained the following should be remembered:
1. Put packets in the freezer as quickly as possible after purchase.
2. Do not exceed "Use By", "Best Before" dates on the packaging.
3. Please note that drawers, baskets, flaps, trays are all removable.
9
FREEZING FRESH FOOD
Freezing capacity of your appliance in a 24 hours period is 10 kg (22.1 lb).
Never exceed this maximum capacity. Fast freeze compartment (3) is shown
in diagram.
Take special care not to mix already frozen food and fresh food.
If the fast freeze compartment (3) is filled with fresh food, other
compartments can also be used to freeze fresh food.
1
2
2
1. Fast-freeze compartment
2. Frozen-food compartments
10
DEFROSTING
Defrost twice a year or when a frost layer of around 7 mm (1/4") has formed.
To start defrosting procedure turn the thermostat knob to zero position
(Alternatively you may switch off the freezer at the socket outlet and pull out
the
mains plug.)
All food should be wrapped in several layers of newspaper and stored in a cool
place (e.g. fridge or larder).
Remove all freezer drawers.The special defrost collection basin collects the defrost
water. Therefore defrosting can be conducted without mess.
Containers full of warm water may be placed carefully in the freezer to speed
up
the defrosting.
Do not use pointed or sharp edged objects such as knives, forks to remove
the frost.
Never use hairdryers, electrical heaters and other similar electrical
appliances for defrosting.
When defrosting has finished, sponge out any defrost water which collects at
the bottom of the freezer and dry the interior thoroughly. Turn the thermostat
knob to mid point. Close the freezer door. Insert the plug into the wall socket
and switch on the electricity supply. Don't forget to tape over the switch to avoid
accidental disconnection.
11
CLEANING AND CARE
** We recommend that you switch off the freezer at the socket outlet and pull
out the mains plug before cleaning.
** Never use any sharp abrasive instrument, soap, household cleaner, detergent
and wax polish for cleaning.
** Use luke warm water to clean the cabinet of the freezer and wipe it dry.
** Use a damp cloth wrung out in a solution of one teaspoon of bicarbonate of
soda to one pint of water to clean the interior and wipe it dry.
** Excess deposit of ice should be removed on a regular basis using the handle
of a spoon. Large accumulation of ice will impair the performance of the freezer.
** If the freezer is not going to be used for a long period of time switch it off,
remove all food, clean it and leave the door ajar.
** To remove a drawer, pull it as far as possible, and then tilt it upwards, and
then pull it out completely.
** Check door seals regularly to ensure they are clean and free from food
particles.
** Never :
• Subject it to hot temperatures in any way,
• Scour, rub etc., with abrasive material.
** Take care when installing your appliance and using it for the first time, during
normal daily use, while defrosting and cleaning the interior freezer compartments
not to damage cold panels and pipes and to avoid any injury. We recommend
the use of a pair of gloves when cleaning the cold panels as you might injure
your fingers and hands and/or damage the appliance beyond repair.
12
DO'S AND DON'TS
Do- Check contents of the freezer at regular intervals.
Do- Clean and defrost your freezer regularly (See "Defrosting")
Do- Keep food for as short a time as possible and adhere to "Best Before",
"Use By" dates.
Do- Store commercially frozen food in accordance with the instructions given
on the packets that you buy.
Do- Always choose high quality fresh food and be sure it is thoroughly clean
before you freeze it.
Do- Prepare fresh food for freezing in small portions to ensure rapid freezing.
Do- Wrap all foods in aluminium foil or freezer quality polythene bags and
make sure any air is excluded.
Do- Wrap frozen food when you buy it and put it in to the freezer as soon as
possible.
Do- Separate food in the compartments. This will enable you to find food quickly
and avoid excessive door opening therefore save electricity.
Do- Remove ice cream from the freezer 10-20 minutes before serving.
Don't- Leave the door open for long periods as this will make the freezer more
costly to run and cause excessive ice formation.
Don't- Use pointed sharp edged objeects such as knives, forks to remove the ice.
Don't- Put hot food into the freezer. Let it cool down first.
Don't- Put liquid-filled bottles or sealed cans containing carbonated liquids into
the freezer as they may burst.
Don't- Store poisonous or dangerous substances in the Freezer. Your freezer has
been designed for the storage of edible foodstuffs only.
Don't- Exceed the maximum freezing capacity (10 kg in any 24 hours) when
freezing fresh food.
Don't- Consume ice-cream and water ices direct from the freezer. The low
temperature may cause 'freezer burns' on lips.
Don't- Freeze fizzy drinks.
Don't- Try to keep frozen food which has thawed, it should be eaten within 24
hours or cooked and refrozen.
Don't- Remove items from the freezer with wet hands.
Don't- Close the door before placing the fast-freeze compartment cover in its
place.
Don’t- Leave frozen food at room temperature to thaw; the best way to defrost
food is to put it in the fridge to thaw slowly. Make sure you avoid defrosting
food or food juices drip onto other food.
PROBLEM SOLVING
If the appliance does not operate when switched on, check:
• The plug is inserted properly in the socket and that the power supply is on. (To check
the power supply to the socket, plug in another appliance)
• The fuse has blown/circuit breaker has tripped/main distribution switch has
been turned off.
• The temperature control has been set correctly.
• New plug is wired correctly if you have changed the fitted moulded plug.
If the appliance is still not operating after the above checks, please refer to the
section on “How To Obtain Service”.
Please ensure that above checks have been made as a charge will be made if no
fault is found.
13
INSTALLATION INSTRUCTIONS - DETAILED STEP BY STEP
598
545
A
595
A (mm)
813 - 863 mm
B (mm)
820 - 870 mm
C (mm)
100 - 150 mm
NOTE
1) Height of the product can be adjusted by the help of adjustable feet (front and back) to fit the furniture
niche height (B).
2) Do not operate this appliance until it has been installed in the furniture.
14
0
0
C=100-150 mm
600
600
D
C
min.
C
min.55
C
B
min.55
D > 150 mm.
15
3
4
5
2
7
1
4
3
5
16
6
6
E = 1,5 mm is recommended.
Top view
E
B = 25 mm minimum.
B
Front view
E
=
=
B
320
20
8
9
20
Note:
1. These dimensions are valid for products,which are hinged on right hand side.
2. When door opening direction is reversed, mirror image of this instruction should be
considered. That is, dimensions should be considered for opposite sides.
17
10
11
12
13
14
18
15
19
GUARANTEE DETAILS
Your new Belling product is guaranteed against the cost of breakdown repairs
for twelve months from the date of the original purchase.
What is covered?
• Repairs necessary as a result of faulty materials, defective components or
manufacturing defect.
• The cost of functional replacement parts, but excluding consumable items.
• The labour costs of a Belling approved repairer to carry out the repair.
What is not covered?
• Transit, delivery or accidental damage or misuse and abuse.
• Cabinet or appearance parts, including knobs, flaps, handles or container lids.
• Accessories or consumable items including but not limited to, ice trays, scrapers,
cutlery baskets, filters and light bulbs.
• Repairs required as a result of unauthorised repair or inexpert installation that
fails to meet the requirements contained in the user instruction book.
• Repairs to products used on commercial or non-residential household premises.
• Loss of frozen food in freezers or fridge/freezers. (Food loss insurance is often
included within your household contents insurance policy, or may be available
separately from your retailer).
Important notes.
• Your Belling product is designed and built for domestic household use only.
• The guarantee will be void if the product is installed or used in commercial or
non-residential domestic household premises.
• The product must be correctly installed, located and operated in accordance
with the instructions contained in the User Instructions Booklet provided.
• The guarantee is given only within the boundaries of the United Kingdom and
the Republic of Ireland.
• The guarantee is applicable only to new products and is not transferable if the
product is resold.
• Belling disclaims any liability for incidental or consequential damages. The
guarantee does not in anyway diminish your statutory or legal rights.
20
problem solving section
Recycling
This product bears the selective sorting symbol for waste electrical and electronic
equipment (WEEE).
This means that this product must be handled pursuant to European Directive 2002/96/EC
in order to be recycled or dismantled to minimize its impact on the environment.
For further information, please contact your local or regional authorities.
Electronic products not included in the selective sorting process are potentially
dangerous for the environment and human health due to the presence of hazardous
substances.
21
Technical data
Fully Integrated Freezer
BE814
PERFORMANCE
Energy efficiency class
A
Energy consumption - Kwh/year
205
Net storage - vol fresh food ltrs (cu.ft.)
-----
Net storage - vol frozen food ltrs (cu.ft)
87 (3.1)
Total net vol - ltrs (cu.ft.)
87 (3.1)
Frozen food compartment rating
4 STAR
Conservation time from failure
19 hrs.
Freezing capacity fresh food - kg /24 hrs.
10
Climate class
SN
Operating noise level dB(A)
39
22
WIRING DIAGRAM
23
BELLING CUSTOMER CARE
In case of difficulty within the UK, please call
Belling Customer Care Centre Helpline on
0844 815 3746
When you dial this number you will hear a recorded message and be given a
number of options.
This indicates that your call has been accepted and is being held in a queue.
Calls are answered in strict rotation as our Customer Care Representatives
become available.
Enter appliance numbers here for future reference:
Model No
Serial No
Please ensure you have the above details (Model No and Serial No) to hand
when calling Belling Customer Care. They are essential to booking your call.
Stoney Lane, Prescot, Merseyside, L35 2XW
48 6083 00 00