1
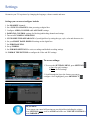
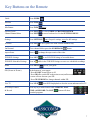
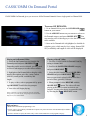
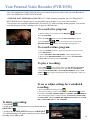
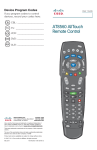
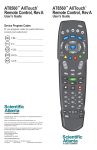
ALL ACCESS HD User Guide
Cisco Digital Box
Table of Contents
How to use the Guide ....................................................................... pg 2
Accessing the Guide
Navigating through the Guide
Browse By Feature
Accessing the Information Banner
Creating a Purchase PIN
Accessing Settings
Selecting Titles to Play
Accessing Rentals during Rental Period
Recording Future Programs
Playback Recording
Modifying Scheduled Recordings
Deleting Recordings
Customizing Guide Views ............................................................... pg 3
Setting up Favorites
Accessing Favorites
Info Banner ...................................................................................... pg 3
Personal Identification Number ..................................................... pg 4
Creating a Parental Control PIN
Parental Control Settings ................................................................ pg 5
How to adjust your Parental Control Settings
Settings .............................................................................................. pg 6
Quick Reference to Available Settings Feature
Guide Functions on the Remote ...................................................... pg 7
Description of Key Buttons on the Remote Control
Available Remotes ............................................................................ pg 8
On Demand Portal ........................................................................... pg 9
Accessing On Demand
Personal Video Recorder (PVR/DVR) ........................................... pg 10
Recording Live Programs
Troubleshooting ............................................................................... pg 11
PVR/DVR Frequently Asked Questions ........................................ pg 12
Notes................................................................................................... pg 13
Guide
To use the Guide:
To access the GUIDE, simply press the GUIDE
button on your remote and the program listings will appear.
The program listings will be
shown over the top of the video
screen.
1. Press the GUIDE
button on your remote to access the GUIDE. The program you are currently watching will be displayed in the bottom right-hand corner of your screen.
2. Scan through the GUIDE with the ARROW
buttons or PAGE UP/DOWN
buttons on the remote.
As you scroll through the listings, you can see the long description of the program at the bottom. While watching LIVE TV, press the INFO
button twice at any time to see the description of the show on the INFO
BANNER of your screen.
3. A CALENDAR is available to view future programming. Press the C
tons to select a date in the CALENDAR within the upcoming 7 days.
button and use the ARROW but-
4. When you find a program to watch that is on now, press OK/SELECT
to tune to the program. If you select a program that has not started yet, a pop-up will appear and will allow you to Tune to the Channel,
Save Channel as favorite, block channel or Set A Reminder. If your Digital Cisco Box
is a Personal Video Recorder (PVR&DVR) you will also have the option to record the program or
record the series.
5. You can browse by theme or browse by title by pressing the B
button on the remote. To
go back to the regular GUIDE, press the B button again and select channel. Use the Arrow buttons or
Page up/Down buttons when browsing by theme or title.
6. To exit the guide and return to your current program, press Exit.
Did You Know...
You can easily find new episodes on the Guide by looking for the New flag located below the program title.
2
Customized Guide Views - Favorites, Hide Channels
You can set up customized views of the guide to easily navigate favorite channels by setting
Favorites
or hiding channels that you don’t use or want to see in the Guide.
To set Favorites:
1. Press Settings
twice, select Favorites and press Ok/Select
. Use the Up/Down ARROW
buttons
to navigate through the networks you would like to choose as your
favorites. To Select/Unselect a FAVORITE channel,
press the OK/select button. A heart icon will appear beside
the channel.
2. You can also set favorites from the info banner by pressing info
lect button
twice. Use the Arrow buttons
to select the heart icon.
and Ok/Se-
3. When you are finished setting your Favorite channels, press
Exit
to return to regular programming.
To Access your Favorites:
1. Press the Favorite
button and your Guide will appear with
your chosen Favorite channels.
2. Select a channel using your arrow buttons and press the Ok/Select
button to tune to the channel.
Info Banner
The Info Banner provides more than just the program description. It also indicates the additional settings available for the program such as closed captioning (CC). These services must be turned on in the settings
menu. They are set to off by default.
To use the INFO Banner:
1. Press Info
twice and the Info Banner will appear
over the video at the bottom of your screen. The info banner
displays program name, channel name and number, current time
and date and the long description of the program you are watching.
2. From the Info Banner, you can add the current channel to
your favorites, block the channel (you will need
to enter your Parental Control PIN to unblock) and/or change
the video aspect ratio from normal to stretched (change
output). If your Digital Cisco Box™ is a PVR/DVR, you will also
have the option to record the current program or
record the series.
3
Your Personal Identification Numbers (PIN)
Parental Control PIN and Purchase PIN
How to secure your settings and purchases:
A Parental Control PIN is necessary for Parental Control settings. A Purchase
PIN is used to securely purchase Pay Per View content. You have to use your Parental Control PIN to
block channel number 801 to securely purchase On Demand content.
Your Default Parental Control Pin:
1. Press Settings
Press Ok/Select
.
twice and scroll to Parental Control.
2. You will be prompted to enter your PIN. The default PIN for Parental
Control and Purchase is 0000 – CASSCOMM recommends changing this
to make your digital box more secure.
To change, enable or disable your Parental PIN:
1. Use the arrow
buttons to navigate to the Parental PIN tab.
2. To change your Parental Control PIN, select change then press
Ok/Select
. Enter a new PIN and confirm by re-entering the
same PIN when prompted. Your new Parental Control PIN is now set.
3. Press Exit
to go back to regular programming.
See page 5 for more details.
Your Default Purchase Pin:
1. Press Settings
twice and scroll to Purchase.
2. You will be prompted to enter your PIN. The default PIN for Parental
Control and Purchase is 0000 – CASSCOMM recommends changing this
to make your digital box more secure.
To change, enable or disable your Purchase PIN:
1. Use the arrow
buttons to navigate to the Purchase PIN tab.
2. To change your PURCHASE PIN, select change then press Ok/Select
. Enter a new PIN and confirm by re-entering the same number when
prompted. Your new Purchase PIN is now set.
3. Press Exit
to go back to regular programming.
Did You Know...
-The default PIN for your account is 0000. If you’ve forgotten your PIN call 1 800-252-1799 for assistance.
- Channel 801 is the dedicated channel for purchasable Video On Demand content.
4
Parental Control Settings (Continued)
How to Configure Parental Control Settings (cont’d):
1. Press Settings
twice and scroll down to Parental Control, select enable and enter your
Parental Control PIN.
2. Navigate to the tab that corresponds to the action you wish to select and press the Ok/Select
You can:
a) Block/Unblock a Channel- Select one or more channels in the list and press Ok/Select
will appear beside the blocked channel. All channels are unblocked by default.
b) Block/Unblock a Rating- Select a rating in the list and press Ok/Select
beside the selected rating. All ratings are unblocked by default.
button.
. A lock
. A lock will appear
c) Set up a Block Timer- This function allows you to disable your cable box from airing a specific
channel on the date and time you specify. Select timers from the list and press Ok/Select
No timers are set by default.
.
d) Hide Blocked Titles- Use the arrow buttons to switch the option from displayed to hidden.
Once highlighted, press Ok/Select. By default all titles are displayed.
3. To exit, press the Exit
button to return to regular programming.
5
Settings
Customize your TV experience by changing the language, volume controls and more.
Settings you can access/configure include:
1. Set Favorite channels.
2. Set a Tune To channel when powering on digital box.
3. Configure audio, volume and language settings.
4. Parental Control settings for blocking/unblocking channels and ratings.
5. Turn on/off Closed Captioning.
6. Customize the appearance of your digital box by setting the type, style, color and character size.
6. Set your Front Panel Display settings on the digital box.
7. Set Purchase PINs.
8. Set up Timers.
9. Set PVR/DVR settings for series recordings and default recording settings.
10. Format the picture to configure the Video and IPG settings.
To access settings:
1. To access the Settings Menu, press Settings
a) Once for quick settings.
b) Twice for full settings.
2. Scroll through the list to the feature you want to
configure. Once highlighted, press Ok/Select
.
.
2 clicks
Did you know...
- Your remote can control all functions on your digital box including the volume.
Press SETTINGS twice, scroll to audio and make sure volume control is
set to VARIABLE.
6
Key Buttons on the Remote
Guide Press Guide
Info Bar
Press Info
Info Banner Press Info
twice
Exit the Guide/ Channel Banner/Menu
Press Exit
Press Exit
to close Guide or Channel Banner.
to move back one level in the Settings Menu.
Settings Press Settings
Favorites
Press Fav
On Demand
Go to channel 800 or press the On Demand
Aspect Ratio
Press #
PVR/DVR Listings Press List
PVR/DVR Scheduled Listings
Press A
Menu Press Menu
PIP (Picture in Picture) At the bottom of your remote:
• Press On/Off to tun PIP on or off.
• Press Swap to switch PIP to the main screen (and hear audio). The main
screen will now become your PIP.
• Press CH Up/Down to change channels within PIP.
Live TV Press Live
DVR Play Features
& Record once for quick settings, twice for full settings.
to see a guide view with Favorite channels only.
button.
to change the aspect ratio of the video.
to see PVR/DVR listings of recorded shows.
while in the PVR/DVR listings screen to see scheduled recordings.
access your guide.
from DVR list/playback to close the screen and return to live TV.
Press any keys in this feature to FF, Rewind, Play,
button will show
Stop and Record. The LIST
recorded programs.
7
Available Remotes for the Cisco HD Digital Box
Phazr-5 UR5-9000L
Cisco AT8560
Atlas URC1056
8
CASSCOMM On Demand Portal
CASSCOMM On Demand gives you access to all On Demand channels from a single portal on Channel 800.
To access ON DEMAND:
1. Go to channel 800 or press the On Demand
button on your remote.
2. Use the ARROW buttons on your remote to select an
On Demand category and press Ok/Select
. You
may need to select a subcategory to view the On Demand
titles available.
3. Once an On Demand title is highlighted, a detailed description, price (which may be free), rating, format (HD/
SD), availability and length of video will be displayed.
Playing an On Demand Video:
1. Select the On Demand service from the On
Demand portal and press Ok/Select .
Depending on the service selected, you may need
to select a subcategory to see the titles available.
Playing a Saved Video:
2. Highlight an On Demand title to display a title,
detailed description, price/free, rating, format
(HD/SD), rental period, availability and
length.
3. Select the title from the list of Saved Programs and press Ok/Select
. Videos
that were previously played will be saved for a
period of time, generally 24 hours.
3. To play a video, select a program title by pressing ok/SELECT and follow the prompts.
4. When prompted, select Resume with the
Ok/Select
button. The video will start
playing at the same location in which it was
stopped. You may also choose to restart the video
by selecting the B
, Restart, button.
4. Your video will begin playing.
NOTE: If applicable, you will be prompted to accept any associated
charges prior to your video playing. Charges begin at $3.99 and will be
displayed on your CASSCOMM bill.
1. Go to the CASSCOMM On Demand Portal by
tuning to channel 800.
2. Scroll to the Saved Programs category
and press Ok/Select .
Did you know...
- Much of the On Demand programming is free.
- Choose a movie from a library of hundreds of options. Any associated costs will automatically be added to
your CASSCOMM bill.
- You have 24 hours to replay all rentals. They will be located under the saved programs category.
9
Your Personal Video Recorder (PVR/DVR)
Your Cisco Digital Box™ HD PVR/DVR puts you in control of what you watch, when you want. Benefits of
your Cisco Digital Box™ HD PVR/DVR include:
1. Rewind, fast forward and pause live TV. While watching a program, the Cisco Digital Box™
HD PVR/DVR stores a digital copy of your program for up to an hour so you won’t miss a minute.
2. Record up to two programs simultaneously or watch live TV while recording another program. You can also
record the program you are watching to view it again at a different time.
To record a live program:
1. While watching a live program, press the Record
button and
then select Record.
or
2. Press the Info
button twice and the info banner will appear.
Click on the record
button to record the live show or click on the
button to record multiple upcoming shows.
record series
To record a future program:
1. Open your GUIDE and locate a program in the future you want to record.
2. Press Ok/Select.
2. Scroll to Record or Record Series in the prompt that follows.
3. When selecting Record Series, choose to record All Episodes
or New Only episodes. Then select record.
To play a recording:
1. Press List
. All recordings can be sorted By Date or By Title.
3. Scroll to the recorded program you wish to play and press Ok/Select.
5. Select Play from start or play from current and press Ok/
. Your program will begin from either the beginning or where you
Select
previously left off.
To see or adjust settings for a scheduled
recording:
To delete a recording:
1. Press the List button and then press A
.
2. Select the recording you wish to modify and press Ok/Select
. Follow
the prompts to Cancel the Recording or Modify the Recording.
3. Record settings that can be configured include: Save Until, Start Time
and Stop Time. Additional series recording settings include New
Only, This Time Only or All Episodes.
1. Press List
.
2. Scroll to the recorded program you want to delete and press
Ok/Select
.
3. Scroll to the Delete Option and press Ok/Select
.
4. A confirmation box will open to ensure you want to delete the
recording. Select Yes or No.
10
Troubleshooting
No Picture On Any Channel
Problem:
You turn on your television and Cisco Digital Box™ but receive no picture on any of your channels.
Potential solutions:
1. Ensure that all equipment is plugged in and turned on. If it is on and the screen is black, try tuning to channel 03
on your Cisco Digital Box.™ (Ensure that your TV is tuned to the correct input.) If no picture appears, go to Step 2.
2. There may be a problem with how your cables are connected to your home entertainment equipment. Ensure that
the cables are connected properly and securely. If there is still no picture:
a. Disconnect the coaxial cable from your Cisco Digital Box™ and connect it directly to your television.
i) Change the channels on your TV. If a picture appears, proceed to Step b below.
ii) If no picture appears, please call us at 1-800-252-1799.
b. Disconnect the cable from your television and reconnect it to your Cisco Digital Box,™ then tune to
channel 03.
3. If these issues do not fix the problem contact us at 1-800-252-1799 to talk with a CASSCOMM representative.
Remote Control Problems
Problem:
Your remote does not control your Cisco Digital Box™ (On/Off, Volume, Channels, etc.).
Potential solutions:
1. Verify that the remote is set to Cable Mode by pressing the CBL button at the top of the remote.
2. Ensure that there is no obstruction blocking the infra-red sensor of the remote from communicating with the Cisco
Digital Box.™
3. Ensure the lights at the top of the remote blink when a button is pressed. If not, replace the batteries (2 AA).
4. If your remote can control all functions on your Cisco Digital Box™ except the volume, ensure that the volume
control is not set to the fixed option in the Settings menu. To check your audio settings, press Settings
twice, select Audio and press Ok/Select. Ensure the volume control option in the prompt is set to Variable.
5. If you are still having problems, try changing channels by pressing the up/down buttons on the front of your
Cisco Digital Box™. If this works, attempt to use the remote control again. If this did not fix your problem, please
contact our office at 1-800-252-1799 to speak with a CASSCOMM representative.
11
Personal Video Recorder (PVR/DVR) Questions
How many programs can I record at one time?
You can record up to two programs simultaneously and
still watch other titles in your already recorded titles list.
When I press on my remote, nothing happens or I
receive a ‘Not Authorized’ message. How do I
fix this?
Usually, resetting or re-authorizing your Cisco Digital
Box™ will fix this problem. You can do this by power
cycling the box. Simply unplug the box from the wall and
plug it back in.
I’ve been tuned to a show since it started. Can I
save this show to my recorded programs list?
Yes, provided that the length of the program does not
exceed one hour and that you have been tuned to the show
since the beginning. If you haven’t been tuned to the show
the entire time, only the portion that you’ve watched since
your last channel change will be saved. To save it, press
info twice on the remote and click record.
Can I use my Cisco Digital Box™ HD PVR/DVR
to record Pay Per View (PPV) events and On Demand programming?
You can record PPV movies and events after purchasing
the PPV event. You cannot record On Demand movies or
programs.
I’ve set up Parental Controls on my Cisco Digtal
Box.™ Do the same Parental Controls apply to
PVR recordings?
Yes. If you block programs by channel, rating or content
in the Settings menu, those settings are carried
over to PVR/DVR recordings. To watch blocked recorded
programs, you will need to enter your Parental Controls PIN (your default PIN is “0000”).
Why do I receive an error message when I try to
change channels during a recording?
The Cisco Digital Box™ HD PVR/DVR will display a
Channel Tune Conflict Notice message if
you are already recording two programs and attempt to
tune to another channel. In this situation, you can choose
to stop one of the recordings and then tune to the desired
channel. Or, you can watch one of the shows that you are
recording by selecting from the on-screen prompt.
I set up a baseball game (or any live event) to
record. Why wasn’t the overtime period recorded?
Sometimes events or programs run beyond their scheduled
end times. For tips on extending the recording time for these
types of events or shows, see page 10.
How long can I pause live TV?
You can pause live TV for up to one hour.
How far back can I rewind live TV?
You can rewind live TV for up to one hour depending
on how long you have been tuned to the program. Each time
you change channels, a new copy is stored in the built-in
recorder. For example, if you’ve been watching the same
channel for 15 minutes, you can rewind 15 minutes of
programming.
What does the red light mean on the front of
the Cisco Digital Box™ HD PVR?
When the red record light is on, a show is currently
being recorded.
Does my Cisco Digital Box™ HD PVR need to be
powered on to record programs?
No. As long as your Cisco Digital Box™ HD PVR/DVR
is plugged in to both the power and a cable outlet, it will
record the programs you have scheduled, regardless of
whether it is turned on or off.
What happens if my Cisco Digital Box™ HD PVR/
DVR temporarily loses power?
Everything you have recorded prior to losing power will
be saved. However, recordings you have scheduled while
the Cisco Digital Box™ HD PVR/DVR is without power
will not be recorded for the duration of the power loss.
Scheduled recordings will resume once the power has been
restored.
Why is my Cisco Digital Box™ HD PVR/DVR not
recording every episode of my favorite program?
Perhaps your favorite program’s title changes slightly
from week to week. Such things as (HD) or other
variances in the title will make the PVR think it is a
different show and it will not be recorded. Browse your
Scheduled Recordings list to see if your favorite
program is set to record in the next few days. If not, reset it
to record the same way you’ve done in the past.
12
Notes...
__________________________________________________________________________________________
__________________________________________________________________________________________
__________________________________________________________________________________________
___________________________________________________________________________________________
__________________________________________________________________________________________
__________________________________________________________________________________________
__________________________________________________________________________________________
___________________________________________________________________________________________
__________________________________________________________________________________________
13