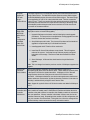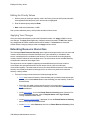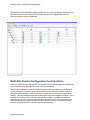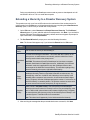
1
SteelEye Protection Suite for Linux v8.1 Technical Documentation August 2012 This document and the information herein is the property of SIOS Technology Corp. (previously known as SteelEye® Technology, Inc.) and all unauthorized use and reproduction is prohibited. SIOS Technology Corp. makes no warranties with respect to the contents of this document and reserves the right to revise this publication and make changes to the products described herein without prior notification. It is the policy of SIOS Technology Corp. to improve products as new technology, components and software become available. SIOS Technology Corp., therefore, reserves the right to change specifications without prior notice. LifeKeeper, SteelEye and SteelEye DataKeeper are registered trademarks of SIOS Technology Corp. Other brand and product names used herein are for identification purposes only and may be trademarks of their respective companies. To maintain the quality of our publications, we welcome your comments on the accuracy, clarity, organization, and value of this document. Address correspondence to: [email protected] Copyright © 2012 By SIOS Technology Corp. San Mateo, CA U.S.A. All rights reserved Table of Contents Chapter 1: Introduction 1 About SteelEye Protection Suite for Linux 1 SPS for Linux Integrated Components 1 SteelEye Protection Suite Software Packaging 1 SPS for Linux Installation Image File 1 SPS Core Package Cluster 2 Optional Recovery Software 2 Documentation and Training 2 Documentation 2 Training 3 3 Technical Support Chapter 2: SPS Installation 3 5 System Requirements 5 Technical Notes 5 SteelEye Protection Suite Software Packaging 5 SPS for Linux Installation Image File 5 SPS Core Package Cluster 6 Optional Recovery Software 6 Planning Your SPS Environment 7 Mapping Server Configurations 7 Sample Configuration Map for LifeKeeper Pair 8 Storage and Adapter Requirements 8 Storage and Adapter Options 9 Supported Storage Models 9 Table of Contents i Supported Adapter Models 22 Setting Up Your SPS Environment 25 Installing the Linux OS and Associated Communications Packages 25 Connecting Servers and Shared Storage 25 Configuring Shared Storage 25 Verifying Network Configuration 26 VLAN Interface Support Matrix 27 Creating Switchable IP Address 27 Installing and Setting Up Database Applications 28 Installing the SteelEye Protection Suite Software 29 Installing the SPS Software Obtaining and Installing the License 29 31 Primary Network Interface Change May Require a License Rehost 32 Internet/IP Licensing 33 Subscription Licensing 33 Subscription Licensing Troubleshooting 33 Obtaining an Internet HOST ID 34 Verifying SPS Installation 34 Upgrading SPS 34 Chapter 3: SteelEye LifeKeeper for Linux Introduction 37 37 Protected Resources 37 LifeKeeper Core 38 LifeKeeper Core Software 38 File System, Generic Application, IP and RAW I/O Recovery Kit Software 39 LifeKeeper GUI Software 40 LifeKeeper Man Pages 40 Configuration Concepts 40 Common Hardware Components 40 Components Common to All LifeKeeper Configurations ii Table of Contents 41 System Grouping Arrangements 41 Active - Active Grouping 42 Active - Standby Grouping 43 Intelligent Versus Automatic Switchback 44 Logging With syslog 45 Resource Hierarchies 45 Resource Types 45 Resource States 46 Hierarchy Relationships 47 Shared Equivalencies 47 Resource Hierarchy Information 48 Resource Hierarchy Example 49 Detailed Status Display 49 Resource Hierarchy Information 51 Communication Status Information 52 LifeKeeper Flags 53 Shutdown Strategy 54 Short Status Display 54 Resource Hierarchy Information 54 Communication Status Information 55 Fault Detection and Recovery Scenarios 55 IP Local Recovery 55 Local Recovery Scenario 56 Command Line Operations 56 Resource Error Recovery Scenario 57 Server Failure Recovery Scenario 59 Installation and Configuration 61 SPS for Linux Installation 61 SPS for Linux Configuration 61 SPS Configuration Steps 61 Table of Contents iii Set Up TTY Connections 62 LifeKeeper Event Forwarding via SNMP 63 Overview of LifeKeeper Event Forwarding via SNMP 63 LifeKeeper Events Table Configuring LifeKeeper Event Forwarding 63 65 Prerequisites 65 Configuration Tasks 65 Verifying the Configuration 66 Disabling SNMP Event Forwarding 66 SNMP Troubleshooting 67 LifeKeeper Event Email Notification 67 Overview of LifeKeeper Event Email Notification 67 LifeKeeper Events Generating Email Configuring LifeKeeper Event Email Notification 68 69 Prerequisites 69 Configuration Tasks 69 Verifying the Configuration 69 Disabling Event Email Notification 70 Email Notification Troubleshooting 70 Optional Configuration Tasks 71 Adding the LifeKeeper GUI Icon to the Desktop Toolbar 71 Changing the Icon Position 71 Configuring the Manual Failover Confirmation Option 71 Setting Server Shutdown Strategy 71 Tuning the LifeKeeper Heartbeat 72 Overview of the Tunable Heartbeat Example 72 73 Configuring the Heartbeat 73 Configuration Considerations 73 Using Custom Certificates with the SPS API iv Table of Contents 74 How Certificates Are Used 74 Using Your Own Certificates 74 Linux Configuration 75 Data Replication Configuration 78 Network Configuration 79 Application Configuration 79 Storage and Adapter Configuration 80 HP Multipath I/O Configurations 98 Device Mapper Multipath I/O Configurations 100 LifeKeeper I-O Fencing Introduction 103 Disabling Reservations 103 Non-Shared Storage 104 Configuring I/O Fencing Without Reservations 104 I/O Fencing Chart 104 Quorum/Witness 106 Quorum/Witness Server Support Package for LifeKeeper 106 Feature Summary 106 Package Requirements 106 Package Installation and Configuration 107 Configurable Components 107 Available Quorum Modes 108 Available Witness Modes 109 Available Actions When Quorum is Lost 110 Additional Configuration for Shared-Witness Topologies 110 Adding a Witness Node to a Two-Node Cluster 111 Expected Behaviors (Assuming Default Modes) 112 Scenario 1 112 Scenario 2 112 Scenario 3 112 Scenario 4 113 Table of Contents v SCSI Reservations 114 Storage Fence Using SCSI Reservations 114 Alternative Methods for I/O Fencing 115 STONITH 115 Using IPMI with STONITH 115 Package Requirements 115 STONITH in VMware vSphere Environments 115 Package Requirements 116 Installation and Configuration 116 <vm_id> 117 Expected Behaviors 118 Watchdog 118 Components 118 Configuration 119 Uninstall 120 Resource Policy Management 120 Overview 120 Steeleye Protection Suite/vAppKeeper Recovery Behavior 121 Custom and Maintenance-Mode Behavior via Policies 121 Standard Policies 121 Meta Policies 122 Important Considerations for Resource-Level Policies 122 The lkpolicy Tool 123 Example lkpolicy Usage 123 Authenticating With Local and Remote Servers 123 Listing Policies 124 Showing Current Policies 124 Setting Policies 124 Removing Policies 124 Configuring Credentials vi Table of Contents 125 Adding or Changing Credentials 125 Listing Stored Credentials 125 Removing Credentials for a Server 125 Additional Information 125 LifeKeeper API 126 Network Configuration 126 Authentication 126 LifeKeeper Administration Overview 127 127 Error Detection and Notification 127 N-Way Recovery 127 Administrator Tasks 128 Editing Server Properties 128 Creating a Communication Path 128 Deleting a Communication Path 129 Server Properties - Failover 130 Creating Resource Hierarchies 131 LifeKeeper Application Resource Hierarchies 132 Recovery Kit Options 132 Creating a File System Resource Hierarchy 132 Creating a Generic Application Resource Hierarchy 134 Creating a Raw Device Resource Hierarchy 135 Editing Resource Properties 136 Editing Resource Priorities 136 Using the Up and Down Buttons 137 Editing the Priority Values 138 Applying Your Changes 138 Extending Resource Hierarchies 138 Extending a File System Resource Hierarchy 139 Extending a Generic Application Resource Hierarchy 139 Table of Contents vii Extending a Raw Device Resource Hierarchy 140 Unextending a Hierarchy 140 Creating a Resource Dependency 141 Deleting a Resource Dependency 142 Deleting a Hierarchy from All Servers 143 LifeKeeper User Guide 145 Using LifeKeeper for Linux 146 GUI 146 GUI Overview - General 146 GUI Server 146 GUI Client 146 Exiting GUI Clients 147 The LifeKeeper GUI Software Package 147 Menus 148 SteelEye LifeKeeper for Linux Menus 148 Resource Context Menu 148 Server Context Menu 149 File Menu 150 Edit Menu - Resource 150 Edit Menu - Server 151 View Menu 151 Help Menu 152 Toolbars 152 SteelEye LifeKeeper for Linux Toolbars 152 GUI Toolbar 152 Resource Context Toolbar 154 Server Context Toolbar 156 Preparing to Run the GUI 156 LifeKeeper GUI - Overview 156 GUI Server viii Table of Contents 157 GUI Client 157 Starting GUI clients 157 Starting the LifeKeeper GUI Applet 157 Starting the application client 158 Exiting GUI Clients Configuring the LifeKeeper GUI 158 158 Configuring the LifeKeeper Server for GUI Administration 158 Running the GUI 158 GUI Configuration 159 GUI Limitations 160 Starting and Stopping the GUI Server 160 To Start the LifeKeeper GUI Server 160 Troubleshooting 160 To Stop the LifeKeeper GUI Server 160 LifeKeeper GUI Server Processes 161 Configuring GUI Users 161 Java Security Policy 162 Location of Policy Files 162 Policy File Creation and Management 163 Granting Permissions in Policy Files 163 Sample Policy File 164 Java Plug-In Downloading the Java Plug-in Running the GUI on a Remote System 165 165 165 Configuring the GUI on a Remote System 165 Running the GUI on a Remote System 166 Applet Troubleshooting 167 Running the GUI on a LifeKeeper Server 167 Browser Security Parameters for GUI Applet 168 Firefox 168 Table of Contents ix Internet Explorer 168 Status Table 168 Properties Panel 169 Output Panel 169 Message Bar 170 Exiting the GUI 170 Common Tasks 170 Starting LifeKeeper 170 Starting LifeKeeper Server Processes 170 Enabling Automatic LifeKeeper Restart 171 Stopping LifeKeeper Disabling Automatic LifeKeeper Restart 171 172 Viewing LifeKeeper Processes 172 Viewing LifeKeeper GUI Server Processes 172 Connecting Servers to a Cluster 173 Disconnecting From a Cluster 173 Viewing Connected Servers 174 Viewing the Status of a Server 174 Viewing Server Properties 175 Viewing Server Log Files 175 Viewing Resource Tags and IDs 176 Viewing the Status of Resources 176 Server Resource Status 176 Global Resource Status 177 Viewing Resource Properties 178 Setting View Options for the Status Window 179 Resource Labels 179 Resource Tree 180 Comm Path Status 180 Row Height 180 x Table of Contents Column Width Viewing Message History Reading the Message History 180 181 181 Expanding and Collapsing a Resource Hierarchy Tree 182 Cluster Connect Dialog 183 Cluster Disconnect Dialog 183 Resource Properties Dialog 184 General Tab 184 Relations Tab 185 Equivalencies Tab 185 Server Properties Dialog 185 General Tab 186 CommPaths Tab 188 Resources Tab 189 Operator Tasks 190 Bringing a Resource In Service 190 Taking a Resource Out of Service 191 Advanced Tasks 191 LCD 191 LifeKeeper Configuration Database Related Topics LCDI Commands 191 192 192 Scenario Situation 192 Hierarchy Definition 193 LCD Configuration Data 195 Dependency Information 195 Resource Status Information 195 Inter-Server Equivalency Information 195 LCD Directory Structure 196 LCD Resource Types 196 Table of Contents xi LifeKeeper Flags 196 Resources Subdirectories 197 Resource Actions 198 Structure of LCD Directory in /opt/LifeKeeper 198 LCM 199 Communication Status Information 200 LifeKeeper Alarming and Recovery 200 Alarm Classes 200 Alarm Processing 201 Alarm Directory Layout 201 Maintenance Tasks 201 Changing LifeKeeper Configuration Values 201 File System Health Monitoring 203 Condition Definitions 204 Full or Almost Full File System 204 Unmounted or Improperly Mounted File System 204 Maintaining a LifeKeeper Protected System 205 Maintaining a Resource Hierarchy 205 Recovering After a Failover 206 Removing LifeKeeper 206 Removing via GnoRPM 207 Removing via Command Line 207 Removing Distribution Enabling Packages 207 Running LifeKeeper With a Firewall 207 LifeKeeper Communication Paths 208 LifeKeeper GUI Connections 208 LifeKeeper IP Address Resources 208 LifeKeeper Data Replication 208 Disabling a Firewall 209 Running the LifeKeeper GUI Through a Firewall xii Table of Contents 209 Starting LifeKeeper 210 Starting LifeKeeper Server Processes 211 Enabling Automatic LifeKeeper Restart 211 Stopping LifeKeeper 211 Disabling Automatic LifeKeeper Restart 212 Transferring Resource Hierarchies 212 Technical Notes 212 LifeKeeper Features 212 Tuning 213 LifeKeeper Operations 214 Server Configuration 216 Package Dependencies List for LifeKeeper 7.5 and Later 216 Confirm Failover and Block Resource Failover Settings 216 Confirm Failover On: 216 Set Block Resource Failover On: 217 Conditions/Considerations: 217 NFS Client Options 217 NFS Client Mounting Considerations 218 UDP or TCP? 218 Sync Option in /etc/exports 218 Red Hat EL6 (and Fedora 14) Clients with Red Hat EL6 NFS Server 218 Red Hat EL5 NFS Clients with a Red Hat EL6 NFS Server 218 Cluster Example Expanded Multicluster Example 218 218 Troubleshooting 221 Known Issues and Restrictions 221 Installation 221 LifeKeeper Core 223 Internet/IP Licensing 228 GUI 229 Table of Contents xiii Data Replication 231 IPv6 234 Apache 237 Oracle Recovery Kit 237 NFS Server Recovery Kit 238 SAP Recovery Kit 239 LVM Recovery Kit 240 DMMP Recovery Kit 241 PostgreSQL Recovery Kit 241 MD Recovery Kit 242 Samba Recovery Kit 243 GUI Troubleshooting 243 Network-Related Troubleshooting (GUI) 243 Long Connection Delays on Windows Platforms From Sun FAQ: 243 243 Running from a Modem: 244 Primary Network Interface Down: 244 No Route To Host Exception: 244 Unknown Host Exception: 244 From Windows: 245 From Linux: 246 Unable to Connect to X Window Server: 247 Adjusting the System Date and Time 247 Communication Paths Going Up and Down 248 Suggested Action 248 Incomplete Resource Created 248 Incomplete Resource Priority Modification 248 Restoring Your Hierarchy to a Consistent State 249 No Shared Storage Found When Configuring a Hierarchy 250 Recovering from a LifeKeeper Server Failure 251 xiv Table of Contents Suggested Action: 251 Recovering from a Non-Killable Process 252 Recovering From A Panic During A Manual Recovery 252 Recovering Out-of-Service Hierarchies 252 Resource Tag Name Restrictions 252 Tag Name Length 252 Valid "Special" Characters 252 Invalid Characters 252 Serial (TTY) Console WARNING 252 Taking the System to init state S WARNING 253 Thread is Hung Messages on Shared Storage 253 Explanation 253 Suggested Action: 253 Chapter 4: SteelEye DataKeeper for Linux Introduction Mirroring with SteelEye DataKeeper for Linux 255 255 255 DataKeeper Features 255 Synchronous vs. Asynchronous Mirroring 256 Synchronous Mirroring 256 Asynchronous Mirroring 256 How SteelEye DataKeeper Works 256 Synchronization (and Resynchronization) 257 Standard Mirror Configuration 258 N+1 Configuration 258 Multiple Target Configuration 259 SteelEye DataKeeper Resource Hierarchy 260 Failover Scenarios 261 Scenario 1 261 Scenario 2 262 Scenario 3 262 Table of Contents xv Scenario 4 Installation and Configuration Before Configuring Your DataKeeper Resources Hardware and Software Requirements 262 265 265 265 Hardware Requirements 265 Software Requirements 266 General Configuration 266 Network Configuration 266 Changing the Data Replication Path 267 Determine Network Bandwidth Requirements 267 Measuring Rate of Change on a Linux System (Physical or Virtual) 267 Determine Network Bandwidth Requirements 268 Measuring Basic Rate of Change 268 Measuring Detailed Rate of Change 269 Analyze Collected Detailed Rate of Change Data 269 Graph Detailed Rate of Change Data 274 Confirm Failover and Block Resource Failover Settings Confirm Failover On When to Select This Setting Block Resource Failover On Conditions/Considerations 278 278 279 279 279 Setting the Flags on Each Server 280 Examples 281 Block All Automatic Failovers Completely 281 Block Failover in One Direction 282 SteelEye DataKeeper for Linux Resource Types 282 Replicate New File System 283 Replicate Existing File System 283 DataKeeper Resource 283 Resource Configuration Tasks xvi Table of Contents 284 Overview 284 Creating a DataKeeper Resource Hierarchy 284 Extending Your Hierarchy 286 Extending a DataKeeper Resource 287 Unextending Your Hierarchy 288 Deleting a Resource Hierarchy 289 Taking a DataKeeper Resource Out of Service 289 Bringing a DataKeeper Resource In Service 290 Testing Your Resource Hierarchy 290 Performing a Manual Switchover from the LifeKeeper GUI Administration Administering SteelEye DataKeeper for Linux 290 293 293 Viewing Mirror Status 293 GUI Mirror Administration 294 Create and View Rewind Bookmarks 295 Force Mirror Online 296 Pause and Resume 296 Pause Mirror 296 Resume Mirror 296 Rewind and Recover Data 296 Set Compression Level 299 Set Rewind Log Location 299 Set Rewind Log Max Size 299 Command Line Mirror Administration 300 Mirror Actions Examples: Mirror Settings Examples: Bitmap Administration Monitoring Mirror Status via Command Line 300 300 300 301 301 302 Table of Contents xvii Example: 302 Server Failure 303 Resynchronization 303 Avoiding Full Resynchronizations 304 Method 1 Procedure Method 2 Procedure Clustering with Fusion-io Fusion-io Best Practices for Maximizing DataKeeper Performance 304 304 305 305 306 306 Network 307 TCP/IP Tuning 307 Configuration Recommendations Multi-Site Cluster SteelEye Protection Suite for Linux Multi-Site Cluster 308 309 309 SteelEye Protection Suite for Linux Multi-Site Cluster 309 Multi-Site Cluster Configuration Considerations 310 Multi-Site Cluster Restrictions 311 Creating a SteelEye Protection Suite for Linux Multi-Site Cluster Resource Hierarchy 311 Replicate New File System 312 Replicate Existing File System 315 DataKeeper Resource 316 Extending Your Hierarchy 318 Extending a DataKeeper Resource 320 Extending a Hierarchy to a Disaster Recovery System 321 Configuring the Restore and Recovery Setting for Your IP Resource 323 Migrating to a Multi-Site Cluster Environment 324 Requirements 324 Before You Start 324 Performing the Migration 325 xviii Table of Contents Successful Migration 334 Troubleshooting 337 Index 341 Table of Contents xix Chapter 1: Introduction About SteelEye Protection Suite for Linux SteelEye Protection Suite (SPS) for Linux integrates high availability clustering with innovative data replication functionality in a single, enterprise-class solution. SPS for Linux Integrated Components SteelEye LifeKeeper provides a complete fault-resilient software solution to provide high availability for your servers' file systems, applications,and processes. LifeKeeper does not require any customized, fault-tolerant hardware. LifeKeeper simply requires two or more systems to be grouped in a network, and site-specific configuration data is then created to provide automatic fault detection and recovery. In the case of a failure, LifeKeeper migrates protected resources from the failed server to a designated back-up server. Users experience a brief interruption during the actual switchover; however, LifeKeeper restores operations on the back-up server without operator intervention. SteelEye DataKeeper provides an integrated data mirroring capability for LifeKeeper environments. This feature enables LifeKeeper resources to operate in shared and non-shared storage environments. SteelEye Protection Suite Software Packaging The SteelEye Protection Suite (SPS) for Linux software, including Optional SPS Recovery Kits, is contained within a single image file (sps.img). SPS for Linux Installation Image File The SPS for Linux image file (sps.img) provides a set of installation scripts designed to perform userinteractive system setup tasks that are necessary when installing SPS on your system. The installation image file identifies what Linux distribution you are running and, through a series of questions you answer, installs various packages required to ensure a successful SPS installation, including the LifeKeeper API (steeleye-lkapi), which is used to allow communications between servers. IMPORTANT NOTE: Currently, this API is reserved for internal use only but may be opened up to customer and third party usage in a future release. The type and sequence of the questions is dependent upon your Linux distribution. Read each question carefully to ensure a proper response. Under normal circumstances, you should be answering Yes to each question in order to complete all the steps required by the installation image file. SteelEye Protection Suite for Linux1 SPS Core Package Cluster The SPS for Linux image file includes a core package cluster containing the following software packages: SPS Core Package Cluster l LifeKeeper (steeleye-lk). The LifeKeeper core packages provide recovery software for core system components, such as memory, CPUs, the operating system, the SCSI disk subsystem and file systems. l LifeKeeper GUI (steeleye-lkGUI). The LifeKeeper GUI package provides a graphical user interface for LifeKeeper administration and monitoring. l DataKeeper (steeleye-lkDR). The DataKeeper package provides data replication (synchronous or asynchronous mirrors) with intent logging. l IP Recovery Kit (steeleye-lkIP). The LifeKeeper IP Recovery Kit provides switchover software for automatic recovery of IP addresses. l Raw I/O Recovery Kit (steeleye-lkRAW). The LifeKeeper Raw I/O Recovery Kit provides support for applications that use raw i/o to bypass kernel buffering. l CCISS Recovery Kit (steeleye-lkCCISS). Optional package that provides support for Hewlett-Packard (Compaq) CCISS devices with DataKeeper. (This package is located on the SPS Installation Image File and will only be installed if HP storage devices (CCISS) are being used with DataKeeper.) l Man Pages (steeleye-lkMAN). The LifeKeeper Man Page package provides reference manual pages for the LifeKeeper product. Optional Recovery Software Recovery kits are also released with the SPS Core software. During the installation, you will be presented with a complete, up-to-date, selectable list of available recovery kits. For information regarding these recovery kits, see the Application Recovery Kits section of the SPS Technical Documentation. Documentation and Training Documentation A complete reference providing instructions for installing, configuring, administering and troubleshooting SteelEye Protection Suite for Linux.The following sections cover every aspect of SPS for Linux: Section Introduction 2Introduction Description Provides an introduction to the SteelEye Protection Suite for Linux product, including software packaging and configuration concepts. Training Section Description SPS for Linux Installation Guide Provides useful information for planning and setting up your SPS environment, installing and licensing SPS and configuring the LifeKeeper graphical user interface (GUI). Configuration Contains detailed information and instructions for configuring the LifeKeeper software on each server in your cluster. Administration Discusses server-level tasks such as editing server properties and creating resources and resource-level tasks such as editing, extending or deleting resources. User's Guide Contains detailed information on the LifeKeeper GUI, including the many tasks that can be performed within the LifeKeeper GUI. Also includes a Technical Notes section along with many more Advanced Topics. DataKeeper Contains planning and installation instructions as well as administration, configuration and user information for SteelEye DataKeeper for Linux. Describes known issues and restrictions and suggests solutions to problems Troubleshooting that may be encountered during installation, configuration and/or use of SteelEye LifeKeeper for Linux. Recovery Kits Contains planning and installation instructions as well as administration, configuration and user information for the Optional Recovery Kits that allow LifeKeeper to manage and control specific applications. Error Code Search Provides a listing of all messages that may be encountered while using SteelEye Protection Suite for Linux and, where appropriate, provides additional explanation of the cause of the errors and necessary action to resolve the error condition. This full listing may be searched for any error code received. Training SPS training is available through SIOS Technology Corp. or through your reseller. Contact your sales representative for more information. Technical Support As a SIOS Technology Corp. customer with a valid Support contract, you are entitled to access the SIOS Technology Corp. Support Self-Service Portal. The SIOS Technology Corp. Support Self-Service Portal offers you the following capabilities: l Search our Solution Knowledge Base to find solutions to problems and answers to questions l Always on 24/7 service with the SIOS Technology Corp. Support team to: SteelEye Protection Suite for Linux3 Technical Support l Log a Case to report new incidents. l View Cases to see all of your open and closed incidents. l Review Top Solutions providing information on the most popular problem resolutions being viewed by our customers. Contact SIOS Technology Corp. Support at [email protected] to set up and activate your SelfService Portal account. You can also contact SIOS Technology Corp. Support at: 1-877-457-5113 (Toll Free) 1-803-808-4270 (International) Email: [email protected] 4Introduction Chapter 2: SPS Installation The SteelEye Protection Suite (SPS) Installation Guide contains information on how to plan and install your SPS environment. In addition to providing the necessary steps for setting up your server, storage device and network components, it includes details for configuring your LifeKeeper graphical user interface (GUI). Once you have completed the steps in this guide, you will be ready to configure your LifeKeeper and DataKeeper resources. The SPS for Linux Technical Documentation provides the information needed to complete your SPS configuration. System Requirements For a complete list of hardware and software requirements and versions, see the SPS for Linux Release Notes. Also, before installing SPS, be sure that you have completed the planning and hardware configuration tasks described in this document. Technical Notes Refer to the Technical Notes and Troubleshooting sections of the SPS for Linux Technical Documentation for information detailing troubleshooting issues, restrictions, etc., pertaining to this software. SteelEye Protection Suite Software Packaging The SteelEye Protection Suite (SPS) for Linux software, including Optional SPS Recovery Kits, is contained within a single image file (sps.img). SPS for Linux Installation Image File The SPS for Linux image file (sps.img) provides a set of installation scripts designed to perform userinteractive system setup tasks that are necessary when installing SPS on your system. The installation image file identifies what Linux distribution you are running and, through a series of questions you answer, installs various packages required to ensure a successful SPS installation, including the LifeKeeper API (steeleye-lkapi), which is used to allow communications between servers. IMPORTANT NOTE: Currently, this API is reserved for internal use only but may be opened up to customer and third party usage in a future release. The type and sequence of the questions is dependent upon your Linux distribution. Read each question carefully to ensure a proper response. Under normal circumstances, you should be SteelEye Protection Suite for Linux5 SPS Core Package Cluster answering Yes to each question in order to complete all the steps required by the installation image file. The SPS for Linux image file includes a core package cluster containing the following software packages: SPS Core Package Cluster l LifeKeeper (steeleye-lk). The LifeKeeper core packages provide recovery software for core system components, such as memory, CPUs, the operating system, the SCSI disk subsystem and file systems. l LifeKeeper GUI (steeleye-lkGUI). The LifeKeeper GUI package provides a graphical user interface for LifeKeeper administration and monitoring. l DataKeeper (steeleye-lkDR). The DataKeeper package provides data replication (synchronous or asynchronous mirrors) with intent logging. l IP Recovery Kit (steeleye-lkIP). The LifeKeeper IP Recovery Kit provides switchover software for automatic recovery of IP addresses. l Raw I/O Recovery Kit (steeleye-lkRAW). The LifeKeeper Raw I/O Recovery Kit provides support for applications that use raw i/o to bypass kernel buffering. l CCISS Recovery Kit (steeleye-lkCCISS). Optional package that provides support for Hewlett-Packard (Compaq) CCISS devices with DataKeeper. (This package is located on the SPS Installation Image File and will only be installed if HP storage devices (CCISS) are being used with DataKeeper.) l Man Pages (steeleye-lkMAN). The LifeKeeper Man Page package provides reference manual pages for the LifeKeeper product. Optional Recovery Software Recovery kits are also released with the SPS Core software. During the installation, you will be presented with a complete, up-to-date, selectable list of available recovery kits. For information regarding these recovery kits, see the Application Recovery Kits section of the SPS Technical Documentation. 6SPS Installation Planning Your SPS Environment The following topics will assist in defining the SPS for Linux cluster environment. Mapping Server Configurations Document your server configuration using the following guidelines: 1. Determine the server names, processor types, memory and other I/O devices for your configuration. When you specify a backup server, you should ensure that the server you select has the capacity to perform the processing should a failure occur on the primary server. 2. Determine your communications connection requirements. Important: Potentially, clustered configurations have two types of communications requirements: cluster requirements and user requirements. l Cluster - A LifeKeeper cluster requires at least two communication paths (also called “comm paths” or “heartbeats”) between servers. This redundancy helps avoid “split-brain” scenarios due to communication failures. Two separate LAN-based (TCP) comm paths using dual independent subnets are recommended, and at least one of these should be configured as a private network. Using a combination of TCP and TTY is also supported. A TTY comm path uses an RS-232 null-modem connection between the servers’ serial ports. Note that using only one comm path can potentially compromise the ability of systems in a LifeKeeper cluster to communicate with each other. If a single comm path is used and the comm path fails, then LifeKeeper hierarchies may try to come into service on multiple systems simultaneously. This is known as a false failover or a “split-brain” scenario. In the “split-brain” scenario, each server believes it is in control of the application and thus may try to access and write data to the shared storage device. To resolve the split-brain scenario, LifeKeeper may cause servers to be powered off or rebooted or leave hierarchies out-of-service to assure data integrity on all shared data. Additionally, heavy network traffic on a TCP comm path can result in unexpected behavior, including false failovers and the failure of LifeKeeper to initialize properly. l User - We recommend that you provide alternate LAN connections for user traffic - that is, a separate LAN connection than the one used for the cluster heartbeat. However, if two TCP comm paths are configured (as recommended), one of those comm paths can share the network address with other incoming and outgoing traffic to the server. l Note: To help ensure that resources are brought into service only when necessary, you may elect to utilize the Quorum/Witness Server Support Package for LifeKeeper. 3. Identify and understand your shared resource access requirements. Clusters that use shared storage can utilize either shared SCSI buses or Fibre Channel loops. Because LifeKeeper locks resources to one server, you must ensure that only one server requires access to all SteelEye Protection Suite for Linux7 Sample Configuration Map for LifeKeeper Pair locked resources at any given time. LifeKeeper device locking is done at the Logical Unit (LUN) level. For active/active configurations, each hierarchy must access its own unique LUN. All hierarchies accessing a common LUN must be active (in-service) on the same server. 4. Determine your shared memory requirements. Remember to take into account the shared memory requirements of third-party applications as well as those of LifeKeeper when configuring shared memory and semaphore parameters. See Tuning in Technical Notes for LifeKeeper’s shared memory requirements. Sample Configuration Map for LifeKeeper Pair This sample configuration map depicts a pair of LifeKeeper servers sharing a disk array subsystem where, normally, Server 1 runs the application(s) and Server 2 is the backup or secondary server. In this case, there is no contention for disk resources because one server at a time reserves the entire disk storage space of the disk array. The disk array controller is labeled “DAC,” and the SCSI host adapters (parallel SCSI, Fibre Channel, etc.) are labeled “SCSI HA.” A pair of servers is the simplest LifeKeeper configuration. When you plan a cluster consisting of more than two servers, your map is even more critical to ensure that you have the appropriate connections between and among servers. For example, in a multi-directional failover configuration, it is possible to define communications paths within LifeKeeper when the physical connections do not exist. Each server must have a physical communication path to every other server in the cluster in order to provide cascading failover capability. Storage and Adapter Requirements Determine your storage and host adapter requirements using the following guidelines: Storage Devices - Based on your application’s data storage requirements, you will need to determine the type and number of data storage devices required by your configuration. Your shared files should 8Planning Your LifeKeeper Environment Storage and Adapter Options reside on a disk array subsystem (Redundant Array of Inexpensive Disks, or RAID). LifeKeeper supports a number of hardware RAID peripherals for use in LifeKeeper configurations. See Storage and Adapter Options for a list of the supported peripherals. Consider the following issues when planning the configuration of your storage devices: l LifeKeeper manages resources at the physical disk or Logical Unit (LUN) level, making the resources on each physical disk or LUN available to only one server in the configuration at a time. As a result, it is a good idea to plan disk allocations before you begin to configure LifeKeeper. For example, each hierarchy in active/active configurations must access its own unique LUN, so a minimum of two LUNs is required for a two-node active/active configuration. l Some model-specific issues and hardware configuration details are maintained at Storage and Adapter Configuration. Adapters - Based upon the type of configuration and the number of peripherals, determine the types and number of SCSI or Fibre Channel Host Adapters required. It is important that any adapter you choose be supported by LifeKeeper, as well as by your Linux distribution so that there is a driver available. Refer to Supported Adapter Models for a list of supported host adapters. For reference purposes, you should add the host adapter specifications to your configuration map. Storage and Adapter Options The following tables list the disk array storage models and adapters currently supported by LifeKeeper in shared storage configurations. For each storage or adapter model, the type of certification is indicated. If storage vendors support other adapter models related to those listed in Storage Adapter Models, then LifeKeeper for Linux supports those adapter models too. Refer to Storage and Adapter Configuration for details about driver versions and other configuration requirements for these arrays and adapters. Note that a supported disk array and adapter are not required in LifeKeeper configurations involving non-shared storage with IP failover only or when using SteelEye Data Replication or Network Attached Storage. Supported Storage Models Vendor Storage Model Certification ADTX ArrayMasStor P Partner testing ArrayMasStor L Partner testing ArrayMasStor FC-II Partner testing Altix TP9100 SIOS Technology Corp. testing Baydel Storage Arrays DAR3 / 5SE68C SIOS Technology Corp. testing DAR3 / C / 5SE68C SIOS Technology Corp. testing SteelEye Protection Suite for Linux9 Supported Storage Models Vendor Storage Model Certification Consan CRD5440 SIOS Technology Corp. testing CRD7220 (f/w 3.00) SIOS Technology Corp. testing DataCore SANsymphony SIOS Technology Corp. testing Dell 650F (CLARiiON) SIOS Technology Corp. testing Dell | EMC CX3−10c / CX3−40c / CX3−20c, CX3−80 / CX3−40(F) / CX3−20(F) Partner Testing Dell | EMC CX300 / CX600 / CX400 / CX700 / CX500 SIOS Technology Corp. testing PowerVault (w/ Dell PERC, LSI Logic MegaRAID) SIOS Technology Corp. testing Dell MD3000 Partner testing Dell PowerVault MD3200 / 3220 Partner testing Dell EqualLogic PS5000 and PS6000 Partner testing Dell EqualLogic PS4000, PS6500, PS6010E/S/X/XV/XVS and PS6510E/X Vendor support statement Dell EqualLogic PS4100, PS4110, PS6100, PS6110 Vendor support statement 10Planning Your LifeKeeper Environment Supported Storage Models Vendor Storage Model Certification EMC Symmetrix 3000 Series SIOS Technology Corp. testing Symmetrix 8000 Series Vendor support statement Symmetrix DMX / DMX2 Partner testing Symmetrix DMX3 / DMX4 Partner testing Symmetrix VMAX Series Partner testing CLARiiON CX200, CX400, CX500, CX600, and CX700 SIOS Technology Corp. testing FalconStor CLARiiON CX300 Partner testing CLARiX CX3-20 Partner testing CLaRiiON CX3FC and combo 40290 Partner testing CLaRiiON CX310c Partner testing CLaRiiON AX4 SIOS Technology Corp. testing CLaRiiON AX45 Partner testing CLaRiiON CX4-120, CX4-240, CX4-480, CX4-960 Partner testing VNX Series 5100 / 5300 / 5500 / 5700 / 750 Vendor support statement FalconStor Network Storage Server (NSS) Version 6.15 Partner testing SteelEye Protection Suite for Linux11 Supported Storage Models Vendor Storage Model Certification Fujitsu ETERNUS3000 (w/ PG-FC105, PG-FC106, or PGFC107), single path only Partner testing ETERNUS6000 (w/ PG-FC106), single path only Partner testing ETERNUS4000 Model 80 and Model 100 (w/ PGFC106, PG-FC107, or PG-FC202), single path only Partner testing FibreCAT S80 (See Storage and Adapter Configuration) Partner testing ETERNUS SX300 (w/ PG-FC106 or PG-FC107), multipath only Partner testing ETERNUS2000 Series: Model 50, Model 100, and Model 200 (with PG-FC202), single path and multipath configurations Partner testing ETERNUS4000 Series: Model 300 and Model 500 (with Vendor support statement PG-FC202), single path and multipath configurations ETERNUS DX60 / DX80 / DX90 Fibre Channel Vendor support statement ETERNUS DX60 S2 / DX80 S2 / DX90 S2 Fibre Channel Vendor support statement ETERNUS DX410 / DX440 Fibre Channel Vendor support statement ETERNUS DX410 S2 / DX440 S2 Fibre Channel Vendor support statement ETERNUS DX8100 / DX8400 / DX8700 Fibre Channel Vendor support statement ETERNUS VS850 Vendor support statement 12Planning Your LifeKeeper Environment Supported Storage Models Vendor Storage Model Certification Hitachi Data HDS RAID 700 (VSP) Systems HDS 7700 Partner testing Vendor support statement HDS 5800 Vendor support statement HDS 9570V Partner testing HDS 9970V Partner testing HDS 9980V Partner testing AMS 500 SIOS Technology Corp. testing SANRISE USP / NSC (TagmaStore USP / NSC) Partner testing BR1200 Partner testing BR1600 Partner testing BR1600E Partner testing BR1600S Partner testing AMS2010 Partner testing AMS2100 Partner testing AMS2300 Partner testing AMS2500 Partner testing SteelEye Protection Suite for Linux13 Supported Storage Models Vendor Storage Model HP/Compaq RA 4100 14Planning Your LifeKeeper Environment Certification SIOS Technology Corp. testing Supported Storage Models Vendor Storage Model Certification MA / RA 8000 SIOS Technology Corp. testing MSA1000 / MSA1500 (active/active and active/passive SIOS Technology Corp. firmware configurations) testing HP MSA1000 Small Business SAN Kit SIOS Technology Corp. testing HP P2000 G3 MSA FC(w/ DMMP on RHEL5.4) SIOS Technology Corp. testing HP P2000 G3 MSA SAS Partner testing HP P4000 / P4300 G2 SIOS Technology Corp. testing HP P4000 VSA Vendor support statement HP P4500 G2 Vendor support statement HP P6300 EVA FC Partner testing HP P9500 Vendor support statement HP XP20000 / XP24000 SIOS Technology Corp. testing 3PAR T400 Fibre Channel Partner testing 3PAR F200 / F400 / T800 Fibre Channel Vendor support statement 3PAR V400 Partner testing EVA3000 / 5000 SIOS Technology Corp. and Partner testing EVA4X00 / 6X00 / 8X00 (XCS 6.x series firmware) SIOS Technology Corp. and Partner testing EVA4400 Partner testing EVA6400 / 8400 Partner testing EVA8100 (XCS 6.x series firmware) Partner testing MSA2000 Fibre Channel Partner testing MSA2000 iSCSI Partner testing MSA2000 SA Partner testing MSA 2300 Fibre Channel Partner testing MSA2300 i Partner testing MSA2300 SA Partner testing SteelEye Protection Suite for Linux15 Supported Storage Models Vendor Storage Model Certification IBM FAStT200 SIOS Technology Corp. testing 16Planning Your LifeKeeper Environment Supported Storage Models Vendor Storage Model Certification FAStT500 SIOS Technology Corp. testing SteelEye Protection Suite for Linux17 Supported Storage Models Vendor Storage Model Certification DS4100 * Partner testing 18Planning Your LifeKeeper Environment Supported Storage Models Vendor Storage Model Certification DS4200 Partner testing DS4300 (FAStT600) * SIOS Technology Corp. testing DS4400 (FAStT700) * SIOS Technology Corp. testing DS4500 (FAStT900) * SIOS Technology Corp. testing DS4700 Partner testing DS4800 Partner testing DS4300 (FAStT600) SIOS Technology Corp. testing DS4400 (FAStT700) SIOS Technology Corp. testing DS5000 Partner testing ESS Model 800 * SIOS Technology Corp. testing DS6800 * SIOS Technology Corp. testing DS8100 * SIOS Technology Corp. testing DS400 (single path only) SIOS Technology Corp. testing DS3200 SIOS Technology Corp. testing DS3300 SIOS Technology Corp. testing DS3400 SIOS Technology Corp. testing DS3500 SIOS Technology Corp. testing IBM eServer xSeries Storage Solution Server Type445- Partner testing R for SANmelody IBM eServer xSeries Storage Solution Server Type445- Partner testing FR for SANmelody IBM SAN Volume Controller * * IBM TotalStorage Proven SIOS Technology Corp. testing IBM Storwize V7000 FC/iSCSI Partner testing SteelEye Protection Suite for Linux19 Supported Storage Models Vendor Storage Model Certification JetStor JetStor II SIOS Technology Corp. testing MicroNet Genesis One Vendor support statement MTI Gladiator 2550 Vendor support statement Gladiator 3550 Vendor support statement Gladiator 3600 Vendor support statement NEC iStorage M100 FC (single path) Partner testing NEC iStorage M10e / M300 / M500 FC (single path) Vendor support statement NEC iStorage S500 / S1500 / S2500 (single path) SIOS Technology Corp. testing NEC iStorage S Series (single path) Vendor support statement NEC iStorage D1-10 / D1-30 (single path) Vendor support statement NEC iStorage D3-10 / D1-10 (single path) Partner testing NEC iStorage D3-10 / D3-30 (single path) Partner testing NEC iStorage D8-10 / D8-20 / D8-30 (single path) Partner testing NAS Vendor support statement FAS2xx Series Vendor support statement FAS9xx Series Vendor support statement FAS2xxx Series Vendor support statement FAS3xxx Series Vendor support statement FAS6xxx Series Vendor support statement SAN Vendor support statement FAS3xxx Series (w/ QLogic QLE246x and DMMP) Vendor support statement SweeperStor SATA Partner testing SweeperStor SAS Partner testing nStor NexStor 4320F Partner testing ProCom Reliant 1000 Vendor support statement NEC Network Appliance (NetApp) Newtech Radion Sys- Rack U2W tems Microdisk U2W Vendor support statement SGI InfiniteStorage 4600 Partner testing Linux MPP driver Partner testing SILVERstor Giant GT-3000 series 20Planning Your LifeKeeper Environment Vendor support statement Partner testing Supported Storage Models Vendor Storage Model Certification Sun StorEdge 3310 Partner testing StorEdge 3510 FC (w/ Sun StorEdge 2Gb PCI Single FC Network Adapter) Partner testing StorEdge 6130 FC (w/ Sun StorEdge 2Gb PCI Single FC Network Adapter) Partner testing StorageTek 2540 (w/ Sun StorageTek 4Gb PCI-E Dual Partner testing FC Host Bus Adapter or Sun StorageTek 4Gb PCI Dual FC Network Adapter TID Winchester Systems Xiotech MassCareRAID Partner testing MassCareRAIDⅡ Partner testing FlashDisk OpenRAID (SCSI) SIOS Technology Corp. testing FlashDisk OpenRAID (FC) SIOS Technology Corp. testing Magnitude 3D SIOS Technology Corp. testing SteelEye Protection Suite for Linux21 Supported Adapter Models Supported Adapter Models Adapter Type Adapter Model Certification Adaptec 2944 W, Adaptec 2944 UW, or Adaptec 2940 U2W SIOS Technology Corp. testing Compaq 64bit PCI Dual Channel Wide Ultra2 SCSI Adapter SIOS Technology Corp. testing Compaq SA 5i, 6i, 532, and 642 PCI Dual Channel Wide Ultra3 SCSI Adapters SIOS Technology Corp. testing Dell PERC 2/DC, PERC 4/DC SIOS Technology Corp. testing LSI Logic MegaRAID Elite 1600 (Dell PERC 3/DC is the OEM version of this adapter) SIOS Technology Corp. testing Differential Adaptec 39160 Partner testing SCSI Adapter Adaptec ASR-2010S (Fujitsu PG-140C / CL) – see Vendor support statement note Vendor support statement Adaptec ASR-3200S (Fujitsu PG-142B /C /D) – Vendor support statement see note LSI Logic MegaRAID SCSI 3200-2 (Fujitsu PC142E) – see note Note: These adapters are Fujitsu tested in LifeKeeper configurations involving non-shared storage with IP failover only or when using SteelEye Data Replication. 22Planning Your LifeKeeper Environment Supported Adapter Models Adapter Type Fibre Channel Adapter Model Certification QLogic QLA 2100, QLogic QLA 2200, QLogic QLA 2340, QLogic QLA 200 (HP Q200) SIOS Technology Corp. testing HP StorageWorks 2GB 64-bit / 133MHz PCI-X to Fibre Channel Host Bus Adapter (FCA2214) SIOS Technology Corp. testing Compaq 64 bit / 66MHz Fibre Channel Host Bus Adapter 120186-B21 SIOS Technology Corp. testing Sun StorEdge 2Gb PCI Single FC Network Adapter (OEMed QLogic QLA 2310) Partner testing Sun StorageTek 4Gb PCI-E Dual FC Host Bus Adapter Partner testing Partner testing Sun StorageTek 4Gb PCI Dual FC Network Adapter SIOS Technology Corp. testing Emulex LP9002 (PG-FC105), Emulex LP1050, Emulex LP10000. (See Emulex Drivers for the required driver and version for these adapters.) Partner testing HP QLogic QMH2462 4Gb FC HBA Partner testing Qlogic QLE2460 (4Gb HBA), Qlogic QLE2462 (4Gb Partner testing HBA) FC1142SR 4Gb single channel PCI-Express Fibre Channel adapter Partner testing FC1242SR 4Gb dual channel PCI-Express Fibre Channel adapter Serial Attached SCSI (SAS) DELL SAS 5/e adapters Partner testing SIOS Technology Corp. does not specifically certify fibre channel hubs and switches, because there are no known LifeKeeper-specific restrictions or requirements on these devices. Unless otherwise noted for a given array in Storage and Adapter Configuration, LifeKeeper recommends the hubs and switches that the disk array vendor supports. SteelEye Protection Suite for Linux23 Setting Up Your SPS Environment Now that the requirements have been determined and LifeKeeper configuration has been mapped, components of this SPS environment can be set up. Note: Although it is possible to perform some setup tasks in a different sequence, this list is provided in the recommended sequence. Installing the Linux OS and Associated Communications Packages Before attempting to install the SPS for Linux software, you must first ensure that your Linux operating system is successfully installed and operational. Please see the Linux installation instructions provided with your distribution of Linux for complete installation details. Note: l It is possible to install Linux after connecting and configuring your shared storage, but it may be simpler to have Linux installed and running before introducing new peripheral devices. l The SPS for Linux Installation Image File provides a set of installation scripts designed to perform user-interactive system setup tasks and installation tasks for installing SPS on your system. Connecting Servers and Shared Storage If you are planning to use LifeKeeper in a non-shared storage environment, then you may skip this information. If you are using LifeKeeper in a data replication (mirroring) environment, see the DataKeeper section of this documentation. If you are using LifeKeeper in a network attached storage environment, see LifeKeeper Network Attached Storage Recovery Kit Administration Guide. Once Linux is installed, you should set the host adapter and shared peripheral addressing. Refer to the documentation accompanying your adapter and storage device for specific details. Configuring Shared Storage LifeKeeper configurations may use the facilities of shared Small Computer System Interface (SCSI) host adapters and shared disk hardware to switch resources from a failed server to a designated backup server. A Fibre Channel Storage Area Network (SAN) may also be used to switch resources from a failed server to a designated backup server. Perform the following tasks before creating disk-based application resource hierarchies that enable LifeKeeper to provide failover protection. SteelEye Protection Suite for Linux25 Verifying Network Configuration 1. Partition disks and LUNs. Because all disks placed under LifeKeeper protection must be partitioned, your shared disk arrays must now be configured into logical units, or LUNs. Use your disk array management software to perform this configuration. You should refer to your disk array software documentation for detailed instructions. Note: l Remember that LifeKeeper locks its disks at the LUN level. Therefore, one LUN may be adequate in an Active/Standby configuration. But, if you are using an Active/Active configuration, then you must configure at least two separate LUNs, so that each hierarchy can access its own unique LUN. 2. Verify that both servers recognize the shared disks (for example, using the fdisk command). If Linux does not recognize the LUNs you have created, then LifeKeeper will not either. 3. Create file systems on your shared disks from the system you plan to use as the primary server in your LifeKeeper hierarchy. Refer to the Linux documentation for complete instructions on the administration of file systems. Verifying Network Configuration It is important to ensure that your network is configured and working properly before you install LifeKeeper. There are several tasks you should do at this point to verify your network operation: 1. If your server installation has a firewall enabled, you will either need to accommodate the LifeKeeper ports or disable the firewall. Please refer to the topic "Running LifeKeeper With a Firewall". 2. From each server, ping the local server, and ping the other server(s) in the cluster. If the ping fails, then do the necessary troubleshooting and perform corrective actions before continuing. 3. If your server has more than one network adapter, you should configure the adapters to be on different subnets. If the adapters are on the same subnet, TCP/IP cannot effectively utilize the second adapter. 4. Ensure that localhost is resolvable by each server in the cluster. If DNS is not implemented, edit the /etc/hosts file and add an entry for the localhost name. This entry can list either the IP address for the local server, or it can list the default entry (127.0.0.1). If localhost is not resolvable, the LifeKeeper GUI may not work. 5. If DNS is implemented, verify the configuration to ensure the servers in your LifeKeeper cluster can be resolved using DNS. 6. Ensure each server’s hostname is correct and will not change after LifeKeeper is installed. If you later decide to change the hostname of a LifeKeeper system, you should follow these steps on all servers in the cluster. a. Stop LifeKeeper on all servers in the cluster using the command: /etc/init.d/lifekeeper stop-nofailover 26Setting Up Your LifeKeeper Environment VLAN Interface Support Matrix b. Change the server’s hostname using the Linux hostname command. c. Before continuing, you should ensure that the new hostname is resolvable by each server in the cluster (see the previous bullets). d. Run the following command on every server in the cluster to update LifeKeeper’s hostname. (Refer to lk_chg_value(1M) for details.) /opt/LifeKeeper/bin/lk_chg_value -o oldhostname -n newhostname e. Start LifeKeeper using the command: /etc/init.d/lifekeeper start LifeKeeper for Linux v7.x supports VLAN interface for Communication Paths and IP resources. The type of VLAN interface can be chosen as described below. VLAN Interface Support Matrix - not supported \ x supported LK Linux v7.1 or Prior Version VLAN_NAME_TYPE CommPath IP resource DEV_PLUS_VID (eth0.0100) - x DEV_PLUS_VID_NO_PAD (eth0.100) - x VLAN_PLUS_VID (vlan0100) x x VLAN_PLUS_VID_NO_PAD (vlan100) x x CommPath IP resource DEV_PLUS_VID (eth0.0100) x x DEV_PLUS_VID_NO_PAD (eth0.100) x x VLAN_PLUS_VID (vlan0100) x x VLAN_PLUS_VID_NO_PAD (vlan100) x x LK Linux v7.2 or Later Version VLAN_NAME_TYPE Creating Switchable IP Address A switchable IP address is a “virtual” IP address that can be switched between servers. It is separate from the IP address associated with the network interface card of each server. Applications under LifeKeeper protection are associated with the switchable IP address. Then, if there is a failure on the SteelEye Protection Suite for Linux27 Installing and Setting Up Database Applications primary server, that IP address “switches” to the backup server. If you plan to configure resource hierarchies for switchable IP addresses, you must do the following on each server in the cluster: l Verify that the computer name is correct and will not be changed. l Verify that the switchable IP addresses are unique using the ping command. l Edit the /etc/hosts file to add an entry for each switchable IP address. Refer to the LifeKeeper for Linux IP Recovery Kit Technical Documentation for additional information. Installing and Setting Up Database Applications If your environment includes a protected database application such as Oracle or MySQL, you should install the application using the documentation provided with the database. Ensure that the database is on a shared file system and that the configuration files are on a shared file system. The executables may either be on each local or a shared file system. Although it is possible to install your application after LifeKeeper is installed, you should test the application to ensure it is configured and operating properly before placing it under LifeKeeper protection. Please reference the specific LifeKeeper database recovery kit documentation for additional installation and setup considerations. 28Setting Up Your LifeKeeper Environment Installing the SteelEye Protection Suite Software Install the SPS software on each server in the SPS configuration. Each SPS server must have the packages necessary to support your configuration requirements, including any optional SPS Recovery Kit packages. The SPS core package cluster and any optional recovery kits will be installed through the command line using the SPS Installation Image File (sps.img). This image file provides a set of installation scripts designed to perform user-interactive system setup tasks that are necessary when installing SPS on your system. The installation image file identifies what Linux distribution you are running and, through a series of questions you answer, installs various packages required to ensure a successful SPS installation. A licensing utilities package is also installed providing utilities for obtaining and displaying the Host ID of your server. Host IDs are used to obtain valid licenses for running SPS. Refer to the SPS for Linux Release Notes for additional information. Note: These installation instructions assume that you are familiar with the Linux operating system installed on your servers. Important: l Installing SPS on your shared storage is not supported. Each server should have its own copy installed on its local disk. l All SPS packages are installed in the directory /opt/LifeKeeper. l If you are re-installing the existing version of LifeKeeper, you should remove the old LifeKeeper packages first. A standard LifeKeeper installation requires that you redefine any existing resource hierarchies. If you wish to retain your current resource hierarchy definitions, refer to the SPS for Linux Release Notes and Upgrading SPS for upgrade instructions. l If you receive an error message referencing the LifeKeeper Distribution Enabling package when you are installing SPS, you should run/re-run the setup script on the SPS Installation Image File. Installing the SPS Software SPS will be installed through the command line regardless of the Linux distribution you are operating under. 1. Mount the sps.img file using the following command: mount PATH/IMAGE_NAME MOUNT_POINT -t iso9660 -o loop Where PATH is the path to the image SteelEye Protection Suite for Linux29 Installing the SPS Software IMAGE_NAME is the name of the image MOUNT_POINT is the path to mount location 2. Change to the sps.img mounted directory and type the following: ./setup 3. Text will appear explaining what is going to occur during the installation procedure. You will now be asked a series of questions where you will answer “y” for Yes or “n” for No. The type and sequence of the questions are dependent upon your Linux distribution. Read each question carefully to ensure a proper response. It is recommended that you answer Yes to each question in order to complete all the steps required for a successful SPS Installation. Note: The Installation image file may install kernel modules to support shared storage devices or the optional NFS Recovery Kit. Note: Beginning with SPS 8.1, when performing a kernel upgrade on RedHat Enterprise Linux systems, it is no longer a requirement that the setup script (./setup) from the installation image be rerun. Modules should be automatically available to the upgraded kernel without any intervention as long as the kernel was installed from a proper RedHat package (rpm file). 4. Next, the SPS Core Packages will be installed. 5. The setup script will then perform the installation of the licensing utilities. See Obtaining and Installing the License for details. 6. After you have answered all the questions posed by the setup script, you will be informed that the installation was successful and then be presented with a list of all SPS Recovery Kits available for installation. Note: Trace information for execution of the setup scripts is saved in /var/log/LK_install.log. Note: During an upgrade, please make sure to stop LifeKeeper before running setup. Note: Previous to SPS for Linux Version 8.1, recovery kits would need to be installed from their individual image files once the core package install was completed. Now, once the packages have been installed, you are presented with a list of available kits for selection. 7. Select the kits you would like installed by highlighting the kit and pressing the "space" bar. This will place an "i" next to each kit that will be installed. Note: To add kits at a later time, simply run setup again followed by -k: ./setup -k 8. Install the SPS software, as appropriate, on the other server(s) in the cluster using the same procedure. For upgrade installations, see Upgrading SPS. 30Installing the SteelEye Protection Suite Software Obtaining and Installing the License SPS for Linux requires a unique license for each server. The license is a run-time license, which means that you can install SPS without it, but the license must be installed before you can successfully start and run the product. Note: If using newer hardware with RHEL 6.1, please see the IP Licensing Known Issues in the SPS for Linux Troubleshooting Section. The Installation script installs the Licensing Utilities package which obtains and displays the Host ID of your server. (The Host ID displayed via the Installation script will always be a MAC address Host ID. If you wish to use an IP Address Host ID, see the Obtaining an Internet HOST ID topic.) The Host ID, along with the Entitlement ID (Authorization Code) which was provided with your SteelEye Protection Suite software, is used to obtain the permanent license required to run SteelEye Protection Suite. The process is illustrated below. Note: Each software package requires a license for each server. Perform the following steps to obtain and install your license(s) for each server in the SPS cluster: 1. Get your Host ID. Make note of the Host ID displayed by the licensing utility in the Installation setup script. The Host ID may also be obtained by running /opt/LifeKeeper/bin/lmhostid on the system(s) that you are obtaining licenses for. 2. Write the Host IDs in a notebook or save them in a file. If saved in a file, copy that file to a system with internet access. Otherwise, take your notebook with you to the system with internet access. SteelEye Protection Suite for Linux31 Primary Network Interface Change May Require a License Rehost 3. Ensure you have your LifeKeeper Entitlement ID (Authorization Code). You should have received an email with your software containing the Entitlement ID needed to obtain the license. 4. Obtain your licenses from the SIOS Technology Corp. Licensing Operations Portal. a. Using the system that has internet access, log in to the SIOS Technology Corp. Licensing Operations Portal. b. Select Manage Entitlements. Note: If changing password, use the Profile button in the upper right corner of the display. c. Find your Entitlement ID and select each Activation ID associated with that Entitlement ID by checking the box to the left of the line item. d. Select the Activate tab. e. Define the required fields and select Next. f. Click on Select Existing Host to choose an already defined host or create a new host by selecting Add New Host. g. Enter the Host ID and click Okay. h. Check the box to the left of the Host ID and select Generate. The Fulfillment ID will display on the License Summary screen. i. Check the box to the left of the Fulfillment ID and select the Email License tab. j. Enter a valid email address to send the license to and select Send. k. Select Complete. l. Retrieve the email(s). m. Copy the file(s) to the appropriate system(s). 5. Install your license(s). On each system, copy the license file(s) to/var/LifeKeeper/license, or on each system, run /opt/LifeKeeper/bin/lkkeyins and specify the filename (including full path) to the file. Primary Network Interface Change May Require a License Rehost The Host ID used by the licensing utility is obtained from the LifeKeeper server’s primary network interface card (NIC). LifeKeeper will check for a valid license each time it starts. If your LifeKeeper server should require a NIC replacement in the future that would cause the Host ID to change, then the next time LifeKeeper is stopped, a License Rehost must be performed before starting LifeKeeper again. Log in to the SIOS Technology Corp. Licensing Operations Portal and select Support Actions/Rehost from the Manage Licenses screen to perform this rehost. (Note: A rehost can be performed one time per six-month period without contacting support.) 32Obtaining and Installing the License Internet/IP Licensing Internet/IP Licensing For information regarding Internet/IP Licensing, please see the Known Issue in the SPS for Linux Troubleshooting section and Obtaining an Internet HOST ID. Subscription Licensing A subscription license is a time-limited license with renewal capability. Similar to an evaluation license, it will expire after a set amount of time unless renewed. This renewal process can be set up to renew automatically by following the procedure below. (Note: The subscription renewal service requires an internet connection to access the SIOS Technology Corp. Licensing Operations server on TCP/IP port 443.) 1. Run the following command: /opt/LifeKeeper/bin/runSubscriptionService start 2. If prompted, enter User ID and Password (from SIOS Technology Corp. Customer Registration) If the previous steps run successfully, the subscription renewal service will now run, in the background, periodically checking renewal status. If licenses are found that will be expiring in a certain number of days (90, 60, 30, 20, 10, 5, 4, 3, 2, 1), a warning notification will be sent to syslog (/var/log/messages), and an attempt will be made to renew the license. If a new license activation is available (a new activation has been purchased for this system's Entitlement), it will be automatically fulfilled and the new licenses will be installed on the system replacing the old licenses. As long as licenses for this system are renewed (activations purchased), the service will ensure that the licenses are upgraded on the system without user intervention. Subscription Licensing Troubleshooting If errors are encountered, please try the following before contacting support: l Review the error messages in the LifeKeeper Log and syslog (/var/log/messages). The following can be run to get messages if necessary: /opt/LifeKeeper/bin/lmsubscribe --immediate l Verify credentials by logging in to the SIOS Technology Corp. Licensing Operations Portal. l Enter credentials using the following command: /opt/LifeKeeper/bin/lmsubscribe –-login If this works, then run the following to start the service: /opt/LifeKeeper/bin/runSubscriptionService start l If Password ever changes on the Licensing Operations Portal, run the following command to update the automatic license renewal service: /opt/LifeKeeper/bin/lmsubscribe --login SteelEye Protection Suite for Linux33 Obtaining an Internet HOST ID l If ownership of the license certificate has changed, please contact SIOS Technology Corp. support personnel to have the certificate moved to the new owner. Once ownership has been moved, the automatic license renewal service will need to be updated with these new credentials by running the following command using the new User ID and Password: /opt/LifeKeeper/bin/lmsubscribe --login Obtaining an Internet HOST ID Use lmhostid to obtain your machine's Internet Host ID. The Internet Host ID is normally the primary IP address of the primary network interface in the system. Internet Host IDs can be used as an alternative to Ethernet (or MAC) Host IDs and may be preferable in virtual environments where MAC addresses can change due to VM cloning. 1. Type the following command: # /opt/LifeKeeper/bin/lmhostid -internet -n 2. Record the ID returned by the program. Example: # /opt/LifeKeeper/bin/lmhostid -internet -n "INTERNET=172.17.100.161" Note: This info must match the information contained in the permanent license key obtained from SIOS Technology Corp. Verifying SPS Installation You can verify that the SPS packages were installed correctly by entering the following at the command line: rpm -V <package name> Note: If the package is installed correctly, no output will be displayed by this command. To perform a query from the command line, type rpm -qi <package name> Note: The expected output for this command is the package information. Upgrading SPS SPS for Linux may be upgraded to future releases while preserving existing resource hierarchies. Review this information carefully to ensure that you minimize application downtime. Note: LifeKeeper can be upgraded to the current version from up to two versions back. If upgrading from a version previous to that, the older version will need to be uninstalled, and SteelEye Protection Suite for Linux will have to be reinstalled. An alternative to uninstalling the older version would be to 34Obtaining and Installing the License Upgrading SPS upgrade from the older version to one of the two acceptable versions, then perform the upgrade to the current version. Note: If using lkbackup during your upgrade, see the lkbackup Known Issue for further information. 1. If you are upgrading an SPS cluster with only two nodes, proceed directly to Step 2. If you are upgrading an SPS cluster with greater than two nodes, switch all applications away from the server to be upgraded now. Do this manually or by setting the LifeKeeper shutdown strategy to "Switchover" which causes the applications to be switched when LifeKeeper is stopped or the server is shut down. 2. If necessary, upgrade the Linux operating system before upgrading SPS. It is recommended that you unextend all resources from a server that is to be upgraded prior to performing the operating system upgrade. 3. Upgrade SPS using the SPS Installation Image File. Mount the SPS Installation Image File using the following command: mount PATH/IMAGE_NAME MOUNT_POINT -t iso9660 -o loop Where PATH is the path to the image IMAGE_NAME is the name of the image MOUNT_POINT is the path to mount location 4. Change to the sps.img mounted directory and type the following: ./setup You will see informational messages confirming that the packages are being upgraded. 5. A list of all available SPS Recovery Kits will appear. You will see a "u" next to each currently installed recovery kit indicating that this kit will be upgraded. If you would like to install any additional kits, select the kits by highlighting and pressing the "space" bar. This will place an "i" next to each kit that will be installed. Note: Previous to SPS for Linux Version 8.1, recovery kits would need to be upgraded from their individual image files once the core packages finished upgrading. Now, once the packages have been upgraded, you are presented with a list indicating which kits are currently installed and will be automatically upgraded, and you're also given the option to select any other kits you would like installed. Note: To add kits at a later time, simply run setup again followed by -k: ./setup -k 6. After upgrading, stop and restart the LifeKeeper GUI in order to load the updated GUI client. 7. If you are upgrading an SPS cluster with greater than two nodes, switch all applications back to the upgraded server. 8. Repeat this procedure for each server in the SPS cluster to be upgraded. CAUTION: The same version and release of SPS must be installed on all systems in a cluster. In general, different versions and/or releases of SPS are not compatible. For situations other than rolling SteelEye Protection Suite for Linux35 Upgrading SPS upgrades, LifeKeeper should not be started when a different version or release is resident and running on another system in the cluster. 36Obtaining and Installing the License Chapter 3: SteelEye LifeKeeper for Linux Introduction SteelEye LifeKeeper for Linux provides high availability clustering for up to 32 nodes with many supported storage configurations, including shared storage (Fiber Channel SAN, iSCSI), network attached storage (NAS), host-based replication and integration with array-based SAN replication including HP Continuous Access. Protected Resources The LifeKeeper family of products includes software that allows you to provide failover protection for a range of system resources. The following figure demonstrates LifeKeeper's flexibility and identifies the resource types you can specify for automatic recovery: l File systems. LifeKeeper allows for the definition and failover of file systems, such as ext2, ext3, ext4, reiserfs, NFS, vxfs or xfs. l Communications resources. LifeKeeper provides communications Recovery Kits for communications resources, such as TCP/IP. l Infrastructure resources. LifeKeeper provides optional Recovery Kits for Linux infrastructure services, such as NFS, Samba, LVM, WebSphere MQ, and software RAID (md). l Web Server resources. LifeKeeper provides an optional Recovery Kit for Apache Web Server resources. l Databases and other applications. LifeKeeper provides optional Recovery Kits for major RDBMS products such as Oracle, MySQL and PostgreSQL, and for enterprise applications such as SAP. LifeKeeper supports N-Way Recovery for a range of resource types. SteelEye Protection Suite for Linux37 LifeKeeper Core LifeKeeper Core LifeKeeper Core is composed of four major components: l LifeKeeper Core Software l File System, Generic Application, Raw I/O and IP Recovery Kit Software l LifeKeeper GUI Software l LifeKeeper Man Pages LifeKeeper Core Software The LifeKeeper Core Software consists of the following components: l LifeKeeper Configuration Database (LCD) - The LCD stores information about the LifeKeeperprotected resources. This includes information on resource instances, dependencies, shared equivalencies, recovery direction, and LifeKeeper operational flags. The data is cached in shared memory and stored in files so that the data can be remembered over system boots. l LCD Interface (LCDI) - The LCDI queries the configuration database (LCD) to satisfy requests for data or modifications to data stored in the LCD. The LCDI may also be used by the Application Recovery Kit to obtain resource state or description information. l LifeKeeper Communications Manager (LCM) - The LCM is used to determine the status of servers in the cluster and for LifeKeeper inter-process communication (local and remote). Loss of LCM communication across all communication paths on a server in the cluster 38SteelEye LifeKeeper for Linux File System, Generic Application, IP and RAW I/O Recovery Kit Software indicates the server has failed. l LifeKeeper Alarm Interface - The LifeKeeper Alarm Interface provides the infrastructure for triggering an event. The sendevent program is called by application daemons when a failure is detected in a LifeKeeper-protected resource. The sendevent program communicates with the LCD to determine if recovery scripts are available. l LifeKeeper Recovery Action and Control Interface (LRACI) - The LRACI determines the appropriate recovery script to execute for a resource and invokes the appropriate restore / remove scripts for the resource. File System, Generic Application, IP and RAW I/O Recovery Kit Software The LifeKeeper Core provides protection of specific resources on a server. These resources are: l File Systems - LifeKeeper allows for the definition and failover of file systems on shared storage devices. A file system can be created on a disk that is accessible by two servers via a shared SCSI bus. A LifeKeeper file system resource is created on the first server and then extended to the second server. File System Health Monitoring detects disk full and improperly mounted (or unmounted) file system conditions. Depending on the condition detected, the Recovery Kit may log a warning message, attempt a local recovery, or failover the file system resource to the backup server. Specific help topics related to the File System Recovery Kit include Creating and Extending a File System Resource Hierarchy and File System Health Monitoring. l Generic Applications - The Generic Application Recovery Kit allows protection of a generic or user-defined application that has no predefined Recovery Kit to define the resource type. This kit allows a user to define monitoring and recovery scripts that are customized for a specific application. Specific help topics related to the Generic Application Recovery Kit include Creating and Extending a Generic Application Resource Hierarchy. l IP Addresses - The IP Recovery Kit provides a mechanism to recover a "switchable" IP address from a failed primary server to one or more backup servers in a LifeKeeper environment. A switchable IP address is a virtual IP address that can switch between servers and is separate from the IP address associated with the network interface card of each server. Applications under LifeKeeper protection are associated with the switchable IP address, so if there is a failure on the primary server, the switchable IP address becomes associated with the backup server. The resource under LifeKeeper protection is the switchable IP address. Refer to the IP Recovery Kit Technical Documentation included with the Recovery Kit for specific product, configuration and administration information. l RAW I/O - The RAW I/O Recovery Kit provides support for raw I/O devices for applications that prefer to bypass kernel buffering. The RAW I/O Recovery Kit allows for the definition and failover of raw devices bound to shared storage devices. The raw device must be configured on the primary node prior to resource creation. Once the raw resource hierarchy is created, it can be extended to additional servers. SteelEye Protection Suite for Linux39 LifeKeeper GUI Software LifeKeeper GUI Software The LifeKeeper GUI is a client / server application developed using Java technology that provides a graphical administration interface to LifeKeeper and its configuration data. The LifeKeeper GUI client is implemented as both a stand-alone Java application and as a Java applet invoked from a web browser. LifeKeeper Man Pages The LifeKeeper Core reference manual pages for the LifeKeeper product. Configuration Concepts LifeKeeper works on the basis of resource hierarchies you define for groups of two or more servers. The following topics introduce the LifeKeeper failover configuration concepts: Common Hardware Components All LifeKeeper configurations share these common components: 1. Server groups. The basis for the fault resilience provided by LifeKeeper is the grouping of two or more servers into a cluster. The servers can be any supported platform running a supported distribution of Linux. LifeKeeper gives you the flexibility to configure servers in multiple overlapping groups, but, for any given recoverable resource, the critical factor is the linking of a group of servers with defined roles or priorities for that resource. The priority of a server for a given resource is used to determine which server will recover that resource should there be a failure on the server where it is currently running. The highest possible priority value is one (1). The server with the highest priority value (normally 1) for a given resource is typically referred to as the primary server for that resource; any other servers are defined as backup servers for that resource. 2. Communications paths. The LifeKeeper heartbeat, a periodic message between servers in a LifeKeeper cluster, is a key fault detection facility. All servers within the cluster require redundant heartbeat communications paths (or, comm paths) to avoid system panics due to simple communications failures. Two separate LAN-based (TCP) comm paths using dual independent subnets are recommended (at least one of these should be configured as a private network); however, using a combination of TCP and TTY comm paths is supported. A TCP comm path can also be used for other system communications. Note: A TTY comm path is used by LifeKeeper only for detecting whether other servers in the cluster are alive. The LifeKeeper GUI uses TCP/IP for communicating status information about protected resources; if there are two TCP comm paths configured, LifeKeeper uses the comm path on the public network for communicating resource status. Therefore if the network used by the LifeKeeper GUI is down, the GUI will show hierarchies on other servers in an UNKNOWN state, even if the TTY (or other TCP) comm path is operational. 3. Shared data resources. In shared storage configurations, servers in the LifeKeeper cluster share access to the same set of disks. In the case of a failure of the primary server, 40SteelEye LifeKeeper for Linux Components Common to All LifeKeeper Configurations LifeKeeper automatically manages the unlocking of the disks from the failed server and the locking of the disks to the next available back-up server. 4. Shared communication. LifeKeeper can automatically manage switching of communications resources, such as TCP/IP addresses, allowing users to connect to the application regardless of where the application is currently active. Components Common to All LifeKeeper Configurations System Grouping Arrangements A resource hierarchy is defined on a cluster of LifeKeeper servers. For a given hierarchy, each server is assigned a priority, with one (1) being the highest possible priority. The primary, or highest priority, server is the computer you want to use for the normal operation of those resources. The server having the second highest priority is the backup server to which you want LifeKeeper to switch those resources should the primary server fail. SteelEye Protection Suite for Linux41 Active - Active Grouping In an active/active group, all servers are active processors, but they also serve as the backup server for resource hierarchies on other servers. In an active/standby group, the primary server is processing and any one of the backup servers can be configured to stand by in case of a failure on the primary server. The standby systems can be smaller, lower-performance systems, but they must have the processing capability to assure resource availability should the primary server fail. Your physical connections and access to the shared resources determine your grouping options. To be grouped, servers must have communications and heartbeat paths installed and operational, and all servers must have access to the disk resources through a shared SCSI or Fibre Channel interface. For example, in the following diagram, there is only one grouping option for the resource AppA on Server 1. Server 2 is the only other server in the configuration that has shared access to the AppA database. The resource AppB on Server 3, however, could be configured for a group including any one of the other three servers, because the shared SCSI bus in this example provides all four servers in the configuration access to the AppB database. Active - Active Grouping In an active/active pair configuration, all servers are active processors; they also serve as the backup server for resource hierarchies on other servers. For example, the configuration example below shows two active/active pairs of servers. Server 1 is processing AppA, but also serves as the backup server for AppX running on Server 2. The reverse is also true. Server 2 is processing AppX, but also serves as the backup server for AppA running on Server 1. Servers 3 and 4 have the same type of active/active relationships. Although the configurations on Servers 1 and 2 and the configurations on Servers 3 and 4 are similar, there is a critical difference. For the AppA and AppX applications, Servers 1 and 2 are the only servers available for grouping. They are the only servers that have access to the shared resources. 42SteelEye LifeKeeper for Linux Active - Standby Grouping AppB and AppC, however, have several grouping options because all four servers have access to the AppB and AppC shared resources. AppB and AppC could also be configured to failover to Server1 and/or Server2 as a third or even fourth backup system. Note: Because LifeKeeper applies locks at the disk level, only one of the four systems connected to the AppB and AppC disk resources can have access to them at any time. Therefore, when Server 3 is actively processing AppB, those disk resources are no longer available to Servers 1, 2, and 4, even though they have physical connections. Active - Standby Grouping In an active/standby pair configuration, the primary server is processing, and the back-up servers are standing by in case of a failure on the primary server. The standby systems can be smaller, lowerperformance systems, but they must have the processing capability to assure resource availability should the primary server fail. SteelEye Protection Suite for Linux43 Intelligent Versus Automatic Switchback A standby server can provide backup for more than one active server. For example in the figure above, Server 2 is the standby server in three active/standby resource pairs. The LifeKeeper resource definitions specify the following active/standby paired relationships: l AppA on Server1 fails over to Server2. l AppB on Server3 fails over to Server2. l AppC on Server4 fails over to Server2. Be aware of these three critical configuration concepts when you are considering configurations with multiple active/standby groups: l Disk ownership. Different active applications cannot use disk partitions on the same shared disk or LUN from different servers. LifeKeeper applies locks at the disk or LUN level. When the SCSI locks are applied, only one system on the shared SCSI bus can access partitions on the disk or LUN. This requires that applications accessing different partitions on the same disk be active on the same server. In the example, Server 3 has ownership of the AppB disk resources and Server 4 owns the AppC resources. l Processing capacity. Although it is unlikely that Servers 1, 3 and 4 would fail at the same time, you must take care when designating a standby server to support multiple resource relationships so that the standby server can handle all critical processing should multiple faults occur. l LifeKeeper administration. In the example, Server 2 provides backup for three other servers. In general it is not desirable to administer the LifeKeeper database on the different logical groups simultaneously. You should first create the resources between the spare and one active system, then between the spare and another active system, and so on. Intelligent Versus Automatic Switchback By default, the switchback setting of a resource is intelligent. This means that once the failover occurs for that resource from Server A to Server B, the resource remains on Server B until another failure or until an administrator intelligently switches the resource to another server. Thus, the resource continues to run on Server B even after Server A returns to service. Server A now serves as a backup for the resource. In some situations, it may be desirable for a resource to switch back automatically to the original failed server when that server recovers. LifeKeeper offers an automatic switchback option as an alternative to the default intelligent switchback behavior described above. This option can be configured for individual resource hierarchies on individual servers. If automatic switchback is selected for a resource hierarchy on a given server and that server fails, the resource hierarchy is failed over to a backup system; when the failed server recovers, the hierarchy is automatically switched back to the original server. Notes: l Checks for automatic switchback are made only when LifeKeeper starts or when a new server is added to the cluster; they are not performed during normal cluster operation. 44SteelEye LifeKeeper for Linux Logging With syslog l LifeKeeper never performs an automatic switchback from a higher priority server to a lower priority server. Logging With syslog Beginning with LifeKeeper 8.0, logging is done through the standard syslog facility. LifeKeeper supports three syslog implementations: standard syslog, rsyslog, and syslog-ng. During package installation, syslog will be configured to use the "local6" facility for all LifeKeeper log messages. The syslog configuration file (for example, /etc/syslog-ng/syslog-ng.conf) will be modified to include LifeKeeper-specific routing sending all LifeKeeper log messages to /var/log/lifekeeper.log. (The original configuration file will be backed up with the same name ending in "~".) The facility can be changed after installation by using the lklogconfig tool located in /opt/LifeKeeper/bin. See the lklogconfig(8) manpage on a system with LifeKeeper installed for more details on this tool. Note: When LifeKeeper is removed from a server, the LifeKeeper-specific syslog configuration will be removed. Resource Hierarchies The LifeKeeper GUI enables you to create a resource hierarchy on one server, then extend that hierarchy to one or more backup servers. LifeKeeper then automatically builds the designated hierarchies on all servers specified. LifeKeeper maintains hierarchy information in a database on each server. If you use the command line interface, you must explicitly define the hierarchy on each server. After you create the resource hierarchy, LifeKeeper manages the stopping and starting of the resources within the hierarchy. The related topics below provide background for hierarchy definition tasks. Resource Types A resource can be either a hardware or software entity, categorized by resource type. LifeKeeper supplies file system and SCSI resource types, and the recovery kits provide communications, RDBMS and other application resource types. For example, a hierarchy for a protected file system includes instances for resources of the following types: l filesys. Linux file system resource objects identified by their mount point. l device. SCSI disk partitions and virtual disks, identified by their device file names, for example sdc1. l disk. SCSI disks or RAID system logical units, identified by SCSI device name, for example sd. SteelEye Protection Suite for Linux45 Resource States Resource States State In-Service, Protected (ISP) Meaning Resource is operational. LifeKeeper local recovery operates normally. LifeKeeper inter-server recovery and failure recovery is operational. In-Service, Resource is operational. LifeKeeper local recovery mechanism is not operational for Unprotected this resource. LifeKeeper inter-server recovery and failure recovery is operational. (ISU) Out-ofService, Failed (OSF) Resource has gone out-of-service because of a failure in the resource. Recovery has not been completed or has failed. LifeKeeper alarming is not operational for this resource. Out-ofService, Unimpaired (OSU) Resource is out-of-service but available to take over a resource from another server. Illegal (Undefined) State (ILLSTATE) This state appears in situations where no state has been set for a resource instance. Under normal circumstances, this invalid state does not last long: a transition into one of the other states is expected. This state will occur if switchover occurs before all LifeKeeper information tables have been updated (for example, when LifeKeeper is first started up). 46SteelEye LifeKeeper for Linux Hierarchy Relationships Hierarchy Relationships LifeKeeper allows you to create relationships between resource instances. The primary relationship is a dependency, for example one resource instance depends on another resource instance for its operation . The combination of resource instances and dependencies is the resource hierarchy. For example, since /usr1 depends on its operation upon the disk subsystem, you can create an ordered hierarchy relationship between /usr1 and those instances representing the disk subsystem. The dependency relationships specified by the resource hierarchy tell LifeKeeper the appropriate order for bringing resource instances in service and out-of-service. In the example resource hierarchy, LifeKeeper cannot bring the /usr1 resource into service until it successfully brings into service first the disk and device instances. Shared Equivalencies When you create and extend a LifeKeeper resource hierarchy, the hierarchy exists on both the primary and the secondary servers. Most resource instances can be active on only one server at a time. For such resources, LifeKeeper defines a second kind of relationship called a shared equivalency that ensures that when the resource is in-service on one server, it is out-of-service on the other servers on which it is defined. In the example below, the shared equivalency between the disk partition resource instances on each server is represented. Each resource instance will have a similar equivalency in this example. SteelEye Protection Suite for Linux47 Resource Hierarchy Information Resource Hierarchy Information The resource status of each resource is displayed in the Detailed Status Display and the Short Status Display. The LifeKeeper tag names of root resources are displayed beginning in the left-most position of the TAG column, with tag names of resources within the hierarchy indented appropriately to indicate dependency relationships between resources. The following sample is from the resource hierarchy section of a short status display (the device and disk ID's are shortened to fit in the display area): LOCAL TAG svr1 svr1 ID app3910-on-svr1 app4238 filesys4083 /jrl1 STATE PRIO PRIMARY ISP 1 svr2 ISP 1 svr2 svr1 device2126 000...300-1 ISP 1 svr2 svr1 disk2083 000...300 1 svr2 ISP See the topic Resource Hierarchy Example for an illustration of a hierarchy. For more information, see the Resource Hierarchy Information section of the topics Detailed Status Display and Short Status Display. 48SteelEye LifeKeeper for Linux Resource Hierarchy Example Resource Hierarchy Example Detailed Status Display This topic describes the categories of information provided in the detailed status display as shown in the following example of output from the lcdstatus command. For information on how to display this information, see the LCD(1M) man page. At the command line, you can enter either man lcdstatus or man LCD. For status information available in the LifeKeeper GUI, see Viewing the Status of a Server or Viewing the Status of Resources. Example of detailed status display: Resource Hierarchy Information Resource hierarchies for machine "wileecoyote": ROOT of RESOURCE HIERARCHY apache-home.fred: id=apache-home.fred app=webserver type=apache state=ISP initialize=(AUTORES_ISP) automatic restore to IN-SERVICE by LifeKeeper info=/home/fred /usr/sbin/httpd reason=restore action has succeeded depends on resources: ipeth0-172.17.104.25,ipeth0-172.17.106.10,ipeth0-172.17.106.105 Local priority = 1 SteelEye Protection Suite for Linux49 Detailed Status Display SHARED equivalency with "apache-home.fred" on "roadrunner", priority = 10 FAILOVER ALLOWED ipeth0-172.17.104.25: id=IP-172.17.104.25 app=comm type=ip state=ISP initialize=(AUTORES_ISP) automatic restore to IN-SERVICE by LifeKeeper info=wileecoyote eth0 172.17.104.25 fffffc00 reason=restore action has succeeded these resources are dependent: apache-home.fred Local priority = 1 SHARED equivalency with "ipeth0-172.17.104.25" on "roadrunner", priority = 10 FAILOVER ALLOWED ipeth0-172.17.106.10: id=IP-172.17.106.10 app=comm type=ip state=ISP initialize=(AUTORES_ISP) automatic restore to IN-SERVICE by LifeKeeper info=wileecoyote eth0 172.17.106.10 fffffc00 reason=restore action has succeeded these resources are dependent: apache-home.fred Local priority = 1 SHARED equivalency with "ipeth0-172.17.106.10" on "roadrunner", priority = 10 FAILOVER ALLOWED ipeth0-172.17.106.105: id=IP-172.17.106.105 app=comm type=ip state=ISP initialize=(AUTORES_ISP) automatic restore to IN-SERVICE by LifeKeeper info=wileecoyote eth0 172.17.106.105 fffffc00 reason=restore action has succeeded These resources are dependent: apache-home.fred Local priority = 1 SHARED equivalency with "ipeth0-172.17.106.105" on "roadrunner", priority = 10 FAILOVER ALLOWED Communication Status Information The following LifeKeeper servers are known: machine=wileecoyote state=ALIVE machine=roadrunner state=DEAD (eventslcm detected failure at Wed Jun 7 15:45:14 EDT 2000) The following LifeKeeper network connections exist: 50SteelEye LifeKeeper for Linux Resource Hierarchy Information to machine=roadrunner type=TCP addresses=192.168.1.1/192.168.105.19 state="DEAD" priority=2 #comm_downs=0 LifeKeeper Flags The following LifeKeeper flags are on: shutdown_switchover Shutdown Strategy The shutdown strategy is set to: switchover. Resource Hierarchy Information LifeKeeper displays the resource status beginning with the root resource. The display includes information about all resource dependencies. Elements common to multiple resources appear only once under the first root resource. The first line for each resource description displays the resource tag name followed by a colon (:), for example: device13557:. These are the information elements that may be used to describe the resources in the hierarchy: l id. Unique resource identifier string used by LifeKeeper. l app. Identifies the type of application, for example the sample resource is a webserver application. l type. Indicates the resource class type, for example the sample resource is an Apache application. l state. Current state of the resource: l ISP—In-service locally and protected. l ISU—In-service, unprotected. l OSF—Out-of-service, failed. l OSU—Out-of-service, unimpaired. l initialize. Specifies the way the resource is to be initialized, for example LifeKeeper restores the application resource, but the host adapter initializes without LifeKeeper. l info. Contains object-specific information used by the object's remove and restore scripts. l reason. If present, describes the reason the resource is in its current state. For example, an application might be in the OSU state because it is in-service (ISP or ISU) on another server. Shared resources can be active on only one of the grouped servers at a time. l depends on resources. If present, lists the tag names of the resources on which this resource depends. SteelEye Protection Suite for Linux51 Communication Status Information l these resources are dependent. If present, indicates the tag names of all parent resources that are directly dependent on this object. l Local priority. Indicates the failover priority value of the targeted server, for this resource. l SHARED equivalency. Indicates the resource tag and server name of any remote resources with which this resource has a defined equivalency, along with the failover priority value of the remote server, for that resource. l FAILOVER ALLOWED. If present, indicates that LifeKeeper is operational on the remote server identified in the equivalency on the line above, and the application is protected against failure. FAILOVER INHIBITED means that the application is not protected due to either the shutting down of LifeKeeper or the stopping of the remote server. Communication Status Information This section of the status display lists the servers known to LifeKeeper and their current state, followed by information about each communications path. These are the communications information elements you can see on the status display: l State. Status of communications path. These are the possible communications state values: l ALIVE. Functioning normally l DEAD. No longer functioning normally l priority. The assigned priority value for the communications path.This item is displayed only for TCP paths. l #comm_downs. The number of times the port has failed and caused a failover. The path failure causes a failover only if no other communications paths are marked "ALIVE" at the time of the failure. In addition, the status display can provide any of the following statistics maintained only for TTY communications paths: l l wrpid. Each TTY communications path has unique reader and writer processes. The wrpid field contains the process ID for the writer process. The writer process sleeps until one of two conditions occurs: l Heartbeat timer expires, causing the writer process to send a message. l Local process requests the writer process to transmit a LifeKeeper maintenance message to the other server. The writer process transmits the message, using its associated TTY port, to the reader process on that port on the other system. rdpid. Each TTY communications path has unique reader and writer processes. The rdpid field contains the process ID for the reader process. The reader process sleeps until one of two conditions occurs: l Heartbeat timer expires and the reader process must determine whether the predefined heartbeat intervals have expired. If so, the reader process marks the communications 52SteelEye LifeKeeper for Linux LifeKeeper Flags path in the DEAD state, which initiates a failover event if there are no other communications paths marked ALIVE. l Remote system writer process transmits a LifeKeeper maintenance message, causing the reader process to perform the protocol necessary to receive the message. l #NAKs. Number of times the writer process received a negative acknowledgment (NAK). A NAK message means that the reader process on the other system did not accept a message packet sent by the writer process, and the writer process had to re-transmit the message packet. The #NAKs statistic can accumulate over a long period of time due to line noise. If, however, you see the numbers increasing rapidly, you should perform diagnostic procedures on the communications subsystem. l #chksumerr. Number of mismatches in the check sum message between the servers. This statistic can accumulate over a long period of time due to line noise. If, however, you see the numbers increasing rapidly, you should perform diagnostic procedures on the communications subsystem. l #incmpltmes. Number of times the incoming message packet did not match the expected size. A high number of mismatches may indicate that you should perform diagnostic procedures on the hardware port associated with the communications path. l #noreply. Number of times the writer process timed out while waiting for an acknowledgment and had to re-transmit the message. Lack of acknowledgment may indicate an overloaded server or it can signal a server failure. l #pacresent. Number of times the reader process received the same packet. This can happen when the writer process on the sending server times out and resends the same message. l #pacoutseq. Number of times the reader received packets out of sequence. High numbers in this field can indicate lost message packets and may indicate that you should perform diagnostic procedures on the communications subsystem. l #maxretrys. Metric that increments for a particular message when the maximum retransmission count is exceeded (for NAK and noreply messages). If you see a high number in the #maxretrys field, you should perform diagnostic procedures on the communications subsystem. LifeKeeper Flags Near the end of the detailed status display, LifeKeeper provides a list of the flags set for the system. A common type is a Lock LCD flag used to ensure that other processes wait until the process lock completes its action. The following is the standard LCD lock format: !action!processID!time!machine:id. These are examples of general LCD lock flags: l !action!02833!701236710!server1:filesys. The creation of a file system hierarchy produces a flag in this format in the status display. The filesys designation can be a different resource type for other application resource hierarchies, or app for generic or user-defined applications. SteelEye Protection Suite for Linux53 Shutdown Strategy l Other typical flags include !nofailover!machine, !notarmode!machine, and shutdown_ switchover. The !nofailover!machine and !notarmode!machineflags are internal, transient flags created and deleted by LifeKeeper, which control aspects of server failover. The shutdown_switchover flag indicates that the shutdown strategy for this server has been set to switchover such that a shutdown of the server will cause a switchover to occur. See the LCDI-flag(1M) for more detailed information on the possible flags. Shutdown Strategy The last item on the detailed status display identifies the LifeKeeper shutdown strategy selected for this system. See Setting Server Shutdown Strategy for more information. Short Status Display This topic describes the categories of information provided in the short status display as shown in the following example of output from the lcdstatus -e command. For information on how to display this information, see the LCD(1M) man page. At the command line, you can enter either man lcdstatus or man LCD. For status information available in the LifeKeeper GUI, see Viewing the Status of a Server or Viewing the Status of Resources. Example of Short Status Display: Resource Hierarchy Information BACKUP svr1 svr1 TAG ID appfs3910-on-svr1 appfs4238 filesys4083 /jrl1 STATE PRIO PRIMARY ISP 1 svr2 ISP 1 svr2 svr1 device2126 000...300-1 ISP 1 svr2 svr1 disk2083 000...300 1 svr2 ISP Communication Status Information MACHINE NETWORK ADDRESSES/DEVICE STATE PRIO svr1 TCP 100.10.1.20/100.11.1.21 ALIVE 1 svr1 TTY /dev/ttyS0 ALIVE -- Resource Hierarchy Information LifeKeeper displays the resource status of each resource. The LifeKeeper tag names of root resources are displayed beginning in the left-most position of the TAG column, with tag names of 54SteelEye LifeKeeper for Linux Communication Status Information resources within the hierarchy indented appropriately to indicate dependency relationships between resources. The BACKUP column indicates the next system in the failover priority order, after the system for which the status display pertains. If the target system is the lowest priority system for a given resource, the BACKUP column for that resource contains dashes (for example, ------). l TAG column. Contains the root tag for the resource. l ID column. Contains each resource’s identifier string. l STATE column. Contains the current state of each resource, as described in Resource States. l PRIO column. Contains the failover priority value of the local server, for each resource. l PRIMARY column. Contains the name of the server with the highest priority, for each resource. Communication Status Information This section of the display lists each communications path that has been defined on the target system. For each path, the following information is provided. l MACHINE. Remote server name for the communications path. l NETWORK. The type of communications path (TCP or TTY) l ADDRESSES/DEVICE. The pair of IP addresses or device name for the communications path l STATE. The state of the communications path (ALIVE or DEAD) l PRIO. For TCP paths, the assigned priority of the path. For TTY paths, this column will contain dashes (----), since TTY paths do not have an assigned priority. Fault Detection and Recovery Scenarios To demonstrate how the various LifeKeeper components work together to provide fault detection and recovery, see the following topics that illustrate and describe three types of recovery scenarios: IP Local Recovery SIOS recommends the use of bonded interfaces via the standard Linux NIC bonding mechanism in any LifeKeeper release where a backup interface is required. Beginning with LifeKeeper Release 7.4.0, bonded interfacing is the only supported method. For releases prior to 7.4.0, the backup interface feature in the IP kit, described below, can be used. The IP local recovery feature allows LifeKeeper to move a protected IP address from the interface on which it is currently configured to another interface in the same server when a failure has been detected by the IP Recovery Kit. Local recovery provides you an optional backup mechanism so that SteelEye Protection Suite for Linux55 Local Recovery Scenario when a particular interface fails on a server, the protected IP address can be made to function on the backup interface, therefore avoiding an entire application/resource hierarchy failing over to a backup server. Local Recovery Scenario IP local recovery allows you to specify a single backup network interface for each LifeKeeperprotected IP address on a server. In order for the backup interface to work properly, it must be attached to the same physical network as the primary interface. The system administrator is expected to insure that a valid interface is being chosen. Note that it is completely reasonable and valid to specify a backup interface on one server but not on another within the cluster (i.e. the chosen backup interface on one server has no impact on the choice of a backup on any other server). When a failure of an IP address is detected by the IP Recovery Kit, the resulting failure triggers the execution of the IP local recovery script. LifeKeeper first attempts to bring the IP address back in service on the current network interface. If that fails, LifeKeeper checks the resource instance to determine if there is a backup interface available. If so, it will then attempt to move the IP address to the backup interface. If all local recovery attempts fail, LifeKeeper will perform a failover of the IP address and all dependent resources to a backup server. The backup interface name can be identified in the Information field of the IP resource instance. The Information field values are space-separated and are, in order, the primary server name, the network interface name, the IP address, the netmask and the backup interface name. Here is an example: ServerA eth0 172.17.106.10 fffffc00 eth1 If no backup interface is configured, the 5th field value will be set to none. When the protected IP address is moved to the backup interface, the 2nd and 5th field values are swapped so that the original backup interface becomes the primary and vice versa. The result is that during LifeKeeper startups, switchovers and failovers, LifeKeeper always attempts to bring the IP address in service on the interface on which it was last configured. Command Line Operations In LifeKeeper for Linux v3.01 or later, the mechanism for adding or removing a backup interface from an existing IP resource instance is provided as a command line utility. This capability is provided by the lkipbu utility. The command and syntax are: lkipbu [-d machine] -{a|r} -t tag -f interface The add operation (specified via the -a option) will fail if a backup interface has already been defined for this instance or if an invalid interface name is provided. The remove operation (specified via the -r option) will fail if the specified interface is not the current backup interface for this instance. A command line mechanism is also provided for manually moving an IP address to its backup interface. This capability is specified via the -m option using the following syntax: lkipbu [-d machine] -m -t tag 56SteelEye LifeKeeper for Linux Resource Error Recovery Scenario This operation will fail if there is no backup interface configured for this instance. If the specified resource instance is currently in service, the move will be implemented by using the ipaction remove operation to un-configure the IP address on the current interface, and ipaction restore to configure it on the backup interface. Following the move, the execute_broadcast_ping function will be used to verify the operation of the address on the new interface, and if successful, the interface values will be swapped in the IP resource instance INFO field. If the specified IP resource instance is out-of-service when this command is executed, the primary and backup interface values will simply be swapped in the INFO field. The lkipbu utility also provides an option for retrieving the currently defined primary and backup interfaces for a specified IP resource instance along with the state of the resource on the primary interface (up or down). This capability is specified via the -s option using the following syntax: lkipbu [-d machine] -s -t tag The output will be similar to the following: IP address: 172.17.106.10 Netmask: 255.255.252.0 Primary interface: eth0 (up) Backup interface: eth1 Refer to the lkipbu(8) man page for further detail. Resource Error Recovery Scenario LifeKeeper provides a real-time daemon monitor, lkcheck, to check the status and health of LifeKeeper-protected resources. For each in-service resource, lkcheck periodically calls the quickCheck script for that resource type. The quickCheck script performs a quick health check of the resource, and if the resource is determined to be in a failed state, the quickCheck script calls the event notification mechanism, sendevent. The following figure illustrates the recovery process tasks when lkcheck initiates the process: SteelEye Protection Suite for Linux57 Resource Error Recovery Scenario 1. lkcheck runs. By default, the lkcheck process runs once every two minutes. When lkcheck runs, it invokes the appropriate quickCheck script for each in-service resource on the system. 2. quickCheck script checks resource. The nature of the checks performed by the quickCheck script is unique to each resource type. Typically, the script simply verifies that the resource is available to perform its intended task by imitating a client of the resource and verifying that it receives the expected response. 3. quickCheck script invokes sendevent. If the quickCheck script determines that the resource is in a failed state, it initiates an event of the appropriate class and type by calling sendevent. 4. Recovery instruction search. The system event notification mechanism, sendevent, first attempts to determine if the LCD has a resource and/or recovery for the event type or component. To make this determination, the is_recoverable process scans the resource hierarchy in LCD for a resource instance that corresponds to the event (in this example, the filesys name). The action in the next step depends upon whether the scan finds resource-level recovery instructions: l Not found. If resource recovery instructions are not found, is_recoverable returns to sendevent and sendevent continues with basic event notification. l Found. If the scan finds the resource, is_recoverable forks the recover process into the background. The is_recoverable process returns and sendevent continues with basic event notification, passing an advisory flag "-A" to the basic alarming event response scripts, indicating that LifeKeeper is performing recovery. 5. Recover process initiated. Assuming that recovery continues, is_recoverable initiates the recover process which first attempts local recovery. 6. Local recovery attempt. If the instance was found, the recover process attempts local recovery by accessing the resource hierarchy in LCD to search the hierarchy tree for a resource that knows how to respond to the event. For each resource type, it looks for a recovery subdirectory containing a subdirectory named for the event class, which in turn contains a recovery script for the event type. The recover process runs the recovery script associated with the resource that is farthest above the failing resource in the resource hierarchy. If the recovery script succeeds, recovery halts. If the script fails, recover runs the script associated with the next resource, continuing until a recovery script succeeds or until recover attempts the recovery script associated with the failed instance. If local recovery succeeds, the recovery process halts. 7. Inter-server recovery begins. If local recovery fails, the event then escalates to inter-server recovery. 8. Recovery continues. Since local recovery fails, the recover process marks the failed instance to the Out-of-Service-FAILED (OSF) state and marks all resources that depend upon the failed resource to the Out-of-Service-UNIMPAIRED (OSU) state. The recover process then 58SteelEye LifeKeeper for Linux Server Failure Recovery Scenario determines whether the failing resource or a resource that depends upon the failing resource has any shared equivalencies with a resource on any other systems,and selects the one to the highest priority alive server. Only one equivalent resource can be active at a time. If no equivalency exists, the recover process halts. If a shared equivalency is found and selected, LifeKeeper initiates inter-server recovery. The recover process sends a message through the LCM to the LCD process on the selected backup system containing the shared equivalent resource. This means that LifeKeeper would attempt inter-server recovery. 9. lcdrecover process coordinates transfer. The LCD process on the backup server forks the process lcdrecover to coordinate the transfer of the equivalent resource. 10. Activation on backup server. The lcdrecover process finds the equivalent resource and determines whether it depends upon any resources that are not in-service. lcdrecover runs the restore script (part of the resource recovery action scripts) for each required resource, placing the resources in-service. The act of restoring a resource on a backup server may result in the need for more shared resources to be transferred from the primary system. Messages pass to and from the primary system, indicating resources that need to be removed from service on the primary server and then brought into service on the selected backup server to provide full functionality of the critical applications. This activity continues, until no new shared resources are needed and all necessary resource instances on the backup are restored. Server Failure Recovery Scenario The LifeKeeper Communications Manager (LCM) has two functions: l Messaging. The LCM serves as a conduit through which LifeKeeper sends messages during recovery, configuration, or when running an audit. l Failure detection. The LCM also plays a role in detecting whether or not a server has failed. LifeKeeper has a built-in heartbeat signal that periodically notifies each server in the configuration that its paired server is operating. If a server fails to receive the heartbeat message through one of the communications paths, LifeKeeper marks that path DEAD. The following figure illustrates the recovery tasks when the LCM heartbeat mechanism detects a server failure. SteelEye Protection Suite for Linux59 Server Failure Recovery Scenario The following steps describe the recovery scenario, illustrated above, if LifeKeeper marks all communications connections to a server DEAD. 1. LCM activates eventslcm. When LifeKeeper marks all communications paths dead, the LCM initiates the eventslcm process. Only one activity stops the eventslcm process: l Communication path alive. If one of the communications paths begins sending the heartbeat signal again, the LCM stops the eventslcm process. It is critical that you configure two or more physically independent, redundant communication paths between each pair of servers to prevent failovers and possible system panics due to communication failures. 2. Message to sendevent. eventslcm sends the system failure alarm by calling sendevent with the event type machfail. 3. sendevent initiates failover recovery. The sendevent program determines that LifeKeeper can handle the system failure event and executes the LifeKeeper failover recovery process lcdmachfail. 4. lcdmachfail checks. The lcdmachfail process first checks to ensure that the non-responding server was not shut down. Failovers are inhibited if the other system was shut down gracefully before system failure. Then lcdmachfail determines all resources that have a shared equivalency with the failed system. This is the commit point for the recovery. 5. lcdmachfail restores resources. lcdmachfail determines all resources on the backup server that have shared equivalencies with the failed primary server. It also determines whether the backup server is the highest priority alive server for which a given resource is configured. All backup servers perform this check, so that only one server will attempt to recover a given hierarchy. For each equivalent resource that passes this check, lcdmachfail invokes the associated restore program. Then, lcdmachfail also restores each resource dependent on a restored resource, until it brings the entire hierarchy into service on the backup server. 60SteelEye LifeKeeper for Linux Installation and Configuration SPS for Linux Installation For complete installation instructions on installing the SPS for Linux software, see the SPS for Linux Installation Guide. Refer to the SPS for Linux Release Notes for additional information. SPS for Linux Configuration Once the SPS environment has been installed, the SPS software can be configured on each server in the cluster. Follow the steps in the SPS Configuration Steps topic below which contains links to topics with additional details. SPS Configuration Steps If you have installed your SPS environment as described in the SPS Installation Guide, you should be ready to start and configure the SPS software on each server in your cluster. Follow the steps below which contain links to topics with additional details. Perform these tasks on each server in the cluster. 1. Start LifeKeeper by typing the following command as root: /etc/init.d/lifekeeper start This command starts all LifeKeeper daemon processes on the server being administered if they are not currently running. For additional information on starting and stopping LifeKeeper, see Starting LifeKeeper and Stopping LifeKeeper. 2. Set Up TTY Communications Connections. If you plan to use a TTY communications (comm) path for a LifeKeeper heartbeat, you need to set up the physical connection for that heartbeat. 3. Configure the GUI. There are multiple tasks involved with configuring the GUI. Start with the LifeKeeper GUI - Overview topic within Preparing to Run the GUI. Then for detailed instructions, follow the browse sequence throughout Preparing to Run the GUI. Note: The first time you run the LifeKeeper GUI, you will see a QuickStart button which opens a window with instructions and links to help you step through the configuration of your LifeKeeper resources. Subsequently, you can access this QuickStart Configuration Assistant under the Help menu. 4. Create Communication Paths. Before you can activate LifeKeeper protection, you must create the communications path (heartbeat) definitions within LifeKeeper. SteelEye Protection Suite for Linux61 Set Up TTY Connections 5. Perform any of the following optional configuration tasks: l Set the Server Shutdown Strategy l Configure the manual failover confirmation option l Tune the LifeKeeper heartbeat l Add the LifeKeeper GUI icon to your desktop toolbar l Configure SNMP Event Forwarding via SNMP l Configure Event Email Notification l If you plan to use STONITH devices in your cluster, create the scripts to control the STONITH devices and place them in the appropriate LifeKeeper events directory. 6. SPS is now ready to protect your applications. The next step depends on whether you will be using one of the optional SPS Recovery Kits: l If you are using an SPS Recovery Kit, refer to the Documentation associated with the kit for instructions on creating and extending your resource hierarchies. l If you are using an application that does not have an associated Recovery Kit, then you have two options: l If it is a simple application, you should carefully plan how to create an interface between your application and LifeKeeper. You may decide to protect it using the Generic Application Recovery Kit included with the LifeKeeper core. Set Up TTY Connections If you plan to use a TTY communications (comm) path for a LifeKeeper heartbeat, you need to set up the physical connection for that heartbeat. Remember that multiple communication paths are required to avoid false failover due to a simple communications failure. Two or more LAN-based (TCP) comm paths should also be used. Connect the TTY cable to the serial ports of each server to be used for the serial heartbeat. 1. Test the serial path using the following command: /opt/LifeKeeper/bin/portio -r -p port -b baud where: l baud is the baud rate selected for the path (normally 9600) l port is the serial port being tested on Server 1, for example /dev/ttyS0. Server 1 is now waiting for input from Server 2. 2. Run command portio on Server 2. On the second system in the pair, type the following command: 62Configuration LifeKeeper Event Forwarding via SNMP echo Helloworld | /opt/LifeKeeper/bin/portio -p port -b baud where: l baud is the same baud rate selected for Server 1. l port is the serial port being tested on Server 2, for example /dev/ttyS0. 3. View the console. If the communications path is operational, the software writes "Helloworld" on the console on Server 1. If you do not see that information, perform diagnostic and correction operations before continuing with LifeKeeper configuration. LifeKeeper Event Forwarding via SNMP Overview of LifeKeeper Event Forwarding via SNMP The Simple Network Management Protocol (SNMP) defines a device-independent framework for managing networks. Devices on the network are described by MIB (Management Information Base) variables that are supplied by the vendor of the device. An SNMP agent runs on each node of the network, and interacts with a Network Manager node. The Network Manager can query the agent to get or set the values of its MIB variables, there by monitoring or controlling the agent's node. The agent can also asynchronously generate messages called traps to notify the manager of exceptional events. There are a number of applications available for monitoring and managing networks using the Simple Network Management Protocol (SNMP). LifeKeeper has an event notification mechanism for registering applications that wish to be notified of specific events or alarms (see the sendevent(5) man page). LifeKeeper can be easily enabled to send SNMP trap notification of key LifeKeeper events to a third party network management console wishing to monitor LifeKeeper activity. The remote management console receiving SNMP traps must first be configured through the administration software of that system; LifeKeeper provides no external SNMP configuration. The remote management server is typically located outside of the LifeKeeper cluster (i.e., it is not a LifeKeeper node). LifeKeeper Events Table The following table contains the list of LifeKeeper events and associated trap numbers. The entire Object ID (OID) consists of a prefix followed by a specific trap number in the following format: prefix.0.specific trap number The prefix is .1.3.6.1.4.1.7359, which expands to iso.org.dod.internet.private.enterprises.7359 in the MIB tree. (7359 is SteelEye’s [SIOS Technology] enterprise number, followed by 1 for LifeKeeper.) For example, the LifeKeeper Startup Complete event generates the OID: .1.3.6.1.4.1.7359.1.0.100. SteelEye Protection Suite for Linux63 LifeKeeper Events Table LifeKeeper Event/Description Trap Object ID # LifeKeeper Startup Complete 100 .1.3.6.1.4.1.7359.1.0.100 101 .1.3.6.1.4.1.7359.1.0.101 102 .1.3.6.1.4.1.7359.1.0.102 110 .1.3.6.1.4.1.7359.1.0.110 111 .1.3.6.1.4.1.7359.1.0.111 112 .1.3.6.1.4.1.7359.1.0.112 120 .1.3.6.1.4.1.7359.1.0.120 121 .1.3.6.1.4.1.7359.1.0.121 122 .1.3.6.1.4.1.7359.1.0.122 Sent from a node recovering a resource; a 131 or 132 trap always 130 follows to indicate whether the recovery was completed or failed. .1.3.6.1.4.1.7359.1.0.130 Sent from a node when LifeKeeper is started on that node LifeKeeper Shutdown Initiated Sent from a node beginning LifeKeeper shutdown LifeKeeper Shutdown Complete Sent from a node completing LifeKeeper shutdown LifeKeeper Manual Switchover Initiated on Server Sent from the node from which a manual switchover was requested LifeKeeper Manual Switchover Complete – recovered list Sent from the node where the manual switchover was completed LifeKeeper Manual Switchover Complete – failed list Sent from each node within the cluster where the manual switchover failed LifeKeeper Node Failure Detected for Server Sent from each node within the cluster when a node in that cluster fails LifeKeeper Node Recovery Complete for Server – recovered list Sent from each node within the cluster that has recovered resources from the failed node LifeKeeper Node Recovery Complete for Server – failed list Sent from each node within the cluster that has failed to recover resources from the failed node LifeKeeper Resource Recovery Initiated LifeKeeper Resource Recovery Failed Sent from the node in trap 130 when the resource being recovered fails to come into service 131* .1.3.6.1.4.1.7359.1.0.131 LifeKeeper Resource Recovery Complete Sent from the node in trap 130 when the recovery of the resource 132 is completed 64Configuration .1.3.6.1.4.1.7359.1.0.132 Configuring LifeKeeper Event Forwarding LifeKeeper Communications Path Up 140 .1.3.6.1.4.1.7359.1.0.140 141 .1.3.6.1.4.1.7359.1.0.141 Trap message all .1.3.6.1.4.1.7359.1.1 Resource Tag 130 .1.3.6.1.4.1.7359.1.2 Resource Tag 131 .1.3.6.1.4.1.7359.1.2 Resource Tag 132 .1.3.6.1.4.1.7359.1.2 List of recovered resources 111 .1.3.6.1.4.1.7359.1.3 List of recovered resources 121 .1.3.6.1.4.1.7359.1.3 List of failed resources 112 .1.3.6.1.4.1.7359.1.4 List of failed resources 122 .1.3.6.1.4.1.7359.1.4 A communications path to a node has become operational LifeKeeper Communications Path Down A communications path to a node has gone down The following variables are used to "carry" additional information in the trap PDU: * This trap may appear multiple times if recovery fails on multiple backup servers. Configuring LifeKeeper Event Forwarding Prerequisites The SNMP event forwarding feature is included as part of the LifeKeeper core functionality, and does not require additional LifeKeeper packages to be installed. It does require that SNMP software be installed on each LifeKeeper node that will generate trap notification of LifeKeeper events. LifeKeeper uses the snmp trap utility to generate the traps. This utility is provided by the snmp-utils package on most Linux distributions (called snmp on SuSE). In older versions of the snmp implementation (prior to 4.1) where the defCommunity directive is not supported, the traps will be sent using the "public" community string. It is not necessary to have an SNMP agent snmpd running on the LifeKeeper node. The configuration of a trap handler on the network management console and its response to trap messages is beyond the scope of this LifeKeeper feature. See the documentation associated with your system management tool for related instructions. Configuration Tasks The following tasks must be performed to set up LifeKeeper SNMP Event Forwarding. All but the last task must be repeated on each node in the LifeKeeper cluster that will be generating SNMP trap messages. SteelEye Protection Suite for Linux65 Verifying the Configuration 1. Ensure that the snmptrap utility is available as noted above. 2. Specify the network management node to which the SNMP traps will be sent. This can be done either by command line or by editing the /etc/default/LifeKeeper file. You must specify the IP address rather than domain name to avoid DNS issues. l By command line, use the lk_configsnmp (see the lk_configsnmp(1M) man page for details). This utility will only accept IP addresses. l Or, edit the defaults file /etc/default/LifeKeeper to add the IP address. Search for the entry LK_TRAP_MGR= and insert the IP address to the right of the = (no white space around the =). 3. If you are using an older version of the snmp implementation that does not support the defCommunity directive, skip this step. Traps will be sent using the "public" community string. Otherwise, do the following: Specify a default community in /usr/share/snmp/snmp.conf. If this file does not exist, create it using sufficiently secure permissions. Add the directive "defCommunity" with a value. This specifies the SNMP version 2c community string to use when sending traps. For example, add a line like this: defCommunity myCommunityString Refer to the snmp.conf man page (delivered with the snmp package) for more information about this configuration file. 4. Perform whatever configuration steps are needed on the remote management console to detect and respond to the incoming trap OIDs from LifeKeeper events. If the management node is a Linux server, the minimum that you would need to do to begin verification of this feature would be to start the snmptrapd daemon with the -f -Lo option (print the messages to stdout). Verifying the Configuration To verify that the configuration is working, initiate a LifeKeeper action (for example, start or stop LifeKeeper, or bring a resource in-service manually using the LifeKeeper GUI). Verify that the trap message was received at the management console. If a trap is not received, inspect the appropriate log files on the management system, and follow the normal troubleshooting practices provided with the management software. The LifeKeeper log can be inspected to determine if there was a problem sending the trap message. See SNMP Troubleshooting for more information. Disabling SNMP Event Forwarding To disable the generation of SNMP traps by LifeKeeper, simply remove the assignment of an IP address from the LK_TRAP_MGR environment variable in the file /etc/default/LifeKeeper. This can be accomplished using the lk_configsnmp utility from the command line with the "disable"option (see the lk_configsnmp(1M) page for an example). Or, edit /etc/default/LifeKeeper and change the entry for LK_TRAP_MGR to LK_TRAP_MGR= (or remove the line entirely). This must be done on each node that should be disabled from sending trap messages. 66Configuration SNMP Troubleshooting SNMP Troubleshooting Following are some possible problems and solutions related to SNMP Event Forwarding. For specific error messages, see the LifeKeeper Message Catalog. Problem: No SNMP trap messages are sent from LifeKeeper. Solution: Verify that the snmptrap utility is installed on the system (it is usually located in /usr/bin). If it is not installed, install the appropriate snmp package (see Prerequisites ). If it is installed in someother location, edit the PATH variable in the file /etc/default/LifeKeeper and add the appropriate path. Problem: No SNMP error messages are logged and SNMP trap messages do not appear to be sent from a LifeKeeper server. Solution: Check to see if LK_TRAP_MGR is set to the IP address of the network management server that will receive the traps. From the command line, use the lk_configsnmp utility with the "query" option to verify the setting (See the lk_configsnmp(1M) man page for an example.) Or, search for the entry for LK_TRAP_MGR in the file /etc/default/LifeKeeper. This variable must be set on each LifeKeeper node that will generate SNMP trap messages. LifeKeeper Event Email Notification Overview of LifeKeeper Event Email Notification LifeKeeper Event Email Notification is a mechanism by which one or more users may receive email notices when certain events occur in a LifeKeeper cluster. LifeKeeper has an event notification mechanism for registering applications that wish to be notified of specific events or alarms (see the sendevent(5) man page). LifeKeeper can be easily enabled to send email notification of key LifeKeeper events to a selected set of users wishing to monitor LifeKeeper activity. Additionally, a log of each email notice issued is available via the LifeKeeper lk_log(8) utility or by using the Viewing Server Log Files facility in the LifeKeeper GUI. The messages may be found in the NOTIFY log. Refer to the lk_log(8) man page for more information about viewing the contents of the logs from the command line. By default, LifeKeeper Event Email Notification is disabled. Enabling this feature requires setting the LK_NOTIFY_ALIAS environment variable defined in /etc/default/LifeKeeper. The LK_ NOTIFY_ALIAS environment variable can be set to a single email address or alias, or it can contain multiple addresses or aliases separated by commas. To set LK_NOTIFY_ALIAS either run lk_ confignotify alias (See the lk_confignotifyalias(1M) man page for an example) from the command line and supply the address or list of addresses that should receive email when an event occurs or edit the defaults file /etc/default/LifeKeeper to add the email address or address list. Search for the entry LK_NOTIFY_ALIAS= and insert the address or address list separated by commas. Repeat this action on all nodes in the cluster that need to send email for the selected LifeKeeper events. SteelEye Protection Suite for Linux67 LifeKeeper Events Generating Email To disable Email Notification, either run lk_confignotifyalias (See the lk_ confignotifyalias(1M) man page for an example) with the --disable argument or edit the defaults file /etc/default/LifeKeeper and remove the setting of LK_NOTIFY_ALIAS (change the line to LK_NOTIFY_ALIAS=). LifeKeeper Events Generating Email The following LifeKeeper events will generate email notices when LK_NOTIFY_ALIAS is set. LifeKeeper Event Event Description LifeKeeper Startup Complete Sent from a node when LifeKeeper is started on that node. LifeKeeper Shutdown Initiated Sent from a node beginning LifeKeeper shutdown. LifeKeeper Shutdown Complete Sent from a node completing LifeKeeper shutdown. LifeKeeper Manual Switchover Initiated on Sent from the node from which a manual switchover was requested. Server LifeKeeper Manual Sent from the node where the manual switchover was completed listing Switchover Complete the resource successfully recovered. recovered list LifeKeeper Manual Sent from the node where the manual switchover was completed listing Switchover Complete the resource that failed to successfully switchover. failed list LifeKeeper Node Failure Detected Sent from each node within the cluster when a node in that cluster fails. LifeKeeper Node Sent from each node within the cluster that has recovered resources from Recovery Complete for the failed node listing the resource successfully recovered. Server - recovered list LifeKeeper Node Sent from each node within the cluster that has failed to recover Recovery Complete for resources from the failed node listing the resource that failed to Server - failed list successfully recover. LifeKeeper Resource Recovery Initiated Sent from a node recovering a resource; a "Resource Recovery Complete" or "Resource Recovery Failed" message always follows to indicate whether the recovery was completed or failed. LifeKeeper Resource Recovery Complete Sent from the node that issued a "Resource Recovery Initiated" message when the recovery of the resource is completed listing the resource successfully recovered. LifeKeeper Resource Recovery Failed Sent from the node that issued a "Resource Recovery Initiated" message if the resource fails to come into service listing the resource that failed to successfully recover. 68Configuration Configuring LifeKeeper Event Email Notification LifeKeeper Communications Path Up A communications path to a node has become operational. LifeKeeper Communications Path Down A communications path to a node has gone down. Configuring LifeKeeper Event Email Notification Prerequisites The Event Email Notification feature is included as part of the LifeKeeper core functionality and does not require additional LifeKeeper packages to be installed. It does require that email software be installed and configured on each LifeKeeper node that will generate email notification of LifeKeeper events. LifeKeeper uses the mail utility, usually installed by the mailx package to send notifications. The configuration of email is beyond the scope of this LifeKeeper feature. By default, LifeKeeper Event Email Notification is disabled. Configuration Tasks The following tasks must be performed to set up LifeKeeper Event Email Notification. 1. Ensure that the mail utility is available as noted above. 2. Identify the user or users that will receive email notices of LifeKeeper events and set LK_ NOTIFY_ALIAS in the LifeKeeper defaults file /etc/default/LifeKeeper. This can be done either from the command line or by editing the file /etc/default/LifeKeeper and specifying the email address or alias or the list of email addresses or aliases that should receive notification. l From the command line, use the lk_confignotifyalias utility (see the lk_ confignotifyalias(1M) man page for details). This utility will only accept email addresses or aliases separated by commas. l Or, edit the defaults file /etc/default/LifeKeeper to add the email address or alias. Search for the entry LK_NOTIFY_ALIAS= and insert the email address or alias (single or list separated by commas) to the right of the = (no white space around the =). Verifying the Configuration To verify that the configuration is working, initiate a LifeKeeper action (for example, start or stop LifeKeeper or bring a resource in-service manually using the LifeKeeper GUI). Verify that an email message was received by the users specified in LK_NOTIFY_ALIAS in the file /etc/default/LifeKeeper and a message was logged in the LifeKeeper log file. If an email message has not been received, follow your normal debugging procedures for email failures. The SteelEye Protection Suite for Linux69 Disabling Event Email Notification LifeKeeper log can be inspected to determine if there was a problem sending the email message. See Email Notification Troubleshooting for more information. Disabling Event Email Notification To disable the generation of email notices by LifeKeeper, simply remove the assignment of an email address or alias from the LK_NOTIFY_ALIAS environment variable in the file /etc/default/LifeKeeper. This can be accomplished using the lk_confignotifyalias utility from the command line with the "--disable" option (see the lk_confignotifyalias(1M) page for an example). Or, edit /etc/default/LifeKeeper and change the entry for LK_ NOTIFY_ALIAS to LK_NOTIFY_ALIAS=. This must be done on each node that should be disabled from sending email messages. Email Notification Troubleshooting Following are some possible problems and solutions related to email notification of LifeKeeper events. For specific error messages, see the LifeKeeper Message Catalog. Problem: No email messages are received from LifeKeeper. Solution: Verify that the mail utility is installed on the system (it is usually located in /bin/mail). If it is not installed, install the mailx package. If it is installed in some other location, edit the PATH variable in the file /etc/default/LifeKeeper and add the path to the mail utility. Problem: No email messages are received from LifeKeeper. Solution: Check the email configuration and ensure email messages have not be queued for delivery indicating a possible email configuration problem. Also ensure that the email address or addresses specified in LK_NOTIFY_ALIAS are valid and are separated by a comma. Problem: The log file has a "mail returned" error message. Solution: There was some problem invoking or sending mail for a LifeKeeper event, such as a "node failure", as the mail command return the error X. Verify the mail configuration and that LK_NOTIFY_ ALIAS contains a valid email address or list of addresses separated by a comma and ensure that email can be sent to those addresses by sending email from the command line using the email recipient format defined in LK_NOTIFY_ALIAS. Problem: No messages, success or failure, are logged and the user or users designated to receive email have not received any mail when a LifeKeeper Event has occurred, such as a node failure. Solution: Check to see if LK_NOTIFY_ALIAS is, in fact, set to an email address or list of addresses separated by commas. From the command line, use the lk_confignotifyalias utility with the "--query" option to verify the setting (See the lk_confignotifyalias(1M) man page for an example.) Or, search for the entry LK_NOTIFY_ALIAS in the file /etc/default/LifeKeeper. This variable must be set on each LifeKeeper node that will 70Configuration Optional Configuration Tasks generate email notification messages. Also, see the Overview of LifeKeeper Event Email Notification to see if the LifeKeeper event generates an email message (not all events generate email messages). Optional Configuration Tasks Adding the LifeKeeper GUI Icon to the Desktop Toolbar The LifeKeeper GUI icon is automatically added to the desktop menu under the System sub-menu during installation of the LifeKeeper GUI package. (If the icon does not appear, then logout and then login again.) If you also wish to add the icon to your desktop toolbar, do the following: Note: The location of the System menu may vary depending on the Linux distribution you are using. Changing the Icon Position In either Gnome or KDE, if you wish change the location of the LifeKeeper GUI icon on the toolbar, do the following: 1. Right-click on the LifeKeeper GUI icon on the toolbar and choose Move (or Move Applet). 2. You can now move the icon across the length of the toolbar. 3. Left click on the desired location to anchor the icon in its new location. Configuring the Manual Failover Confirmation Option In certain configurations, it may be desirable to require manual confirmation by a system administrator before allowing LifeKeeper to perform a failover recovery of a system that it detects as failed. This capability can be used to prevent LifeKeeper from performing failovers in situations where LifeKeeper detects that a remote system has crashed when it actually has not. This situation is possible in configurations that do not include redundant heartbeat communications paths. This option is configured by setting the confirmso!uname flag on the system which will be performing the failover recovery, where uname refers to the name of the remote system which has failed. See the LCDI-flag(1M) manual page. When this flag is set and LifeKeeper determines that the indicated system has failed, the lk_ confirmso(1M) command must be used to confirm or block switchovers. See the lk_ confirmso(1M) manual page for details on its use, and for information about modifying the default timeout and action values associated with this feature, as specified by the CONFIRMSOTO and CONFIRMSODEF tunables in /etc/default/LifeKeeper. Setting Server Shutdown Strategy The Shutdown Strategy is a LifeKeeper configuration option that governs whether or not resources are switched over to a backup server when a server is shut down. The options are: SteelEye Protection Suite for Linux71 Tuning the LifeKeeper Heartbeat Do Not Switch Over Resources (default) LifeKeeper will not bring resources in service on a backup server during an orderly shutdown. Switch Over Resources LifeKeeper will bring resources in service on a backup server during an orderly shutdown. The Shutdown Strategy is set by default to "Do Not Switch Over Resources." You should decide which strategy you want to use on each server in the cluster, and if you wish, change the Shutdown Strategy to"Switch Over Resources". For each server in the cluster: 1. On the Edit Menu, point to Server and then click Properties. 2. Select the server to be modified. 3. On the General Tab of the Server Properties dialog, select the Shutdown Strategy. Note: The LifeKeeper process must be running during an orderly shutdown for the Shutdown Strategy to have an effect. If LifeKeeper is not running or the resources are not currently in service, the resources will not switch over. Tuning the LifeKeeper Heartbeat Overview of the Tunable Heartbeat The LifeKeeper heartbeat is the signal sent between LifeKeeper servers over the communications path(s) to ensure each server is "alive". There are two aspects of the heartbeat that determine how quickly LifeKeeper detects a failure: l Interval: the number of seconds between heartbeats. l Number of Heartbeats: the number of heartbeats that can be missed before LifeKeeper determines that the communications path is dead, triggering a failover. The heartbeat values are specified by two tunables in the LifeKeeper defaults file /etc/default/LifeKeeper. These tunables can be changed if you wish LifeKeeper to detect a server failure sooner than it would using the default values: l LCMHBEATTIME (interval) l LCMNUMHBEATS (number of heartbeats) The following table summarizes the defaults and minimum values for the tunables over both TCP and TTY heartbeats. The interval for a TTY communications path cannot be set below 2 seconds because of the slower nature of the medium. Tunable Default Value Minimum Value LCMHBEATTIME 5 LCMNUMHBEATS 3 72Configuration 1 (TCP) 2 (TTY) 2 (TCP or TTY) Example Important Note: The values for both tunables MUST be the SAME on all servers in the cluster. Example Consider a LifeKeeper cluster in which both intervals are set to the default values. LifeKeeper sends a heartbeat between servers every 5 seconds. If a communications problem causes the heartbeat to skip two beats, but it resumes on third heartbeat, LifeKeeper takes no action. However, if the communications path remains dead for 3 beats, LifeKeeper will label that communications path as dead, but will initiate a failover only if the redundant communications path is also dead. Configuring the Heartbeat You must manually edit file /etc/default/LifeKeeper to add the tunable and its associated value. Normally, the defaults file contains no entry for these tunables; you simply append the following lines with the desired value as follows: LCMHBEATTIME=x LCMNUMHBEATS=y If you assign the value to a number below the minimum value, LifeKeeper will ignore that value and use the minimum value instead. Configuration Considerations l If you wish to set the interval at less than 5 seconds, then you should ensure that the communications path is configured on a private network, since values lower than 5 seconds create a high risk of false failovers due to network interruptions. l Testing has shown that setting the number of heartbeats to less than 2 creates a high risk of false failovers. This is why the value has been restricted to 2 or higher. l The values for both the interval and number of heartbeats MUST be the SAME on all servers in the cluster in order to avoid a false failovers. Because of this, LifeKeeper must be shutdown on both servers before editing these values. If you wish to edit the heartbeat tunables after LifeKeeper is in operation with protected applications, you may use the command /etc/init.d/lifekeeper stop-daemons, which stops LifeKeeper but does not bring down the protected applications. l LifeKeeper does not impose an upper limit for the LCMHBEATTIME and LCMNUMHBEATS values. But setting these values at a very high number can effectively disable LifeKeeper's ability to detect a failure. For instance, setting both values to 25 would instruct LifeKeeper to wait 625 seconds (over 10 minutes) to detect a server failure, which may be enough time for the server to re-boot and re-join the cluster. Note: If you are using both TTY and TCP communications paths, the value for each tunable applies to both communications paths. The only exception is if the interval value is below 2, which is the minimum for a TTY communications path. For example, suppose you specify the lowest values allowed by LifeKeeper in order to detect failure as quickly as possible: LCMHBEATTIME=1 SteelEye Protection Suite for Linux73 Using Custom Certificates with the SPS API LCMNUMHBEATS=2 LifeKeeper will use a 1 second interval for the TCP communications path, and a 2 second interval for TTY. In the case of a server failure, LifeKeeper will detect the TCP failure first because its interval is shorter (2 heartbeats that are 1 second apart), but then will do nothing until it detects the TTY failure, which will be after 2 heartbeats that are 2 seconds apart. Using Custom Certificates with the SPS API Beginning with Release 7.5, the SteelEye Protection Suite (SPS) API uses SSL/TLS to communicate between different systems. Currently, this API is only partially used and is reserved for internal use only but may be opened up to customer and third party usage in a future release. By default, the product is installed with default certificates that provide some assurance of identity between nodes. This document explains how to replace these default certificates with certificates created by your own Certificate Authority (CA). Note: Normal SPS communication does not use these certificates. How Certificates Are Used In cases where SSL/TLS is used for communications between SPS servers to protect the data being transferred, a certificate is provided by systems to identify themselves. The systems also use a CA certificate to verify the certificate that is presented to them over the SSL connection. Three certificates are involved: l /opt/LifeKeeper/etc/certs/LK4LinuxValidNode.pem (server certificate) l /opt/LifeKeeper/etc/certs/LK4LinuxValidClient.pem (client certificate) l /opt/LifeKeeper/etc/certs/LKCA.pem (certificate authority) The first two certificates must be signed by the CA certificate to satisfy the verification performed by the servers. Note that the common name of the certificates is not verified, only that the certificates are signed by the CA. Using Your Own Certificates In some installations, it may be necessary to replace the default certificates with certificates that are created by an organization's internal or commercial CA. If this is necessary, replace the three certificates listed above with new certificates using the same certificate file names. These certificates are of the PEM type. The LK4LinuxValidNode.pem and LK4LinuxValidClient.pem each contain both their respective key and certificate. The LK4LinuxValidNode.pem certificate is a server type certificate. LK4LinuxValidClient.pem is a client type certificate. If the default certificates are replaced, SPS will need to be restarted to reflect the changes. If the certificates are misconfigured, steeleye-lighttpd daemon will not start successfully and errors will be received in the LifeKeeper log file. If problems arise, refer to this log file to see the full command that should be run. 74Configuration Linux Configuration Linux Configuration Operating System The default operating system must be installed to ensure that all required packages are installed. The minimal operating system install does not contain all of the required packages, and therefore, cannot be used with LifeKeeper. SteelEye Protection Suite for Linux75 Linux Configuration In order to provide the highest level of availability for a LifeKeeper cluster, the kernel version used on a system is very important. The table below lists each supported distribution and version with the kernel that has passed LifeKeeper certification testing. Note: Beginning with SPS 8.1, when performing a kernel upgrade on RedHat Enterprise Linux systems, it is no longer a requirement that the setup script (./setup) from the installation image be rerun. Modules should be automatically available to the upgraded kernel without any intervention as long as the kernel was installed from a proper RedHat package (rpm file). Distribution/Version Supported kernels Red Hat Enterprise Linux 5 and Red Hat Enterprise Linux 5 Advanced Platform for x86 and AMD64/EM64T 2.6.18-8.el5 2.6.18-8.1.1.el5 (default kernel) 2.6.18-53.el5 (Update 1) 2.6.18-92.el5 (Update 2) 2.6.18-128.el5 (Update 3) 2.6.18-164.el5 (Update 4) 2.6.18-194.el5 (Update 5) 2.6.18-238.el5 (Update 6) 2.6.18-274.el5 (Update 7) 2.6.18-308.el5 (Update 8) Red Hat Enterprise Linux 6 for x86 and AMD64/EM64T 2.6.32-71.el6 2.6.32-131.17.1.el6 (Update 1) 2.6.32-220.el6 (Update 2) SUSE SLES 10 for x86 and x86_64 Kernel updates 76Configuration Note: This is the final release containing support for SLES 10. 2.6.16.21-0.8 (default kernel) 2.6.16.46-0.12 (SP1) 2.6.16.60-0.21 (SP2) 2.6.16.60-0.23 2.6.16.60-0.54 (SP3) 2.6.16.60-0.85.1 (SP4) SUSE SLES 11 for x86 and x86_64 2.6.27.19-5 2.6.32.12-0.7 (SP1) 3.0.13-0.27.1 (SP2) Oracle Enterprise Linux 5 for x86 and x86_ 64 2.6.18-8.el5 2.6.18-53.0.0.0.1.el5 (Update 1) 2.6.18-92.0.0.0.1.el5 (Update 2) 2.6.18-128.0.0.0.1.el5 (Update 3) 2.6.18-164.0.0.0.1.el5 (Update 4) 2.6.18-194.0.0.0.1.el5 (Update 5) 2.6.18-238.0.0.0.1.el5 (Update 6) 2.6.18-274.0.0.0.1.el5 (Update 7) 2.6.18-308.0.0.0.1.el5 (Update 8) The Community ENTerprise Operating System (CentOS) 5.0 for x86 and x86_64 2.6.18-8.el5 2.6.18-53.el5 (Update 1) 2.6.18-92.1.10.el5 (Update 2) 2.6.18-128.el5 (Update 3) 2.6.18-164.2.1.el5 (Update 4) 2.6.18-194.el5 (Update 5) 2.6.18-238.el5 (Update 6) 2.6.18-274.3.1.el5 (Update 7) 2.6.18-308.el5 (Update 8) Linux Configuration Dynamic device addition Prior to LifeKeeper startup, Linux must configure all devices. If a LifeKeeper protected device is configured after LifeKeeper is started, LifeKeeper must be stopped on each server that shares the device and then be restarted. This will enable the device detection and validation to confirm the configuration and enable LifeKeeper to access the device. The Linux SCSI driver has several parameters that control which devices will be probed for Logical Units (LUNs): LUN support l List of devices that do not support LUNs – this list of devices are known to NOT support LUNs, so the SCSI driver will not allow the probing of these devices for LUNs. l List of devices that do support LUNs – this list of devices is known to support LUNs well, so always probe for LUNs. l Probe all LUNs on each SCSI device – if a device is not found on either list, whether to probe or not. This parameter is configured by make config in the SCSI module section. While most distributions (including SUSE) have the Probe all LUNs setting enabled by default, Red Hat has the setting disabled by default. External RAID controllers that are typically used in LifeKeeper configurations to protect data are frequently configured with multiple LUNs (Logical Units). To enable LUN support, this field must be selected and the kernel remade. To enable Probe all LUNs without rebuilding the kernel or modules, set the variable max_scsi_luns to 255 (which will cause the scan for up to 255 LUNs). To set the max_scsi_luns on a kernel where the scsi driver is a module (e.g. Red Hat), add the following entry to /etc/modules.conf, rebuild the initial ramdisk and reboot loading that ramdisk: options scsi_mod max_scsi_luns=255 To set the max_scsi_luns on a kernel where the scsi driver is compiled into the kernel (e.g. SUSE), add the following entry to /etc/lilo.conf: append="max_scsi_luns=255" Note: For some devices, scanning for 255 LUNs can have an adverse effect on boot performance (in particular devices with the BLIST_SPARSELUN defined). The Dell PV650F is an array where this has been experienced. To avoid this performance problem, set the max_scsi_luns to the maximum number of LUNs you have configured on your arrays such as 16 or 32. For example, append="max_scsi_luns=16" SteelEye Protection Suite for Linux77 Data Replication Configuration While running the SPS Installation setup script, you may encounter a message regarding a failed dependency requirement for a libstdc++ library. This library is provided in one of several compat-libstdc++ rpm packages, depending on the hardware platform and Linux distribution you are running. Even on 64-bit systems, LifeKeeper requires the use of the 32-bit architecture package rather than the 64-bit version (x86_64) and will fail to start due to a missing required library if the 64-bit architecture version is installed. libstdc++ library requirement To avoid (or resolve) this problem, install the 32-bit architecture version of the compat-libstdc++ package found on the OS installation media and run (or re-run) the I/S setup script. Note that some distributions also carry more than one 32-bit version of this package (e.g. compat-libstdc++-296-2.96-132.7.2 and compatlibstdc++-33-3.2.3-47.3). In this situation, simply install both versions to ensure that the required library is installed. libXp and Similar to the item above, you may also encounter installation messages regarding libXt library failed dependency requirements for the libXp and libXt libraries. LifeKeeper requires requirement the 32-bit versions of these libraries, even on 64-bit platforms. s Data Replication Configuration Item Description SteelEye DataKeeper supports Linux kernel versions 2.6 and higher. Several DataKeeper features have additional minimum kernel requirements. The table below lists each DataKeeper feature with an “X” indicating which Linux distributions the feature is supported on. RED HAT DataKeeper Feature SteelEye DataKeeper Feature/ Distribution Matrix SUSE RHEL RHEL SLES SLES 5+ 6 10 11 Multiple Target Support (kernel 2.6.7+) X X X X Bitmap Intent Logging (kernel 2.6.16+) X X X X Asynchronous (WAN) Replication (kernel 2.6.16+) X X X X Bitmap Merging (2.6.27+) X* X *Applies X to RHEL 5.4 or later. Bitmap merging code was backported into the Red Hat EL5 Update 4 kernel by Red Hat. 78Configuration Network Configuration Item Description SteelEye DataKeeper documentation The documentation for SteelEye DataKeeper is located within the SteelEye Protection Suite Technical Documentation on the SIOS Technology Corp. Website. Network Configuration Item Description LifeKeeper-protected IP addresses are implemented on Linux as logical interfaces. When a logical interface is configured on Linux, a route to the subnet associated with the logical interface is automatically added to the routing table, even if a route to that subnet already exists (for example, through the physical interface). This IP Recovery additional route to the subnet could possibly result in multiple routing-table entries to the same subnet. Kit impact on routing If an application is inspecting and attempting to verify the address from which table incoming connections are made, the multiple routing-table entries could cause problems for such applications on other systems (non-LifeKeeper installed) to which the LifeKeeper system may be connecting. The multiple routing table entries can make it appear that the connection was made from the IP address associated with the logical interface rather than the physical interface. IP subnet mask EEpro100 driver initialization For IP configurations under LifeKeeper protection, if the LifeKeeper-protected IP address is intended to be on the same subnet as the IP address of the physical interface on which it is aliased, the subnet mask of the two addresses must be the same. Incorrect settings of the subnet mask may result in connection delays and failures between the LifeKeeper GUI client and server. The Intel e100 driver should be installed to resolve initialization problems with the eepro100 driver on systems with Intel Ethernet Interfaces. With the eepro100 driver, the following errors may occur when the interface is started at boot time and repeat continuously until the interface is shut down. eth0: card reports no Rx buffers eth0: card reports no resources Application Configuration Item Description The initialization files for databases need to be either on a shared device and Database symbolically linked to specified locations in the local file system or kept on initialization separate systems and manually updated on both systems when changes need to files be implemented. SteelEye Protection Suite for Linux79 Storage and Adapter Configuration Item Localized Oracle mount points Description Localized Oracle environments are different depending on whether you connect as internal or as sysdba. A database on a localized mount point must be created with “connect / as sysdba” if it is to be put under LifeKeeper protection. Upgrading an SPS protected Apache application as part of upgrading the Linux operating system requires that the default server instance be disabled on start up. Apache updates If your configuration file (httpd.conf) is in the default directory (/etc/httpd/conf), the Red Hat upgrade will overwrite the config file. Therefore, you should make a copy of the file before upgrading and restore the file after upgrading. Also, see the Specific Configuration Considerations for Apache Web Server section in the Apache Web Server Recovery Kit Administration Guide. Storage and Adapter Configuration Item Multipath I/O and Redundant Controllers Description There are several multipath I/O solutions either already available or currently being developed for the Linux environment. SIOS Technology Corp. is actively working with a number of server vendors, storage vendors, adapter vendors and driver maintainers to enable LifeKeeper to work with their multipath I/O solutions. LifeKeeper’s use of SCSI reservations to protect data integrity presents some special requirements that frequently are not met by the initial implementation of these solutions. Refer to the technical notes below for supported disk arrays to determine if a given array is supported with multiple paths and with a particular multipath solution. Unless an array is specifically listed as being supported by LifeKeeper with multiple paths and with a particular multipath solution, it must be assumed that it is not. 80Configuration Storage and Adapter Configuration Item Description In multipath configurations, performing heavy I/O while paths are being manipulated can cause a system to temporarily appear to be unresponsive. When the multipath software moves the access of a LUN from one path to another, it must also move any outstanding I/Os to the new path. The rerouting of the I/Os can cause a delay in the response times for these I/Os. If additional I/Os continue to be issued during this time, they will be queued in the system and can cause a system to run out of memory available to any process. Under very heavy I/O loads, these delays and low memory conditions can cause the system to be unresponsive such that LifeKeeper may detect a server as down and initiate a failover. There are many factors that will affect the frequency at which this issue may be seen. Heavy I/O in Multipath Configurations l The speed of the processor will affect how fast I/Os can be queued. A faster processor may cause the failure to be seen more frequently. l The amount of system memory will affect how many I/Os can be queued before the system becomes unresponsive. A system with more memory may cause the failure to be seen less frequently. l The number of LUNs in use will affect the amount of I/O that can be queued. l Characteristics of the I/O activity will affect the volume of I/O queued. In test cases where the problem has been seen, the test was writing an unlimited amount of data to the disk. Most applications will both read and write data. As the reads are blocked waiting on the failover, writes will also be throttled, decreasing the I/O rate such that the failure may be seen less frequently. For example, during testing of the IBM DS4000 multipath configuration with RDAC, when the I/O throughput to the DS4000 was greater than 190 MB per second and path failures were simulated, LifeKeeper would (falsely) detect a failed server approximately one time out of twelve. The servers used in this test were IBM x345 servers with dual Xeon 2.8GHz processors and 2 GB of SteelEye memory connected ProtectiontoSuite a DS4400 for Linux81 with 8 volumes (LUNs) per server in use. To avoid the failovers, the LifeKeeper parameter Storage and Adapter Configuration Item Special Considerations for Switchovers with Large Storage Configurations Description With some large storage configurations (for example, multiple logical volume groups with 10 or more LUNs in each volume group), LifeKeeper may not be able to complete a sendevent within the default timeout of 300 seconds when a failure is detected. This results in the switchover to the backup system failing. All resources are not brought in-service and an error message is logged in the LifeKeeper log. The recommendation with large storage configurations is to change SCSIERROR from “event” to “halt” in the /etc/default/LifeKeeper file. This will cause LifeKeeper to perform a “halt” on a SCSI error. LifeKeeper will then perform a successful failover to the backup system. HP MA8000 Certified by SIOS Technology Corp. with QLogic 2200 adapters. Use the qla2200 driver version 6.04.50 or later. HP MSA1000 and MSA1500 Certified by SIOS Technology Corp. with HP FCA2214 (QLA 2340) adapters in both single and multiple path configurations. Configuration requirements and notes for support of the MSA1000 in a multipath configuration are provided in the separate HP Multipath I/O Configurations section. HP 3PAR F200/F400/T400/T800 The HP 3PAR was tested by a SIOS Technology Corp. partner with the following configurations: HP 3PAR T400 (Firmware (InForm OS) version 2.3.1 MU4) using HP 82Q 8Gb Dual Port PCI-e FC HBA AJ764A (Firmware version 5.03.02, driver version 8.03.01.05.05.06-k) with DMMP (devicemapper-1.02.55-2.el5, device-mapper-multipath0.4.7-42.el5). The test was performed with LifeKeeper for Linux v7.3 using RHEL 5.6 (kernel 2.6.18238.el5). See the Device Mapper Multipath I/O Configurations section also, especially in the case of F400. 82Configuration Storage and Adapter Configuration Item HP 3PAR V400 Description The HP 3PAR V400 was tested by a SIOS Technology Corp. partner with the following configurations: HP 3PAR V400 (Firmware (InForm OS) version 3.1.1) using HP 82E 8Gb Dual Port PCI-e FC HBA AJ763A/AH403A (Firmware version 1.11A5 (U3D1.11A5) sli-3, driver version 8.3.5.30.1p (RHEL bundled)) with DMMP (device-mapper-1.02.62-3, devicemapper-multipath-0.4.9-41.el6). The test was performed with LifeKeeper for Linux v7.5 using RHEL 6.1 . HP EVA 3000/5000 and EVA 4X00/6X00/8X00 (XCS 6.x series firmware) Certified by SIOS Technology Corp. with HP FCA2214 (QLA 2340) adapters in both single and multiple path configurations. Configuration requirements and notes for support of the EVA in a multipath configuration are provided in the separate HP Multipath I/O Configurations section. HP EVA4400 Certified by Hewlett-Packard Company. Both single path and multipath configuration require the DMMP Recovery Kit and the HP DMMP software.The EVA4400 has been qualified to work with LifeKeeper on Red Hat EL 5 Update 3 and Novell SLES 11. Novell testing was completed by the HP Storage Group. HP EVA6400/8400 Certified by Hewlett-Packard Company. Both single path and multipath configuration require the DMMP Recovery Kit and the HP DMMP software.The EVA6400/8400 has been qualified to work with LifeKeeper on Red Hat EL 5 Update 3 and Novell SLES 11. Novell testing was completed by the HP Storage Group. HP EVA 8100 (XCS 6.x series firmware) Certified by a SIOS Technology Corp. partner with HP FC 1142SR adapters in DMMP multiple path configurations. Configuration requirements and notes for support of the EVA in a multipath configuration are provided in the separate Device Mapper Multipath I/O Configurations section. EVA 8100 was tested with XCS v6.200 firmware with device-mapper-multipath-0.4.7.-23.el5 with the DMMP Recovery Kit v7.3 with RHEL 5.3. SteelEye Protection Suite for Linux83 Storage and Adapter Configuration Item Description HP MSA2000fc Certified by Hewlett-Packard Company with Fibre Channel in both single path and multipath configurations. Models tested were the MSA2012fc and the MSA2212fc with the QLogic QMH2462 HBA using driver version 8.01.07.25 in a single path configuration. The multipath configuration testing was completed using the same models with HP DMMP and the LifeKeeper DMMP Recovery Kit. HP MSA2000i Certified by Hewlett-Packard Company with iSCSI in a multipath configuration. The model used for testing was the MSA2012i with HP DMMP. Single path testing was not performed by HP; however, SIOS Technology Corp. supports single path configurations with HP DMMP and the LifeKeeper DMMP Recovery Kit. HP MSA2000sa Certified by Hewlett-Packard Company with SA in both single path and multipath configurations. The model used for testing was the MSA2012sa. Both single path and multipath configuration require the DMMP Recovery Kit and the HP DMMP software. HP supports direct connect configurations only at this time. HP MSA 2300fc Certified by Hewlett-Packard Company with Fibre Channel in both single and multipath configurations. The model tested was the MSA2324fc with the HP AE312A (FC2142SR) HBA using driver version 8.02.09-d0-rhel4.7-04 in a single path configuration. The multipath configuration testing was completed using the same model with HP DMMP and the LifeKeeper DMMP Recovery Kit. HP MSA 2300i Certified by Hewlett-Packard Company. Both single path and multipath configuration require the DMMP Recovery Kit and the HP DMMP software. HP MSA 2300sa Certified by Hewlett-Packard Company. Both single path and multipath configuration require the DMMP Recovery Kit and the HP DMMP software.Only MSA2300sa rack and tower configurations with DMMP are supported. Blade configurations with LifeKeeper are not supported. 84Configuration Storage and Adapter Configuration Item Description HP P2000 G3 MSA SAS Certified by SIOS Technology Corp. in multipath configurations using the Device Mapper Multipath Recovery Kit. LifeKeeper for Linux can support up to 11 LUNs in a single cluster with the P2000 G3 SAS array. HP P4000/P4300 G2 Certified by SIOS Technology Corp. in both a single path and multipath configuration on RHEL 5.5 using the built-in SCSI support in the core of LifeKeeper with iSCSI Software Initiators. Model tested was the HP P4300 G2 7.2TB SAS Starter SAN BK716A. The default kit supports single path storage as well as some multipath storage. In general, the multipath storage is limited to active/passive configurations. HP P4500 G2 Certified by Hewlett-Packard Company guaranteeing the compatibility of P4500 with P4000 (shown above). HP P6300 EVA FC This storage unit was tested by a SIOS Technology Corp. partner in multipath configuration on RHEL 6.1 using the Device Mapper Multipath Recovery Kit. Certified by Hewlett-Packard Company using SteelEye LifeKeeper for Linux v7.2 or later. Model tested was the HP P9500/XP and has been qualified to work with LifeKeeper on the following: l HP P9500/XP Red Hat Enterprise for 32-bit, x64 (64-bit; Opteron and Intel EMT64) RHEL 5.3, RHEL 5.4, RHEL 5.5 l SuSE Enterprise Server for 32-bit, x64 (64-bit; Opteron and Intel EMT64) SLES 10 SP3, SLES 11, SLES 11 SP1 l Native or Inbox Clustering Solutions RHCS and SLE HA SteelEye Protection Suite for Linux85 Storage and Adapter Configuration Item HP XP20000/XP24000 Description Certified by SIOS Technology Corp. using LifeKeeper forLinux with DMMP ARK in RHEL 5, SLES10 and SLES 11,configured as multipath by DMMP. The model numbers of tested storage are XP20000 and XP24000. The connection interface is FC. The model number of tested HBA is QLogic QMH2562 and firmware is 4.04.09; driver version is 8.03.00.10.05.04-k. SIOS Technology Corp. recommends that user change setting of path_checker into readsector0 in XP storage. IBM DS4000 Storage (formerly known as IBM FAStT) Certified by SIOS Technology Corp. with QLogic 2200 and 2340 adapters in both single and multiple path configurations. Use the qla2200 or qla2300 driver, version 6.03.00 or later, as defined by IBM.When using IBM DS4000 storage arrays systems with Emulex FC adapters, use the lpfc driver versions specified in the Emulex Drivers item below. Single path (i.e. single loop) support: In a single path configuration, a fibre channel switch or hub is required for LifeKeeper to operate properly. Multiple path (i.e. dual loop) support: Multiple paths are supported with the DS4000 storage array models that are released with RDAC support (currently the DS4300, DS4400 and DS4500 models). Fibre channel switches and hubs are not required with multiple path configurations with RDAC. RDAC is a software package that handles path failovers so that an application is not affected by a path failure. The steps to install and setup RDAC are slightly different depending on the version being used. Refer to the IBM RDAC documentation for the instructions to install, build and setup. IBM DS5000 Certified by partner testing in a multipath configuration using IBM RDAC. Please consult the IBM website to obtain the supported RDAC drivers for your distribution. 86Configuration Storage and Adapter Configuration Item IBM DS3500 (FC Model) Description Certified by SIOS Technology Corp. in single path and multipath configurations on Red Hat Enterprise Linux Server Release 5.5 (Tikanga), HBA: QLE2560, QLE2460, RDAC: RDAC 09.03.0C05.0331. RDAC is needed for both single path and multipath. Note: SAS and iSCSI connect are not supported. IBM DS3400 Storage Certified by SIOS Technology Corp. with QLogic 2300 adapters in both single and multiple path configurations. Use the qla2200 or qla2300 driver, version 6.03.00 or later, as defined by IBM. Please refer to the table entry for IBM DS4000 Storage for more information on single and multiple path support. IBM System Storage DS3300 Certified by SIOS Technology Corp. with iSCSI Software Initiators. This storage device works in a two node LifeKeeper cluster in both single and multipath configurations. It is required that the IBM RDAC driver be installed on both servers for either single or multipath configurations. If you are using a multipath configuration, you must set SCSIHANGMAX to 50 in the /etc/default/LifeKeeper file.Please consult the IBM website to obtain the supported RDAC drivers for your distribution. IBM System Storage DS3200 Certified by SIOS Technology Corp. with the IBM SAS HBA (25R8060). This storage device works in a two node LifeKeeper cluster in both single and multipath configurations. It is required that the IBM RDAC driver be installed on both servers for either single or multipath configurations. Please consult the IBM website to obtain the supported SAS and RDAC drivers for your Linux distribution. IBM DS400 Certified by SIOS Technology Corp. in single path configurations only. Use the firmware version 7.01 build 0838 or later, as defined by IBM. IBM San Volume Controller (SVC) Certified by partner testing in a single path configuration. Certified by SIOS Technology Corp. in multipath configurations using the the Device Mapper Multipath Recovery Kit. SteelEye Protection Suite for Linux87 Storage and Adapter Configuration Item IBM eServer xSeries Storage Solution Server Type445-R / Type445-FR for SANmelody IBM Storwize V7000 iSCSI Description Certified by partner testing with IBM TotalStorage FC2-133 Host Bus Adapters in multiple path configurations. Use the qla2300 driver, version 7.00.61(non-failover) or later, as defined by IBM.Multiple path support: Multiple paths are supported with the IBM eServer xSeries Storage Solution Server Type445-R / Type445-FR for SANmelody, using the Multipath Linux Driver for IBM SANmelody Solution Server, version 1.0.0 or later. The IBM Storwize V7000 (Firmware Version 6.3.0.1) has been certified by partner testing using iSCSI (iscsi-initiator-utils-6.2.0.87234.el6.x86_64) with DMMP (device-mapper1.02.66-6.el6, device-mapper-multipath-0.4.946.el6). The test was performed with LifeKeeper for Linux v7.5 using RHEL 6.2. Restriction: IBM Storwize V7000 must be used in combination with the Quorum/Witness Server Kit and STONITH. Disable SCSI reservation by setting the following in /etc/default/LifeKeeper: RESERVATIONS=none IBM Storwize V7000 FC 88Configuration The IBM Storwize V7000 FC has been certified by partner testing in multipath configurations on Red Hat Enterprise Linux Server Release 6.2 (Tikanga), HBA: QLE2562 DMMP: 0.4.9-46. Storage and Adapter Configuration Item Description SIOS Technology Corp. has certified the Dell PowerVault storage array for use in a 2-node cluster with the Dell PERC 2/DC, Dell PERC 4/DC, and LSI Logic MegaRAID Elite 1600 storage controllers, as long as the following set of configuration requirements are met. (Note that the Dell PERC 3/DC is the OEM version of the MegaRAID Elite 1600.) These requirements are necessary because these host-based RAID controllers do not provide support for SCSI reservations and unique device IDs, which LifeKeeper normally requires. 1. The Dell PowerVault storage should not be mixed with any other types of shared storage to be managed by LifeKeeper within the same cluster. 2. Follow the instructions provided with your hardware for configuring the Dell PowerVault storage and the controllers for use in a cluster. Specifically, this includes getting into the controller firmware setup screens simultaneously on both systems, selecting the adapter properties page, setting “Cluster Mode” to “Enabled”, and setting the “Initiator ID” to 6 on one system and to 7 on the other. You should then make sure that both controllers can see the same LUNs, and that the Linuxmegaraid driver is properly configured to be loaded. Dell PowerVault with Dell PERC and LSI Logic MegaRAID controllers 3. Because this storage configuration does not support SCSI reservations, you must disable the use of SCSI reservations within LifeKeeper. This is accomplished by adding the option “RESERVATIONS=none” to the LifeKeeper defaults file, /etc/default/LifeKeeper, on both nodes in the cluster. You must manually configure a unique ID for each LUN to be managed by LifeKeeper, using the /opt/LifeKeeper/bin/lkID utility. The assigned ID must be unique within the cluster and should be sufficiently constructed to avoid potential future conflicts. The lkID utility will automatically generate a unique ID for you if desired. Refer to the lkID(8) man page for more details about the use of the Protection Suite for Linux89 utility,SteelEye the IDs that it generates, where the ID is placed, and any possible restrictions. Also, see the note regarding Storage and Adapter Configuration Item Description Dell | EMC (CLARiiON) CX200 EMC has approved two QLogic driver versions for use with this array and the QLA2340 adapter: the qla2x00-clariion-v6.03.00-1 and the qla2x00clariion-v4.47.18-1. Both are available from the QLogic website at www.qlogic.com. DELL MD3000 Certified by Partner testing in both single path and multipath configurations with DELL SAS 5/e adapters. This was specifically tested with RHEL4; however, there are no known issues using other LifeKeeper supported Linux distributions or versions.RDAC is required for both single path and multipath configurations.For single path configurations, use the HBA host type of "Windows MSCS Cluster single path". For multipath configurations, use the HBA host type of “Linux". Dell PowerVault MD3200/3220 was tested by a SIOS Technology Corp. partner with the following configuration: Dell PowerVault MD3200/3220 90Configuration DMMP with the DMMP Recovery Kit on RHEL 5.5. Must be used with the combination of Quorum/Witness Server Kit and STONITH. To disable SCSI reservation, set RESERVATIONS=none in "/etc/default/LifeKeeper". Server must have interface based on IPMI 2.0. Storage and Adapter Configuration Item Description The Dell EqualLogic was tested by a SIOS Technology Corp. partner with the following configurations: l Dell EqualLogic PS5000 using SCSI -2 reservations with the iscsi-initiator (Software initiator) using Red Hat Enterprise Linux ES release 4 (Nahant Update 5) with kernel 2.6.9-55.EL. The testing was completed using iscsiinitiator-utils-4.0.3.0-5 and multipath configuration using bonding with activebackup (mode=1). l Dell EqualLogic PS5000 using DMMP with the DMMP Recovery Kit with RHEL 5 with iscsi-initiator-utils-6.2.0.8650.8.el5. With a large number of luns (over 20), change the REMOTETIMEOUT setting in /etc/default/LifeKeeper to REMOTETIMEOUT=600. Dell EqualLogic PS5000 The Dell EqualLogic was tested by a SIOS Technology Corp. partner with the following configurations: Dell EqualLogic PS4000/4100/4110/6000/6010/6100/6110/6500/ Dell EqualLogic 6510 using DMMP with the DMMP Recovery Kit PS4000/4100/4110/6000/6010/6100/6110/6500/with RHEL 5.3 with iscsi-initiator-utils-6.2.0.8686510 0.18.el5. With a large number of luns (over 20), change the REMOTETIMEOUT setting in /etc/default/LifeKeeper to REMOTETIMEOUT=600. FalconStor Network Storage Server (NSS) Certified by SIOS Technology Corp.The following parameters should be set in /etc/multipath.conf: polling_interval 5 no_path_retry 36 Hitachi HDS RAID 700 (VSP) The RAID 700 (VSP) was tested by a SIOS Technology Corp. partner organization in a single path configuration as follows: OS: Red Hat Enterprise Linux Server Release 5.5 (Tikanga) HBA: Qlogic QLE2562 (Driver:OSbundle-8.03.01.04.05.05-k) / Emulex LPe12002 (Driver:OSbundle-8.2.0.63.3p). Note: Multipath configuration is not yet certified. SteelEye Protection Suite for Linux91 Storage and Adapter Configuration Item Description Certified by SIOS Technology Corp. in a single path configuration with QLogic 23xx adapters. Use the qla2300 driver, version 6.04 or later. Hitachi HDS 9570V, 9970V and 9980V 92Configuration Note: SIOS Technology Corp. recommends the use of only single controller (i.e. single loop) configurations with these arrays, using a fibre channel switch or hub. However, it is also possible to configure a LifeKeeper cluster in which each server is connected directly to a separate controller or port on the Hitachi array, without the use of a switch or hub, as long as each server has only a single path to the storage. It should be noted that LifeKeeper behaves quite differently from its normal behavior in a split-brain scenario using this configuration. LifeKeeper normally performs a failover of an active hierarchy in a split-brain scenario causing the original primary node to reboot as a result of the stolen SCSI reservation. When the Hitachi arrays are configured with the servers directly connected to multiple controllers or ports, certain timing peculiarities within the Hitachi arrays prevent LifeKeeper from acquiring a SCSI reservation on the backup node and the failover attempt fails, leaving at least part of the hierarchy running on the original primary node. For this reason, it is important that all LifeKeeper resources in such a configuration have a direct line of dependencies to one of the disk resources such that no resources can be brought in-service if the disk resources cannot be transferred. This is particularly true of any IP resources in the hierarchy. Storage and Adapter Configuration Item Description There are certain specific “host mode” settings required on the Hitachi arrays in order to allow LifeKeeper to work properly in this kind of directly connected configuration.For the 9570V array, the following settings are required: Hitachi HDS 9980V Host connection mode1 --> Standard mode Host connection mode2 --> Target Reset mode (Bus Device Reset) Third Party Process Logout Spread mode LIP port all reset mode --> LIP port all reset mode For the 9970V and 9980V arrays, the “host mode” must be set to “SUN”.The HDS 9980V was tested by a SIOS Technology Corp. partner organization in a multipath configuration using DMMP on SLES9 SP3 with LSI Logic Fusion HBAs. Refer to the Device Mapper Multipath I/O Configurations section for details. nStor NexStor 4320F This storage was tested by a SIOS Technology Corp. partner organization, in a dual controller configuration with each server in a 2-node cluster directly connected to a separate controller in the array. With this configuration, the LifeKeeper behavior in a split-brain scenario is the same as that described above for the Hitachi HDS storage arrays, and the same hierarchy configuration precautions should be observed. ADTX ArrayMasStor L and FC-II These storage units were tested by a SIOS Technology Corp. partner organization, both in a single path configuration with a switch and in a dual controller configuration with each server in a 2-node cluster directly connected to a separate controller in the array. In both configurations, the LifeKeeper behavior in a split-brain scenario is the same as that described above for the Hitachi HDS storage arrays, and the same hierarchy configuration precautions should be observed.The ArrayMasStor L was also tested and certified by our partner organization in a multipath configuration using QLogic 2340 and 2310 host bus adapters and the QLogic failover driver, version 6.06.10. SteelEye Protection Suite for Linux93 Storage and Adapter Configuration Item Description Fujitsu ETERNUS3000 This storage unit was tested by a SIOS Technology Corp. partner organization in a single path configuration only, using the PGFC105 (Emulex LP9001), PG-FC106 (Emulex LP9802), and PG-PC107 host bus adapters and the lpfc driver v7.1.14-3. Fujitsu ETERNUS 6000 This storage unit was tested by a SIOS Technology Corp. partner organization in a single path configuration only, using the PGFC106 (Emulex LP9802) host bus adapter and the lpfc driver v7.1.14-3. Fujitsu FibreCAT S80 This array requires the addition of the following entry to /etc/default/LifeKeeper: ADD_LUN_TO_DEVICE_ID=TRUE Fujitsu ETERNUS SX300 This storage unit was tested by a SIOS Technology Corp. partner organization in a multipath configuration only using the PG-FC106 (Emulex LP9802) and PG-FC107 host bus adapters and the lpfc driver v7.1.14. The RDAC driver that is bundled with the SX300 is required. Fujitsu ETERNUS2000 Model 50 This storage unit was tested by a SIOS Technology Corp. partner organization in a multipath configuration with dual RAID controllers using the PG-FC202 (LPe1150-F) host bus adapter with the EMPD multipath driver. Firmware version WS2.50A6 and driver version EMPD V2.0L12 were used in the testing. Testing was performed with LifeKeeper for Linux v6.2 using RHEL4 (kernel 2.6.967.ELsmp) and RHEL5 (kernel 2.6.18-53.el5). Fujitsu ETERNUS4000 Model 300 This storage unit was tested by a SIOS Technology Corp. partner organization in a multipath configuration with dual RAID controllers using the PG-FC202 (LPe1150-F) host bus adapter with the EMPD multipath driver. 94Configuration Storage and Adapter Configuration Item Fujitsu ETERNUS2000 Model 200 Description This storage unit was tested by Fujitsu Limited in a multipath configuration using PG-FC203L (Emulex LPe1250-F8) host bus adapter (Firmware version 1.11A5, driver version 8.2.0.48.2p) with EMPD multipath driver (driver version V2.0L20, patch version T000973LP-1). The test was performed with LifeKeeper for Linux v7.1 using RHEL5 (kernel 2.6.18-164.el5). Fujitsu ETERNUS VS850 Certified by vendor support statement in a single path configuration and in multipath configurations using the Device Mapper Multipath Recovery Kit. This storage unit was tested by a SIOS Technology Corp. partner organization, in a multipath configuration with dual RAID controllers, using the QLogic PCI to Fibre Channel Host Adapter for QLE2462 (with Firmware version 4.03.01 [IP], Driver version 8.02.08) with storage firmware J200. Testing was performed with LifeKeeper for Linux v6.2 with DMMP Recovery Kit v6.2 using the following distributions and kernels: RHEL4 DMMP Newtech SweeperStor SATA and SAS Emulex LP 11002 8.0.16.32 or later Emulex LPe 11002 8.0.16.32 or later Qlogic QLA 2462 8.01.07 or later Qlogic QLE 2462 8.01.07 or later RHEL5 DMMP Emulex LP 11002 8.1.10.9 or later Emulex LPe 11002 8.1.10.9 or later Qlogic QLA 2462 8.01.07.15 or later Qlogic QLE 2462 8.01.07.15 or later SLES10 DMMP Emulex LP 11002 8.1.10.9 or later Emulex LPe 11002 8.1.10.9 or later Qlogic QLA 2462 8.01.07.15 or later Qlogic QLE 2462 8.01.07.15 or later Note: DMMP is required for multipath configurations. SteelEye Protection Suite for Linux95 Storage and Adapter Configuration Item Description This storage unit was tested by a SIOS Technology Corp. partner with the following single path configuration: TID MassCareRAID l Host1 Qlogic QLE2562 (HBA BIOS 2.10, driver version qla2xxx-8.03.01.04.05.05-k *) l Host2 HP AE312A (HBA BIOS 1.26, driver version qla2xxx-8.03.01.04.05.05-k *) l The test was performed with LifeKeeper for Linux v7.3 using Red Hat Enterprise Linux 5.5 (kernel2.6.18-194.el5) LifeKeeper for Linux can support up to 11 LUNs in a single cluster with the TID MassCareRAID array. TIDMassCareRAIDⅡ This storage unit was tested by a SIOS Technology Corp. partner organization in a multipath configuration using the Qlogic driver with SCSI-2 reservations with no Fibre Channel switches. Red Hat Enterprise Linux ES release 4 Update6 was used with the 2.6.9-67.ELsmp kernel. The FAILFASTTIMER setting in /etc/default/LifeKeeper needs to be changed from 5 to 30. Sun StorageTek 2540 This storage unit was tested by a SIOS Technology Corp. partner organization, in a multipath configuration using RDAC with Dual RAID Controllers, using the StorageTek 4Gb PCI-E Dual FC Host Bus Adapter and the Sun StorageTek 4Gb PCI Dual FC Network Adapter. QLogic Drivers For other supported fibre channel arrays with QLogic adapters, use the qla2200 or qla2300 driver, version 6.03.00 or later. Emulex Drivers For the supported Emulex fibre channel HBAs, you must use the lpfc driver v8.0.16 or later. Adaptec 29xx Drivers For supported SCSI arrays with Adaptec 29xx adapters, use the aic7xxx driver, version 6.2.0 or later, provided with the OS distribution. 96Configuration Storage and Adapter Configuration Item Description This storage device was successfully tested with SUSE SLES 9 Service Pack 3, Device Mapper - Multipath and Qlogic 2340 adapters. We expect that it should work with other versions, distributions and adapters; however, this has not been tested. See DataCore for specific support for these and other configurations. DataCore SANsymphony One issue was found during failover testing with heavy stress running where multiple server reboots would result in a server only configuring a single path. The test configuration consisted of a 3-node cluster where 2 servers would be killed simultaneously. After the 2 servers rebooted, about 50% of the time one server would only have a single path configured. A reboot of the server would resolve the problem. This issue was never seen when only a single server was rebooted. This issue has been reported to DataCore. This item is not considered a critical issue since at least one path continues to be available. This storage device was successfully tested with Red Hat EL 4 Update 3 and Qlogic 2340 adapters. We expect that LifeKeeper would also work with other versions, distributions and adapters; however, this has not been tested. See Xiotech for specific support for these and other configurations. The Magnitude 3D was tested in a single path configuration. Xiotech Magnitude 3D During setup, one configuration issue was detected where only 8 LUNs were configured in the OS. This is due to the Magnitude 3D specifying in the SCSI inquiry data that it is a SCSI-2 device. The SCSI driver in the 2.6 kernel will not automatically address more than 8 LUNs on a SCSI-2 device unless the device is included in its exception list. The Magnitude 3D is not in that list. Xiotech provided a workaround for testing to issue a command to /proc/scsi/scsi to configure each LUN. SteelEye Protection Suite for Linux97 HP Multipath I/O Configurations HP Multipath I/O Configurations Item Description MSA1000 and MSA1500 Multipath Requirements with Secure Path LifeKeeper supports Secure Path for multipath I/O configurations with the MSA1000 and MSA1500. This support requires the use of the Secure Path v3.0C or later. HP P2000 LifeKeeper supports the use of HP P2000 MSA FC. This storage unit was tested by SIOS Technology Corp. in a multipath configuration on RHEL 5.4. EVA3000 and EVA5000 Multipath Requirements with Secure Path LifeKeeper requires the following in order to support the EVA3000 and EVA5000 in a multipath I/O configuration using Secure Path: 1. EVA VCS v2.003, or v3.00 or later. For each server, use Command View v3.00 to set the Host OS type to Custom and the Custom Mode Number as hex000000002200282E. See the HP Secure Path Release Notes for detailed instructions. 2. HP Secure Path v3.0C or later. Multipath Cluster Installation Using Secure Path For a fresh installation of a multiple path cluster that uses Secure Path, perform these steps: 1. Install the OS of choice on each server. 2. Install the clustering hardware: FCA2214 adapters, storage, switches and cables. 3. Install the HP Platform Kit. 4. Install the HP Secure Path software. This will require a reboot of the system. Verify that Secure Path has properly configured both paths to the storage. See Secure Path documentation for further details. 5. Install LifeKeeper. Multipath LifeKeeper for Linux supports the use of the QLogic failover driver for multipath Support for I/O configurations with the MSA1000 and MSA1500. This support requires the MSA1000 and use of the QLogic driver v7.00.03 or later.. MSA1500 with QLogic Failover Driver 98Configuration HP Multipath I/O Configurations Multipath Support for EVA with QLogic Failover Driver LifeKeeper supports the EVA 3000/5000 and the EVA 4X00/6X00/8X00 with the QLogic failover driver. The 3000/5000 requires firmware version 4000 or higher. The 4000/6000/8000 requires firmware version 5030 or higher. The latest QLogic driver supplied by HP (v8.01.03 or later) should be used. The host connection must be "Linux". There is no restriction on the path/mode setting by LifeKeeper. Notice that previous restrictions for a special host connection, the setting of the preferred path/mode and the ports that can be used on the EVA do not exist for this version of firmware and driver. Upgrading a Single Path MSA1000/ MSA1500 or EVA Configuration to Multiple Paths with Secure Path To upgrade a cluster from single path to multiple paths, perform the following steps (this must be a cluster-wide upgrade): 1. Upgrade LifeKeeper to the latest version following the normal upgrade procedures. This step can be accomplished as a rolling upgrade such that the entire cluster does not have to be down. 2. Stop LifeKeeper on all nodes. The cluster will be down until the hardware upgrade is complete and step 5 is finished for all nodes. 3. Install/upgrade the HP Platform Kit on each node. 4. Install the HP Secure Path software on each node. This will require a reboot of the system. Verify that Secure Path has properly configured both paths to the storage. See Secure Path documentation for further details. 5. Start LifeKeeper. All hierarchies should work as they did before the upgrade. Note: This is a change from how the previous version of LifeKeeper supported an upgrade. Secure Path Persistent Device Nodes Secure Path supports “persistent” device nodes that are in the form of /dev/spdev/spXX where XX is the device name. These nodes are symbolic links to the specific SCSI device nodes /dev/sdXX. LifeKeeper v4.3.0 or later will recognize these devices as if they were the “normal” SCSI device nodes /dev/sdXX. LifeKeeper maintains its own device name persistence, both across reboots and across cluster nodes, by directly detecting if a device is /dev/sda1 or /dev/sdq1, and then directly using the correct device node. Note: Support for symbolic links to SCSI device nodes was added in LifeKeeper v4.3.0. Active/Passive Controllers and Controller Switchovers The MSA1000 implements multipathing by having one controller active with the other controller in standby mode. When there is a problem with either the active controller or the path to the active controller, the standby controller is activated to take over operations. When a controller is activated, it takes some time for the controller to become ready. Depending on the number of LUNs configured on the array, this can take 30 to 90 seconds. During this time, IOs to the storage will be blocked until they can be rerouted to the newly activated controller. SteelEye Protection Suite for Linux99 Device Mapper Multipath I/O Configurations Single Path on Boot Up Does Not Cause Notification If a server can access only a single path to the storage when the system is loaded, there will be no notification of this problem. This can happen if a system is rebooted where there is a physical path failure as noted above, but transient path failures have also been observed. It is advised that any time a system is loaded, the administrator should check that all paths to the storage are properly configured, and if not, take actions to either repair any hardware problems or reload the system to resolve a transient problem. Device Mapper Multipath I/O Configurations Protecting Applications and File Systems That Use Device Mapper Multipath Devices Multipath Device Nodes In order for LifeKeeper to operate with and protect applications or file systems that use Device Mapper Multipath devices, the Device Mapper Multipath (DMMP) Recovery Kit must be installed. Once the DMMP Kit is installed, simply creating an application hierarchy that uses one or more of the multipath device nodes will automatically incorporate the new resource types provided by the DMMP Kit. To use the DMMP Kit, any file systems and raw devices must be mounted or configured on the multipath device nodes rather than on the native /dev/sd* device nodes. The supported multipath device nodes to address the full disk are /dev/dm#, /dev/mapper/<uuid>, /dev/mapper/<user_friendly_name> and /dev/mpath/<uuid>. To address the partitions of a disk, use the device nodes for each partition created in the /dev/mapper directory. The Device Mapper Multipath Recovery Kit uses SCSI-3 persistent reservations with a "Write Exclusive" reservation type. This means that devices reserved by one node in the cluster will remain read-accessible to other nodes in the cluster, but those other nodes will be unable to write to the device. Note that this does not mean that you can expect to be able to mount file systems on those other Use of SCSI- nodes for ongoing read-only access. 3 Persistent Reservations LifeKeeper uses the sg_persist utility to issue and monitor persistent reservations. If necessary, LifeKeeper will install the sg_persist(8) utility. SCSI-3 Persistent Reservations must be enabled on a per LUN basis when using EMC Symmetrix (including VMAX) arrays with multipathing software and LifeKeeper. 100Configuration Device Mapper Multipath I/O Configurations The Device Mapper Multipath Kit has been tested by SIOS Technology Corp. with the EMC CLARiiON CX300, the HP EVA 8000, HP MSA1500, HP P2000, the IBM SAN Volume Controller (SVC), the IBM DS8100, the IBM DS6800, the IBM ESS, the DataCore SANsymphony, and the HDS 9980V. Check with your storage vendor to determine their support for Device Mapper Multipath. Enabling support for the use of reservations on the CX300 requires that the hardware handler be notified to honor reservations. Set the following parameter in /etc/multipath.conf for this array: hardware_handler “3 emc 0 1" The HP MSA1500 returns a reservation conflict with the default path checker setting (tur). This will cause the standby node to mark all paths as failed. To avoid this condition, set the following parameter in /etc/multipath.conf for this array: path_checker readsector0 The HP 3PAR F400 returns a reservation conflict with the default path checker. To avoid this conflict, set (add) the following parameter in Hardware Requirements /etc/default/LifeKeeper for this array: DMMP_REGISTRATION_TYPE=hba For the HDS 9980V the following settings are required: l Host mode: 00 l System option: 254 (must be enabled; global HDS setting affecting all servers) l Device emulation: OPEN-V Refer to the HDS documentation "Suse Linux Device Mapper Multipath for HDS Storage" or "Red Hat Linux Device Mapper Multipath for HDS Storage" v1.15 or later for details on configuring DMMP for HDS. This documentation also provides a compatible multipath.conf file. For the EVA storage with firmware version 6 or higher, DMMP Recovery Kit v6.1.2-3 or later is required. Earlier versions of the DMMP Recovery Kit are supported with the EVA storage with firmware versions prior to version 6. For SUSE, multipath-tools-0.4.5-0.14 or later is required. Multipath For Red Hat, device-mapper-multipath-0.4.5-12.0.RHEL4 or later is required. Software Requirements It is advised to run the latest set of multipath tools available from the vendor. The feature content and the stability of this multipath product are improving at a very fast rate. Some storage vendors such as IBM have not certified DMMP with SLES 11 at this Linux time. Distribution Requirements SIOS Technology Corp. is currently investigating reported issues with DMMP, SLES 11, and EMCs CLARiiON and Symmetrix arrays. SteelEye Protection Suite for Linux101 Device Mapper Multipath I/O Configurations While running IO tests on Device Mapper Multipath devices, it is not uncommon for actions on the SAN, for example, a server rebooting, to cause paths to temporarily be reported as failed. In most cases, this will simply cause one path to fail leaving other paths to send IOs down resulting in no observable failures other than a small performance impact. In some cases, multiple paths can be reported as failed leaving no paths working. This can cause an application, such as a file system or database, to see IO errors. There has been much improvement in Device Mapper Multipath and the vendor support to eliminate these failures. However, at times, these can still be seen. To avoid these situations, consider these actions: 1. Verify that the multipath configuration is set correctly per the instructions of the disk array vendor. 2. Check the setting of the “failback” feature. This feature determines how quickly a path is reactivated after failing and being repaired. A setting of “immediate” indicates to resume use of a path as soon as it comes back online. A setting of an integer indicates the number of seconds after a path comes back online to resume using it. A setting of 10 to 15 generally provides sufficient settle time to avoid thrashing on the SAN. Transient path failures 3. Check the setting of the "no_path_retry" feature. This feature determines what Device Mapper Multipath should do if all paths fail. We recommend a setting of 10 to 15. This allows some ability to "ride out" temporary events where all paths fail while still providing a reasonable recovery time. The LifeKeeper DMMP kit will monitor IOs to the storage and if they are not responded to within four minutes LifeKeeper will switch the resources to the standby server. NOTE: LifeKeeper does not recommend setting "no_path_ retry" to "queue" since this will result in IOs that are not easily killed. The only mechanism found to kill them is on newer versions of DM, the settings of the device can be changed: /sbin/dmsetup message -u 'DMid' 0 fail_if_no_path This will temporarily change the setting for no_path_retry to fail causing any outstanding IOs to fail. However, multipathd can reset no_path_retry to the default at times. When the setting is changed to fail_if_no_path to flush failed IOs, it should then be reset to its default prior to accessing the device (manually or via LifeKeeper). If "no_path_retry" is set to "queue" and a failure occurs, LifeKeeper will switch the resources over to the standby server. However, LifeKeeper will not kill these IOs. The recommended method to clear these IOs is through a reboot but can also be done by an administrator using the dmsetup command above. If the IOs are not cleared, then data corruption can occur if/when the resources are taken out of service on the other server thereby releasing the locks and allowing the "old" IOs to be issued. 102Configuration LifeKeeper I-O Fencing Introduction LifeKeeper I-O Fencing Introduction I/O fencing is the locking away of data from a malfunctioning node preventing uncoordinated access to shared storage. In an environment where multiple servers can access the same data, it is essential that all writes are performed in a controlled manner to avoid data corruption. Problems can arise when the failure detection mechanism breaks down because the symptoms of this breakdown can mimic a failed node. For example, in a two-node cluster, if the connection between the two nodes fails, each node would “think” the other has failed, causing both to attempt to take control of the data resulting in data corruption. I/O fencing removes this data corruption risk by blocking access to data from specific nodes. Disabling Reservations While reservations provide the highest level of data protection for shared storage, in some cases, the use of reservations is not available and must be disabled within LifeKeeper. With reservations disabled, the storage no longer acts as an arbitrator in cases where multiple systems attempt to access the storage, intentionally or unintentionally. Consideration should be given to the use of other methods to fence the storage through cluster membership which is needed to handle system hangs, system busy situations and any situation where a server can appear to not be alive. The key to a reliable configuration without reservations is to “know” that when a failover occurs, the “other” server has been powered off or power cycled. There are four fencing options that help accomplish this, allowing LifeKeeper to provide a very reliable configuration, even without SCSI reservations. These include the following: l STONITH (Shoot the Other Node in the Head) using a highly reliable interconnect, i.e. serial connection between server and STONITH device. STONITH is the technique to physically disable or power-off a server when it is no longer considered part of the cluster. LifeKeeper supports the ability to power off servers during a failover event thereby insuring safe access to the shared data. This option provides reliability similar to reservations but is limited to two nodes physically located together. l Quorum/Witness – Quorum/witness servers are used to confirm membership in the cluster, especially when the cluster servers are at different locations. While this option can handle split-brain, it, alone, is not recommended due to the fact that it does not handle system hangs. l Watchdog – Watchdog monitors the health of a server. If a problem is detected, the server with the problem is rebooted or powered down. This option can recover from a server hang; however, it does not handle split-brain; therefore this option alone is also not recommended. l CONFIRM_SO – This option requires that automatic failover be turned off, so while very reliable (depending upon the knowledge of the administrator), it is not as available. While none of these alternative fencing methods alone are likely to be adequate, when used in combination, a very reliable configuration can be obtained. SteelEye Protection Suite for Linux103 Non-Shared Storage Non-Shared Storage If planning to use LifeKeeper in a non-shared storage environment, the risk of data corruption that exists with shared storage is not an issue; therefore, reservations are not necessary. However, partial or full resyncs and merging of data may be required. To optimize reliability and availability, the above options should be considered with non-shared storage as well. Note: For further information comparing the reliability and availability of the different options, see the I/O Fencing Comparison Chart. It is important to note that no option will provide complete data protection, but the following combination will provide almost the same level of protection as reservations. Configuring I/O Fencing Without Reservations To configure a cluster to support node fencing, complete the following steps: 1. Stop LifeKeeper. 2. Disable the use of SCSI reservations within LifeKeeper. This is accomplished by editing the LifeKeeper defaults file, /etc/default/LifeKeeper, on all nodes in the cluster. Add or modify the Reservations variable to be “none”, e.g. RESERVATIONS=”none”. (Note that this option should only be used when reservations are not available.) 3. Obtain and configure a STONITH device or devices to provide I/O fencing. Note that for this configuration, STONITH devices should be configured to do a system “poweroff” command rather than a “reboot”. Take care to avoid bringing a device hierarchy in service on both nodes simultaneously via a manual operation when LifeKeeper communications have been disrupted for some reason. 4. If desired, obtain and configure a quorum/witness server(s). For complete instructions and information on configuring and using a witness server, see Quorum/Witness Server Support Package topic. Note: The quorum/witness server should reside at a site apart from the other servers in the cluster to provide the greatest degree of protection in the event of a site failure. 5. If desired, configure watchdog. For more information, see the Watchdog topic. I/O Fencing Chart Split-Brain Reservations On Alone 104Configuration Hung Server I/O Fencing Chart Quroum/Witness Watchdog Watchdog & Quorum/Witness STONITH (serial) Reservations Off Nothing STONITH (serial) CONFIRM_SO* Quorum/Witness Watchdog Non-Shared Storage Default Features Quorum/Witness CONFIRM_SO* Watchdog STONITH (serial) Watchdog & STONITH SteelEye Protection Suite for Linux105 Quorum/Witness Most Reliable Least Reliable * While CONFIRM_SO is highly reliable (depending upon the knowledge of the administrator), it has lower availability due to the fact that automatic failover is turned off. Quorum/Witness Quorum/Witness Server Support Package for LifeKeeper Feature Summary The Quorum/Witness Server Support Package for LifeKeeper (steeleye-lkQWK) combined with the existing failover process of the LifeKeeper core allows system failover to occur with a greater degree of confidence in situations where total network failure could be common. This effectively means that local site failovers and failovers to nodes across a WAN can be done while greatly reducing the risk of “split-brain” situations. The package will provide a majority-based quorum check to handle clusters with greater than two nodes. This additional quorum logic will only be enabled if the witness support package is installed. Using one or more witness servers will allow a node, prior to bringing resources in service after a communication failure, to get a “second opinion” on the status of the failing node. The witness server is an additional server that acts as an intermediary to determine which servers are part of the cluster. When determining when to fail over, the witness server allows resources to be brought in service on a backup server only in cases where it verifies the primary server has failed and is no longer part of the cluster. This will prevent failovers from happening due to simple communication failures between nodes when those failures don’t affect the overall access to, and performance of, the in-service node. During actual operation, for the initial implementation, all other nodes in the cluster will be consulted, including the witness node(s). Package Requirements In addition to the requirements already discussed, this package requires that standard, licensed LifeKeeper core be installed on the server(s) that will act as the witness server(s). Note: As long as communication paths are configured correctly, multiple clusters can share a single quorum/witness server (for more information, see “Additional Configuration for Shared-Witness Topologies” below). All nodes which will participate in a quorum/witness mode cluster, including witness-only nodes, should be installed with the Quorum/Witness Server Support Package for LifeKeeper. If using the tcp_remote quorum mode, the hosts configured in QUORUM_HOSTS within /etc/default/LifeKeeper are not required to be installed with the Quorum/Witness Server Support Package for LifeKeeper. 106Configuration Package Installation and Configuration Package Installation and Configuration The Quorum/Witness Server Support Package for LifeKeeper will need to be installed on each server in the quorum/witness mode cluster, including any witness-only servers. The only configuration requirement for the witness node is to create appropriate comm paths. The general process for adding a witness server(s) will involve the following steps: l Set up the server(s) for the witness node(s) and ensure network communications are available to the other nodes. l Install the LifeKeeper core on the witness node(s) and properly license/activate it. l Install the quorum/witness support package on all nodes in the cluster. l Create appropriate communication paths between the nodes including the witness node. Once this is complete, the cluster should behave in quorum/witness mode, and failovers will consult other nodes including the witness node prior to a failover being allowed. The default configuration after installing the package will enable majority-based quorum and witness checks. Note: Due to majority-based quorum, it is recommended that the clusters always be configured with an odd number of nodes. See the Configurable Components section below for additional configuration options. Note: Any node with the witness package installed can participate in witness functionality. The witness-only nodes will simply have a compatible version of the LifeKeeper core, the witness package installed and will not host any protected resources. Configurable Components The quorum/witness package contains two configurable modes: quorum and witness. By default, installing the quorum/witness package will enable both quorum and witness modes suitable for most environments that need witness features. The behavior of these modes can be customized via the /etc/default/LifeKeeper configuration file, and the quorum and witness modes can be individually adjusted. The package installs default settings into the configuration file when it is installed, majority being the default quorum mode and remote_verify being the default witness mode. An example is shown below: QUORUM_MODE=majority WITNESS_MODE=remote_verify Note: Although each cluster node can have an entirely different witness/quorum configuration, it is recommended that all nodes have the same configuration to avoid unexpected, and difficult to diagnose, situations. SteelEye Protection Suite for Linux107 Available Quorum Modes Available Quorum Modes Three quorum checking modes are available which can be set via the QUORUM_MODE setting in /etc/default/LifeKeeper: majority (the default), tcp_remote and none/off. Each of these is described below: majority The majority setting, which is the default, will determine quorum based on the number of visible/alive LifeKeeper nodes at the time of the check. This check is a simple majority -- if more than half the total nodes are visible, then the node has quorum. tcp_remote The tcp_remote quorum mode is similar to majority mode except: l servers consulted are configured separately from the cluster and its comm paths (these servers do NOT have to have LifeKeeper installed). l servers are consulted by simply connecting to the TCP/IP service listening on the configured port. Additional configuration is required for this mode since the TCP timeout allowance (QUORUM_ TIMEOUT_SECS) and the hosts to consult (QUORUM_HOSTS) must be added to /etc/default/LifeKeeper. An example configuration for tcp_remote is shown below: QUORUM_MODE=tcp_remote # What style of quorum verification do we do in comm_up/down # and lcm_avail (maybe other) event handlers. # The possible values are: # - none/off: Do nothing, skip the check, assume all is well. # - majority: Verify that this node and the nodes it can reach # have more than half the cluster nodes. # - tcp_remote: Verify that this node can reach more than half # of the QUORUM_HOSTS via tcp/ip. QUORUM_HOSTS=myhost:80,router1:443,router2:22 # If QUORUM_MODE eq tcp_remote, this should be a comma delimited # list of host:port values – like myhost:80,router1:443,router2:22. # This doesn't matter if the QUORUM_MODE is something else. QUORUM_TIMEOUT_SECS=20 # The time allowed for tcp/ip witness connections to complete. # Connections that don't complete within this time are treated # as failed/unavailable. # This only applies when the QUORUM_MODE is tcp_remote. WITNESS_MODE=remote_verify 108Configuration Available Witness Modes # This can be # mode, core # death of a # also think either off/none or remote_verify. In remote_verify event handlers (comm_down) will doublecheck the system by seeing if other visible nodes it is dead. QUORUM_LOSS_ACTION=fastboot # This can be one of osu, fastkill or fastboot. # fastboot will IMMEDIATELY reboot the system if a loss of quorum # is detected. # fastkill will IMMEDIATELY halt/power off the system upon # loss of quorum. # osu will just take any in-service resources out of service. # Note: this action does not sync disks or unmount filesystems. QUORUM_DEBUG= # Set to true/on/1 to enable debug messages from the Quorum # modules. HIDE_GUI_SYS_LIST=1 Note: Due to the inherent flexibility and complexity of this mode, it should be used with caution by someone experienced with both LifeKeeper and the particular network/cluster configuration involved. none/off In this mode, all quorum checking is disabled. This causes the quorum checks to operate as if the node always has quorum regardless of the true state of the cluster. Available Witness Modes Two witness modes are available which can be set via the WITNESS_MODE setting in the /etc/default/LifeKeeper: remote_verify and none/off. Each of these is described below: remote_verify In this default mode, witness checks are done to verify the status of a node. This is typically done when a node appears to be failing. It enables a node to consult all the other visible nodes in the cluster about their view of the status of the failing machine to double-check the communications. none/off In this mode, witness checking is disabled. In the case of a communication failure, this causes the logic to behave exactly as if there was no witness functionality installed. Note: It would be unnecessary for witness checks to ever be performed by servers acting as dedicated quorum/witness nodes that do not host resources; therefore, this setting should be set to none/off on these servers. SteelEye Protection Suite for Linux109 Available Actions When Quorum is Lost Available Actions When Quorum is Lost The witness package offers three different options for how the system should react if quorum is lost -“fastboot”, “fastkill” and “osu”. These options can be selected via the QUORUM_LOSS_ACTION setting in /etc/default/LifeKeeper. All three options take the system’s resources out of service; however, they each allow a different behavior. The default option, when the quorum package is installed, is fastboot. Each of these options is described below: fastboot If the fastboot option is selected, the system will be immediately rebooted when a loss of quorum is detected (from a communication failure). Although this is an aggressive option, it ensures that the system will be disconnected from any external resources right away. In many cases, such as with storage-level replication, this immediate release of resources is desired. Two important notes on this option are: 1. The system performs an immediate hard reboot without first performing any shut-down procedure; no tasks are performed (disk syncing, etc.). 2. The system will come back up performing normal startup routines, including negotiating storage and resource access, etc. fastkill The fastkill option is very similar to the fastboot option, but instead of a hard reboot, the system will immediately halt when quorum is lost. As with the fastboot option, no tasks are performed (disk syncing, etc.), and the system will then need to be manually rebooted and will come back up performing normal startup routines, including negotiating storage and resource access, etc. osu The osu option is the least aggressive option, leaving the system operational but taking resources out of service on the system where quorum is lost. In some cluster configurations, this is all that is needed, but it may not be strong enough or fast enough in others. Additional Configuration for Shared-Witness Topologies When a quorum witness server will be shared by more than one cluster, it can be configured to simplify individual cluster management. In standard operation, the LifeKeeper GUI will try to connect to all cluster nodes at once when connected to the first node. It connects to all the systems that can be seen by each system in the cluster. Since the shared witness server is connected to all clusters, this will cause the GUI to connect to all systems in all clusters visible to the witness node. To avoid this situation, the HIDE_GUI_SYS_LIST configuration parameter should be set to “true” on any shared witness server. This effectively hides the servers that are visible to the witness server, resulting in the GUI only connecting to servers in the cluster that are associated with the first server connected to. Note: This should be set only on the witness server. Since the GUI connects only to servers in the cluster that are associated with the first server connected to, if that first server is the witness server, and HIDE_GUI_SYS_LIST is set to “true,” the 110Configuration Adding a Witness Node to a Two-Node Cluster GUI will not automatically connect to the other servers with established communication paths. As this behavior is not typical LifeKeeper GUI behavior, it may lead an installer to incorrectly conclude that there is a network or other configuration problem. To use the LifeKeeper GUI on a witness server with this setting, connect manually to one of the other nodes in the cluster, and the remaining nodes in the cluster will be shown in the GUI correctly. Note: To prevent witness checks from being performed on all systems in all clusters, the witness_ mode should always be set to none/off on shared, dedicated quorum witness nodes. Adding a Witness Node to a Two-Node Cluster The following is an example of a two-node cluster utilizing the Quorum/Witness Server Support Package for LifeKeeper by adding a third “witness” node. SteelEye Protection Suite for Linux111 Expected Behaviors (Assuming Default Modes) Simple Two-Node Cluster with Witness Node Server A and Server B should already be set up with LifeKeeper core with resource hierarchies created on Server A and extended to Server B (Server W will have no resource hierarchies extended to it). Using the following steps, a third node will be added as the witness node. 1. Set up the witness node, making sure network communications are available to the other two nodes. 2. Install LifeKeeper core on the witness node and properly license/activate it. 3. Install the Quorum/Witness Server Support Package on all three nodes. 4. Create comm paths between all three nodes. 5. Set desired quorum checking mode in /etc/default/LifeKeeper (majority, tcp_remote, none/off) (select majority for this example). See Available Quorum Modes for an explanation of these modes. 6. Set desired witness mode in /etc/default/LifeKeeper (remote_verify, none/off). See Available Witness Modes for an explanation of these modes. Expected Behaviors (Assuming Default Modes) Scenario 1 Communications fail between Servers A and B If the communications fail between Server A and Server B, the following will happen: l Both Server A and B will begin processing communication failure events, though not necessarily at exactly the same time. l Both servers will perform the simple quorum check and determine that they still are in the majority (both A and B can see W and think they have two of the three known nodes). l Each will consult the other nodes with whom they can still communicate about the true status of the server with whom they’ve lost communications. In this scenario, this means that Server A will consult W about B’s status and B will also consult W about A’s status. l Server A and B will both determine that the other is still alive by having consulted the witness server and no failover processing will occur. Resources will be left in service where they are. Scenario 2 Communications fail between Servers A and W Since all nodes can and will act as witness nodes when the witness package is installed, this scenario is the same as the previous. In this case, Server A and Witness Server W will determine that the other is still alive by consulting with Server B. Scenario 3 Communications fail between Server A and all other nodes (A fails) 112Configuration Scenario 4 In this case, Server B will do the following: l Begin processing a communication failure event from Server A. l Determine that it can still communicate with the Witness Server W and thus has quorum. l Verify via Server W that Server A really appears to be lost and, thus, begin the usual failover activity. l Server B will now have the protected resources in service. With B now acting as Source, communication resumes for Server A Based on the previous scenario, Server A now resumes communications. Server B will process a comm_up event, determine that it has quorum (all three of the nodes are visible) and that it has the resources in service. Server A will process a comm_up event, determine that it also has quorum and that the resources are in service elsewhere. Server A will not bring resources in service at this time. With B now acting as Source, Server A is powered on with communications to the other nodes In this case, Server B will respond just like in the previous scenario, but Server A will process an lcm_ avail event. Server A will determine that it has quorum and respond normally in this case by not bringing resources in service that are currently in service on Server B. With B now acting as Source, Server A is powered on without communications In this case, Server A will process an lcm_avail event and Servers B and W will do nothing since they can’t communicate with Server A. Server A will determine that it does not have quorum since it can only communicate with one of the three nodes. In the case of not having quorum, Server A will not bring resources in service. Scenario 4 Communications fail between Server A and all other nodes (A's network fails but A is still running) In this case, Server B will do the following: l Begin processing a communication failure event from Server A. l Determine that it can still communicate with the Witness Server W and thus has quorum. l Verify via server W that Server A really appears to be lost and, thus, begin the usual failover activity. l Server B will now have the protected resources in service. Also, in this case, Server A will do the following: l Begin processing a communication failure event from Server B. l Determine that it cannot communicate with Server B nor the Witness Server W and thus does not have quorum. l Immediately reboot ("fastboot" is the default behavior causing a hard reboot). SteelEye Protection Suite for Linux113 SCSI Reservations SCSI Reservations Storage Fence Using SCSI Reservations While LifeKeeper for Linux supports both resource fencing and node fencing, its primary fencing mechanism is storage fencing through SCSI reservations. This fence, which provides the highest level of data protection for shared storage, allows for maximum flexibility and maximum security providing very granular locking to the LUN level. The underlying shared resource (LUN) is the primary quorum device in this architecture. Quorum can be defined as exclusive access to shared storage, meaning this shared storage can only be accessed by one server at a time. The server who has quorum (exclusive access) owns the role of “primary.” The establishment of quorum (who gets this exclusive access) is determined by the “quorum device.” As stated above, with reservations enabled, the quorum device is the shared resource. The shared resource establishes quorum by determining who owns the reservation on it. This allows a cluster to continue to operate down to a single server as long as that single server can access the LUN. SCSI reservations protect the shared user data so that only the system designated by LifeKeeper can modify the data. No other system in the cluster or outside the cluster is allowed to modify that data. SCSI reservations also allow the application being protected by LifeKeeper to safely access the shared user data when there are multiple server failures in the cluster. A majority quorum of servers is not required; the only requirement is establishing ownership of the shared data. Adding quorum/witness capabilities provides for the establishment of quorum membership. Without this membership, split-brain situations could result in multiple servers, even all servers, killing each other. Watchdog added to configurations with reservations enabled provides a mechanism to recover 114Configuration Alternative Methods for I/O Fencing from partially hung servers. In cases where a hung server goes undetected by LifeKeeper, watchdog will begin recovery. Also, in the case where a server is hung and not able to detect that the reservation has been stolen, watchdog can reboot the server to begin its recovery. Alternative Methods for I/O Fencing In addition to resource fencing using SCSI reservations, LifeKeeper for Linux also supports disabling reservations. Regardless of whether reservations are enabled or disabled, there are two issues to be aware of: l Access to the storage must be controlled by LifeKeeper. l Great care must be taken to ensure that the storage is not accessed unintentionally such as by mounting file systems manually, fsck manually, etc. If these two rules are followed and reservations are enabled, LifeKeeper will prevent most errors from occurring. With reservations disabled (alone), there is no protection. Therefore, other options must be explored in order to provide this protection. The following sections discuss these different fencing options and alternatives that help LifeKeeper provide a reliable configuration even without reservations. STONITH STONITH (Shoot The Other Node in the Head) is a fencing technique for remotely powering down a node in a cluster. LifeKeeper can provide STONITH capabilities by using external power switch controls, IPMI-enabled motherboard controls and hypervisor-provided power capabilities to power off the other nodes in a cluster. Using IPMI with STONITH IPMI (Intelligent Platform Management Interface) defines a set of common interfaces to a computer system which can be used to monitor system health and manage the system. Used with STONITH, it allows the cluster software to instruct the switch via a serial or network connection to power off or reboot a cluster node that appears to have died thus ensuring that the unhealthy node cannot access or corrupt any shared data. Package Requirements l IPMI tools package (e.g. ipmitool-1.8.11-6.el6.x86_64.rpm) STONITH in VMware vSphere Environments vCLI (vSphere Command-Line Interface) is a command-line interface supported by VMware for managing your virtual infrastructure including the ESXi hosts and virtual machines. You can choose the vCLI command best suited for your needs and apply it for your LifeKeeper STONITH usage between VMware virtual machines. SteelEye Protection Suite for Linux115 Package Requirements Package Requirements l VMware vSphere SDK Package (e.g. VMware-vSphere-SDK-4.X.X-XXXXX.i386.tar.gz) l l VMware vSphere CLI (vSphere CLI is included in the same installation package as the vSphere SDK.) (Note: Only required when using vmware-cmd) VMware Tools (e.g. VMwareTools-8.3.7-341836.tar.gz) Installation and Configuration After installing LifeKeeper and configuring communication paths for each node in the cluster, install and configure STONITH. 1. Install the LifeKeeper STONITH script by running the following command: /opt/LifeKeeper/samples/STONITH/stonith-install 2. (*For IPMI usage only) Using BIOS or the ipmitool command, set the following BMC (Baseboard Management Controller) variables: l Use Static IP l IP address l Sub netmask l User name l Password l Add Administrator privilege level to the user l Enable network access to the user Example using ipmitool command (For detailed information, see the ipmitool man page.) # ipmitool lan set 1 ipsrc static # ipmitool lan set 1 ipaddr 192.168.0.1 # ipmitool lan set 1 netmask 255.0.0.0 # ipmitool user set name 1 root # ipmitool user set password 1 secret # ipmitool user priv 1 4 # ipmitool user enable 1 3. Edit the configuration file. Update the configuration file to enable STONITH and add the power off command line. Note: Power off is recommended over reboot to avoid fence loops (i.e. two machines have lost communication but can still STONITH each other, taking turns powering each other off and rebooting). 116Configuration <vm_id> /opt/LifeKeeper/config/stonith.conf # LifeKeeper STONITH configuration # # Each system in the cluster is listed below. To enable STONITH for a # given system, # remove the '#' on that line and insert the STONITH command line to power off # that system. # Example1: ipmi command # node-1 ipmitool -I lanplus -H 10.0.0.1 -U root -P secret power off # Example2: vCLI-esxcli command # node-2 esxcli --server=10.0.0.1 --username=root --password=secret vms vm kill --type='hard' --world-id=1234567 # Example3: vCLI-vmware_cmd command # node-3 vmware-cmd -H 10.0.0.1 -U root -P secret <vm_id> stop hard minute-maid ipmitool -I lanplus -H 192.168.0.1 -U root -P secret power off kool-aid ipmitool -I lanplus -H 192.168.0.2 -U root -P secret power off vm1 esxcli --server=10.0.0.1 --username=root --password=secret vms vm kill --type='hard' --world-id=1234567 vm2 vmware-cmd -H 10.0.0.1 -U root -P secret <vm_id> stop hard <vm_id> vSphere CLI commands run on top of vSphere SDK for Perl. <vm_id> is used as an identifier of the VM. This variable should point to the VM's configuration file for the VM being configured. To find the configuration file path: 1. Type the following command: vmware-cmd -H <vmware host> -l 2. This will return a list of VMware hosts. Example output from vmware-cmd -l with three vms listed: /vmfs/volumes/4e08c1b9-d741c09c-1d3e-0019b9cb28be/lampserver/lampserver.vmx /vmfs/volumes/4e1e1386-0b862fae-a859-0019b9cb28bc/oracle10/oracle.vmx /vmfs/volumes/4e08c1b9-d741c09c-1d3e0019b9cb28be/lampserver02/lampserver02.vmx Find the VM being configured in the resulting list. 3. Paste the path name into the <vm_id> variable. The example above would then become: SteelEye Protection Suite for Linux117 Expected Behaviors vmware-cmd -H 10.0.0.1 -U root -P secret /vmfs/volumes/4e08c1b9-d741c09c-1d3e0019b9cb28be/lampserver/lampserver.vmx stop hard Note: For further information on VMware commands, use vmware-cmd with no arguments to display a help page about all options. Expected Behaviors When LifeKeeper detects a communication failure with a node, that node will be powered off and a failover will occur. Once the issue is repaired, the node will have to be manually powered on. Watchdog Watchdog is a method of monitoring a server to ensure that if the server is not working properly, corrective action (reboot) will be taken so that it does not cause problems. Watchdog can be implemented using special watchdog hardware or using a software-only option. (Note: This configuration has only been tested with Red Hat Enterprise Linux Versions 5 and 6. No other operating systems have been tested; therefore, no others are supported at this time.) Components l Watchdog timer software driver or an external hardware component l Watchdog daemon – rpm available through the Linux distribution l LifeKeeper core daemon – installed with the LifeKeeper installation l Health check script – LifeKeeper monitoring script LifeKeeper Interoperability with Watchdog 118Configuration Configuration Read the next section carefully. The daemon is designed to recover from errors and will reset the system if not configured carefully. Planning and care should be given to how this is installed and configured. This section is not intended to explain and configure watchdog, but only to explain and configure how LifeKeeper interoperates in such a configuration. Configuration The following steps should be carried out by an administrator with root user privileges. The administrator should already be familiar with some of the risks and issues with watchdog. The health check script (LifeKeeper monitoring script) is the component that ties the LifeKeeper configuration with the watchdog configuration (/opt/LifeKeeper/samples/watchdog/LifeKeeper-watchdog). This script provides full monitoring of LifeKeeper and should not require any modifications. 1. If watchdog has been previously configured, enter the following command to stop it. If not, go to Step 2. /etc/rc.d/init.d/watchdog stop Confirmation should be received that watchdog has stopped Stopping watchdog: [OK] 2. Edit the watchdog configuration file (/etc/watchdog.conf) supplied during the installation of watchdog software. l Modify test-binary: test-binary = /opt/LifeKeeper/samples/watchdog/LifeKeeperwatchdog l Modify test-timeout: test-timeout = 5 l Modify interval: interval = 7 The interval value should be less than LifeKeeper communication path timeout (15 seconds), so a good number for the interval is generally half of this value. 3. Make sure LifeKeeper has been started. If not, please refer to the Starting LifeKeeper topic. 4. Start watchdog by entering the following command: /etc/rc.d/init.d/watchdog start Confirmation should be received that watchdog has started Starting watchdog: [OK] 5. To start watchdog automatically on future restarts, enter the following command: chkconfig --levels 35 watchdog on SteelEye Protection Suite for Linux119 Uninstall Note: Configuring watchdog may cause some unexpected reboots from time to time. This is the general nature of how watchdog works. If processes are not responding correctly, the watchdog feature will assume that LifeKeeper (or the operating system) is hung, and it will reboot the system (without warning). Uninstall Care should be taken when uninstalling LifeKeeper. The above steps should be done in reverse order as listed below. WARNING: IF UNINSTALLING LIFEKEEPER BY REMOVING THE RPM PACKAGES THAT MAKE UP LIFEKEEPER, TURN OFF WATCHDOG FIRST! In Step 2 above, the watchdog config file was modified to call on the LifeKeeper-watchdog script; therefore, if watchdog is not turned off first, it will call on that script that is no longer there. An error will occur when this script is not found which will trigger a reboot. This will continue until watchdog is turned off. 1. Stop watchdog by entering the following command: /etc/rc.d/init.d/watchdog stop Confirmation should be received that watchdog has stopped Stopping watchdog: [OK] 2. Edit the watchdog configuration file (/etc/watchdog.conf) supplied during the installation of watchdog software. l Modify test-binary and interval by commenting out those entries (add # at the beginning of each line): #test-binary = #interval = (Note: If interval was used previously for other functions, it can be left as-is) 3. Uninstall LifeKeeper. See the Removing LifeKeeper topic. 4. Watchdog can now be started again. If only used by LifeKeeper, watchdog can be permanently disabled by entering the following command: chkconfig --levels 35 watchdog off Resource Policy Management Overview Resource Policy Management in Steeleye Protection Suite for Linux and Steeleye vAppKeeper provides behavior management of resource local recovery and failover (or VMware HA integration). Resource policies are managed with the lkpolicy command line tool (CLI). 120Configuration Steeleye Protection Suite/vAppKeeper Recovery Behavior Steeleye Protection Suite/vAppKeeper Recovery Behavior Steeleye Protection Suite and SteelEye vAppKeeper are designed to monitor individual applications and groups of related applications, periodically performing local recoveries or notifications when protected applications fail. Related applications, by example, are hierarchies where the primary application depends on lower-level storage or network resources. When an application or resource failure occurs, the default behavior is: 1. Local Recovery: First, attempt local recovery of the resource or application. An attempt will be made to restore the resource or application on the local server without external intervention. If local recovery is successful, then Steeleye Protection Suite/vAppKeeper will not perform any additional action. 2. Failover (or VMware HA integration): Second, if a local recovery attempt fails to restore the resource or application (or the recovery kit monitoring the resource has no support for local recovery), then a failover will be initiated. Failovers can take two different forms: l Steeleye Protection Suite for Linux: In this configuration, used for high availability clusters, the failover action attempts to bring the application (and all dependent resources) into service on another server within the cluster. l SteelEye vAppKeeper: In this configuration, used for application monitoring in VMware environments, a failover action alerts VMware HA that an application failure occurred in the virtual machine (VM) guest. Typical VMware HA response is to immediately, without warning, restart the VM guest to rectify the problem. In some cases, VMware HA can also move the VM guest to a different VM host or take another action. How VMware HA handles the condition is independent of the SteelEye vAppKeeper configuration. Please see SteelEye Protection Suite Fault Detection and Recovery Scenarios or vAppKeeper Fault Detection and Recovery Scenarios for more detailed information about our recovery behavior. Custom and Maintenance-Mode Behavior via Policies Steeleye Protection Suite/vAppKeeper Version 7.5 and later supports the ability to set additional policies that modify the default recovery behavior. There are four policies that can be set for individual resources (see the section below about precautions regarding individual resource policies) or for an entire server. The recommended approach is to alter policies at the server level. The available policies are: Standard Policies l Failover (For vAppKeeper, this leverages VMware HA integration, which initiates a restart of the VM). This policy setting can be used to turn on/off resource failover. (Note: In order for reservations to be handled correctly, Failover cannot be turned off for individual scsi resources.) l LocalRecovery - Steeleye Protection Suite/vAppKeeper, by default, will attempt to recover protected resources by restarting the individual resource or the entire protected application SteelEye Protection Suite for Linux121 Meta Policies prior to performing a failover. This policy setting can be used to turn on/off local recovery. l TemporalRecovery - Normally, Steeleye Protection Suite will perform local recovery of a failed resource. If local recovery fails, Steeleye Protection Suite will perform a resource hierarchy failover to another node (vAppKeeper will trigger VMware HA). If the local recovery succeeds, failover will not be performed. There may be cases where the local recovery succeeds, but due to some irregularity in the server, the local recovery is re-attempted within a short time; resulting in multiple, consecutive local recovery attempts. This may degrade availability for the affected application. To prevent this repetitive local recovery/failure cycle, you may set a temporal recovery policy. The temporal recovery policy allows an administrator to limit the number of local recovery attempts (successful or not) within a defined time period. Example: If a user sets the policy definition to limit the resource to three local recovery attempts in a 30-minute time period, Steeleye Protection Suite will fail over when a third local recovery attempt occurs within the 30-minute period. Defined temporal recovery policies may be turned on or off. When a temporal recovery policy is off, temporal recovery processing will continue to be done and notifications will appear in the log when the policy would have fired; however, no actions will be taken. Note: It is possible to disable failover and/or local recovery with a temporal recovery policy also in place. This state is illogical as the temporal recovery policy will never be acted upon if failover or local recovery are disabled. Meta Policies The "meta" policies are the ones that can affect more than one other policy at the same time. These policies are usually used as shortcuts for getting certain system behaviors that would otherwise require setting multiple standard policies. l NotificationOnly - This mode allows administrators to put Steeleye Protection Suite or vAppKeeper in a "monitoring only" state. Both local recovery and failover of a resource (or all resources in the case of a server-wide policy) are affected. The user interface will indicate a Failure state if a failure is detected; but no recovery or failover action will be taken. Note: The administrator will need to correct the problem that caused the failure manually and then bring the affected resource(s) back in service to continue normal Steeleye Protection Suite operations. Important Considerations for Resource-Level Policies Resource level policies are policies that apply to a specific resource only, as opposed to an entire resource hierarchy or server. Example : app - IP - file system 122Configuration The lkpolicy Tool In the above resource hierarchy, app depends on both IP and file system. A policy can be set to disable local recovery or failover of a specific resource. This means that, for example, if the IP resource's local recovery fails and a policy was set to disable failover of the IP resource, then the IP resource will not fail over or cause a failover of the other resources. However, if the file system resource's local recovery fails and the file system resource policy does not have failover disabled, then the entire hierarchy will fail over. Note: It is important to remember that resource level policies apply only to the specific resource for which they are set. This is a simple example. Complex hierarchies can be configured, so care must be taken when setting resource-level policies. The lkpolicy Tool The lkpolicy tool is the command-line tool that allows management (querying, setting, removing) of policies on servers running Steeleye Protection Suite for Linux or SteelEye vAppKeeper. lkpolicy supports setting/modifying policies, removing policies and viewing all available policies and their current settings. In addition, defined policies can be set on or off, preserving resource/server settings while affecting recovery behavior. The general usage is : lkpolicy [--list-policies | --get-policies | --set-policy | --remove-policy] <name value pair data...> The <name value pair data...> differ depending on the operation and the policy being manipulated, particularly when setting policies. For example: Most on/off type policies only require --on or --off switch, but the temporal policy requires additional values to describe the threshold values. Example lkpolicy Usage Authenticating With Local and Remote Servers The lkpolicy tool communicates with Steeleye Protection Suite and vAppKeeper servers via an API that the servers expose. This API requires authentication from clients like the lkpolicy tool. The first time the lkpolicy tool is asked to access a Steeleye Protection Suite or vAppKeeper server, if the credentials for that server are not known, it will ask the user for credentials for that server. These credentials are in the form of a username and password and: 1. Clients must have Steeleye Protection Suite/vAppKeeper admin rights. This means the username must be in the lkadmin group according to the operating system's authentication configuration (via pam). It is not necessary to run as root, but the root user can be used since it is in the appropriate group by default. 2. The credentials will be stored in the credential store so they do not have to be entered manually each time the tool is used to access this server. See Configuring Credentials for SteelEye Protection Suite or Configuring Credentials for vAppKeeper for more information on the credential store and its management with the credstore utility. An example session with lkpolicy might look like this: SteelEye Protection Suite for Linux123 Listing Policies [root@thor49 ~]# lkpolicy -l -d v6test4 Please enter your credentials for the system 'v6test4'. Username: root Password: Confirm password: Failover LocalRecovery TemporalRecovery NotificationOnly [root@thor49 ~]# lkpolicy -l -d v6test4 Failover LocalRecovery TemporalRecovery NotificationOnly [root@thor49 ~]# Listing Policies lkpolicy --list-policy-types Showing Current Policies lkpolicy --get-policies lkpolicy --get-policies tag=\* lkpolicy --get-policies --verbose tag=mysql\* # all resources starting with mysql lkpolicy --get-policies tag=mytagonly Setting Policies lkpolicy --set-policy Failover --off lkpolicy --set-policy Failover --on tag=myresource lkpolicy --set-policy Failover --on tag=\* lkpolicy --set-policy LocalRecovery --off tag=myresource lkpolicy --set-policy NotificationOnly --on lkpolicy --set-policy TemporalRecovery --on recoverylimit=5 period=15 lkpolicy --set-policy TemporalRecovery --on --force recoverylimit=5 period=10 Removing Policies lkpolicy --remove-policy Failover tag=steve Note: NotificationOnly is a policy alias. Enabling NotificationOnly is the equivalent of disabling the corresponding LocalRecovery and Failover policies. 124Configuration Configuring Credentials Configuring Credentials Credentials for communicating with other systems are managed via a credential store. This store can be managed, as needed, by the /opt/LifeKeeper/bin/credstore utility. This utility allows server access credentials to be set, changed and removed - on a per server basis. Adding or Changing Credentials Adding and changing credentials are handled in the same way. A typical example of adding or changing credentials for a server, server.mydomain.com, would look like this: /opt/LifeKeeper/bin/credstore -k server.mydomain.com myuser In this case, myuser is the username used to access server.mydomain.com and the password will be asked for via a prompt with confirmation (like passwd). Note: The key name used to store LifeKeeper server credentials must match exactly the hostname used in commands such as lkpolicy. If the hostname used in the command is an FQDN, then the credential key must also be the FQDN. If the hostname is a short name, then the key must also be the short name. You may wish to set up a default key in the credential store. The default credentials will be used for authentication when no specific server key exists. To add or change the defaultkey, run: /opt/LifeKeeper/bin/credstore -k default myuser Listing Stored Credentials The currently stored credentials can be listed by the following command: /opt/LifeKeeper/bin/credstore -l This will list the keys stored in the credential store and, in this case, the key indicates the server for which the credentials are used. (This command will not actually list the credentials, only the key names, since the credentials themselves may be sensitive.) Removing Credentials for a Server Credentials for a given server can be removed with the following command: /opt/LifeKeeper/bin/credstore -d -k myserver.mydomain.com In this case, the credentials for the server myserver.mydomain.com will be removed from the store. Additional Information More information on the credstore utility can be found by running: /opt/LifeKeeper/bin/credstore --man SteelEye Protection Suite for Linux125 LifeKeeper API This will show the entire man/help page for the command. LifeKeeper API The LifeKeeper API is used to allow communications between LifeKeeper servers. IMPORTANT NOTE: Currently, this API is reserved for internal use only but may be opened up to customer and third party usage in a future release. Network Configuration Each LifeKeeper server provides the API via an SSL Connection on port 778. This port may be changed using the configuration variable API_SSL_PORT in /etc/default/LifeKeeper. Authentication The LifeKeeper API uses PAM for authentication. Access to the API is only granted to users that are members of the group lkadmin, lkoper or lkguest. Depending on the PAM configuration of the system, this can be accomplished by using the local system files (i.e. /etc/passwd and /etc/group) or by including the user in an LDAP or Active Directory group. Note: The LifeKeeper API does not use the user database that is managed by the lkpasswd utility. 126Configuration LifeKeeper Administration Overview LifeKeeper does not require administration during operation. LifeKeeper works automatically to monitor protected resources and to perform the specified recovery actions if a fault should occur. You use the LifeKeeper GUI in these cases: l Resource and hierarchy definition. LifeKeeper provides these interface options: l LifeKeeper GUI. l LifeKeeper command line interface. l Resource monitoring. The LifeKeeper GUI provides access to resource status information and to the LifeKeeper logs. l Manual intervention. You may need to stop servers or specific resources for maintenance or other administrative actions. The LifeKeeper GUI provides menu functions that allow you to bring specific resources in and out of service. Once applications have been placed under LifeKeeper protection, they should be started and stopped only through these LifeKeeper interfaces. Starting and stopping LifeKeeper is done through the command line only. See GUI Tasks and Maintenance Tasks for detailed instructions on performing LifeKeeper administration, configuration and maintenance operations. Error Detection and Notification The ability to provide detection and alarming for problems within an application is critical to building the best total fault resilient solution. Since every specific application varies on the mechanism and format of failures, no one set of generic mechanisms can be supplied. In general, however, many application configurations can rely on the Core system error detection provided within LifeKeeper. Two common fault situations are used to demonstrate the power of LifeKeeper's core facilities in the topics Resource Error Recovery Scenario and Server Failure Recovery Scenario. LifeKeeper also provides a complete environment for defining errors, alarms, and events that can trigger recovery procedures. This interfacing usually requires pattern match definitions for the system error log (/var/log/messages), or custom-built application specific monitor processes. N-Way Recovery N-Way recovery allows different resources to fail over to different backup servers in a cluster. Return to Protected Resources SteelEye Protection Suite for Linux127 Administrator Tasks Administrator Tasks Editing Server Properties 1. To edit the properties of a server, bring up the Server Properties dialog just as you would for viewing server properties. 2. If you are logged into that server with the appropriate permissions, the following items will be editable. l Shutdown Strategy l Failover Confirmation 3. Once you have made changes, the Apply button will be enabled. Clicking this button will apply your changes without closing the window. 4. When you are finished, click OK to save any changes and close the window, or Cancel to close the window without applying changes. Creating a Communication Path Before configuring a LifeKeeper communication path between servers, verify the hardware and software setup. For more information, see the SPS for Linux Release Notes To create a communication path between a pair of servers, you must define the path individually on both servers. LifeKeeper allows you to create both TCP (TCP/IP) and TTY communication paths between a pair of servers. Only one TTY path can be created between a given pair. However, you can create multiple TCP communication paths between a pair of servers by specifying the local and remote addresses that are to be the end-points of the path. A priority value is used to tell LifeKeeper the order in which TCP paths to a given remote server should be used. IMPORTANT: Using a single communication path can potentially compromise the ability of servers in a cluster to communicate with one another. If a single comm path is used and the comm path fails, LifeKeeper hierarchies may come in service on multiple servers simultaneously. This is known as "false failover". Additionally, heavy network traffic on a TCP comm path can result in unexpected behavior, including false failovers and LifeKeeper initialization problems. 1. There are four ways to begin. l Right-click on a server icon, then click Create Comm Path when the server context menu appears. l On the global toolbar, click the Create Comm Path button. l On the server context toolbar, if displayed, click the Create Comm Path button. l On the Edit menu, select Server, then Create Comm Path. 2. A dialog entitled Create Comm Path will appear. For each of the options that follow, click 128LifeKeeper Administration Overview Deleting a Communication Path Help for an explanation of each choice. 3. Select the Local Server from the list box and click Next. 4. Select one or more Remote Servers in the list box. If a remote server is not listed in the list box (i.e. it is not yet connected to the cluster), you may enter it using Add. You must make sure that the network addresses for both the local and remote servers are resolvable (for example, with DNS or added to the /etc/hosts file). Click Next. 5. Select either TCP or TTY for Device Type and click Next. 6. Select one or more Local IP Addresses if the Device Type was set for TCP. Select the Local TTY Device if the Device Type was set to TTY. Click Next. 7. Select the Remote IP Address if the Device Type was set for TCP. Select the Remote TTY Device if the Device Type was set to TTY. Click Next. 8. Enter or select the Priority for this comm path if the Device Type was set for TCP. Enter or select the Baud Rate for this Comm Path if the Device Type was set to TTY. Click Next. 9. Click Create. A message should be displayed indicating the network connection is successfully created. Click Next. 10. If you selected multiple Local IP Addresses or multiple Remote Servers and the Device Type was set for TCP, then you will be taken back to Step 6 to continue with the next Comm Path. If you selected multiple Remote Servers and the Device Type was set for TTY, then you will be taken back to Step 5 to continue with the next Comm Path. 11. Click Done when presented with the concluding message. You can verify the comm path by viewing the Server Properties Dialog or by entering the command lcdstatus -q. See the LCD(1M) man page for information on usinglcdstatus. You should see an ALIVE status. In addition, check the server icon in the right pane of the GUI. If this is the first comm path that has been created, the server icon shows a yellow heartbeat, indicating that one comm path is ALIVE, but there is no redundant comm path. The server icon will display a green heartbeat when there are at least two comm paths ALIVE. IMPORTANT: When using IPv6 addresses to create a comm path, statically assigned addresses should be used instead of auto-configured/stateless addresses as the latter may change over time which will cause the comm path to fail. If the comm path does not activate after a few minutes, verify that the paired server's computer name is correct. If using TTY comm paths, verify that the cable connection between the two servers is correct and is not loose. Use the portio(1M) command if necessary to verify the operation of the TTY connection. Deleting a Communication Path 1. There are four ways to begin. SteelEye Protection Suite for Linux129 Server Properties - Failover l Right-click on a server icon, then click Delete Comm Path when the server context menu appears. l On the global toolbar, click the Delete Comm Path button. l On the server context toolbar, if displayed, click the Delete Comm Path button. l On the Edit menu, select Server, then Delete Comm Path. 2. A dialog entitled Delete Comm Path will appear. For each of the optionst hat follow, click Help for an explanation of each choice. 3. Select Local Server from the list and click Next. This dialog willonly appear if the delete is selected using the Delete Comm Path button on the global toolbar or via the Edit menu selecting Server. 4. Select the communications path(s) that you want to delete and click Next. 5. Click Delete Comm Path(s). If the output panel is enabled, the dialog closes, and the results of the commands to delete the communications path(s) are shown in the output panel. If not, the dialog remains up to showthese results, and you click Done to finish when all results have beendisplayed. A message should be displayed indicating the networkconnection is successfully removed 6. Click Done to close the dialog and return to the GUI status display. Server Properties - Failover In the event that the primary server has attempted and failed local recovery, or failed completely, most server administrators will want LifeKeeper to automatically restore the protected resource(s) to a backup server. This is the default LifeKeeper behavior. However, some administrators may not want the protected resource(s) to automatically go in-service at a recovery site. For example, if LifeKeeper is installed in a WAN environment where the network connection between the servers may not be reliable in a disaster recovery situation. Automatic failover is enabled by default for all protected resources. To disable automatic failover for protected resources or to prevent automatic failover to a backup server, use the Failover section located on the General tab of Server Properties to configure as follows: For each server in the cluster: 1. Bring up the Server Properties dialog just as you would for viewing server properties. 2. Select the General tab. In the Failover section of the Server Properties dialog, check the server to disable system and resource failover capabilities. By default, all failover capabilities of LifeKeeper are enabled. In the Disable System Failover column, select the server to be disqualified as a backup server for a complete failure of the local server. In the Disable Resource Failover column, select the server to be disqualified as a backup server for any failed resource hierarchy on this local server. Resource failovers cannot be disabled without first disabling system failover capabilities. 130LifeKeeper Administration Overview Creating Resource Hierarchies To commit your selections, press the Apply button. Creating Resource Hierarchies 1. There are four ways to begin creating a resource hierarchy. l Right-click on a server icon to bring up the server context menu, then click on Create Resource Hierarchy. l On the global toolbar, click on the Create Resource Hierarchy button. l On the server context toolbar, if displayed, click on the Create Resource Hierarchy button. l On the Edit menu, select Server, then click on Create Resource Hierarchy. 2. A dialog entitled Create Resource Wizard will appear with a list of all recognized recovery kits installed within the cluster. Select the Recovery Kit that builds resource hierarchies to protect your application and click Next. SteelEye Protection Suite for Linux131 LifeKeeper Application Resource Hierarchies 3. Select the Switchback Type and click Next. 4. Select the Server and click Next. Note: If you began from the server context menu, the server will be determined automatically from the server icon that you clicked on, and this step will be skipped. 5. Continue through the succeeding dialogs, entering whatever data is needed for the type of resource hierarchy that you are creating. LifeKeeper Application Resource Hierarchies If you install LifeKeeper without any recovery kits, the Select Recovery Kit list includes options for File System or Generic Application by default. The Generic Application option may be used for applications that have no associated recovery kits. If you install the Raw I/O or IP Recovery Kits (both of which are Core Recovery Kits that are packaged separately and included on the LifeKeeper Core media), the Select Recovery Kit list will provide additional options for these Recovery Kits. See the following topics describing these available options: l Creating a File System Resource Hierarchy l Creating a Generic Application Resource Hierarchy l Creating a Raw Device Resource Hierarchy The IP Recovery Kit is documented in the IP Recovery Kit Technical Documentation. Recovery Kit Options Each optional recovery kit that you install adds entries to the Select Recovery Kit list; for example, you may see Oracle, Apache, and NFS Recovery Kits. Refer to the Administration Guide that accompanies each recovery kit for directions on creating the required resource hierarchies. Note: If you wish to create a File System or other application resource hierarchy that is built on a logical volume, then you must first have the Logical Volume Manager (LVM) Recovery Kit installed. Creating a File System Resource Hierarchy Use this option to protect a file system only (for example, if you have shared files that need protection). 1. There are four ways to begin creating a file system resource hierarchy. l Right-click on a server icon to bring up the server context menu, then click on Create Resource Hierarchy. l On the global toolbar, click on the Create Resource Hierarchy button. l On the server context toolbar, if displayed, click on the Create Resource Hierarchy 132LifeKeeper Administration Overview Creating a File System Resource Hierarchy button. l On the Edit menu, select Server, then click on Create Resource Hierarchy. 2. A dialog entitled Create Resource Wizard will appear with a Recovery Kit list. Select File System Resource and click Next. 3. Select the Switchback Type and click Next. 4. Select the Server and click Next. Note: If you began from the server context menu, the server will be determined automatically from the server icon that you clicked on, and this step will be skipped. 5. The Create gen/filesys Resource dialog will now appear. Select the Mount Point for the file system resource hierarchy and click Next. The selected mount point will be checked to see that it is shared with another server in the cluster by checking each storage kit to see if it recognizes the mounted device as shared. If no storage kit recognizes the mounted device, then an error dialog will be presented: <file system> is not a shared file system Selecting OK will return to the Create gen/filsys Resource dialog. Note: l In order for a mount point to appear in the choice list, the mount point must be currently mounted. If an entry for the mount point exists in the /etc/fstab file, LifeKeeper will remove this entry during the creation and extension of the hierarchy. It is advisable to make a backup of /etc/fstab prior to using the NAS Recovery Kit, especially if you have complex mount settings. You can direct that entries are re-populated back into /etc/fstab on deletion by setting the /etc/default/LifeKeeper tunable REPLACEFSTAB=true|TRUE. l Many of these resources (SteelEye DataKeeper, LVM, Device Mapper Multipath, etc.) require LifeKeeper recovery kits on each server in the cluster in order for the file system resource to be created. If these kits are not properly installed, then the file system will not appear to be shared in the cluster. 6. LifeKeeper creates a default Root Tag for the file system resource hierarchy. (This is the label used for this resource in the status display). You can select this root tag or create your own, then click Next. 7. Click Create Instance. A window will display a message indicating the status of the instance creation. 8. Click Next. A window will display a message that the file system hierarchy has been created successfully. 9. At this point, you can click Continue to move on to extending the file system resource hierarchy, or you can click Cancel to return to the GUI. If you click Cancel, you will receive a warning message that your hierarchy exists on only one server, and it is not protected at this point. SteelEye Protection Suite for Linux133 Creating a Generic Application Resource Hierarchy Creating a Generic Application Resource Hierarchy Use this option to protect a user-defined application that has no associated recovery kit. Templates are provided for the user supplied scripts referenced below in $LKROOT/lkadm/subsys/gen/app/templates. Copy these templates to another directory before customizing them for the application that you wish to protect and testing them. Note: For applications depending upon other resources such as a file system, disk partition, or IP address, create each of these resources separately, and use Create Dependency to create the appropriate dependencies. 1. There are four ways to begin creating a generic application resource hierarchy. l Right-click on a server icon to bring up the server context menu, then click on Create Resource Hierarchy. l On the global toolbar, click on the Create Resource Hierarchy button. l On the server context toolbar, if displayed, click on the Create Resource Hierarchy button. l On the Edit menu, select Server, then click on Create Resource Hierarchy. 2. A dialog entitled Create Resource Wizard will appear with a Recovery Kit list. Select Generic Application and click Next. 3. Select the Switchback Type and click Next. 4. Select the Server and click Next. Note: If you began from the server context menu, the server will be determined automatically from the server icon that you clicked on, and this step will be skipped. 5. On the next dialog, enter the path to the Restore Script for the application and click Next. This is the command that starts the application. A template restore script, restore.template, is provided in the templates directory. The restore script must not impact applications that are already started. 6. Enter the path to the Remove Script for the application and click Next. This is the command that stops the application. A template remove script, remove.template, is provided in the templates directory. 7. Enter the path to the quickCheck Script for the application and click Next. This is the command that monitors the application. A template quickCheck script, quickCheck.template, is provided in the templates directory. 8. Enter the path to the Local Recovery Script for the application and click Next. This is the command that attempts to restore a failed application on the local server. A template recover script, recover.template, is provided in the templates directory. 9. Enter any Application Information and click Next. This is optional information about the application that may be needed by the restore, remove, recover, and quickCheck scripts. 10. Select either Yes or No for Bring Resource In Service, and click Next. Selecting No will 134LifeKeeper Administration Overview Creating a Raw Device Resource Hierarchy cause the resource state to be set to OSU following the create; selecting Yes will cause the previously provided restore script to be executed. For applications depending upon other resources such as a file system, disk partition, or IP address, select No if you have not already created the appropriate dependent resources. 11. Enter the Root Tag, which is a unique name for the resource instance. (This is the label you will see for this resource in the status display.) 12. Click Create Instance to start the creation process. A window will display a message indicating the status of the instance creation. 13. Click Next. A window will display a message that the hierarchy has been created successfully. 14. At this point, you can click Continue to move on to extending the generic application resource hierarchy, or you can click Cancel to return to the GUI. If you click Cancel, you will receive a warning that your hierarchy exists on only one server, and it is not protected at this point. Creating a Raw Device Resource Hierarchy Use this option to protect a raw device resource. For example, if you create additional table space on a raw device that needs to be added to an existing database hierarchy, you would use this option to create a raw device resource. Note: LifeKeeper locks shared disk partition resources at the disk logical unit (or LUN) level to one system in a cluster at a time. 1. There are four ways to begin creating a raw device resource hierarchy. l Right-click on a server icon to bring up the server context menu, then click on Create Resource Hierarchy. l On the global toolbar, click on the Create Resource Hierarchy button. l On the server context toolbar, if displayed, click on the Create Resource Hierarchy button. l On the Edit menu, select Server, then click on Create Resource Hierarchy. 2. A dialog entitled Create Resource Wizard will appear with a Recovery Kit list. Select Raw Device and click Next. 3. Select the Switchback Type and click Next. 4. Select the Server and click Next. Note: If you began from the server context menu, the server will be determined automatically from the server icon that you clicked on, and this step will be skipped. 5. Select the Raw Partition on a shared storage device where this resource will reside, and click Next. 6. Enter the Root Tag, which is a unique name for the resource instance. (This is the label you will see for this resource in the status display.) SteelEye Protection Suite for Linux135 Editing Resource Properties 7. Click Create Instance to start the creation process. A window titled Creating scsi/raw resource will display text indicating what is happening during creation. 8. Click Next. A window will display a message that the hierarchy has been created successfully. 9. At this point, you can click Continue to move on the extending the raw resource hierarchy, or you can click Cancel to return to the GUI. If you click Cancel, you will receive a message warning that your hierarchy exists on only one server, and it is not protected at this point Editing Resource Properties 1. To edit the properties of a resource, bring up the Resource Properties dialog just as you would for viewing resource properties. 2. If you are logged into that server with the appropriate permissions, the following items will be editable. l Switchback l Resource Configuration (only for resources with specialized configuration settings) l Resource Priorities 3. Once you have made changes, the Apply button will be enabled. Clicking this button will apply your changes without closing the window. 4. When you are finished, click OK to save any changes and close the window, or Cancel to close the window without applying changes. Editing Resource Priorities You can edit or reorder the priorities of servers on which a resource hierarchy has been defined. First, bring up the Resource Properties dialog just as you would for viewing resource properties. The Resource Properties dialog displays the priority for a particular resource on a server in the Equivalencies Tab as shown below. 136LifeKeeper Administration Overview Using the Up and Down Buttons There are two ways to modify the priorities: l Reorder the priorities by moving an equivalency with the Up/Down buttons ,or l Edit the priority values directly. Using the Up and Down Buttons 1. Select an equivalency by clicking on a row in the Equivalencies table. The Up and/or Down buttons will become enabled, depending on which equivalency you have selected. The Up button is enabled unless you have selected the highestpriority server. The Down button is enabled unless you have selected thelowest priority server. 2. Click Up or Down to move the equivalency in the priority list. The numerical priorities column will not change, but the equivalency will move up or down in the list. SteelEye Protection Suite for Linux137 Editing the Priority Values Editing the Priority Values 1. Select a priority by clicking on a priority value in the Priority column of the Equivalencies table. A box appears around the priority value, and the value is highlighted. 2. Enter the desired priority and press Enter. l Note: Valid server prioritiesare 1 to 999. After you have edited the priority, the Equivalencies table will be re-sorted. Applying Your Changes Once you have the desired priority order in the Equivalencies table, click Apply (or OK) to commit your changes. The Apply button applies any changes that have been made. The OK button applies any changes that have been made and then closes the window. The Cancel button closes the window without saving any changes made since Apply was last clicked. Extending Resource Hierarchies The LifeKeeper Extend Resource Hierarchy option copies an existing hierarchy from one server and creates a similar hierarchy on another LifeKeeper server. Once a hierarchy is extended to other servers, cascading failover is available for that resource. The server where the existing hierarchy currently resides is referred to as the template server. The server where the new extended hierarchy will be placed is referred to as the target server. The target server must be capable of supporting the extended hierarchy and it must be able to communicate with equivalent hierarchies on other remote servers (via active LifeKeeper communications paths). This means that all recovery kits associated with resources in the existing hierarchy must already be installed on the target server, as well as every other server where the hierarchy currently resides. 1. There are five ways to extend a resource hierarchy through the GUI. l Create a new resource hierarchy. When the dialog tells you that the hierarchy has been created, click on the Continue button to start extending your new hierarchy via the PreExtend Wizard. l Right-click on a global or server-specific resource icon to bring up the resource context menu, then click on Extend Resource Hierarchy to extend the selected resource via the Pre-Extend Wizard. l On the global toolbar, click on the Extend Resource Hierarchy button. When the PreExtend Wizard dialog appears, select a Template Server and a Tag to Extend, clicking on Next after each choice. l On the resource context toolbar, if displayed, click on the Extend Resource Hierarchy button to bring up the Pre-Extend Wizard. l On the Edit menu, select Resource, then click on Extend Resource Hierarchy. When 138LifeKeeper Administration Overview Extending a File System Resource Hierarchy the Pre-Extend Wizard dialog appears, select a Template Server and a Tag to Extend, clicking on Next after each choice. 2. Either select the default Target Server or enter one from the list of choices, then click Next. 3. Select the Switchback Type, then click Next. 4. Either select the default or enter your own Template Priority, then click Next. 5. Either select or enter your own Target Priority, then click Next. 6. The dialog will then display the pre-extend checks that occur next. If these tests succeed, LifeKeeper goes on to perform any steps that are needed for the specific type of resource that you are extending. The Accept Defaults button which is available for the Extend Resource Hierarchy option is intended for the user who is familiar with the LifeKeeper Extend Resource Hierarchy defaults, and wants to quickly extend a LifeKeeper resource hierarchy without being prompted for input or confirmation. Users who prefer to extend a LifeKeeper resource hierarchy using the interactive, stepby-step interface of the GUI dialogs should use the Next button. Note: ALL roots in a multi-root hierarchy must be extended together, that is, they may not be extended as single root hierarchies. Note: For command line instructions, see Extending the SAP Resource from the Command Line in the SAP Documentation. Extending a File System Resource Hierarchy This operation can be started automatically after you have finished creating a file system resource hierarchy, or from an existing file system resource, as described in the section on extending resource hierarchies. After you have done that, you then complete the steps below, which are specific to file system resources. 1. The Extend gen/filesys Resource Hierarchy dialog box appears. Select the Mount Point for the file system hierarchy, then click Next. 2. Select the Root Tag that LifeKeeper offers, or enter your own tag for the resource hierarchy on the target server, then click Next. 3. The dialog displays the status of the extend operation, which should finish with a message saying that the hierarchy has been successfully extended. Click Next Server if you want to extend the same resource hierarchy to a different server. This will repeat the extend operation. Or click Finish to complete this operation. 4. The dialog then displays verification information as the extended hierarchy is validated. When this is finished, the Done button will be enabled. Click Done to finish. Extending a Generic Application Resource Hierarchy This operation can be started automatically after you have finished creating a generic application resource hierarchy, or from an existing generic application resource, as described in the section on SteelEye Protection Suite for Linux139 Extending a Raw Device Resource Hierarchy extending resource hierarchies. After you have done that, you then complete the steps below, which are specific to generic application resources. 1. Select the Root Tag that LifeKeeper offers, or enter your own tag for the resource hierarchy on the target server, then click Next. 2. Enter any Application Information next (optional), then click Next. 3. The dialog displays the status of the extend operation, which should finish with a message saying that the hierarchy has been successfully extended. Click Next Server if you want to extend the same resource hierarchy to a different server. This will repeat the extend operation. Or click Finish to complete this operation. 4. The dialog then displays verification information as the extended hierarchy is validated. When this is finished, the Done button will be enabled. Click Done to finish. Extending a Raw Device Resource Hierarchy This operation can be started automatically after you have finished creating a raw device resource hierarchy, or from an existing raw device resource, as described in the section on extending resource hierarchies. After you have done that, you then complete the steps below, which are specific to raw device resources. 1. Select the Root Tag that LifeKeeper offers, or enter your own tag for the resource hierarchy on the target server, then click Next. 2. The dialog displays the status of the extend operation, which should finish with a message saying that the hierarchy has been successfully extended. Click Next Server if you want to extend the same resource hierarchy to a different server. This will repeat the extend operation. Or click Finish to complete this operation. 3. The dialog then displays verification information as the extended hierarchy is validated. When this is finished, the Done button will be enabled. Click Done to finish. Unextending a Hierarchy The LifeKeeper Unextend Resource Hierarchy option removes a complete hierarchy, including all of its resources, from a single server. This is different than the Delete Resource Hierarchy selection which removes a hierarchy from all servers. When using Unextend Resource Hierarchy, the server from which the existing hierarchy is to be removed is referred to as the target server. The Unextend Resource Hierarchy selection can be used from any LifeKeeper server that has active LifeKeeper communications paths to the target server. 1. There are five possible ways to begin. l Right-click on the icon for the resource hierarchy/server combination that you want to unextended. When the resource context menu appears, click Unextend Resource Hierarchy. 140LifeKeeper Administration Overview Creating a Resource Dependency l Right-click on the icon for the global resource hierarchy that you want to unextended. When the resource context menu appears, click Unextend Resource Hierarchy. When the dialog comes up, select the server in the Target Server list from which you want to unextended the resource hierarchy, and click Next. l On the global toolbar, click the Unextend Resource Hierarchy button. When the dialog comes up, select the server in the Target Server list from which you want to unextended the resource hierarchy, and click Next. On the next dialog, select the resource hierarchy that you want to unextended from the Hierarchy to Unextend list, and click Next again. l On the resource context toolbar, if displayed, click the Unextend Resource Hierarchy button. l On the Edit menu, point to Resource and then click Unextend Resource Hierarchy. When the dialog comes up, select the server in the Target Server list from which you want to unextended the resource hierarchy, and click Next. On the next dialog, select the resource hierarchy that you want to unextended from the Hierarchy to Unextend list, and click Next again. 2. The dialog will display a message verifying the server and resource hierarchy that you have specified to be unextended. Click Unextend to perform the action. 3. If the output panel is enabled, the dialog closes, and the results of the commands to unextended the resource hierarchy are shown in the output panel. If not, the dialog remains up to show these results, and you click Done to finish when all results have been displayed. Creating a Resource Dependency While most Recovery Kits create their dependencies during the original resource hierarchy creation task, under certain circumstances, you may want to create new or additional resource dependencies or delete existing ones. An example might be that you wish to change an existing IP dependency to another IP address. Instead of deleting the entire resource hierarchy and creating a new one, you can delete the existing IP dependency and create a new dependency with a different IP address. 1. There are four possible ways to begin. l Right-click on the icon for the parent server-specific resource under the server, or the parent global resource, to which you want to add a parent-child dependency. When the resource context menu appears, click Create Dependency. Note: If you right-clicked on a server-specific resource in the right pane, the value of the Server will be that server. If you right-clicked on a global resource in the left pane, the value of the Server will be the server where the resource has the highest priority. l On the global toolbar, click the Create Dependency button. When the dialog comes up, select the server in the Server list from which you want to begin creating the resource dependency, and click Next. On the next dialog, select the parent resource from the Parent Resource Tag list, and click Next again. l On the resource context toolbar, if displayed, click the Create Dependency button. SteelEye Protection Suite for Linux141 Deleting a Resource Dependency l On the Edit menu, point to Resource and then click Create Dependency. When the dialog comes up, select the server in the Server list from which you want to begin creating the resource dependency, and click Next. On the next dialog, select the parent resource from the Parent Resource Tag list, and click Next again. 2. Select a Child Resource Tag from the drop down box of existing and valid resources on the server. The dialog will display all the resources available on the server with the following exceptions: l The parent resource, its ancestors, and its children. l A resource that has not been extended to the same servers as the parent resource. l A resource that does not have the same relative priority as the parent resource. l Any resource that is not in-service on the same server as the parent, if the parent resource is in-service. Click Next to proceed to the next dialog. 3. The dialog will then confirm that you have selected the appropriate parent and child resource tags for your dependency creation. Click Create Dependency to create the dependency on all servers in the cluster to which the parent has been extended. 4. If the output panel is enabled, the dialog closes, and the results of the commands to create the dependency are shown in the output panel. If not, the dialog remains up to show these results, and you click Done to finish when all results have been displayed. Deleting a Resource Dependency 1. There are four possible ways to begin. l Right-click on the icon for the parent server-specific resource under the server, or the parent global resource, from which you want to delete a parent-child dependency. When the resource context menu appears, click Delete Dependency. l On the global toolbar, click the Delete Dependency button. When the dialog comes up, select the server in the Server list from which you want to begin deleting the resource dependency, and click Next. On the next dialog, select the parent resource from the Parent Resource Tag list, and click Next again. l On the resource context toolbar, if displayed, click the Delete Dependency button. l On the Edit menu, point to Resource and then click Delete Dependency. When the dialog comes up, select the server in the Server list from which you want to begin deleting the resource dependency, and click Next. On the next dialog, select the parent resource from the Parent Resource Tag list, and click Next again. 2. Select the Child Resource Tag from the drop down box. This should be the tag name of the child in the dependency that you want to delete. Click Next to proceed to the next dialog box. 3. The dialog then confirms that you have selected the appropriate parent and child resource tags for your dependency deletion. Click Delete Dependency to delete the dependency on all 142LifeKeeper Administration Overview Deleting a Hierarchy from All Servers servers in the cluster. 4. If the output panel is enabled, the dialog closes, and the results of the commands to delete the dependency are shown in the output panel. If not, the dialog remains up to show these results, and you click Done to finish when all results have been displayed. Deleting a Hierarchy from All Servers 1. There are five possible ways to begin. l Right-click on the icon for a resource in the hierarchy that you want to delete under the server where you want the deletion to begin. When the resource context menu appears, click Delete Resource Hierarchy. l Right-click on the icon for a global resource in the hierarchy that you want to delete. When the resource context menu appears, click Delete Resource Hierarchy. When the dialog comes up, select the server in the Target Server list from which you want to begin deleting the resource hierarchy, and click Next. l On the global toolbar, click the Delete Resource Hierarchy button. When the dialog comes up, select the server in the Target Server list from which you want to begin deleting the resource hierarchy, and click Next. On the next dialog, select a resource in the hierarchy that you want to delete from the Hierarchy to Delete list, and click Next again. l On the resource context toolbar in the properties panel, if displayed, click the Delete Resource Hierarchy button. l On the Edit menu, point to Resource and then click Delete Resource Hierarchy. When the dialog comes up, select the server in the Target Server list from which you want to begin deleting the resource hierarchy, and click Next. On the next dialog, select a resource in the hierarchy that you want to delete from the Hierarchy to Delete list, and click Next again. 2. The dialog will display a message verifying the hierarchy you have specified for deletion. Click Delete to perform the action. 3. If the output panel is enabled, the dialog closes, and the results of the commands to delete the hierarchy are shown in the output panel. If not, the dialog remains up to show these results, and you click Done to finish when all results have been displayed. SteelEye Protection Suite for Linux143 LifeKeeper User Guide The User Guide is a complete, searchable resource containing detailed information on the many tasks that can be performed within the LifeKeeper GUI. Click User Guide to access this documentation. The tasks that can be performed through the GUI can be grouped into three areas: Common Tasks - These are basic tasks that can be performed by any user such as connecting to a cluster, viewing server or resource properties, viewing log files and changing GUI settings. Operator Tasks - These are more advanced tasks that require Operator permission, such as bringing resources in and out of service. Administrator Tasks - These are tasks that require Administrator permission. They include serverlevel tasks such as editing server properties, creating resources, creating or deleting comm paths and resource-level tasks such as editing, extending, or deleting resources. The table below lists the default tasks that are available for each user permission. Additional tasks may be available for specific resource types, and these will be described in the associated resource kit documentation. Task Permission Guest Operator Administrator View servers and resources X X X Connect to and disconnect from servers X X X View server properties and logs X X X Modify server properties X Create resource hierarchies X Create and delete comm paths X View resource properties X X Modify resource properties Take resources into and out of service X X X X Extend and unextend resource hierarchies X Create and delete resource dependencies X Delete resource hierarchies X SteelEye Protection Suite for Linux145 Using LifeKeeper for Linux Using LifeKeeper for Linux The following topics provide detailed information on the LifeKeeper graphical user interface (GUI) as well as the many tasks that can be performed within the LifeKeeper GUI. GUI The GUI components should have already been installed as part of the LifeKeeper Core installation. The LifeKeeper GUI uses Java technology to provide a graphical user interface to LifeKeeper and its configuration data. Since the LifeKeeper GUI is a client/server application, a user will run the graphical user interface on a client system in order to monitor or administer a server system where LifeKeeper is running. The client and the server components may or may not be on the same system. GUI Overview - General The GUI allows users working on any machine to administer, operate or monitor servers and resources in any cluster as long as they have the required group memberships on the cluster machines. (For details, see Configuring GUI Users.) The GUI Server and Client components are described below. GUI Server The GUI server by default is not initialized on each LifeKeeper server at system startup. The GUI server communicates with GUI clients using Hypertext Transfer Protocol (HTTP) and Remote Method Invocation (RMI). By default, the GUI server is not initialized during LifeKeeper startup but can be configured to start with the core LifeKeeper process. See Starting/Stopping the GUI Server. GUI Client The GUI client can be run either as an application on any LifeKeeper server or as a web client on any Java-enabled system. The client includes the following components: l The status table on the upper left displays the high level status of connected servers and their resources. l The properties panel on the upper right displays detailed information about the most recently selected status table object. l The output panel on the bottom displays command output. l The message bar at the very bottom of the window displays processing status messages. l The context (in the properties panel) and global toolbars provide fast access to frequently used 146User Guide Exiting GUI Clients tasks. l The context (popup) and global menus provide access to all tasks. Exiting GUI Clients Select Exit from the File Menu to disconnect from all servers and close the client. The LifeKeeper GUI Software Package The LifeKeeper GUI is included in the steeleye-lkGUI software package which is bundled with the LifeKeeper Core Package Cluster. The steeleye-lkGUI package: l Installs the LifeKeeper GUI Client in Java archive format. l Installs the LifeKeeper GUI Server. l Installs the LifeKeeper administration web server. Note: The LifeKeeper administration web server is configured to use Port 81, which should be different from any public web server. l Installs a Java policy file in /opt/LifeKeeper/htdoc/ which contains the minimum permissions required to run the LifeKeeper GUI. The LifeKeeper GUI application uses the java.policy file in this location for access control. l Prepares LifeKeeper for GUI administration. Before continuing, you should ensure that the LifeKeeper GUI package has been installed on the LifeKeeper server(s). You can enter the command rpm -qi steeleye-lkGUI to verify that this package is installed. You should see output including the package name steeleye-lkGUI if the GUI package is installed. SteelEye Protection Suite for Linux147 Menus Menus SteelEye LifeKeeper for Linux Menus Resource Context Menu The Resource Context Menu appears when you right-click on a global (cluster-wide) resource, as shown above, or a server-specific resource instance, as shown below, in the status table. The default resource context menu is described here, but this menu might be customized for specific resource types, in which case the menu will be described in the appropriate resource kit documentation. The actions are invoked for the resource that you select. If you select a resource instance on a specific server, the action is invoked for that server while if you select a global (cluster-wide) resource, you will need to select the server. In Service. Bring a resource hierarchy into service. Out of Service. Take a resource hierarchy out of service. 148User Guide Server Context Menu Extend Resource Hierarchy. Copy a resource hierarchy to another server for failover support. Unextend Resource Hierarchy. Remove an extended resource hierarchy from a single server. Create Dependency. Create a parent/child relationship between two resources. Delete Dependency. Remove a parent/child relationship between two resources. Delete Resource Hierarchy. Remove a resource hierarchy from all servers in the LifeKeeper cluster. Properties. Display the Resource Properties Dialog. Server Context Menu The Server Context Menu appears when you right-click on a server icon in the status table. This menu is the same as the Edit Menu's Server submenu except that the actions are always invoked on the server that you initially selected. Disconnect. Disconnect from a cluster. Refresh. Refresh GUI. View Logs. View LifeKeeper log messages on connected servers. Create Resource Hierarchy. Create a resource hierarchy. Create Comm Path. Create a communication path between servers. Delete Comm Path. Remove communication paths from a server. Properties. Display the Server Properties Dialog. SteelEye Protection Suite for Linux149 File Menu File Menu Connect. Connect to a LifeKeeper cluster. Connection to each server in the LifeKeeper cluster requires login authentication on that server. Exit. Disconnect from all servers and close the GUI window. Edit Menu - Resource In Service. Bring a resource hierarchy into service. Out of Service. Take a resource hierarchy out of service. Extend Resource Hierarchy. Copy a resource hierarchy to another server for failover support. Unextend Resource Hierarchy. Remove an extended resource hierarchy from a single server. Create Dependency. Create a parent/child relationship between two resources. Delete Dependency. Remove a parent/child relationship between two resources. Delete Resource Hierarchy. Remove a resource hierarchy from all servers in the LifeKeeper cluster. Properties. Display the Resource Properties Dialog. 150User Guide Edit Menu - Server Edit Menu - Server Disconnect. Disconnect from a cluster. Refresh. Refresh GUI. View Logs. View LifeKeeper log messages on connected servers. Create Resource Hierarchy. Create a resource hierarchy. Create Comm Path. Create a communication path between servers. Delete Comm Path. Remove communication paths from a server. Properties. Display the Server Properties Dialog. View Menu Global Toolbar. Display this component if the checkbox is selected. Message Bar. Display this component if the checkbox is selected. SteelEye Protection Suite for Linux151 Help Menu Properties Panel. Display this component if the checkbox is selected. Output Panel. Display this component if the checkbox is selected. Options. Edit the display properties of the GUI. History. Display the newest messages that have appeared in the Message Bar in the LifeKeeper GUI Message History dialog box (up to 1000 lines). Expand Tree. Expand the entire resource hierarchy tree. Collapse Tree. Collapse the entire resource hierarchy tree. Help Menu Technical Documentation. Displays the landing page of the SIOS Technology Corp. Technical Documentation. About.... Displays LifeKeeper GUI version information. Toolbars SteelEye LifeKeeper for Linux Toolbars GUI Toolbar This toolbar is a combination of the default server and resource context toolbars which are displayed on the properties panel except that you must select a server and possibly a resource when you invoke actions from this toolbar. Connect. Connect to a LifeKeeper cluster. 152User Guide GUI Toolbar Disconnect. Disconnect from a LifeKeeper cluster. Refresh. Refresh GUI. View Logs. View LifeKeeper log messages on connected servers. Create Resource Hierarchy. Create a resource hierarchy. Delete Resource Hierarchy. Remove a resource hierarchy from all servers in the LifeKeeper cluster. Create Comm Path. Create a communication path between servers. Delete Comm Path. Remove communication paths from a server. In Service. Bring a resource hierarchy into service. Out of Service. Take a resource hierarchy out of service. Extend Resource Hierarchy. Copy a resource hierarchy to another server for failover support. Unextend Resource Hierarchy. Remove an extended resource hierarchy from a single server. SteelEye Protection Suite for Linux153 Resource Context Toolbar Create Dependency. Create a parent/child relationship between two resources. Delete Dependency. Remove a parent/child relationship between two resources. Migrate Hierarchy to Multi-Site Cluster. Migrate an existing hierarchy to a Multi-Site Cluster Environment. Resource Context Toolbar The resource context toolbar is displayed in the properties panel when you select a server-specific resource instance in the status table. The actions are invoked for the server and the resource that you select. Actions that are not available for selection for a resource will be grayed out. In Service. Bring a resource hierarchy into service. Out of Service. Take a resource hierarchy out of service. Extend Resource Hierarchy. Copy a resource hierarchy to another server for failover support. Unextend Resource Hierarchy. Remove an extended resource hierarchy from a single server. Add Dependency. Create a parent/child relationship between two resources. 154User Guide Resource Context Toolbar Remove Dependency. Remove a parent/child relationship between two resources. Delete Resource Hierarchy. Remove a resource hierarchy from all servers. SteelEye Protection Suite for Linux155 Server Context Toolbar Server Context Toolbar The server context toolbar is displayed in the properties panel when you select a server in the status table. The actions are invoked for the server that you select. Disconnect. Disconnect from a LifeKeeper cluster. Refresh. Refresh GUI. View Logs. View LifeKeeper log messages on connected servers. Create Resource Hierarchy. Create a resource hierarchy. Delete Resource Hierarchy. Remove a resource hierarchy from all servers in the LifeKeeper cluster. Create Comm Path. Create a communication path between servers. Delete Comm Path. Remove communication paths from a server. Preparing to Run the GUI LifeKeeper GUI - Overview The LifeKeeper GUI uses Java technology to provide a graphical status interface to LifeKeeper and 156User Guide GUI Server its configuration data. Since the LifeKeeper GUI is a client/server application, a user will run the graphical user interface on a client system in order to monitor or administer a server system where LifeKeeper is executing. The client and the server may or may not be the same system. The LifeKeeper GUI allows users working on any machine to administer, operate, or monitor servers and resources in any cluster, as long as they have the required group memberships on the cluster machines. [For details, see Configuring GUI Users.] The LifeKeeper GUI Server and Client components are described below. GUI Server The LifeKeeper GUI server is initialized on each server in a LifeKeeper cluster at system startup. It communicates with the LifeKeeper core software via the Java Native Interface (JNI), and with the LifeKeeper GUI client using Remote Method Invocation (RMI). GUI Client The LifeKeeper GUI client is designed to run either as an application on a Linux system, or as an applet which can be invoked from a web browser on either a Windows or Unix system. The LifeKeeper GUI client includes the following graphical components: l The status table on the upper left displays the high level status of connected servers and their resources. l The properties panel on the upper right displays detailed information about the most recently selected status table object. l The output panel on the bottom displays command output. l The message bar at the very bottom of the window displays processing status messages. l The server context and resource context toolbars (in the properties panel) and global toolbar provide fast access to frequently-used tasks. l The server context and resource context menus (popup) and global menus (file, edit server, edit resource, view, and help) provide access to all tasks. Right-clicking on a graphic resource, server, or table cell will display a context menu. Most tasks can also be initiated from these context menus, in which case the resources and servers will be automatically determined. Starting GUI clients Starting the LifeKeeper GUI Applet To run the LifeKeeper GUI applet via the web open your favorite web browser and go to the URL http://<server name>:81 where <server name> is the name of a LifeKeeper server. This will load the LifeKeeper GUI applet from the LifeKeeper GUI server on that machine. After it has finished loading, you should see the Cluster Connect dialog, which allows you to connect to any GUI server. SteelEye Protection Suite for Linux157 Starting the application client NOTE: When you run the applet, if your system does not have the required Java Plug-in, you will be automatically taken to the web site for downloading the plug-in. You must also set your browser security parameters to enable Java. If you have done this and the client still is not loading, see GUI Troubleshooting. Starting the application client Users with administrator privileges on a LifeKeeper server can run the application client from that server. To start the LifeKeeper GUI app run /opt/LifeKeeper/bin/lkGUIapp from a graphical window. If you have done this and the client still is not loading, see GUI Troubleshooting. Exiting GUI Clients Select Exit from the File menu to disconnect from all servers and close the client. Configuring the LifeKeeper GUI Configuring the LifeKeeper Server for GUI Administration Perform the following steps for each LifeKeeper server. Each step contains references or links for more detailed instructions. 1. You must install the Java Runtime Environment (JRE) or Java Software Development Kit (JDK) on each server. See the SPS for Linux Release Notes for the required Java version and URL to access the required download. Note: You may install the JRE from the SPS Installation Image File by running the setup script from the installation image file and opting only to install the JRE. (See the SPS for Linux Installation Guide for more information.) 2. Start the LifeKeeper GUI Server on each server (see Starting/Stopping the GUI Server). Note: Once the GUI Server has been started following an initial installation, starting and stopping LifeKeeper will start and stop all LifeKeeper daemon processes including the GUI Server. 3. If you plan to allow users other than root to use the GUI, then you need to Configure GUI Users. Running the GUI You can run the LifeKeeper GUI: l on the LifeKeeper server in the cluster and/or l on a remote system outside the cluster See Running the GUI on the LifeKeeper Server for information on configuring and running the GUI on a server in your LifeKeeper cluster. 158User Guide GUI Configuration See Running the GUI on a Remote System for information on configuring and running the GUI on a remote system outside your LifeKeeper cluster. GUI Configuration Item Description GUI client and server communication The LifeKeeper GUI client and server use Java Remote Method Invocation (RMI) to communicate. For RMI to work correctly, the client and server must use resolvable hostnames or IP addresses. If DNS is not implemented (or names are not resolvable using other name lookup mechanisms), edit the /etc/hosts file on each client and server to include the names and addresses of all other LifeKeeper servers. The LifeKeeper GUI server requires that the Java Runtime Environment (JRE) Java virtual machine, the Java platform core classes and supporting files - be installed. The JRE for Linux is available on the SPS for Linux Installation Image File (See the SPS for Linux Installation Guide) or it can be downloaded directly from http://www.oracle.com/technetwork/java/javase/downloads/index.html. (Note: If downloading directly from this site, make sure you download Version 1.6.) GUI Server Java platform Note: By default, the LifeKeeper GUI server expects the JRE on each server to be installed in the directory /usr/java/jre1.6.0_33. If this is not found, it will look in the directory /usr/java/jdk1.6.0_33 for a Java Software Development Kit (JDK). If you want to use a JRE or JDK in another directory location, you must edit the PATH in the LifeKeeper default file /etc/default/LifeKeeper to include the directory containing the java interpreter, java.exe. If LifeKeeper is running when you edit this file, you should stop and restart the LifeKeeper GUI server to recognize the change. Otherwise, the LifeKeeper GUI will not be able to find the Java command. Java remote object registry server port The LifeKeeper GUI server uses port 82 for the Java remote object registry on each LifeKeeper server. This should allow servers to support RMI calls from clients behind typical firewalls. LifeKeeper administration web server The LifeKeeper GUI server requires an administration web server for client browser communication. Currently, the LifeKeeper GUI server is using a private copy of the lighttpd web server for its administration web server. This web server is installed and configured by the steeleye-lighttpd package and uses port 81 to avoid a conflict with other web servers. GUI client network access LifeKeeper GUI clients require network access to all hosts in the LifeKeeper cluster. When running the LifeKeeper GUI client in a browser, you will have to lower the security level to allow network access for applets. Be careful not to visit other sites with security set to low values (e.g., change the security settings only for intranet or trusted sites). SteelEye Protection Suite for Linux159 GUI Limitations GUI Limitations Item Description GUI interoperability restriction The LifeKeeper for Linux client may only be used to administer LifeKeeper on Linux servers. The LifeKeeper for Linux GUI will not interoperate with LifeKeeper for Windows. Starting and Stopping the GUI Server To Start the LifeKeeper GUI Server If the LifeKeeper GUI Server is not running, type the following command as root: /opt/LifeKeeper/bin/lkGUIserver start This command starts all LifeKeeper GUI Server daemon processes on the server being administered if they are not currently running. A message similar to the following is displayed. # Installing GUI Log # LK GUI Server Startup at: # Mon May 8 14:14:46 EDT 2006 # LifeKeeper GUI Server Startup completed at: # Mon May 8 14:14:46 EDT 2006 Once the LifeKeeper GUI Server is started, all subsequent starts of LifeKeeper will automatically start the LifeKeeper GUI Server processes. Troubleshooting The LifeKeeper GUI uses Ports 81 and 82 on each server for its administration web server and Java remote object registry, respectively. If another application is using the same ports, the LifeKeeper GUI will not function properly. These values may be changed by editing the following entries in the LifeKeeper default file /etc/default/LifeKeeper. GUI_WEB_PORT=81 GUI_RMI_PORT=82 Note: These port values are initialized in the GUI server at start time. If you alter them, you will need to stop and restart the GUI server. These values must be the same across all clusters to which you connect. To Stop the LifeKeeper GUI Server If the LifeKeeper GUI Server is running, type the following command as root: /opt/LifeKeeper/bin/lkGUIserver stop 160User Guide LifeKeeper GUI Server Processes This command halts all LifeKeeper GUI Server daemon processes on the server being administered if they are currently running. The following messages are displayed. # LifeKeeper GUI Server Shutdown at: # Fri May 19 15:37:27 EDT 2006 # LifeKeeper GUI Server Shutdown Completed at: # Fri May 19 15:37:28 EDT 2006 LifeKeeper GUI Server Processes To verify that the LifeKeeper GUI Server is running, type the following command: ps -ef | grep runGuiSer You should see output similar to the following: root 2805 1 0 08:24 ? 00:00:00 sh/opt/LifeKeeper/bin/runGuiSer To see a list of the other GUI Server daemon processes currently running, type the following command: ps -ef | grep S_LK You should see output similar to the following: root 30228 30145 0 11:20 ? 00:00:00 java -Xint -Xss3M -DS_LK=true -Djava.rmi.server.hostname=thor48 ... Configuring GUI Users There are three classes of GUI users with different permissions for each. 1. Users with Administrator permission throughout a cluster can perform all possible actions through the GUI. 2. Users with Operator permission on a server can view LifeKeeper configuration and status information and can bring resources into service and take them out of service on that server. 3. Users with Guest permission on a server can view LifeKeeper configuration and status information on that server. The GUI server must be invoked as root. During installation of the GUI package, an entry for the root login and password is automatically configured in the GUI password file with Administratorpermission, allowing root to perform all LifeKeeper tasks on that server via the GUI application or web client. If you plan to allow users other than root to use LifeKeeper GUI clients, then you need to configure LifeKeeper GUI users. The best practice is to always grant permissions on a cluster-wide basis. It is possible to grant permissions on a single-server basis, but that is confusing to users and makes it impossible to perform administrative tasks. User administration is performed through the command line interface, using lkpasswd, as described below. Unless otherwise specified, all commands require you to enter the user's password twice. SteelEye Protection Suite for Linux161 Java Security Policy They take effect on the user's next login or when the GUI server is restarted, whichever comes first. Each user has a single permission on a given server. Previous permission entries are deleted if a new permission is specified on that server. l To grant a user Administrator permission for the LifeKeeper GUI, type the following command: /opt/LifeKeeper/bin/lkpasswd -administrator <user> l To grant a user Operator permission for the LifeKeeper GUI, type the following command: /opt/LifeKeeper/bin/lkpasswd -operator <user> l To grant a user Guest permission for the LifeKeeper GUI, type the following command: /opt/LifeKeeper/bin/lkpasswd -guest <user> l To change the password for an existing user without changing their permission level, type the following command: /opt/LifeKeeper/bin/lkpasswd <user> l To prevent an existing user from using the LifeKeeper GUI, type the following command: /opt/LifeKeeper/bin/lkpasswd -delete <user> This command does not require password entry. Note: These commands update the GUI password file only on the server being administered. You should repeat the command on all servers in the LifeKeeper cluster. Java Security Policy The LifeKeeper GUI uses policy-based access control. When the GUI client is loaded, it is assigned permissions based on the security policy currently in effect. The policy, which specifies permissions that are available for code from various signers/locations, is initialized from an externally configurable policy file. There is, by default, a single system-wide policy file and an optional user policy file. The system policy file, which is meant to grant system-wide code permissions, is loaded first, and then the user policy file is added to it. In addition to these policy files, the LifeKeeper GUI policy file may also be loaded if the LifeKeeper GUI is invoked as an application. Location of Policy Files The system policy file is by default at: <JAVA.HOME>/lib/security/java.policy (Linux) <JAVA.HOME>\lib\security\java.policy (Windows) Note: JAVA.HOME refers to the value of the system property named "JAVA.HOME", which specifies the directory into which the JRE or JDK was installed. 162User Guide Policy File Creation and Management The user policy file starts with `.` and is by default at: <USER.HOME>\.java.policy Note: USER.HOME refers to the value of the system property named "user.home", which specifies the user's home directory. For example, the home directory on a Windows NT workstation for a user named Paul might be "paul.000". For Windows systems, the user.home property value defaults to C:\WINNT\Profiles\<USER> (on multi-user Windows NT systems) C:\WINDOWS\Profiles\<USER> (on multi-user Windows 95/98 systems) C:\WINDOWS (on single-user Windows 95/98 systems) The LifeKeeper GUI policy file is by default at: /opt/LifeKeeper/htdoc/java.policy (Linux) Policy File Creation and Management By default, the LifeKeeper GUI policy file is used when the LifeKeeper GUI is invoked as an application. If you are running the LifeKeeper GUI as an applet, you will need to create a user policy file in your home directory if one does not already exist. The user policy file should specify the minimum permissions required to run the LifeKeeper GUI, which are provided in the "Sample Policy File" section later in this topic. A policy file can be created and maintained via a simple text editor, or via the graphical Policy Tool utility included with the Java Runtime Environment (JRE) or Java Development Kit (JDK). Using the Policy Tool saves typing and eliminates the need for you to know the required syntax of policy files. For information about using the Policy Tool, see the Policy Tool documentation at http://docs.oracle.com/javase/6/docs/technotes/tools/. The simplest way to create a user policy file with the minimum permissions required to run the LifeKeeper GUI is to copy the LifeKeeper GUI policy file located in /opt/LifeKeeper/htdoc/java.policy to your home directory and rename it .java.policy (note the leading dot before the filename which is required). On a Windows system, you can copy the LifeKeeper GUI policy file by opening the file http://<server name>:81/java.policy (where <server name> is the host name of a LifeKeeper server) and saving it as .java.policy in your home directory. If you need to determine the correct location for a user policy file, enable the Java Console using the Java Control Panel and start the LifeKeeper GUI as an applet. The home directory path for the user policy file will be displayed in the Java Console. Granting Permissions in Policy Files A permission represents access to a system resource. In order for a resource access to be allowed for an applet, the corresponding permission must be explicitly granted to the code attempting the access. A permission typically has a name (referred to as a "target name") and, in some cases, a comma-separated list of one or more actions. For example, the following code creates a FilePermission object representing read access to the file named abc in the /tmp directory: SteelEye Protection Suite for Linux163 Sample Policy File perm = new java.io.FilePermission("/tmp/abc","read"); In this, the target name is "/tmp/abc" and the action string is "read". A policy file specifies what permissions are allowed for code from specified code sources. An example policy file entry granting code from the /home/sysadmin directory read access to the file /tmp/abc is: grant codeBase "file:/home/sysadmin/" { permissionjava.io.FilePermission "/tmp/abc", "read"; }; Sample Policy File The following sample policy file includes the minimum permissions required to run the LifeKeeper GUI. This policy file is installed in /opt/LifeKeeper/htdoc/java.policy by the LifeKeeper GUI package. /* * Permissions needed by the LifeKeeper GUI. You may want to * restrict this by codebase. However, if you do this, remember * that the recovery kits can have an arbitrary jar component * with an arbitrary codebase, so you'll need to alter the grant * to cover these as well. */ grant { /* * Need to be able to do this to all machines in the * LifeKeeper cluster. You may restrict the network * specification accordingly. */ permission java.net.SocketPermission"*", "accept,connect,resolve"; /* * We use URLClassLoaders to get remote properties files and * jar pieces. */ permission java.lang.RuntimePermission"createClassLoader"; /* * The following are needed only for the GUI to run as an * application (the default RMI security manager is more * restrictive than the one a browser installs for its * applets. */ permission java.util.PropertyPermission "*","read"; permission java.awt.AWTPermission "*"; permission java.io.FilePermission "<<ALL FILES>>","read,execute"; }; 164User Guide Java Plug-In Java Plug-In Regardless of the browser you are using (see supported browsers), the first time your browser attempts to load the LifeKeeper GUI, it will either automatically download the Java Plug-In software or redirect you to a web page to download and install it. From that point forward, the browser will automatically invoke the Java Plug-in software every time it comes across web pages that support the technology. Downloading the Java Plug-in Java Plug-in software is included as part of the Java Runtime Environment (JRE) for Solaris, Linux and Windows. Downloading the JRE typically takes a total of three to ten minutes, depending on your network and system configuration size. The download web page provides more documentation and installation instructions for the JRE and Java Plug-in software. Note 1: You should close and restart your browser after installing the plug-in and whenever plug-in properties are changed. Note 2: Only Java Plug-in Version 1.6.x or later are supported with LifeKeeper. Running the GUI on a Remote System You may administer LifeKeeper from a Linux, Unix or Windows system outside the LifeKeeper cluster by running the LifeKeeper GUI as a Java applet. Configuring and running the GUI in this environment is described below. Configuring the GUI on a Remote System In order to run the LifeKeeper GUI on a remote Linux, Unix or Windows system, your browser must provide full JDK 1.6 applet support. Refer to the SPS for Linux Release Notes for information on the supported platforms and browsers for the LifeKeeper GUI. 1. If you are running the LifeKeeper GUI as an applet, you need to create a user policy file in your home directory if one does not already exist. The user policy file should specify the minimum permissions required to run the LifeKeeper GUI. l The simplest way to create a user policy file with the minimum permissions required to run the LifeKeeper GUI is to copy the LifeKeeper GUI policy file located in /opt/LifeKeeper/htdoc/java.policy to your home directory and rename it .java.policy(note there is a leading dot in the file name that is required). On a Windows system, you can copy the LifeKeeper GUI policy file by opening the file http://<server name>:81/java.policy (where <servername> is the host name of a LifeKeeper server), and saving it as .java.policy in your home directory. If you need to determine the correct location for a user policy file, enable the Java Console using the Java Control Panel, and start the LifeKeeper GUI as an applet. The home directory path for the user policy file will be displayed in the Java Console. SteelEye Protection Suite for Linux165 Running the GUI on a Remote System l If you already have a user policy file, you can add the required entries specified in/opt/LifeKeeper/ htdoc/java.policy on a LifeKeeper server into the existing file using a simple text editor. See Java Security Policy for further information. 2. You must set your browser security parameters to low. This generally includes enabling of Java and Java applets. Since there are several different browsers and versions, the instructions for setting browser security parameters are covered in Setting Browser Security Parameters for the GUI Applet. Note: It is important to use caution in visiting external sites with low security settings. 3. When you run the GUI for the first time, if you are using Netscape or Internet Explorer and your system does not have the required Java plug-in, you may be automatically taken to the appropriate web site for downloading the plug-in. See the SPS for Linux Release Notes for the required Java Plug-in version and URL to access the download. Running the GUI on a Remote System After you have completed the tasks described above, you are ready to run the LifeKeeper GUI as a Java applet on a remote system. 1. Open the URL, http://<server name>:81, for the LifeKeeper GUI webpage (where <server name> is the name of the LifeKeeper server). The web page contains the LifeKeeper splash screen and applet. When the web page is opened, the following actions take place: l the splash screen is displayed l the applet is loaded l the Java Virtual Machine is started l some server files are downloaded l the applet is initialized Depending upon your network and system configuration, these actions may take up to 20 seconds. Typically, browsers provide some minimal status as the applet is loading and initializing. If everything loads properly, a Start button should appear in the applet area. If the splash screen does not display a Start button or you suspect that the applet failed to load and initialize, refer to Applet Troubleshooting or see Network-Related Troubleshooting. 2. When prompted, click Start. The LifeKeeper GUI appears and the Cluster Connect Dalog is automatically displayed. Once a Server has been entered and connection to the cluster established, the GUI window displays a visual representation and status of the resources protected by the connected servers. The GUI menus and toolbar buttons provide LifeKeeper administration functions. Note: Some browsers add “Warning: Applet Window” to windows and dialogs created by an applet. This is normal and can be ignored. 166User Guide Applet Troubleshooting Applet Troubleshooting If you suspect that the applet failed to load and initialize, try the following: 1. Verify that applet failed. Usually a message is printed somewhere in the browser window specifying the state of the applet. In Netscape and Internet Explorer, an icon may appear instead of the applet in addition to some text status. Clicking this icon may bring up a description of the failure. 2. Verify that you have installed the Java Plug-in. If your problem appears to be Java Plug-in related, refer to the Java Plug-in topic. 3. Verify that you have met the browser configuration requirements, especially the security settings. Refer to Setting Browser Security Parameters for the GUI Applet for more information. If you don't find anything obviously wrong with your configuration, continue with the next steps. 4. Open the Java Console. l For Firefox, Netscape and older versions of Internet Explorer, run the Java Plug-In applet from your machine's Control Panel and select the option to show the console, then restart your browser. l For recent versions of Internet Explorer, select Tools > Java Console. If you do not see the Java Console menu item, select Tools > Manage Add-Ons and enable the console, after which you may need to restart your browser before the console will appear. l For Mozilla, select Tools > Web Development > Java Console. 5. Reopen the URL, http://<server name>:81 to start the GUI applet. If you've modified the Java Plug-In Control Panel, restart your browser. 6. Check the console for any messages. The messages should help you resolve the problem. If the problem appears to be network related, refer to Network-Related Troubleshooting. Running the GUI on a LifeKeeper Server The simplest way to run the LifeKeeper GUI is as an application on a LifeKeeper server. By doing so you are, in effect, running the GUI client and server on the same system. 1. After configuring the LifeKeeper server for GUI Administration, you can run the GUI as an application on the server by entering the following command as root: /opt/LifeKeeper/bin/lkGUIapp 2. The lkGUIapp script sets the appropriate environment variables and starts the application. As the application is loading, an application identity dialog or splash screen for LifeKeeper appears. 3. After the application is loaded, the LifeKeeper GUI appears and the Cluster Connect dialog is automatically displayed. Enter the Server Name you wish to connect to, followed by the login SteelEye Protection Suite for Linux167 Browser Security Parameters for GUI Applet and password. 4. Once a connection to the cluster is established, the GUI window displays a visual representation and status of the resources protected by the connected servers. The GUI menus and toolbar buttons provide administration functions. Browser Security Parameters for GUI Applet WARNING: Be careful of other sites you visit with security set to low values. Firefox 1. From the Edit menu, select Preferences. 2. In the Preferences dialog box, select Content. 3. Select the Enable Java and Enable Java Script options. 4. Click Close. Internet Explorer The most secure method for using Internet Explorer is to add the LifeKeeper server to the Trusted Sites zone as follows: 1. From the Tools menu, click Internet Options. 2. Click the Security tab. 3. Select Trusted Sites zone and click Custom Level. 4. Under Reset custom settings, select Medium/Low, then click Reset. 5. Click Sites. 6. Enter the server name and port number for the LifeKeeper server(s) to which you wish to connect (for instance: http://server1:81). An alternative, but possibly less secure method, is to do the following: 1. From the Tools menu, click Internet Options. 2. Select either Internet or Local Intranet (depending upon whether your remote system and the LifeKeeper cluster are on the same intranet). 3. Adjust the Security Level bar to Medium (for Internet) or Medium-low (for Local Intranet). These are the default settings for each zone. 4. Click OK. Status Table The status table provides a visual representation of the status of connected servers and their 168User Guide Properties Panel resources. It shows: l the state of each server in the top row, l the global (cross-server) state and the parent-child relationships of each resource in the leftmost column, and l the state of each resource on each server in the remaining cells. The states of the servers and resources are shown using graphics, text and color. An empty table cell under a server indicates that a particular resource has not been defined on that server. If you select a server or a resource instance in the status table, detailed state information and a context-sensitive toolbar for that item are shown in the properties panel. You can also pop up the appropriate server context menu or resource context menu for any item by right-clicking on that cell. The status table is split into two sections. The relative sizes of the left and right sections can be modified by moving the divider between them. The status table can also be collapsed to show only the highest level items in the hierarchy trees. Collapsing or expanding resource items in the tree causes the hierarchies listed in the table to also expand and collapse. Properties Panel The properties panel displays the properties of the server or resource that is selected in the status table. The properties panel has the same functionality as the server properties dialog or the resource properties dialog, plus a context-sensitive toolbar to provide fast access to commonly used commands. The caption at the top of this panel is server_name if a server is selected, or server_ name: resource_name if a resource is selected. The context-sensitive toolbars displayed in the properties panel are the server context toolbar and the resource context toolbar. Server or resource toolbars may also be customized. For more information on customized toolbars, see the corresponding application recovery kit documentation. The buttons at the bottom of the properties panel function as follows: l The Apply button applies any changes that have been made to editable properties on the panel. This button is only enabled if you have changed an editable property. l The Reset button queries the server for the current values of all properties, clearing any changes that you may have made. This button is always enabled. l The Help button displays context-sensitive help for the properties panel. This button is always enabled. You increase or decrease the size of the properties panel by sliding the separator at the left of the panel to the left or right. If you want to open or close this panel, use the Properties Panel checkbox on the View Menu. Output Panel The output panel collects output from commands issued by the LifeKeeper GUI client. When a command begins to run, a time stamped label is added to the output panel, and all of the output from SteelEye Protection Suite for Linux169 Message Bar that command is added under this label. If you are running multiple commands at the same time (typically on different servers), the output from each command is sent to the corresponding section making it easy to see the results of each. You increase or decrease the size of the output panel by sliding the separator at the top of the panel up or down. If you want to open or close this panel, use the Output Panel checkbox on the View Menu. When the output panel is closed, the dialog that initiates each command will stay up, the output will be displayed on that dialog until you dismiss it and you will not be able to review the output from any command after you have closed that dialog. After the output panel is reopened, the LifeKeeper GUI will return to its default behavior. Message Bar The message bar appears beneath the status window. It is used for displaying messages in a single text line. Message such as "Connecting to Server X" or "Failure to connect to Server X" might be displayed. To hide the message bar, clear the Message Bar checkbox in the View Menu. To display the message bar, select the Message Bar checkbox in the View Menu. To see a history of messages displayed in the message bar, see Viewing Message History. Exiting the GUI Select Exit from the File Menu to disconnect from all servers and close the GUI window. Common Tasks The following are basic tasks that can be performed by any user. Starting LifeKeeper All SPS software is installed in the directory /opt/LifeKeeper. When you have completed all of the verification tasks, you are ready to start LifeKeeper on both servers. This section provides information for starting the LifeKeeper server daemon processes. The LifeKeeper GUI application is launched using a separate command and is described in Configuring the LifeKeeper GUI. LifeKeeper provides a command line interface that starts and stops the LifeKeeper daemon processes. These daemon processes must be running before you start the LifeKeeper GUI. Starting LifeKeeper Server Processes If LifeKeeper is not currently running on your system, type the following command as the user root on all servers: /etc/init.d/lifekeeper start Following the delay of a few seconds, an informational message is displayed. 170User Guide Enabling Automatic LifeKeeper Restart Note: If you receive an error message referencing the LifeKeeper Distribution Enabling Package when you start LifeKeeper, you should install / re-install the LifeKeeper Installation Image File. See the LCD(1M) man page by entering man LCD at the command line for details on the /etc/init.d/lifekeeper start command. Enabling Automatic LifeKeeper Restart While the above command will start LifeKeeper, it will need to be performed each time the system is re-booted. If you would like LifeKeeper to start automatically when server boots up, type the following command: chkconfig lifekeeper on See the chkconfig man page for further information. Stopping LifeKeeper If you need to stop LifeKeeper, type the following command as root to stop it: /etc/init.d/lifekeeper stop-nofailover This command will shut down LifeKeeper on the local system if it is currently running. It will first remove all protected resources from service on the local system then shut down the LifeKeeper daemons. Protected resources will not fail over to another system in the cluster. LifeKeeper will automatically restart when the system is restarted. /etc/init.d/lifekeeper stop-daemons This command will skip the section that removes resources from service. The resources will remain running on the local system but will no longer be protected by LifeKeeper. This command should be used with caution, because if resources are not gracefully shut down, then items such as SCSI locks will not be removed. If the system on which this command is executed subsequently fails or is shut down, the system(s) will NOT initiate failover of the appropriate resources. LifeKeeper will automatically restart when the system is restarted. /etc/init.d/lifekeeper stop This command will remove the resources from service but does not set the !nofailover! flag [see LCDIflag(1M)] on any of the systems that it can communicate with. This means that failover will occur if the shutdown_switchover flag is set. If shutdown_switchover is not set, then this command behaves the same as /etc/init.d/lifekeeper stop-nofailover. LifeKeeper will automatically restart when the system is restarted. SteelEye Protection Suite for Linux171 Disabling Automatic LifeKeeper Restart Disabling Automatic LifeKeeper Restart If you do not want LifeKeeper to automatically restart when the system is restarted, type the following command: chkconfig lifekeeper off See the chkconfig man page for further information. Viewing LifeKeeper Processes To see a list of all LifeKeeper daemon processes currently running, type the following command: ps -ef | grep LifeKeeper An example of the output is provided below: root 947 1 0 16:25 ?00:00:00 /opt/LifeKeeper/bin/lcm root 948 1 0 16:25 ? 00:00:00/opt/LifeKeeper/bin/ttymonlcm root 949 1 0 16:25 ? 00:00:00/opt/LifeKeeper/bin/lcd root 950 1 0 16:25 ? 00:00:00/opt/LifeKeeper/bin/lkcheck root 951 1 0 16:25 ? 00:00:00/opt/LifeKeeper/bin/lkscsid root 1104 1 0 16:26 ? 00:00:00/opt/LifeKeeper/bin/lk_logmgr -1 Note: There are additional GUI Server daemon processes that run in addition to the core LifeKeeper daemon processes shown above. See Viewing LifeKeeper GUI Server Processes for a list of the processes associated with the GUI Server. Viewing LifeKeeper GUI Server Processes To verify that the LifeKeeper GUI Server is running, type the following command: ps -ef | grep runGuiSer You should see output similar to the following: root 2805 1 0 08:24 ? 00:00:00 sh /opt/LifeKeeper/bin/runGuiSer To see a list of the other GUI Server daemon processes currently running, type the following command: ps -efw | grep S_LK You should see output similar to the following: root 819 764 0 Oct16 ? 00:00:00 java -Xint -Xss3M -DS_LK=true Djava.rmi.server.hostname=wake -Dcom.steeleye.LifeKeeper.rmiPort=82 -Dcom.steeleye.LifeKeeper.LKROOT=/opt/LifeKeeper -DGUI_RMI_ 172User Guide Connecting Servers to a Cluster REGISTRY=internal -DGUI_WEB_PORT=81 com.steeleye.LifeKeeper.beans.S_LK Connecting Servers to a Cluster 1. There are two possible ways to begin. l On the global toolbar, click the Connect button. l On the File Menu, click Connect. 2. In the Server Name field of the Cluster Connect dialog, enter the name of a server within the cluster to which you want to connect. Note: If using an IPv6 address, this address will need to be enclosed in brackets [ ]. This will allow a connection to be established through a machine's IPv6 address. Alternatively, a name can be assigned to the address, and that name can then be used to connect. 3. In the Login and Password fields, enter the login name and password of a user with LifeKeeper authorization on the specified server. 4. Click OK. If the GUI successfully connects to the specified server, it will continue to connect to (and add to the status display) all known servers in the cluster until no new servers are found. Note: If the initial login name and password fails to authenticate the client on a server in the cluster, the user is prompted to enter another login name and password for that server. If "Cancel" is selected from the Password dialog, connection to that server is aborted and the GUI continues connecting to the rest of the cluster. Disconnecting From a Cluster This task disconnects your GUI client from all servers in the cluster, and it does so through the server you select. SteelEye Protection Suite for Linux173 Viewing Connected Servers 1. There are three possible ways to begin. l On the Global Toolbar, click the Disconnect button. l On the Edit Menu, select Server and then click Disconnect. l On the Server Context Toolbar, if displayed, click the Disconnect button. 2. In the Select Server in Cluster list of the Cluster Disconnect Dialog, select the name of a server in the cluster from which you want to disconnect. 3. Click OK. A Confirmation dialog listing all the servers in the cluster is displayed. 4. Click OK in the Confirmation dialog to confirm that you want to disconnect from all servers in the cluster. After disconnecting from the cluster, all servers in that cluster are removed from the GUI status display. Viewing Connected Servers The state of a server can be determined by looking at the graphic representation of the server in the table's header as shown below. See Viewing the Status of a Server for an explanation of the server states indicated visually by the server icon. Viewing the Status of a Server The state of a server can be determined by looking at the graphic representation of the server in the table's header as shown below. Server State 174User Guide Visual state What it Means Viewing Server Properties Client has valid connection to the server. Comm paths originating from this server to an ALIVE remote server are ALIVE. ALIVE Comm paths which may be marked DEAD and which target a DEAD server are ignored because the DEAD server will be reflected in its own graphic. Client has valid connection to the server. One or more comm paths from this server to a given remote server are marked as DEAD. ALIVE No redundant comm path exists from this server to a given remote server. DEAD Reported as DEAD by other servers in the cluster. UNKNOWN Network connection was lost. Last known LifeKeeper state is ALIVE. Viewing Server Properties 1. There are two possible ways to begin. l Right-click on the icon for the server for which you want to view the properties. When the Server Context Menu appears, click Properties. Server properties will also be displayed in the Properties Panel if it is enabled when clicking on the server. l On the Edit Menu, point to Server and then click Properties. When the dialog comes up, select the server for which you want to view the properties from the Server list. 2. If you want to view properties for a different server, select that server from the dialog's Server list. 3. When you are finished, click OK to close the window. Viewing Server Log Files 1. There are four ways to begin. l Right-click on a server icon to display the Server Context Menu, then click View Log to bring up the LifeKeeper Log Viewer Dialog. l On the Global Toolbar, click the View Log button, then select the server that you want to view from the Server list in the LifeKeeper Log Viewer Dialog. l On the Server Context Toolbar, if displayed, click the View Log button. SteelEye Protection Suite for Linux175 Viewing Resource Tags and IDs l On the Edit Menu, point to Server, click View Log, then select the server that you want to view from the Server list in the LifeKeeper Log Viewer Dialog. 2. If you started from the Global Toolbar or the Edit Menu and you want to view logs for a different server, select that server from the Server list in the LifeKeeper Log Viewer Dialog. This feature is not available if you selected View Logs from the Server Context Menu or Server Context Toolbar. 3. When you are finished, click OK to close the Log Viewer dialog. Viewing Resource Tags and IDs A resource's tag and ID can be viewed quickly by positioning the cursor over a resource icon in the status window and clicking the left mouse button once (single-click). The resource tag and ID of the server having the lowest priority number are displayed in the message bar. To display the resource tag and ID for a resource on a specific server, single-click the appropriate resource instance cell in the table. Messages displayed in the message bar look similar to the following: Resource Tag = ipdnet0-153.98.87.73, Resource ID = IP-153.98.87.73 Under certain circumstances, the GUI may not be able to determine the resource ID, in which case only the resource tag is displayed in the message bar. Viewing the Status of Resources The status or state of a resource is displayed in two formats: Global Resource Status (across all servers), and the Server Resource Status (on a single server). The global resource status is shown in the Resource Hierarchy Tree in the left pane of the status window. The server resource status is found in the table cell where the resource row intersects with the server column. Server Resource Status The following figure shows servers with resource statuses of active, standby and unknown. l All resources on "wallace" are active l All resources on "gromit", "pat","mike" and "batman" are standby l All resources on "bullwinkle" are unknown 176User Guide Global Resource Status Server Resource State Visual State What it Means Active Resource is operational on this server and protected. (ISP) Degraded Resource is operational on this server, but not protected by a backup resource. (ISU) StandBy Server can take over operation of the resource. (OSU) Failed Problem with resource detected on this server. For example, an attempt to bring the resource in-service failed. (OSF) Unknown Resource has not been initialized (ILLSTATE), or LifeKeeper is not running on this server. Empty panel Server does not have the resource defined. Global Resource Status SteelEye Protection Suite for Linux177 Viewing Resource Properties Visual State Description What it Means / Causes Normal Resource is active (ISP) and all backups are active. Warning Resource is active (ISP). One or more backups are marked as unknown or failed (OSF). Resource has been taken out-of-service for normal reasons. Failed. Resource is not active on any servers (OSF). Resource has stopped running by unconventional means. Recovery has not been completed or has failed. More than one server is claiming to be active. Unknown. Could not determine state from available information. Lost connection to server. All server resource instances are in an unknown state. Viewing Resource Properties 1. There are three possible ways to begin. l Right-click on the icon for the resource/server combination for which you want to view the properties. When the Resource Context Menu appears, click Properties. Resource properties will also be displayed in the Properties Panel if it is enabled. l Right-click on the icon for the global resource for which you want to view the properties. When the Resource Context Menu appears, click Properties. When the dialog comes up, select the server for which you want to view that resource from the Server list. l On the Edit Menu, point to Resource and then click Properties. When the dialog comes up, select the resource for which you want to view properties from the Resource list, and the server for which you want to view that resource from the Server list. 2. If you want to view properties for a different resource, select that resource from the Resource list. 3. If you want to view resource properties for a different server, select that server from the Server list. 4. When you are finished, click OK to close the window. 178User Guide Setting View Options for the Status Window Setting View Options for the Status Window The Options Dialog is available from the View menu. This allows you to specify various LifeKeeper display characteristics. These settings, along with all checkbox menu item settings and the various window sizes, are stored between sessions in the file .lkGUIpreferences in your home folder on the client machine. This file is used by both the web and application clients. The preference settings on each client machine are independent of those on other machines. If you want to synchronize preference settings between two machines, you may do so permanently by sharing the preference files or temporarily by moving copies between the machines. 1. On the View Menu, click Options. The View Options Dialog is displayed. 2. To arrange the display of resources in the status window, click the Display Options tab and then select the option group you would like to modify. See the detailed explanation of the option groups below. 3. Click OK to save your settings and return to the status window. Resource Labels This option group allows you to specify whether resources are viewed in the resource hierarchy tree by their tag name or ID. Note: The resource tag/ID shown in the resource hierarchy tree belongs to the server having the lowest priority number. If you wish to see the tag/ID for a resource on a specific server, left-click the resource instance cell in the table and its tag/ID will be displayed in the message bar. By tag name: By ID: SteelEye Protection Suite for Linux179 Resource Tree Resource Tree This option group allows you to specify the sorting order of the resources in the resource hierarchy tree. l Sort By Resource will sort resources by resource label only. l Sort By Cluster will sort by server cluster and resource label such that resources belonging in the same cluster of servers will be grouped together. l No Sort will disable sorting such that the resources are displayed in the order in which they are discovered by the GUI. Top level resources in the resource hierarchy tree may be sorted manually by left-clicking the resource in the tree and "dragging" it to a new position. The order depends on what resource is moved and the location in the tree to which it has been moved. Note: The 0 (zero) and 9 (nine) keys are defined as hot/accelerator keys to facilitate quickly expanding or collapsing the resource hierarchy tree. The mouse can be used to expand or collapse the complete tree by clicking on the title area of the resource hierarchy tree; double-click to expand and single-click to collapse. Comm Path Status This option group allows you to specify the representation of comm path status in the server status graphic. l Warn if No Redundancy will show a server warning graphic if the comm paths between a set of servers are not configured with a redundant comm path. l No Redundancy Required will ignore a lack of redundant comm paths between a pair of servers but will still present server warning graphic if there are comm path failures. Row Height This option group allows you to control the row height of the resources in the table. The choices are Default, Small and Smallest. Note: The "+" and "-" keys are defined as hot/accelerator keys to facilitate quickly resizing resources in the resource hierarchy tree and table. Column Width This option group allows you to control the column width of the servers and resources in the table. The choices are: l Default: Standard width. l Custom: Allows you to select a width (in pixels) from a drop-down list. 180User Guide Viewing Message History l Automatic: Automatically resizes all columns to fill available space. Note: The 7 (seven) and 8 (eight) keys are defined as hot/accelerator keys to facilitate quickly resizing the column size of resources in the resource hierarchy table. Viewing Message History 1. On the View Menu, click History. The LifeKeeper GUI Message History dialog is displayed. 2. If you want to clear all messages from the history, click Clear. 3. Click OK to close the dialog. The Message History dialog displays the most recent messages from the message bar. The history list can display a maximum of 1000 lines. When the maximum number of lines is exceeded, the new messages will "push out" the oldest messages. These messages represent only the actions between the client and the server and are displayed in chronological order, the most recent messages appearing at the top of the list. Reading the Message History <-- indicates that the message is incoming from a server and typically has a format of: <--"server name":"action" <--"server name":"app res": "action" <--"server name":"res instance":"action" --> indicates that the message is outgoing from a client and typically has a format of: -->"server name":"action" -->"server name":"app res": "action" -->"server name":"res instance":"action" The Clear button clears the history but does not close the dialog. The OK button closes the dialog without clearing the history. SteelEye Protection Suite for Linux181 Expanding and Collapsing a Resource Hierarchy Tree Expanding and Collapsing a Resource Hierarchy Tree In this segment of the tree, the resource file_system_ 2 is expanded and the resource nfs-/opt/qe_ auto/NFS/export1 is collapsed. appears to the left of a resource icon if it is expanded. appears if it is collapsed. To expand a resource hierarchy tree, l Click the or l Double-click the resource icon to the right of a . To expand all resource hierarchy trees, l On the View Menu, click Expand Tree or l Double-click the Resource Hierarchy Tree button in the column header in the left pane of the Status window. Note: The resource tag/ID shown in the resource hierarchy tree belongs to the server having the lowest priority number. If you wish to see the tag/ID for a resource on a specific server, left-click the resource instance cell in the table and its tag/ID will be displayed in the message bar. To collapse a resource hierarchy tree, l click the or l double-click the resource icon to the right of a . To collapse all resource hierarchy trees, l On the View Menu, click Collapse Tree or l Double-click the Resource Hierarchy Tree button in the column header in the left pane of the Status window 182User Guide Cluster Connect Dialog Note: The "9" and "0" keys are defined as hot/accelerator keys to facilitate quickly expanding or collapsing all resource hierarchy trees. Cluster Connect Dialog Server Name. The name of the server to which you want to connect. Login. The login name of a user with LifeKeeper authorization on the server to which you want to connect. Password. The password that authorizes the specified login on the server to which you want to connect. Cluster Disconnect Dialog Select Server in Cluster. A drop-down list box containing the names of connected servers will appear. From the list, select a server from the cluster from which you want to disconnect. All servers in the cluster to be disconnected are noted in the confirmation dialog. SteelEye Protection Suite for Linux183 Resource Properties Dialog Resource Properties Dialog The Resource Properties dialog is available from the Edit menu or from a resource context menu. This dialog displays the properties for a particular resource on a server. When accessed from the Edit menu, you can select the resource and the server. When accessed from a resource context menu, you can select the server. General Tab l Tag. The name of a resource instance, unique to a system, that identifies the resource to an administrator. l ID. A character string associated with a resource instance, unique among all instances of the resource type, that identifies some internal characteristics of the resource instance to the application software associated with it. l Switchback. (editable if user has Administrator permission) The setting that governs the recovery behavior of the server where the resource was in service when it failed. If the setting is intelligent, the server acts as a possible backup for the given resource. If the setting is automatic, the server actively attempts to re-acquire the resource, providing the following conditions are met: l The resource hierarchy must have been in service on the server when it left the cluster. l If it is in service at all, then the resource must currently be in service on a server with a lower priority. Note: Checks for automatic switchback are made only when LifeKeeper starts or when a new server is added to the cluster; they are not performed during normal cluster operation. l l State. Current state of the resource instance: l Active - In-service locally and protected. l Warning - In-service locally, but local recovery will not be attempted. l Failed - Out-of-service, failed. l Standby - Out-of-service, unimpaired. l ILLSTATE - A resource state has not been initialized properly by the resource initialization process which is run as part of the LifeKeeper startup sequence. Resources in this state are not under LifeKeeper protection. l UNKNOWN - Resource state could not be determined. The GUI server may not be available. Reason. If present, describes the reason the resource is in its current state, that is, the reason for the last state change. For example the application on galahad is in the OSU state because the shared primary resource ordbfsaa-on-tristan on tristan is in ISP or ISU state. Shared 184User Guide Relations Tab resources can be active on only one of the grouped systems at a time. l Initialization. The setting that determines resource initialization behavior at boot time, for example, AUTORES_ISP, INIT_ISP, or INIT_OSU. Relations Tab l Parent. Identifies the tag names of the resources that are directly dependent on this resource. l Child. Identifies the tag names of all resources on which this resource depends. l Root. Tag name of the resource in this resource hierarchy that has no parent. Equivalencies Tab l Server. The name of the server on which the resource has a defined equivalency. l Priority (editable if the user has Administrator permission). The failover priority value of the targeted server, for this resource. l Tag. The tag name of this resource on the equivalent server. l Type. The type of equivalency (SHARED, COMMON, COMPOSITE). l Reorder Priorities. (available if the user has Administrator permission) Up/Down buttons let you to re-order the priority of the selected equivalency. The OK button applies any changes that have been made and then closes the window. The Apply button applies any changes that have been made. The Cancel button, closes the window without saving any changes made since Apply was last clicked. Server Properties Dialog The Server Properties dialog is available from a server context menu or from the Edit menu. This dialog displays the properties for a particular server. The properties for the server will also be displayed in the properties panel if it is enabled. The three tabs of this dialog are described below. The OK button applies any changes that have been made and then closes the window. The Apply button applies any changes that have been made. The Cancel button closes the window without saving any changes made since Apply was last clicked. SteelEye Protection Suite for Linux185 General Tab General Tab l Name. Name of the selected server. l State. Current state of the server. These are the possible server state values: l l ALIVE - server is available. l DEAD - server is unavailable. l UNKNOWN - state could not be determined. The GUI server may not be available. Permission. The permission level of the user currently logged into that server. These are the possible permission values: 186User Guide General Tab l Administrator - the user can perform any LifeKeeper task. l Operator - the user can monitor LifeKeeper resource and server status, and can bring resources in service and take them out of service. l Guest - the user can monitor LifeKeeper resource and server status. l Shutdown Strategy. (editable if the user has Administrator permission) The setting that governs whether or not resources are switched over to a backup server in the cluster when a server is shutdown. The setting "Switchover Resources" indicates that resources will be brought in service on a backup server in the cluster. The setting "Do not Switchover Resources" indicates that resources will not be brought in service on another server in the cluster. l Failover Strategy. The setting allows you to require the confirmation of failovers from specific systems in the LifeKeeper cluster. It is only available to LifeKeeper administrators. Operators and guests will not be able to see it. By default, all failovers proceed automatically with no user intervention. However, once the confirm failover flag is set, failovers from the designated system will require confirmation by executing the command: lk_confirmso -y system. The failover may be blocked by executing the command: lk_confirmso -n system. The system will take a pre-programmed default action unless one of these commands is executed within a specified interval. Two flags in the /etc/default/LifeKeeper file govern this automatic action. l CONFIRMSODEF This specifies the default action. If set to "0", the default action is to proceed with failover. If set to "1", the default action is to block failover. l CONFIRMSOTO This is set to the time in seconds that LifeKeeper should wait before taking the default action. SteelEye Protection Suite for Linux187 CommPaths Tab CommPaths Tab l Server. The server name of the other server the communication path is connected to in the LifeKeeper cluster. l Priority. The priority determines the order by which communication paths between two servers will be used. Priority 1 is the highest and priority 99 is the lowest. l State. State of the communications path in the LifeKeeper Configuration Database (LCD). These are the possible communications path state values: l ALIVE - functioning normally. l DEAD - no longer functioning normally. l UNKNOWN - state could not be determined. The GUI server may not be available. l Type. The type of communications path, TCP (TCP/IP) or TTY, between the server in the list and the server specified in the Server field. l Address/Device. The IP address or device name that this communications path uses. l Comm Path Status. Summary communications path status determined by the GUI based on the state of the communications paths in the LifeKeeper Configuration Database (LCD). 188User Guide Resources Tab These are the possible communications path status values displayed below the detailed text in the lower panel: l NORMAL - all comm paths functioning normally. l FAILED - all comm paths to a given server are dead. l UNKNOWN - comm path status could not be determined. The GUI server may not be available. l WARNING - one or more comm paths to a given server are dead. l DEGRADED - one ore more redundant comm paths to a given server are dead. l NONE DEFINED - no comm paths defined. Resources Tab SteelEye Protection Suite for Linux189 Operator Tasks l Name. The tag name of a resource instance on the selected server. l Application. The application name of a resource type (gen, scsi, ...) l Resource Type. The resource type, a class of hardware, software, or system entities providing a service (for example, app, filesys, nfs, device, disk,...) l State. The current state of a resource instance: l ISP - In-service locally and protected. l ISU - In-service locally, but local recovery will not be attempted. l OSF - Out-of-service, failed. l OSU - Out-of-service, unimpaired. l ILLSTATE - Resource state has not been initialized properly by the resource initialization process which is run as part of the LifeKeeper startup sequence. Resources in this state are not under LifeKeeper protection. l UNKNOWN - Resource state could not be determined. The GUI server may not be available. Operator Tasks The following topics are more advanced tasks that require Operator permission. Bringing a Resource In Service 1. There are five possible ways to begin. l Right-click on the icon for the resource/server combination that you want to bring into service. When the Resource Context Menu appears, click In Service. l Right-click on the icon for the global resource that you want to bring into service. When the Resource Context Menu appears, click In Service. When the dialog comes up, select the server on which to perform the In Service from the Server list and click Next. l On the Global Toolbar, click the In Service button. When the dialog comes up, select the server on which to perform the In Service from the Server list and click Next. On the next dialog, select one or more resources that you want to bring into service from the Resource(s) list and click Next again. l On the Resource Context Toolbar, if displayed, click the In Service button. l On the Edit Menu, point to Resource and then click In Service. When the dialog comes up, select the server on which to perform the In Service from the Server list, and click Next. On the next dialog, select one or more resources that you want to bring into service from the Resource(s) list and click Next again. 2. A dialog appears confirming the server and resource(s) that you have selected to bring into service. This dialog will include a warning if you are bringing a dependent child resource into 190User Guide Taking a Resource Out of Service service without bringing its parent resource into service as well. Click In Service to bring the resource(s) into service along with any dependent child resources. 3. If the Output Panel is enabled, the dialog closes and the results of the commands to bring the resource(s) in service are shown in the output panel. If not, the dialog remains up to show these results and you click Done to finish when all results have been displayed. Any additional dependent (child) resources that were brought into service are noted in the dialog or output panel. 4. Errors that occur while bringing a resource in service are logged in the LifeKeeper log of the server on which you want to bring the resource into service. Taking a Resource Out of Service 1. There are four possible ways to begin. l Right-click on the icon for the global resource or resource/server combination that you want to take out of service. When the Resource Context Menu appears, click Out of Service. l On the Global Toolbar, click the Out of Service button. When the Out of Service dialog comes up, select one or more resources that you want to take out of service from the Resource(s) list, and click Next. l On the Resource Context Toolbar, if displayed, click the Out of Service button. l On the Edit Menu, point to Resource and then click Out of Service. When the Out of Service dialog comes up, select one or more resources that you want to take out of service from the Resource(s) list, and click Next. 2. An Out of Service dialog appears confirming the selected resource(s) to be taken out of service. This dialog will include a warning if you are taking a dependent child resource out of service without taking its parent resource out of service as well. Click Out of Service to proceed to the next dialog box. 3. If the Output Panel is enabled, the dialog closes, and the results of the commands to take the resource(s) out of service are shown in the output panel. If not, the dialog remains up to show these results, and you click Done to finish when all results have been displayed. 4. Errors that occur while taking a resource out of service are logged in the LifeKeeper log of the server on which you want to take the resource out of service. Advanced Tasks LCD LifeKeeper Configuration Database SteelEye Protection Suite for Linux191 Related Topics The LifeKeeper Configuration Database (LCD) maintains the object-oriented resource hierarchy information and stores recovery direction information for all resource types known to LifeKeeper. The data is cached within system shared memory and stored in files so that configuration data is retained over system restarts. The LCD also contains state information and specific details about resource instances required for recovery. See the following related topics for information on the LCD directory structure, types of data stored, resource types available and use of application scripts. Related Topics LCDI Commands LifeKeeper provides two mechanisms for defining an application resource hierarchy: l LifeKeeper GUI l LifeKeeper Configuration Database Interface (LCDI) commands The LCDI is a set of interface commands provided by LifeKeeper that you can use to create and customize resource hierarchy configurations to meet your application needs. You use the command interface when an application depends upon multiple resources (such as two or more file systems). For a description of the commands, see the LCDI manual pages. This topic provides a development scenario that demonstrates the way you can use both the GUI and command functions to create a resource hierarchy. Scenario Situation The example application, ProjectPlan, has data stored in SCSI file systems shared by Servers 1 and 2. Server 1 will be the primary hierarchy for the application. The application has two file systems: /project-data and /schedule. The first step in the hierarchy definition is to determine the dependencies. The example application has these dependencies: l Shared file systems. The application depends upon its file systems: /project-data and /schedule. l SCSI disk subsystem. The file systems in turn depend upon the SCSI disk subsystem, which includes the device, disk and host adapter resources. As a result, the task is to create a hierarchy that looks like the following diagram. 192User Guide Hierarchy Definition Hierarchy Definition These are the tasks required to construct the example application hierarchy: 1. Create file system resources. The LifeKeeper GUI provides menus to create file system resources. See Creating File System Resource Hierarchies. At the end of this definition task, the LCD has two filesys resources defined as follows: ID Tag Server /project-data project-data-on-Server1 Server1 /project-data project-data-from-Server1 Server2 /schedule /schedule schedule-on-Server1 schedule-from-Server1 Server1 Server2 Note: LifeKeeper does not place any significance on the tag names used; they are simply labels. The tag names shown are the LifeKeeper defaults. 2. Define resources. The example requires the following definitions: Application: projectapp Resource Type: plan Instance ID: 1yrplan Tag: the-project-plan SteelEye Protection Suite for Linux193 Hierarchy Definition Note: Although you can create much of the definition using the LifeKeeper GUI, the rest of this example demonstrates the command interface. 3. Create directories. On each system, you create the necessary application recovery directories under the directory /opt/LifeKeeper/subsys with the command: mkdir -p /opt/LifeKeeper/subsys/projectapp/Resources/plan/actions 4. Define application. The following commands create the application named projectapp: app_create -d Server1 -a projectapp app_create -d Server2 -a projectapp 5. Define the resource type. The following commands create the resource type named plan: typ_create -d Server1 -a projectapp -r plan typ_create -d Server2 -a projectapp -r plan 6. Install recovery scripts. Copy your restore and remove scripts to the following directory on each server: /opt/LifeKeeper/subsys/projectapp/Resources/plan/actions 7. Define instance. The following commands define an instance of resource type plan with the id 1yrplan: ins_create -d Server1 -a projectapp -r plan -I\ AUTORES_ISP -t the-project-plan -i 1yrplan ins_create -d Server2 -a projectapp -r plan -I\ SEC_ISP -t the-project-plan -i 1yrplan The -I AUTORES_ISP instruction for the instance created on Server1 tells LifeKeeper to automatically bring the resource in service when LifeKeeper is restarted. In this case, the resource’s restore script is run and, if successful, the resource is placed in the ISP state. This operation is not performed if the paired resource is already in service. The -I SEC_ISP instruction for the instance created on Server2 tells LifeKeeper that this resource instance should not be brought into service when LifeKeeper is restarted. Instead, Server2 will serve as the backup for the resource on Server1, and the local resource will be brought in service upon failure of the primary resource or server. 8. Define dependencies. The following commands define the dependencies between the application and the file systems: dep_create -d Server1 -p the-project-plan -c project-data-onSystem1 dep_create -d Server2 -p the-project-plan -c project-datafrom-Server1 194User Guide LCD Configuration Data dep_create -d Server1 -p the-project-plan -c schedule-onServer1 dep_create -d Server2 -p the-project-plan -cschedule-fromServer1 9. Execute lcdsync. Execute the following lcdsync commands to inform LifeKeeper to update its copy of the configuration: lcdsync -d Server1 lcdsync -d Server2 10. Bring resources into service. Access the LifeKeeper GUI on the primary server and on the Edit menu, select Resource, then In-Service to bring the resources into service. LCD Configuration Data LCD stores the following related types of data: l Dependency Information l Resource Status Information l Inter-Server Equivalency Information Dependency Information For each defined resource, LifeKeeper maintains a list of dependencies and a list of dependents (resources depending on a resource.) For information, see the LCDI_relationship (1M) and LCDI_instances (1M) manual pages. Resource Status Information LCD maintains status information in memory for each resource instance. The resource states recognized by LCD are ISP, ISU, OSF, OSU and ILLSTATE. Resources may change from one state to another when a system event occurs or when an administrator takes certain actions. When a resource changes states, the status change is reflected in the LCD on the local server as well as in the database of the backup servers for that resource. Inter-Server Equivalency Information Relationships may exist between resources on various servers. A shared equivalency is a relationship between two resources on different servers that represents the same physical entity. When two servers have a resource with a shared equivalency relationship, LifeKeeper attempts to ensure in its actions that only one of the two servers has the resource instance in the in-service, protected [ISP] state at any one time. Both servers can have the resource instance in an out-ofservice state [OSU or OSF], but for data integrity reasons, only one server can have the resource in service at any given time. SteelEye Protection Suite for Linux195 LCD Directory Structure Disks on a Small Computer System Interface (SCSI) bus are one example of equivalent resources. With the SCSI locking (or reserve) mechanism, only one server can own the lock for a disk device at any point in time. This lock ownership feature guarantees that two or more servers cannot access the same disk resource at the same time. Furthermore, the dependency relationships within a hierarchy guarantee that all resources that depend upon the disk, such as a file system, are in service on only one server at a time. LCD Directory Structure Major subdirectories under /opt/LifeKeeper: l config. LifeKeeper configuration files, including shared equivalencies. l bin. LifeKeeper executable programs, such as is_recoverable. See Fault Detection and Recovery Scenarios for descriptions. l subsys. Resources and types. LifeKeeper provides resource and type definitions for the shared SCSI disk subsystem in scsi and for the generic application menu functions in gen. When you define an application interface, you create directories under subsys. l events. Alarming events. See LifeKeeper Alarming and Recovery for further information. The structure of the LCD directory in /opt/LifeKeeper is shown in the topic Structure of LCD Directory in /opt/LifeKeeper. LCD Resource Types The LCD is maintained in both shared memory and in the /opt/LifeKeeper directory. As highlighted on the directory structure diagram, subsys contains two application resource sets you can use to define your application interface: l gen - generic application and file system information l scsi - recovery information specific to the SCSI These subdirectories are discussed in Resources Subdirectories. LifeKeeper Flags Near the end of the detailed status display, LifeKeeper provides a list of the flags set for the system. A common type is a Lock LCD flag used to ensure that other processes wait until the process lock completes its action. The following is the standard LCD lock format: !action!processID!time!machine:id. These are examples of general LCD lock flags: l !action!02833!701236710!<servername>:filesys. The creation of a filesystem hierarchy produces a flag in this format in the status display. The filesys designation can be a 196User Guide Resources Subdirectories different resource type for other application resource hierarchies or app for generic or userdefined applications. l Other typical flags include !nofailover!machine and shutdown_switchover. The !nofailover!machine flag is an internal, transient flag created and deleted by LifeKeeper which controls aspects of server failover. The shutdown_switchover flag indicates that the shutdown strategy for this server has been set to switchover such that a shutdown of the server will cause a switchover to occur. See LCDI-flag(1M) for more detailed information on the possible flags. Resources Subdirectories The scsi and gen directories each contain a resources subdirectory. The content of those directories provides a list of the resource types provided by LifeKeeper: scsi resource types. You find these resource types in the /opt/LifeKeeper/subsys/scsi/resources directory. Note that there may be additional directories depending upon your configuration. l device—disk partitions or virtual disk devices l disk—physical disks or LUNs l hostadp—host adapters gen resource types. You find these resource types in the /opt/LifeKeeper/subsys/gen/resources directory: l filesys—file systems l app—generic or user-defined applications that may depend upon additional resources Each resource type directory contains one or more of the following: l instances. This file reflects the permanent information saved in the LCD about resource instances. It contains descriptive information for the resource instances associated with this resource type. WARNING: Do not modify the instances file (or any LCD file) directly. To create or manipulate resource instances, use only the LifeKeeper GUI functions or the LifeKeeper LCDI_instances commands: ins_create, ins_remove, ins_gettag, ins_setas, ins_setinfo, ins_setinit, ins_setstate and ins_list. Refer to the LCDI_instances (1M) manual pages for explanations of these commands. l recovery. This optional directory contains the programs used to attempt the local recovery of a resource for which a failure has been detected. The recovery directory contains directories that correspond to event classes passed to sendevent. The names of the directories must match the class parameter (-C) passed to the sendevent program. (See LifeKeeper Alarming and Recovery.) In each subdirectory, the application can place recovery programs that service event types of the corresponding event class. The name of these programs must match the string passed to sendevent with the -E parameter. This optional directory may not exist for many applications. SteelEye Protection Suite for Linux197 Resource Actions l actions. This directory contains the set of recovery action programs that act only on resource instances of the specific resource type. If, for your application, any actions apply to all resource types within an application, place them in an actions subdirectory under the application directory rather than under the resource type directory. Recovery direction software is used to modify or recover a resource instance. Two actions, remove and restore, must exist in the actions directory for each resource type. Resource Actions The actions directory for a resource type contains the programs (most often shell scripts) that describe specific application functions. Two actions are required for every resource type—restore and remove. The remove and restore programs should perform symmetrically opposite functions; that is, they undo the effect of one another. These scripts should never be run manually. They should only be run by executing the LifeKeeper Recovery Action and Control Interface (LRACI) perform_action shell program described in the LRACI-perform_action (1M) manual page. Structure of LCD Directory in /opt/LifeKeeper The following diagram shows the directory structure of /opt/LifeKeeper. 198User Guide LCM LCM The LifeKeeper Communications Manager (LCM) provides reliable communication between processes on one or more LifeKeeper servers. This process can use redundant communication paths between systems so that failure of a single communication path does not cause failure of LifeKeeper or its protected resources. The LCM supports a variety of communication alternatives including RS232 (TTY) and TCP/IP connections. The LCM provides the following: l LifeKeeper Heartbeat. Periodic communication with other connected LifeKeeper systems to determine if the other systems are still functioning. LifeKeeper can detect any total system failure that is not detected by another means by recognizing the absence of the heartbeat signal. l Administration Services. The administration functions of LifeKeeper use the LCM facilities to perform remote administration. This facility is used for single-point administration, configuration verification and sanity checking of administrative actions. l Configuration and Status Communication. The LifeKeeper configuration database (LCD) tracks resource status, availability and configuration through the LCM facilities. These facilities allow the LCD to maintain consistent resource information between the primary and secondary systems. SteelEye Protection Suite for Linux199 Communication Status Information l Failover Recovery. If a resource fails on a system, the LCM notifies LifeKeeper to recover the resource on a backup system. In addition to the LifeKeeper services provided by the LCM, inter-system application communication is possible through a set of shell commands for reliable communication. These commands include snd_msg, rcv_msg, and can_talk. These commands are described in the LCMI_mailboxes (1M) manual pages. The LCM runs as a real-time process on the system assuring that critical communications such as system heartbeat will be transmitted. Communication Status Information The communications status information section of the status display lists the servers known to LifeKeeper and their current state followed by information about each communication path. The following sample is from the communication status section of a short status display: MACHINE NETWORK ADDRESSES/DEVICE STATE PRIO tristan TCP 100.10.100.100/100.10.100.200 ALIVE 1 tristan TTY /dev/ttyS0 ALIVE -For more information, see the communication status information section of the topics Detailed Status Display and the Short Status Display. LifeKeeper Alarming and Recovery LifeKeeper error detection and notification is based on the event alarming mechanism, sendevent. The key concept of the sendevent mechanism is that independent applications can register to receive alarms for critical components. Neither the alarm initiation component nor the receiving application(s) need to be modified to know the existence of the other applications. Applicationspecific errors can trigger LifeKeeper recovery mechanisms via the sendevent facility. This section discusses topics related to alarming including alarm classes, alarm processing and alarm directory layout and then provides a processing scenario that demonstrates the alarming concepts. Alarm Classes The /opt/LifeKeeper/events directory lists a set of alarm classes. These classes correspond to particular sub-components of the system that produces events (for example, filesys). For each alarm class, subdirectories contain the set of potential alarms (for example, badmount and diskfull). You can register an application to receive these alarms by placing shell scripts or programs in the appropriate directories. LifeKeeper uses a basic alarming notification facility. With this alarming functionality, all applications registered for an event have their handling programs executed asynchronously by sendevent when the appropriate alarm occurs. With LifeKeeper present, the sendevent process first determines if the LifeKeeper resource objects can handle the class and event. If LifeKeeper finds a class/event match, it executes the appropriate recover scenario. 200User Guide Alarm Processing Defining additional scripts for the sendevent alarming functionality is optional. When you define LifeKeeper resources, LifeKeeper provides the basic alarming functionality described in the processing scenarios later in this chapter. Note: Local recovery for a resource instance is the attempt by an application under control of LifeKeeper to return interrupted resource services to the end-user on the same system that generated the event. Inter-server recovery allows an application to migrate to a backup system. This type of recovery is tried after local recovery fails or is not possible. Alarm Processing Applications or processes that detect an event which may require LifeKeeper attention can report the event by executing the sendevent program, passing the following arguments: respective error class, error name and failing instance. Refer to the sendevent(5) manual pages for required specifics and optional parameters and syntax. Alarm Directory Layout The /opt/LifeKeeper/events directory has two types of content: l LifeKeeper supplied classes. LifeKeeper provides two alarm classes listed under the events directory: lifekeeper and filesys. An example of an alarm event includes diskfull. The alarm classes correspond to the strings that are passed with the -C option to the sendevent command and the alarm events correspond to the strings that are passed with the -E option. The lifekeeper alarm class is used internally by LifeKeeper for event reporting within the LifeKeeper subsystem. l Application-specific classes. The other subdirectories in the events directory are added when specific applications require alarm class definitions. Applications register to receive these alarms by placing shell scripts or binary programs in the directories. These programs are named after the application package to which they belong. Maintenance Tasks The following are tasks for maintaining LifeKeeper. Changing LifeKeeper Configuration Values There are a number of values in LifeKeeper that may need to be changed after LifeKeeper has been configured and set up. Examples of values that may be modified include the uname of LifeKeeper servers, comm path ip addresses, ip resource addresses and tag names. To change these values, carefully follow the instructions below. 1. Stop LifeKeeper on all servers in the cluster using the command: /etc/init.d/lifekeeper stop-nofailover There is no need to delete comm paths or unextend resource hierarchies from any of the servers. SteelEye Protection Suite for Linux201 Changing LifeKeeper Configuration Values 2. If you are changing the uname of a LifeKeeper server, change the server's hostname using the Linux hostname(1) command. 3. Before continuing, ensure that any new host names are resolvable by all of the servers in the cluster. If you are changing comm path addresses, check that the new addresses are configured and working (the ping and telnet utilities can be used to verify this). 4. If more than one LifeKeeper value is to be changed, old and new values should be specified in a file on each server in the cluster in the following format: old_value1=new_value1 .... old_value9=new_value9 5. Verify that the changes to be made do not have any unexpected side effects by examining the output of running the lk_chg_value command on all servers in the cluster. If there is more than one value to change, run the command: $LKROOT/bin/lk_chg_value -Mvf file_name where file_name is the name of the file created in Step 4. If there is only one value to change, run the command: $LKROOT/bin/lk_chg_value -Mvo old_value -n new_value The -M option specifies that no modifications should be made to any LifeKeeper files. 6. Modify LifeKeeper files by running the lk_chg_value command without the -M option on all servers in the cluster. If there is more than one value to change, run the command: $LKROOT/bin/lk_chg_value -vf file_name where file_name is the name of the file created in Step 4. If there is only one value to change, run the command: $LKROOT/bin/lk_chg_value -vo old_value -n new_value 7. Restart LifeKeeper using the command: /etc/init.d/lifekeeper start If the cluster is being viewed using the LifeKeeper GUI, it may be necessary to close and restart the GUI. Example: Server1 and Server2 are the LifeKeeper server unames in a two-node cluster. Server1 has a comm path with address 172.17.100.48. Server2 has an ip resource with address 172.17.100.220 which is extended to Server1. We wish to change the following values for Server1: 202User Guide File System Health Monitoring Value uname Old Server1 comm path address 172.17.100.48 New Newserver1 172.17.105.49 IP resource address 172.17.100.220 172.17.100.221 The following steps should be performed to make these changes. 1. Stop LifeKeeper on both Server1 and Server2 using the command: /etc/init.d/lifekeeper stop-nofailover 2. Change the uname of Server1 to Newserver1 using the command: hostname Newserver1 3. Create the file, /tmp/subs, with the content below, on both Newserver1 and Server2: Server1=Newserver1 172.17.100.48=172.17.105.49 172.17.100.220=172.17.100.221 4. Verify that the changes specified will not have any unexpected side effects by examining the output of running the following command on both servers: $LKROOT/bin/lk_chg_value -Mvf /tmp/subs 5. Modify the LifeKeeper files by running the lk_chg_value command without the -M option on both servers: $LKROOT/bin/lk_chg_value -vf /tmp/subs 6. Restart LifeKeeper on both servers using the command: /etc/init.d/lifekeeper start Notes: l To see the changes lk_chg_value will make without modifying any LifeKeeper files, use the -M option. To see the files lk_chg_value is examining, use -v. To not modify tag names, use the -T option. To not modify resource ids, use the -I option. File System Health Monitoring The File System Health Monitoring feature detects conditions that could cause LifeKeeper protected applications that depend on the file system to fail. Monitoring occurs on active/in-service resources (i.e. file systems) only. The two conditions that are monitored are: l A full (or almost full) file system, and l An improperly mounted (or unmounted) file system. When either of these two conditions is detected, one of several actions might be taken. SteelEye Protection Suite for Linux203 Condition Definitions l A warning message can be logged and email sent to a system administrator. l Local recovery of the resource can be attempted. l The resource can be failed over to a backup server. Condition Definitions Full or Almost Full File System A "disk full" condition can be detected, but cannot be resolved by performing a local recovery or failover - administrator intervention is required. A message will be logged by default. Additional notification functionality is available. For example, an email can be sent to a system administrator, or another application can be invoked to send a warning message by some other means. To enable this notification functionality, refer to the topic Configuring LifeKeeper Event Email Notification. In addition to a "disk full" condition, a "disk almost full" condition can be detected and a warning message logged in the LifeKeeper log. The "disk full" threshold is: FILESYSFULLERROR=95 The "disk almost full" threshold is: FILESYSFULLWARN=90 The default values are 90% and 95% as shown, but are configurable via tunables in the /etc/default/LifeKeeper file. The meanings of these two thresholds are as follows: FILESYSFULLWARNING - When a file system reaches this percentage full, a message will be displayed in the LifeKeeper log. FILESYSFULLERROR - When a file system reaches this percentage full, a message will be displayed in the LifeKeeper log as well as the system log. The file system notify script will also be called. Unmounted or Improperly Mounted File System LifeKeeper checks the /etc/mtab file to determine whether a LifeKeeper protected file system that is in service is actually mounted. In addition, the mount options are checked against the stored mount options in the filesys resource information field to ensure that they match the original mount options used at the time the hierarchy was created. If an unmounted or improperly mounted file system is detected, local recovery is invoked and will attempt to remount the file system with the correct mount options. If the remount fails, failover will be attempted to resolve the condition. The following is a list of common causes for remount failure which would lead to a failover: l corrupted file system (fsck failure) l failure to create mount point directory 204User Guide Maintaining a LifeKeeper Protected System l mount point is busy l mount failure l LifeKeeper internal error Maintaining a LifeKeeper Protected System When performing shutdown and maintenance on a LifeKeeper-protected server, you must put that system’s resource hierarchies in service on the backup server before performing maintenance. This process stops all activity for shared disks on the system needing maintenance. Perform these actions in the order specified, where Server A is the primary system in need of maintenance and Server B is the backup server: 1. Bring hierarchies in service on Server B. On the backup, Server B, use the LifeKeeper GUI to bring in service any resource hierarchies that are currently in service on Server A. This will unmount any file systems currently mounted on Server A that reside on the shared disks under LifeKeeper protection. See Bringing a Resource In Service for instructions. 2. Stop LifeKeeper on Server A. Use the LifeKeeper command /etc/init.d/lifekeeper stop-nofailover to stop LifeKeeper. Your resources are now unprotected. 3. Shut down Linux and power down Server A. Shut down the Linux operating system on Server A, then power off the server. 4. Perform maintenance. Perform the necessary maintenance on Server A. 5. Power on Server A and restart Linux. Power on Server A, then reboot the Linux operating system. 6. Start LifeKeeper on Server A. Use the LifeKeeper command /etc/init.d/lifekeeper start to start LifeKeeper. Your resources are now protected. 7. Bring hierarchies back in-service on Server A, if desired. On Server A, use the LifeKeeper GUI to bring in service all resource hierarchies that were switched over to Server B. Maintaining a Resource Hierarchy You can perform maintenance on a resource hierarchy while maintaining LifeKeeper protection of all other hierarchies on the system. This involves taking the hierarchy in need of maintenance out of service and then bringing it back in-service after you complete the maintenance tasks. To perform maintenance on a resource hierarchy: 1. Take the hierarchy out of service. Use the LifeKeeper GUI to take as much of the resource hierarchy out of service as you need to perform the maintenance. See Taking a Resource Out of Service for instructions. 2. Perform maintenance. Perform the necessary maintenance on the resource hierarchy. SteelEye Protection Suite for Linux205 Recovering After a Failover 3. Restore the hierarchy. Use the LifeKeeper GUI to bring the resource hierarchy back in service. See Bringing a Resource In Service for instructions. Recovering After a Failover After LifeKeeper performs a failover recovery from a primary server (Server A) to a backup server (Server B), perform the following steps: 1. Review logs. When LifeKeeper on Server B performs a failover recovery from Server A, status messages are displayed during the failover. The exact output depends upon the configuration. Some messages on failure to mount or unmount are expected and do not suggest failure of recovery. These messages, as well as any errors that occur while bringing the resource in service on Server B, are logged in the LifeKeeper log. 2. Perform maintenance. Determine and fix the cause of the failure on Server A. Server A may need to be powered down to perform maintenance. 3. Reboot Server A, if necessary. Once maintenance is complete, reboot Server A if necessary. 4. Start LifeKeeper, if necessary. If LifeKeeper is not running on Server A, use the command /etc/init.d/lifekeeper start to start LifeKeeper. 5. Move application back to Server A. At a convenient time, use the LifeKeeper GUI to bring the application back into service on Server A. See Bringing a Resource In Service for instructions. Note that this step may be unnecessary if the application on Server A was configured for Automatic Switchback. Removing LifeKeeper You can uninstall the LifeKeeper packages in a Linux environment using any rpm supported graphical interface or through the command line. This section provides detailed instructions on uninstalling LifeKeeper using the rpm command from the command line. Refer to the rpm(8) man page for complete instructions on using the rpm command. For information on rpm software, you can go to the following web site: http://www.rpm.org/. Included below are the requirements for removing LifeKeeper software. l Move applications. Before you remove the software, you should verify that you do not have applications requiring LifeKeeper protection on the server. You should never remove LifeKeeper from a server where an application resource hierarchy is in service. Removing LifeKeeper removes all configuration data such as equivalencies, resource hierarchy definitions and log files. See Transferring Resource Hierarchies for additional information. l Start LifeKeeper. LifeKeeper recovery kits may require LifeKeeper to be running when you remove the recovery kit software. If it is not running, the removal process cannot remove the resource instances from other LifeKeeper servers in the cluster which would leave the servers in an inconsistent state. 206User Guide Removing via GnoRPM l Remove all packages. If you remove the LifeKeeper core, you should first remove other packages that depend upon LifeKeeper; for example, LifeKeeper recovery kits. It is recommended that before removing a LifeKeeper recovery kit, you first remove the associated application resource hierarchy. Note: It is recommended that before removing recovery kit software, first remove any associated hierarchies from that server. You may do this using the Unextend Resource configuration task. If you remove a LifeKeeper recovery kit package without unextending the existing hierarchies, any of the corresponding resource hierarchies currently defined and protected by this recovery kit will automatically be deleted from your system. The general rule is: You should never remove the recovery kit from a server where the resource hierarchy is in service. This will corrupt your current hierarchies, and you will need to recreate them when you reinstall the recovery kit. Removing via GnoRPM In the GnoRPM window, for each package to be removed, right-click on the package icon and click Uninstall on the pop-up menu. (Alternatively, you can select the package icon, then click the Uninstall button.) Removing via Command Line To remove LifeKeeper from a server, use the rpm -e <packagename> command to remove all the LifeKeeper packages. Refer to the rpm(8) man page for complete instructions on using the rpm command. For example, to remove the LifeKeeper core package, enter the following command: rpm -e steeleye-lk For reference, the packages in the LifeKeeper core package cluster are listed below: steeleye-lk steeleye-lkGUI steeleye-lkHLP steeleye-lkIP steeleye-lkMAN steeleye-lkRAW steeleye-lkCCISS Removing Distribution Enabling Packages After removing the LifeKeeper packages, the distribution-specific enabling package installed by the setup script on the SPS Installation Image File should be removed. Depending on your Linux distribution, that package name is steeleye-lk<Linux Distribution>, for example: steeleye-lkRedHat steeleye-lkSuSE Running LifeKeeper With a Firewall LifeKeeper for Linux can work with a firewall in place on the same server if you address the following SteelEye Protection Suite for Linux207 LifeKeeper Communication Paths network access requirements. Note: If you wish to simply disable your firewall, see Disabling a Firewall below. LifeKeeper Communication Paths Communication paths are established between pairs of servers within the LifeKeeper cluster using specific IP addresses. Although TCP Port 7365 is used by default on the remote side of each connection as it is being created, the TCP port on the initiating side of the connection is arbitrary. The recommended approach is to configure the firewall on each LifeKeeper server to allow both incoming and outgoing traffic for each specific pair of local and remote IP addresses in the communication paths known to that system. LifeKeeper GUI Connections The LifeKeeper GUI uses a number of specific TCP ports, including Ports 81 and 82 as the default initial connection ports. The GUI also uses Remote Method Invocation (RMI), which uses Ports 1024 and above to send and receive objects. All of these ports must be open in the firewall on each LifeKeeper server to at least those external systems on which the GUI client will be run. LifeKeeper IP Address Resources The firewall should be configured to allow access to any IP address resources in your LifeKeeper hierarchies from those client systems that need to access the application associated with the IP address. Remember that the IP address resource can move from one server to another in the LifeKeeper cluster; therefore, the firewalls on all of the LifeKeeper servers must be configured properly. LifeKeeper also uses a broadcast ping test to periodically check the health of an IP address resource. This test involves sending a broadcast ping packet from the virtual IP address and waiting for the first response from any other system on the local subnet. To prevent this test from failing, the firewall on each LifeKeeper server should be configured to allow the following types of network activity. l Outgoing Internet Control Message Protocol (ICMP) packets from the virtual IP address (so that the active LifeKeeper server can send broadcast pings) l Incoming ICMP packets from the virtual IP address (so that other LifeKeeper servers can receive broadcast pings) l Outgoing ICMP reply packets from any local address (so that other LifeKeeper servers can respond to broadcast pings) l Incoming ICMP reply packets to the virtual IP address (so that the active LifeKeeper server can receive broadcast ping replies) LifeKeeper Data Replication When using LifeKeeper Data Replication, the firewall should be configured to allow access to any of the ports used by nbd for replication. The ports used by nbd can be calculated using the following 208User Guide Disabling a Firewall formula: 10001 + <mirror number> + <256 * i> where i starts at zero and is incremented until the formula calculates a port number that is not in use. In use constitutes any port found defined in /etc/services, found in the output of netstat -an --inet, or already defined as in use by another LifeKeeper Data Replication resource. For example: If the mirror number for the LifeKeeper Data Replication resource is 0, then the formula would initially calculate the port to use as 10001, but that number is defined in /etc/services on some Linux distributions as the SCP Configuration port. In this case, i is incremented by 1 resulting in Port Number 10257, which is not in /etc/services on these Linux distributions. Disabling a Firewall If you wish to disable your firewall, then do the following: 1. Stop the firewall using one of the following commands, depending upon your firewall package: /etc/init.d/ipchains stop or /etc/init.d/iptables stop If operating in an IPv6 environment, be sure to account for ip6tables /etc/init.d/ip6tables stop If running SuSE Linux Enterprise Server /etc/init.d/SuSEfirewall2_init stop /etc/init.d/SuSEfirewall2_setup stop 2. Either remove the package (using rpm -e) or disable its startup using one of the following commands, depending upon your firewall package: /sbin/chkconfig --del ipchains or /sbin/chkconfig --del iptables /sbin/chkconfig --del ip6tables If running SuSE Linux Enterprise Server, you must manage SuSEfirewall2 configuration settings. Running the LifeKeeper GUI Through a Firewall In some situations, a LifeKeeper cluster is placed behind a corporate firewall and administrators wish to run the LifeKeeper GUI from a remote system outside the firewall. LifeKeeper uses Remote Method Invocation (RMI) to communicate between the GUI server and client. The RMI client must to be able to make connections in each direction. Because the RMI client uses dynamic ports, you can not use preferential ports for the client. One solution is to use ssh to tunnel through the firewall as follows: SteelEye Protection Suite for Linux209 Starting LifeKeeper 1. Make sure your IT department has opened the secure shell port on the corporate firewall sufficiently to allow you to get behind the firewall. Often the machine IT allows you to get to is not actually a machine in your cluster but an intermediate one from which you can get into the cluster. This machine must be a Unix or Linux machine. 2. Make sure both the intermediate machine and the LifeKeeper server are running sshd (the secure shell daemon) and that X11 port forwarding is enabled (this is usually the line `X11Forwarding yes' in /etc/ssh/sshd_config, but if you are unsure, have your IT do this for you. 3. From your Unix client in X, tunnel to the intermediate machine using: ssh -X -C <intermediate machine> The -C means `compress the traffic' and is often useful when coming in over slower internet links. 4. From the intermediate machine, tunnel to the LifeKeeper server using: ssh -X <LifeKeeper server> You should not need to compress this time since the intermediate machine should have a reasonably high bandwidth connection to the LifeKeeper server. 5. If all has gone well, when you issue the command: echo $DISPLAY it should be set to something like `localhost:10.0'. If it is not set, it is likely that X11 forwarding is disabled in one of the sshd config files. 6. Verify that you can pop up a simple xterm from the LifeKeeper server by issuing the command: /usr/X11R6/bin/xterm 7. If the xterm appears, you're ready to run lkGUIapp on the LifeKeeper server using the following command: /opt/LifeKeeper/bin/lkGUIapp 8. Wait (and wait some more). Java uses a lot of graphics operations which take time to propagate over a slow link (even with compression), but the GUI console should eventually appear. Starting LifeKeeper All SPS software is installed in the directory /opt/LifeKeeper. When you have completed all of the verification tasks, you are ready to start LifeKeeper on both servers. This section provides information for starting the LifeKeeper server daemon processes. The LifeKeeper GUI application is launched using a separate command and is described in Configuring the LifeKeeper GUI. LifeKeeper provides a command line interface that starts and stops the LifeKeeper daemon processes. These daemon processes must be running before you start the LifeKeeper GUI. 210User Guide Starting LifeKeeper Server Processes Starting LifeKeeper Server Processes If LifeKeeper is not currently running on your system, type the following command as the user root on all servers: /etc/init.d/lifekeeper start Following the delay of a few seconds, an informational message is displayed. Note: If you receive an error message referencing the LifeKeeper Distribution Enabling Package when you start LifeKeeper, you should install / re-install the LifeKeeper Installation Image File. See the LCD(1M) man page by entering man LCD at the command line for details on the /etc/init.d/lifekeeper start command. Enabling Automatic LifeKeeper Restart While the above command will start LifeKeeper, it will need to be performed each time the system is re-booted. If you would like LifeKeeper to start automatically when server boots up, type the following command: chkconfig lifekeeper on See the chkconfig man page for further information. Stopping LifeKeeper If you need to stop LifeKeeper, type the following command as root to stop it: /etc/init.d/lifekeeper stop-nofailover This command will shut down LifeKeeper on the local system if it is currently running. It will first remove all protected resources from service on the local system then shut down the LifeKeeper daemons. Protected resources will not fail over to another system in the cluster. LifeKeeper will automatically restart when the system is restarted. /etc/init.d/lifekeeper stop-daemons This command will skip the section that removes resources from service. The resources will remain running on the local system but will no longer be protected by LifeKeeper. This command should be used with caution, because if resources are not gracefully shut down, then items such as SCSI locks will not be removed. If the system on which this command is executed subsequently fails or is shut down, the system(s) will NOT initiate failover of the appropriate resources. LifeKeeper will automatically restart when the system is restarted. /etc/init.d/lifekeeper stop SteelEye Protection Suite for Linux211 Disabling Automatic LifeKeeper Restart This command will remove the resources from service but does not set the !nofailover! flag [see LCDIflag(1M)] on any of the systems that it can communicate with. This means that failover will occur if the shutdown_switchover flag is set. If shutdown_switchover is not set, then this command behaves the same as /etc/init.d/lifekeeper stop-nofailover. LifeKeeper will automatically restart when the system is restarted. Disabling Automatic LifeKeeper Restart If you do not want LifeKeeper to automatically restart when the system is restarted, type the following command: chkconfig lifekeeper off See the chkconfig man page for further information. Transferring Resource Hierarchies When you need to perform routine maintenance or other tasks on a LifeKeeper Server, you can use the LifeKeeper GUI to move in-service resources to another server. To transfer in-service resource hierarchies from Server A to Server B, use the GUI to bring the hierarchies into service on Server B. Repeat until all of Server A’s resources have been placed in-service on their respective backup servers. See Bringing a Resource In Service for instructions. When all of Server A’s resources are active on their backup server(s), you can shut down Server A without affecting application processing. For the maintenance period, however, the resources may not have LifeKeeper protection depending on the number of servers in the cluster. Technical Notes We strongly recommend that you read the following technical notes concerning configuration and operational issues related to your LifeKeeper environment. LifeKeeper Features Item Description Licensing LifeKeeper requires unique runtime license keys for each server. This applies to both physical and virtual servers. A license key is required for the LifeKeeper core software, as well as for each separately packaged LifeKeeper recovery kit. The installation script installs a Licensing Utilities package that obtains and displays the Host ID of your server. The Host IDs, along with the Activation ID(s) provided with your software, are used to obtain license keys from the SIOS Technology Corp. website. 212User Guide Tuning Large Cluster Support LifeKeeper supports large cluster configurations, up to 32 servers. There are many factors other than LifeKeeper, however, that can affect the number of servers supported in a cluster. This includes items such as the storage interconnect and operating system or storage software limitations. Refer to the vendor-specific hardware and software configuration information to determine the maximum supported cluster size. LifeKeeper for Linux v5.2 and later does support wide/multi-byte characters in resource and tag names but does not include native language message support. The LifeKeeper GUI can be localized by creating locale-specific versions of the International- Java property files, although currently only the English version is fully localized. However, many of the messages displayed by the LifeKeeper GUI come from the ization and localization LifeKeeper core, so localization of the GUI will provide only a partial solution for users until the core software is fully localized. See also Language Environment Effects under Restrictions or Known Issues for additional information. LifeKeeper MIB File LifeKeeper can be configured to issue SNMP traps describing the events that are occurring within the LifeKeeper cluster. See the lk_configsnmp(8) man page for more information about configuring this capability. The MIB file describing the LifeKeeper traps can be found at /opt/LifeKeeper/include/LifeKeeper-MIB.txt. Watchdog LifeKeeper supports the watchdog feature. The feature was tested by SIOS Technology Corp. on Red Hat EL 5.5 64-bit, Red Hat EL 5.6 32-bit and Red Hat EL 6 + softdog. STONITH LifeKeeper supports the STONITH feature. This feature was tested by SIOS Technology Corp. on SLES 11 on IBM x3550 x86_64 architecture and RHEL5.5 64-bit. XFS File System The XFS file system does not use the fsck utility to check and fix a file system but instead relies on mount to replay the log. If there is a concern that there may be a consistency problem, the system administrator should unmount the file system by taking it out of service and run xfs_check(8) and xfs_repair(8) to resolve any issues. IPv6 SIOS has migrated to the use of the ip command and away from the ifconfig command (for more information, see the IPv6 Known Issue). Tuning Item Description SteelEye Protection Suite for Linux213 LifeKeeper Operations IPC Semaphores and IPC Shared Memory LifeKeeper requires Inter-Process Communication (IPC) semaphores and IPC shared memory. The default Red Hat values for the following Linux kernel options are located in/usr/src/linux/include/linux/sem.h and should be sufficient to support most LifeKeeper configurations. Option Required Default Red Hat 6.2 SEMOPM 14 32 SEMUME 20 32 SEMMNU 60 32000 SEMMAP 25 32000 SEMMNI 25 128 LifeKeeper requires that system resources be available in order to failover successfully to a backup system. For example, if the system file table is full, LifeKeeper may be unable to start new processes and perform a recovery. In kernels with enterprise patches, including those supported by LifeKeeper, file-max, the maximum number of open files in the system, is configured by default to 1/10 of the system memory size, which should be sufficient to support most LifeKeeper configurations. Configuring the file-max value lower than the default could result in unexpected LifeKeeper failures. The value of file-max may be obtained using the following command: System File Table cat /proc/sys/fs/file-nr This will return three numbers. The first represents the high watermark of file table entries (i.e. the maximum the system has seen so far); the second represents the current number of file table entries, and the third is the file-max value. To adjust file-max, add (or alter) the “fs,file-max” value in /etc/sysctl.conf (see sysctl.conf(5) for the format) and then run sysctl –p to update the system. The value in /etc/sysctl.conf will persist across reboots. LifeKeeper Operations Item Description Kernel Debugg er (kdb) Before using the Kernel Debugger (kdb) or moving to init s on a LifeKeeper protected server, you should first either shut down LifeKeeper on that server or switch any LifeKeeper protected resources over to the backup server. Use of kdb with the LifeKeeper SCSI Reservation Daemons (lkscsid and lkccissd) enabled (they are enabled by default) can also lead to unexpected panics. init s 214User Guide LifeKeeper Operations LifeKeeper uses a lock to protect shared data from being accessed by other servers on a shared SCSI Bus. If LifeKeeper cannot access a device as a result of another server taking the lock on a device, then a critical error has occurred and quick action should be System taken or data can be corrupted. When this condition is detected, LifeKeeper enables a Panic on feature that will cause the system to panic. Locked Shared If LifeKeeper is stopped by some means other than ‘/etc/init.d/lifekeeper Devices stop-nofailover’ with shared devices still reserved (this could be caused by executing init s), then the LifeKeeper locking mechanism may trigger a kernel panic when the other server recovers the resource(s). All resources must be placed out-ofservice before stopping LifeKeeper in this manner. nolock Option When using storage applications with locking and following recommendations for the NFS mount options, SPS requires the additional nolock option be set, e.g. rw,nolock,bg,hard,nointr,tcp,nfsvers=3,timeo=600,rsize=32768,w size=32768,actimeo=0. Recoveri ng OutofService Hierarch ies As part of the recovery following the failure of a LifeKeeper server, resource hierarchies that were configured on the failed server but which were not in-service anywhere at the time of the server failure are recovered on the highest priority alive server at the time of the failure. This is the case no matter where the out-of-service hierarchy was last in service, including the failed server, the recovering server, or some other server in the cluster. The firewall and SELinux are enabled upon installation. After installation is complete, SELinux should be disabled and the firewall should be modified. LifeKeeper will not install or function if the SELinux mode is "enabled" or "permissive." To disable SELinux in RedHat, run the system-configsecuritylevel-tui tool from the console of the host system. While SELinux for SLES 11 SP1 is available, it too must be disabled (http://www.novell.com/linux/releasen.../SUSE-SLES/11/). Coexiste nce with Linux Firewalls and SELinux AppArmor (for distributions that use this security model) may be enabled. LifeKeeper will function if a host firewall is enabled. However, unless absolutely necessary, it is recommended that the firewall be disabled and that the LifeKeeper protected resources reside behind another shielding firewall. If LifeKeeper must coexist on firewall enabled hosts, note that LifeKeeper uses specific ports for communication paths, GUI, IP and Data Replication. When using the Linux firewall feature, the specific ports that LifeKeeper is using need to be opened. To disable or modify the RedHat firewall, run the system-configsecuritylevel-tui tool from the console of the host system. To disable or modify the SUSE firewall, run yast2 and choose Security and Users, then Firewall. Refer to Running LifeKeeper with a Firewall for details. Suid Mount Option The suid mount option is the default when mounting as root and is not written to the /etc/mtab by the mount command. The suid mount option is not needed in LifeKeeper environments. SteelEye Protection Suite for Linux215 Server Configuration Server Configuration Item Description BIOS Updates The latest available BIOS should always be installed on all LifeKeeper servers. Package Dependencies List for LifeKeeper 7.5 and Later The following is a list of dependencies that may be necessary for the required packages in LifeKeeper 7.5 and later depending upon your OS distribution. IMPORTANT: The 32-bit versions of these packages are required. Please note that there may be additional packages that must be installed to satisfy the dependencies of this list. bzip2 OR libbz2 OR bzip2-lib glibc iproute OR iproute2 iptables iputils libstdc++ OR libstdc++43 mktemp nfs-utils OR nfs-kernel-server (if protecting NFS shares) pam zlib Note: The ORs are the Linux OS distribution variances. Please note that this list is not all inclusive. Depending on the base packages and Linux OS distribution, additional package dependencies may be required. Also, if the configure script detects that certain optional software components are installed, additional package dependencies may be necessary. You may want to consider using a repository-based package manager such as yum or zypper that is designed to automatically resolve dependencies by searching in predefined software repositories, thereby easing the installation of these required packages. Confirm Failover and Block Resource Failover Settings Make sure you review and understand the following descriptions, examples and considerations before setting the Confirm Failover or Block Resource Failover in your LifeKeeper environment. These settings are available from the command line or on the Properties panel in the LifeKeeper GUI. Confirm Failover On: Definition – Enables manual failover confirmation from System A to System B (where System A is the server whose properties are being displayed in the Properties Panel and System B is the system to the left of the checkbox). If this option is set on a system, it will require a manual confirmation by a 216User Guide Set Block Resource Failover On: system administrator before allowing LifeKeeper to perform a failover recovery of a system that it detects as failed. Use the lk_confirmso command to confirm the failover. By default, the administrator has 10 minutes to run this command. This time can be changed by modifying the CONFIRMSOTO setting in /etc/default/LifeKeeper. If the administrator does not run the lk_confirmso command within the time allowed, the failover will either proceed or be blocked. By default, the failover will proceed. This behavior can be changed by modifying the COMFIRMSODEF setting in /etc/default/LifeKeeper. Example: If you wish to block automatic failovers completely, then you should set the Confirm Failover On option in the Properties panel and also set CONFIRMSODEF to 1 (block failover) and CONFIRMSOTO to 0 (do not wait to decide on the failover action). When to select this setting: This setting is used in most Disaster Recovery and other WAN configurations where the configuration does not include redundant heartbeat communications paths. In a regular site (non multi-site cluster), open the Properties page from one server and then select the server that you want the Confirm Failover flag to be set on. For a Multi-site WAN configuration: Enable manual failover confirmation For a Multi-site LAN configuration: Do not enable manual failover confirmation In a multi-site cluster environment – from the non-disaster system, select the DR system and check the set confirm failover flag. You will need to open the Properties panel and select this setting for each non-disaster server in the cluster. Set Block Resource Failover On: Definition - By default, all resource failures will result in a recover event that will attempt to recover the failed resource on the local system. If local recovery fails or is not enabled, then LifeKeeper transfers the resource hierarchy to the next highest priority system for which the resource is defined. However, if this setting is selected on a designated system(s), all resource transfers due to a resource failure will be blocked from the given system. When the setting is enabled, the following message is logged: Local recovery failure, failover blocked, MANUAL INTERVENTION REQUIRED Conditions/Considerations: In a Multi-site configuration, do not select Block Failover for any server in the configuration. Remember: This setting will not affect failover behavior if there is a complete system failure. It will only block failovers due to resource failures. NFS Client Options When setting up a LifeKeeper protected NFS server, how the NFS clients connect to that server can make a significant impact on the speed of reconnection on failover. SteelEye Protection Suite for Linux217 NFS Client Mounting Considerations NFS Client Mounting Considerations An NFS Server provides a network-based storage system to client computers. To utilize this resource, the client systems must “mount” the file systems that have been NFS exported by the NFS server. There are several options that system administrators must consider on how NFS clients are connected to the LifeKeeper protected NFS resources. UDP or TCP? The NFS Protocol can utilize either the User Datagram Protocol (UDP) or the Transmission Control Protocol (TCP). NFS has historically used the UDP protocol for client-server communication. One reason for this is that it is easier for NFS to work in a stateless fashion using the UDP protocol. This “statelessness” is valuable in a high availability clustering environment, as it permits easy reconnection of clients if the protected NFS server resource is switched between cluster hosts. In general, when working with a LifeKeeper protected NFS resource, the UDP protocol tends to work better than TCP. Sync Option in /etc/exports Specifying “sync” as an export option is recommended for LifeKeeper protected NFS resources. The “sync” option tells NFS to commit writes to the disk before sending an acknowledgment back to the NFS client. The contrasting “async” option is also available, but using this option can lead to data corruption, as the NFS server will acknowledge NFS writes to the client before committing them to disk. NFS clients can also specify “sync” as an option when they mount the NFS file system. Red Hat EL6 (and Fedora 14) Clients with Red Hat EL6 NFS Server Due to what appears to be a bug in the NFS server for Red Hat EL6, NFS clients running Red Hat EL6 (and Fedora 14) cannot specify both an NFS version (nfsvers) and UDP in the mount command. This same behavior has been observed on an Ubuntu10.10 client as well. This behavior is not seen with Red Hat EL5 clients when using a Red Hat EL6 NFS server, and it is also not seen with any clients using a Red Hat EL5 NFS server. The best combination of NFS mount directives to use with Red Hat EL6 (Fedora 14) clients and a Red Hat EL 6 NFS server is: mount <protected-IP>:<export> <mount point> -o nfsvers=2,sync,hard,intr,timeo=1 l This combination produces the fastest re-connection times for the client in case of a switchover or failover of the LifeKeeper protected NFS server. Red Hat EL5 NFS Clients with a Red Hat EL6 NFS Server The best combination of options when using NFS clients running Red Hat EL5 with a Red Hat EL6 NFS server for fast reconnection times is: mount <protected-IP>:<export> <mount point> -o nfsvers=3,sync,hard,intr,timeo=1,udp Cluster Example Expanded Multicluster Example 218User Guide Expanded Multicluster Example SteelEye Protection Suite for Linux219 Troubleshooting The Message Catalog (located on our Technical Documentation site under “Search for an Error Code”) provides a listing of all error codes, including operational, administrative and GUI, that may be encountered while using SteelEye Protection Suite for Linux and, where appropriate, provides additional explanation of the cause of the error code and necessary action to resolve the issue. This full listing may be searched for any error code received, or you may go directly to one of the following individual Message Catalogs: l Core Message Catalog l DMMP Kit Message Catalog l File System Kit Message Catalog l Gen/App Kit Message Catalog l GUI Message Catalog l IP Kit Message Catalog l Oracle Listener Kit Message Catalog l Oracle Kit Message Catalog l SCSI Kit Message Catalog l DataKeeper Kit Message Catalog In addition to utilizing the Message Catalog described above, the following topics detail troubleshooting issues, restrictions, etc., that may be encountered: Known Issues and Restrictions Included below are the restrictions or known issues open against LifeKeeper for Linux, broken down by functional area. Installation Description In Release 7.4 and forward, relocation of the SteelEye product RPM packages is no longer supported. SteelEye Protection Suite for Linux221 Installation Description GUI does not work with default RHEL6 64-bit There is a compatibility issue against Red Hat Enterprise Linux 6 64-bit Solution: Install the following packages, which are contained in the installation media of the OS, prior to installing LifeKeeper. If these are not installed prior to installing LifeKeeper, the install will not finish correctly. libXau-1.0.5-1.el6.i686.rpm libxcb-1.5-1.el6.i686.rpm libX11-1.3-2.el6.i686.rpm libXext-1.1-3.el6.i686.rpm libXi-1.3-3.el6.i686.rpm libXtst-1.0.99.2-3.el6.i686.rpm The multipathd daemon will log errors in the error log when the nbd driver is loaded as it tries to scan the new devices Solution: To avoid these errors in the log, add devnode "^nbd" to the blacklist in /etc/multipath.conf. Incomplete NFS Setup Logging When running the Installation setup script from the ISO image (sps.img), the output from the script patching process for NFS is not captured in the LifeKeeper install log (/var/log/LK_install.log). No workaround is available. Core package upgrade from 7.x fails with conflict on Html.pm package Upgrading the LifeKeeper Core package (steeleye-lk) from a release prior to 7.4.0 to release 7.5.0 or later will result in a conflicts error on the file /opt/LifeKeeper/lib/perl/Html.pm. Resolving this error and successfully installing the Core package will require the use of the --force option to rpm. When using the loopback interface in the INTERFACELIST tunable, licensing will not function properly. The loopback (lo) interface cannot be used in the INTERFACELIST tunable. lklicmgr tool incorrectly displays a "HOSTID mismatch" when a license file based on an IP Address is used. If a license file based on an IP Address is used, lklicmgr incorrectly displays a HOSTID mismatch error. This is only a display issue with lklicmgr. The license will function as expected. Configuration of NFS for High Availability operation fails when attempting to patch the nfslock init script. The nfs-utils package is required for high availability operations with NFS. If not installed on the system, the patch process to enable the HA features in the nfslock init script will fail. Solution: Install the nfs-utils package, then rerun the SPS Installation setup script. 222Troubleshooting LifeKeeper Core LifeKeeper Core SteelEye Protection Suite for Linux223 LifeKeeper Core Description Language Environment Effects Some LifeKeeper scripts parse the output of Linux system utilities and rely on certain patterns in order to extract information. When some of these commands run under non-English locales, the expected patterns are altered, and LifeKeeper scripts fail to retrieve the needed information. For this reason, the language environment variable LC_MESSAGES has been set to the POSIX “C” locale (LC_MESSAGES=C) in /etc/default/LifeKeeper. It is not necessary to install Linux with the language set to English (any language variant available with your installation media may be chosen); the setting of LC_MESSAGES in /etc/default/LifeKeeper will only influence LifeKeeper. If you change the value of LC_MESSAGES in /etc/default/LifeKeeper, be aware that it may adversely affect the way LifeKeeper operates. The side effects depend on whether or not message catalogs are installed for various languages and utilities and if they produce text output that LifeKeeper does not expect. File system labels should not be used in large configurations The use of file system labels can cause performance problems during boot-up with large clusters. The problems are generally the result of the requirement that to use labels all devices connected to a system must be scanned. For systems connected to a SAN, especially those with LifeKeeper where accessing a device is blocked, this scanning can be very slow. To avoid this performance problem on Red Hat systems, edit /etc/fstab and replace the labels with the path names. Cannot break reservation on QLogic driver (qla2xxx) running SUSE SLES 10 Failover does not work on a SUSE SLES 10 system using the QLogic driver (qla2xxxx). On x86 boxes running SLES 10 with the stock QLogic driver, a failover does not work since we cannot break the reservation. It appears the qla2xxx driver delivered on SLES 10 will only issue a reset if there is a hung IO. NOTE: The qla2xxx driver delivered on SLES 10 SP1 corrects the problem. Syntax errors can occur with gen/app resources When the steeleye-lkGUI package is upgraded without upgrading the core, a syntax error can occur with gen/app resources. The steeleye-lkGUI package contains updates to the gen/app GUI components that require the same version or later version of the core. NOTE: When upgrading LifeKeeper, both the GUI and the core packages should be upgraded to the latest versions. When the core is upgraded in conjunction with the GUI package, no errors should occur. Shutdown hangs on SLES10 systems When running shutdown on an AMD64 system with SLES10, the system locks up and the shutdown does not complete. This has been reported to Novell via bug #294787. The lockup appears to be caused by the SLES10 powersave package. Workaround: Remove the SLES10 powersave package to enable shutdown to complete successfully. 224Troubleshooting LifeKeeper Core Description lkscsid will halt system when it should issue a sendevent When lkscsid detects a disk failure, it should, by default, issue a sendevent to LifeKeeper to recover from the failure. The sendevent will first try to recover the failure locally and if that fails, will try to recover the failure by switching the hierarchy with the disk to another server. On some versions of Linux (RHEL5 and SLES11), lkscsid will not be able to issue the sendevent but instead will immediately halt the system. This only affects hierarchies using the SCSI device nodes such as /dev/sda. Setup will fail for RHEL6 64-bit There is a compatibility issue against Red Hat Enterprise Linux 6 64-bit. Solution: Install the following packages, which are contained in the installation media of the OS, prior to installing LifeKeeper. If these are not installed prior to running LifeKeeper setup, the setup will not finish correctly. rpm -i compat-libstdc++-33-3.2.3-69.el6.i686 libgcc-4.4.4-13.el6.i686 rpm -i nss-softokn-freebl-3.12.7-1.1.el6.i686 glibc-2.12-1.7.el6.i686 Note: See Package Dependencies List for LifeKeeper 7.5 and Later for more information. DataKeeper Create Resource fails When using DataKeeper with fully virtualized VMs running on Citrix XenServer (or other hypervisor that may provide IDE disk emulation), an error occurs on the create: ERROR 104052: Cannot get the hardware ID of the device "dev/hda3" This is due to the fact that the fully virtualized VMs have their local disk drives show up as IDE drives and getId is not able to query IDE disks on these VMs properly. Workaround: Add /dev/hda* to the DEVNAME device_pattern file, e.g.: # cat /opt/LifeKeeper/subsys/scsi/Resources/DEVNAME/device_ pattern /dev/hda* Specifying hostnames for API access The key name used to store LifeKeeper server credentials must match exactly the hostname of the other LifeKeeper server (as displayed by the hostname command on that server). If the hostname is an FQDN, then the credential key must also be the FQDN. If the hostname is a short name, then the key must also be the short name. Workaround: Make sure that the hostname(s) stored by credstore match the hostname exactly. SteelEye Protection Suite for Linux225 LifeKeeper Core Description The use of lkbackups taken from versions of LifeKeeper previous to 8.0.0 requires manually updating /etc/default/LifeKeeper when restored on 8.0.0 In LifeKeeper/SPS 8.0.0, there have been significant enhancements to the logging and other major core components. These enhancements affect tunables in the /etc/default/LifeKeeper file. When an lkbackup is restored on 8.0.0, these tunables will no longer have the right values causing a conflict. Solution: Prior to restoring from an lkbackup, save /etc/default/LifeKeeper. After restoring from the lkbackup, merge in the new tunable values for: LKSYSLOGTAG=LifeKeeper LKSYSLOGSELECTOR=local6 See section on Logging With syslog for further information. Restore of an lkbackup after a resource has been created may leave broken equivalencies The configuration files for created resources are saved during an lkbackup. If a resource is created for the first time after an lkbackup has been taken, that resource may not be properly accounted for when restoring from this previous backup. Solution: Restore from lkbackup prior to adding a new resource for the first time. If a new resource has been added after an lkbackup, it should either be deleted prior to performing the restore, or delete an instance of the resource hierarchy, then re-extend the hierarchy after the restore. Note: It is recommended that an lkbackup be run when a resource of a particular type is created for the first time. Resources removed in the wrong order during failover In cases where a hierarchy shares a common resource instance with another root hierarchy, resources are sometimes removed in the wrong order during a cascading failover or resource failover. Solution: Creating a common root will ensure that resource removals in the hierarchy occur from the top down. 1. Create a gen/app that always succeeds on restore and remove. 2. Make all current roots children of this new gen/app. Note: Using /bin/true for the restore and remove script would accomplish this. 226Troubleshooting LifeKeeper Core Description LifeKeeper syslog EMERG severity messages do not display to a SLES10 or SLES11 host's console which has AppArmor enabled LifeKeeper is accessing /var/run/utmp which is disallowed by the SLES10 or SLES11 AppArmor syslog-ng configuration. Solution: To allow LifeKeeper syslog EMERG severity messages to appear on a SLES10 or SLES11 console with AppArmor enabled, add the following entry to /etc/apparmor.d/sbin.syslog-ng: /var/run/utmp kr If added to sbin.syslog-ng, you can replace the existing AppArmor definition (without rebooting) and update with: apparmor_parser -r /etc/apparmor.d/sbin.syslog-ng Verify that the AppArmor update was successful by sending an EMERG syslog entry via: logger -p local6.emerg "This is a syslog/lk/apparmor test." SteelEye Protection Suite for Linux227 Internet/IP Licensing Internet/IP Licensing Description INTERFACELIST syntax, /etc/hosts settings dependency /etc/hosts settings: When using internet-based licensing (IPv4 address), the configuration of /etc/hosts can negatively impact license validation. If LifeKeeper startup fails with: Error in obtaining LifeKeeper license key: Invalid host. The hostid of this system does not match the hostid specified in the license file. and the listed internet hostid is correct, then the configuration of /etc/hosts may be the cause. To correctly match /etc/hosts entries, IPv4 entries must be listed before any IPv6 entries. To verify if the /etc/hosts configuration is the cause, run the following command: /opt/LifeKeeper/bin/lmutil lmhostid -internet -n If the IPv4 address listed does not match the IPv4 address in the installed license file, then /etc/hosts must be modified to place IPv4 entries before IPv6 entries to return the correct address. INTERFACELIST syntax: By default, licensing in LifeKeeper is based on the primary network interface eth0. LifeKeeper installation and startup errors will occur if interface eth0 is renamed. Renaming is not supported, as it will cause LifeKeeper to fail to obtain a unique system HOST ID. To address consistent network device naming conventions introduced in RedHat Enterprise Linux 6.1, the tunable INTERFACELIST was added to specify the name of the primary interface in RedHat Enterprise Linux 6.x. The consistent network device naming of interfaces uses the name em<port number> for on board interfaces and pci<slot number>p<port number>_<virtual function instance> for pci add-in interfaces. By default, LifeKeeper will look for network device em0 on RedHat Enterprise Linux 6.x systems. If that device does not exist, then the INTERFACELIST tunable must be configured to specify the primary interface name. The tunable should only contain the primary interface name but does support additional names in a colon separated list: e.g. INTERFACELIST=em0:em1. Note: The INTERFACELIST tunable value should be set in /etc/default/LifeKeeper. If the LifeKeeper core package has not yet been installed, /etc/default/LifeKeeper will not exist. In this case, ensure that INTERFACELIST is set in the environment prior to rerunning the setup script (e.g. export INTERFACELIST=em1). 228Troubleshooting GUI GUI Description GUI login prompt may not re-appear when reconnecting via a web browser after exiting the GUI When you exit or disconnect from the GUI applet and then try to reconnect from the same web browser session, the login prompt may not appear. Workaround: Close the web browser, re-open the browser and then connect to the server. When using the Firefox browser, close all Firefox windows and re-open. lkGUIapp on RHEL5 reports unsupported theme errors When you start the GUI application client, you may see the following console message. This message comes from the RHEL 5 and FC6 Java platform look and feel and will not adversely affect the behavior of the GUI client. /usr/share/themes/Clearlooks/gtk-2.0/gtkrc:60: Engine "clearlooks" is unsupported, ignoring GUI does not immediately update IP resource state after network is disconnected and then reconnected When the primary network between servers in a cluster is disconnected and then reconnected, the IP resource state on a remote GUI client may take as long as 1 minute and 25 seconds to be updated due to a problem in the RMI/ TCP layer. SteelEye Protection Suite for Linux229 GUI Description Java Mixed Signed/Unsigned Code Warning - When loading the LifeKeeper Java GUI client applet from a remote system, the following security warning may be displayed: Enter “Run” and the following dialog will be displayed: Block? Enter “No” and the LifeKeeper GUI will be allowed to operate. Recommended Actions: To reduce the number of security warnings, you have two options: 1. Check the “Always trust content from this publisher” box and select “Run”. The next 230Troubleshooting time the LifeKeeper GUI Java client is loaded, the warning message will not be displayed. Data Replication Description steeleye-lighttpd process fails to start if Port 778 is in use If a process is using Port 778 when steeleye-lighttpd starts up, steeleye-lighttpd fails causing a failure to connect to the GUI. Solution: Set the following tunable on all nodes in the cluster and then restart LifeKeeper on all the nodes: Add the following line to /etc/default/LifeKeeper: API_SSL_PORT=port_number where port_number is the new port to use. Data Replication Description In symmetric active SDR configurations with significant I/O traffic on both servers, the filesystem mounted on the netraid device (mirror) stops responding and eventually the whole system hangs Due to the single threaded nature of the Linux buffer cache, the buffer cache flushing daemon can hang trying to flush out a buffer which needs to be committed remotely. While the flushing daemon is hung, all activities in the Linux system with dirty buffers will stop if the number of dirty buffers goes over the system accepted limit (set in/proc/sys/kernel/vm/bdflush). Usually this is not a serious problem unless something happens to prevent the remote system from clearing remote buffers (e.g. a network failure). LifeKeeper will detect a network failure and stop replication in that event, thus clearing a hang condition. However, if the remote system is also replicating to the local system (i.e. they are both symmetrically replicating to each other), they can deadlock forever if they both get into this flushing daemon hang situation. The deadlock can be released by manually killing the nbd-client daemons on both systems (which will break the mirrors). To avoid this potential deadlock entirely, however, symmetric active replication is not recommended. GUI does not show proper state on SLES 10 SP2 system This issue is due to a SLES 10 SP2 kernel bug and has been fixed in update kernel version 2.6.16.60-0.23. On SLES 10 SP2, netstat is broken due to a new format in /proc/<PID>/fd. Solution: Please upgrade kernel version 2.6.16.60-0.23 if running on SLES 10 SP2. Note: Beginning with SPS 8.1, when performing a kernel upgrade on RedHat Enterprise Linux systems, it is no longer a requirement that the setup script (./setup) from the installation image be rerun. Modules should be automatically available to the upgraded kernel without any intervention as long as the kernel was installed from a proper RedHat package (rpm file). SteelEye Protection Suite for Linux231 Data Replication Description 32-bit zlib packages should be installed to RHEL 6 (64-bit) for Set Compression Level When using SDR with RHEL 6 (64-bit), the following error may appear: Could not start balance on Target when Compression Level is set on RHEL 6 (64-bit) Solution: To resolve the issue, please install the 32-bit zlib packages from RHEL 6 when using RHEL 6 (64-bit). Mirror breaks and fills up /var/log/messages with errors This issue has been seen occasionally (on Red Hat EL 6.x and CentOS 6) during stress tests with induced failures, especially in killing the nbd_server process that runs on a mirror target system. Upgrading to the latest kernel for your distribution may help lower the risk of seeing this particular issue, such as kernel-2.6.32-131.17.1.el6 on Red Hat EL 6.0 or 6.1. Rebooting the source system will clear up this issue. With the default kernel that comes with CentOS 6 (2.6.32-71.el6), this issue may occur much more frequently (even when the mirror is just under a heavy load.) Unfortunately, CentOS has not yet released a kernel (2.6.32-131.17.1) that will improve this situation. SIOS recommends updating to the 2.6.32-131.17.1 kernel as soon as it becomes available for CentOS 6. Note: Beginning with SPS 8.1, when performing a kernel upgrade on RedHat Enterprise Linux systems, it is no longer a requirement that the setup script (./setup) from the installation image be rerun. Modules should be automatically available to the upgraded kernel without any intervention as long as the kernel was installed from a proper RedHat package (rpm file). High CPU usage reported by top for md_raid1 process with large mirror sizes With the mdX_raid1 process (with X representing the mirror number), high CPU usage as reported by top can be seen on some OS distributions when working with very large mirrors (500GB or more). Solution: To reduce the CPU usage percent, modify the chunk size to 1024 via the LifeKeeper tunable LKDR_CHUNK_SIZE then delete and recreate the mirror in order to use this new setting. The use of lkbackup with DataKeeper resources requires a full resync Although lkbackup will save the instance and mirror_info files, it is best practice to perform a full resync of DataKeeper mirrors after a restore from lkbackup as the status of source and target cannot be guaranteed while a resource does not exist. 232Troubleshooting Data Replication Description Mirror resyncs may hang in early RedHat/CentOS 6.x kernels with a "Failed to remove device" message in the LifeKeeper log Kernel versions prior to version 2.6.32-131.17.1 (RHEL 6.1 kernel version 2.6.32-131.0.15 before update, etc) contain a problem in the md driver used for replication. This problem prevents the release of the nbd device from the mirror resulting in the logging of multiple "Failed to remove device" messages and the aborting of the mirror resync. A system reboot may be required to clear the condition. This problem has been observed during initial resyncs after mirror creation and when the mirror is under stress. Solution: Kernel 2.6.32-131.17.1 has been verified to contain the fix for this problem. If you are using DataKeeper with RedHat or CentOS 6 kernels before the 2.6.32-131.17.1 version, we recommend updating to this or the latest available version. DataKeeper: Nested file system create will fail with DataKeeper When creating a DataKeeper mirror for replicating an existing File System, if a file system is nested within this structure, the user must unmount it first before creating the File System resource. Workaround: Manually unmount the nested file systems and remount / create each nested mount. SteelEye Protection Suite for Linux233 IPv6 IPv6 234Troubleshooting IPv6 Description SIOS has migrated to the use of the ip command and away from the ifconfig command. Because of this change, customers with external scripts are advised to make a similar change. Instead of issuing the ifconfig command and parsing the output looking for a specific interface, scripts should instead use "ip -o addr show" and parse the output looking for lines that contain the words "inet" and "secondary". # ip -o addr show 1: lo: <LOOPBACK,UP,LOWER_UP> mtu 16436 qdisc noqueue state UNKNOWN \ link/loopback 00:00:00:00:00:00 brd 00:00:00:00:00:00 1: lo inet 127.0.0.1/8 scope host lo 1: lo inet6 ::1/128 scope host \ valid_lft forever preferred_lft forever 2: eth0: <BROADCAST,MULTICAST,UP,LOWER_UP> mtu 1500 qdisc pfifo_ fast state UP qlen 1000 \ link/ether d2:05:de:4f:a2:e6 brd ff:ff:ff:ff:ff:ff 2: eth0 inet 172.17.100.77/22 brd 172.17.103.255 scope global eth0 2: eth0 inet 172.17.100.79/22 scope global secondary eth0 2: eth0 inet 172.17.100.80/22 scope global secondary eth0 2: eth0 inet6 2001:5c0:110e:3364::1:2/64 scope global \ valid_lft forever preferred_lft forever 2: eth0 inet6 2001:5c0:110e:3300:d005:deff:fe4f:a2e6/64 scope global dynamic \ valid_lft 86393sec preferred_lft 14393sec 2: eth0 inet6 fe80::d005:deff:fe4f:a2e6/64 scope link \ valid_lft forever preferred_lft forever So for the above output from the ip command, the following lines contain virtual IP addresses for the eth0 interface: 2: eth0 inet 172.17.100.79/22 scope global secondary eth0 2: eth0 inet 172.17.100.80/22 scope global secondary eth0 SteelEye Protection Suite for Linux235 IPv6 Description 'IPV6_AUTOCONF = No' for /etc/sysconfig/network-scripts/ifcfg-<nicName> is not being honored on reboot or boot On boot, a stateless, auto-configured IPv6 address is assigned to the network interface. If a comm path is created with a stateless IPv6 address of an interface that has IPV6_AUTOCONF=No set, the address will be removed if any system resources manage the interface, e.g. ifdown <nicName>;ifup <nicName>. Comm path using auto-configured IPv6 addresses did not recover and remained dead after rebooting primary server because IPV6_AUTOCONF was set to No. Solution: Use Static IPv6 addresses only. The use of auto-configured IPv6 addresses could cause a comm loss after a reboot, change NIC, etc. While IPv6 auto-configured addresses may be used for comm path creation, it is incumbent upon the system administrator to be aware of the following conditions: l IPv6 auto-configured/stateless addresses are dependent on the network interface (NIC) MAC address. If a comm path was created and the associated NIC is later replaced, the auto-configured IPv6 address will be different and LifeKeeper will correctly show the comm path is dead. The comm path will need to be recreated. l At least with RHEL5.6, implementing the intended behavior for assuring consistent IPv6 auto-configuration during all phases of host operation requires specific domain knowledge for accurately and precisely setting the individual interface config files AS WELL AS the sysctl.conf, net.ipv6.* directives (i.e. explicity setting IPV6_AUTOCONF in the ifcfg<nic> which is referenced by the 'if/ip' utilities AND setting directives in /etc/sysctl.conf which impact NIC control when the system is booting and switching init levels). IP: Modify Source Address Setting for IPv6 doesn't set source address When attempting to set the source address for an IPv6 IP resource, it will report success when nothing was changed. Workaround: Currently no workaround is available. This will be addressed in a future release. IP: Invalid IPv6 addressing allowed in IP resource creation Entering IPv6 addresses of the format 2001:5c0:110e:3368:000000:000000001:61:14 is accepted when the octets contain more than four characters. Workaround: Enter correctly formatted IPv6 addresses. Can't connect to host via IPv6 addressing lkGUIapp will fail connecting to a host via IPv6 hex addressing, either via resolvable host name or IP address. lkGUIapp requires an IPv4 configured node for connection. IPv6 comm paths are fully supported. 236Troubleshooting Apache Description IPv6 resource reported as ISP when address assigned to bonded NIC but in 'tentative' state IPv6 protected resources in LifeKeeper will incorrectly be identified as 'In Service Protected' (ISP) on SLES systems where the IPv6 resource is on a bonded interface, a mode other than 'activebackup' (1) and Linux kernel 2.6.21 or lower. The IPv6 bonded link will remain in the 'tentative' state with the address unresolvable. Workaround: Set the bonded interface mode to 'active-backup' (1) or operate with an updated kernel which will set the link state from 'tentative' to 'valid' for modes other than 'active-backup' (1). Note: Beginning with SPS 8.1, when performing a kernel upgrade on RedHat Enterprise Linux systems, it is no longer a requirement that the setup script (./setup) from the installation image be rerun. Modules should be automatically available to the upgraded kernel without any intervention as long as the kernel was installed from a proper RedHat package (rpm file). Apache Description Apache Kit does not support IPv6; doesn't indentify IPv6 in httpd.conf Any IPv6 addresses assigned to the 'Listen' directive entry in the httpd.conf file will cause problems. Solution: Until there is support for IPv6 in the Apache Recovery Kit, there can be no IPv6 address in the httpd.conf file after the resource has been created. Oracle Recovery Kit Description The Oracle Recovery Kit does not include support for Connection Manager and Oracle Names features The LifeKeeper Oracle Recovery Kit does not include support for the following Oracle Net features of Oracle: Oracle Connection Manager, a routing process that manages a large number of connections that need to access the same service; and Oracle Names, the Oracle-specific name service that maintains a central store of service addresses. The LifeKeeper Oracle Recovery Kit does protect the Oracle Net Listener process that listens for incoming client connection requests and manages traffic to the server. Refer to the LifeKeeper for Linux Oracle Recovery Kit Administration Guide for LifeKeeper configuration specific information regarding the Oracle Listener. SteelEye Protection Suite for Linux237 NFS Server Recovery Kit Description The Oracle Recovery Kit does not support the ASM or grid component features of Oracle 10g The following information applies to Oracle 10g database instances only. The Oracle Automatic Storage Manager (ASM) feature provided in Oracle 10g is not currently supported with LifeKeeper. In addition, the grid components of 10g are not protected by the LifeKeeper Oracle Recovery Kit. Support for raw devices, file systems, and logical volumes are included in the current LifeKeeper for Linux Oracle Recovery Kit. The support for the grid components can be added to LifeKeeper protection using the gen/app recovery kit. The Oracle Recovery Kit does not support NFS Version 4 The Oracle Recovery Kit supports NFS Version 3 for shared database storage. NFS Version 4 is not supported at this time due to NFSv4 file locking mechanisms. Oracle listener stays in service on primary server after failover Network failures may result in the listener process remaining active on the primary server after an application failover to the backup server. Though connections to the correct database are unaffected, you may still want to kill that listener process. NFS Server Recovery Kit Description Top level NFS resource hierarchy uses the switchback type of the hanfs resource The switchback type, which dictates whether the NFS resource hierarchy will automatically switch back to the primary server when it comes back into service after a failure, is defined by the hanfs resource. Some clients are unable to reacquire nfs file locks When acting as NFS clients, some Linux kernels do not respond correctly to notifications from an NFS server that an NFS lock has been dropped and needs to be reacquired. As a result, when these systems are the clients of an NFS file share that is protected by LifeKeeper, the NFS locks held by these clients are lost during a failover or switchover. When using storage applications with locking and following recommendations for the NFS mount options, SPS requires the additional nolock option be set, e.g. rw,nolock,bg,hard,nointr,tcp,nfsvers=3,timeo=600,rsize=32768,wsize=327 68,actimeo=0. NFS v4 changes not compatible with SLES 11 nfs subsystem operation The mounting of a non-NFS v4 remote export on SLES 11 starts rpc.statd. The start up of rpc.statd on the out of service node in a cluster protecting an NFS v4 root export will fail. Solution: Do not mix NFS v2/v3 with a cluster protecting an NFS v4 root export. 238Troubleshooting SAP Recovery Kit Description NFS v4 cannot be configured with IPv6 IPv6 virtual IP gets rolled up into the NFSv4 heirarchy. Solution: Do not use an IPv6 virtual IP resource when creating an NFSv4 resource. NFS v4: Unable to re-extend hierarchy after unextend Extend fails because export point is already exported on the target server. A re-extend to server A of a NFS v4 hierarchy will fail if a hierarchy is created on server A and extended to server B, brought in service on server B and then unextended from server A. Solution: On server A run the command "exportfs -ra" to clean up the extra export information left behind. NFSv3: File Lock switchover fails on RedHat 6.x and CentOS 6.x Attempting to fail over file locks on a server failover / switchover does not work with any RedHat 6.x or CentOS 6.x system. Lock failover with NFSv3 is currently not supported on these OS versions. Solution: Use the lock failover features available with NFSv4. The Oracle Recovery Kit does not support NFSv4 The Oracle Recovery Kit supports NFSv3 for shared database storage. NFSv4 is not supported at this time due to NFSv4 file locking mechanisms. SAP Recovery Kit Description Failed delete or unextend of a SAP hierarchy Deleting or unextending a SAP hierarchy that contains the same IP resource in multiple locations within the hierarchy can sometimes cause a core dump that results in resources not being deleted. To correct the problem, after the failed unextend or delete operation, manually remove any remaining resources using the LifeKeeper GUI. You may also want to remove the core file from the server. Handle Warnings gives a syntax error at -e line 1 When changing the default behavior of No in Handle Warnings to Yes, an error is received. Solution: Leave this option at the default setting of No. Note: It is highly recommended that this setting be left on the default selection of No as Yellow is a transient state that most often does not indicate a failure. Choosing same setting causes missing button on Update Wizard If user attempts to update the Handle Warning without changing the current setting, the next screen, which indicates that they must go back, is missing the Done button. SteelEye Protection Suite for Linux239 LVM Recovery Kit Description When changes are made to res_state, monitoring is disabled If Protection Level is set to BASIC and SAP is taken down manually (i.e. for maintenance), it will be marked as FAILED and monitoring will stop. Solution: In order for monitoring to resume, LifeKeeper will need to start up the resource instead of starting it up manually. ERS in-service fails on remote host if ERS is not parent of Core/CI Creating an ERS resource without any additional SAP resource dependents will cause initial inservice to fail on switchover. Solution: Create ERS as parent of CI/Core instance (SCS or ASCS), then retry in-service. LVM Recovery Kit Description Use of lkID incompatible with LVM overeaten on entire disk When lkID is used to generate unique disk IDs on disks that are configured as LVM physical volumes, there is a conflict in the locations in which the lkID and LVM information is stored on the disk. This causes either the lkID or LVM information to be overwritten depending on the order in which lkID and pvcreate are used. Workaround: When it is necessary to use lkID in conjunction with LVM, partition the disk and use the disk partition(s) as the LVM physical volume(s) rather than the entire disk. LVM actions slow on RHEL 6 When running certain LVM commands on RHEL 6, performance is sometimes slower than in previous releases. This can be seen in slightly longer restore and remove times for hierarchies with LVM resources. The configuration of Raw and LVM Recovery Kits together is not supported in RHEL 6 environment When creating a Raw resource, the Raw Recovery Kit is looking for a device file based on major # and minor # of Raw device. As the result, /dev/dm-* will be the device; however, this type of /dev/dm-* cannot be handled by the LVM Recovery Kit and a "raw device not found" error will occur in the GUI. 240Troubleshooting DMMP Recovery Kit DMMP Recovery Kit Description DMMP: Write issued on standby server can hang If a write is issued to a DMMP device that is reserved on another server, then the IO can hang indefinitely (or until the device is no longer reserved on the other server). If/when the device is released on the other server and the write is issued, this can cause data corruption. The problem is due to the way the path checking is done along with the IO retries in DMMP. When "no_path_retry" is set to 0 (fail), this hang will not occur. When the path_checker for a device fails when the path is reserved by another server (MSA1000), then this also will not occur. Workaround: Set "no_path_retry" to 0 (fail). However, this can cause IO failures due to transient path failures. DMMP: Multiple initiators are not registered properly for SAS arrays that support ATP_C LifeKeeper does not support configurations where there are multiple SAS initiators connected to an SAS array. In these configurations, LifeKeeper will not register each initiator correctly, so only one initiator will be able to issue IOs. Errors will occur if the multipath driver (DMMP for example) tries to issue IOs to an unregistered initiator. LifeKeeper on RHEL 6 cannot support reservations connected to an EMC Clariion PostgreSQL Recovery Kit Description On SLES 10 SP2, the PostgreSQL resource hierarchy fails with error the database is not running or has experienced a dbfail event This issue is due to a SLES 10 SP2 kernel bug and has been fixed in update kernel version 2.6.16.60-0.23. On SLES 10 SP2, the netstat is broken due to a new format in /proc/<PID>/fd. The netstat utility is used in the PostgreSQL recovery kit to verify that the database is running. Solution: Please upgrade kernel version 2.6.16.60-0.23 if running on SLES 10 SP2. SteelEye Protection Suite for Linux241 MD Recovery Kit MD Recovery Kit Description MD Kit does not support mirrors created with “homehost” The LifeKeeper MD Recovery Kit will not work properly with a mirror created with the "homehost" feature. Where "homehost" is configured, LifeKeeper will use a unique ID that is improperly formatted such that in-service operations will fail. On SLES 11 systems, the “homehost” will be set by default when a mirror is created. The version of mdadm that supports “homehost” is expected to be available on other distributions and versions as well. When creating a mirror, specify -homehost="" on the command line to disable this feature. If a mirror already exists that has been created with the “homehost” setting, the mirror must be recreated to disable the setting. If a LifeKeeper hierarchy has already been built for a mirror created with “homehost”, the hierarchy must be deleted and recreated after the mirror has been built with the “homehost” disabled. MD Kit does not support MD devices created on LVM devices The LifeKeeper MD Recovery Kit will not work properly with an MD device created on an LVM device. When the MD device is created, it is given a name that LifeKeeper does not recognize. MD Kit configuration file entries in /etc/mdadm.conf not commented out The LifeKeeper configuration file entries in /etc/mdadm.conf should be commented out after a reboot. These file entries are not commented out. Components not going out of service in some all path failures In some cases during an all path failure, mdadm detects the failed legs and the MD quickCheck starts trying to recover before lkscsid detects the failed disk, causing multiple recoveries at the same time resulting in components not being taken out of service. Local recovery not performed in large configurations In some cases with large configurations (6 or more hierarchies), if a local recovery is triggered (sendevent), not all of the hierarchies are checked resulting in local recovery attempt failures. Mirrors automatically started during boot On some systems (for example those running RHEL 6), there is an AUTO entry in the configuration file (/etc/mdadm.conf) that will automatically start mirrors during boot (example: AUTO +imsm +1.x –all). Solution: Since LifeKeeper requires that mirrors not be automatically started, this entry will need to be edited to make sure that LifeKeeper mirrors will not be automatically started during boot. The previous example (AUTO +imsm +1.x –all) is telling the system to automatically start mirrors created using imsm metadata and 1.x metadata minus all others. This entry should be changed to "AUTO -all", telling the system to automatically start everything “minus” all; therefore, nothing will be automatically started. Important: If system critical resources (such as root) are using MD, make sure that those mirrors are started by other means while the LifeKeeper protected mirrors are not. 242Troubleshooting Samba Recovery Kit Description MD resource instances can be adversely impacted by udev processing during restore During udev processing, device nodes are removed and recreated. Occasionally during a restore, LifeKeeper will try to access a node before it has been recreated causing the restore to fail. Solution: Perform the LifeKeeper restore action again. Samba Recovery Kit Description The Samba Recovery Kit is currently not supported with SLES 11 SP2. GUI Troubleshooting If you are having problems configuring the LifeKeeper GUI from a remote system, see one of the following topics: Java Plug-In Troubleshooting Applet Troubleshooting Network-Related Troubleshooting (GUI) Network-Related Troubleshooting (GUI) LifeKeeper uses Java RMI (Remote Method Invocation) for communications between GUI clients and servers. Some potential problems may be related to RMI, and others are general network configuration problems. Long Connection Delays on Windows Platforms From Sun FAQ: Most likely, your host's networking setup is incorrect. RMI uses the Java API networking classes, in particular java.net.InetAddress, which will cause TCP/IP host name lookups for both host to address mapping and address to hostname. On Windows, the lookup functions are performed by the native Windows socket library, so the delays are not happening in RMI but in the Windows libraries. If your host is set up to use DNS, then this could be a problem with the DNS server not knowing about the hosts involved in communication, and what you are experiencing are DNS lookup timeouts. If this is the case, try specifying all the hostnames/addresses involved in the file \windows\system32\drivers\etc\hosts. The format of a typical host file is: IPAddress Server Name SteelEye Protection Suite for Linux243 Running from a Modem: e.g.: 208.2.84.61 homer.somecompany.com homer This should reduce the time it takes to make the first lookup. In addition, incorrect settings of the Subnet Mask and Gateway address may result in connection delays and failures. Verify with your Network Administrator that these settings are correct. Running from a Modem: When you connect to a network in which the servers reside via modem (using PPP or SLIP), your computer acquires a temporary IP number for its operation. This temporary number may not be the one your hostname maps to (if it maps to anything at all), so in this case, you must tell the servers to communicate with you by IP alone. To do this, obtain your temporary IP number by opening your modem connection window. This number will be used to set the hostname property for the GUI client. To set the hostname for a browser with the Plugin, open the Java Plug-In Control Panel, and set the hostname for the client by adding the following to "Java Run Time Parameters". -Djava.rmi.server.hostname=<MY_HOST> To set the hostname for the HotJava browser, append the following to the hotjava command line: -Djava.rmi.server.hostname=<MY_HOST> For example: -Djava.rmi.server.hostname=153.66.140.1 Primary Network Interface Down: The LifeKeeper GUI uses Remote Method Invocation (RMI) to maintain contact between the GUI client and the GUI server. In nearly every case, contact is established over the primary network interface to the server. This means that if the server's primary Ethernet interface goes down, contact is lost and the GUI client shows that server state as Unknown. The only solution to this problem is to bring the server's primary Ethernet interface up again. Additionally, due to limitations in RMI, this problem cannot be overcome by using a multi-homed server (server with multiple network interfaces). No Route To Host Exception: A socket could not be connected to a remote host because the host could not be contacted. Typically, this means that some link in the network between the local server and the remote host is down, or that the host is behind a firewall. Unknown Host Exception: The LifeKeeper GUI Client and Server use Java RMI (Remote Method Invocation) technology to communicate. For RMI to work correctly, the client and server must use resolvable hostname or IP 244Troubleshooting From Windows: addresses. When unresolvable names, WINS names or unqualified DHCP names are used, this causes Java to throw an UnknownHostException. This error message may also occur under the following conditions: l Server name does not exist. Check for misspelled server name. l Misconfigured DHCP servers may set the fully-qualified domain name of RMI servers to be the domain name of the resolver domain instead of the domain in which the RMI server actually resides. In this case, RMI clients outside the server's DHCP domain will be unable to contact the server because of the its incorrect domain name. l The server is on a network that is configured to use Windows Internet Naming Service (WINS). Hosts that are registered under WINS may not be reachable by hosts that rely solely upon DNS. l The RMI client and server reside on opposite sides of a firewall. If your RMI client lies outside a firewall and the server resides inside of it, the client will not be able to make any remote calls to the server. When using the LifeKeeper GUI, the hostname supplied by the client must be resolvable from the server and the hostname from the server must be resolvable by the client. The LifeKeeper GUI catches this exception and alerts the user. If the client cannot resolve the server hostname, this exception is caught and Message 115 is displayed. If the server cannot resolve the Client hostname, this exception is caught and Message 116 is displayed. Both these messages include the part of the Java exception which specifies the unqualified hostname that was attempted. Included below are some procedures that may be used to test or verify that hostname resolution is working correctly. From Windows: 1. Verify communication with the Linux Server From a DOS prompt, ping the target using the hostname: ping <TARGET_NAME> For Example: ping homer A reply listing the target's qualified hostname and IP address should be seen. 2. Verify proper configuration l Check configuration of DNS or install a DNS server on your network. l Check the settings for ControlPanel->Network->Protocols->TCP/IP. Verify with your Network Administrator that these settings are correct. Note that the hostname in the DNS tab should match the name used on the local name server. This should also match the hostname specified in the GUI error message. SteelEye Protection Suite for Linux245 From Linux: l Try editing the hosts file to include entries for the local host and the LifeKeeper servers that it will be connected to. On Windows 95/98 systems the hosts file is: %windir%\HOSTS (for example, C:\WINDOWS\HOSTS). Note: On Windows 95/98, if the last entry in the hosts file is not concluded with a carriage-return/line-feed then the hosts file will not be read at all. On Windows NT systems the hosts file is: %windir%\System32\DRIVERS\ETC\HOSTS (for example, C:\WINNT\System32\DRIVERS\ETC\HOSTS). For example, if my system is called HOSTCLIENT.MYDOMAIN.COM and uses IP address 153.66.140.1, add the following entry to the hosts file: 153.66.140.1 HOSTCLIENT.MYDOMAIN.COM HOSTCLIENT 3. Try setting the hostname property to be used by the GUI client. To do this from a browser with the Plugin, open the Java Plug-In Control Panel, and set the host name for the client by adding the following to "Java Run Time Parameters": Djava.rmi.server.hostname=<MY_HOST> 4. Check for Microsoft network-related patches at www.microsoft.com. From Linux: 1. Verify communication with other servers by pinging the target server from Linux using its hostname or IP address: ping <TARGET_NAME> For example: ping homer A reply listing the target's qualified hostname should be seen. 2. Verify that localhost is resolvable by each server in the cluster using ping with its hostname or IP address. If DNS is not implemented, edit the /etc/hosts file and add an entry for the localhost name. This entry can list either the IP address for the local server, or it can list the default entry (127.0.0.1). 3. Check that DNS is specified before NIS. DNS should be put before NIS in the hosts line of /etc/nsswitch.conf, and /etc/resolv.conf should point to a properly configured DNS server(s). 4. If DNS is not to be implemented or no other method works, edit the /etc/hosts file, and add an entry for the hostname. 246Troubleshooting Unable to Connect to X Window Server: 5. Try setting the hostname property to be used by the GUI client. This will need to be changed for each administrator. To do this from a browser with the Plugin, open the Java Plug-In Control Panel and set the hostname for the client by adding the following to "Java Run Time Parameters": -Djava.rmi.server.hostname=<MY_HOST> To do this from the HotJava browser, append the following to the hotjava command line: -Djava.rmi.server.hostname=<MY_HOST> For Example: -Djava.rmi.server.hostname=153.66.140.1 -Djava.rmi.server.hostname= homer.somecompany.com Unable to Connect to X Window Server: When running the LifeKeeper GUI application from a telnet session, you need to ensure that the GUI client is allowed to access the X Window Server on the LifeKeeper server. The LifeKeeper server must also be able to resolve the hostname or network address of the GUI client. When you telnet into the LifeKeeper server to run the LifeKeeper GUI application, the DISPLAY environment variable should contain the client's host name and display number. For example, if you telnet into a server named Server1 from a client named Client1, the DISPLAY environment variable should be set to Client1:0. When you run the LifeKeeper GUI application, it will try to send the output to the DISPLAY name for Client1. If Client1 is not allowed access to the X Window Server, the LifeKeeper GUI application will fail with an exception. When starting the LifeKeeper GUI as an application, if an error occurs indicating that you cannot connect to the X Window Server or that you cannot open the client DISPLAY name, try the following: 1. Set the display variable using the host name or IP address. For example: DISPLAY=Client1.somecompany.com:0 DISPLAY=172.17.5.74:0 2. Use the xhost or xauth command to verify that the client may connect to the X Window Server on the LifeKeeper server. 3. Add a DNS entry for the client or add an entry for the client to the local hosts file on the LifeKeeper server. Verify communication with the client by pinging the client from the LifeKeeper server using its hostname or IP address. Adjusting the System Date and Time Changing the system date/time backwards while in multi-user mode can cause trouble with LifeKeeper. The SCSI ha_xref_tbl is used during resource management. If the date or time is changed to an earlier time value, management of resources with timestamps later than the new time can be frozen until the new time catches up to the point where it was when the ha_xref_tbl was built. SteelEye Protection Suite for Linux247 Communication Paths Going Up and Down As a result of this problem, your users may have trouble creating or changing resources during the frozen interval. To adjust the system date/time counters backward: 1. Go to single-user mode (which stops LifeKeeper). 2. Change the date or time backwards. 3. Go back to multi-user mode. 4. Restart LifeKeeper. The operation builds a new ha_xref_tbl with the new current time so that the operation can continue. Note: Changing the timezone (TZ shell variable) or changing from Daylight to Standard time does not affect LifeKeeper. Linux holds all time values as an absolute count of seconds from January 1, 1970 and changing the timezone or daylight/standard time is simply an ASCII interpretation of the absolute seconds counter. The counter itself is not changed. Communication Paths Going Up and Down If you find the communication paths failing then coming back up repeatedly (the LifeKeeper GUI showing them as Alive, then Dead, then Alive), the heartbeat tunables may not be set to the same values on all servers in the cluster. This situation is also possible if the tunable name is misspelled in the LifeKeeper defaults file /etc/default/LifeKeeper on one of the servers. Suggested Action 1. Shut down LifeKeeper on all servers in the cluster. 2. On each server in the cluster, check the values and spelling of the LCMHBEATTIME and LCMNUMHBEATS tunables in /etc/default/LifeKeeper. Ensure that for each tunable, the values are the same on ALL servers in the cluster. 3. Restart LifeKeeper on all servers. Incomplete Resource Created If the resource setup process is interrupted leaving instances only partially created, you must perform manual cleanup before attempting to install the hierarchy again. Use the LifeKeeper GUI to delete any partially-created resources. See Deleting a Hierarchy from All Servers for instructions. If the hierarchy list does not contain these resources, you may need to use the ins_remove (see LCDIinstances(1M)) and dep_remove (LCDI-relationship(1M)) to clean up the partial hierarchies. Incomplete Resource Priority Modification A hierarchy in LifeKeeper is defined as all resources associated by parent/child relationships. For resources that have multiple parents, it is not always easy to discern from the GUI all of the root 248Troubleshooting Restoring Your Hierarchy to a Consistent State resources for a hierarchy. In order to maintain consistency in a hierarchy, LifeKeeper requires that priority changes be made to all resources in a hierarchy for each server. The GUI enforces this requirement by displaying all root resources for the hierarchy selected after the OK or Apply button is pressed. You have the opportunity at this point to accept all of these roots or cancel the operation. If you accept the list of roots, the new priority values will be applied to all resources in the hierarchy. You should ensure that no other changes are being made to the hierarchy while the Resource Properties dialog for that hierarchy is displayed. Before you have edited a priority in the Resource Properties dialog, any changes being made to LifeKeeper are dynamically updated in the dialog. Once you have begun making changes, however, the values seen in the dialog are frozen even if underlying changes are being made in LifeKeeper. Only after selecting the Apply or OK button will you be informed that changes were made that will prevent the priority change operation from succeeding as requested. In order to minimize the likelihood of unrecoverable errors during a priority change operation involving multiple priority changes, the program will execute a multiple priority change operation as a series of individual changes on one server at a time. Additionally, it will assign temporary values to priorities if necessary to prevent temporary priority conflicts during the operation. These temporary values are above the allowed maximum value of 999 and may be temporarily displayed in the GUI during the priority change. Once the operation is completed, these temporary priority values will all be replaced with the requested ones. If an error occurs and priority values cannot be rolled back, it is possible that some of these temporary priority values will remain. If this happens, follow the suggested procedure outlined below to repair the hierarchy. Restoring Your Hierarchy to a Consistent State If an error occurs during a priority change operation that prevents the operation from completing, the priorities may be left in an inconsistent state. Errors can occur for a variety of reasons, including system and communications path failure. If an error occurs after the operation has begun, and before it finishes, and the program was not able to roll back to the previous priorities, you will see a message displayed that tells you there was an error during the operation and the previous priorities could not be restored. If this should happen, you should take the following actions to attempt to restore your hierarchy to a consistent state: 1. If possible, determine the source of the problem. Check for system or communications path failure. Verify that other simultaneous operations were not occurring during the same time that the priority administration program was executing. 2. If possible, correct the source of the problem before proceeding. For example, a failed system or communications path must be restored before the hierarchy can be repaired. 3. Re-try the operation from the Resource Properties dialog. 4. If making the change is not possible from the Resource Properties dialog, it may be easier to attempt to repair the hierarchy using the command line hry_setpri. This script allows priorities to be changed on one server at a time and does not work through the GUI. 5. After attempting the repair, verify that the LifeKeeper databases are consistent on all servers by executing the eqv_list command for all servers where the hierarchy exists and observing the priority values returned for all resources in the hierarchy. SteelEye Protection Suite for Linux249 No Shared Storage Found When Configuring a Hierarchy 6. As a last resort, if the hierarchy cannot be repaired, you may have to delete and re-create the hierarchy. No Shared Storage Found When Configuring a Hierarchy When you are configuring resource hierarchies there are a number of situations that might cause LifeKeeper to report a "No shared storage" message: Possible Cause: Communications paths are not defined between the servers with the shared storage. When a hierarchy is configured on the shared storage device, LifeKeeper verifies that at least one other server in the cluster can also access the storage. Suggested Action: Use the LifeKeeper GUI or lcdstatus (1M) to verify that communication paths are configured and that they are active. Possible Cause: Communication paths are not operational between the servers with the shared storage. Suggested Action: Use the LifeKeeper GUI or lcdstatus (1M) to verify that communication paths are configured and that they are active. Possible Cause: Linux is not able to access the shared storage. This could be due to a driver not being loaded, the storage not being powered up when the driver was loaded, or the storage device is not configured properly. Suggested Action: Verify that the device is properly defined in /proc/scsi/scsi. Possible Cause: The storage was not configured in Linux before LifeKeeper started. During the startup of LifeKeeper, all SCSI devices are scanned to determine the mappings for devices. If a device is configured (powered on, connected or driver loaded) after LifeKeeper is started, then LifeKeeper must be stopped and started again to be able to configure and use the device. Suggested Action: Verify that the device is listed in $LKROOT/subsys/scsi/Resources/hostadp/device_info where $LKROOT is by default /opt/LifeKeeper. If the device is not listed in this file, LifeKeeper will not try to use the device. Possible Cause: The storage is not supported. The Storage and Adaptors topic lists specific SCSI devices that are supported and have been tested with LifeKeeper. However, note that this list includes known devices; there may be other devices that SIOS Technology Corp. has not tested which meet LifeKeeper requirements. Suggested Action: Verify that the device is listed in $LKROOT/subsys/scsi/Resources/hostadp/device_info where $LKROOT is by default /opt/LifeKeeper. If the device is listed in this file but the ID following the device name begins 250Troubleshooting Recovering from a LifeKeeper Server Failure with "NU-" then LifeKeeper was unable to get a unique ID from the device. Without a unique ID LifeKeeper cannot determine if the device is shared. Possible Cause: The storage may require a specific LifeKeeper software to be installed before the device can be used by LifeKeeper. Examples are the steeleye-lkRAW kit to enable Raw I/O support and the steeleye-lkDR software to enable data replication. Suggested Action: Verify that the necessary LifeKeeper packages are installed on each server. See the SPS for Linux Release Notes for software requirements. Additional Tip: The test_lk(1M) tool can be used to help debug storage and communication problems. Recovering from a LifeKeeper Server Failure If any server in your LifeKeeper cluster experiences a failure that causes re-installation of the operating system (and thus LifeKeeper), you will have to re-extend the resource hierarchies from each server in the cluster. If any server in the cluster has a shared equivalency relationship with the reinstalled server, however, LifeKeeper will not allow you to extend the existing resource hierarchy to the re-installed server. LifeKeeper will also not allow you to unextend the hierarchy from the reinstalled server because the hierarchy does not really exist on the server that was re-installed. Suggested Action: 1. On each server where the resource hierarchies are configured, use the eqv_list command to obtain a list of all the shared equivalencies (see LCDI-relationship for details). The example below shows the command and resulting output for the IP resource iptag on server1 and server2 where server2 is the server that was re-installed and server1 has the hierarchy configured: eqv_list -f: server1:iptag:server2:iptag:SHARED:1:10 2. On each server where the resource hierarchies are configured, use eqv_remove to manually remove the equivalency relationship for each resource in the hierarchy (see LCDIrelationship for details). For example, execute the following command on server1 using the example from step 1 above: eqv_remove -t iptag -S server2 -e SHARED 3. In clusters with more than two servers, steps 1-2 should be repeated on each server in the cluster where equivalency relationships for these resource hierarchies are defined. SteelEye Protection Suite for Linux251 Recovering from a Non-Killable Process 4. Finally, extend each resource hierarchy from the server where the resource hierarchy is inservice to the re-installed server using the GUI. Recovering from a Non-Killable Process If a process is not killable, LifeKeeper may not be able to unmount a shared disk partition. Therefore, the resource cannot be brought into service on the other system. The only way to recover from a nonkillable process is to reboot the system. Recovering From A Panic During A Manual Recovery A PANIC during manual switchover may cause incomplete recovery. If a PANIC or other major system failure occurs during a manual switchover, complete automatic recovery to the back-up system cannot be assured. Check the backup system to make sure all resources required to be inservice are in-service. If they are not in-service, use the LifeKeeper GUI to manually bring the missing resources into service. See Bringing a Resource In-Service for instructions. Recovering Out-of-Service Hierarchies As a part of the recovery following the failure of a LifeKeeper server, resource hierarchies that are configured on the failed server, but are not in-service anywhere at the time of the server failure, are recovered on the highest priority alive server at the time of the failure. This is the case no matter where the out-of-service hierarchy was last in-service, including the failed server, the recovering server, or some other server in the hierarchy. Resource Tag Name Restrictions Tag Name Length All tags within LifeKeeper may not exceed the 256 character limit. Valid "Special" Characters - _ . / However, the first character in a tag should not contain "." or "/". Invalid Characters + ; : ! @ # $ * = "space" Serial (TTY) Console WARNING If any part of the serial console data path is unreliable or goes out of service, users who have a serial 252Troubleshooting Taking the System to init state S WARNING (RS-232 TTY) console can experience severe problems with LifeKeeper service. During operation, LifeKeeper generates console messages. If your configuration has a serial console (instead of the standard VGA console), the entire data path from LifeKeeper to the end-user terminal must be operational in order to ensure the delivery of these console messages. If there is any break in the data path—such as terminal powered off, modem disconnected, or cable loose—the Linux STREAMS facility queues the console message. If the STREAMS queue becomes full, the Unix kernel suspends LifeKeeper until the STREAMS buffer queue again has room for more messages. This scenario could cause LifeKeeper to HANG. Note: The use of serial consoles in a LifeKeeper environment is strongly discouraged and the use of the VGA console is recommended. If you must use a serial console, be sure that your serial console is turned on, the cables and optional modems are connected properly, and that messages are being displayed. Taking the System to init state S WARNING When LifeKeeper is operational, the system must not be taken directly to init state S. Due to the operation of the Linux init system, such a transition causes all the LifeKeeper processes to be killed immediately and may precipitate a fastfail. Instead, you should either stop LifeKeeper manually (using /etc/init.d/lifekeeper stop-nofailover) or take the system first to init state 1 followed by init state S. Thread is Hung Messages on Shared Storage In situations where the device checking threads are not completing fast enough, this can cause messages to be placed in the LifeKeeper log stating that a thread is hung. This can cause resources to be moved from one server to another and in worse case, cause a server to be killed. Explanation The FAILFASTTIMER (in /etc/default/LifeKeeper) defines the number of seconds that each device is checked to assure that it is functioning properly, and that all resources that are owned by a particular system are still accessible by that system and owned by it. The FAILFASTTIMER needs to be as small as possible to guarantee this ownership and to provide the highest data reliability. However if a device is busy, it may not be able to respond at peak loads in the specified time. When a device takes longer than the FAILFASTTIMER then LifeKeeper considers that device as possibly hung. If a device has not responded after 3 loops of the FAILFASTTIMER time period then LifeKeeper attempts to perform recovery as if the device has failed. The recovery process is defined by the tunable SCSIERROR. Depending on the setting of SCSIERROR the action can be a sendevent to perform local recovery and then a switchover if that fails or it can cause the system to halt. Suggested Action: In cases where a device infrequently has a hung message printed to the error log followed by a message that it is no longer hung and the number in parenthesis is always 1, there should be no SteelEye Protection Suite for Linux253 Suggested Action: reason for alarm. However, if this message is frequently in the log, or the number is 2 or 3, then two actions may be necessary: l Attempt to decrease the load on the storage. If the storage is taking longer than 3 times the FAILFASTTIMER (3 times 5 or 15 seconds by default) then one should consider the load that is being placed on the storage and re-balance the load to avoid these long I/O delays. This will not only allow LifeKeeper to check the devices frequently, but it should also help the performance of the application using that device. l If the load can not be reduced, then the FAILFASTTIMER can be increased from the default 5 seconds. This value should be as low as possible so slowly increase the value until the messages no longer occur, or occur infrequently. Note: When the FAILFASTTIMER value is modified LifeKeeper must be stopped and restarted before the new value will take affect. 254Troubleshooting Chapter 4: SteelEye DataKeeper for Linux Introduction SteelEye DataKeeper for Linux provides an integrated data mirroring capability for LifeKeeper environments. This feature enables LifeKeeper resources to operate in shared and non-shared storage environments. Mirroring with SteelEye DataKeeper for Linux How Steeleye DataKeeper Works Mirroring with SteelEye DataKeeper for Linux SteelEye DataKeeper for Linux offers an alternative for customers who want to build a high availability cluster (using SteelEye LifeKeeper) without shared storage or who simply want to replicate business-critical data in real-time between servers. SteelEye DataKeeper uses either synchronous or asynchronous volume-level mirroring to replicate data from the primary server (mirror source) to one or more backup servers (mirror targets). DataKeeper Features SteelEye DataKeeper includes the following features: l Allows data to be reliably, efficiently and consistently mirrored to remote locations over any TCP/IP-based Local Area Network (LAN) or Wide Area Network (WAN). l Supports synchronous or asynchronous mirroring. l Transparent to the applications involved because replication is done at the block level below the file system. l Supports multiple simultaneous mirror targets including cascading failover to those targets when used with LifeKeeper. l Supports point-in-time data rewind to allow recovery of lost or corrupted data. l Built-in network compression allows higher maximum throughput on Wide Area Networks. l Supports all major file systems (see the SPS for Linux Release Notes product description for more information regarding journaling file system support). SteelEye Protection Suite for Linux255 Synchronous vs. Asynchronous Mirroring l Provides failover protection for mirrored data. l Integrates into the LifeKeeper Graphical User Interface. l Fully supports other LifeKeeper Application Recovery Kits. l Automatically resynchronizes data between the primary server and backup servers upon system recovery. l Monitors the health of the underlying system components and performs a local recovery in the event of failure. l Supports Stonith devices for I/O fencing. For details, refer to the STONITH topic. Synchronous vs. Asynchronous Mirroring Understanding the differences between synchronous and asynchronous mirroring will help you choose the appropriate mirroring method for your application environment. Synchronous Mirroring SteelEye DataKeeper provides real-time mirroring by employing a synchronous mirroring technique in which data is written simultaneously on the primary and backup servers. For each write operation, DataKeeper forwards the write to the target device(s) and awaits remote confirmation before signaling I/O completion. The advantage of synchronous mirroring is a high level of data protection because it ensures that all copies of the data are always identical. However, the performance may suffer due to the wait for remote confirmation, particularly in a WAN environment. Asynchronous Mirroring With asynchronous mirroring, each write is made to the source device and then a copy is queued to be transmitted to the target device(s). This means that at any given time, there may be numerous committed write transactions that are waiting to be sent from the source to the target device. The advantage of asynchronous mirroring is better performance because writes are acknowledged when they reach the primary disk, but it can be less reliable because if the primary system fails, any writes that are in the asynchronous write queue will not be transmitted to the target. To mitigate this issue, SteelEye DataKeeper makes an entry to an intent log file for every write made to the primary device. The intent log is a bitmap file indicating which data blocks are out of sync between the primary and target mirrors. In the event of a server failure, the intent log can be used to avoid a full resynchronization (or resync) of the data. Note: The intent log can be used in both asynchronous and synchronous mirroring modes, but the intent log with asynchronous mirroring is supported only with a 2.6.16 or higher Linux kernel. How SteelEye DataKeeper Works SteelEye DataKeeper creates and protects NetRAID devices. A NetRAID device is a RAID1 device 256Introduction Synchronization (and Resynchronization) that consists of a local disk or partition and a Network Block Device (NBD) as shown in the diagram below. A LifeKeeper supported file system can be mounted on a NetRAID device like any other storage device. In this case, the file system is called a replicated file system. LifeKeeper protects both the NetRAID device and the replicated file system. The NetRAID device is created by building the DataKeeper resource hierarchy. Extending the NetRAID device to another server will create the NBD device and make the network connection between the two servers. SteelEye DataKeeper starts replicating data as soon as the NBD connection is made. The nbd-client process executes on the primary server and connects to the nbd-server process running on the backup server. Synchronization (and Resynchronization) After the DataKeeper resource hierarchy is created and before it is extended, it is in a degraded mode; that is, data will be written to the local disk or partition only. Once the hierarchy is extended to the backup (target) system, SteelEye DataKeeper synchronizes the data between the two systems and all subsequent writes are replicated to the target. If at any time the data gets “out-of-sync” (i.e., a system or network failure occurs) SteelEye DataKeeper will automatically resynchronize the data on the source and target systems. If the mirror was configured to use an intent log (bitmap file), SteelEye DataKeeper uses it to determine what data is out-of-sync so that a full resynchronization is not required. If the mirror was not configured to use a bitmap file, then a full resync is performed after any interruption of data replication. SteelEye Protection Suite for Linux257 Standard Mirror Configuration Standard Mirror Configuration The most common mirror configuration involves two servers with a mirror established between local disks or partitions on each server, as shown below. Server1 is considered the primary server containing the mirror source. Server2 is the backup server containing the mirror target. N+1 Configuration A commonly used variation of the standard mirror configuration above is a cluster in which two or more servers replicate data to a common backup server. In this case, each mirror source must replicate to a separate disk or partition on the backup server, as shown below. 258Introduction Multiple Target Configuration Multiple Target Configuration When used with an appropriate Linux distribution and kernel version 2.6.7 or higher, SteelEye DataKeeper can also replicate data from a single disk or partition on the primary server to multiple backup systems, as shown below. SteelEye Protection Suite for Linux259 SteelEye DataKeeper Resource Hierarchy A given source disk or partition can be replicated to a maximum of 7 mirror targets, and each mirror target must be on a separate system (i.e. a source disk or partition cannot be mirrored to more than one disk or partition on the same target system). This type of configuration allows the use of LifeKeeper’s cascading failover feature, providing multiple backup systems for a protected application and its associated data. SteelEye DataKeeper Resource Hierarchy The following example shows a typical DataKeeper resource hierarchy as it appears in the LifeKeeper GUI: 260Introduction Failover Scenarios The resource datarep-ext3-sdr is the NetRAID resource, and the parent resource ext3-sdr is the file system resource. Note that subsequent references to the DataKeeper resource in this documentation refer to both resources together. Because the file system resource is dependent on the NetRAID resource, performing an action on the NetRAID resource will also affect the file system resource above it. Failover Scenarios The following four examples show what happens during a failover using SteelEye DataKeeper. In these examples, the LifeKeeper for Linux cluster consists of two servers, Server 1 (primary server) and Server 2 (backup server). Scenario 1 Server 1 has successfully completed its replication to Server 2 after which Server 1 becomes inoperable. Result: Failover occurs. Server 2 now takes on the role of primary server and operates in a degraded mode (with no backup) until Server 1 is again operational. SteelEye DataKeeper will then initiate a resynchronization from Server 2 to Server 1. This will be a full resynchronization on kernel 2.6.18 and lower. On kernels 2.6.19 and later or with RedHat Enterprise Linux 5.4 kernels 2.6.18-164 or later (or a supported derivative of RedHat 5.4 or later), the resynchronization will be partial, meaning only the changed blocks recorded in the bitmap files on the source and target will need to be synchronized. Note: SteelEye DataKeeper sets the following flag on the server that is currently acting as the mirror source: $LKROOT/subsys/scsi/resources/netraid/$TAG_last_owner When Server 1 fails over to Server 2, this flag is set on Server 2.Thus, when Server 1 comes back up; SteelEye DataKeeper removes the last owner flag from Server1. It then begins resynchronizing the data from Server 2 to Server 1. SteelEye Protection Suite for Linux261 Scenario 2 Scenario 2 Considering scenario 1, Server 2 (still the primary server) becomes inoperable during the resynchronization with Server 1 (now the backup server). Result: Because the resynchronization process did not complete successfully, there is potential for data corruption. As a result, LifeKeeper will not attempt to fail over the DataKeeper resource to Server 1. Only when Server 2 becomes operable will LifeKeeper attempt to bring the DataKeeper resource in-service (ISP) on Server 2. Scenario 3 Both Server 1 (primary) and Server 2 (target) become inoperable. Server 1 (primary) comes back up first. Result: Server 1 will not bring the DataKeeper resource in-service. The reason is that if a source server goes down, and then it cannot communicate with the target after it comes back online, it sets the following flag: $LKROOT/subsys/scsi/resources/netraid/$TAG_data_corrupt This is a safeguard to avoid resynchronizing data in the wrong direction. In this case you will need to force the mirror online on Server1, which will delete the data_corrupt flag and bring the resource into service on Server 1. See Force Mirror Online. Note: The user must be certain that Server 1 was the last primary before removing the $TAG_data_ corrupt file. Otherwise data corruption might occur. You can verify this by checking for the presence of the last_owner flag. Scenario 4 Both Server 1 (primary) and Server 2 (target) become inoperable. Server 2 (target) comes back up first. 262Introduction Scenario 4 Result: LifeKeeper will not bring the DataKeeper resource ISP on Server 2. When Server 1 comes back up, LifeKeeper will automatically bring the DataKeeper resource ISP on Server 1. SteelEye Protection Suite for Linux263 Installation and Configuration Before Configuring Your DataKeeper Resources The following topics contain information for consideration before beginning to create and administer your DataKeeper resources. They also describe the three types of DataKeeper resources. Please refer to the LifeKeeper Configuration section for instructions on configuring LifeKeeper Core resource hierarchies. Hardware and Software Requirements Your LifeKeeper configuration should meet the following requirements prior to the installation of SteelEye DataKeeper. Hardware Requirements l Servers - Two or more LifeKeeper for Linux supported servers. l IP Network Interface Cards - Each server requires at least one network interface card. Remember, however, that a LifeKeeper cluster requires two communication paths; two separate LAN-based communication paths using dual independent sub-nets are recommended, and at least one of these should be configured as a private network. However using a combination of TCP and TTY is also supported. Note: Due to the nature of software mirroring, network traffic between servers can be heavy. Therefore, it is recommended that you implement a separate private network for your SteelEye DataKeeper devices which may require additional network interface cards on each server. l Disks or Partitions - Disks or partitions on the primary and backup servers that will act as the source and target disks or partitions. The target disks or partitions must be at least as large as the source disk or partition. Note: With the release of SteelEye Data Replication 7.1.1, it became possible to replicate an entire disk, one that has not been partitioned (i.e. /dev/sdd). Previous versions of SteelEye Data Replication required that a disk be partitioned (even if it was a single large partition; i.e. /dev/sdd1) before it could be replicated. SteelEye Data Replication 7.1.1 removed that restriction. SteelEye Protection Suite for Linux265 Software Requirements Software Requirements l Operating System – SteelEye DataKeeper can be used with any major Linux distribution based on the 2.6 Linux kernel. See the SPS for Linux Release Notes for a list of supported distributions. Asynchronous mirroring and intent logs are supported only on distributions that use a 2.6.16 or later Linux kernel. Multiple target support (i.e., support for more than 1 mirror target) requires a 2.6.7 or later Linux kernel. l LifeKeeper Installation Script - In most cases, you will need to install the following package (see the “Product Requirements” section in the SPS for Linux Release Notes for specific SteelEye DataKeeper requirements): HADR-generic-2.6 This package must be installed on each server in your LifeKeeper cluster prior to the installation of SteelEye DataKeeper. The HADR package is located on the SPS Installation Image File, and the appropriate package is automatically installed by the Installation setup script. l LifeKeeper Software - You must install the same version of the LifeKeeper Core on each of your servers. You must also install the same version of each recovery kit that you plan to use on each server. See the SPS for Linux Release Notes for specific SPS requirements. l SteelEye DataKeeper software - Each server in your SPS cluster requires SteelEye DataKeeper software. Please see the SPS for Linux Installation Guide for specific instructions on the installation and removal of SteelEye DataKeeper. General Configuration l The size of the target disks or partitions (on the backup servers) must be equal to or greater than the size of the source disk or partition (on the primary server). l Once the DataKeeper resource is created and extended, the synchronization process will delete existing data on the target disks or partitions and replace it with data from the source partition. Network Configuration l The network path that is chosen for data replication between each pair of servers must also already be configured as a LifeKeeper communication path between those servers. To change the network path, see Changing the Data Replication Path. l When configuring DataKeeper resources, avoid using an interface/address already in use by a LifeKeeper IP resource that has local recovery enabled. For example, if a LifeKeeper IP resource is configured on interface eth1 having local recovery enabled with interface eth2, DataKeeper resources should avoid using either eth1 or eth2. Enabling local recovery will disable the interface during switchover to the backup interface which can cause SteelEye DataKeeper failure. 266Installation and Configuration Changing the Data Replication Path l This release of SteelEye DataKeeper does not support Automatic Switchback for DataKeeper resources. Additionally, the Automatic Switchback restriction is applicable for any other LifeKeeper resource sitting on top of a DataKeeper resource. l If using Fusion-io, see the Network section of Clustering with Fusion-io for further network configuration information. Changing the Data Replication Path Starting with LK 7.1, mirror endpoints can be modified using lk_chg_value. For example, to change a mirror endpoint from IP address 192.168.0.1 to 192.168.1.1: 1. /etc/init.d/lifekeeper stop-nofailover (lk_chg_value cannot be run while LifeKeeper is running) 2. lk_chg_value -o 192.168.0.1 -n 192.168.1.1 3. /etc/init.d/lifekeeper start Execute these commands on all servers involved in the mirror(s) that are using this IP address. Note: This command will also modify communication paths that are using the address in question. Determine Network Bandwidth Requirements Prior to installing SteelEye DataKeeper, you should determine the network bandwidth requirements for replicating your current configuration whether you are employing virtual machines or using physical Linux servers. If you are employing virtual machines (VMs), use the method Measuring Rate of Change on a Linux System (Physical or Virtual) to measure the rate of change for the virtual machines that you plan to replicate. This value indicates the amount of network bandwidth that will be required to replicate the virtual machines. After determining the network bandwidth requirements, ensure that your network is configured to perform optimally. If your network bandwidth requirements are above your current available network capacity, you may need to consider one or more of the following options: l Enable compression in SteelEye DataKeeper (or in the network hardware, if possible) l Increase your network capacity l Reduce the amount of data being replicated l Create a local, non-replicated storage repository for temporary data and swap files l Manually schedule replication to take place daily at off-peak hours Measuring Rate of Change on a Linux System (Physical or Virtual) DataKeeper for Linux can replicate data across any available network. In Multi-Site or Wide Area Network (WAN) configurations, special consideration must be given to the question, "Is there SteelEye Protection Suite for Linux267 Determine Network Bandwidth Requirements sufficient bandwidth to successfully replicate the partition and keep the mirror in the mirroring state as the source partition is updated throughout the day?" Keeping the mirror in the mirroring state is critical because a switchover of the partition is not allowed unless the mirror is in the mirroring state. Determine Network Bandwidth Requirements Prior to installing SteelEye DataKeeper, you should determine the network bandwidth requirements for replicating your data. Use the method below to measure the rate of change for the data that you plan to replicate. This value indicates the amount of network bandwidth that will be required to replicate that data. After determining the network bandwidth requirements, ensure that your network is configured to perform optimally. If your network bandwidth requirements are above your current available network capacity, you must consider one or more of the following options: l Enable compression in DataKeeper, or in the network hardware, if possible l Create a local, non-replicated storage repository for temporary data and swap files that don't really need to be replicated l Reduce the amount of data being replicated l Increase your network capacity SteelEye DataKeeper handles short bursts of write activity by adding that data to its async queue. However, make sure that over any extended period of time, the disk write activity for all replicated volumes combined remains, on average, below the amount of change that DataKeeper and your network can transmit. If the network capacity is not sufficient to keep up with the rate of change that occurs on your disks, and the async queue fills up, the mirror will revert to synchronous behavior, which can negatively affect performance of the source server. Measuring Basic Rate of Change Use the following command to determine file(s) or partition(s) to be mirrored. For example /dev/sda3, and then measure the amount of data written in a day: MB_START=`awk '/sda3 / { print $10 / 2 / 1024 }' /proc/diskstats` … wait for a day … MB_END=`awk '/sda3 / { print $10 / 2 / 1024 }' /proc/diskstats` The daily rate of change, in MB, is then MB_END – MB_START. 268Installation and Configuration Measuring Detailed Rate of Change SteelEye DataKeeper can mirror daily, approximately: T1 (1.5Mbps) - 14,000 MB/day (14 GB) T3 (45Mbps) - 410,000 MB/day (410 GB) Gigabit (1Gbps) - 5,000,000 MB/day (5 TB) Measuring Detailed Rate of Change The best way to collect Rate of Change data is to log disk write activity for some period of time (one day, for instance) to determine what the peak disk write periods are. To track disk write activity, create a cron job which will log the timestamp of the system followed by a dump of /proc/diskstats. For example, to collect disk stats every two minutes, add the following link to /etc/crontab: */2 * * * * root ( date ; cat /proc/diskstats ) >> /path_ to/filename.txt … wait for a day, week, etc … then disable the cron job and save the resulting data file in a safe location. Analyze Collected Detailed Rate of Change Data The roc-calc-diskstats utility analyzes data collected in the previous step. This utility takes a /proc/diskstats output file that contains output, logged over time, and calculates the rate of change of the disks in the dataset. roc-calc-diskstats #!/usr/bin/perl # Copyright (c) 2011, SIOS Technology, Corp. # Author: Paul Clements use strict; sub msg { printf STDERR @_; } sub dbg { return if (! $ENV{'ROC_DEBUG'}); msg @_; } $0 =~ s@^.*/@@; # basename sub usage { msg "Usage: $0 <interval> <start-time> <iostat-data-file> [dev-list]\n"; SteelEye Protection Suite for Linux269 Analyze Collected Detailed Rate of Change Data msg "\n"; msg "This utility takes a /proc/diskstats output file that contains\n"; msg "output, logged over time, and calculates the rate of change of\n"; msg "the disks in the dataset\n"; msg "OUTPUT_CSV=1 set in env. dumps the full stats to a CSV file on STDERR\n"; msg "\n"; msg "Example: $0 1hour \"jun 23 12pm\" steeleye-iostat.txt sdg,sdh\n"; msg "\n"; msg "interval - interval between samples\n"; msg "start time - the time when the sampling starts\n"; msg "iostat-data-file - collect this with a cron job like:\n"; msg "\t0 * * * * (date ; cat /proc/diskstats) >> /root/diskstats.txt\n"; msg "dev-list - list of disks you want ROC for (leave blank for all)\n"; exit 1; } usage if (@ARGV < 3); my $interval = TimeHuman($ARGV[0]); my $starttime = epoch($ARGV[1]); my $file = $ARGV[2]; my $blksize = 512; # /proc/diskstats is in sectors my %devs = map { $_ => 1 } split /,/, $ARGV[3]; my %stat; my $firsttime; my $lasttime; # datestamp divides output my %days = ( 'Sun' => 1, 'Mon' => 1, 'Tue' => 1, 'Wed' => 1, 'Thu' => 1, 'Fri' => 1, 'Sat' => 1); my %fields = ( 'major' => 0, 'minor' => 1, 'dev' => 2, 'reads' => 3, 'reads_merged' => 4, 'sectors_read' => 5, 'ms_time_reading' => 6, 'writes' => 7, 'writes_merged' => 8, 'sectors_written' => 9, 'ms_time_writing' => 10, 270Installation and Configuration Analyze Collected Detailed Rate of Change Data 'ios_pending' => 11, 'ms_time_total' => 12, 'weighted_ms_time_total' => 13 ); my $devfield = $fields{'dev'}; my $calcfield = $ENV{'ROC_CALC_FIELD'} || $fields{'sectors_written'}; dbg "using field $calcfield\n"; open(FD, "$file") or die "Cannot open $file: $!\n"; foreach (<FD>) { chomp; @_ = split; if (exists($days{$_[0]})) { # skip datestamp divider if ($firsttime eq '') { $firsttime = join ' ', @_[0..5]; } $lasttime = join ' ', @_[0..5]; next; } next if ($_[0] !~ /[0-9]/); # ignore if (!%devs || exists $devs{$_[$devfield]}) { push @{$stat{$_[$devfield]}}, $_[$calcfield]; } } @{$stat{'total'}} = totals(\%stat); printf "Sample start time: %s\n", scalar(localtime($starttime)); printf "Sample end time: %s\n", scalar(localtime($starttime + ((@{$stat {'total'}} - 1) * $interval))); printf "Sample interval: %ss #Samples: %s Sample length: %ss\n", $interval, (@{$stat{'total'}} - 1), (@{$stat{'total'}} - 1) * $interval; print "(Raw times from file: $firsttime, $lasttime)\n"; print "Rate of change for devices " . (join ', ', sort keys %stat) . "\n"; foreach (sort keys %stat) { my @vals = @{$stat{$_}}; my ($max, $maxindex, $roc) = roc($_, $blksize, $interval, @vals); printf "$_ peak:%sB/s (%sb/s) (@ %s) average:%sB/s (%sb/s)\n", HumanSize ($max), HumanSize($max * 8), scalar localtime($starttime + ($maxindex * $interval)), HumanSize($roc), HumanSize($roc * 8); } # functions sub roc { SteelEye Protection Suite for Linux271 Analyze Collected Detailed Rate of Change Data my $dev = shift; my $blksize = shift; my $interval = shift; my ($max, $maxindex, $i, $first, $last, $total); my $prev = -1; my $first = $_[0]; if ($ENV{'OUTPUT_CSV'}) { print STDERR "$dev," } foreach (@_) { if ($prev != -1) { if ($_ < $prev) { dbg "wrap detected at $i ($_ < $prev)\n"; $prev = 0; } my $this = ($_ - $prev) * $blksize / $interval; if ($this > $max) { $max = $this; $maxindex = $i; } if ($ENV{'OUTPUT_CSV'}) { print STDERR "$this," } } $prev = $_; # store current val for next time around $last = $_; $i++; } if ($ENV{'OUTPUT_CSV'}) { print STDERR "\n" } return ($max, $maxindex, ($last - $first) * $blksize / ($interval * ($i - 1))); } sub totals { # params: stat_hash my $stat = shift; my @totalvals; foreach (keys %$stat) { next if (!defined($stat{$_})); my @vals = @{$stat{$_}}; my $i; foreach (@vals) { $totalvals[$i++] += $_; } } 272Installation and Configuration Analyze Collected Detailed Rate of Change Data return @totalvals; } # converts to KB, MB, etc. and outputs size in readable form sub HumanSize { # params: bytes/bits my $bytes = shift; my @suffixes = ( '', 'K', 'M', 'G', 'T', 'P' ); my $i = 0; while ($bytes / 1024.0 >= 1) { $bytes /= 1024.0; $i++; } return sprintf("%.1f %s", $bytes, $suffixes[$i]); } # convert human-readable time interval to number of seconds sub TimeHuman { # params: human_time my $time = shift; my %suffixes = ('s' => 1, 'm' => 60, 'h' => 60 * 60, 'd' => 60 * 60 * 24); $time =~ /^([0-9]*)(.*?)$/; $time = $1; my $suffix = (split //, $2)[0]; # first letter from suffix if (exists $suffixes{$suffix}) { $time *= $suffixes{$suffix}; } return $time; } sub epoch { # params: date my $date = shift; my $seconds = `date +'%s' --date "$date" 2>&1`; if ($? != 0) { die "Failed to recognize time stamp: $date\n"; } return $seconds; } Usage: # ./roc-calc-diskstats <interval> <start_time> <diskstats-datafile> [dev-list] Usage Example (Summary only): SteelEye Protection Suite for Linux273 Graph Detailed Rate of Change Data # ./roc-calc-diskstats 2m “Jul 22 16:04:01” /root/diskstats.txt sdb1,sdb2,sdc1 > results.txt The above example dumps a summary (with per disk peak I/O information) to results.txt Usage Example (Summary + Graph Data): # export OUTPUT_CSV=1 # ./roc-calc-diskstats 2m “Jul 22 16:04:01” /root/diskstats.txt sdb1,sdb2,sdc1 2> results.csv > results.txt The above example dumps graph data to results.csv and the summary (with per disk peak I/O information) to results.txt Example Results (from results.txt) Sample start time: Tue Jul 12 23:44:01 2011 Sample end time: Wed Jul 13 23:58:01 2011 Sample interval: 120s #Samples: 727 Sample length: 87240s (Raw times from file: Tue Jul 12 23:44:01 EST 2011, Wed Jul 13 23:58:01 EST 2011) Rate of change for devices dm-31, dm-32, dm-33, dm-4, dm-5, total dm-31 peak:0.0 B/s (0.0 b/s) (@ Tue Jul 12 23:44:01 2011) average:0.0 B/s (0.0 b/s) dm-32 peak:398.7 KB/s (3.1 Mb/s) (@ Wed Jul 13 19:28:01 2011) average:19.5 KB/s (156.2 Kb/s) dm-33 peak:814.9 KB/s (6.4 Mb/s) (@ Wed Jul 13 23:58:01 2011) average:11.6 KB/s (92.9 Kb/s) dm-4 peak:185.6 KB/s (1.4 Mb/s) (@ Wed Jul 13 15:18:01 2011) average:25.7 KB/s (205.3 Kb/s) dm-5 peak:2.7 MB/s (21.8 Mb/s) (@ Wed Jul 13 10:18:01 2011) average:293.0 KB/s (2.3 Mb/s) total peak:2.8 MB/s (22.5 Mb/s) (@ Wed Jul 13 10:18:01 2011) average:349.8 KB/s (2.7 Mb/s) Graph Detailed Rate of Change Data To help understand your specific bandwidth needs over time, SIOS has created a template spreadsheet called diskstats-template.xlsx. This spreadsheet contains sample data which can be overwritten with the data collected by roc-calc-diskstats. diskstats-template 274Installation and Configuration Graph Detailed Rate of Change Data 1. Open results.csv, and select all rows, including the total column. 2. Open diskstats-template.xlsx, select the diskstats.csv worksheet. 3. In cell 1-A, right-click and select Insert Copied Cells. 4. Adjust the bandwidth value in the cell towards the bottom left of the worksheet to reflect an amount of bandwidth you have allocated for replication. Units: Megabits/second (Mb/sec) Note: The cells to the right will automatically be converted to bytes/sec to match the raw data collected. SteelEye Protection Suite for Linux275 Graph Detailed Rate of Change Data 5. Make a note of the following row/column numbers: a. Total (row 6 in screenshot below) b. Bandwidth (row 9 in screenshot below) c. Last datapoint (column R in screenshot below) 6. Select the bandwidth vs ROC worksheet. 7. Right-click on the graph and select Select Data... a. Adjust Bandwidth Series i. From the Series list on the left, select bandwidth ii. Click Edit iii. Adjust the Series Values: field with the following syntax: 276Installation and Configuration Graph Detailed Rate of Change Data “=diskstats.csv!$B$<row>:$<final_column>$<row>" example: “=diskstats.csv!$B$9:$R:$9" iv. Click OK b. Adjust ROC Series i. From the Series list on the left, select ROC ii. Click Edit iii. Adjust the Series Values: field with the following syntax: “=diskstats.csv!$B$<row>:$<final_ column>$<row>" example: “=diskstats.csv!$B$6:$R:$6" SteelEye Protection Suite for Linux277 Confirm Failover and Block Resource Failover Settings iv. Click OK c. Click OK to exit the Wizard 8. The Bandwidth vs ROC graph will update. Please analyze your results to determine if you have sufficient bandwidth to support replication of your data. Confirm Failover and Block Resource Failover Settings In certain configurations, it may be desirable to require manual confirmation by a system administrator before allowing SPS to perform a failover recovery of a system that it detects as failed. This capability can be used to prevent SPS from performing failovers in situations where SPS detects that a remote system has crashed when it actually has not. This situation is possible in configurations that do not include redundant heartbeat communication paths. Make sure you review and understand the following descriptions, examples and considerations before setting Confirm Failover or Block Resource Failover in your SPS environment. These settings are available from the command line or on the Properties panel in the LifeKeeper GUI. Confirm Failover On The Confirm Failover On setting allows you to require manual confirmation of failovers from specific systems in the SPS cluster. It is only available to SPS administrators. Operators and guests will not be able to see it. By default, all failovers proceed automatically with no user intervention. However, once the Confirm Failover flag is set, failovers from the designated system will require confirmation. Execute one of the following lk_confirmso commands to confirm the failover: To proceed with failover: lk_confirmso -y system To block failover: lk_confirmso -n system By default, the administrator has ten minutes to run this command. This time can be changed by modifying the CONFIRMSOTO setting in /etc/default/LifeKeeper. CONFIRMSOTO is set to the 278Installation and Configuration When to Select This Setting time in seconds that LifeKeeper should wait before taking the default action (setting this to zero means “don’t wait before taking default action”). If the administrator does not run the lk_confirmso command within the time allowed, the failover will either proceed or be blocked. By default, the failover will proceed. This behavior can be changed by modifying the CONFIRMSODEF setting in /etc/default/LifeKeeper. CONFIRMSODEF specifies the action to be taken. If set to "0", the action is to proceed with failover. If set to "1", the action is to block failover. Note: Using the Command Line, this option is configured by setting the confirmso!uname flag on the system which will be performing the failover recovery, where uname refers to the name of the remote system which has failed. See the LCDI-flag(1M) manual page. When to Select This Setting This setting is used in most Disaster Recovery, XenServer and other WAN configurations where the configuration does not include redundant heartbeat communication paths. l In a regular site (non-multi-site cluster and non-XenServer), open the Properties page from one server and then select the server that you want the Confirm Failover flag to be set on. l For a Multi-site WAN configuration: Enable manual failover confirmation. l For a Multi-site LAN configuration: Do not enable manual failover confirmation. l In a multi-site cluster environment – from the non-disaster system, select the DR system and check the set confirm failover flag. You will need to open the Properties panel and select this setting for each non-disaster server in the cluster. l In a XenServer environment, all servers in the list (not just the DR site) need to be checked. Block Resource Failover On The Block Resource Failover On setting blocks all resource transfers due to a resource failure from the given system. By default, all resource failures will result in a recover event that will attempt to recover the failed resource on the local system. If local recovery fails or is not enabled, then LifeKeeper transfers the resource hierarchy to the next highest priority system for which the resource is defined. However, if this setting is selected on a designated system(s), all resource transfers due to a resource failure will be blocked from the given system. When the setting is enabled, the following message is logged: Local recovery failure, failover blocked, MANUAL INTERVENTION REQUIRED Conditions/Considerations l In a multi-site configuration, do not select Block Failover for any server in the configuration. l In a XenServer environment, select Block Failover for each system in the cluster. Remember: This setting will not affect failover behavior if there is a complete system SteelEye Protection Suite for Linux279 Setting the Flags on Each Server failure. It will only block failovers due to local resource failures. Setting the Flags on Each Server 1. Log in to the LifeKeeper GUI and select a server in your cluster. If the Properties panel option is selected on the View menu, the Properties panel will display (on the right side of the GUI). On the General tab in the bottom of the panel, your system configuration will be displayed: 2. In the Set Confirm Failover On column, select the checkbox for each server in the cluster that you want confirmation on. In the example above, ServerA properties are set to confirm failover on ServerB from ServerA. In order to set Confirm Failover on ServerA from ServerB, you will need to go into ServerB properties and check the box next to ServerA. 280Installation and Configuration Examples 3. In the Set Block Resource Failover On column, select the checkbox for each server in the cluster as required. In the following example, ServerA properties are set to Block Failover to ServerB from ServerA. In order to set Block Failover to ServerA from ServerB, you will need to go into ServerB properties and check the box next to ServerA. IMPORTANT CONSIDERATION FOR MULTI-SITE CLUSTER CONFIGURATIONS: Do not check the Block Resource Failover On fields for the servers in a Multi-Site Cluster configuration. 4. Click Apply Changes. Examples Block All Automatic Failovers Completely 1. Select a server in your cluster and view Properties. 2. On the General tab, check the “Set Confirm Failover On“ box next to each server. SteelEye Protection Suite for Linux281 Block Failover in One Direction 3. In /etc/default/LifeKeeper, set the following: CONFIRMSODEF = 1 CONFIRMSOTO = 0 4. Perform the above steps on each server in your cluster. Block Failover in One Direction 1. Select the server in your cluster that would fail over in this scenario and view Properties. 2. On the General tab, check the “Set Confirm Failover On“ box on the server that you want to block failover on. 3. In /etc/default/LifeKeeper, set the following: CONFIRMSOTO = 0 CONFIRMSODEF = 1 Use the default settings on the server that you blocked failover on. This will allow failover to occur from it to the other server, but not to it from the other server. The following illustrates this by allowing failover from ServerA to ServerB while blocking failover from ServerB to ServerA. SteelEye DataKeeper for Linux Resource Types When creating your DataKeeper resource hierarchy, LifeKeeper will prompt you to select a resource 282Installation and Configuration Replicate New File System type. There are several different DataKeeper resource types. The following information can help you determine which type is best for your environment. Replicate New File System Choosing a New Replicated File System will create/extend the NetRAID device, mount the given mount point on the NetRAID device and put both the LifeKeeper supported file system and the NetRAID device under LifeKeeper protection. The local disk or partition will be formatted. CAUTION: All data will be deleted. Replicate Existing File System Choosing Replicate Existing File System will use a currently mounted disk or partition and create a NetRAID device without deleting the data on the disk or partition. SteelEye DataKeeper will unmount the local disk or partition, create the NetRAID device using the local disk or partition and mount the mount point on the NetRAID device. It will then put both the NetRAID device and the LifeKeeper supported file system under LifeKeeper protection. Important: If you are creating SteelEye Protection Suite for Linux Multi-Site Cluster hierarchies, your application will be stopped during the create process. You will need to restart your application once you have finished creating and extending your hierarchies. DataKeeper Resource Choosing a DataKeeper Resource will create/extend the NetRAID device and put it under LifeKeeper protection without a file system. You might choose this replication type if using a database that can use a raw I/O device. In order to allow the user continued data access, SteelEye DataKeeper will not attempt to unmount and delete a NetRAID device if it is currently mounted. The user must manually unmount it before attempting a manual switchover and mount it on the other server after the manual switchover. Note: After the DataKeeper resource has been created, should you decide to protect a manually mounted file system with LifeKeeper, you can do so as follows: 1. Format the NetRAID device with a LifeKeeper supported file system. 2. Mount the NetRAID device. 3. Create and extend a file system hierarchy using the NetRAID device as if it were a shared storage disk or partition. LifeKeeper’s file system recovery kit will now be responsible for mounting/unmounting it during failover. SteelEye Protection Suite for Linux283 Resource Configuration Tasks Resource Configuration Tasks You can perform all SteelEye DataKeeper configuration tasks via the LifeKeeper Graphical User Interface (GUI). The LifeKeeper GUI provides a guided interface to configure, administer and monitor SteelEye DataKeeper resources. Overview The following tasks are available for configuring SteelEye DataKeeper: l Create a Resource Hierarchy - Creates a DataKeeper resource hierarchy. l Delete a Resource Hierarchy - Deletes a DataKeeper resource hierarchy. l Extend a Resource Hierarchy - Extends a DataKeeper resource hierarchy from the primary server to a backup server. l Unextend a Resource Hierarchy - Unextends (removes) a DataKeeper resource hierarchy from a single server in the LifeKeeper cluster. l Create Dependency- Creates a child dependency between an existing resource hierarchy and another resource instance and propagates the dependency changes to all applicable servers in the cluster. l Delete Dependency- Deletes a resource dependency and propagates the dependency changes to all applicable servers in the cluster. l In Service - Activates a resource hierarchy. l Out of Service - Deactivatesa resource hierarchy. l View/Edit Properties - View or edit the properties of a resource hierarchy. Creating a DataKeeper Resource Hierarchy If you are creating a DataKeeper resource hierarchy in a Multi-Site Cluster environment, refer to the procedures at the end of this section after you select the Hierarchy Type. Perform the following on your primary server: 1. Select Edit > Server > Create Resource Hierarchy The Create Resource Wizard dialog will appear. 2. Select the Data Replication option from the drop down list and click Next to continue. 3. You will be prompted for the following information. When the Back button is active in any of the dialog boxes, you can go back to the previous dialog box. This is helpful should you encounter any error requiring you to correct the previously entered information. You may click Cancel at any time to cancel the entire creation process. 284Installation and Configuration Creating a DataKeeper Resource Hierarchy Field Tips You must select intelligent switchback. This means that after a failover to the backup server, an administrator must manually switch the DataKeeper resource back to the primary server. Switchback Type CAUTION: This release of SteelEye DataKeeper does not support Automatic Switchback for DataKeeper resources. Additionally, the Automatic Switchback restriction is applicable for any other LifeKeeper resource sitting on top of a DataKeeper resource. Select the name of the server where the NetRAID device will be created (typically this is your primary server). All servers in your cluster are included in the drop down list box. Server Choose the data replication type you wish to create by selecting one of the following: Hierarchy Type l Replicate New File System l Replicate Existing File System l DataKeeper Resource Select or edit the name of the bitmap file used for intent logging. If you choose None, then an intent log will not be used and every resynchronization will be a full resync instead of a partial resync. Bitmap File Important: The bitmap file should not reside on a btrfs filesystem. Placing data replication bitmap files on a btrfs filesystem will result in an "invalid argument" error when LifeKeeper tries to configure the mirror. The default location for the bitmap file is under /opt/LifeKeeper. This default location should be changed if /opt/LifeKeeper resides on a btrfs filesystem. Select Yes to allow this replication resource to support asynchronous replication to target systems. Select No if you will use synchronous replication to all targets. You will be asked later to choose the actual type of Enable replication, asynchronous or synchronous, when the replication resource is Asynchronous extended to each target server. (See Mirroring with SteelEye DataKeeper for Replication ? a discussion of both replication types.) If you want the replication to any of these targets to be performed asynchronously, you should choose Yes here, even if the replication to other targets will be done synchronously. The next sequence of dialog boxes depends on which Hierarchy Type you have chosen. While some of the dialog boxes may be the same for each Hierarchy Type, their sequence and the required information may be slightly different. The next three topics take you through the remainder of the Hierarchy creation process. l DataKeeper Resource l Replicate New File System l Replicate Existing File System SteelEye Protection Suite for Linux285 Extending Your Hierarchy Extending Your Hierarchy This operation can be started from the Edit menu or initiated automatically upon completing the Create Resource Hierarchy option, in which case you should refer to Step 2 below. 1. On the Edit menu, select Resource, then Extend Resource Hierarchy. The Pre-Extend Wizard appears. If you are unfamiliar with the Extend operation, click Next. If you are familiar with the LifeKeeper Extend Resource Hierarchy defaults and want to bypass the prompts for input/confirmation, click Accept Defaults. 2. The Pre-Extend Wizard will prompt you to enter the following information. Note: The first two fields appear only if you initiated the Extend from the Edit menu. Field Template Server Tips Select the TemplateServer where your DataKeeper resource hierarchy is currently in service. It is important to remember that the Template Server you select now and the Tag to Extend that you select in the next dialog box represent an in-service (activated) resource hierarchy. An error message will appear if you select a resource tag that is not in service on the template server you have selected. The drop down box in this dialog provides the names of all the servers in your cluster. Tag to Extend This is the name of the DataKeeper instance you wish to extend from the template server to the target server. The drop down box will list all the resources that you have created on the template server. Target Server Enter or select the server you are extending to. You must select intelligent switchback. This means that after a failover to the backup server, an administrator must manually switch the DataKeeper resource back to the primary server. Switchback CAUTION: This release of SteelEye DataKeeper does not support Automatic Type Switchback for DataKeeper resources. Additionally, the Automatic Switchback restriction is applicable for any other LifeKeeper resource sitting on top of a SteelEye DataKeeper resource. Template Priority Select or enter a Template Priority. This is the priority for the DataKeeper hierarchy on the server where it is currently in service. Any unused priority value from 1 to 999 is valid, where a lower number means a higher priority (1=highest). The extend process will reject any priority for this hierarchy that is already in use by another system. The default value is recommended. Note: This selection will appear only for the initial extend of the hierarchy. 286Installation and Configuration Extending a DataKeeper Resource Field Target Priority Tips Select or enter the Target Priority. This is the priority for the new extended DataKeeper hierarchy relative to equivalent hierarchies on other servers. Any unused priority value from 1 to 999 is valid, indicating a server’s priority in the cascading failover sequence for the resource. A lower number means a higher priority (1=highest). Note that LifeKeeper assigns the number “1” to the server on which the hierarchy is created by default. The priorities need not be consecutive, but no two servers can have the same priority for a given resource. After receiving the message that the pre-extend checks were successful, click Next. Depending upon the hierarchy being extended, LifeKeeper will display a series of information boxes showing the Resource Tags to be extended, some of which cannot be edited. 3. Click Next to launch the Extend Resource Hierarchy configuration task. 4. The next section lists the steps required to complete the extension of a DataKeeper resource to another server. Extending a DataKeeper Resource 1. After you have been notified that your pre-extend script has executed successfully, you will be prompted for the following information: Field Tips Enter the name of the file system mount point on the target server. (This dialog Mount Point will not appear if there is no LifeKeeper-protected filesystem associated with the DataKeeper Resource.) Root Tag Select or enter the Root Tag. This is a unique name for the filesystem resource instance on the target server. (This dialog will not appear if there is no LifeKeeper-protected filesystem associated with the DataKeeper Resource.) Select the disk or partition where the replicated file system will be located on the target server. The list of disks or partitions in the drop down box contains all the available disks or partitions that are not: Target Disk or Partition l already mounted l swap disks or partitions l LifeKeeper-protected disks or partitions The drop down list will also filter out special disks or partitions, for example, root (/), boot (/boot), /proc, floppy and cdrom. Note: The size of the target disk or partition must be greater than or equal to that of the source disk or partition. SteelEye Protection Suite for Linux287 Unextending Your Hierarchy Field Tips DataKeeper Resource Select or enter the DataKeeper Resource Tag name. Tag Select or edit the name of the bitmap file used for intent logging. If you choose Bitmap File none, then an intent log will not be used, and every resynchronization will be a full resync instead of a partial resync. Select the pair of local and remote IP addresses to use for replication between the target server and the other indicated server in the cluster. The valid paths and their associated IP addresses are derived from the set of LifeKeeper communication paths that have been defined for this same pair of servers. Due Replication to the nature of DataKeeper, it is strongly recommended that you use a private (dedicated) network. Path If the DataKeeper Resource has previously been extended to one or more target servers, the extension to an additional server will loop through each of the pairings of the new target server with existing servers, prompting for a Replication Path for each pair. Choose “synchronous” or “asynchronous” to indicate the type of replication that should be used between the indicated pair of servers. Replication As for the previous Replication Path field, if the DataKeeper Resource has Type previously been extended to one or more target servers, the extension to an additional server will loop through each of the pairings of the new target server with existing servers, prompting for a Replication Type for each pair. 2. Click Extend to continue. An information box will appear verifying that the extension is being performed. 3. Click Finish to confirm the successful extension of your DataKeeper resource instance. 4. Click Done to exit the Extend Resources Hierarchy menu selection. Note: Be sure to test the functionality of the new instance on all servers by performing a manual switchover. See Testing Your Resource Hierarchy for details. At this point, SteelEye DataKeeper has initiated the data resynchronization from the source to the target disk or partition. In the LifeKeeper GUI, the state of the DataKeeper resource on the target server is set to “Resyncing”. Once the resynchronization is complete, the state will change to “Target” which is the normal Standby condition. During resynchronization, the DataKeeper resource, and any resource that depends on it, will not be able to failover. This is to avoid data corruption. Unextending Your Hierarchy To remove a resource hierarchy from a single server in the LifeKeeper cluster, do the following: 288Installation and Configuration Deleting a Resource Hierarchy 1. On the Edit menu, select Resource then Unextend Resource Hierarchy. 2. Select the Target Server where you want to unextend the DataKeeper resource. It cannot be the server where the DataKeeper resource is currently in service (active). Note: If you selected the Unextend task by right-clicking from the right pane on an individual resource instance, this dialog box will not appear. Click Next. 3. Select the DataKeeper Hierarchy to Unextend and click Next. (This dialog will not appear if you selected the Unextend task by right-clicking on a resource instance in either pane). 4. An information box appears confirming the target server and the DataKeeper resource hierarchy you have chosen to unextend. Click Unextend. 5. Another information box appears confirming that the DataKeeper resource was unextended successfully. Click Done to exit the Unextend Resource Hierarchy menu selection. Note: At this point, data is not being replicated to the backup server. Deleting a Resource Hierarchy To delete a DataKeeper resource from all servers in your LifeKeeper configuration, complete the following steps. Note: It is recommended that you take the DataKeeper resource out of service BEFORE deleting it. Otherwise, the md and NetRAID devices will not be removed, and you will have to unmount the file system manually. See Taking a DataKeeper Resource Out of Service. 1. On the Edit menu, select Resource, then Delete Resource Hierarchy. 2. Select the name of the TargetServer where you will be deleting your DataKeeper resource hierarchy. Note: If you selected the Delete Resource task by right-clicking from either the left pane on a global resource or the right pane on an individual resource instance, this dialog will not appear. 3. Select the Hierarchy to Delete. (This dialog will not appear if you selected the Delete Resource task by right-clicking on a resource instance in the left or right pane.) Click Next. 4. An information box appears confirming your selection of the target server and the hierarchy you have selected to delete. Click Delete. 5. Another information box appears confirming that the DataKeeper resource was deleted successfully. Click Done to exit. Note: If the NetRAID device was mounted prior to the resource deletion then it will remain mounted. Otherwise, the NetRAID device will also be deleted. Taking a DataKeeper Resource Out of Service Taking a DataKeeper resource out of service removes LifeKeeper protection for the resource. It SteelEye Protection Suite for Linux289 Bringing a DataKeeper Resource In Service breaks the mirror, unmounts the file system (if applicable), stops the md device and kills the nbd server and client. WARNING: Do not take your DataKeeper resource out of service unless you wish to stop mirroring your data and remove LifeKeeper protection. Use the Pause operation to temporarily stop mirroring. 1. In the right pane of the LifeKeeper GUI, right-click on the DataKeeper resource that is in service. 2. Click Out of Service from the resource popup menu. 3. A dialog box confirms the selected resource to be taken out of service. Any resource dependencies associated with the action are noted in the dialog. Click Next. 4. An information box appears showing the results of the resource being taken out of service. Click Done. Bringing a DataKeeper Resource In Service Bringing a DataKeeper resource in service is similar to creating the resource: LifeKeeper starts the nbd server and client, starts the md device which synchronizes the data between the source and target devices, and mounts the file system (if applicable). 1. Right-click on the DataKeeper resource instance from the right pane. 2. Click In Service from the popup menu. A dialog box appears confirming the server and resource that you have selected to bring into service. Click In Service to bring the resource into service. 3. An information box shows the results of the resource being brought into service. Any resource dependencies associated with the action are noted in the confirmation dialog. Click Done. Testing Your Resource Hierarchy You can test your DataKeeper resource hierarchy by initiating a manual switchover. This will simulate a failover of the resource instance from the primary server to the backup server. Performing a Manual Switchover from the LifeKeeper GUI You can initiate a manual switchover from the LifeKeeper GUI by selecting Edit, Resource, and InService. For example, an in-service request executed on a backup server causes the DataKeeper resource hierarchy to be taken out-of-service on the primary server and placed in-service on the backup server. At this point, the original backup server is now the primary server and original primary server has now become the backup server. After the switchover, the state of the DataKeeper resource on the target server is set to “Resyncing” in the LifeKeeper GUI. Once the resynchronization is complete the state will change to “Target”, which is the normal Standby condition. Note: Manual failover is prevented for DataKeeper resources during resynchronization. 290Installation and Configuration Performing a Manual Switchover from the LifeKeeper GUI If you execute the Out of Service request, the resource hierarchy is taken out of service without bringing it in service on the other server. The resource can only be brought in service on the same server if it was taken out of service during resynchronization. SteelEye Protection Suite for Linux291 Administration Administering SteelEye DataKeeper for Linux The following topics provide information to help in understanding and managing SteelEye DataKeeper for Linux operations and issues after DataKeeper resources are created. Viewing Mirror Status You can view the Replication Status dialog to see the following information about your mirror: l Mirror status: Fully Operational, Paused, Resyncing, or Out Of Sync l Synchronization status: percent complete l Replication type: synchronous or asynchronous l Replication direction: from source server to target server l Bitmap: the state of the bitmap/intent log l Rewind Log: the location and size of the rewind log (if enabled) l Network Compression Level: the compression level (if enabled) To view the Replication Status dialog, do the following: 1. Click the View menu, and select Properties Panel. 2. Click the DataKeeper resource in the LifeKeeper status display. or, 1. Right-click the DataKeeper resource in the LifeKeeper status display. 2. From the pop-up menu, select Properties. SteelEye Protection Suite for Linux293 GUI Mirror Administration GUI Mirror Administration A SteelEye DataKeeper mirror can be administered through the LifeKeeper GUI in two ways: 1. By enabling the Properties Panel and clicking the toolbar icons (shown in the screenshot). 294Administration Create and View Rewind Bookmarks Click on each icon below for a description or, 2. By right-clicking the data replication resource and selecting an action from the popup menu. Create and View Rewind Bookmarks A bookmark is an entry that is placed in the rewind log file. Bookmarks are useful for keeping track of important system events (such as upgrades) in case a rewind needs to be performed. When you perform a rewind, all bookmarked log entries will be displayed as choices for the rewind point. SteelEye Protection Suite for Linux295 Force Mirror Online Force Mirror Online Force Mirror Online should be used only in the event that both servers have become inoperable and the primary server cannot bring the resource in service after rebooting. Selecting Force Mirror Online removes the data_corrupt flag and brings the DataKeeper resource in service. For more information, see Primary server cannot bring the resource ISP in the Troubleshooting section. Note: Mirror_settings should be run on the target system(s) (or on all systems, if you want the settings to take effect regardless of which system becomes the mirror source). The mirror must be paused and restarted before any settings changes will take effect. Pause and Resume Pause Mirror Resume Mirror You may pause a mirror to temporarily stop all writes from being replicated to the target disk. For example, you might pause the mirror to take a snapshot of the target disk or to increase I/O performance on the source system during peak traffic times. When the mirror is paused, it will be mounted for read (or read/write with kernel 2.6.19 or higher) access at the normal filesystem mount point on the target system. Any data written to the target while the mirror is paused will be overwritten when the mirror is resumed. Rewind and Recover Data The rewind feature allows the data on the target disk to be rewound back to any previous disk write. The steps involved are: 296Administration Rewind and Recover Data 1. The mirror is paused. 2. A timestamp associated with previous disk write is selected and the disk is rewound to that time. 3. The user is asked to verify the rewound data and indicate its condition (good or bad). 4. The user then has the option to use the current data (go to Step 5) or continue rewinding by selecting another timestamp (go to Step 2). 5. The user has the choice of recovering the data manually and then resuming the mirror (erasing the rewound data) or switching the mirror and any protected applications to the target system and using the rewound data as the new production data. The user is led through the steps above with a series of wizard dialogs. The dialogs are explained below: 1. Confirm that you wish to rewind the data. Click Continue. 2. The mirror is being paused in preparation for the rewind. Click Next. 3. Select or type in a timestamp that you wish to rewind to. Bookmarked log entries as well as a random sampling of other log entries appear in the dropdown list. The progress bar at the bottom of the dialog displays which data is good (green), bad (red) or unknown (yellow). So, at the beginning of the rewind process, the progress bar is all yellow. Once the data has been rewound and you have indicated that the data is good or bad, the progress bar is updated with green and red sections accordingly. SteelEye Protection Suite for Linux297 Rewind and Recover Data Dialog 3 4. The data is being rewound. After the data is rewound, the target disk is mounted for read-only access so that the data can be verified. Click Next. Dialog 4 5. You are asked for comments on the data. Enter any comments (not mandatory) and click Next. 6. You are now asked to indicate whether the data is valid or not. Answer Yes or No and click Next. 7. You are now asked if you wish to continue rewinding (go back to Dialog 3) or accept the current rewound data and begin recovery (go on to Dialog 8). 8. You are now asked to choose a recovery method. The choices are: a. Move applications to <target system> (go on to Dialog 9) b. Manually copy data to the source system (go on to Dialog 10) c. Make your selection and click Next. 9. The hierarchy is now being switched over to the target server. The rewound data will be 298Administration Set Compression Level resynced to the old source disk. Click Finish. Rewind is complete. 10. You are asked to manually copy files to the source system. Copy any rewound data that you wish to keep to a safe location, then click Next. 11. The mirror is now being resumed. A full resynchronization will occur from the source to target. Click Finish. Rewind is complete. Set Compression Level The Network Compression Level may be set to a value from 0 to 9. A value of 0 disables compression entirely. Level 1 is the fastest but least aggressive compression level, while Level 9 is the slowest but best. Network compression is typically effective only on WANs. Set Rewind Log Location Select the directory where the rewind log file should be stored (this is only applicable when the system is a mirror target). There should be adequate space in this location to store the desired amount of history in the log1. The log cannot be located on a mirror or shared disk and should, for optimal performance, be located on a separate physical disk from any mirrors. An empty setting disables rewind logging. Note: The mirror must be paused and restarted before any setting changes will take effect. 1The log file contains a copy of every disk block that is written to the mirrored disk so the log file can grow larger than the mirrored disk itself if the same disk blocks are written multiple times, as is the case when a file is modified or appended to. Set Rewind Log Max Size Enter the maximum log file size in megabytes (MB). An empty value or zero (0) disables the file size limit. There should be adequate space on the log file disk to accommodate the log file growing to the SteelEye Protection Suite for Linux299 Command Line Mirror Administration maximum size. However, the log will wrap around and overwrite the earliest entries when it detects that it has run out of disk space. Command Line Mirror Administration In addition to performing actions through the LifeKeeper GUI, the mirror can also be administered using the command line. There are several commands (found in the $LKROOT/bin directory) that can be used to administer a DataKeeper resource. Mirror Actions mirror_action <tag> <action> <source> [target(s)] <tag> is the LifeKeeper resource tag of the DataKeeper resource <action> is one of: pause, resume, force, fullresync <source> is the current source system <target> is the target system (or list of systems) that the action should affect Examples: To pause the mirror named datarep-ext3 from source system, adam, to target system, eve: mirror_action datarep-ext3 pause adam eve To resume replication from adam to both eve and sophocles: mirror_action datarep-ext3 resume adam eve sophocles To force the mirror online on system eve: mirror_action datarep-ext3 force eve To resume replication and force a full resynchronization from adam to sophocles: mirror_action datarep-ext3 fullresync adam sophocles Mirror Settings mirror_settings <tag> <setting> <value> <tag> is the LifeKeeper resource tag of the DataKeeper resource <setting> is one of: logdir, logmax, compress <value> is the value to be set 300Administration Examples: Note: mirror_settings should be run on the target system(s) (or on all systems, if you want the settings to take effect regardless of which system becomes the mirror source). The mirror must be paused and restarted before any settings changes will take effect. Examples: To set the network compression level to 5: mirror_settings datarep-ext3 compress 5 To disable network compression: mirror_settings datarep-ext3 compress 0 To set the rewind logging directory (and enable rewind logging): mirror_settings datarep-ext3 logdir /tmp/logs To disable rewind logging: mirror_settings datarep-ext3 logdir “” To set the rewind log maximum size to 1GB: mirror_settings datarep-ext3 logmax 1073741824 To disable the rewind log maximum size limit: mirror_settings datarep-ext3 logmax 0 Bitmap Administration bitmap -a <num>|-c|-d|-X <bitmap_file> -a <num> adds the asynchronous write parameter to the bitmap file. It is needed if a synchronous mirror is upgraded to include an asynchronous target. The default value for <num> is 256. -c cleans the bitmap file (zeroes all the bits). This can be used to avoid a full resync in case an exact replica of the source disk exists on the target. Use this option with extreme caution. -d dirties the bitmap file (sets all the bits to ones). This option can be used to force a full resync, for example after a split-brain situation has occurred. -X<bitmap file> examines the bitmap file and displays useful information about the bitmap and the mirror. In addition, the mdadm command may also be used to administer a DataKeeper resource, as the DataKeeper resource is actually an md device. Refer to the mdadm(8) man page for details. Note: When using mdadm, be sure to use the version that is located in $LKROOT/bin, as it is more up-todate than the version included with the operating system. SteelEye Protection Suite for Linux301 Monitoring Mirror Status via Command Line Monitoring Mirror Status via Command Line Normally, the mirror status can be checked using the Replication Status tab in the Resource Properties dialog of the LifeKeeper GUI. However, you may also monitor the status of your mirror by executing: $LKROOT/bin/mirror_status <tag> Example: # mirror_status datarep-ext3-sdr [-] eve -> adam Status: Paused Type: Asynchronous [-] eve -> sophocles Status: Resynchronizing [=> ] 11% Resync Speed: 1573K/sec Type: Synchronous Bitmap: 4895 bits (chunks), 4895 dirty (100.0%) The following command may also be helpful: cat /proc/mdstat A sample mdstat file is shown below: eve:~ # cat /proc/mdstat Personalities : [raid1] md1 : active raid1 nbd10[1] nbd8[3](F) sdb1[0] 313236 blocks super non-persistent [3/2] [UU_] bitmap: 3/3 pages [12KB], 64KB chunk, file: /opt/LifeKeeper/bitmap_ext3-sdr unused devices: <none/></tag> 302Administration Server Failure Server Failure If both your primary and backup servers become inoperable, your DataKeeper resource will be brought into service/activated only when both servers are functional again. This is to avoid data corruption that could result from initiating the resynchronization in the wrong direction. If you are certain that the only operable server was the last server on which the resource was “In Service Protected” (ISP), then you can force it online by right-clicking the DataKeeper resource and then selecting Force Mirror Online. Resynchronization During the resynchronization of a DataKeeper resource, the state of this resource instance on the target server is “Resyncing”. However, the resource instance is “Source” (ISP) on the primary server. The LifeKeeper GUI reflects this status by representing the DataKeeper resource on the target server with the following icon: and the DataKeeper resource on the primary server with this icon: As soon as the resynchronization is complete, the resource state on the target becomes “Target” and the icon changes to the following: The following points should be noted about the resynchronization process: l A SteelEye DataKeeper resource and its parent resources cannot fail over to a target that was in the synchronization process when the primary failed. l If your DataKeeper resource is taken out of service/deactivated during the synchronization of a target server, that resource can only be brought back into service/activated on the same system or on another target that is already in sync (if multiple targets exist), and the resynchronization will continue. l If your primary server becomes inoperable during the synchronization process, any target server that is in the synchronization process will not be able to bring your DataKeeper resource into service. Once your primary server becomes functional again, a resynchronization of the mirror will continue. SteelEye Protection Suite for Linux303 Avoiding Full Resynchronizations Avoiding Full Resynchronizations When replicating large amounts of data over a WAN link, it is desirable to avoid full resynchronizations which can consume large amounts of network bandwidth and time. With newer kernels, SteelEye DataKeeper can avoid almost all full resyncs by using its bitmap technology. However, the initial full resync, which occurs when the mirror is first set up, cannot be avoided when existing data is being replicated. (For brand new data, SteelEye does not perform a full resync, so the steps below are not necessary.) There are a couple of ways to avoid an initial full resync when replicating existing data. Two recommended methods are described below. Method 1 The first method consists of taking a raw disk image and shipping it to the target site. This results in minimal downtime as the mirror can be active on the source system while the data is in transit to the target system. Procedure 1. Create the mirror (selecting Replicate Existing Filesystem), but do not extend the mirror to the target system. 2. Take the mirror out of service. 3. Take an image of the source disk or partition. For this example, the chosen disk or partition is /dev/sda1: root@source# dd if=/dev/sda1 of=/tmp/sdr_disk.img bs=65536 (The block size argument of 65536 is merely for efficiency). This will create a file containing the raw disk image of the disk or partition. Note that instead of a file, a hard drive or other storage device could have been used. 4. Optional Step – Take a checksum of the source disk or partition: root@source# md5sum /dev/sda1 5. Optional Step – Compress the disk image file: root@source# gzip /tmp/sdr_disk.img 6. Clear the bitmap file, e.g.: root@source# /opt/LifeKeeper/bin/bitmap -c /opt/LifeKeeper/bitmap_sdr 304Administration Method 2 7. Bring the mirror and dependent filesystem and applications (if any), into service. The bitmap file will track any changes made while the data is transferred to the target system. 8. Transfer the disk image to the target system using your preferred transfer method. 9. Optional Step – Uncompress the disk image file on the target system: root@target# gunzip /tmp/sdr_disk.img.gz 10. Optional Step – Verify that the checksum of the image file matches the original checksum taken in Step 4: root@target# md5sum /tmp/sdr_disk.img 11. Transfer the image to the target disk, for example, /dev/sda2: root@target# dd if=/tmp/sdr_disk.img of=/dev/sda2 bs=65536 12. Set LKDR_NOFULL_SYNC=1 in /etc/default/LifeKeeper on both systems: root@source# echo 'LKDR_NO_FULL_SYNC=1' >> /etc/default/LifeKeeper root@target# echo 'LKDR_NO_FULL_SYNC=1' >> /etc/default/LifeKeeper 13. Extend the mirror to the target. A partial resync will occur. Method 2 This method can be used if the target system can be easily transported to or will already be at the source site when the systems are configured. This method consists of temporarily modifying network routes to make the eventual WAN mirror into a LAN mirror so that the initial full resync can be performed over a faster local network. In the following example, assume the source site is on subnet 10.10.10.0/24 and the target site is on subnet 10.10.20.0/24. By temporarily setting up static routes on the source and target systems, the "WAN" traffic can be made to go directly from one server to another over a local ethernet connection or loopback cable. Procedure 1. Install and configure the systems at the source site. 2. Add static routes: root@source# route add -net 10.10.20.0/24 dev eth0 root@target# route add -net 10.10.10.0/24 dev eth0 The systems should now be able to talk to each other over the LAN. SteelEye Protection Suite for Linux305 Clustering with Fusion-io 3. Configure the communication paths in LifeKeeper. 4. Create the mirror and extend to the target. A full resync will occur. 5. Pause the mirror. Changes will be tracked in the bitmap file until the mirror is resumed. 6. Delete the static routes: root@source# route del -net 10.10.20.0/24 root@target# route del -net 10.10.10.0/24 7. Shut down the target system and ship it to its permanent location. 8. Boot the target system and ensure network connectivity with the source. 9. Resume the mirror. A partial resync will occur. Clustering with Fusion-io Fusion-io Best Practices for Maximizing DataKeeper Performance SPS for Linux includes integrated, block level data replication functionality that makes it very easy to set up a cluster when there is no shared storage involved. Using Fusion-io, SPS for Linux allows you to form "shared nothing" clusters for failover protection. When leveraging data replication as part of a cluster configuration, it is critical that you have enough bandwidth so that data can be replicated across the network just as fast as it is being written to disk. The following best practices will allow you to get the most out of your “shared nothing” SPS cluster configuration when high-speed storage is involved: 306Administration Network Network l Use a 10 Gbps NIC: Flash-based storage devices from Fusion-io (or other similar products from OCZ, LSI, etc.) are capable of writing data at speeds of HUNDREDS (750+) MB/sec or more. A 1 Gbps NIC can only push a theoretical maximum of approximately 125 MB/sec, so anyone taking advantage of an ioDrive’s potential can easily write data much faster than 1 Gbps network connection could replicate it. To ensure that you have sufficient bandwidth between servers to facilitate real-time data replication, a 10 Gbps NIC should always be used to carry replication traffic. l Enable Jumbo Frames: Assuming that your network cards and switches support it, enabling jumbo frames can greatly increase your network’s throughput while at the same time reducing CPU cycles. To enable jumbo frames, perform the following configuration (example on a RedHat/CentOS/OEL Linux distribution): l Run the following command: ifconfig <interface_name> mtu 9000 l To ensure change persists across reboots, add “MTU=9000” to the following file: /etc/sysconfig/network-scripts/ifcfg-<interface_name> l To verify end-to-end jumbo frame operation, run the following command: ping -s 8900 -M do <IP-of-other-server> l Change the NIC’s transmit queue length: l Run the following command: /sbin/ifconfig <interface_name> txqueuelen 10000 l l To preserve the setting across reboots, add to /etc/rc.local. Change the NIC’s netdev_max_backlog: l Set the following in /etc/sysctl.conf: net.core.netdev_max_backlog = 100000 TCP/IP Tuning l TCP/IP tuning that has shown to increase replication performance: l Edit /etc/sysctl.conf and add the following parameters (Note: These are examples and may vary according to your environment): net.core.rmem_default = 16777216 net.core.wmem_default = 16777216 net.core.rmem_max = 16777216 net.core.wmem_max = 16777216 net.ipv4.tcp_rmem = 4096 87380 16777216 SteelEye Protection Suite for Linux307 Configuration Recommendations net.ipv4.tcp_wmem = 4096 65536 16777216 net.ipv4.tcp_timestamps = 0 net.ipv4.tcp_sack = 0 net.core.optmem_max = 16777216 net.ipv4.tcp_congestion_control=htcp Configuration Recommendations l Allocate a small (~100 MB) disk partition, located on the Fusion-io drive to place the bitmap file. Create a filesystem on this partition and mount it, for example, at /bitmap: # mount | grep /bitmap /dev/fioa1 on /bitmap type ext3 (rw) l Prior to creating your mirror, adjust the following parameters in /etc/default/LifeKeeper: l LKDR_CHUNK_SIZE=4096 l l l l Default value is 64 LKDR_SPEED_LIMIT=1500000 l Default value is 50000 l LKDR_SPEED_LIMIT specifies the maximum bandwidth that a resync will ever take — this should be set high enough to allow resyncs to go at the maximum speed possible. LKDR_SPEED_LIMIT_MIN=200000 l Default value is 20000 l LKDR_SPEED_LIMIT_MIN specifies how fast the resync should be allowed to go when there is other I/O going on at the same time. As a rule of thumb, this should be set to half or less of the drive’s maximum write throughput in order to avoid starving out normal I/O activity when a resync occurs. Create your mirrors and configure the cluster as you normally would. 308Administration Multi-Site Cluster SteelEye Protection Suite for Linux Multi-Site Cluster The SteelEye Protection Suite for Linux Multi-Site Cluster is a separately licensed product that uses a LifeKeeper shared storage configuration between two or more servers with the additional ability to replicate the shared disk(s) to one or more target servers using SteelEye DataKeeper for Linux. SteelEye Protection Suite for Linux Multi-Site Cluster The SteelEye Protection Suite for Linux Multi-Site Cluster is a separately licensed product that uses a LifeKeeper shared storage configuration between two or more servers with the additional ability to replicate the shared disk(s) to one or more target servers using SteelEye DataKeeper. SteelEye Protection Suite for Linux Multi-Site Cluster can be built upon a Wide Area Network that is configured to provide failover of IP addresses across multiple network segments that are on different subnets. This configuration involves either a virtual network (Virtual LAN (VLAN)) or Virtual Private Network (VPN). Following is an image of the SteelEye LifeKeeper GUI after the SteelEye Protection Suite for Linux Multi-Site Cluster product has been configured. Although the hierarchies appear unbalanced, they are configured properly and will function correctly. If you are an existing SteelEye DataKeeper customer SteelEye Protection Suite for Linux309 Multi-Site Cluster Configuration Considerations and are familiar with the SteelEye LifeKeeper graphical user interface, the SteelEye Protection Suite Multi-Site Cluster resource hierarchy display in the LifeKeeper GUI will appear differently from previous releases of SteelEye DataKeeper. Multi-Site Cluster Configuration Considerations Before you begin configuring your systems, it’s important to understand what hierarchy configurations you should avoid in the Linux Multi-Site Cluster hierarchy environment. Below are three examples of hierarchy configurations that should be avoided in the Linux Multi-Site Cluster environment. In all these cases, a Linux Multi-Site Cluster hierarchy shares an underlying device with another hierarchy. Failure or switchover of either hierarchy will impact the associated hierarchy. This could possibly produce unintended consequences such as application failure or mirror breakage; which would require a full-resync process later. In addition, complications could result when switching the mirror sources to the DR site allowing it to mirror back to the primary site since the mirror target system will have the lower level disk resources in service. Any shared resources must also be operational (ISP) on the same node as the mirror target. 310Multi-Site Cluster Multi-Site Cluster Restrictions Example Description 1 Using the Multi-Site Cluster hierarchy’s mirror disk resource more than once in the same or different hierarchies. 2 Using the same Multi-Site Cluster file system or disk resource for the mirror bitmap in more than one Multi-Site Cluster hierarchy. (Each mirror’s bitmap file must reside on a unique LUN and can’t be shared.) 3 Using the bitmap file system, device or disk resource with another hierarchy (MultiSite or non-Multi-Site). Multi-Site Cluster Restrictions l The SteelEye Logical Volume Manager Recovery Kit should not be installed on the Disaster Recovery node when using Linux Multi-Site Cluster. Creating a SteelEye Protection Suite for Linux Multi-Site Cluster Resource Hierarchy Perform the following on your primary server: 1. Select Edit > Server > Create Resource Hierarchy The Create Resource Wizard dialog will appear. 2. Select the Data Replication option from the drop down list and click Next to continue. 3. You will be prompted for the following information. When the Back button is active in any of the dialog boxes, you can go back to the previous dialog box. This is helpful should you encounter any error requiring you to correct the previously entered information. You may click Cancel at any time to cancel the entire creation process. Field Tips You must select intelligent switchback. This means that after a failover to the backup server, an administrator must manually switch the Multi-Site Cluster resource back to the primary server. Switchback CAUTION: This release of SteelEye DataKeeper does not support Type Automatic Switchback for DataKeeper resources. Additionally, the Automatic Switchback restriction is applicable for any other LifeKeeper resource that becomes part of the Multi-Site Cluster hierarchy. This includes anything sitting above the hierarchy or becomes a child within the hierarchy. Server Select the name of the server where the NetRAID device will be created (typically this is your primary server). All servers in your cluster are included in the drop down list box. SteelEye Protection Suite for Linux311 Replicate New File System Field Tips Choose the data replication type you wish to create by selecting one of the following: Hierarchy Type l Replicate New File System l Replicate Existing File System l DataKeeper Resource The next sequence of dialog boxes depends on which Hierarchy Type you have chosen. While some of the dialog boxes may be the same for each Hierarchy Type, their sequence and the required information may be slightly different. The following three topics will take you through the remainder of the Hierarchy creation process: l Replicate New File System l Replicate Existing File System l DataKeeper Resource Replicate New File System This option will create a NetRAID device, format it with a LifeKeeper supported file system type, mount the file system on the NetRAID device and place both the mounted file system and the NetRAID device under LifeKeeper protection. The NetRAID device and the local disk or partition will be formatted causing existing data to be deleted. You should select this option if you want to create a mirror on a new file system and place it under LifeKeeper protection. You will need one free disk or partition for this resource type. CAUTION: This option will cause your local disk or partition to be formatted and all existing data will be deleted. 1. Enter the following information when prompted: Field Tips The list of Source Disks or Partitions in the drop-down list contains all the available disks or partitions that are not: Source Disk or Partition l currently mounted l swap disks or partitions l LifeKeeper-protected disks or partitions The drop-down list will also filter out special disks or partitions, for example, root (/), boot (/boot), /proc, floppy and cdrom. 2. The following screen will display if you select a source disk or partition that is not shared. 312Multi-Site Cluster Replicate New File System 3. Select Back to select a different source disk or partition that is shared. Provide the remaining information to finish configuring the SteelEye Protection Suite for Linux Multi-Site Cluster resource Field Tips New Mount Enter the New Mount Point of the new file system. This should be the mount Point point where the replicated disk or partition will be located. New File System Type Select the File System Type. You may only choose from the LifeKeeper supported file system types. DataKeeper Select or enter a unique DataKeeper Resource Tag name for the DataKeeper Resource resource instance. Tag File System Select or enter the File System Resource Tag name for the file system Resource resource instance. Tag SteelEye Protection Suite for Linux313 Replicate New File System Field Tips Select the bitmap file entry from the pull down list. Displayed in the list are all available shared file systems that can be used to hold the bitmap file. The bitmap file must be placed on a shared device that can switch between the local nodes in the cluster. Bitmap File Important: The bitmap file should not reside on a btrfs filesystem. Placing data replication bitmap files on a btrfs filesystem will result in an "invalid argument" error when LifeKeeper tries to configure the mirror. The default location for the bitmap file is under /opt/LifeKeeper. This default location should be changed if /opt/LifeKeeper resides on a btrfs filesystem. 4. Click Next to continue to the Confirmation Screen. 5. A confirmation screen noting the location where the new file system will be created and a warning indicating the pending reformat of the local disk or partition will display. Click Create to begin Resource Creation. 6. LifeKeeper will verify that you have provided valid data to create your resource on a new file system. If LifeKeeper detects a problem, an ERROR will appear in the information box. If the validation is successful, your resource will be created. Note that the creation of the file system may take several minutes depending upon the disk or partition size. Click Next to continue. 7. An information box appears announcing the successful creation of your new replicated file system resource hierarchy. You must Extend the hierarchy to another server in your cluster to begin data replication and in order to place it under LifeKeeper protection. Click Next to extend the resource or click Cancel if you wish to extend your resource at another time. If you click Continue LifeKeeper will launch the Pre-extend Wizard. Refer to Step 2 under Extending Your Hierarchy for details on how to extend your resource hierarchy to another server. 314Multi-Site Cluster Replicate Existing File System Replicate Existing File System This option will unmount a currently mounted file system on a local disk or partition, create a NetRAID device, then re-mount the file system on the NetRAID device. Both the NetRAID device and the mounted file system are placed under LifeKeeper protection. You should select this option if you want to create a mirror on an existing file system and place it under LifeKeeper protection. 1. Enter the following information when prompted: Field Tips Existing Mount Point This should be the mount point to be mounted on the NetRAID device on the primary server. The local disk or partition should already be mounted on this mount point. 2. The following screen will display if you select a mount point that is not shared. 3. Select Back to select a different mount point that is shared. Provide the remaining information to finish configuring the SteelEye Protection Suite for Linux Multi-Site Cluster resource. Field Tips DataKeeper Select or enter a unique DataKeeper Resource Tag name for the DataKeeper Resource resource instance. Tag File System Resource Select or enter the File System Resource Tag name. Tag SteelEye Protection Suite for Linux315 DataKeeper Resource Field Tips Select the bitmap file entry from the pull down list. Displayed in the list are all available shared file systems that can be used to hold the bitmap file. The bitmap file must be placed on a shared device that can switch between the local nodes in the cluster. Bitmap File Important: The bitmap file should not reside on a btrfs filesystem. Placing data replication bitmap files on a btrfs filesystem will result in an "invalid argument" error when LifeKeeper tries to configure the mirror. The default location for the bitmap file is under /opt/LifeKeeper. This default location should be changed if /opt/LifeKeeper resides on a btrfs filesystem. 4. Click Next to create your DataKeeper resource on the primary server. 5. LifeKeeper will verify that you have provided valid data to create your DataKeeper resource. If LifeKeeper detects a problem, an ERROR will appear in the information box. If the validation is successful, your resource will be created. Click Next. 6. An information box appears announcing that you have successfully created an existing replicated file system resource hierarchy. You must Extend the hierarchy to another server in your cluster to begin replication and to place it under LifeKeeper protection. Click Next to extend the resource, or click Cancel if you wish to extend your resource at another time. If you click Continue LifeKeeper will launch the Pre-extend Wizard. Refer to Step 2 under Extending Your Hierarchy for details on how to extend your resource hierarchy to another server. DataKeeper Resource This option will create only the NetRAID device (not a file system) and place the device under LifeKeeper protection. You should select this option if you only want to create a DataKeeper device on a disk or partition and place the device under LifeKeeper protection. You will need to manually make and mount a file system on this device in order to create a readable mirror. You will need one free disk or partition for this resource type. 1. Enter the following information when prompted: 316Multi-Site Cluster DataKeeper Resource Field Tips The list of Source Disks or Partitions in the drop down box contains all the available disks or partitions that are not: Source Disk or Partition l currently mounted l swap type disks or partitions l LifeKeeper-protected disks or partitions The drop down list will also filter out special disks or partitions, for example, root (/), boot (/boot), /proc, floppy and cdrom. Note: If using VMware, see the VMware Known Issue. 2. The following screen will display if you select a source disk or partition that is not shared. 3. Select Back to select a different source disk or partition that is shared. Provide the remaining information to finish configuring the SteelEye Protection Suite for Linux Multi-Site Cluster resource. SteelEye Protection Suite for Linux317 Extending Your Hierarchy Field Tips DataKeeper Select or enter a unique DataKeeper Resource Tag name for the DataKeeper Resource resource instance. Tag Select the bitmap file entry from the pull down list. Displayed in the list are all available shared file systems that can be used to hold the bitmap file. The bitmap file must be placed on a shared device that can switch between the local nodes in the cluster. Bitmap File Important: The bitmap file should not reside on a btrfs filesystem. Placing data replication bitmap files on a btrfs filesystem will result in an "invalid argument" error when LifeKeeper tries to configure the mirror. The default location for the bitmap file is under /opt/LifeKeeper. This default location should be changed if /opt/LifeKeeper resides on a btrfs filesystem. 4. Click Next. 5. An information window appears notifying you that you will have to manually make the file system and mount the NetRAID device (/dev/mdX) before being able to use it. Click Create to create your DataKeeper device on the local disk or partition. 6. An information box appears and LifeKeeper will verify that you have provided valid data to create your DataKeeper resource. If LifeKeeper detects a problem, an ERROR will appear in the information box. If the validation is successful, your resource will be created. Click Next to continue. 7. An information box appears announcing the successful creation of your DataKeeper resource device. You must Extend the hierarchy to another server in your cluster to begin data replication and in order to place it on the backup/target server and under LifeKeeper protection. Click Continue to extend the resource, or click Cancel if you wish to extend your resource at another time. If you click Continue LifeKeeper will launch the Pre-extend Wizard. Refer to Step 2 under Extending Your Hierarchy for details on how to extend your resource hierarchy to another server. Extending Your Hierarchy This operation should be started on the Primary Server to the Secondary Server from the Edit menu or initiated automatically upon completing the Create Resource Hierarchy option in which case you should refer to Step 2 below. 1. On the Edit menu, select Resource then Extend Resource Hierarchy. The Pre-Extend Wizard appears. If you are unfamiliar with the Extend operation, click Next. If you are familiar with the LifeKeeper Extend Resource Hierarchy defaults and want to bypass the prompts for 318Multi-Site Cluster Extending Your Hierarchy input/confirmation, click Accept Defaults. 2. The Pre-Extend Wizard will prompt you to enter the following information. Note: The first two fields appear only if you initiated the Extend from the Edit menu. Field Template Server Tips Select the Template Server where your DataKeeper resource hierarchy is currently in service. It is important to remember that the Template Server you select now and the Tag to Extend that you select in the next dialog box represent an in-service (activated) resource hierarchy. An error message will appear if you select a resource tag that is not in service on the template server you have selected. The drop down box in this dialog provides the names of all the servers in your cluster. Tag to Extend This is the name of the DataKeeper instance you wish to extend from the template server to the target server. The drop down box will list all the resources that you have created on the template server. Target Server Enter or select the server you are extending to. You must select intelligent switchback. This means that after a failover to the backup server, an administrator must manually switch the Multi-Site Cluster hierarchy resource back to the primary server. Switchback CAUTION: This release of DataKeeper for Linux does not support Automatic Type Switchback for DataKeeper resources. Additionally, the Automatic Switchback restriction is applicable for any other LifeKeeper resource that becomes part of the Multi-Site Cluster hierarchy. This includes anything sitting above the hierarchy or becomes a child within the hierarchy. Template Priority Select or enter a Template Priority. This is the priority for the DataKeeper hierarchy on the server where it is currently in service. Any unused priority value from 1 to 999 is valid, where a lower number means a higher priority (1=highest). The extend process will reject any priority for this hierarchy that is already in use by another system. The default value is recommended. Note: This selection will appear only for the initial extend of the hierarchy. Target Priority Select or enter the Target Priority. This is the priority for the new extended DataKeeper hierarchy relative to equivalent hierarchies on other servers. Any unused priority value from 1 to 999 is valid, indicating a server’s priority in the cascading failover sequence for the resource. A lower number means a higher priority (1=highest). Note that LifeKeeper assigns the number “1” to the server on which the hierarchy is created by default. The priorities need not be consecutive, but no two servers can have the same priority for a given resource. 3. After receiving the message that the pre-extend checks were successful, click Next. SteelEye Protection Suite for Linux319 Extending a DataKeeper Resource 4. Depending upon the hierarchy being extended, LifeKeeper will display a series of information boxes showing the Resource Tags to be extended, some of which cannot be edited. Click Next to launch the Extend Resource Hierarchy configuration task. The next section lists the steps required to complete the extension of a DataKeeper resource to another server. Extending a DataKeeper Resource 1. After you have been notified that your pre-extend script has executed successfully, you will be prompted for the following information: Field Tips Enter the name of the file system mount point on the target server. (This dialog Mount Point will not appear if there is no LifeKeeper-protected filesystem associated with the DataKeeper Resource.) Root Tag Select or enter the Root Tag. This is a unique name for the filesystem resource instance on the target server. (This dialog will not appear if there is no LifeKeeper-protected filesystem associated with the DataKeeper Resource.) DataKeeper Resource Select or enter the DataKeeper Resource Tag name. Tag Select the name of the bitmap file used for intent logging. If you choose None, then an intent log will not be used and every resynchronization will be a full resync instead of a partial resync. Bitmap File Important: The bitmap file should not reside on a btrfs filesystem. Placing data replication bitmap files on a btrfs filesystem will result in an "invalid argument" error when LifeKeeper tries to configure the mirror. The default location for the bitmap file is under /opt/LifeKeeper. This default location should be changed if /opt/LifeKeeper resides on a btrfs filesystem. 2. Click Next to continue. An information box will appear verifying that the extension is being performed. 3. Click Finish to confirm the successful extension of your DataKeeper resource instance. 4. Click Done to exit the Extend Resources Hierarchy menu selection. Note: Be sure to test the functionality of the new instance on all servers by performing a manual switchover. See Testing Your Resource Hierarchy for details. At this point, DataKeeper has initiated the data resynchronization from the source to the target disk or partition. In the LifeKeeper GUI, the state of the DataKeeper resource on the target server is set to “Resyncing”. Once the resynchronization is complete, the state will change to “Target” which is the normal Standby condition. 320Multi-Site Cluster Extending a Hierarchy to a Disaster Recovery System During resynchronization, the DataKeeper resource and any resource that depends on it will not be able to fail over. This is to avoid data corruption. Extending a Hierarchy to a Disaster Recovery System This operation can only occur from an ISP node or as the continuation of the creation process for multiple nodes from the Edit menu or initiated automatically upon completing the Create Resource Hierarchy option, in which case you should refer to Step 2 below. 1. On the Edit menu, select Resource then Extend Resource Hierarchy. The Pre-Extend Wizard appears. If you are unfamiliar with the Extend operation, click Next. If you are familiar with the LifeKeeper Extend Resource Hierarchy defaults and want to bypass the prompts for input/confirmation, click Accept Defaults. 2. The Pre-Extend Wizard will prompt you to enter the following information. Note: The first two fields appear only if you initiated the Extend from the Edit menu. Field Target Server Tips Enter or select the server you are extending to. You must select intelligent switchback. This means that after a failover to the backup server, an administrator must manually switch the Multi-Site Cluster hierarchy resource back to the primary server. Switchback CAUTION: This release of SteelEye DataKeeper for Linux does not support Type Automatic Switchback for DataKeeper resources. Additionally, the Automatic Switchback restriction is applicable for any other LifeKeeper resource that becomes part of the Multi-Site Cluster hierarchy. This includes anything sitting above the hierarchy or becomes a child within the hierarchy. Target Priority Template Priority Select or enter the Target Priority. This is the priority for the new extended DataKeeper hierarchy relative to equivalent hierarchies on other servers. Any unused priority value from 1 to 999 is valid, indicating a server’s priority in the cascading failover sequence for the resource. A lower number means a higher priority (1=highest). Note that LifeKeeper assigns the number “1” to the server on which the hierarchy is created by default. The priorities need not be consecutive, but no two servers can have the same priority for a given resource. Select or enter a Template Priority. This is the priority for the DataKeeper hierarchy on the server where it is currently in service. Any unused priority value from 1 to 999 is valid, where a lower number means a higher priority (1=highest). The extend process will reject any priority for this hierarchy that is already in use by another system. The default value is recommended. Note: This selection will appear only for the initial extend of the hierarchy. 3. After receiving the message that the pre-extend checks were successful, click Next. SteelEye Protection Suite for Linux321 Extending a Hierarchy to a Disaster Recovery System Note: Depending upon the hierarchy being extended, LifeKeeper will display a series of information boxes showing the Resource Tags to be extended, some of which cannot be edited. 4. Click Next to launch the Extend Resource Hierarchy configuration task. The next section lists the steps required to complete the extension of a DataKeeper resource to another server. 1. After you have been notified that your pre-extend script has executed successfully, you will be prompted for the following information: Field Tips Enter the name of the file system mount point on the target server. (This dialog Mount Point will not appear if there is no LifeKeeper-protected filesystem associated with the DataKeeper Resource.) Root Tag Select or enter the Root Tag. This is a unique name for the filesystem resource instance on the target server. (This dialog will not appear if there is no LifeKeeper-protected filesystem associated with the DataKeeper Resource.) Select the disk or partition where the replicated file system will be located on the target server. The list of disks or partitions in the drop down box contains all the available disks or partitions that are not: Target Disk or Partition l already mounted l swap disks or partitions l LifeKeeper-protected disks or partitions The drop down list will also filter out special disks or partitions, for example, root (/), boot (/boot), /proc, floppy and cdrom. Note: The size of the target disk or partition must be greater than or equal to that of the source disk or partition. DataKeeper Resource Select or enter the DataKeeper Resource Tag name. Tag Select or edit the name of the bitmap file used for intent logging. If you choose None, then an intent log will not be used, and every resynchronization will be a full resync instead of a partial resync. Bitmap File Important: The bitmap file should not reside on a btrfs filesystem. Placing data replication bitmap files on a btrfs filesystem will result in an "invalid argument" error when LifeKeeper tries to configure the mirror. The default location for the bitmap file is under /opt/LifeKeeper. This default location should be changed if /opt/LifeKeeper resides on a btrfs filesystem. 322Multi-Site Cluster Configuring the Restore and Recovery Setting for Your IP Resource Field Tips Select the pair of local and remote IP addresses to use for replication between the target server and the other indicated server in the cluster. The valid paths and their associated IP addresses are derived from the set of LifeKeeper communication paths that have been defined for this same pair of servers. Due Replication to the nature of DataKeeper, it is strongly recommended that you use a private (dedicated) network. Path If the DataKeeper Resource has previously been extended to one or more target servers, the extension to an additional server will loop through each of the pairings of the new target server with existing servers, prompting for a Replication Path for each pair. Choose “synchronous” or “asynchronous” to indicate the type of replication that should be used between the indicated pair of servers. Replication As for the previous Replication Path field, if the DataKeeper Resource has Type previously been extended to one or more target servers, the extension to an additional server will loop through each of the pairings of the new target server with existing servers, prompting for a Replication Type for each pair. 2. Click Next to continue. An information box will appear verifying that the extension is being performed. 3. Click Finish to confirm the successful extension of your DataKeeper resource instance. 4. Click Done to exit the Extend Resources Hierarchy menu selection. Configuring the Restore and Recovery Setting for Your IP Resource To complete this configuration, you will need configure the Restore and Recovery setting for your IP resource to Disable. This option is displayed in the Properties pane. When the Properties pane is open for an IP resource or the properties for an IP resource are being displayed, this setting is one of three button options. Refer to the IP Recovery Kit for more information regarding this option. Note: Be sure to test the functionality of the new instance on all servers by performing a manual switchover. See Testing Your Resource Hierarchy for details. At this point, SteelEye DataKeeper has initiated the data resynchronization from the source to the target disk or partition once the extend to the disaster recovery node is completed. In the LifeKeeper GUI, the state of the DataKeeper resource on the target server is set to “Resyncing”. Once the resynchronization is complete, the state will change to “Target” which is the normal Standby condition. During resynchronization, the DataKeeper resource and any resource that depends on it will not be able to fail over. This is to avoid data corruption. If you haven’t done so already, make sure you set the confirm failover flags. Refer to the section Confirm Failover and Block Resource Failover Settings for more information about this procedure. SteelEye Protection Suite for Linux323 Migrating to a Multi-Site Cluster Environment Migrating to a Multi-Site Cluster Environment The SteelEye Multi-Site Migrate feature is included in the SteelEye Protection Suite for Linux MultiSite Cluster product. This additional feature enables an administrator to migrate an existing SteelEye Linux LifeKeeper environment to a Multi-Site Cluster Environment. The migration procedure allows selected shared file system’s resources to be safely migrated and replicated with minimum hierarchy downtime. Following are a few important considerations when creating a Multi-Site resource from an existing file system: l The Multi-Site migrate procedure will un-mount the file system during the creation process and remount it on a NETRAID device. l Any applications that depend on this file system will need to be stopped during the create resource procedure. This action is handled by the Migrate procedure; no administration action is required. l Hierarchies containing the following resource types cannot be migrated using the Multi-Site migration feature– NAS (scsi/netstorage), DRBD (scsi/drbd), SDR (scsi/netraid) and MultiSite Cluster resource (scsi/disrec). Requirements Prior to performing a migration, make sure your systems meet the requirements described in the Installation and Configuration section of this document. In addition to the more general SDR requirements outlined in the Installing SDR section, you must have Novell’s SLES 11, SLES 10 or Red Hat Enterprise Linux 5 installed on each system in your cluster. This feature is defined for configurations that have two servers that share a storage device. One of the servers is considered the primary and is located at a primary site. A third server is remote and located at a disaster recovery site. After you have installed the SteelEye Protection Suite for Linux Multi-Site Cluster on the primary node and other shared storage nodes, there is no additional installation or configuration required to take advantage of the Migrate feature. Before You Start The following image depicts a file system resource hierarchy prior to performing a migrate. 324Multi-Site Cluster Performing the Migration Performing the Migration There are three methods for configuring and performing a Multi-Site Migrate. You can: l Select the Migrate icon from the LifeKeeper GUI toolbar resource to migrate. and then select the l Select the file system resource and right-click the mouse to display the Migrate Hierarchy to Multi-Site Cluster menu option. SteelEye Protection Suite for Linux325 Performing the Migration l Select the file system resource and select the Migration icon from the Properties Panel toolbar. 326Multi-Site Cluster Performing the Migration If you initiate the Migrate from the global toolbar icon, the following dialog box will display: 1. Select the server where the hierarchy to migrate exists and is in-service. Click Next. SteelEye Protection Suite for Linux327 Performing the Migration 2. Select the root hierarchy tag that will be migrated and click Next. The root tag can be a file system or other application resource. The tag selected (for non-file system resources) must contain a file system dependent resource. If you select a File System in the LifeKeeper GUI window and select Migrate Hierarchy to Multi-Site Cluster from the pop-up window or the Migrate icon in the Properties Panel Migrate icon, the following initialization screen displays. 328Multi-Site Cluster Performing the Migration 3. Press Continue when the Continue button is enabled. The following bitmap dialog will display. SteelEye Protection Suite for Linux329 Performing the Migration 4. Select a bitmap file for the file system you are migrating. Select Next. Important: Once you select Next, you will not be able to change the Bitmap File Selection for this file system resource. 330Multi-Site Cluster Performing the Migration 5. Select the second bitmap file for the second file system being migrated within the hierarchy. After selecting the first bitmap file in the previous dialog box, any additional file system tags will be displayed so that the user can enter a unique bitmap file for each additional file system tag. Note: This screen will not appear if there is only one file system being migrated. Also, multiple screens similar to this will exist if there are more than two file systems being migrated. 6. Select Next, a summary screen similar to the one below will display. SteelEye Protection Suite for Linux331 Performing the Migration 7. This Summary screen displays all the configuration information you’ve submitted during the Migrate procedure. Once you select Migrate, the following screen displays. 332Multi-Site Cluster Performing the Migration 8. The Migration status will display in this window. Press Finish when the Finish button is enabled. SteelEye Protection Suite for Linux333 Successful Migration Successful Migration The following image is an example of a file system resource hierarchy after the Multi-Site migration is completed. At this time, the hierarchy can be extended to the non-shared node (megavolt). 334Multi-Site Cluster Successful Migration SteelEye Protection Suite for Linux335 Troubleshooting This section provides information regarding issues that may be encountered with the use of DataKeeper for Linux. Where appropriate, additional explanation of the cause of an error is provided along with necessary action to resolve the error condition. Messages specific to DataKeeper for Linux can be found in the DataKeeper Message Catalog. Messages from other SPS components are also possible. In these cases, please refer to the Combined Message Catalog. Both of these catalogs can be found on our Technical Documentation site under “Search for an Error Code” which provides a listing of all error codes, including operational, administrative and GUI, that may be encountered while using SteelEye Protection Suite for Linux and, where appropriate, provides additional explanation of the cause of the error code and necessary action to resolve the issue. This full listing may be searched for any error code received, or you may go directly to one of the individual Message Catalogs for the appropriate SPS component. The following table lists possible problems and suggestions. Symptom Suggested Action Deleting a DataKeeper resource will not delete the NetRAID device if the NetRAID device not NetRAID device is mounted. You can manually unmount the device and deleted after delete it by executing: DataKeeper mdadm –S <md_device> (cat /proc/mdstat to determine the <md_ resource deletion. device>). Installation/HADR rpm fails See the Installation section for complete instructions on manually installing these files. Errors during failover Check the status of your device. If resynchronization is in progress you cannot perform a failover. After primary server panics, DataKeeper resource goes ISP on the secondary server, but when primary server reboots, the DataKeeper resourc e becomes OSF on both servers. Check the “switchback type” selected when creating your DataKeeper resource hierarchy. Automatic switchback is not supported for DataKeeper resources in this release. You can change the Switchback type to “Intelligent” from the resource properties window. SteelEye Protection Suite for Linux337 Troubleshooting Symptom Suggested Action Primary server cannot bring the resource ISP when it reboots after both servers became inoperable. If the primary server becomes operable before the secondary server, you can force the DataKeeper resource online by opening the resource properties dialog, clicking the Replication Status tab, clicking the Actions button, and then selecting Force Mirror Online. Click Continue to confirm, then Finish. Error creating a DataKeeper hierarchy on currently mounted NFS file system You are attempting to create a DataKeeper hierarchy on a file system that is currently exported by NFS. You will need to replicate this file system before you export it. DataKeeper GUI wizard does not list a newly created partition The Linux OS may not recognize a newly created partition until the next reboot of the system. View the /proc/partitions file for an entry of your newly created partition. If your new partition does not appear in the file, you will need to reboot your system. This is a “split-brain” scenario that can be caused by a temporary communications failure. After communications are resumed, both systems assume they are primary. DataKeeper will not resync the data because it does not know which system was the last primary system. Manual intervention is required. If not using a bitmap: You must determine which server was the last backup, then take the resource out of service on that server. DataKeeper will then perform a FULL resync. Resources appear green (ISP) on both primary and backup servers. If using a bitmap (2.6.18 and earlier kernel): You should take both resources out of service, starting with the original backup node first. You should then dirty the bitmap on the primary node by executing: $LKROOT/lkadm/subsys/scsi/netraid/bin/bitmap –d /opt/LifeKeeper/bitmap_filesys (where /opt/LifeKeeper/bitmap_filesys is the bitmap filename). This will force a full resync when the resource is brought into service. Next, bring the resource into service on the primary node and a full resync will begin. If using a bitmap (2.6.19 and later kernel or with RedHat Enterprise Linux 5.4 kernels 2.6.18-164 or later or a supported derivative of RedHat 5.4 or later): You must determine which server was the last backup, then take the resource out of service on that server. DataKeeper will then perform a partial resync. 338Troubleshooting Troubleshooting Symptom Core - Language Environment Effects Core - Shutdown hangs on SLES10 systems Suggested Action Some LifeKeeper scripts parse the output of Linux system utilities and rely on certain patterns in order to extract information. When some of these commands run under non-English locales, the expected patterns are altered and LifeKeeper scripts fail to retrieve the needed information. For this reason, the language environment variable LC_MESSAGES has been set to the POSIX “C” locale (LC_MESSAGES=C) in/etc/default/LifeKeeper. It is not necessary to install Linux with the language set to English (any language variant available with your installation media may be chosen); the setting of LC_MESSAGES in /etc/default/LifeKeeper will only influence LifeKeeper. If you change the value of LC_MESSAGES in /etc/default/LifeKeeper, be aware that it may adversely affect the way LifeKeeper operates. The side effects depend on whether or not message catalogs are installed for various languages and utilities and if they produce text output that LifeKeeper does not expect. When running shutdown on an AMD64 system with SLES10, the system locks up and the shutdown does not complete. This has been reported to Novell via bug #294787. The lockup appears to be caused by the SLES10 powersave package. Workaround: Remove the SLES10 powersave package to enable shutdown to complete successfully. GUI - GUI login prompt may not reappear when reconnecting via a web browser after exiting the GUI GUI - lkGUIapp on RHEL5 reports unsupported theme errors When you exit or disconnect from the GUI applet and then try to reconnect from the same web browser session, the login prompt may not appear. Workaround: Close the web browser, re-open the browser and then connect to the server. When using the Firefox browser, close all Firefox windows and re-open. When you start the GUI application client, you may see the following console message: /usr/share/themes/Clearlooks/gtk-2.0/gtkrc:60: Engine "clearlooks" is unsupported, ignoring This message comes from the RHEL 5 and FC6 Java platform look and feel and will not adversely affect the behavior of the GUI client. SteelEye Protection Suite for Linux339 Troubleshooting Symptom Suggested Action On SLES 10 SP2, netstat is broken due to a new format in /proc/<PID>/fd. This issue is due to a SLES 10 SP2 kernel bug and has been fixed in kernel update version 2.6.16.60-0.23. Data Replication GUI does not show proper state on SLES 10 SP2 system Data Replication Size limitation on 32-bit machines Solution: Please upgrade to kernel version 2.6.16.60-0.23 if running on SLES 10 SP2. Note: Beginning with SPS 8.1, when performing a kernel upgrade on RedHat Enterprise Linux systems, it is no longer a requirement that the setup script (./setup) from the installation image be rerun. Modules should be automatically available to the upgraded kernel without any intervention as long as the kernel was installed from a proper RedHat package (rpm file). When trying to replicate a drive larger than 2 TB on a 32-bit machine, the following error may occur: Negotiation: ..Error: Exported device is too big for me. Get 64-bit machine Solution: If using SteelEye DataKeeper on a 32-bit machine, you cannot replicate a driver that is greater than 2 TB in size. During the DataKeeper create process, the disk IDs of virtual hard disks are not appearing in the drop-down box which should contain all disks or partitions available for replication. Device IDs of VMware guests missing in /dev/disk/by-id VMware Device IDs are not being placed into /dev/disk/by-id, therefore DataKeeper cannot determine what their correct IDs are. Workaround: Manually add the drive to the following file: /opt/LifeKeeper/subsys/scsi/resources/DEVNAME/devic e_pattern 340Troubleshooting Index Index A Active/Active 42 Active/Standby 43 Adapter Options 9 Administration 127 API 126 Asynchronous Mirroring 256 Automatic LifeKeeper Restart Disabling 172, 212 Enabling 171, 211 Automatic Switchback 44 B Bitmap File 285 Block Resource Failover 279 Browser Security Parameters 168 btrfs Filesystem 285, 314, 316, 318, 320, 322 C Command Line Mirror Administration 300 Monitoring Mirror Status 302 Communication Paths Creating 128 Deleting 129 Firewall 207 Heartbeat 40 Compression Level 299 SteelEye Protection Suite for Linux341 Index Configuration 61 Application 79 Concepts 40 Data Replication 78 General 266 Network 79 Verify Network Configuration 26 Network and LifeKeeper 266 Optional Tasks 71 Shared Storage 25 Steps 61 Storage and Adapter 80 Values 201 Confirm Failover 278 CONFIRM_SO Disabling Reservations 103 Connecting Servers and Shared Storage 25 Servers to a Cluster 173 Core 38 Credentials 125 Custom Certificates 74 D Data Replication Path 267 Database Applications 28 Dialogs Cluster Connect 183 Cluster Disconnect 183 Resource Properties 184 342Troubleshooting Index Server Properties 185 Disconnecting 173 E Environment Setup 25 Error Detection 127 Event Email Notification 67 Configuration 69 Overview 63 Troubleshooting 70 Event Forwarding via SNMP 63 Configuration 65 Overview 63 SNMP Troubleshooting 67 F Failover Scenarios 261 Fault Detection and Recovery 55 IP Local Recovery 55 Resource Error Recovery Scenario 57 Server Failure Recovery Scenario 59 Fencing Alternative Methods 115 I/O Fencing Chart 104 Introduction 103 File Systems 39 Firewall Running LifeKeeper GUI Through Firewall 209 Running LifeKeeper with Firewall 207 Flags 280 SteelEye Protection Suite for Linux343 Index Force Mirror Online 296 G Generic Applications 39 GUI Adding Icon to Desktop Toolbar 71 Configuring 158 Configuring Users 161 Exiting 170 Overview 156 Running on LifeKeeper Server 167 Running on Remote System 165 Software Package 147 Starting 160 Stopping 160 Viewing GUI Server Processes 172 H Hardware 40 Health Monitoring 203 I In Service 190 Installation 29 Command Line 29 License 31 Verify 34 Intelligent Switchback 44 INTERFACELIST 228 Internet Host ID 34 Introduction How It Works 256 344Troubleshooting Index Mirroring 255 IP Addresses 39 J Java Plug-in 165 Security Policy 162 L LCD Interface (LCDI) 192 License 31 LifeKeeper Alarm Interface 200 LifeKeeper Communications Manager (LCM) 199 Alarming and Recovery 200 Status Information 200 LifeKeeper Configuration Database (LCD) 192 Commands 192 Configuration Data 195 Directory Structure 196 Flags 196 Resource Types 196 Resources Subdirectories 197 Structure of LDC Directory in /opt/LifeKeeper 198 LifeKeeper Recovery Action and Control Interface (LRACI) 39 lkbackup Broken Equivalencies 226 With SDR 232 lkpolicy Tool 123 M Manual Failover Confirmation 71, 278 Mapping Server Configurations 7 SteelEye Protection Suite for Linux345 Index Menus 148 Edit Menu - Resource 150 Edit Menu - Server 151 File 150 Help 152 Resource Context 148 Server Context 149 View 151 Message Bar 170 Mirror Administration Command Line 300 GUI 294 Mirror Status Monitoring via Command Line 302 Viewing 293 Multi-Site Cluster 309 Before You Start 324 Configuration Considerations 310 File System Replicate Existing 315 Replicate New 312 Migration Performing 325 Successful 334 Overview 309 Requirements 324 Resource Hierarchy Creating 311 Extending 318 Extending to Disaster Recovery System 321 346Troubleshooting Index Restore and Recover 323 Restrictions 311 N N-Way Recovery 127 Nested File System 233 Network Bandwidth Determine Requirements 267 Measuring Rate of Change 267 O Out of Service 191 Output Panel 169 P Packaging 1, 5 Pause and Resume 296 Properties Panel 169 Protected Resources 37 Q Quorum/Witness 106 Actions When Quorum is Lost 110 Configurable Components 107 Disabling Reservations 103 Installation and Configuration 107 Quorum Modes 108 Shared Witness 110 Witness Modes 109 R Rate of Change 267 RAW I/O 39 SteelEye Protection Suite for Linux347 Index Recovery After Failover 206 Non-Killable Process 252 Out-of-Service Hierarchies 252 Panic During Manual Recovery 252 Server Failure 251 Removing LifeKeeper 206 Requirements DataKeeper 78 Firewall 207 Hardware 265 Quorum/Witness Package 106 Software 265 STONITH 115 Storage and Adapter 8 Reservations Disabling 103 SCSI 114 Resource Dependency Creating 141 Deleting 142 Resource Hierarchies 45 Collapsing Tree 182 Creating 131, 284 File System 132 Generic Application 134 Raw Device 135 Deleting 143, 289 Example 49 Expanding Tree 182 348Troubleshooting Index Extending 138, 286 File System 139 Generic Application 139 Raw Device 140 Hierarchy Relationships 47 In Service 290 Information 48 Maintaining 205 Out of Service 289 Testing 290 Transferring 212 Unextending 140, 288 Resource Policy Management 120 Resource Priorities 136 Resource Properties 136 Resource States 46 Resource Types 45 Resynchronization 303 Avoiding Full 304 Rewind Create and View Rewind Bookmarks 295 Rewind and Recover Data 296 Set Rewind Log Location 299 Set Rewind Log Max Size 299 S Server Failure 303 Server Groups 40 Server Properties Editing 128 SteelEye Protection Suite for Linux349 Index Failover 130 Viewing 175 Shared Communication 41 Shared Data Resources 40 Shared Equivalencies 47 Starting LifeKeeper 170, 210 Status Display Detailed 49 Short 54 Status Table 168 STONITH Disabling Reservations 103 Stopping LifeKeeper 171, 211 Storage Options 9 Switchable IP Address 27 Synchronous Mirroring 256 System Date and Time 247 T Tag Name Restrictions 252 Valid Characters 252 Technical Notes 212 Technical Support 3 Toolbars 152 GUI 152 Resource Context 154 Server Context 156 Troubleshooting 221, 337 Communication Paths 248 350Troubleshooting Index GUI Troubleshooting 243 Incomplete Resource Created 248 Incomplete Resource Priority Modification 248 Known Issues 221 Restrictions 221 TTY Connections 62 U Upgrading 34 V View Options 179 Viewing Connected Servers 174 Message History 181 Resource Properties 178 Resource Tags and IDs 176 Server Log Files 175 Server Properties 175 Status of a Server 174 Status of Resources 176 VMware Known Issue 340 W Watchdog Disabling Reservations 103 SteelEye Protection Suite for Linux351