1
TurboDyne Series
AXIS
Self-Powered Safety Hub with AM/FM/Weather
Alert Radio and USB Cell Phone Charger
OWNER’S MANUAL
AXIS OWNER’S MANUAL
DO YOU NEED HELP?
If you need help, please contact us, Monday-Friday, 8:00
a.m.-4:30 p.m., North American Pacific Time. 1-800-872-2228
from the U.S; 1-800-637-1648 from Canada; 650-903-3866,
worldwide; FAX: 650-903-3867; web site, www.etoncorp.
com; Etón Corporation, 1015 Corporation Way, Palo Alto, CA
94303, USA
WARNING
UÊÊÌÊiÝ«ÃiÊÌ
ÃÊ>««>ViÊÌÊÀ>ÊÀÊÃÌÕÀi°Ê
UÊÊÌÊÃÕLiÀ}iÊÀÊiÝ«ÃiÊvÀÊiÝÌi`i`Ê«iÀ`ÊÌÊÜ>ÌiÀ°
UÊ*ÀÌiVÌÊvÀÊ
}
Ê
Õ`ÌÞÊ>`ÊÀ>°
UÊ1«Õ}Êi`>ÌiÞÊvʵÕ`Ê
>ÃÊLiiÊëi`ÊÀÊvÊ>ÊLiVÌÊ
has fallen into the apparatus.
UÊ
i>ÊÞÊÜÌ
Ê>Ê`ÀÞÊVÌ
°ÊÊÊÌÊÕÃiÊ`iÌiÀ}iÌÃÊÀÊ
chemical solvents as this might damage the finish.
UÊ1«Õ}Ê>`Ê`ÃViVÌÊiÝÌiÀ>Ê>Ìi>ÃÊÌÊVÕ`i`®Ê
during lightning storms.
UÊÊÌÊÀiÛiÊVÛiÀÊQÀÊL>VR°
UÊ,iviÀÊÃiÀÛV}ÊÌʵÕ>wi`ÊÃiÀÛViÊ«iÀÃi°
ENVIRONMENT
Disposal
VVÀ`}ÊÌÊÌ
iÊÕÀ«i>ÊÀiVÌÛiÊÓääÓÉÈÉ
Ê>ÊiiVÌÀV>Ê>`Ê
electronic products must be collected separately by a local collection
system. Please act according to your local rules and do not dispose of
your old products with your normal household waste.
Please dispose of all types of batteries per your Government,
State or Local rules and/or regulations. If you are unsure,
please call the appropriate local authority to find out how to
dispose of them safely and help protect the environment.
3
AXIS OWNER’S MANUAL
FUNCTION KEYS
Tune and Volume Knob
Power/Dynamo/Battery/
Cell Phone Charger
Weather Alert
LED Flashlight/
Flashing beacon
Set (Alarm/Time)
Up/Down
Alarm
AM/FM/NOAA
Weather Band Tuner
USB Cell Phone Charger
Mini USB
(DC-IN)
AUX Audio-In
Headphone Jack
4
AXIS OWNER’S MANUAL
TURNING THE AXIS ON/OFF
/
iÊ8-ÊÃÊ«ÜiÀi`ÊLÞÊÎÊÊL>ÌÌiÀiÃÊBATT®Ê>`Ê
Ì
iÊÀiV
>À}i>LiÊL>ÌÌiÀÞÊDYN®ÊÌ
>ÌÊ«Õ}ÃÊÃ`iÊÌ
iÊ
battery compartment.
To turn the radio on, press the BATT button or the DYN
LÕÌÌÊvÀÌÊÀ}
ÌÊÃ`i®Ê>`ÊÌ
iÊ«ÀiÃÃÊPOWERÊLÕÌÌÊ
ÜÌ
ÊÌ
iÊVÀViÊ>`ÊÛiÀÌV>Êi®°
THE POWER BUTTON
The POWER button is located on the front right side of the
radio and has a circle with the vertical line through it. Press
this button to turn the radio on.
VOLUME CONTROL
/ÕÀÊÌ
iÊVÌÀÊL]Ê>Lii`ÊVOL, to control the volume. Scroll
Ì
iÊLÊÕ«ÊÌÊÀ>ÃiÊÌ
iÊÛÕiÆÊÃVÀÊÌÊ`ÜÊÌÊÜiÀÊÛÕi°Ê
Always turn down the volume before using earphones.
USING BATTERY POWER
Insert 3 AAA batteries, press the BATTÊLÕÌÌÊvÀÌÊÀ}
ÌÊÃ`iÊvÊ
À>`®Ê>`ÊÌ
iÊ«ÀiÃÃÊÌ
iÊPOWER button to turn the radio on.
5
AXIS OWNER’S MANUAL
USING AND CHARGING THE
RECHARGABLE BATTERY
/
iÊÀiV
>À}i>LiÊ ÊViiÌ>Ê
Þ`À`i®ÊL>ÌÌiÀÞÊÃÊV>Ìi`Ê
in the battery compartment. To use it, plug the battery into the
ÃViÌÊ>`>ViÌÊÌÊÌ]Ê«ÀiÃÃÊÌ
iÊDYNÊLÕÌÌÊvÀÌÊÀ}
ÌÊÃ`iÊvÊ
À>`®Ê>`ÊÌ
iÊÌ
iÊPOWER button. You may have to charge the
L>ÌÌiÀÞ°Ê/Ê`ÊÌ
Ã]ÊëÞÊÌÕÀÊÌ
iÊVÀ>ÊvÀÊäÊÃiV`ðÊ9ÕÊV>Ê
>ÃÊV
>À}iÊÛ>ÊÊ1-ÊV>Ìi`ÊÕ`iÀÊ
Êx6®ÊÊÌ
iÊL>VÊvÊ
the radio. After charging, press DYN and then POWER. After a
few years the rechargeable battery will eventually lose its ability to
hold a charge. Contact Etón Corporation to order a replacement.
7
iÊVÀ>ÊV
>À}}ÊÌ
iÊ ÊL>ÌÌiÀÞ]ÊÌ
iÊL>ÌÌiÀÞÊV
>À}iÊ
`V>ÌÀÊV>Ìi`ÊÊvÀÌÊÀ}
ÌÊÃ`iÊvÊÀ>`®ÊÌÕÀÃÊÀi`°Ê7
iÊ
charging the battery with the USB cord, the charging light turns
red while charging and turns green when fully charged.
A fully charged rechargeable Ni-MH battery will play for about 4
ÌÊxÊ
ÕÀÃ]Ê>ÌÊÜÊÛÕi°Ê
À>ÊV
>À}}ÊvÀÊ£ÊÕÌiÊÜÊ«>ÞÊ
the radio for about 5 minutes, at low volume.
Warning: If you have the rechargeable battery unplugged,
`ÊÌÊÌÕÀÊÌ
iÊVÀ>]Ê>ÃÊÌ
ÃÊV>ÊV>ÕÃiÊÛiÀ>`ÊÌÊÌiÀ>Ê
components, and possibly damage them.
6
AXIS OWNER’S MANUAL
USING THE DC-IN (5V) USB CORD
A USB charging cord is included. Plug the large USB plug into your
V«ÕÌiÀ½ÃÊ1-ÊÃViÌÊV«ÕÌiÀÊÕÃÌÊLiÊÌÕÀi`Ê®ÊÀÊÌÊ>Ê
Ê
>`>«ÌiÀÊÌÊVÕ`i`®ÊÜÌ
Ê>Ê1-ÊÃViÌÊÊÌÊÕÃÌÊÃÕ««ÀÌÊx6Êxää®]Ê
available at most electronics retailers. Plug the mini-USB plug into the
ÊÃViÌÊV>Ìi`ÊÕ`iÀÊÌ
iÊÌ«ÊÀÕLLiÀÊVÛiÀÊÊÌ
iÊL>VÊvÊÌ
iÊ
À>`®°Ê/Ê«>ÞÊÌ
iÊÀ>`ÊÜÌ
ÕÌÊV
>À}}ÊÌ
iÊÀiV
>À}i>LiÊL>ÌÌiÀÞ]Ê
press BATT and then POWERÊLÕÌÌÊÜÌ
ÊVÀViÊ>`ÊÛiÀÌV>Êi®°Ê/Ê
play the radio and charge the rechargeable battery, press DYN and
then press POWER°ÊÊvÕÊV
>À}iÊÃÊ>VµÕÀi`Ê>vÌiÀÊ>LÕÌÊnÊ
ÕÀÃÊvÊ
charging. The radio can be played while it’s charging.
LCD BACKLIGHT
>V
ÊÌiÊ>ÊLÕÌÌÊÃÊ«ÀiÃÃi`]ÊÌ
iÊ
ÊL>V}
ÌÊÌÕÀÃÊÊ
for about 10 seconds.
SELECTING BANDS AND
TUNING IN STATIONS
The AXIS plays AMÊxÓä£Ç£äÊâ®]ÊFMÊnÇ°x£änÊâ®Ê>`Ê
seven NOAA Weather channels:
Select AM, FM or WB1-WB7ÊÜÌ
ÊÌ
iÊL>`ÊLÊÊÌ
iÊivÌÊ
side of the radio.
When listening to FMÊ>`Ê7i>Ì
iÀÊV
>iÃ]ÊiÝÌi`ÊÌ
iÊ
telescopic antenna all the way up. When tuning AM stations
the telescopic antenna is not needed and can be lowered.
Tune into stations by scrolling the TUNEÊL°
7
AXIS OWNER’S MANUAL
/
iÊÜi>Ì
iÀÊvÀiµÕiViÃÊ>ÀiÊÊV
>iÃÊ7£ÊÌ
ÀÕ}
Ê7Ç°Ê
ÃiÊ>ÊÃÌ>ÌÊÜÌ
ÊÌ
iÊLÊÊÌ
iÊivÌÊÃ`iÊvÊÌ
iÊÀ>`°Ê
Try all of them and find the one with the strongest signal; the
strongest signal is your weather station. In most communities
ÞÊiÊV
>iÊÜÊLiÊ
i>À`°Ê/
iÊvÀiµÕiViÃÊ>ÃÃV>Ìi`ÊÜÌ
Ê
them are:
WEATHER BAND CHANNELS
>iÊ£ÊÊÊÊ£ÈÓ°{ääÊ
â
>iÊÓÊÊÊÊ£ÈÓ°{ÓxÊâ
>iÊÎÊÊÊÊ£ÈÓ°{xäÊ
â
>iÊ{ÊÊÊÊ£ÈÓ°{ÇxÊâ
>iÊxÊÊÊÊ£ÈÓ°xääÊ
â
>iÊÈÊÊÊÊ£ÈÓ°xÓxÊâ
>iÊÇÊÊÊÊ£ÈÓ°xxäÊâÊ
THE NOAA ALERT FEATURE
After you have tuned into your local weather channel, the
radio can be set to the alert function by pressing the ALERT
LÕÌÌÊLiÜÊ>`ÊÀ}
ÌÊvÊÌ
iÊ
®°Ê7
iÊ«ÀiÃÃi`]ʼALERT’
flashes on the right of the display. This function turns off the
ÃÕ`]ÊLÕÌÊVÌÕiÃÊÌÊÌÀÊÌ
iÊ "ÊvÀiµÕiVÞ°ÊvÊ>Ê
>iÀÌÊÃÊLÀ>`V>ÃÌ]ÊÌ
iÊÃÕ`ÊÌÕÀÃÊL>VÊÊ>ÕÌ>ÌV>Þ]Ê
enabling you to hear the alert broadcast. To turn Alert off,
press ALERTÊ>}>Ê>`ʼALERT’ disappears from the display.
NOTE: While ALERTÊÃÊÃiiVÌi`]ÊÊÌ
iÀÊÃÌ>ÌÃÊiÝVÕ`}Ê
®ÊV>ÊLiÊÌÕi`ÊÊÀÊÀiViÛi`°
8
AXIS OWNER’S MANUAL
CHARGING CELL PHONES
If your cell phone has a USB charging cord, you can use it. If not,
you can purchase one from www.iGo.com, or call 1-888-205-0093.
To purchase a charging tip and cord for your cell phone, go to
www.iGo.com, or call 1-888-205-0093. Purchase USB charging
cable model# PS00271-0003 and have the brand and model of
your cell phone ready to purchase the tip.
To use the cell phone’s USB charging cord, connect it to the
À>`½ÃÊ>À}iÊ1-ÊÃViÌÊV>Ìi`ÊÕ`iÀÊÌ
iÊÀÕLLiÀÊVÛiÀÊÊ
Ì
iÊL>VÊvÊÌ
iÊÀ>`°®Ê*ÀiÃÃÊÌ
iÊCELL button and the battery
«ÜiÀÊÜÊ`ÀiVÌÞÊ`Õ«ÊV
>À}iÊÌÊÞÕÀÊViÊ«
i°Ê/
iÊÝÃÊ
will only charge your cell phone if the battery indicator shows
it at half full, or two bars. To charge your cell phone with a low
L>ÌÌiÀÞ]ÊÌÕÀÊÌ
iÊVÀ>ÊvÀÊÇÊÕÌiÃÊ>ÌÊ£ÎäÊÀ«ÊÌÊV
>À}iÊÌ
iÊ
Viʫ
iÊiÕ}
ÊÌÊÌ>ÊvÀÊ>LÕÌÊxÊÕÌiðÊ
/
iÊÝÃÊ
>ÃÊ>ÊÜÊÛÌ>}iÊ«ÀÌiVÌÊVÀVÕÌÊÌÊ>Û`ÊÌ
iÊL>ÌÌiÀÞÊ
from dropping too low in voltage from cell phone charging. If the
L>ÌÌiÀÞÊÃÞLÊÊÌ
iÊ
Ê`ë>ÞÊÃ
ÜÃÊÌ
ÀiiÊL>ÀÃ]ÊÌÊV>ÊÃÕ««ÀÌÊ
Viʫ
iÊV
>À}}°Ê7
iÊÌ
iÊL>ÌÌiÀÞÊÃÞLÊÃÊL}]ÊÌÊÃÌ«ÃÊ
charging your cell phone and you are urged to re-charge the battery
ÕÌÊÌ
iÊL}ÊÃÌ«ÃÊÃÊÌ
>ÌÊViÊ«
iÊV
>À}}ÊV>ÊÀiÃÕi°
9
AXIS OWNER’S MANUAL
CHARGING CELL PHONES (continued)
To charge your cell phone:
1.
2.
3.
4.
Press DYN°Ê>iÊÃÕÀiÊÌ
>ÌÊÌ
iÊL>ÌÌiÀÞÊÃÞLÊ
>ÃÊÌ
ÀiiÊ
L>ÀðÊvÊÌÊ`iýÌÊÀÊvÊ̽ÃÊL}ÊÌÊÕÃÌÊLiÊV
>À}i`ÊLÞÊ
VÀ>}ÊÀÊÜÌ
Ê>Ê
Ê>`>«ÌiÀÊÕÌÊÌÊÃÌ«ÃÊL}°Ê
Plug the USB cell phone charging cord into the PHONE
,,ÊÃViÌÊÕ`iÀÊÌ
iÊÀÕLLiÀÊVÛiÀÊÊÌ
iÊL>VÊ
vÊÌ
iÊÀ>`®°
Plug the other end of the cord into the cell phone.
Press the button labeled CELLÊ>`ʼ
½ÊÜÊ>««i>ÀÊÊÌ
iÊ
ÜiÀÊÀ}
ÌÊVÀiÀÊvÊÌ
iÊ
Ê`ë>Þ°Ê/
iÊViÊ«
iÊÃ
Õ`Ê
start charging and show charging on its display.
After about 20 minutes of charging, the cell phone should have
>ÊÌ>ÊÌiÊvÊÓäÊÌÊÓxÊÕÌiðÊ
If you don’t have time to charge the radio’s rechargeable battery
you can still charge your cell phone by pressing DYN and turning
Ì
iÊVÀ>ÊvÀÊÇÊÕÌiðÊ7Ì
ÊÞÕÀÊViÊ«
iÊ«Õ}}i`Ê]Ê«ÀiÃÃÊ
CELL and charge the cell phone for about 5 minutes, after which
ÞÕÊV>ÊÌ>ÊvÀÊ>LÕÌÊÈÊÕÌiðÊ
10
AXIS OWNER’S MANUAL
SETTING THE TIME AND ALARM
To set the time:
1.
2.
3.
4.
5.
È°Ê
7.
With the radio turned off, press the SETÊLÕÌÌÊÌ
iÊvÕÀÌ
Ê
LÕÌÌÊvÀÊÌ
iÊivÌ]ÊÕ`iÀÊÌ
iÊ`ë>Þ®ÊvÀÊiÊÃiV`°Ê
While the hour flashes press the UP or DOWN buttons
Ì
iÊÎÀ`Ê>`ÊÓ`ÊLÕÌÌÊvÀÊÌ
iÊivÌ]ÊÕ`iÀÊÌ
iÊ`ë>Þ®Ê
to set the hour.
Press SET again.
While the minute flashes press the UP or DOWN buttons
to set the minutes.
Press SET again.
vÊÞÕÊÜÃ
ÊÌÊV
>}iÊÌ
iÊVVÊ`iÊvÀÊ£ÓÊÌÊÓ{Ê
ÕÀÃÊ
or vice versa, press the UP or DOWN buttons to change it
from the one displayed to the other.
Press SETÊÌÊw>âiÊÌ
iÊÌiÊÃiÌÌ}°
To set the alarm:
1.
2.
3.
4.
5.
6.
7.
With the radio turned off, press the ALARM button
ÌÊÌ
iÊv>ÀÊivÌÊÃ`iÊÕ`iÀÊÌ
iÊ`ë>Þ®ÊÃÊÌ
>Ìʼ,½Ê
appears at the top of the display.
Press SETÊÌÊ>iÊÌ
iÊ
ÕÀÊy>Ã
°ÊÊ
While the hour flashes, press the UP or DOWN buttons
to set the alarm hour.
Press SETÊÌÊ>iÊÌ
iÊÕÌiÃÊy>Ã
°Ê
While the minute flashes, press the UP or DOWN buttons
to set the alarm minutes.
Press SETÊÌÊw>âiÊÌ
iÊ>>ÀÊÃiÌÌ}°Ê
Press ALARM again to deactivate the alarm.
11
AXIS OWNER’S MANUAL
TURNING THE ALARM ON AND OFF
With the radio on or off press the ALARM button. Notice that
Ü
iÊ̽ÃÊ]ʼ,½Ê>««i>ÀÃÊ>ÌÊÌ
iÊÌ«ÊvÊÌ
iÊ`ë>Þ°Ê7
iÊ
̽ÃÊvv]ʼ,½Ê`Ã>««i>Àð
USING THE FLASHLIGHT
AND EMERGENCY LIGHT
Use the ON/OFF/ ” “ switch on the top left of the radio
to turn these lights on and off. The ON position turns on a
flashlight. The ” “ position turns on a flashing red light.
The OFF position turns the lights off.
EARPHONE JACK
The AUDIO-OUTÊÃViÌÊÃÊÕ`iÀÊÌ
iÊÜiÀÊÀÕLLiÀÊVÛiÀÊÊ
Ì
iÊL>VÊvÊÌ
iÊÀ>`°Ê*Õ}ÊÊ>ÞÊÃÌiÀiÊi>À«
iðÊÕ`ÊÃÊ
heard in mono only. Always turn down the volume before
plugging in earphone/headphones.
AUDIO-IN SOCKET
The AUDIO-INÊÃViÌÊÃÊV>Ìi`ÊÕ`iÀÊÌ
iÊÜiÀÊÀÕLLiÀÊ
VÛiÀÊÊÌ
iÊL>VÊvÊÌ
iÊÀ>`°ÊÌÊi>LiÃÊÞÕÊÌÊÃÌiÊÌÊ
other devices, such as MP3 players, using a stereo 3.5 mm
£ÉnÊV
®ÊViVÌÀÊVÀ`°
12
AXIS OWNER’S MANUAL
RESETTING THE AXIS
vÊÌ
iÊÝÃÊiÛiÀÊÃÌ«ÃÊÜÀ}ÊÀÊܽÌÊÌÕÀÊ]ÊÕÃÌÊÀiÃiÌÊÌ°Ê
Remove your AAA batteries and unplug the rechargeable
L>ÌÌiÀÞ°ÊiÌÊÌ
iÊÀ>`ÊÃÌÊvÀÊÎäÊÕÌiÃ]ÊÌ
iÊ«ÕÌÊÌ
iÊL>VÊ
in. To play it from AAAs press BATT first, then POWER. To
play it from the rechargeable batteries, first press DYN, turn
Ì
iÊVÀ>ÊvÀÊ>ÌÊi>ÃÌÊiÊÕÌi]ÊÌ
iÊ«ÀiÃÃÊPOWER.
WARRANTY REGISTRATION
To ensure full warranty coverage or product updates, registration
of your product should be completed as soon as possible after
purchase or receipt. You may use one of the following options
to register your product:
1.
By visiting our website at www.etoncorp.com
2.
Mail in enclosed warranty card.
3.
Mail your registration card or information to the following
address. Include your name, full mailing address, phone
number, model purchased, date purchased, retail vendor
>iÊ>`Ê«À`ÕVÌÊÃiÀ>ÊÕLiÀÊÌÞ«V>ÞÊV>Ìi`ÊÊÀÊi>ÀÊ
Ì
iÊL>ÌÌiÀÞÊV«>ÀÌiÌ®\Ê
Etón Corporation
1015 Corporation Way
Palo Alto, CA 94303
13
AXIS OWNER’S MANUAL
LIMITED WARRANTY
Retain the warranty information from your warranty card with
your proof of purchase or the Limited Warranty information
can also be viewed at www.etoncorp.com
SERVICE FOR YOUR PRODUCT
To obtain service for your product, we recommend first
contacting an Etón service representative at 1-800-872-2228
1-®]Ê£nääÈÎÇ£È{nÊ
>>`>®ÊÀÊÈxä®ÊäÎÎnÈÈÊ7À`Ü`i®ÊvÀÊ«ÀLiÊ`iÌiÀ>ÌÊ>`ÊÌÀÕLiÃ
Ì}°ÊvÊ
vÕÀÌ
iÀÊÃiÀÛViÊÃÊÀiµÕÀi`]ÊÌ
iÊÌiV
V>ÊÃÌ>vvÊÜÊÃÌÀÕVÌÊ
ÜÊ
to proceed based on whether the radio is still under warranty
or needs non-warranty service.
WARRANTY – If your product is still in warranty and the Etón
service representative determines that warranty service is needed,
>ÊÀiÌÕÀÊ>ÕÌ
Àâ>ÌÊÜÊLiÊÃÃÕi`Ê>`ÊÃÌÀÕVÌÃÊvÀÊÃ
«iÌÊ
ÌÊ>Ê>ÕÌ
Àâi`ÊÜ>ÀÀ>ÌÞÊÀi«>ÀÊv>VÌÞ°Ê"Ê "/ÊÃ
«ÊÞÕÀÊÀ>`Ê
L>VÊÜÌ
ÕÌÊLÌ>}ÊÌ
iÊÀiÌÕÀÊ>ÕÌ
Àâ>ÌÊÕLiÀ°Ê
NON-WARRANTY – If your product is no longer under warranty
>`ÊÀiµÕÀiÃÊÃiÀÛViÊÕÀÊÌiV
V>ÊÃÌ>vvÊÜÊÀiviÀÊÞÕÊÌÊÌ
iÊi>ÀiÃÌÊ
repair facility that will be able to best handle the repair.
For service outside of North America, please refer to the
distributor information included at time of purchase or receipt.
14
AXIS OWNER’S MANUAL
15
Etón Corporation
À«À>ÌiÊi>`µÕ>ÀÌiÀÃ
1015 Corporation Way
Palo Alto, California 94303 USA
tel +1 650-903-3866
tel +1 800-872-2228
v>Ýʳ£ÊÈxääÎÎnÈÇ
Etón Canada
1 Yonge Street, Suite 1801
Toronto, Ontario M5E 1W7 Canada
tel +1 416-214-6885
iÃ}i`ÊLÞÊÌÊ
À«À>ÌÊ>`Ê>ÃÃiLi`ÊÊ
>°Ê
© Copyright 2011 Etón Corporation. All rights reserved.
v. 051011
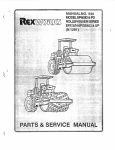
TurboDyne Series
AXIS
QUICK GUIDE
GETIING STARTED
1
Open battery compartment to access the
battery slot and rechargeable battery.
2
Connect the rechargeable batteries (located on the back battery
cartridge) to the device by inserting the cables. This device can
also be powered by 3 AAA alkaline batteries.
RADIO OPERATION
Tune and Volume knob
Use the TUNE knob or the DOWN/UP
buttons to change the station
frequency. Adjust the volume levels
with the VOL knob.
it---
LED Flashlight/Flashing beacon
Adjust light source knob ON and
OFF to use LED lights. Switch
light source .;;t to turn on red
flashing beacon
AMIFM/NOAA
Weather Band Tuner
Use the band switch to
choose AM, FM or one of
the seven Weather band
channels.
Power/Dynamo/Battery/Cell Phone Charger
Press POWER to turn radio ON/OFF. Press
the BATT button to use the AAA batteries
as main power source. Press the DYN
button to use the rechargeable batteries
as main power source. Press CELL when
directing power into a USB connected cell
phone (see "CELL PHONE CRANK
CHARGING" for more details).
Alert
Press the ALERT button to access the
Alert system. When Alert function is on,
none of the seven weather band stations
will be broadcasting.
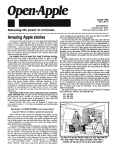
SETTING THE CLOCK AND ALARM
Alarm Clock
To set alarm clock, press the ~ . Press SET once to select
the hour. Use the DOWN and UP buttons to set desired
alarm time. Press SET again to change the minute. Press
SET one last time to set the alarm clock.
Clock
To set clock, press POWER button twice so only the time
is shown on the screer, and the radio is off. Press SET
once. The hour should be flashing. Select the DOWN
and UP buttons to select the hour. Press SET again to
adjust the minute. Press SET a third time to set the clock.
CELL PHONE CRANK CHARGING
Once the Axis has been fully charged either through the mini USB port (cord included) or by the hand crank, please follow
the instructions below for charging your cell phone .
USB Cell Phone Charger
1-
8
til
=-J
G
G
Mini USB
(DC-IN}
AUX Audio-In
Headphone Jack
2
1
Turn the hand crank for
immediate power to the
rechargeable batteries (included).
3
Lift the water resistant cover to
access USB inputs/outputs and
headphone jack.
Plug in USB cord for direct power
transfer from device to cell phone.
Press the CELL button to directly
access the dump charge feature.
----- --~----
WARNING
•
•
•
•
•
•
•
Do not submerge or expose for extended period to water.
Protect from high humidity and rain
Only operate within specified temperature range (32 oF to 104 °F).
Unplug any wires connected to the device immediately if liquid
has been spilled or any object has fallen in the apparatus.
Clean only with a dry cloth . Do not use detergents or chemical
solvents as these might damage the finish.
Do not remove cover [or back] .
Refer servicing to qualified service personnel.
DISPOSAL
Please dispose of old electrical and electronic equipment according
to your local environmental laws and guidelines. Please dispose
of all types of batteries per your Government, State or Local rules
and/or regulations . If you are unsure, please call the appropriate
local authority to find out how to dispose of them safely and help
protect the environment.
0
0
READ THIS FIRST
The rechargeable NiMh battery has been disconnected for
transportation purposes. To use the crank-charge system,
open the battery compartm€nt and connect the rechargeable
battery's plug into its socket, as per the diagram below:
---=--==--=---=-.:.:.~ ::.:. =-...:.-.=.-=-:-~~-:
I
..
I
I
rr::.... ..·=-- .·.-::::.-:- _... ·==--=-....::..:::...==-·.: ·.:::::
QUESTIONS
Et6n Corporation
1015 Corporation Way
Palo Alto/ CA 94303. USA
1.800.872 .2228 U.S.
1.800.637.1648 Canada
1.650.903.3866 World-Wide
www.etoncorp.com
cus to mersvc@eton corp.com
Standard of Quality
Limited Warranty and Product Registration
USA
Canada
Et6n Corporation
Corporate Headquarters
10 15 Corporation Way
Palo Alto, CA 94303
Et6n Electronics Canada LTD
Toronto Office
1 Yonge Street, Suite 1801
Toronto, Ontario MSE 1W7
www .etoncorp.com
www.etoncorp.com
_.
eron
CORPORA TION
LIMITED WARRANTY
Et6n Corporatron (E t6n) offers a limited warranty to the original customer against manufacturing
defects in materi al and workmansnip on th:s product This warranty is valid on!y for the original
purchaser and is rrot transferable .
TWO (2) YEARS PARTS AND LABOR · Europe
ONE (1) YEAR PARTS AND LABOR · North America
1his lirnited warranty beg:r:s on the or·rgin al date of purchase, and is valid only 'Yi products
purchased througn an authorized Ct6n retailer. Warranty repair s must De pc~formed by Et6n or an
authurizE~ (j servrce center To receive 'vVarranty service, the original da1e(j bill of sa!e, u: a copy,
must be presented upon request as proof of purchase. Installation, removal or reinstallation of the
product is not included under tris warranty Shipping m Et6n or t he authorrzed serv:ce center rs
the respon<,inrl ity of the purcha ser. F-or pro(iucts purcl1ased rn furope, p:ease rerurr1 to vour de3Jer
or tt-:e distrrbutor of your cour1t1 v, \I'.J~licr, is list!':'d or1 a sheet included in H1e packap,1r:g
returning any product for warranty service, the purchaser must contact Etr.Jn or the designated
service center for t;out!leshootrng and service procerJure instructions Damaged parts or product:;
become the property of Et6n. Parts and products replaced Dy Et6n assume the remaining original
warra rlty, or r1rnetv (90) days, \Nilicrrever is; longer.
This irm1te1j warranty covers manu facturing 1jefect s in material and workmanshrp encount ered rn
norma!, nor!cornrner cial US(: of this proc]uc t anrJ srrail r1ot apply to the foilowing, :ncluding, but not
lrmi trd tCJ damage th at occurs due to appircations and uses for whrcr: the product 'Nas nc)t
inter1ded; failures or wroblems that are caused by products or equipment not supplied by Et6rt
accidents, misuse, abuse. neglect rn isapplication, fire, water, lightning, or other acts of nature;
incorrect hr1e voltage, flucwatiOils, or sucges; damage caused by improper or fault y inst allati on:
damage cau';ed by aud leakage from improperly installed or defective batteries; product alteration
or modificatron or use of un3uthor ized parts, supplies. accessories, or equioment t hat darnage this
prodLjct or result in servrce problems
Et6n \/J ill repair or replace thrs product at our option and at no charge, wrtn new or rPcomJitioned
part ~; 1f this product is four1d to be defect ive durir:g the !irnrted warranty perrod. T:::. be elig!tJ ie fcrr
w;:Jrrant'>' coverage, tt-Je producT must be retumed with ',h:ppir1g cha;·ge·s p:epcJ;d ~~u iater thar1 1S
ciays after the eYpiration of the vva rr cmty period t o ct6n or the designated :oervicr::' cen!('r Prrc: tc:
SERVICE INFORMATION
To obtain serviu:' for ycJur Et6n product first contac t an Et6n service re presen t ative at
1 - 800-87 2-2,~28 US, 1-800-63 7 1548 Can .:Kia or your res pective country di strr[riJtor in Europe
(see enr !oserl list) tor troublesrrooting. Marry e.o:THTton ques1ions and problems c:m be r•c:so lverj
over t he phone.
WARRANTY REGISTRATION
SERVICE FOR YOUR PRODUCT
To ensu re full warranty coverage or product updates, registration of your
pmduct shou ld be completed as soor1 as possible after purchase or receipt.
You may use one of the following options to register your product:
To obtairl service for your product, we recommend first contactirlg an Et6n
service represer1tative at: l-800-872-2228 US, l-800-637-1648 Car1ada,
(650) 903-3866 or [email protected] for problem determination
and trouble-srrOotin g If furtr1er service is requir ed, the technical staff will
instruct how to proceed based or1 whether the radio is still under warranty or
needs non-warranty servi ce.
1. By visit ing our webs1te at http://www.etoncorp.com.
2. Mail in enclosed warrant\ card.
3. Mail your registration carcj or informatior1 to following address; include your
name, full mail ing address, phone number, email address, model purchased,
date purcr·rased, retail vendor r1ame:
WARRANTY- If y'our profJuct is still in vvarran ty and the Eton service
1epresentative determines warranty service is needed, a return autt1orization
will be issued and instl·uctions will be giver1. DO NOT ship your radio back
without obtair1ing the retum authorization.
Et6n Corporation
101 5 Corporation Way
Palo Alto, CA 94303 USA
NON-WARRANTY - If your product is no longer under warr·anty and requires
LIMITED WARRANTY
service, the Et6n service representative will refer you to the nearest repair
facility that will best r1andle the re pair.
Retain the wa rranty information from your warranty card wi th your proof of
purchase or.the Limitecl Warranty 1nformatior1 can also be viewed at
www .etoncorp.com.
F- or service outside North America, plea se refer to the distributor information
incl uded at time uf i)urchase/receipt
*Denotes Required Field
1. Your annual income?
Eton Product Registration
0
0
0
Go to: www.etoncorp.com/productregistration, or mail this form today.
Serial number*:
(located
i11
the back of
trH:'
0
0
0
Under $14,999
$15,000 to $30,000
$30,001 to $50,000
$50,001 to $75,000
$75,001 to $150,000
Over $150,001
unrt)
2. Your age?
Date of purchase*:
0
0
0
0
Dealers name*:
City*:
0
0
0
0
Under 16
16-20
21-25
26-30
0
0
0
31-35
36-40
41-45
51-55
56-60
61 and over
46-50
3. What are your listening interests? (Check all that apply)
0
0
CountryITerritory*:
0
Satellite Radio
Shortwave/International Broadcast
Local AM/FM
4. Did you consider another unit before choosing this product?
Name*:
Address*:
-
0
0
- - - -- -- - -
Yes (Please Specify Model): - - - · - - - --- - - - - -- - -- -No
5. What is your occupation?-- --·------------------- - --------- - - - ---- - ·- - - -
6. How did you hear about Et6n?
City*:
0
0
0
State/Provice *:
Newspaper ad
0
Article
Radio ad
Through a retailer
0
0
Web Search
Other ___________________ _
Postal Code/ZIP Code*:
- - -------- -- - -- - ---·--·----- - ----·--- - -- - - - --
Country/Territory*:
Telephone Number*:
Email*:
0
Yes! I would like Et6n to send me information
on products including special offers, new product
launches, and product updates/information:
0
Email
0
Mail
.,.
ero n
CORPORATION
www etoncorp.com
L__