1
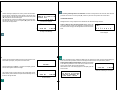
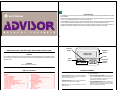
2 INTRODUCTION Congratulations! You are now using one of the most versatile, technically advanced, feature-packed alphanumeric display pagers available. The Motorola ADVISOR Message Receiver provides a complete personal message center that fits easily in your pocket or purse, or in a convenient carrying case you can wear on your belt. The ADVISOR Message Receiver stores complete messages in memory, continuously keeps you informed of the status of each message, and provides message-memory control with a variety of memory-management functions. The Motorola ADVISOR Message Receiver offers many convenient features not found on most pagers; therefore, we suggest that you read this operating instructions manual carefully to get the full benefit from your pager. IMPORTANT SAFETY INSTRUCTIONS–KEEP THESE INSTRUCTIONS WARNING Do not dispose of batteries in fire–they may explode. Do not swallow batteries. If an AAA battery is swallowed, contact your local poison control center, your physician, or the National Battery Ingestion Hotline at (202) 625-3333. Function Button Liquid-Crystal Display (LCD) Lamp Read Button Directional Control Buttons ADVISOR WARNING Do not swallow the battery door. TABLE OF CONTENTS Introduction............................................................................... 2 Safety Notes .............................................................................. 3 Operation................................................................................... 5 Turning the ADVISOR On ...................................................... 5 Turning the ADVISOR Off...................................................... 6 Receiving a Message............................................................. 6 Reading your Message.......................................................... 7 Automatic and Manual Message Scrolling .......................... 8 Manual Scrolling Line by Line .............................................. 9 Moving Through Messages in Memory .............................. 11 Previewing the First Screen of Messages in Memory....... 12 The Advisor Function Menu................................................... 14 Alerts Function .................................................................... 16 Clock Function..................................................................... 18 Alarm Function .................................................................... 19 Speaker Function ................................................................ 21 Lock Function ......................................................................22 Delete Function ....................................................................26 Personal Message File............................................................30 Transferring a Message .......................................................30 Transferring a Message from the Read Mode ....................32 Reading a Message..............................................................33 Deleting a Message..............................................................35 ADVISOR Standard Features..................................................37 Selected ADVISOR Options....................................................39 Duplicate Message Detection..............................................39 Priority Alerting....................................................................39 Memory Clean Up.................................................................39 Group Call.............................................................................40 Mail Drop ..............................................................................41 Out-of-Range Indicator ........................................................43 Battery Information .................................................................43 On/Reset Button CONTROL SUMMARY READ BUTTON–Used to read messages in memory. DIRECTIONAL CONTROL BUTTONS– These buttons have several functions: FUNCTION BUTTON–Used to select the ADVISOR’s special function menu. When pressed and held for one second, the backlight turns on. • LEFT and RIGHT BUTTONS–Used to move the ON/RESET BUTTON–Used to turn the ADVISOR “on,” as well as reset the unit when it is paged. • UP and DOWN BUTTONS–Used to scroll the mes- LAMP–Flashes to give a visual indication when a message is received. cursor through the status screen or to preview the first screen of each message in memory. Also used to move between various menu functions. sage display forward or back, one line at a time. Also used to move the cursor between the first and second lines of the message status screen. 6 OPERATION Turning the ADVISOR on: Press the On/Reset button to turn the pager on. The power-up screen shows during the 4-second power-up alert. After the power-up sequence, the message-status screen is displayed for eight seconds when there are messages in memory. After eight seconds the display changes to the “blank” (standby) screen. The ‘ON’ ( ú ) and speaker ( õ ) symbols at the left of the screen indicate that the pager is on and ready to accept messages. NOTE ú The speaker symbol is not shown if the pager is in the silent mode. õ ú MOTOROLA, INC. õ 4:00 PM 7/05/90 Turning the ADVISOR off: To turn the ADVISOR off, press the On/Reset button until the “ PUSH FOR OFF ” screen appears on the display. The “ PUSH FOR OFF ” screen displays an arrow pointing to the Function button. Press the Function button to turn the pager off. NOTE The “ PUSH FOR OFF ” screen automatically times out after four seconds. If the Function button is not pressed before time out occurs, the display reverts to the message-status screen, then to the blank screen. Power-Up Screen Example ú ©©À õ Blank (Standby) Screen Example 4:00 PM 7/05/90 Message-Status Screen Example Receiving a Message: When an incoming message is being received, the pager emits a 12-second alert, displays the incoming message symbol ( ¢ ), and the date and time. The new message is represented by a flashing full arrow ( À ). To stop the alert and reset your pager, press any one of ADVISOR’s buttons . ú PUSH FOR OFF õ ® Push for Off Screen Example À õ XXXXXXX¢ 4:00 PM 7/05/90 Incoming Message Screen 5 8 If the message is not read within eight seconds, the screen blanks and the “on” symbol ( ú ) in the upper left-hand corner blinks to indicate that you have an unread message. NOTE If a new message is received while there are unread messages in memory, the cursor is positioned to the most recent unread message. ú õ 4:00 PM 7/05/90 Blanked Display with Flashing “On” Symbol Reading your Message: To read the message, press either the Read button or the On/Reset button, then position the cursor on the memory location of the message you wish to read, and press the Read button. NOTE An incoming message may be read immediately by pressing the Read button during the 12-second alert. ©©À À õ 9:05 AM 7/06/90 Cursor Positioned on Memory Location 7 Automatic Message Scrolling: When the Read button is pressed to read a message, the automatic-message-scrolling feature is activated. In this mode, the ADVISOR scrolls through each screen of the message at a rate of four seconds per screen. Preceding the message is a number and a colon showing the memory location of that message. Manual Message Scrolling: To manually scroll through a message, press the Read button one additional time to activate the freeze/advance screen mode. In this mode, subsequent presses of the Read button advance through each screen of the message. After the last screen of the message is displayed, the ADVISOR reverts back to the message-status screen. X01:PLEASE COME TO MY OFFICE TO DISCUSS THE NEW CONTRACT AT 3:00 TODAY. BRING First Screen of Message #1 THE COMPLETED FINANCIAL ANALYSIS 9:05 AM 7/06/90 Second Screen of Message #1 10 Manual Scrolling Line by Line: When a message contains more than four lines of data, it can be read line-by-line using the Up and Down Directional Control buttons. X01:PLEASE COME TO MY OFFICE TO DISCUSS THE NEW CONTRACT AT 3:00 TODAY. BRING The following paragraphs describe how an alphanumeric page such as “ P LE AS E C OM E T O M Y O FFICE TO DISCUSS THE NEW CONTRACT AT 3:00 TODAY. BRING THE COMPLETED FINANCIAL ANALYSIS ” could be read line by line. Press the Down Directional Control button again to scroll to the next line of the message. First Screen of Message #1 Press the Read button to display the first screen of the message. MY OFFICE TO DISCUSS THE NEW CONTRACT AT 3:00 TODAY. BRING THE COMPLETED Press the Down Directional Control button to scroll forward one line. THE NEW CONTRACT AT 3:00 TODAY. BRING THE COMPLETED FINANCIAL ANALYSIS Third Screen - Forward Two Lines To scroll backward one line, press the Up Directional Control button. Second Screen - Forward One Line MY OFFICE TO DISCUSS THE NEW CONTRACT AT 3:00 TODAY. BRING THE COMPLETED Second Screen - Backward One LIne 9 12 Additional Messages: When additional messages are received, a flashing full arrow ( À ) is positioned on the memory location of the most recent message. ©©À õ 9:17 AM 7/06/90 Message-Status Screen with Cursor Positioned on New Message Moving through the Messages in Memory: The Left and Right Directional Control buttons are used to move forward and backward through the memory locations in the message-status screen. As shown in the screen example, pressing the Left Directional Control button moves the cursor to memory location #2. 9:17 AM 7/06/90 Message-Status Screen with Cursor Positioned on Message #2 11 Press the Read button to go to the first screen of message #2. Press the Right Directional Control button to see the first screen of message #3. 02:SALES MEETING HAS BEEN CHANGED TO 1:00 9:10 AM 7/06/90 First Screen of Message #2 03:555-1212 ©À© õ Previewing the first Screen of the Messages in Memory: The Left and Right Directional Control buttons may be used to preview the first screen of each message in memory. The following paragraphs describe how the first screen of three stored messages could be previewed. 9:17 AM 7/06/90 First Screen of Message #3 14 If you press the Right Directional Control button again, after the last line of message #3, the cursor wraps around to the first line of message #1. Press the Left Directional Control button to see the first screen of message #3. X01:PLEASE COME TO MY OFFICE TO DISCUSS THE NEW CONTRACT AT 3:00 TODAY. BRING First Screen of Message #1 03:555-1212 9:17 AM 7/06/90 THE ADVISOR FUNCTION MENU The ADVISOR Function menu is displayed by pressing the Function button. The functions to the left of the Home position ( Õ ) are used to activate the special pager settings: alerts, clock, alarm, and speaker. The functions to the right of the Home position are used to activate the memory-management functions: lock, delete, and the Personal Message File (if equipped). The Left and Right Directional Control buttons are used to move between the functions. A flashing symbol indicates which function or field you are currently in. For example, if you wish to set the time and date, move the cursor until the time and date function symbol ( à ) is flashing. As you then select the fields of the time and date function screen, they flash to indicate which field you are in. 02:SALES MEETING HAS BEEN CHANGED TO 1:00 First Screen of Message #3 Press it again to see the first screen of message #2. 9:10 AM 7/06/90 First Screen of Message #2 13 16 Speaker Alarm Clock Alerts ©©©À É Ã » á Õ ë ¶ « The ADVISOR Function Menu MOTOROLA INC. É Ã » á Õ Function Menu with No Messages in Memory 15 Home Position Alerts Function: The ADVISOR’s alerts (silent or audible) are configured by selecting the Alerts symbol ( É ) in the Function Menu. Lock Personal Message File ADVISOR Audible Alerts choices are as follows: Delete áÁ Escalert - 12-second alert at increasing volume levels. áË Loud Long Alert - 12-second alert at the loudest volume level. É á áÁ Ó Ì Home Audible Silent Alerts Selection Screen áÈ Loud Short Alert - 2-second alert at the loudest volume level. áÍ Long Soft Alert - 12-second alert at the softest volume level. áÎ Short Soft Alert - 2-second alert at the softest volume level. Ï Chirp Alert - Chirp at the loudest volume level. É á áÁ áË áÈ áÍ áÎ Ï Ô Ó Ì Ô No Alert - No alert on incoming messages. ADVISOR Silent Alerts choices are as follows: Audible Alerts Selection Screen 18 Ï Chirp Alert - Chirp at the loudest level. If the pager is equipped with the VIBRA-PAGE feature, it chirps and vibrates on incoming messages. Ì No Chirp Alert - No chirp occurs. If the pager is equipped with the VIBRA-PAGE feature, it only vibrates on incoming messages. Ô No Alert - No alert, (including vibrator) on incoming messages. Right Directional Control buttons to move to the field(s) you wish to change (hours, minutes, am/pm/24hr, day, month, year); the Up and Down Directional Control buttons are used to change the value in the selected field. É á áÁ Ó Ï Ì Ô Silent Alerts Selection Screen 12:00 AM Once the new time and date is displayed on the screen, press the Function button to save your changes. To change or preview the current alert settings, press the Function button to bring up the Function menu. Use the Left Directional Control button to move the cursor to the alerts symbol ( É ). Press the Function button again to display the alerts screen. If the alerts are not set as desired, use the Up, Down, Left, and Right Directional Control buttons to move the cursor through the choices in each field. You must press the Function button when the desired alert settings appear on the display and before automatic time out occurs (or before the pager is reset) to save the new alert settings. 6/11/90 Set-Time-and-Date Screen NOTE The set-time-and-date screen automatically times out after 12 seconds. The Function button must be pressed before time out occurs to save your changes. Clock Function: Press the Function button to display the function menu. Use the Left Directional Control button to move the cursor to the clock symbol ( à ). Press the Function button to display the set-time-and-date screen. Use the Left and 17 20 Alarm Function: To set the alarm, press the Function button. Use the Left Directional Control button to move the cursor to the alarm symbol ( » ). Press the Function button to display the alarm screen. Use the Left and Right Directional Control buttons to move to the field you wish to change, and the Up and Down Directional Control buttons to set the hour and minutes fields. 12:00 AM ì Set-Alarm Screen Use the Right Directional Control button to move to the “alarm off/alarm on” field. The Up and Down Directional Control buttons are used to select “alarm on” ( ò ) or “alarm off” ( ì ). 10:30 AM Alarm Off 19 ì 10:30 AM Alarm On ò Once the new alarm setting is shown on the display, press the Function button, before the display times out, to save your changes. If the alarm has been activated, the “alarm on” symbol ( ò ) is shown in the message-status screen. The alarm sounds at the time you have set as long as the pager is on and/or the Auto Alarm Power-Up option (see options section) is chosen. ©À© õ XXXXXXXò 9:05 AM 7/06/90 Message-Status Screen with the Alarm Activated 22 Speaker Function (Audible or Silent): The Speaker Function is used to set the ADVISOR to either the audible mode or the silent mode of operation. If the speaker symbol ( õ ) is displayed in the lower left-hand corner of the screen, the pager is in the audible mode; if no speaker is displayed, the pager is in the silent mode. ©©À õ To change the mode of operation, press the Function button, move the cursor to the speaker symbol, then press the Function button again. The pager either vibrates or chirps to indicate which mode the pager is in. 9:05 AM 7/08/90 The Lock Function: Up to 10 messages, or a total of 3200 characters, can be “locked” to prevent them from being overwritten when memory is full. To lock a message, press the Read button to display the messagestatus screen. Use the Left or Right Directional Control button to position the cursor on the memory location of the message you wish to lock. ©©©À õ 9:05 AM 7/08/90 Message-Status Screen with Cursor Positioned on Message to be Locked Audible Mode of Operation ©©©À ©©À ©©©À 9:05 AM É Ã » á Õ ë ¶ « Press the Function button to display the Function menu. 7/08/90 Move the cursor to the lock symbol ( ë ), then press the Function button again. É Ã » á Õ ë ¶ « Message-Status Screen with Function Menu Displayed Silent Mode of Operation Function Menu Screen 21 24 A special reversed lock symbol ( í ) replaces the arrow symbol in the message-status screen. When the cursor is not positioned on the locked message, the standard lock symbol is shown. ©©©í õ When you read the first line of a locked message, the memory location identifier is preceded by the lock symbol. ë04:MR. SMITH WILL ARRIVE AT 4:00 PM ON FLIGHT 382. Message with Lock Symbol 23 9:05 AM 7/08/90 Message-Status Screen Showing Reversed Lock Symbol 9:05 AM Unlocking a Message: To unlock a message, follow the same procedure used to lock it. An unlock symbol ( ï ) is shown in place of the lock symbol in the Function menu. Locking a Message While in the Read Mode: To lock a message while in the read mode, press the Read button then position the cursor on the memory location of the message you wish to read/lock. ©©Àë õ NOTE Locked messages cannot be deleted or transferred to the Personal Message file. You must unlock the message before transferring or deleting it. 7/08/90 Locked Message with Standard Lock Press the Read button to display the message. ©©©À õ 9:05 AM 7/08/90 Message-Status Screen with Cursor Positioned on Message to be Locked ë04:MR. SMITH WILL ARRIVE AT 4:00 PM ON FLIGHT 382. First Line of Message to be Locked 26 While the message is displayed on the screen, press the Function button. (Only the memory management functions appear in the Function menu when the pager is in the read mode.) Move the cursor to the lock symbol ( ë ), then press the Function button again. ë04:MR. SMITH WILL ARRIVE AT 4:00 PM ON FLIGHT 382. Õ ë ¶ « The ADVISOR then reverts to the message-status screen and the message becomes locked in memory. A lock symbol ( ë ) replaces the arrow cursor at that message location. Message to be Locked with Function Menu Displayed ©©©í õ 9:05 AM 7/08/90 Unlocking a Message While in the Read Mode: To unlock a message while in the read mode, follow the same procedure used to lock it. An unlock symbol ( ï ) is shown in place of the lock symbol in the Function Menu. THE DELETE FUNCTION Messages that are no longer important can be deleted from the ADVISOR Message Receiver. Deleting a Message from the Message-Status Screen: Position the cursor on the memory location of the message to be deleted and press the Function button to bring up the Message Status screen with Function menu. Message-Status Screen Showing Locked Message ©À©© É Ã » á Õ ë ¶ « Message-Status Screen with Function Menu Displayed 25 28 Press the Function button to display the Function menu. Move the cursor to the delete symbol ( « ) then press the Function button. When all remaining memory locations are filled and a new message is received, it forces all stored messages to move to the first memory locations, and the new message is stored in the last, unoccupied memory location. ©À©© DELETE? When the delete prompt ( DELETE ? ) appears on the display, press the Function button again to delete the message. Delete Prompt Deleting a Message While in the Read Mode: To delete a message while in the read mode, position the cursor on the memory location of the message you wish to delete, then press the Read button. When the first screen of the message appears on the display, press the Function button. © À© The message symbol no longer appears in the message-status screen and the memory location remains unoccupied until the remaining memory locations to the right are filled. 27 õ 9:05 AM 7/08/90 Message Status Screen after Message has been Deleted X01:PLEASE COME TO MY OFFICE TO DISCUSS THE NEW CONTRACT AT 3:00 TODAY. BRING First Screen of Message to be Deleted À ©© õ 9:05 AM © 7/08/90 Message-Status Screen with Cursor Positioned on Message to be Deleted 30 Move the cursor to the delete symbol ( ¶ ) then press the Function button again. ë01:PLEASE COME TO MY OFFICE TO DISCUSS THE NEW CONTRACT AT Õ ë ¶ « When the delete prompt ( DELETE ? ) appears on the display, press the Function button again to delete the message. The ADVISOR leaves the read mode and the display changes to the message-status screen. That memory location is now unoccupied. First Screen of Message to be Deleted with Function Menu Displayed À© õ 9:05 AM X01:PLEASE COME TO MY OFFICE TO DISCUSS THE NEW CONTRACT AT XXXXXDELETE? 7/08/90 Message-Status Screen Showing Unoccupied Memory Location Personal Message File: With this option, up to 10 personal messages (a total of 1000 characters) may be transferred and stored in one memory location. The Personal Message File area is located on the second line of the message-status screen in the 20th memory location. (The 20th memory location is the last right-hand position on the second line of the display.) X© ©© õ 9:05 AM À 7/06/90 Location of Personal Message File Transferring a Message to the Personal Message File: To transfer a message to the Personal Message File, position the cursor at the memory location of the message you wish to transfer and press the Function button. ©À©© É Ã » á Õ ë ¶ « Message-Status Screen with Cursor Positioned on Message to be Transferred to the Personal Message File First Screen of Message with Delete 29 32 Use the Right Directional Control button to position the cursor on the Personal Message File symbol ( ¶ ), then press the Function button to transfer the message to the Personal Message File. ë01:PLEASE COME TO MY OFFICE TO DISCUSS THE NEW CONTRACT AT Õ ë ¶ « The message will no longer be shown in the message-status screen. The arrow symbol ( À ), which represents your message, is located in the Personal Message File area. The display then reverts to the message-status screen. NOTE Once a message is transferred to the personal message file, the cursor remains in that file. To exit the Personal Message File and go back to the message-status screen, press the Up Directional Control button. To return to the personal message file from the message-status screen, press the Down Directional Control button. 31 Message-Status Screen with Function Menu Displayed X© ©© õ 9:05 AM À 7/06/90 Message-Status Screen: Shows Message Transferred to Personal Message File Transferring a Message from the Read Mode to the Personal Message File: To transfer a message to the personal message file while you are reading it, position the cursor on the message you wish to read, then press the Read Button. À ©© © When the message is displayed, press the Function button. õ Move the cursor to the Personal Message File symbol ( ¶ ), then press the Function button again. Message-Status Screen with Cursor Positioned on Message to be Transferred ë01:PLEASE COME TO MY OFFICE TO DISCUSS THE NEW CONTRACT AT Õ ë ¶ « First Screen of Message to be Transferred with Function Menu Displayed 9:05 AM 7/08/90 X01:PLEASE COME TO MY OFFICE TO DISCUSS THE NEW CONTRACT AT 3:00 TODAY. BRING First Screen of Message to be Transferred 34 The message is removed from its memory location and stored in the personal message file. The display reverts to the message-status screen. X© ©© õ Reading the Personal Message File: To read the personal message file, position the cursor at the Personal Message File location and press the Read button. 9:05 AM NOTE The messages contained in the Personal Message File are stored in a vertical fashion in the order in which you transferred them; therefore, the Right and Left Directional Control buttons are inoperative. À 7/06/90 THE COMPLETED FINANCIAL ANALYSIS 9:05 AM Message-Status Screen: Shows Message Transferred to Personal Message File 7/06/90 Second Screen of Last Message Stored in the Personal Message File The pager automatically scrolls through all of the messages stored in the Personal Message File. Pressing the Read button one additional time allows you to manually scroll through the messages and activates the Freeze/Advance Screen mode. ¶02:PLEASE COME TO MY OFFICE TO DISCUSS THE NEW CONTRACT AT 3:00 TODAY. BRING ¶01:SALES MEETING HAS BEEN CHANGED TO 1:00. 9:10 AM 7/06/90 The Up and Down Directional Control buttons can be used to scroll through the Personal Message File line by line. First Screen of Last Message Stored in the Personal Message File Next Screen of a Message Stored in the Personal Message File 33 36 Deleting a Message from the Personal Message File: The only way to remove a message from the Personal Message File is to delete it while viewing the file. Position the cursor on the Personal Message File symbol and press the Read button. Scroll through the messages until the message you wish to delete appears on the display. Press the Function button. Only the delete symbol ( « ) appears. Position the cursor on the delete symbol and press the Function button. When the delete prompt appears on the screen, press the Function button again to ¶01:SALES MEETING delete the message. HAS BEEN CHANGED TO 1:00. XXXXXDELETE? Delete Prompt 35 ¶02:PLEASE COME TO MY OFFICE TO DISCUSS THE NEW CONTRACT AT 3:00 TODAY. BRING First Screen of Message to be Deleted from the Personal Message File ¶01:SALES MEETING HAS BEEN CHANGED TO 1:00. Õ ë —¶ First Screen of Message to be Deleted from the Personal Message File with Function Menu Displayed Personal and Group Messages ©©©À ©© Mail Drop (Information Services) õ 9:05 AM History Dump File ©© 7/08/90 Message-Status Screen Showing the Personal Message File Area, the History Dump File Area, the Mail Drop Area, and the Personal and Group Call Area. Personal Message File 38 ADVISOR STANDARD FEATURES Liquid Crystal Display (LCD): The four-line LCD offers a high-contrast dot-matrix display for easy readability of characters. Up to 80 characters can be displayed at a time. The display is backlighted when the Function button is pressed and held for over one second while the display is active. The backlight stays on as long as there is activity on the display. To manually turn the light off, press and hold the Function button again for over one second. Message-Status Screen: The ADVISOR message-status screen provides complete message-status information. When the message-status screen is displayed, it shows the number of messages in memory and the status (locked, read, or unread) of each stored message. This screen also displays the current time and date (if set), pager conditions such as low battery, memory full, and alarm activated. Memory Capacity: The ADVISOR pager can store up to 20 personal and/or group calls (optional) messages in its memory. A single message may be 2000 characters in length. The ADVISOR can also store up to 16 Mail Drop messages (optional). An additional 10 messages can be transferred to the Personal Message File (if equipped) and 10 messages can be stored in the History Dump File. The maximum number of characters the ADVISOR can accept is 6400. Message Time and Date Stamping: The last line of all incoming and stored messages shows the time of day and the date that the message was received. (NOTE: The time and date must be correctly set for this feature to be accurate.) 02:SALES MEETING HAS BEEN CHANGED TO 1:00 9:10 AM Memory Retention: When the pager is turned off, all messages and pager settings (time and date, alarm, alerts – audible or silent) remain in memory. Memory-Full Indication: If more than 20 messages (or 6400 characters) are stored in memory, an incoming message could cause the earliest unlocked, read message to be transferred to the History Dump File (if equipped with that option), or dropped from the pager’s memory. A “ MEMORY FULL ” warning on the message-status screen indicates that a message may be pushed out of memory by a new incoming message. 7/06/90 Message Time-and-Date Stamp ©©©©©©©©©©©©©©©©©©©À õ XXMEMORY FULL 5:05 PM 8/25/90 Memory-Full Indicator 37 40 OPTIONS Duplicate Message Detection: With this option installed, new messages are compared to messages already stored in memory. If duplication is detected, a “ DUPLICATE ” prompt appears, indicating that the message has been received more than once. The duplicated message appears with the latest time and date stamp. This option prevents the same message from occupying more than one memory location. XXXXDUPLICATE 03:555-1212 õ 10:08 AM õ 7/06/90 X05:MALFUNCTION MACHINE 8 XXXXGROUP 3 10:08 AM 7/06/90 Duplicate Indicator Priority Alerting: With this option installed, incoming priority messages cause the pager to generate an audible alert regardless of the mode of operation (silent or audible). Memory Clean Up: When this option installed, all messages that are locked, unread, or stored in the personal message file remain in memory when the pager is turned off. All unlocked, read messages, Mail Drop messages, and messages in the History Dump File are discarded. The remaining messages are moved to first memory locations. 39 Group Call: This option allows for a number of people to be paged with the same message at the same time. A unique alert accompanies the Group Call message, and a group identifier follows the message. Group Call Indicator History Dump File: When this option is installed, and pager memory is full, the next incoming message causes the oldest, read, unlocked message to be transferred to the History Dump File. This file is located on the second line of the message-status screen in the 19th memory location. ©©©© ©© õ À© 9:05 AM 7/08/90 History Dump Area 42 Messages in the History Dump File are read and deleted in the same manner as the Personal Message File; or the History Dump File can be deleted in its entirety by selecting the delete function from the messagestatus screen. The message number indicator is preceded by a History File symbol ( Ù ) to indicate that you are reading messages which have been transferred to the History Dump File. Mail Drop (Information Services): If your ADVISOR is equipped to receive Information Services such as sports scores, weather, or news, these messages are displayed on the second line of the message-status screen. They differ from personal messages as follows: • Each type of Information Service appears in a specific memory location on the second line of the message-status screen. For example: Sports scores may appear in memory location #1 on the second line, and weather in memory location #2. Ù04:MR. SMITH WILL ARRIVE AT 4:00 PM ON FLIGHT 382. First Screen of a Message Stored in the History Dump File • As updates are received, the information in the specific memory location is replaced by the new information. • Information Service messages cannot be locked or transferred to the History Dump File. • Information Services messages do not remain in memory when the ADVISOR is turned off unless the pager is equipped with “Save Mail Drop Messages” option. Delete Memory Retention: When this option is installed, all messages are discarded from the ADVISOR memory when the pager is turned off. Auto Alarm Power-Up: When this option is installed, and the pager alarm is set to sound, the ADVISOR automatically powers up and generates the pager alarm. ©©©À ©© õ 10:09 AM 7/06/90 Message-Status Screen with Mail Drop Messages Show Source Identifier: This option displays a source identifier at the end of a message (before the time stamp), showing which source was used to send the message. The source identifier is enclosed in brackets (e.g., <6>). õ THE COMPLETED FINANCIAL ANALYSIS XXXXXXX<5> 9:05 AM 7/06/90 Second Screen of a Message with Source Identifier 41 44 Out-of-Range Indication: With this option installed, special out-of-range symbols ( ó ) are displayed if no transmission is detected for the pre-programmed interval. ©©À ó ó ó ó ó BATTERY INFORMATION 7/08/90 õ X4:00 PM The ADVISOR pager is designed to operate with a single AAA-size alkaline Message-Status Screen with battery (NRN4819A). AAA-size alkaline batteries from other manufacturOut-of-Range Indicators ers may give comparable performance, but have not been tested by Motorola. NOTE Do not use carbon zinc batteries in the ADVISOR pager. Installing/Replacing the Battery (Refer to Figure 1 on page 45): a. Locate the black locking switch on the bottom of the pager. b. Slide the black locking switch to the unlock position. This reveals a red indicator and shows that the battery compartment cover is in the unlocked condition. 43 c. Note the triangular arrow located on the square textured area on the battery door; slide the door in the direction of the arrow until the battery compartment door is completely free from the pager housing. d. Align the battery so that the battery’s polarity markings (+ and –) match the markings in the battery compartment and insert the battery. WARNING DO NOT PUT THE BATTERY IN BACKWARD. IF THE BATTERY IS INSERTED BACKWARD, ALL MESSAGES AND TIME INFORMATION WILL BE LOST. e. Reinstall the battery compartment cover in reverse order of disassembly by sliding the cover onto the bottom of the pager in the opposite direction of the arrows. f. Make sure to slide the black locking switch to the locked position. Low-Battery Indication: When the battery condition is low, the pager emits an alert at the lowest volume level and displays a low-battery warning on the message-status screen. Note: The audible alert can be programmed out of the pager so that only the warning display indicates a low battery. ©©©À XXXXLOW BATTERY 7/09/90 õ X9:05 AM Low-Battery Screen 46 NOTES .................................................................................................................................................................................................................... .................................................................................................................................................................................................................... .................................................................................................................................................................................................................... .................................................................................................................................................................................................................... .................................................................................................................................................................................................................... .................................................................................................................................................................................................................... .................................................................................................................................................................................................................... .................................................................................................................................................................................................................... .................................................................................................................................................................................................................... .................................................................................................................................................................................................................... Figure 1. Installing/Removing the Battery 45 REPAIR AND MAINTENANCE Your Advisor message receiver, properly handled, is capable of many years of trouble-free service. However, should it ever require service, Motorola’s National Service Organization, staffed with specially trained technicians, offers strategically located repair and maintenance facilities. Consult your Motorola sales representative for service locations in your area. COMPUTER SOFTWARE COPYRIGHTS The Motorola products described in this manual may include copyrighted Motorola computer programs stored in semiconductor memories or other media. Laws in the United States and other countries preserve for Motorola certain exclusive rights for copyrighted computer programs, including the exclusive right to copy or reproduce in any form the copyrighted computer program. Accordingly, any copyrighted Motorola computer programs contained in the Motorola products described in this manual may not be copied or reproduced in any manner without the express written permission of Motorola. Furthermore, the purchase of Motorola products shall not be deemed to grant either directly or by implication, estoppel, or otherwise, any license under the copyrights, patents or patent applications of Motorola, except for the normal, non-exclusive, royalty-free license to use that arises by operation of law in the sale of a product. ....................................................................................................................................................................................................................