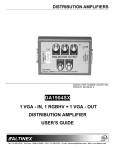
1
Creative Wireless Adapter CB3200/CB3700 User’s Guide Application Setup & User’s Guide Information in this document is subject to change without notice and does not represent a commitment on the part of Creative Technology Ltd. No part of this manual may be reproduced or transmitted in any form or by any means, electronic or mechanical, including photocopying and recording, for any purpose without the written permission of Creative Technology Ltd. The software described in this document is furnished under a license agreement and may be used or copied only in accordance with the terms of the license agreement. It is against the law to copy the software on any other medium except as specifically allowed in the license agreement. The licensee may make one copy of the software for backup purposes only. The Software License Agreement is found in a separate folder on the Installation CD. Copyright © 2006 Creative Technology Ltd. All rights reserved. Version 1.0 January 2006 Bluetooth is a registered trademark of the Bluetooth SIG, Inc., USA. Microsoft, MS-DOS, and Windows are registered trademarks of Microsoft Corporation. Intel and Pentium are registered trademarks of Intel Corporation. All other products are trademarks or registered trademarks of their respective owners and are hereby recognized as such. All specifications are subject to change without prior notice. Actual contents may differ slightly from those pictured. ii TABLE OF CONTENTS INTRODUCTION ............................................................................................................ 1 About Your Creative Wireless Adapter CB3200/CB3700 ......................................................................... 1 Package Contents....................................................................................................................................... 1 System Requirements.................................................................................................................................. 1 Bluetooth Tray............................................................................................................................................ 2 My Bluetooth Places .................................................................................................................................. 2 Icons used for Bluetooth devices and services........................................................................................... 2 GETTING STARTED...................................................................................................... 6 Installing Your USB Adapter ..................................................................................................................... 6 Configuring Your Bluetooth Device........................................................................................................... 6 Verifying Your Bluetooth Installation........................................................................................................ 7 Pairing Your USB Adapter to Other Bluetooth-Enabled Devices............................................................. 7 Finding services ......................................................................................................................................... 8 Setting up a connection .............................................................................................................................. 9 Determining a connection status ............................................................................................................. 10 Send to another Bluetooth device ............................................................................................................ 10 Uninstalling Your USB Adapter............................................................................................................... 11 CLIENT APPLICATIONS............................................................................................ 12 About Client and Server........................................................................................................................... 12 Human Interface Device .......................................................................................................................... 12 Printer ...................................................................................................................................................... 13 Audio Gateway ......................................................................................................................................... 13 Headset..................................................................................................................................................... 14 Bluetooth Serial Port ............................................................................................................................... 14 Dial-up Networking.................................................................................................................................. 15 Fax............................................................................................................................................................ 16 File Transfer ............................................................................................................................................ 16 Image........................................................................................................................................................ 17 PIM Exchange.......................................................................................................................................... 19 PIM Synchronization................................................................................................................................ 19 Network Access ........................................................................................................................................ 20 BLUETOOTH SERVICES............................................................................................ 22 Common Configuration Settings.............................................................................................................. 22 Notifications ............................................................................................................................................. 22 Audio Gateway ......................................................................................................................................... 23 Bluetooth Image Transfer ........................................................................................................................ 23 Bluetooth Serial Port ............................................................................................................................... 24 Dial-up Networking Service..................................................................................................................... 24 Fax Service............................................................................................................................................... 25 File Transfer Service................................................................................................................................ 25 Headset Service........................................................................................................................................ 26 Network Access ........................................................................................................................................ 27 PIM Item Transfer.................................................................................................................................... 28 PIM Synchronization................................................................................................................................ 30 CONFIGURATION PANEL ......................................................................................... 31 General Tab ............................................................................................................................................. 31 Accessibility Tab ...................................................................................................................................... 31 Discovery Tab .......................................................................................................................................... 32 Local Services Tab ................................................................................................................................... 34 Hardware Tab .......................................................................................................................................... 38 SECURITY...................................................................................................................... 39 iii Introduction.............................................................................................................................................. 39 Authentication .......................................................................................................................................... 39 Authorization............................................................................................................................................ 39 Bluetooth Device Identity......................................................................................................................... 39 Encryption ................................................................................................................................................ 40 Link Key ................................................................................................................................................... 40 Pairing Devices........................................................................................................................................ 40 Passkey..................................................................................................................................................... 41 Secure Connection ................................................................................................................................... 41 Security Request Dialog Box.................................................................................................................... 41 PRODUCT SPECIFICATIONS.................................................................................... 42 Bluetooth Operation................................................................................................................................. 42 Frequency Range ..................................................................................................................................... 42 Data Rate (Throughput)........................................................................................................................... 42 Interface ................................................................................................................................................... 42 Security..................................................................................................................................................... 42 Antenna .................................................................................................................................................... 42 LED Indicators......................................................................................................................................... 42 Dimensions (W x H x D) .......................................................................................................................... 42 Weight ...................................................................................................................................................... 42 TROUBLESHOOTING ................................................................................................. 43 iv INTRODUCTION About Your Creative Wireless Adapter CB3200/CB3700 Thank you for choosing the Creative Wireless Adapter CB3200/CB3700. Your USB adapter is easy to set up and supports wireless transfer rates of up to 3 Mbps*. Your USB adapter adds Bluetooth technology to your computer and can be paired with other Bluetooth-enabled devices. Note: CB3700 (Black strap) - Class 1 (up to 100m) CB3200 (Silver strap) - Class 2 (up to 10m) * May vary depending on actual operating environment and mode. Effective throughput of up to 2.1 Mbps. Package Contents • Creative Wireless Adapter CB3200/CB3700 • Quick Start leaflet • Installation CD System Requirements • • • • • • Genuine Intel® Pentium® II 300 MHz or higher IBM compatible PC Microsoft® Windows® XP, Windows 2000, Windows Millennium Edition (Me) or Windows 98 Second Edition (SE)** 64 MB RAM (128 MB recommended) 40 MB of free hard disk space Available USB port CD-ROM drive installed for software installation Note: ** Stereo music streaming is supported in Windows XP/2000 only. 1 Bluetooth Tray After installing the software, you would find a shortcut icon to My Bluetooth Places on your desktop. However, there is another icon that you will see after successful installation of the software. Normally located on the lower right-hand corner of your computer screen, the Windows system tray will now have an additional icon. This is the Bluetooth Tray. The Bluetooth Tray provides quick access to numerous Bluetooth operations. In this section, we will discuss the many uses of this icon. From this tray, you can: Have access to My Bluetooth Places: double-click the Bluetooth tray icon. Have access to the Bluetooth Setup Wizard: The wizard will help you . Configure how this computer accesses a service on another Bluetooth device . Locate remote Bluetooth devices. . Configure the way that this computer provides services to remote Bluetooth devices. . Set the name and type of this Bluetooth device, e.g., “Mary’s PC” on desktop. Have access to the Bluetooth Configuration Panel: right-click the Bluetooth tray icon. Select Advanced Configuration. Have Quick Connect option: right-click the Bluetooth icon, select Quick Connect, and then select the type of service to which you wish to connect. Start/Stop Bluetooth on this computer. My Bluetooth Places My Bluetooth Places is part of Windows Explorer. There are multiple ways to access My Bluetooth Places: In the Windows system tray, Right-click the Bluetooth icon and select Explore My Bluetooth Places Or Double-click the Bluetooth icon On the desktop, double-click the Bluetooth icon Open Windows Explorer and select My Bluetooth Places in the Folder panel or from the Address shortcut menu. Icons used for Bluetooth devices and services Before we move on to the next chapter about the various Bluetooth devices and services, it is important to get familiar first with the icons that you will see and know what they mean. Each Bluetooth icon changes its color to provide at-a-glance feedback about the status of a device or service. In the next few tables below, you will find both device and service icons in different colors, depending on which Windows platform you are using. Here, we divide the icon types into two – one for Windows XP, and the other for Windows 98SE / ME / 2000. 2 Device icons for Windows XP Bluetooth icons provide at-a-glance feedback about a device or service’s status by changing appearance. The Bluetooth icon in the Windows system tray provides feedback about Bluetooth status. Bluetooth Icon Indicates Bluetooth Status Status Icon Enable Description Paired Blue with White Disabled Blue with Red Blue with Green Connected Device Icon Types Device Type Normal Connected Paired Audio Gateway Desktop Computer Headset Human Interface Device Laptop Computer Modem Network Access Point Personal Digital Assistant (PDA) Printer Cellular Telephone Unknown Devices 3 Service icons for Windows XP Service icons are gray or yellow in color (or gray with yellow accents) in their “normal” state. When in their “connected” state, the primary color of the icon changes to green. Service Icon Types Service Name Normal Connected Unavailable Audio Gateway Dial-up Networking Fax Headset Network Access PIM Item Transfer PIM Synchronization Public Folder Bluetooth Serial Port Device icons for Windows 98SE / ME / 2000 Device Icon Types Device Type Normal Connected Paired Audio Gateway Desktop Computer Headset Human Interface Device Laptop Computer Modem Network Access Point 4 Printer Cellular Telephone Personal Digital Assistant (PDA) Unknown Devices Service icons for Windows 98SE / ME / 2000 Service icons are gray or yellow in color (or gray with yellow accents) in their “normal” state. When in the “connected” state, the primary color of the icon changes to green. Service Icon Types Service Name Normal Connected Not Available Audio Gateway Dial-up Networking Fax Headset Network Access PIM Item Transfer PIM Synchronization Public Folder (File Transfer) Bluetooth Serial Port 5 GETTING STARTED Installing Your USB Adapter Before you install your Creative Wireless Adapter CB3200/CB3700, take note of the Bluetooth Device Address (BDA) found on a label on your USB adapter. You need them later to verify your Bluetooth installation and pair your Bluetooth devices. DO NOT connect the USB adapter to your computer before installing the software. You will be required to do so halfway through the installation. 1. Turn on your computer and insert the Installation CD into your CD-ROM/DVD-ROM drive. Your CD should start automatically. If it does not, follow the steps below: i. Double-click the My Computer icon. Alternatively, click Start --> My Computer. ii. Right-click the CD-ROM/DVD-ROM drive icon, and then click AutoPlay. 2. Follow the instructions on the screen to install the Bluetooth software. 3. When the Software Installation Wizard dialog box appears, click the Next button. 4. When the License Agreement dialog box appears, select I accept the terms in the license agreement and click the Next button. 5. Follow the instructions on the screen. 6. When the Bluetooth device not found dialog box appears, click the Cancel button. 7. Click the Finish button. 8. When prompted, restart your computer. 9. Connect your USB adapter to your computer's USB port. Note: Windows 98 and 98 SE users may be prompted by an Add New Hardware Wizard dialog box when Windows detects your USB device. Follow the instructions on the screen. You may need to insert the Windows Installation CD into the CD-ROM drive during installation. Some computers may be supplied without the Windows CD, but have the necessary files stored in c:\windows\options\cabs (replace c:\ with the drive letter your Windows has been installed on). The My Bluetooth Places icon appears on your computer’s desktop and system tray. For Windows XP Service Pack 2 only 1. When the Found New Hardware Wizard dialog box appears, select No, not this time and click the Next button. 2. Select Install from a list or specific location (Advanced) and click the Next button. 3. Select Don’t search. I will choose the driver to install and click the Next button. 4. Select CB3200/CB3700 Creative Wireless Adapter and click the Next button. 5. Click the Finish button. Your USB adapter should appear under Bluetooth Devices in Device Manager. 6. When the Driver Signature Notice dialog box appears, click the OK button. Note: Your computer's USB port may be located on the front panel. If your USB adapter does not fit into the USB port located on the back panel, connect it to the USB port located on the front panel. Configuring Your Bluetooth Device 1. On your taskbar, right-click the My Bluetooth Places icon , and select Start Using Bluetooth. The Initial Bluetooth Configuration Wizard dialog box appears. 2. Follow the instructions on the screen to complete the configuration. 3. When you are prompted to install another Bluetooth device, click the Skip button. 4. Click the Finish button. 6 Verifying Your Bluetooth Installation 1. On your taskbar, right-click the My Bluetooth Places icon , and select Advanced Configuration. The Bluetooth Configuration dialog box appears. 2. Click the Hardware tab. 3. In the Device Properties box, check the device status and device address. The device should be indicated as working properly and the device address should match the BDA, found on a label on your USB adapter. Pairing Your USB Adapter to Other Bluetooth-Enabled Devices Using My Bluetooth Places Application You need to pair your USB adapter for it to work with other Bluetooth-enabled devices. Use the My Bluetooth Places application to pair your USB adapter to Bluetooth-enabled devices. a. Using My Bluetooth Places Application 1. On your taskbar, double-click the My Bluetooth Places icon . The My Bluetooth Places window appears. 2. Double-click the Find Bluetooth Devices icon. For Windows XP only: In the Bluetooth Tasks box, click View devices in range. 3. In the Entire Bluetooth Neighborhood dialog box, double-click the Bluetooth-enabled device that you want to pair to. 4. Follow the instructions on the screen. Note: If prompted for a Bluetooth pin code, type the pin code of the Bluetooth-enabled device that you are pairing your USB adapter to. b. Using the Auto-connect Pairing Button To pair your USB adapter to a Bluetooth-enabled keyboard or mouse, using the Autoconnect pairing button, do the following: Note: The following steps for using the Auto-connect pairing button are for Windows XP or Windows 2000 only. 1. Make sure that your Bluetooth-enabled keyboard or mouse is in Discoverable mode. For more information, refer to your keyboard or mouse’s User’s Guide. 2. Press and hold the Auto-connect pairing button on your USB adapter until the Power/Activity LED blinks blue. 3. When the Bluetooth Device Selection dialog box appears on the screen, your USB adapter will detect your Bluetooth-enabled mouse or keyboard. 4. To pair to your keyboard The Bluetooth Security Setup dialog box will appear once your keyboard is detected. On the PIN Code box, a keyboard pairing pin is displayed. Type the pin in the PIN Code box, and press the <Enter> key. The Bluetooth icon on the taskbar turns green. To pair to your mouse The Confirmation Required dialog box will appear once your mouse is detected. Follow the instructions and click the Click here button. The Bluetooth icon on the taskbar turns green. 7 Finding services After discovering the devices you can have access to, you may perform Service Discovery. Each available device that you have discovered in the Bluetooth Neighborhood provides you with several services. To find out what these services are, simply do either of the following: Double-click a device in the Bluetooth Neighborhood, OR Right-click a device and select Discover Available Services. The services that CREATIVE BLUETOOTH SOFTWARE supports are as follows: Bluetooth Serial Port establishes a wireless connection between two Bluetooth devices. The serial connection can be used by applications as though there is a serial cable between the devices. Dial-up Networking allows you to use a Bluetooth modem, or modem on another Bluetooth device, to connect to the Internet and send/receive e-mail. Fax allows you to send a fax transmission through another Bluetooth device. File Transfer (Public Folder) allows you to perform file system operations on another Bluetooth device such as browse, drag-and-drop, open, print, cut, copy, paste, delete, rename, etc. Headset allows a Bluetooth headset to be used as the audio input/output mechanism for another Bluetooth device, such as a computer or cell phone. PIM Item Transfer allows you to exchange Personal Information Manager (PIM) data such as business cards, calendar items, e-mail messages, and notes. PIM Synchronization allows you to synchronize Personal Information Manager (PIM) data between two Bluetooth devices. Network Access allows you to gain access to the Internet using another Bluetooth device’s Local Area Network (LAN) connection. Audio Gateway allows the microphone/speakers on Bluetooth device (typically a computer) to be used as the audio input/output mechanism for a remote Bluetooth device, such as a cell phone. 8 Note: Not all Bluetooth devices provide all of these services. For instance, network gateways only displays the Network Access service to let you have access to the Local Area Network (LAN) connection. Setting up a connection Now that you know how to discover available devices and their services, you are now ready to make a Bluetooth connection with another device. Setting up a new connection is fast and easy, you have these choices: Create a connection from the Bluetooth Icon in the System Tray In the Windows system tray, right-click the Bluetooth icon, select Quick Connect and then the Bluetooth service that you wish to use. If this computer has created a connection to the desired type of service in the past, the options on the shortcut menu are: 1. The name(s) of any devices(s) with which prior connections to this type of service have been established. Select a name from the list to re-establish connection. 2. Other devices… Select this option to search for additional devices that potentially provide the desired service, select a device from the list and then click Connect. If this computer has never created a connection to this type of service, the only option on the shortcut menu is “Find Devices…” Select this option to search for devices that potentially provide the desired service, select a device from the list and then click Connect. Using the Bluetooth Setup Wizard To start the Bluetooth Setup Wizard, you have 3 ways, Start the Wizard by right-clicking the Bluetooth icon in the Windows system tray and select Bluetooth Setup Wizard. Or, In Windows Explorer, with My Bluetooth Places selected, from the Bluetooth menu, select Bluetooth Setup Wizard. Or, Right-click the Bluetooth Icon on Desktop and select Bluetooth Setup Wizard. Follow the wizard’s on-screen instructions. Create a connection from Entire Bluetooth Neighborhood In Windows Explorer, 1. In the Folders panel, select Entire Bluetooth Neighborhood, right-click a device name and select “Connect to … “ Or, 9 2. In the Folders panel, expand Entire Bluetooth Neighborhood, select a device, and then, in the right panel, right-click a service provided by that device and select “Connect to …” Determining a connection status The Bluetooth Connection Status dialog box displays information about the status of a connection. It is also where you disconnect an active connection. To display the Connection Status dialog box: 1. Open My Bluetooth Places and select My Device. 2. Right-click a service name and then select Status from the pop-up menu. The Connection Status dialog box opens and provides the following information: Status: tells you whether you are Connected or Disconnected. Device Name: the name of the device to which your computer is connected. Duration: the length of time this connection has been established, displayed in hours, minutes, and seconds. Depending on the service, the connection may time out (automatically disconnect) after a specific period of inactivity. Activity: the number of bytes sent and received over the connection. Signal Strength: a variable scale that ranges from Too Weak through Good to Too Strong. Also in the dialog box you will find three ‘control’ buttons: Properties: click this button to display the Bluetooth Properties dialog box for the connection. Disconnect: click this button to end your current connection. Close: click this button to close the Bluetooth Connection Status dialog box. Send to another Bluetooth device This feature is used to send information to another Bluetooth device. Data types include: Files form Windows Explorer Documents form Microsoft Office applications, including: Word Excel Access PowerPoint Microsoft Outlook items, including: Contacts Appointments Tasks Messages 10 Notes To use Send to other Bluetooth device 1 2 3 In the application: 1.1 Windows Explorer – select one or more files to be transferred. Folders cannot be transferred. 1.2 Microsoft Office – only the document in the active window can be transferred. 1.3 Microsoft Outlook – select one or more items to be transferred. From the application’s File menu, select Send To, and then select Bluetooth from the shortcut menu. Select a device from the shortcut menu to send the data Or Select Other…, choose a device from the list and then click OK to send the data. Uninstalling Your USB Adapter At times you may need to uninstall or reinstall your USB adapter to correct problems, change configurations, or upgrade supported drivers. The following instructions tell you how to do so in all Windows operating systems. 1. 2. 3. 4. 5. 6. 7. 8. Click Start → Settings → Control Panel. Double-click the Add/Remove Programs icon. Click the Install/Uninstall tab (or Change or Remove Programs button). Select the CREATIVE BLUETOOTH SOFTWARE entry, and then click the Add/Remove (or Change/Remove) button. In the confirmation dialog box, click the Yes button. Turn off or remove your device, and then click the OK button. Click the Yes button to complete uninstalling your device. When prompted, restart your computer. 11 CLIENT APPLICATIONS About Client and Server Before we start discussing about what each of the services does, let us briefly tell you a bit about Client and Server since we will be mentioning a lot of these two in this chapter. In order for two Bluetooth devices to exchange data, they must establish a connection. However, before a connection is established, one device must request a connection with the other. This is the Client. The second device that accepts or rejects the connection is then known as the Server. Many Bluetooth devices can act as both client and server. Human Interface Device The Human Interface Device (HID) Application allows this computer to wireless use one or more remote Bluetooth HIDs as input/output devices. For example, the HID Application allows this computer to use a Bluetooth keyboard and a Bluetooth mouse. Create a Bluetooth HID connection: Note: Some HIDs have multiple modes. Before establishing a connection, be sure the HID is in the desired mode. For example, in the case of an HID that can function as both mouse and a laser printer, be sure the mode switch is set to “Mouse” before attempting to connect. 1. On the Client, open My Bluetooth Places by double-clicking the icon on your desktop. 2. Select Entire Bluetooth Neighborhood. 3. Right-click anywhere except on a device name and select Refresh from the pop-up menu to see an updated list. 4. Double-click HID devices, such as Keyboard or Mouse to make connection. 5. Once an HID connection is established, that connection will persist. If the computer is shut down, when the computer is turned on again the connection will re-establish automatically. Note: HIDs usually have a button, which is sometimes difficult to find, that must be pressed before other Bluetooth devices can locate the HID. Even after the button is pressed, the HID can only be discovered for a limited time, and then the button must be pressed again. The time period can be as short as 30 seconds or as long as 180 seconds. Read the document that accompanies the HID before you attempt to connect to the devices. Close an HID connection: Under normal circumstances, there is no reason to close an HID connection; once established the connection is maintained automatically, even during the power off and power on processes. If, for some reason, the connection must be closed: from My Bluetooth Places, right-click the service name and select Disconnect. 12 When an HID connection is closed manually by the operator, the connection’s “persistence” is broken. The connection must be re-established manually, after which the connection will again persist until broken manually. Printer The Bluetooth Printer allows this computer to use a Bluetooth printer. Once a Bluetooth printer has been properly installed, it can be used from this computer in the same way as any other printer would be. Create a Bluetooth Printer connection at first time: 1. On the Client, open My Bluetooth Places by double-clicking the icon on your desktop. 2. Select Entire Bluetooth Neighborhood. 3. Right-click anywhere except on a device name and select Refresh from the popup menu to see an updated list. 4. Double-click Printer you want to make a Bluetooth connection. 5. Once an Bluetooth Printer connection is established at first time, that might need you install the printer driver. Push OK button to start the printer driver installation. 6. When the wizard asks you to select a printer and model, select the printer and model on the list. If your printer is not in the list of options, click Have Disk…, insert the driver disk or CD for the printer, and then navigate to the driver and directory that contains the driver initiation file (.inf) for the printer. 7. To complete the installation, follow the on-screen instructions. 8. After install printer driver, you can use this Bluetooth Printer as other printer you have. Delete a printer: 1. Click the Start button on windows system tray. 2. Click Settings 3. Click Printers 4. Right-click the printer you want to delete and select Delete Audio Gateway The Audio Gateway service allows a remote Bluetooth device to use this computer’s microphone and speaker’s the remote device’s audio input and output devices. For example, if this computer has voice recognition capabilities, a Bluetooth headset might be used as the audio input device. Connection is initiated from the client. To establish a Bluetooth Audio Gateway connection: 1. On the Client, open My Bluetooth Places by double-clicking the icon on your desktop. 2. Select Entire Bluetooth Neighborhood. 3. Right-click anywhere except on a device name and select Refresh from the pop-up menu to see an updated list. 4. Right-click the server that will provide the Audio Gateway service and then select Discover Available Services to display an updated list of services. 13 5. 6. Double-click Audio Gateway. Open Volume Control on windows tray to adjust the volume you want. Client must have a sound card, microphone, and speakers installed. The Bluetooth radio on both server and client must support audio. Headset The Headset application allows client (this computer) to use a Bluetooth headset (or any other device that offers the Bluetooth headset service) as the audio input and output device for server. To create a headset connection: 1. Make sure the headset is already in PAIRING mode. 2. On the Client, open My Bluetooth Places by double-clicking the icon on your desktop. 3. Select Entire Bluetooth Neighborhood. 4. Right-click anywhere except on a device name and select Refresh from the pop-up menu to see an updated list. 5. Right-click the server that will provide the Headset service and then select Discover Available Services to display an updated list of services. 6. Double-click Headset. Server must have a sound card, microphone, and speakers installed. The Bluetooth radio on both server and client must support audio. Bluetooth Serial Port The Bluetooth Serial Port service allows two Bluetooth devices to establish a wireless connection through a virtual communications port and then use that connection as if it were a hardwired serial cable between those devices. Connection is initiated from the client. To establish a Bluetooth serial port connection: 1. On the Client, open My Bluetooth Places by double-clicking the icon on your desktop. 2. Select Entire Bluetooth Neighborhood. 3. Right-click anywhere except on a device name and select Refresh from the popup menu. This updates your current list of available devices. 4. Right-click the server (the receiver of your request) with which you want to establish a connection. Select Discover Available Services from the pop-up menu to display an updated list of available services. 5. Double-click Bluetooth Serial Port. A dialog box appears, containing the communications port number assigned to this connection by the client. The application that will use this connection must be configured to send data to this port. To determine the communications port that the service will use: 14 1. On the Server, open My Bluetooth Places by double-clicking the icon on your desktop. 2. Right-click My Device and select Properties from the pop-up menu. 3. In the Bluetooth Configuration Panel, select the Local Services tab. Double-click the Bluetooth Serial Port service to display its Service Properties dialog box. The Service Properties dialog box displays the communications port that the connection is using. To close a Bluetooth serial port connection: 1. On the Client, open My Bluetooth Places by double-clicking the icon on your desktop. 2. Select the device that is providing the Bluetooth Serial Port service. 3. Right-click Bluetooth Serial Port and then select Disconnect Bluetooth Serial Port from the pop-up menu. Another method to close the connection is from the Server. However, this is not recommended: 1. On the Server, open My Bluetooth Places by double-clicking the icon on your desktop. 2. Select My Device. 3. Right-click Bluetooth Serial Port and then select Stop to close the service. The service must be re-started before it will be available to remote devices. Note: To restart connection, right-click Bluetooth Serial Port and select Start from the pop-up menu. Dial-up Networking The Dial-up Networking service allows a Bluetooth client to use a modem that is physically connected to a different Bluetooth device (acting as the server). Once a wireless connection is established between the two devices, the client can use the server’s modem as if it were a local device on the client. Connection is initiated from the Client. To establish a Dial-up Networking session: 1. On the Client, open My Bluetooth Places by double-clicking the icon on your desktop. 2. Select Entire Bluetooth Neighborhood. 3. Right-click anywhere except on a device name and then select Refresh from the pop-up menu for an updated list. 4. Right-click the server that will provide the Dial-up Networking Service and select Discover Available Services from the pop-up menu to display an updated list of available services. 5. In My Bluetooth Places, double-click Dial-up Networking. 6. The Connect To dialog box opens, prompting you to fill in your user name, password, and the phone number to be dialed. 7. Click the Dial button. Selecting the Save password checkbox will let you connect to the same number in the future without having to type in all the connecting information. 15 You can now open a Web browser and connect to the Internet as if the modem was attached to your computer. To close a Dial-up Networking connection: 1. On the Client, open My Bluetooth Places by double-clicking the icon on your desktop. 2. Select the device that is providing the Dial-up Networking service. 3. Right-click the device, and then select Disconnect Dial-up Networking from the pop-up menu. Fax The Fax service allows a Bluetooth client to perform a wireless fax transmission using a device that is physically attached to a Bluetooth server. Connection is initiated from the Client. To send a fax: 1. On the Client, open My Bluetooth Places by double-clicking the icon on your desktop. 2. Select Entire Bluetooth Neighborhood. 3. Right-click anywhere except on a device name and select Refresh from the pop-up menu to see an updated list. 4. Right-click the server that will provide the Fax service and then select Discover Available Services to display an updated list of services. 5. Double-click Fax. Once the fax connection is established, you need to open or create the document to be faxed and use the Print or Send to Fax Recipient option available in most applications. The Fax connection automatically closes when the transmission is complete. File Transfer The File Transfer service allows a Bluetooth device to perform file operations on the default File Transfer directory – and all the folders and files that it contains – of another Bluetooth device. To perform a folder or file operation: 1. On the device from which the File Transfer service will be used, open My Bluetooth Places by double-clicking the icon on your desktop. 2. Select Entire Bluetooth Neighborhood. 3. Right-click anywhere except on a device name and then select Refresh from the pop-up menu to see an updated list. 4. Right-click the device that you want to transfer files to and then select Discover Available Services to display an updated list of available services. 5. Click the plus (+) sign right next to Public Folder to expand that folder. If there are subfolders, click all the plus (+) signs until you see all the files under the subfolders. 16 Types of File Transfer operations There are various types of file operations that you can perform. With My Bluetooth Places opened, right-click a folder and select an option from the pop-up menu. A dialog box appears, its title varies depending on the operation being carried out. In the dialog box that is displayed, you will see the current operation indicated at the bottom of the box. The types of operations that can be accomplished are: Open: there are two items you may open: − Files: are opened in the application associated with them. − Folders: are expanded to show their file contents. Print: sends the selected Server file to the Client’s default printer. Send to: − 3.5” Floppy Drive: copies the selected item(s) from the server to the client’s 3.5” floppy drive. − My Shared Folder: copies the selected item(s) from the server to the default File Transfer folder on the client. Cut: copies a folder and its contents, or individually selected files in a folder, to the Windows clipboard. When the clipboard contents are pasted to a new location, the originally selected file(s) on the server are deleted. Copy: copies a folder and its contents, or individually selected files in a folder, to the Windows clipboard. Delete: removes selected file(s) and/or folder(s) on the server. Rename: allows you to change an empty folder’s name. Properties: displays the file or folder’s properties in a dialog box. Other options may appear, depending on the content in which the menu appears: Update: refreshes the contents of a folder. New Folder: creates a new folder on the server. Abort FTP Operation: cancels an ongoing File Transfer operation. Image The Bluetooth Imaging application allows this computer to send images to remote devices that provide the Bluetooth imaging service. Possible uses include the transfer of images to a Bluetooth camera, camera/phone, or any other device that offers the Bluetooth Imaging service. The supported image formats are: BMP GIF PNG JPG 17 Image Format Conversion Some devices, particularly battery-powered devices such as phones and cameras, may only be able to accept images in one format and at a single fixed resolution. In that case, the image is converted to the required format and resolution before it is transferred to the remote device. Create an Imaging Connection Imaging application connections are created automatically on an as-needed basis. To send an image to the remote imaging device: 1. In Entire Bluetooth Neighborhood, drag-and-drop the image file onto the destination’s device icon. 2. In Windows Explorer, right-click an image file and, from the shortcut menu, select Copy. Then, in Entire Bluetooth Neighborhood, right-click the destination device, and, from the shortcut menu, select Paste. 3. If a shortcut to the remote device’s imaging service exists in My Bluetooth Places, drag-and-drop, or, copy-and-paste, to that shortcut. Close an Imaging Connection Imaging connections close automatically when the image transfer is complete. To abort the image transfer, click Cancel in the transfer dialog box. Configure The Bluetooth Configuration Panel > Client Applications > Imaging > General tab provides options to configure: The application name - to change it, highlight the existing name and enter the new name. Secure connection - to enable secure connection, select the option box. To disable secure connection, clear the option box. Remote Camera Operation Remote operation of the Bluetooth imaging device, such as the ability to trip a camera’s shutter or browse the images on a device, may be possible, depending on the functions supported by the remote device. There are three prerequisites: This computer must be running under the Windows XP operating system. The remote imaging device must support the action. See the remote imaging device’s documentation for information about the remote functions the device supports. The remote imaging device must be installed on this computer (see below). Install an Imaging Device 1. Perform a search for devices and then, from Entire Bluetooth Neighborhood, rightclick a Bluetooth imaging device, and select Add Camera from the shortcut menu. Windows installs the camera and adds it to the Cameras and Scanners section of My Computer. 18 Note: Only Windows XP can install an imaging device; previous operating systems do not have native support for this option. Uninstall an Imaging Device 1. In Entire Bluetooth Neighborhood, right-click an installed Imaging device and then select Delete Camera from the shortcut menu. PIM Exchange The Information Exchange service provides a way to send and receive Microsoft Outlook items to and from another Bluetooth device, such as a Personal Digital Assistant (PDA) or notebook computer. The supported Outlook items are: Business cards (*.vcf and *.vcd) Calendar entries (*.vcs) Notes (*.vnt) Messages (*.vmg) There are three types of operations: Send – sends an object to another device. Receive – requests an object from another device. Exchange – sends a client object and receives a server object. You can set the default location of your business card and the location where you received items from the Bluetooth Configuration Panel. To send, receive, or exchange an object: 1. On the Client, open My Bluetooth Places by double-clicking the icon on your desktop. 2. Right-click the Inbox icon of the remote device and then select an option from the pop-up menu. Notes: Business cards are sent, received, or exchanged without further intervention. To send calendar items, notes, and messages, go to the folder that contains the item you want to send out. Then select the item and click Open. PIM Synchronization The PIM Synchronization service is used to match information between a Bluetooth client and a Bluetooth server. A perfect example would be a Personal Information Manager (PIM) database. CREATIVE BLUETOOTH SOFTWARE supports synchronization with devices that support IrMC v1.1 and exchange the v2.1 vCard format. 19 If Information Synchronization is used for the first time with a new application, it may take a few minutes to synchronize the database. This is how it works – it merges data from both devices, deletes duplicate entries, and then copies the updated database to both devices. Following the first attempt, subsequent uses of Information Synchronization for the same application will be much faster – only the changes that have been made since the devices were last synchronized will be exchanged. Microsoft Outlook is the only Personal Information Manager that this release of CREATIVE BLUETOOTH SOFTWARE supports. Outlook permits duplicate entries, so all duplicates may not be exchanged in the synchronization process. The only thing synchronized would be Outlook’s default contacts folder. Items in the subfolders will not be synchronized. This means that if you have moved items from the default folder to a subfolder, they will seem to be deleted after the next synchronization. To apply PIM Synchronization: 1. On the client, open My Bluetooth Places by double-clicking the icon on your computer. 2. Select Entire Bluetooth Neighborhood. 3. Right-click anywhere except on a device name and then select Refresh from the pop-up menu to see an updated list. 4. Right-click the server that you want to synchronize with and then select Discover Available Services to display an updated list of available services. 5. Double-click PIM Synchronization. A dialog box appears, displaying the synchronization progress. Once the process is complete, the connection automatically closes. Network Access The Network Access service allows a Bluetooth client to use a Local Area Network (LAN) connection that is physically attached to a Bluetooth server. Possible network access servers include: Bluetooth-enabled computers that have a hardwired Ethernet connection Stand-alone Bluetooth Network Access Points The Bluetooth server must be specifically configured to provide Network Access service. However, after a Bluetooth device is configured as a Network Access server, it cannot act as a Network Access client without being re-configured. In the next sections to follow, we will discuss about how to set up Network Access in different Windows platforms. Windows 2000, Server-side Setup 1. From the Windows Control Panel, select Network and Dial-up Connections. 2. Right-click the Local Area Connection icon and select Properties. The Local Area Connection Properties dialog box opens. 3. Click the Sharing tab. Select Enable Internet Connection Sharing. 4. Click OK. 5. Click Yes to enable Internet connection sharing. 20 Windows XP, Server-side Setup 1. Have your Windows XP compact disc handy. You may need it during the setup process. 2. From the Windows Control Panel, select Network Connections. 3. Right-click the Local Area Connection icon and then select Properties. The Local Area Connection Properties dialog box opens. 4. Click the Advanced tab. Select Enable Internet Connection Sharing to allow network users to connect, control, or disable this Internet connection. 5. Select Allow other network users to connect through this computer’s Internet connection. 6. Click OK. 21 BLUETOOTH SERVICES Common Configuration Settings These properties can be set individually for each Bluetooth service: Service Name - the default name of each service can be changed. Secure Connection - requires that remote devices provide proof of identity and that all data be encrypted. Startup Automatically - starts the service automatically when Bluetooth is started. Notifications - provides visual and/or audio notification that a remote device is attempting to connect (or has connected) to a service on this computer. Notifications There are three types of notification: Authentication request, also called a PIN code request - this notification is displayed automatically in a balloon over the Notification area, at the far right of the taskbar if a Personal Identification Code is required before a connection can proceed. An audio file can also be associated with the notification. Authorization request, also called a connection request - this type of notification can be visual, audio, or both. It notifies you of attempts to access a Bluetooth service on this computer; the connection will not proceed until you click the balloon that is displayed over the Notification area, at the far right of the taskbar. If the notification balloon is ignored, the connection request will time out and fail. Notification only - this type of notification does not affect access in any way; it is solely for information purposes to let you know that a connection has been established. Example: Both Authentication and Authorization request notifications are controlled by whether Secure Connection is enabled for an individual service. An example of how notifications might work when a remote device attempts to access a service on this computer, if all notifications are enabled: Authentication - a balloon notification (audio optional) prompts you for a PIN code. If the PIN code does not match the code entered on the remote device, the connection will not be allowed. After the remote device has been authenticated this notification will not appear again, unless the paired relationship is broken. If the paired relationship is broken, the devices must re-pair. Authorization - a balloon notification is displayed and/or a sound file provides audio notification that a remote device is attempting to access a Bluetooth service on this computer. Click the balloon to proceed. A dialog box prompts you to enable the connection only once, or to allow this device to use the service every time. After a connection has been authorized, an additional visual and/or audio notification may be displayed (if enabled). This notification is for information only to inform the operator that a connection has been established. Note: After two devices are paired, the authentication notification will no longer be displayed when a connection is attempted. If Always allow is enabled during the authorization process, the authorization notification will not be displayed on future connection attempts. Connection notification only happens if it has been enabled on the Notifications tab of the individual service being accessed. 22 Service Access Notification Notifications lets you associate a sound (Windows *.wav file) and/or a visual indication with access attempts by remote devices. A different notification sound can be associated with each local Bluetooth service. Associate a Sound with Service Access From the Bluetooth Configuration Panel, Local Services tab: 1. Double-click a service name and then select the Notifications tab. 2. Select the options you want; both visual and sound notifications may be selected for a single event. 3. Choose a sound; click the Browse button and navigate to the sound file (*.wav) be used for notification. To preview the sound file, click the play button Audio Gateway The Bluetooth Audio Gateway service enables the computer to use the microphone and speakers on a remote Bluetooth device as the input and output devices for the computer. For example, if this computer has voice recognition capabilities, a Bluetooth headset might be used as the audio input device. Hardware Requirements: The Bluetooth hardware on this computer and on the remote device must support audio. The remote device handles both audio input and output for this computer; therefore, this computer does not require a sound card, microphone, or speakers. Configure the Audio Gateway Service: 1. From the Notification area, at the far right of the taskbar, right-click the Bluetooth icon, select Advanced Configuration > Local Services, and then double-click the Audio Gateway service. 2. Set the common configuration properties of the service, and then click OK. Bluetooth Image Transfer The Bluetooth image transfer service allows this computer to accept images from remote devices that support Bluetooth image transfer. The supported image formats are: BMP GIF PNG JPG Received images are stored in the Bluetooth exchange folder. Configure the Bluetooth Imaging Service From the Windows system tray, right-click the Bluetooth icon, select Advanced Configuration > Local Services, and then double-click the Bluetooth Imaging service. Set the common configuration properties of the service, and then click OK. 23 Bluetooth Serial Port The Bluetooth Serial Port service enables a remote Bluetooth device to establish a wireless serial connection with this computer. The wireless serial connection may be used by applications as though a physical serial cable connected the devices. To establish a Bluetooth Serial Port connection: The connection must be initiated from the remote device by the Bluetooth Serial Port application. Determine the communications port being used by this computer for the Bluetooth Serial Port: In the Notification area, at the far right of the taskbar, right-click the Bluetooth icon, select Advanced Configuration, and then select the Local Services tab. The COM port assigned to this service is the last item in the Bluetooth Serial Port service row. Configure the application on this computer that will use this service to send its data to this COM. Add or Delete a Bluetooth Serial Port The Bluetooth Serial Port service has one pre-configured Bluetooth Serial Port, but additional Bluetooth Serial Ports can be added as needed. To add a port: 1. From the Bluetooth Configuration Panel, Local Services tab, click Add Serial Service. 2. In the Properties dialog box, modify the properties. Enter a unique name (fewer than 99 alphanumeric characters). Select secure connection. Select Startup Automatically. 3. From the COM Port shortcut menu select a communications port that is not assigned to any other service. 4. Click OK. To remove a Bluetooth Serial Port: From the Bluetooth Configuration Panel, Local Services tab, select the port to be removed, and then click Delete. Note: The Delete button is only available when a Bluetooth Serial Port is selected. Dial-up Networking Service The Bluetooth Dial-up Networking service makes it possible for a remote Bluetooth device to use a modem that is physically connected to this computer. The remote device can then access the Internet or log on to a remote network. Configure the Dial-up Networking Service From the Notification area, at the far right of the taskbar, right-click the Bluetooth icon, select Advanced Configuration > Local Services, and then double-click the Dial-up Networking service. Select the physical modem to be used from the Modems shortcut menu. 24 Set the common configuration properties of the service, and then click OK. Fax Service The Fax service allows a remote Bluetooth device to send a Fax via a modem that is physically attached to this computer. Configure the Fax Service From the Notification area, at the far right of the taskbar, right-click the Bluetooth icon, select Advanced Configuration > Local Services, and then double-click the Fax service. Select the physical modem to be used from the Modems shortcut menu. Set the common configuration properties of the service, and then click OK. File Transfer Service The File Transfer service allows this computer to perform file operations on the Bluetooth exchange folder (and the folders and files it contains) of a remote device. To Use the File Transfer Service 1. Right-click the Bluetooth icon and select Explore My Bluetooth Places. 2. Configure Windows Explorer so that the Folders pane is visible (View > Explorer Bar > Folders). 3. In the Folders pane, select Entire Bluetooth Neighborhood. 4. On the menu bar, select Bluetooth > Search For Devices. 5. In the Folders pane, expand Entire Bluetooth Neighborhood to show the devices in the vicinity. 6. Select a device and expand that branch to view the Bluetooth exchange folder of the remote device. Note: If Public Folder is not available, the remote device is not configured to allow remote file operations. Use drag-and-drop to copy any file or folder contained in the Public Folder of the remote device to a folder on this computer. You can also drag-and-drop files or folders from this computer to the Public Folder (and its sub-folders) of the remote device. Other file operations - right-click a file or folder in the remote device’s Public Folder for a context sensitive menu. All potential menu options may not be available at all times. Potential menu options include: Open - opens the selected file on this computer, using the default application for this type of file. Print - sends the selected file to this computer’s default printer. Send To 3 ½ floppy (A) - sends the selected file to the 3 ½ inch floppy drive on this computer 25 Public Folder on My Device - sends the selected file to the Public Folder on this computer. Rename - applies only to empty folders; file names and the names of folders that contain objects cannot be changed using this technique. Cut, Copy, Paste, Delete, Refresh, View & New - standard Windows functions. Headset Service The Bluetooth Headset Service allows this computer to provide audio input/output for remote Bluetooth devices. Example: if the remote device is a Bluetooth telephone, this computer’s microphone and speakers can be used as speakerphone input and output for that device. Hardware Requirements This computer must have a sound card, microphone, and speakers installed. The Bluetooth hardware on this computer and on the remote device must support audio. Configure the Headset Service From the Notification area, at the far right of the taskbar, rightclick the Bluetooth icon, select Advanced Configuration > Local Services, and then double-click the Headset service. Set the common configuration properties of the service, and then click OK. Usage Example with a Bluetooth Telephone From the Bluetooth phone, search for devices that offer the Headset Service, select the Headset Service on this computer, and then select Connect. Note: Individual Bluetooth phone manufacturers may use different terminology to describe the Headset Service, but the word audio and/or headset should be in the description - refer to the documentation included with the Bluetooth phone for assistance. If the Headset Service has Secure Connection enabled, a PIN code and Authorization will be required to complete the connection. When the phone successfully connects to the Headset Service: In the Notification area, at the far right of the taskbar, the Bluetooth icon will be a blue field with a green insert (if another Bluetooth connection existed before this connection was established, the icon would have already been this color). A notification balloon will appear briefly above the Bluetooth icon with a message similar to: Bluetooth Connection Successful Bluetooth device My Bluetooth Cell Phone is connected to the Headset service on this computer The Headset Service now monitors the phone and displays a notification balloon over the 26 Bluetooth icon in the Notification area, at the far right of the taskbar when an incoming call is detected. Click the balloon to acknowledge the notification, and then, in the Incoming Call dialog box, click the Accept button to accept the call. The audio signal from the phone is re-routed to the audio output device (speakers or earphones) on the computer, and the microphone on the computer provides the audio input for the phone. To reject the incoming call, when the Incoming Call dialog box is displayed, click the Reject button. Network Access The Bluetooth Network Access service enables a remote Bluetooth device to access a Local Area Network that is physically attached to this computer or allows a remote device to become part of an ad hoc network provided by this computer. After this computer has been configured to provide the Network Access service to other Bluetooth devices, it will not be able to use the Bluetooth Network Access service provided by another Bluetooth device without being re-configured. In other words, this computer cannot be both a Bluetooth Network Access server and a Bluetooth Network Access client at the same time. Setup for Windows 98SE & Windows Me Note: Internet Protocol routing software is required on Windows 98SE and Windows Me servers. Install and configure the routing software as instructed by the software's manufacturer before you configure the computer as a Network Access server. Configure the server: 1. From Windows Control Panel, double-click the Network icon. 2. On the Configuration tab, select TCP/IP-> Bluetooth LAN Access Server Driver (scroll down if necessary). 3. Click Properties and select the IP Address tab. Select Specify an IP address Enter an IP Address (suggested value - 192.168.1.1) Enter a Subnet Mask (suggested value - 255.255.255.0) 4. Click OK to close each dialog box, and then click Yes to restart the computer. Setup for Windows 2000 and Windows XP If Internet Connection sharing was previously enabled (before Creative Bluetooth Software was installed) it must be disabled and then re-enabled before the Bluetooth network adapter can use it. Configure for Internet/LAN: Before you begin, verify that the: Bluetooth software is installed and enabled Bluetooth device is turned on Server has access to the Local Area Network (LAN). If the LAN provides Internet access, the connection can be verified by using the server’s browser to connect to the Internet through the LAN. 1. Configure Bluetooth - right-click the Bluetooth icon in the notification area, select Advanced Configuration, and then 27 From the Local Services tab, select Network Access, and then click Properties. From the General tab, in the Select the type of service drop-down list, select Allow other devices to access the Internet/LAN via this computer, and then in the Connection Sharing section, select Configure Connection Sharing to display Windows XP - the Network Connections window Windows 2000 - the Network and Dial-up Connections window 2. Configure Windows Right-click Local Area Connection, select Properties, and then Windows XP - from the Advanced tab, in the Internet Connection Sharing section, select Allow other network users to connect through this computer’s Internet connection. Then select Bluetooth Connection in the Home Networking drop-down list, if available. (The Home Networking drop-down list is not available on all versions of Windows XP.) Windows 2000 - from the Sharing tab, in the Internet Connection Sharing section, select Enable Internet Connection Sharing for this connection. Click OK to close the window. 3. Click OK in the Bluetooth Properties window to complete the configuration process. Note: If a firewall is in use, additional steps may be required before the browser can access the Internet. Contact your information technology department to determine if a firewall is in use or for assistance in configuring the Local Area Network settings for your proxy server. Verify the Server Setup From a different Bluetooth computer: 1. Find the server - from My Bluetooth Places, in Entire Bluetooth Neighborhood, right-click in an empty area, and then select Refresh from the shortcut menu. 2. Display the services - right-click the server and select Discover Available Services from the shortcut menu. 3. Connect to the server - double-click the Network Access service and follow the on-screen instructions. 4. Open a browser and connect to the Internet to verify the connection. PIM Item Transfer The PIM Item Transfer service allows Personal Information Manager items to be transferred between this computer and a remote Bluetooth device. Four data types are supported: Business Cards Calendar Items Email Messages Notes 28 Each data type can be saved in any of the supported and installed PIMs. Note: PIMs that are not installed on this computer will not appear in the shortcut menus. When the PIM associated with an individual data type is changed on the PIM Item Transfer page, that data type is also changed for the PIM Synchronization service. Configure In addition to the configuration options common to all Bluetooth services, this service also has settings that determine: How business card requests are handled. The options are: Never send my business card - ignore the request Choose a business card as needed - when prompted, select a business card to be sent to the requester. Always send the same business card - when a request is received, always send the same business card. When this option is selected, a dialog box prompts you to select an installed Personal Information Manager (if more than one is installed on this computer) and an existing business card. Previously sent business cards - after a card is selected using the Always send the same business card option, that card will be added to the shortcut menu as an option. Note: Previously sent business card additions to the menu are limited to ten, after which the oldest contact will be replaced. Where to store inbound data items, on an individual basis. Options include (not all options apply to all items): Do Not Accept. Any of the installed PIMs on this computer. Save to Folder. The Bluetooth exchange folder location - the directory on this computer where inbound items that are not to be saved in a PIM will be kept. Note: This is also the folder where the File Transfer service stores inbound items. If this folder is reconfigured here, it will also be reconfigured in that service automatically. Whether to send/receive attachments with email. Close a PIM Item Transfer Connection PIM Item Transfer connections close automatically when the data transfer is complete. Default Business Card Selection When the Always send the same business card option is selected, a dialog box prompts you to select a default business card. The first time the dialog box is displayed it provides a way to choose the Personal Information Manager that stores the default business card. Click the down-arrow in the PIM shortcut menu and select the PIM to be used. 29 On subsequent appearances of this dialog box, the PIM selection option is not available. Change the Selected PIM On the PIM Item Transfer properties page, Received items section, there is a Business Cards shortcut menu. When a PIM was selected during initial setup the selected item in this menu was set to the same PIM. To change the PIM used for the default business card, open this shortcut menu and select a new PIM. Note: A new default business card must be selected from the database of the newly selected PIM. Choose a Default Business Card 1. In the Select a Bluetooth Business Card dialog box that is displayed when Always send the same business card is selected, select the card. Note: Move your mouse over a selected business card to display additional information about that contact. 2. Click OK to choose a selected business card and return to the PIM Item Transfer Properties page. The chosen contact is now displayed and selected in the Business card requests shortcut menu. Note: In addition to the default menu options, the shortcut menu can hold up to ten contact names. If the Always send the same business card option is selected again, and a different contact is chosen, the properties page will display both contacts in the shortcut menu. PIM Synchronization The PIM Synchronization service can be used by a remote device to synchronize its Personal Information Manager (PIM) database with the PIM database of this computer. Four data types are supported: Business cards Calendar items Email messages Notes Whether an individual item is accepted and where it is stored after it is accepted is configured in the PIM Item Transfer service. If that service is not configured to store a particular data type in Outlook, then that data type cannot be synchronized. Microsoft Outlook permits duplicate entries, so all duplicates may not be exchanged in the synchronization process. Note: Data types that will be synchronized must be saved in the PIM database (this is configured in the PIM Item Transfer service); otherwise, that data type will not be available for selection (it will be dimmed) in the PIM Synchronization configuration settings. Note: Only Outlook’s default contacts folder is synchronized. Items in sub-folders are not synchronized. Items that are moved from the default folder to a sub-folder will not be displayed the next time synchronization takes place. 30 CONFIGURATION PANEL The Bluetooth Configuration Panel provides access to various settings including Bluetooth services, hardware, security, and events notification. In this chapter, we will thoroughly discuss each of the tabs in the Configuration Panel. There are two ways to open the Bluetooth Configuration Panel. Use either one of the following: Click the Start menu, go to Settings and select Control Panel. From the Windows Control Panel, select Bluetooth Configuration. Right-click the Bluetooth Tray icon on the Windows system tray. Select Advanced Configuration. General Tab The settings on the General tab of the Bluetooth Configuration Panel determine information that is displayed to remote devices. Identity section: Computer name: enter a unique name to identify your computer to other Bluetooth devices in the vicinity; this field cannot be left blank. Computer type: select either Desktop or Laptop from the drop-down menu to help identify your device type when other Bluetooth devices search for your computer. Accessibility Tab The Accessibility tab in the Bluetooth Configuration Panel lets you specify which remote devices can have access to your computer, which remote devices have access, and whether an audio warning is played when a Personal Identification Number (PIN code) is required. Allow other devices to discover this computer: To allow your computer to be discovered by other devices, simply select Let other Bluetooth devices discover this computer. This will allow remote Bluetooth devices to find and report your computer. However, this option will not be available if you have selected Allow no devices to connect. Control the types of devices that are allowed to connect to this computer: You can also control the types of devices that are allowed to connect to your computer. The Allow drop-down menu gives you the following options: All devices: All remote devices are permitted to connect to your computer. Connections are subject to additional security restrictions, such as authentication and authorization, that may be required by the individual services provided by this computer. No devices: No remote devices will be permitted to initiate a connection with your computer. However, your computer can still initiate a connection with other remote Bluetooth devices. Only devices listed below: Only the listed devices are allowed to connect to your computer (see the next section, Adding and deleting devices for details). Choose an audio notification file: You can also choose an audio notification file when Secure Connection is enabled for any of the Bluetooth Services on this computer and PIN code is required before that service can be 31 accessed. To chose a notification sound that will play when a remote device attempts to access a service that requires a secure connection, click Select audio file.. and select the sound (*.wav) file to be played. Limited access to this computer to specific remote devices: You can limit access to this computer to specific remote devices From the Bluetooth Configuration Panel, Accessibility tab, in the Allow shortcut menu, select “Only devices listed below”. Add a device to the list: 3. Click Add Device 4. In the Devices with access… dialog box select the desired device(s) and click OK. Note: Multiple devices may be selected using SHIFT + click and/or CTRL + click. Delete a device from the list In the list of devices allowed to access this computer, select the device to be removed from the list, and then click Delete. Discovery Tab The Discovery tab lets you specify whether your computer will do an automatic search for other Bluetooth devices or not, how often it searches for them, and what type of devices it discovers. Periodic Search for Devices: If you prefer to have your computer perform a periodic search for other Bluetooth devices, simply select the Look for other Bluetooth devices option. Make sure you enter the number of minutes (choose between 1 and 60) as this represents how often you want CREATIVE BLUETOOTH SOFTWARE to search for devices. Note: When My Bluetooth Place is first opened it performs and initial automatic search for devices even if “Look for other Bluetooth devices” is not enable. Determine the devices that will be report: Also in this tab, you can specify the devices that you want your computer to report. CREATIVE BLUETOOTH SOFTWARE can screen out devices that you do not find necessary to access. You can choose between the following by selecting one from the drop-down list: Report all Bluetooth devices, OR Report only selected Bluetooth devices (see Discovery, Adding specific devices and Deleting specific devices for details.) Discover Specific Devices: You can specify CREATIVE BLUETOOTH SOFTWARE to report only specific devices, specific class(es) of device(s), or specific type(s) of device(s) within a class. The discovered devices can be mixed-and-matched – you can discover one or more specific devices, classes of devices, and types of devices within a class at the same time. 32 To have CREATIVE BLUETOOTH SOFTWARE report only specific devices: 1. Open the Bluetooth Configuration Panel by right-clicking the Bluetooth Tray icon on the Windows system tray. Select Advanced Configuration. The Bluetooth Configuration Panel is displayed. 2. Click the Discovery tab. 3. Select Report only selected Bluetooth devices from the drop-down list. 4. Click the Add Device button. The Discoverable devices dialog box opens. 5. Select the device you want discovered and click OK. Notes: Multiple devices can be selected at the same time by holding the SHIFT or CTRL key down as you select the devices. The device(s) that you want to add to the list must be within radio range. Devices that are not within radio range will NOT appear in the list of devices. To report only a specific class of device: 1. Open the Bluetooth Configuration Panel by right-clicking the Bluetooth Tray icon on the Windows system tray. Select Advanced Configuration. The Bluetooth Configuration Panel is displayed. 2. Click the Discovery tab. 3. Select Report only selected Bluetooth devices from the drop-down list. 4. Click the Add Device button. The Discoverable devices dialog box opens. 5. Select Allow this computer to discover specific devices or types of devices within a class. 6. From the Class drop-down list, select a class of devices to be discovered. 7. Click OK. To report only a specific type of device within a class: 1. Follow steps 1 to 6 in the previous procedure (To report only a specific class of device). 2. From the Type drop-down list, select the specific type of device to be reported. 3. Click OK. To remove a device from the list of devices to be discovered: 1. Open the Bluetooth Configuration Panel by right-clicking the Bluetooth Tray icon on the Windows system tray. Select Advanced Configuration. The Bluetooth Configuration Panel is displayed. 2. Click the Discovery tab. 3. Select the device you want to remove. 4. Click the Delete button. Note: If you have not selected the Report only selected Bluetooth devices option, the Delete button will not be available. To temporarily override the discovery of specific devices: 1. Open the Bluetooth Configuration Panel by right-clicking the Bluetooth Tray icon on the Windows system tray. Select Advanced Configuration. The Bluetooth Configuration Panel is displayed. 33 2. Click the Discovery tab. 3. Select Report all Bluetooth devices. The specifically (and previously) selected devices will be discovered along with all other devices. Notes: To re-enable specific device discovery, re-select Report only selected Bluetooth devices. When all devices are deleted, an error message will appear if Report all Bluetooth devices is not selected. Temporarily override the discovery of specific devices: In the Bluetooth Configuration Panel, from the Discovery tab, select “Report all Bluetooth devices”. The specifically selected devices will be discovered along with all other devices. To re-enable specific device discovery re-select “Report only selected Bluetooth devices.” Local Services Tab The Local Services tab allows you to change the settings of all the services that your computer has made available to other remote devices. Each service can be configured individually to change its security, name, and other settings. The Local Services tab also provides you with the option of adding and deleting user-defined serial services. We will discuss the details on how to do that later in this section. The following are the names of the local services that CREATIVE BLUETOOTH SOFTWARE provide: (Please note that names of all the services will be displayed even though the server may not be able to support all of them.) Audio Gateway Headset PIM Synchronization Fax File Transfer PIM Item Transfer Dial-up Networking Network Access Bluetooth Serial Port Common Configuration Setting: We mentioned earlier that you could change the settings of each service individually. However, all of the local services will have common settings and Notification settings for all of the following: These properties can be set individually for each Bluetooth services: For General: Service name: User can change service name on text box. Startup Automatically: User can define service startup Automatically when Bluetooth is started. Security Connection: User can define service with security connection or not on check box. 34 For Notification: Notifications: provides visual and/or audio notification that a remote device is attempting to connect (or has connected) to a service on this computer. There are three types of notification: Authentication request, also called a PIN code request: This notification appears automatically in a balloon over the Windows system tray if a Personal Identification Code is required before a connection can proceed. An audio file can also be associated with the notification. Authorization request, also called a connection request: This type of notification can be visual, audio, or both. It notifies you of attempts to access a Bluetooth service on this computer; the connection will not proceed until you click the balloon that appears over the Windows system tray. If the notification balloon is ignored, the connection request will time out and fail. Notification only: This type of notification does not effect access in any way; it solely for information purposes to let you know that a connection has been established. The Notifications lets you associate sound (in the form of Windows *.wav file) and/or a visual indication with access attempts by remote devices. A different notification sound can be associated with each local Bluetooth service, depending on security settings, including such cases: When a PIN code is required When a remote device attempts to access: − files on this computer (in Windows XP only) − a Bluetooth port − the Dial-up network service − the LAN Access service − the Fax service When a remote device attempts to send: − information items − synchronization information To associate a sound with a Bluetooth event: 1. Open the Bluetooth Configuration Panel by right-clicking the Bluetooth Tray icon on the Windows system tray. Select Advanced Configuration. The Bluetooth Configuration Panel is displayed. 2. Click the Local Service tab. 3. Double click a service name and select the Notifications tab. 4. In the Sound section, click the Browse button and look for the sound file (*.wav) that you want to use for notification. 5. To hear a preview of the sound, click Play. Note: To hear the sound, the Notify checkbox must be selected. Otherwise, the sound file will not play even if it has been assigned. 6. Click OK. 35 Settings that are additional to all of the local services While each of the local service includes all of the above common settings, some services have an additional setting that is only available to it and will not be found elsewhere: Network Access: has additional setting for the network adapter and connection sharing. Dial-up Networking: has an additional setting for selecting the modem that the service will be using. Fax: has an additional setting for selecting the modem that the service will be using. Bluetooth Serial Port: has an additional setting for selecting the communications port that the service will be using. File Transfer: has additional setting for exchange folder location and the setting about security for files and folders. PIM Synchronization: has additional setting for synchronization object define, such as Business Cards, Calendar Item, Email and Notes. PIM Item Transfer: has additional setting for transfer and receive items defined, such as Business Cards, Calendar Item, Email and Notes. Adding a user-defined Bluetooth Serial Port Most applications that use a serial connection may also use wireless Bluetooth Serial port service to transfer data. The Bluetooth Serial Port replaces all physical cables, thus reducing clutter. When using CREATIVE BLUETOOTH SOFTWARE, you will have one pre-configured Bluetooth Serial Port. However, you can always add another when needed. Similarly, you may remove it any time. To add a Bluetooth Serial Port: 1. Open the Bluetooth Configuration Panel by right-clicking the Bluetooth Tray icon on the Windows system tray. Select Advanced Configuration. The Bluetooth Configuration Panel is displayed. 2. Click the Local Services tab. 3. Click the Add Serial Service button. 4. In the Service Properties dialog box that appears, modify these: Enter a unique name (less than 99 alphanumeric characters). Select the appropriate security settings. Select Startup Automatically if you want the service to start automatically when CREATIVE BLUETOOTH SOFTWARE initializes. From the COM Port drop-down list, select a communications port that is not assigned to any other service. 5. Click OK. Removing a user-defined Bluetooth Serial Port 1. Open the Bluetooth Configuration Panel by right-clicking the Bluetooth Tray icon on the Windows system tray. Select Advanced Configuration. The Bluetooth Configuration Panel is displayed. 2. Click the Local Services tab. 3. Select the port you want to remove. 36 4. Click Delete. Note: The Delete button is only available when the Bluetooth Serial Port service or a user-defined serial port service is selected. Changing a local service’s properties Earlier, we discussed about the five property settings that each of the local services would have. Here, we’ll show you how to change a local service’s properties and what the options are. To change a local service’s properties: 1. Open the Bluetooth Configuration Panel by right-clicking the Bluetooth Tray icon on the Windows system tray. Select Advanced Configuration from the submenu. The Bluetooth Configuration Panel is displayed. 2. Click the Local Services tab. 3. Double-click the service name. 4. Select the appropriate boxes or leave them cleared, depending on what you want CREATIVE BLUETOOTH SOFTWARE to do. Startup Automatically: enabled by default. When enabled, it starts the service when CREATIVE BLUETOOTH SOFTWARE initializes. If Startup is disabled, you can still start the service manually. Note: To start the service manually at a later time, simply right-click the service and select Start from the pop-up menu. Security Connection: enabled by default. When enabled, it using service with security connection. It requires confirmation by the server operator before a remote device is allowed to connect to this service. See the detail information for security type below. Service Name: enter a service name (no more than 99 alphanumeric characters) in this field. In most cases, a service name is supplied by default. However, in environments where there is more than one device of the same type or one device provides more than one service of the same type (this is only possible with the Bluetooth Serial Port service), the service name can be customized. 5. Click OK. To stop a local service, right-click the service and select Stop from the pop-up menu. Stopped services are no longer available for use by clients. You may also see a summary of information about each local service from Windows Explorer. To do this, open your Windows Explorer. With Local Device selected, click the View menu, and then select Details. You will find the following basic information: Service: the name of the service Startup: tells you whether it’s automatic or manual. Status: − Started (COM#) – the service is running and ready to use COM# − Not Started – the service is not running (not available to clients) − Connected (COM#) – the service is in use, the local port is COM# − Connected – the service is in use. Device name if connected: 37 − Empty field – the service is not connected. − A device name and Bluetooth Device Address – identifies the device that is using the service. At times you need to interrupt a connection from the server side. To do this, right-click the local service and then select Stop from the pop-up menu. To restart the service later, rightclick the local service and then select Start. Hardware Tab The Hardware tab provides basic information about the Bluetooth hardware installed in this computer. In some cases, it allows you to have access to the Advanced Settings dialog box. In this tab, you will see the following sections: Devices: Name: the name of the device, e.g., Bluetooth Device. Type: the type of device you have, e.g., USB. Device Properties: Device Status: indicates if the device is operating properly or if there is a problem or conflict. Manufacturer: the name of the company that made the device you selected in the Devices section of this dialog box. Firmware Revision: the manufacturer’s firmware version number. Device Address: displays the Bluetooth Device Address (BDA or BD_Addr) programmed into this device when it was manufactured. HCI Version: the version number of the Bluetooth Specification that the Host Controller Interface (HCI) complies with. HCI Revision: the revision number of the Bluetooth Specification that the Host Controller Interface (HCI) complies with. LMP Version: the version number of the Bluetooth Specification that the Link Manager Protocol (LMP) complies with. LMP Sub Version: the sub-version number of the Bluetooth Specification that the Link Manager Protocol (LMP) complies with. Click Apply to save the changes – the changes will be applied the next time you restart your Bluetooth device. 38 SECURITY Introduction Each service that the server provides can be configured to require the Secure Connection setting, that means of, Authorization: the server operator must acknowledge all connection attempts before a connection is established. Authentication: the server requires a Personal Identification Number code (PIN, also referred to as a “passkey”) or a Link Key before a connection is established. Encryption: all data sent between the Bluetooth client and Bluetooth server is encrypted. The encryption key is based on the Authentication Link Key. Encryption requires that Authentication be enabled. The Secure Connection is enabled by default. Authentication Authentication is used to verify identity. It requires a passkey or Link Key from the remote device. When a remote device attempts access to a unit, a visual and/or audio warning notifies the local operator of the invitation. The local operator can open a dialog box that provides: 1. The user-friendly name of the device attempting access. 2. A place for the local operator to enter a Bluetooth passkey. The operator of the remote system must then enter the identical passkey. If no passkey is supplied or if the notification is ignored after a preset timeout, access will be denied. In cases wherein devices are paired, those devices automatically exchange a Link Key and authentication is carried out without operator intervention. Authorization Authorization is yes-or-no security. When a remote device attempts to connect, a visual and/or audio warning alerts the server operator. The server operator then responds by clicking the Bluetooth Tray icon in the Windows system tray to open a dialog box that displays: 1. The user-friendly name of the device attempting to connect. 2. The local service to which the remote device is attempting to connect. The server operator may grant or deny access to the service by clicking an on-screen button. If the server operator ignores the Authorization notification after a preset timeout, access will be denied. Bluetooth Device Identity Every Bluetooth device has a unique Bluetooth Device Address (BDA) assigned to it during the manufacturing process. This address cannot be changed. 39 The BDA is usually displayed in hexadecimal format; 00:D0:B7:03:2E:9F is a valid BDA. Each Bluetooth device also has a configurable, user-friendly name to help distinguish it from other devices. The user-friendly name may be up to 99 alphanumeric characters in length and may contain spaces. My Personal Computer is a valid user-friendly name. Encryption Encrypting translates data into an unreadable format using a secret key or password. Decrypting the data requires the same key or password that was used to encrypt it. Encryption in CREATIVE BLUETOOTH SOFTWARE is based on the same passkey or Link Key that is used for Authentication. If Authentication is not enabled, the key will not be available and encryption will not take place. Link Key A Link Key is a unique, internally generated access code. Link Keys are generated automatically when devices are paired or when authentication is enabled. Link Keys are created by combining the following three items: The Passkey The Bluetooth Device Address An internally generated random number After a link key is generated, manual entry of the passkey is not require. Pairing Devices Pairing devices establishes a rather permanent relationship between two devices. It creates a permanent security link between the two and enables easy access to all the available services without having to enter access information every time a connection is attempted. Paired devices share a unique Link Key that they exchange when they are establishing the connection. Moreover, the mate of a pair will always appear in My Bluetooth Places even if the mate is disconnected or is beyond connection range. Paired devices remain paired even in the following scenario: One of the devices is not powered up. A service connection is interrupted or the service stopped. One or both devices have been rebooted. When Secure Connection is enabled, devices will pair automatically the first time they connect (a passkey must be successfully exchange) To pair devices before attempting a connection: 1. Open My Bluetooth Places by double-clicking the icon on your desktop. 2. Select Entire Bluetooth Neighborhood. 3. Right-click anywhere except on a device name and select Refresh from the popup menu to see an updated list. 4. Right-click the device you want to pair and select Pair Device from the shortcut menu. 40 5. Enter PIN Code for the device as requested. After pairing, you will see a pair icon on the device you made. To break a paired device relationship: 1. Open My Bluetooth Places by double-clicking the icon on your desktop. 2. Select Entire Bluetooth Neighborhood. 3. Right-click anywhere except on a device name and select Refresh from the pop-up menu to see an updated list. 4. Right-click the device you want to unpair and select Unpair Device from the shortcut menu. Passkey A Passkey is a password that is made up of 16 or less characters. Passkeys are also referred to as PIN codes, or Personal Identification Numbers. Passkey will be required if the Secure Connection option is enabled for a Bluetooth service or application. Secure Connection A passkey or link key is required each time a connection is attempted. All data exchanged over the Bluetooth connection is encrypted. Depending on other configuration options, authorization may also be required. Security Request Dialog Box Depending on your security settings, you may see a Bluetooth Authorization or Bluetooth PIN Code Request dialog box when a connection is attempted. But this is only if you have either Authorization or Authentication enabled. The method of notification is in the form of a bubble message displayed over the Bluetooth Tray icon in the Windows system tray. Click the bubble message and follow the instructions on the screen. The instructions vary, depending on the security configuration of the system. If the security notification is ignored after a preset timeout, the connection request will fail. In the Security Request dialog box, you will see the following: Device Name: displays the user-friendly name of the device that is attempting to connect. Request to access: displays the service that the remote device is trying to access. OK: grants permission to establish connection. No: denies permission to establish a connection. A checkbox that, when enabled, always allows the connecting device to access the service requested. 41 PRODUCT SPECIFICATIONS Bluetooth Operation Bluetooth v2.0 + EDR compliance Bluetooth 2.4GHz CB3700 - Class 1 radio, up to radius of 100 meters (328 feet)* Bluetooth 2.4GHz CB3200 - Class 2 radio, up to radius of 10 meters (32.8 feet)* Tx Power CB3700 - Class 1 - 20 dBm max with power control CB3200 - Class 2 - 4 dBm max with power control Frequency Range 2.400–2.4835 GHz Band Data Rate (Throughput) Up to 2.1Mbps* (achievable with another Bluetooth v2.0 device) Interface B-type USB connector Security 128-bit encryption and authentication Antenna Internal LED Indicators Blue - Power / Activity Dimensions (W x H x D) 99 mm x 19 mm x 9 mm (3.25 “ x 0.62 “ x 0.30“) Weight 8 g (0.28 oz) *(May vary depending on actual operating environment and mode.) 42 TROUBLESHOOTING Q: What is a Bluetooth Device Address (BDA) and where can I find it? Can I change the BDA? A: Every Bluetooth device has a unique 48-bit Bluetooth Device Address, or BDA. This address cannot be changed by the end-user. A device’s BDA is usually displayed in hexadecimal format, for example, 00:D0:B7:03:2E:9F. You may find your device’s BDA in the Hardware tab of your Configuration Panel or on a label on your USB adapter. Q: I get an “X” mark on my Service icon. What does that mean? A: Icons for Services that are not available will have a red “X” mark. Services may be unavailable because the necessary hardware (such as the modem for Dial-up Networking) is not installed. Q: Windows can’t seem to detect my USB dongle device. What do I do? A: First, go to your Control Panel and select System. Then select Device Manager to see if the USB dongle is enabled. If it’s not, simply unplug the USB dongle off its port and then plug it back in. If after doing this, Windows still cannot detect your device, unplug the USB dongle and re-install its software. Q: How do I use my USB dongle in such applications as wireless printing, active synchronization with PDA, dial-up networking, network access, and file transfer? A: Details to these can be found in the Application Setup Guide, which is included in the USB dongle installation CD. Q: Why can’t I connect to a paired device? A: Paired devices are always displayed in My Bluetooth Places even if the remote device is out of connection range or is turned off. If you can’t connect to a paired device, verify that the remote member of the pair is within radio range and powered up before you attempt to connect again. Q: I can’t discover services on an unpaired remote device. What is the problem? A: The remote device may not be powered up or may be out of range. To correct this problem, first verify that the remote device is turned on. If it is, make sure that the remote device is in ‘Connectable’ mode and have provide services which you want. Open the Bluetooth Configuration Panel and select Accessibility tab. Also perform a Search for Devices to determine if the device is within range. Q: The Dial-up Networking service does not start. Is this a problem? A: The Dial-up Networking service will never start unless a properly configured modem is attached to the server. (Please refer to the Application Setup Guide for details). What you can do: Verify that the modem is usable as a local device from the server. On the server, in the Bluetooth Configuration Panel, click the Local Services tab, and then double-click the Dial-up Networking service. Click the down arrow in the Modem field. Select the Startup checkbox and then select the modem that will be used to dial up. Click OK. Click OK to close the Bluetooth Configuration Panel. 43 Q: How do I determine the Bluetooth Device Address (BDA) of my hardware device and the version number of both the Bluetooth Specification and the Link Manager Protocol (LMP)? A: Open the Bluetooth Configuration Panel and click the Hardware tab. In the Device Address section, locate the BDA of the selected Bluetooth device and the version number of both the Host Controller Interface and the Link Manager Protocol. Q: How do I test a Network Access connection? A: If the client is hardwired to the LAN, simply unplug the hardwired connection to ensure that the test checks the wireless connection rather than the hardwired connection. If the server has access to the Internet, open a browser on the client device (after connecting to Server’s network access service) and connect to the World Wide Web. You may also Ping the server from the DOS prompt. Q: Why do I get an “Unknown Port” message when I attempt to use a Bluetooth Serial Port? A: The unknown Port error message usually means that an attempt was made to connect to a port that was in use. Additional Bluetooth Serial Ports can be added if they are required. Q: What can I do when uninstalling Creative Bluetooth software cannot be completed, due to reasons such as electricity stops? A: Use the Installation CD to reinstall the Creative Bluetooth software, and then uninstall the driver. Q: What can I do when functions don’t run normally? A: Un-plug and plug the dongle, or restart your computer. Q: How to turn off warning message during installation under Window XP? A: Perform the following before Creative Bluetooth software installation, to turn off warnings during installation of Creative Bluetooth software. Start Menu->My Computer->View System Information (Properties) ->Hardware->Driver Signing->Ignore. After installation, the previous setting may be restored if desired. 44