1
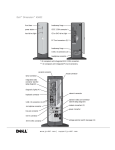
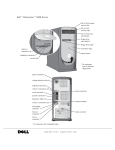
Dell™ Dimension™ 2300C
front door
breakaway hinges
power button
IEEE 1394 connector*
hard-drive light
CD or DVD drive light
PC Card connectors (2)**
USB 2.0 connectors (2)
headphone connector
* On computers with integrated IEEE 1394 connectors.
** On computers with integrated PC Card connectors.
parallel connector
mouse connector
serial connector
video connector
diagnostic lights (4)
network connector
keyboard connector
USB 2.0 connectors (4)
microphone connector
modem connectors (2)
power connector
line-out connector
line-in connector
IEEE 1394 connector*
voltage selection switch (see page 9)
w w w. j p . d e l l . c o m | s u p p o r t . j p . d e l l . c o m
Hints, Notices, and Cautions
HINT: A HINT indicates important information that helps you make better
use of your computer.
NOTICE: A NOTICE indicates either potential damage to hardware or loss of
data and tells you how to avoid the problem.
CAUTION: A CAUTION indicates a potential for property damage,
personal injury, or death.
Abbreviations and Acronyms
For a complete list of abbreviations and acronyms, see the Tell Me How help
file. To access help files, see page 36.
____________________
Information in this document is subject to change without notice.
© 2003 Dell Computer Corporation. All rights reserved.
Reproduction in any manner whatsoever without the written permission of Dell Computer
Corporation is strictly forbidden.
Trademarks used in this text: Dell, the DELL logo, Dimension, Inspiron, Latitude, OptiPlex, and
Dell Precision are trademarks of Dell Computer Corporation; Intel and Celeron are registered
trademarks of Intel Corporation; Microsoft and Windows are registered trademarks of Microsoft
Corporation.
Other trademarks and trade names may be used in this document to refer to either the entities claiming
the marks and names or their products. Dell Computer Corporation disclaims any proprietary interest
in trademarks and trade names other than its own.
This product incorporates copyright protection technology that is protected by method claims of
certain U.S. patents and other intellectual property rights owned by Macrovision Corporation and
other rights owners. Use of this copyright protection technology must be authorized by Macrovision
Corporation, and is intended for home and other limited viewing uses only unless otherwise
authorized by Macrovision Corporation. Reverse engineering or disassembly is prohibited.
June 2003
P/N 2W209
Rev. A02
Contents
CAUTION: Safety Instructions
General
. . . . . . . . . . . . . . . . . . .
7
. . . . . . . . . . . . . . . . . . . . . . . . . . . . .
7
When Using Your Computer
. . . . . . . . . . . . . . . . . . . .
When Working Inside Your Computer
. . . . . . . . . . . . . .
Protecting Against Electrostatic Discharge
10
. . . . . . . . . . .
11
. . . . . . . . . . . . . . . . . .
11
. . . . . . . . . . . . . . . . . . . . . . . .
12
Ergonomic Computing Habits
Battery Disposal
9
Finding Information for Your Computer
. . . . . . . . . . . . . .
13
1 Setting Up and Using Your Computer
Connecting the AC Adapter
. . . . . . . . . . . . . . . . . . . .
. . . . . . . . . .
19
. . . . . . . . . . . . . . . . . . . . . . . .
21
. . . . . . . . . . . . . . . . . . . . . . . . . .
21
Attaching and Removing the Computer Stand .
Setting Up a Printer
Printer Cable
18
Connecting a Parallel Printer
Connecting a USB Printer .
. . . . . . . . . . . . . . . . . .
21
. . . . . . . . . . . . . . . . . . .
22
Connecting an IEEE 1394 Device (Optional)
. . . . . . . . . . .
23
Transferring Information to a New Computer
. . . . . . . . . . .
24
. . . . . . . . . . . . . .
25
Setting Up a Home and Office Network
. . . . . . . . . . . . . . . .
25
. . . . . . . . . . . . . . . . . . . . .
25
. . . . . . . . . . . . . . . . . . . . .
26
Connecting to a Network Adapter
Network Setup Wizard
Connecting to the Internet
Setting Up Your Internet Connection
. . . . . . . . . . . . . .
26
Contents
3
Copying CDs
. . . . . . . . . . . . . . . . . . . . . . . . . . . .
Using Easy CD Creator Basic
. . . . . . . . . . . . . . . . .
Using Blank CD-R Discs or Blank CD-RW Discs
Helpful Tips
27
28
. . . . . . . .
29
. . . . . . . . . . . . . . . . . . . . . . . . . .
29
How to Copy a CD
. . . . . . . . . . . . . . . . . . . . . . .
30
. . . . . . . . . . . . . . . . . . . . .
31
. . . . . . . . . . . . . . . . . . . . . . . . .
34
Turning Off the Computer
2 Solving Problems
Finding Solutions
. . . . . . . . . . . . . . . . . . . . .
36
. . . . . . . . . . . . . . . . . . . . . . . . .
36
. . . . . . . . . . . . . . . . . . . . . . . . . .
37
Finding Help Information
Battery Problems
Drive Problems
CD drive problems
. . . . . . . . . . . . . . . . . . . . . . .
Problems writing to a CD-RW drive
. . . . . . . . . . . . . .
37
DVD drive problems
. . . . . . . . . . . . . . . . . . . . . .
38
Hard drive problems
. . . . . . . . . . . . . . . . . . . . . .
38
. . . . . . . . . . . . .
39
. . . . . . . . . . . . . . . . . . . . . . . . . .
41
E-Mail, Modem, and Internet Problems
Error Messages
General Problems
. . . . . . . . . . . . . . . . . . . . . . . . .
A program stops responding
. . . . . . . . . . . . . . . . . .
A program crashes repeatedly
42
. . . . . . . . . . . . . . . . .
42
42
A solid blue screen appears
. . . . . . . . . . . . . . . . . .
43
Other software problems
. . . . . . . . . . . . . . . . . . . .
43
Other technical problems
. . . . . . . . . . . . . . . . . . . .
44
. . . . . . . . . . . . . . . . . .
44
. . . . . . . . . . . . . . . . . . . . . . .
45
. . . . . . . . . . . . . . . . . . . . . . . .
45
. . . . . . . . . . . . . . . . . . . . . . . . . .
46
IEEE 1394 Problems
Keyboard Problems
Mouse Problems
Contents
42
A program is designed for an earlier Windows operating system
General hardware problems
4
37
Network Problems
. . . . . . . . . . . . . . . . . . . . . . . . .
48
PC Card Problems
. . . . . . . . . . . . . . . . . . . . . . . . .
49
Power Problems .
. . . . . . . . . . . . . . . . . . . . . . . . . .
49
Printer Problems
. . . . . . . . . . . . . . . . . . . . . . . . . .
51
. . . . . . . . . . . . . . . . . . . . . . . . .
52
Scanner Problems
Sound and Speaker Problems
. . . . . . . . . . . . . . . . . . .
53
. . . . . . . . . . . . . . . . . . . .
54
. . . . . . . . . . . . . . . . . . . . . .
54
Video and Monitor Problems
If the screen is blank
If the screen is difficult to read
. . . . . . . . . . . . . . . . .
55
. . . . . . . . . . . . . . . . . . . . . . . . . .
58
. . . . . . . . . . . . . . . . . . . . . . . . . . . . . . .
60
3 Advanced Troubleshooting
Diagnostic Lights
Drivers
. . . . . . . . . . . . . . . . . . . . . . . .
60
Identifying Drivers
. . . . . . . . . . . . . . . . . . . . . . .
60
Reinstalling Drivers
. . . . . . . . . . . . . . . . . . . . . . .
61
. . . . . . . . . . . . . . . . . . . . . . .
62
What Is a Driver?
Using System Restore
Creating a Restore Point
. . . . . . . . . . . . . . . . . . . .
Restoring the Computer to an Earlier Operating State
Undoing the Last System Restore
63
. . . . . . . . . . . . . . . .
64
. . . . . . .
64
. . . . . . . . . . . . . .
65
. . . . . . . . . . . . . . . . . . . . . .
65
Resolving Software and Hardware Incompatibilities
Reinstalling Microsoft® Windows® XP .
Before You Reinstall
63
. . . . . .
Reinstalling Windows XP
. . . . . . . . . . . . . . . . . . . .
65
4 Adding Parts
Front and Back View of the Computer
. . . . . . . . . . . . . . .
70
Contents
5
Front View .
Back View
. . . . . . . . . . . . . . . . . . . . . . . . . .
70
. . . . . . . . . . . . . . . . . . . . . . . . . . .
72
Reattaching the Front Door
. . . . . . . . . . . . . . . . . . . .
. . . . . . . . . . . . . . . . . . .
74
. . . . . . . . . . . . . . . . . .
76
. . . . . . . . . . . . . . . . . . . . . . . . .
77
Opening the Computer Cover
Looking Inside Your Computer
System Board
. . . . . . . . . . . . . . . . . . . .
78
. . . . . . . . . . . . . . . . . . . . . . . . .
78
Adding PC Cards (Optional)
PC Card Types
73
Installing a PC Card
. . . . . . . . . . . . . . . . . . . . . .
78
Removing a PC Card
. . . . . . . . . . . . . . . . . . . . . .
79
. . . . . . . . . . . . . . . . . . . . . . . .
80
. . . . . . . . . . . . . . . . . . . . . . . . . .
82
Adding Other Cards
Adding Memory
. . . . . . . . . . . . . . . . . . .
84
. . . . . . . . . . . . . . . . . . . . . . . . . . .
86
Closing the Computer Cover
5 Appendix
Specifications
Standard Settings
. . . . . . . . . . . . . . . . . . . . . . . . .
Viewing Settings
. . . . . . . . . . . . . . . . . . . . . . . .
System Setup Program Screens
91
. . . . . . . . . . . . . . . . . . .
92
. . . . . . . . . . . . . . . . . . . . . . .
93
. . . . . . . . . . . . . . . . . . .
94
. . . . . . . . . . . . . . . . . . . . . . . . . .
95
Dell Technical Support Policy
Contacting Dell
. . . . . . . . . . . . . . . . . . . . . .
96
. . . . . . . . . . . . . . . . . . . . . . . . . . . . . . . . . . .
97
Regulatory Information
Index
6
Contents
91
. . . . . . . . . . . . . . . .
Clearing Forgotten Passwords
Replacing the Battery
90
CAUTION: Safety Instructions
Use the following safety guidelines to help ensure your own personal safety and to help protect
your computer and working environment from potential damage.
General
•
Do not attempt to service the computer yourself unless you are a trained service
technician. Always follow installation instructions closely.
•
To help prevent electric shock, plug the computer and device power cables into properly
grounded electrical outlets. These cables are equipped with 3-prong plugs to help ensure
proper grounding. Do not use adapter plugs or remove the grounding prong from a cable.
If you must use an extension cable, use a 3-wire cable with properly grounded plugs.
•
To help avoid the potential hazard of electric shock, do not use your computer during an
electrical storm.
•
To help avoid the potential hazard of electric shock, do not connect or disconnect any
cables or perform maintenance or reconfiguration of this product during an electrical
storm.
•
If your computer includes a modem, the cable used with the modem should be
manufactured with a minimum wire size of 26 American wire gauge (AWG) and an FCCcompliant RJ-11 modular plug.
•
Before you clean your computer, disconnect the computer from the electrical outlet.
Clean your computer with a soft cloth dampened with water. Do not use liquid or aerosol
cleaners, which may contain flammable substances.
•
To help avoid possible damage to the system board, wait 5 seconds after turning off the
computer before disconnecting a device from the computer.
CAU TION: Safe ty Instr u c tions
7
w w w. d e l l . c o m | s u p p o r t . d e l l . c o m
CAUTION: Safety Instructions (continued)
8
•
To avoid shorting out your computer when disconnecting a network cable, first unplug
the cable from the network adapter on the back of your computer, and then from the
network jack. When reconnecting a network cable to your computer, first plug the cable
into the network jack, and then into the network adapter.
•
To help protect your computer from sudden, transient increases and decreases in
electrical power, use a surge suppressor, line conditioner, or uninterruptible power supply
(UPS).
•
Ensure that nothing rests on your computer’s cables and that the cables are not located
where they can be stepped on or tripped over.
•
Do not push any objects into the openings of your computer. Doing so can cause fire or
electric shock by shorting out interior components.
•
Keep your computer away from radiators and heat sources. Also, do not block cooling
vents. Avoid placing loose papers underneath your computer; do not place your computer
in a closed-in wall unit or on a bed, sofa, or rug.
•
Do not use your computer during an electrical storm unless the AC adapter cable has
been disconnected from the electrical outlet.
•
When you use the AC adapter to run the computer or to charge the battery, place the AC
adapter in a ventilated area, such as a desk top or on the floor.
•
The AC adapter may become hot during normal operation of your computer. Use care
when handling the adapter during or immediately after operation.
CAUTION: Safety Ins tr uctions
When Using Your Computer
As you use your computer, observe the following safe-handling guidelines.
CAUTION: Do not operate your computer with any cover(s) (including computer
covers, bezels, filler brackets, front-panel inserts, and so on) removed.
•
Your computer is equipped with one of the following:
–
A fixed-voltage power supply — Computers with a fixed-voltage power supply do not
have a voltage selection switch on the back panel and operate at only one voltage (see
the regulatory label on the outside of the computer for its operating voltage).
–
An auto-sensing voltage circuit — Computers with an auto-sensing voltage circuit do
not have a voltage selection switch on the back panel and automatically detect the
correct operating voltage.
–
A manual voltage selection switch — Computers with a voltage selection switch on
the back panel must be manually set to operate at the correct operating voltage.
NOTICE: To help avoid damaging a computer with a manual voltage selection switch, set the
switch for the voltage that most closely matches the AC power available in your location. For Japan,
the voltage selection switch must be set to the 115-V position even though the AC power available in
Japan is 100 V. Also, ensure that your monitor and attached devices are electrically rated to
operate with the AC power available in your location.
•
Before working inside the computer, unplug the computer to help prevent electric shock
or system board damage. Certain system board components continue to receive power
any time the computer is connected to AC power.
W h e n U s i n g Yo u r C o m p ut e r
9
w w w. d e l l . c o m | s u p p o r t . d e l l . c o m
When Using Your Computer (continued)
When Working Inside Your Computer
Before you open the computer cover, perform the following steps in the sequence indicated.
CAUTION: Do not attempt to service the computer yourself, except as explained in
your online Dell™ documentation or in instructions otherwise provided to you by
Dell. Always follow installation and service instructions closely.
NOTICE: To help avoid possible damage to the system board, wait 5 seconds after turning off the
computer before removing a component from the system board or disconnecting a device from the
computer.
1
Perform an orderly computer shutdown using the operating system menu.
2
Turn off your computer and any devices connected to the computer.
3
Ground yourself by touching an unpainted metal surface on the chassis, such as the metal
around the card-slot openings at the back of the computer, before touching anything
inside your computer.
While you work, periodically touch an unpainted metal surface on the computer chassis
to dissipate any static electricity that might harm internal components.
4
Disconnect your computer and devices, including the monitor, from their electrical
outlets. Also, disconnect any telephone or telecommunication lines from the computer.
Doing so reduces the potential for personal injury or shock.
In addition, take note of these safety guidelines when appropriate:
•
10
When you disconnect a cable, pull on its connector or on its strain-relief loop, not on the
cable itself. Some cables have a connector with locking tabs; if you are disconnecting this
type of cable, press in on the locking tabs before disconnecting the cable. As you pull
connectors apart, keep them evenly aligned to avoid bending any connector pins. Also,
before you connect a cable, ensure that both connectors are correctly oriented and
aligned.
When Using Yo ur Computer
When Using Your Computer (continued)
•
Handle components and cards with care. Do not touch the components or contacts on a
card. Hold a card by its edges or by its metal mounting bracket. Hold a component such
as a microprocessor chip by its edges, not by its pins.
CAUTION: There is a danger of a new battery exploding if it is incorrectly installed.
Replace the battery only with the same or equivalent type recommended by the
manufacturer. Do not dispose of the battery along with household waste. Contact
your local waste disposal agency for the address of the nearest battery deposit site.
Protecting Against Electrostatic Discharge
Static electricity can harm delicate components inside your computer. To prevent static
damage, discharge static electricity from your body before you touch any of your computer’s
electronic components, such as the microprocessor. You can do so by touching an unpainted
metal surface on the computer chassis.
As you continue to work inside the computer, periodically touch an unpainted metal surface to
remove any static charge your body may have accumulated.
You can also take the following steps to prevent damage from electrostatic discharge (ESD):
•
Do not remove components from their antistatic packing material until you are ready to
install the component in your computer. Just before unwrapping the antistatic packaging,
discharge static electricity from your body.
•
When transporting an electrostatic sensitive component, first place it in an antistatic
container or packaging.
•
Handle all electrostatic sensitive components in a static-safe area. If possible, use
antistatic floor pads and workbench pads.
Ergonomic Computing Habits
CAUTION: Improper or prolonged keyboard use may result in injury.
CAUTION: Viewing the monitor screen for extended periods of time may result in
eye strain.
For comfort and efficiency, observe the ergonomic guidelines in the Tell Me How help file when
setting up and using your computer.
W h e n U s i n g Yo u r C o m p ut e r
11
w w w. d e l l . c o m | s u p p o r t . d e l l . c o m
When Using Your Computer (continued)
Battery Disposal
Your computer uses a lithium coin-cell battery. The lithium coin-cell battery is a long-life
battery, and it is very possible that you will never need to replace it. However, should you need
to replace it, see page 93.
Do not dispose of the battery along with household waste. Contact your local waste disposal
agency for the address of the nearest battery deposit site.
12
When Using Yo ur Computer
Finding Information for Your Computer
What Are You Looking For?
Find it Here
•
•
•
•
ResourceCD
A diagnostic program for my computer
Drivers for my computer
My computer documentation
My device documentation
You can use this CD to access documentation and reinstall drivers
(see page 61).
•
•
•
•
•
How to set up a printer
How to troubleshoot and solve problems
How to add parts
How to contact Dell
Warranty information
Owner’s Manual
Fi nding Infor m at ion fo r Yo ur Comput er
13
w w w. d e l l . c o m | s u p p o r t . d e l l . c o m
What Are You Looking For?
Find it Here
• Express Service Code and Service Tag
Number
• Microsoft® Windows® License Label
Express Ser vice Code and Product Key
Located on your computer.
• How to reinstall my operating system
Operating System CD
If you reinstall your operating system, use the ResourceCD to
reinstall drivers for the devices that came with your computer.
• Latest drivers for my computer
• Answers to technical service and support
questions
• Online discussions with other users and
technical support
• Documentation for my computer
14
Dell Support website
The Dell Support website provides several online tools, including:
• Knowledge Base — hints, tips, and online courses
• Customer Forum — online discussion with other Dell customers
• Upgrades — upgrade information for components, such as
memory, the hard drive, and the operating system
• Customer Care — contact information, order status, warranty, and
repair information
• Downloads — drivers, patches, and software updates
• Reference — computer documentation, product specifications,
and white papers
F i n d i n g I n f o r ma t i o n f o r Yo u r C o m p u te r
What Are You Looking For?
Find it Here
• How to set up my computer
Setup Diagram
• Tips on using Windows
• How to clean my computer
• How to use my mouse and keyboard
Te l l M e H o w H e l p F i l e
1 Click the Start button, and then click Help and Support.
2 Click User and system guides, and then click User’s guides.
3 Click Tell Me How.
• How to use Windows XP
• Documentation for my computer and
devices
Windows XP Help and Support Center
1 Click the Start button, and then click Help and Support.
2 Type a word or phrase that describes your problem, and then click
the arrow icon.
3 Click the topic that describes your problem.
4 Follow the instructions shown on the screen.
Fi nding Infor m at ion fo r Yo ur Comput er
15
w w w. d e l l . c o m | s u p p o r t . d e l l . c o m
16
F i n d i n g I n f o r ma t i o n f o r Yo u r C o m p u te r
1
SECTION 1
Setting Up and Using
Yo u r C o m p u t e r
Connecting the AC Adapter
Attaching and Removing the Computer Stand
Setting Up a Printer
Connecting an IEEE 1394 Device (Optional)
Transferring Information to a New Computer
Setting Up a Home and Office Network
Connecting to the Internet
Copying CDs
Turning Off the Computer
w w w. d e l l . c o m | s u p p o r t . d e l l . c o m
Connecting the AC Adapter
1
Connect the AC adapter to the plug on the AC power cable.
CAUTION: If you decide to connect the green ground wire to an
electrical outlet, do not permit contact between the green ground
wire and power leads because electrical shock, fire, or damage to
your computer can occur (see the following figure).
2
If you decide not to connect the green ground wire to the electrical
outlet, go to step 4.
3
Connect the metal ground connector to the grounding source on the
outlet (see the following figure):
a
Loosen the grounding source.
b
Slide the metal ground connector behind the grounding source,
and tighten the grounding source.
grounding source
metal ground connector
4
18
Connect the AC power cable to the outlet.
Setting Up and Using Yo ur Computer
Attaching and Removing the Computer
Stand
To attach the stand:
1
Rotate the computer to an upside-down position.
2
Insert the screw into the bottom of the stand.
3
Align the two tabs and the screw on the stand with the tab holes and
screw hole in the bottom of the computer.
screw
HINT: Place your
computer on a soft
surface to prevent
scratching the top cover.
screw hole
tabs (2)
tab holes (2)
4
Tighten the screw.
5
Place the computer in the upright position.
Setting Up and Using Yo ur Comput er
19
w w w. d e l l . c o m | s u p p o r t . d e l l . c o m
To remove the stand:
20
1
Turn the computer over so that the stand is at the top.
2
Loosen the screw and lift the stand away.
3
Place the computer in a horizontal position until you reattach the
stand.
Setting Up and Using Yo ur Computer
Setting Up a Printer
NOTICE: Complete the operating system setup before you connect a printer to
the computer.
See the documentation that came with the printer for setup information,
including how to:
•
Obtain and install updated drivers
•
Connect the printer to the computer
•
Load paper and install the toner or ink cartridge
•
Contact the printer manufacturer for technical assistance
Printer Cable
Your printer connects to your computer with either a USB cable or a parallel
cable. Your printer may not come with a printer cable, so if you purchase a
cable separately, ensure that it is compatible with your printer. If you
purchased a printer cable at the same time you purchased your computer,
the cable may arrive in the computer box.
Connecting a Parallel Printer
1
Complete the operating system setup, if you have not already done so.
2
Turn off the computer (see page 31).
NOTICE: For best results, use a 3 m (10 ft) or shorter parallel cable.
3
Attach the parallel printer cable to the parallel connector on the
computer and tighten the two screws. Attach the cable to the
connector on the printer and snap the two clips into the two notches.
Setting Up and Using Yo ur Comput er
21
w w w. d e l l . c o m | s u p p o r t . d e l l . c o m
screws (2)
parallel connector on computer
connector on
printer
clips (2)
parallel printer
cable
notches (2)
4
Turn on the printer and then turn on the computer. If the Add New
Hardware Wizard window appears, click Cancel.
5
Install the printer driver if necessary. See the documentation that
came with your printer.
Connecting a USB Printer
HINT: You can connect
USB devices while the
computer is turned on.
22
1
Complete the operating system setup, if you have not already done so.
2
Install the printer driver if necessary. See the documentation that
came with your printer.
3
Attach the USB printer cable to the USB connector on the computer
and the printer. The USB connectors fit only one way.
Setting Up and Using Yo ur Computer
USB connector on the
computer
USB connector
on printer
USB printer
cable
Connecting an IEEE 1394 Device
(Optional)
IEEE 1394 devices can move large amounts of data between computers and
devices and are ideal for use with multimedia devices, such as digital video
cameras.
Your computer provides an IEEE 1394 connector on both the front and
back panels. (See "Front and Back View of the Computer" on page 70 for
locations.)
Setting Up and Using Yo ur Comput er
23
w w w. d e l l . c o m | s u p p o r t . d e l l . c o m
HINT: The connector can
accept six-pin IEEE 1394
devices with the use of an
adapter.
IEEE 1394
connector
IEEE 1394
cable
Transferring Information to a New
Computer
Windows XP provides a Files and Settings Transfer Wizard to move data,
such as e-mails, window sizes, toolbar settings, and Internet bookmarks,
from one computer to another. First you collect the data from the source
computer, and then you import the data to the new computer.
If the source computer uses another Windows operating system, the wizard
can be launched from the Windows XP operating system CD. You can
transfer the data to the new computer over a network or serial connection,
or you can store it on a removable medium, such as a writable CD.
To transfer information to a new computer:
HINT: The CD that you
need to place in your CD
or DVD drive is titled
Operating System.
24
1
Click the Start button, point to All Programs→ Accessories→ System
Tools, and then click Files and Settings Transfer Wizard.
2
On the welcome screen, click Next.
3
On the Which computer is this? screen, select New Computer, and
then click Next.
4
Follow the instructions on the screen.
Setting Up and Using Yo ur Computer
Setting Up a Home and Office Network
Connecting to a Network Adapter
Before you connect your computer to a network, it must have a network
adapter installed and a network cable connected to it.
To connect a network cable:
1
Connect the network cable to the network adapter connector on the
back of your computer.
2
Connect the other end of the network cable to a network connection
device.
HINT: Insert the cable
until it clicks into place,
and then gently pull it to
ensure that it is secure.
HINT: Do not use a
network cable with a
telephone wall jack.
network adapter
connector on computer
network
wall jack
network cable
Network Setup Wizard
Windows XP provides a Network Setup Wizard to guide you through the
process of sharing files, printers, or an Internet connection between
computers in a home or small office.
1
Click the Start button, point to All Programs→ Accessories→
Communications, and then click Network Setup Wizard.
2
On the welcome screen, click Next.
3
Click checklist for creating a network.
Setting Up and Using Yo ur Comput er
25
w w w. d e l l . c o m | s u p p o r t . d e l l . c o m
HINT: Selecting the
connection method This
computer connects
directly to the Internet
enables the integrated
firewall provided with
Windows XP.
4
Complete the checklist and required preparations, and then return to
the Network Setup Wizard.
5
Follow the instructions on the screen.
Connecting to the Internet
To connect to the Internet, you need a modem or network connection and
an Internet service provider (ISP), such as AOL or MSN. Your ISP will offer
one or more of the following Internet connection options:
HINT: ISPs may vary by
country.
•
Dial-up connections that provide Internet access through a phone line.
Dial-up connections are considerably slower than DSL and cable
modem connections.
•
DSL connections that provide high-speed Internet access through
your existing phone line. With a DSL connection, you can access the
Internet and use your phone on the same line simultaneously.
•
Cable modem connections that provide high-speed Internet access
through your local cable TV line.
If you are using a dial-up connection, connect a telephone cable to the
modem connector on your computer and to the telephone wall jack before
you set up your Internet connection. If you are using a DSL or cable modem
connection, contact your ISP for setup instructions.
Setting Up Your Internet Connection
To set up an AOL or MSN connection:
1
Save and close any open files, and exit any open programs.
2
Double-click the MSN Explorer or AOL icon on the Windows®
desktop.
3
Follow the instructions on the screen to complete the setup.
If you do not have an MSN Explorer or AOL icon on your desktop or if you
want to set up an Internet connection with a different ISP:
26
1
Save and close any open files, and exit any open programs.
2
Click the Start button and click Control Panel.
3
Click Network and Internet Connections.
Setting Up and Using Yo ur Computer
4
Click Set up or change your Internet connection.
5
In the Internet Properties window, click Setup and then click Next.
The New Connection Wizard appears.
6
Click Connect to the Internet.
7
In the next window, click the appropriate option:
8
•
If you do not have an ISP and want to select one, click Choose
from a list of Internet service providers (ISPs).
•
If you have already obtained setup information from your ISP but
you did not receive a setup CD, click Set up my connection
manually.
•
If you have a CD, click Use the CD I got from an ISP.
Click Next.
If you selected Set up my connection manually, continue to step 9.
Otherwise, follow the instructions on the screen to complete the
setup.
9
10
Click the appropriate option under How do you want to connect to
the Internet?, and then click Next.
Use the setup information provided by your ISP to complete the setup.
HINT: If you do not know
which type of connection
to select, contact
your ISP.
If you are having problems connecting to the Internet, see page 39. If you
cannot connect to the Internet but have successfully connected in the past,
the ISP might have a service outage. Contact your ISP to check the service
status, or try connecting again later.
Copying CDs
This section applies only to computers that have a CD- or DVD-recording
device.
HINT: Ensure that you
follow all copyright laws
when you create CDs.
The information in this section is based on the Roxio Easy CD Creator
Basic documentation that came with your computer. See the following
section, "Using Easy CD Creator Basic," for instructions on how to locate
that documentation.
Setting Up and Using Yo ur Comput er
27
w w w. d e l l . c o m | s u p p o r t . d e l l . c o m
HINT: The information in
this section also applies to
using Easy CD Creator
Basic with a DVD+RW or
a DVD+R drive.
HINT: Some music and
game CDs are copyprotected. If you have a
CD that cannot be copied,
you must use the original
CD for everyday use.
To burn CDs, you need to use CD-burner software. Roxio Easy CD Creator
Basic is your computer's CD-burner software. The software includes these
project programs that enable you to record specialty CDs for different types
of uses:
•
DirectCD allows you to format a blank CD-R or CD-RW disc so that
you can use Microsoft® Windows® Explorer to drag and drop data
files to the CD-RW drive. You can use a DirectCD-formatted CD-RW
disc like another hard drive on your computer because CD-RW discs
are fully rewritable (CD-R discs can be used with DirectCD, but that
media type has overwriting limitations—see "Using Blank CD-R Discs
or Blank CD-RW Discs" for recording media differences).
•
MusicCD allows you to burn custom music CDs.
•
DataCD allows you to copy a variety of your documents, such as
spreadsheet or accounting files, to a CD for permanent storage.
•
Disc Copier allows you to make a backup copy of almost any type of
CD. This program allows you to make a copy of a CD for everyday use
so that you can archive and save the original copy. (Disc Copier is
titled "CD Copier" in some versions of Roxio CD Creator Basic.)
All four project programs are available on the Easy CD Creator Basic Select
a Project menu screen. To view the Select a Project menu screen, click the
Start button, point to All Programs→ Roxio Easy CD Creator, and then
click Project Selector.
Using Easy CD Creator Basic
See the Easy CD Creator Basic documentation for instructions on how to
use the program, information about different recording techniques, and CD
media limitations. The Easy CD Creator Basic documentation is located in
the Microsoft® Windows® XP Help and Support Center (see page 36). The
documentation is also provided on the Dell Dimension ResourceCD, which
is included with your computer. Each Easy CD Creator Basic project
program also has thorough online help files.
28
Setting Up and Using Yo ur Computer
Using Blank CD-R Discs or Blank CD-RW Discs
Your CD-RW drive writes to two different types of recording media—CD-R
and CD-RW discs. Use blank CD-R (CD-Recordable) disks to record music
or permanently store data files. After creating a CD-R disc, you cannot write
to that disc again without changing your method of recording (see the
Roxio documentation for more information). Use blank CD-RW
(CD-ReWritable) discs when you want to write, erase, rewrite, and update
your files onto CDs.
Helpful Tips
•
You must use the Easy CD Creator Basic project programs to copy and
record all music and data CDs. You can use Windows Explorer to drag
and drop files to a CD-R or CD-RW disc only after you first use
DirectCD to format the disc.
•
You must use CD-R discs to burn music CDs that you want to play in
regular stereos. CD-RW discs do not play in most home or car stereos.
•
If you want to copy files from the Internet or files from a floppy or Zip
drive, copy those files to your hard drive first, and then burn your CD.
Your CD-RW drive requires a steady stream of data to properly record.
Direct Internet downloads, floppy drives, and Zip drives may not be
able to provide a steady data stream to your CD-RW drive.
•
Music MP3 files can be played only on MP3 players or on computers
that have MP3 software installed.
•
Ensure that you set the sampling rate to at least 128 Kbps when you
burn MP3 files to a CD. Otherwise, recording errors may occur.
•
Do not burn a blank CD-R or CD-RW disc to its maximum capacity;
for example, do not copy a 650-MB file to a 650-MB blank CD. The
CD-RW drive needs 1 or 2 MB of the blank CD to finalize the
recording.
•
Use a blank CD-RW disc to practice CD recording until you are
familiar with CD recording techniques. If you make a mistake, you can
erase the CD-RW disc and try again. You can also use blank CD-RW
discs to test music file projects before you record the project
permanently to a blank CD-R disc.
•
See the Roxio support website at support.roxio.com for additional
helpful tips.
Setting Up and Using Yo ur Comput er
29
w w w. d e l l . c o m | s u p p o r t . d e l l . c o m
How to Copy a CD
HINT: If you have a
DVD/CD-RW combo drive
and experience recording
problems, first check for
available software
patches at the Dell
Support website at
support.dell.com and if
necessary, the Roxio
support website at
support.roxio.com.
This procedure assumes that your computer is equipped with a single
CD-RW drive (without an additional CD drive). If your computer is
equipped with both types of drives, see the Roxio documentation for
instructions on how to copy CDs from a CD drive to a CD-RW drive.
1
Click the Start button, point to All Programs→ Roxio Easy CD
Creator, and then click Project Selector.
The Select a Project window appears.
2
Click Disc Copier. (Disc Copier is titled "CD Copier" in some versions
of Easy CD Creator Basic.)
The Disc Copier window appears and displays your CD-RW drive in
the Copy from and the Record to lists.
3
Insert the source CD that you want to copy into the CD-RW drive.
The Disc Copier project program briefly checks the source CD in the
CD-RW drive to ensure that it is a readable CD.
4
Click Copy.
Depending on the size of the files that are being copied, the copy
process may take a few minutes.
5
After the source CD is copied, remove the source CD from the
CD-RW drive tray.
The CD-RW drive tray opens automatically after the source CD is
copied.
HINT: You must use
CD-R discs to burn music
CDs that you want to
play in regular stereos.
CD-RW discs do not play
in most home or car
stereos.
30
6
Insert a blank CD into the CD-RW drive and close the tray.
The recording starts automatically.
After the recording completes, click OK.
Setting Up and Using Yo ur Computer
Turning Off the Computer
NOTICE: To prevent data loss, you must turn off your computer through the
Start menu rather than by pressing the power button.
1
Save and close any open files and exit any open programs.
2
Click the Start button and then click Turn off Computer.
3
Click Turn off.
HINT: If you are having
difficulty turning off your
computer, see "General
Problems" on page 42.
The computer automatically turns off after the shutdown process
finishes.
4
Turn off your monitor and any other devices connected to power.
Setting Up and Using Yo ur Comput er
31
32
Setting Up and Using Yo ur Computer
w w w. d e l l . c o m | s u p p o r t . d e l l . c o m
2
SECTION 2
Solving Problems
Finding Solutions
Finding Help Information
Battery Problems
Drive Problems
E-Mail, Modem, and Internet Problems
Error Messages
General Problems
IEEE 1394 Problems
Keyboard Problems
Mouse Problems
Network Problems
PC Card Problems
Power Problems
Printer Problems
Scanner Problems
Sound and Speaker Problems
Video and Monitor Problems
w w w. j p . d e l l . c o m | s u p p o r t . j p . d e l l . c o m
Finding Solutions
Sometimes it’s difficult to figure out where to go for answers. Use this chart
to help you quickly find the answers to your questions.
See page 49.
Press a key or move the
mouse. See the Tell Me How
help file for information on
standby mode.
Get technical assistance from
Dell. See page 95.
See page 41.
34
So l vi n g Pro b l em s
See page 54.
See page 53.
See page 51.
See page 39.
See page 46.
See page 45.
See page 37.
See page 48.
See page 52.
See page 41.
See page 42.
See page 39.
See page 39.
See page 42.
So l vi n g Pro b l em s
35
w w w. j p . d e l l . c o m | s u p p o r t . j p . d e l l . c o m
Finding Help Information
TO A C C E S S T H E Tell Me How H E L P F I L E
1 Click the Start button, and then click Help and Support.
2 Click User and system guides, and then click User’s guides.
3 Click Tell Me How.
TO A C C E S S W I N D O W S H E L P
1 Click the Start button, and then click Help and Support.
2 Type a word or phrase that describes your problem, and then click the arrow
icon.
3 Click the topic that describes your problem.
4 Follow the instructions shown on the screen.
TO L O C A T E A D D I T I O N A L I N F O R M A T I O N F O R Y O U R C O M P U T E R — See
page 13.
HINT: Check Windows
Explorer to see if your
device is listed as a drive.
Battery Problems
CAUTION: There is a danger of a new battery exploding if it is
incorrectly installed. Replace the battery only with the same or
equivalent type recommended by the manufacturer. Discard used
batteries according to the manufacturer's instructions.
CAUTION: Before you begin any of the procedures in this section,
follow the safety instructions on page 7.
R E P L A C E T H E B A T T E R Y — If you have to repeatedly reset time and date
information after turning on the computer, or if an incorrect time or date displays
during start-up, replace the battery (see page 93). If the battery still does not
work properly, contact Dell (see page 95).
36
So l vi n g Pro b l em s
Drive Problems
CD drive problems
A D J U S T T H E W I N D O W S V O L U M E C O N T R O L — Click the speaker icon in
the lower-right corner of your screen.
• Ensure that the volume is turned up by clicking the slidebar and dragging
it up.
• Ensure that the sound is not muted by clicking any boxes that are checked.
HINT: High-speed CD
drive vibration is normal
and may cause noise. This
does not indicate a defect
in the drive or the CD.
TE S T T H E D R I V E W I T H A N O T H E R C D — Insert another CD to eliminate
the possibility that the original CD is defective.
C H E C K T H E S P E A K E R S A N D S U B W O O F E R — See "Sound and Speaker
Problems" on page 53.
E N S U R E T H A T W I N D O W S R E C O G N I Z E S T H E D R I V E — Click the Start
button and click My Computer. If the CD drive is not listed, perform a full scan
with your antivirus software to check for and remove viruses. Viruses can
sometimes prevent Windows from recognizing the drive.
C L E A N T H E D I S C — See the Tell Me How help file for instructions on
cleaning your CDs. To access help files, see page 36.
C H E C K F O R I N T E R R U P T R E Q U E S T C O N F L I C T S — See page 64.
Problems writing to a CD-RW drive
TU R N O F F S T A N D B Y M O D E I N W I N D O W S B E F O R E W R I T I N G T O A
C D- R W D I S C — For information on power conservation modes, see the Tell
Me How help file or search for the keyword standby in Windows Help. To access
help files, see page 36.
HINT: If you disable
standby mode to write to a
CD-RW drive, remember
to reenable standby mode
when you finish writing to
the CD.
C L O S E O T H E R P R O G R A M S — The CD-RW drive must receive a steady
stream of data when writing. If the stream is interrupted, an error occurs. Try
closing all programs before writing to the CD-RW.
So l vi n g Pro b l em s
37
w w w. j p . d e l l . c o m | s u p p o r t . j p . d e l l . c o m
DVD drive problems
HINT: Because of
different regions
worldwide and different
disc formats, not all DVD
titles work in all DVD
drives.
TE S T T H E D R I V E W I T H A N O T H E R DVD — Insert another DVD to
eliminate the possibility that the original DVD is defective.
E N S U R E T H A T W I N D O W S R E C O G N I Z E S T H E D R I V E — Double-click My
Computer on the desktop. If the DVD drive is not listed, perform a full scan with
your antivirus software to check for and remove viruses. Viruses can sometimes
prevent Windows from recognizing the drive.
C L E A N T H E D I S C — See the Tell Me How help file for instructions on
cleaning your DVDs. To access help files, see page 36.
C H E C K F O R I N T E R R U P T R E Q U E S T C O N F L I C T S — See page 64.
Hard drive problems
RUN CHECK DISK
1 Double-click My Computer on the desktop.
2 Right-click the drive letter (local disk) that you want to scan for errors, and
then click Properties.
3 Click the Tools tab.
4 Under Error-checking, click Check Now.
5 Click Start.
C H E C K F O R I N T E R R U P T R E Q U E S T C O N F L I C T S — See page 64.
38
So l vi n g Pro b l em s
E-Mail, Modem, and Internet Problems
C H E C K T H E T E L E P H O N E L I N E C O N N E C T I O N — Verify that the telephone
line is connected to the jack on the modem. (The jack has either a green label or
a connector-shaped icon next to it.) Ensure that you hear a click when you insert
the telephone line connector into the modem.
HINT: Connect the
modem to an analog
telephone jack only. The
modem does not operate
while it is connected to a
digital telephone network.
C H E C K T H E T E L E P H O N E J A C K — Disconnect the telephone line from the
modem and connect it to a telephone. Listen for a dial tone.
CONNECT THE MODEM DIRECTLY TO THE TELEPHONE WALL JACK —
If you have other telephone devices sharing the line, such as an answering
machine, fax machine, surge protector, or line splitter, then bypass them and use
the telephone to connect the modem directly to the telephone wall jack.
U S E A D I F F E R E N T T E L E P H O N E L I N E — If you are using a line that is 3 m
(10 ft) or more in length, try a shorter one.
R U N T H E M O D E M H E L P E R D I A G N O S T I C S — Click the Start button, point
to All Programs, and then click Modem Helper. Follow the instructions on the
screen to identify and resolve modem problems. (Modem Helper is not available
on all computers.)
VE R I F Y T H A T T H E M O D E M I S C O M M U N I C A T I N G W I T H W I N D O W S ®
1 Click the Start button, and then click Control Panel.
2 Click Printers and Other Hardware.
3 Click Phone and Modem Options.
4 Click the Modems tab.
5 Click the COM port for your modem.
6 Click Properties, click the Diagnostics tab, and then click Query Modem to
verify that the modem is communicating with Windows.
If all commands receive responses, the modem is operating properly.
So l vi n g Pro b l em s
39
w w w. j p . d e l l . c o m | s u p p o r t . j p . d e l l . c o m
TU R N O F F C A L L W A I T I N G ( C A T C H - P H O N E ) — See your telephone
directory for instructions on deactivating this feature. Then adjust the dial-up
networking connection properties.
1 Click the Start button, and then click Control Panel.
2 Click Printers and Other Hardware, and then click Phone and Modem
Options.
3 Click your connection type to highlight it.
4 Click the Dialing Rules tab, and then click Edit.
5 Click the To Disable Call Waiting box to place a checkmark in it.
6 Select the disable code from the drop-down menu (for example, *70).
7 Click Apply, and then click OK.
E N S U R E T H A T Y O U A R E C O N N E C T E D T O T H E I N T E R N E T — With the
Outlook Express e-mail program open, click File. If Work Offline has a
checkmark next to it, click the checkmark to remove it and connect to the
Internet.
ENSURE THAT YOU HAVE SUBSCRIBED TO AN INTERNET SERVICE
P R O V I D E R — Contact an Internet service provider to subscribe.
C O N T A C T Y O U R I N T E R N E T S E R V I C E P R O V I D E R — Contact your Internet
service provider for assistance.
C H E C K F O R I N T E R R U P T R E Q U E S T C O N F L I C T S — See page 64.
40
So l vi n g Pro b l em s
Error Messages
A FILENAME CANNOT CONTAIN ANY OF THE FOLLOWING
C H A R A C T E R S : \ / : * ? “ < > | — Do not use these characters in
filenames.
A R E Q U I R E D .DLL F I L E W A S N O T F O U N D — The program that you are
trying to open is missing an essential file. To remove and then reinstall the
program:
1 Click the Start button.
2 Click Control Panel.
3 Click Add or Remove Programs.
4 Select the program you want to remove.
5 Click the Change or Remove Program icon.
6 See the program documentation for installation instructions.
I N S E R T B O O T A B L E M E D I A — The operating system is trying to boot to a
nonbootable CD. Insert a bootable CD.
NOT ENOUGH MEMORY OR RESOURCES. CLOSE SOME PROGRAMS AND
T R Y A G A I N — You have too many programs open. Close all windows and open
the program that you want to use. In some cases, you might have to restart your
computer to restore computer resources. If so, try running the program that you
want to use first.
O P E R A T I N G S Y S T E M N O T F O U N D — Contact Dell (see page 95).
THE FILE BEING COPIED IS TOO LARGE FOR THE DESTINATION
D R I V E — The file that you are trying to copy is too large to fit on the disc. Try
copying the file to a blank disk or using a larger-capacity disc.
x:\ I S N O T A C C E S S I B L E . T H E D E V I C E I S N O T R E A D Y — Insert a disc
into the drive and try again.
So l vi n g Pro b l em s
41
w w w. j p . d e l l . c o m | s u p p o r t . j p . d e l l . c o m
General Problems
A program stops responding
END THE PROGRAM
1 Press <Ctrl><Shift><Esc> simultaneously.
2 Click Applications.
3 Click the program that is no longer responding.
4 Click End Task.
TU R N T H E C O M P U T E R O F F — If your computer locks up and you are unable
to get a response by pressing a key on your keyboard or moving your mouse, press
and hold the power button for at least 8 to 10 seconds until the computer turns
off. Then press the power button again to turn on the computer. You might lose
data if you are unable to perform an operating system shutdown.
A program crashes repeatedly
HINT: Software usually
includes installation
instructions in its
documentation or on
a CD.
C H E C K T H E S O F T W A R E D O C U M E N T A T I O N — Many software
manufacturers maintain websites with information that may help you solve the
problem. Ensure that you properly installed and configured the program. If
necessary, uninstall and then reinstall the program.
A program is designed for an earlier Windows operating system
RUN THE PROGRAM COMPATIBILITY WIZARD
Windows XP provides a Program Compatibility Wizard that configures a
program so it runs in an environment similar to non-Windows XP operating
system environments.
1 Click the Start button, point to All Programs→ Accessories, and then click
Program Compatibility Wizard.
2 In the welcome screen, click Next.
3 Follow the instructions on the screen.
42
So l vi n g Pro b l em s
A solid blue screen appears
TU R N T H E C O M P U T E R O F F — If the computer does not respond to a
keystroke or a proper shutdown, press the power button for at least 8 to
10 seconds until the computer turns off. Press the power button again to restart
the computer. The chkdsk program automatically runs during the start-up
process. Follow the instructions on the screen.
Other software problems
CHECK THE SOFTWARE DOCUMENTATION OR CONTACT THE SOFTWARE
MANUFACTURER FOR TROUBLESHOOTING INFORMATION
B A C K U P Y O U R F I L E S I M M E D I A T E L Y — If your computer has a CD-RW
drive installed, see the drive’s documentation for instructions.
ENSURE THAT YOU HAVE NOT MADE AN ERROR WHILE ENTERING
D A T A — See the program documentation to make sure that the values or
characters you are entering are valid.
C H E C K F O R V I R U S E S — Use a virus-scanning program to check the hard
drive or CDs.
R E S T A R T T H E C O M P U T E R — Save and close any open files, exit any open
programs, and then shut down your computer through the Start menu instead of
pressing the power button. Otherwise, you may lose data.
CHECK FOR COMPATIBILITY
• Ensure that the program is compatible with the operating system installed on
your computer and that your computer meets the minimum hardware
requirements needed to run the software. See the software documentation for
information.
• If necessary, uninstall and then reinstall the program.
ENSURE THAT YOU PROPERLY INSTALLED AND CONFIGURED THE
P R O G R A M — See the software documentation for information. If necessary,
uninstall and then reinstall the program.
So l vi n g Pro b l em s
43
w w w. j p . d e l l . c o m | s u p p o r t . j p . d e l l . c o m
Other technical problems
G O T O T H E D E L L S U P P O R T W E B S I T E — Go to support.dell.com for help
with general usage, installation, and troubleshooting questions.The support
website offers several different tools to help you, such as Dell Forum—a chat
room where you can communicate with other Dell customers about their
computers and gain access to technical support through e-mail. See "Dell
Support website" on page 14 for more information about the website. See the
Service and Support Guide that came with your computer for a description of the
hardware and software support provided by Dell.
C A L L D E L L — If you cannot solve your problem using the Dell Support
website or e-mail service, call Dell for technical assistance (see psge 93). See the
Service and Support Guide that came with your computer for a description of the
hardware and software support provided by Dell.
General hardware problems
If your computer exhibits one or more of the following symptoms, a device
conflict may exist:
•
Your computer locks up, particularly while using a specific device.
•
A recently added device does not work.
•
A sound card emits noise or demonstrates other problems.
•
Unintelligible characters print from the printer.
•
The mouse pointer does not move or "stutters" when it moves.
•
Messages appear stating that the computer is not operating at
maximum performance.
•
Errors occur and programs crash for no apparent reason.
•
Nothing displays on the monitor.
RE M O VE A NY R E C E NT L Y AD D E D HA R D W A R E T O S E E I F IT R E S O L V E S
T H E C O N F L I C T — If removing the hardware resolves the conflict, see the
hardware documentation for configuration and troubleshooting instructions. If
the problem persists, contact the hardware manufacturer for technical assistance.
44
So l vi n g Pro b l em s
CHECK YOUR OPERATING SYSTEM DOCUMENTATION FOR ADDITIONAL
TROUBLESHOOTING INFORMATION
C H E C K F O R I N T E R R U P T R E Q U E S T C O N F L I C T S — See page 64.
IEEE 1394 Problems
C H E C K T H E IEEE 13 94 D E V I C E — Ensure that the IEEE 1394 device is
properly inserted into the connector.
E N S U R E T H A T T H E I EEE 1394 D E V I C E I S R E C O G N I Z E D B Y
WINDOWS®
1 Click the Start button.
2 Click Control Panel.
3 Click Printers and Other Hardware. If your IEEE 1394 device is listed,
Windows recognizes the device.
I F Y O U H A V E P R O B L E M S W I T H A D E L L - P R O V I D E D I EEE 1394
D E V I C E — Contact Dell (see page 95).
I F Y O U H A V E P R O B L E M S W I T H A N I EEE 139 4 D E V I C E N O T P R O V I D E D
B Y D E L L — Contact the IEEE 1394 device manufacturer.
Keyboard Problems
RE S T A R T T H E C O MP U T E R
• If the mouse is functioning, shut down the computer (see page 31). After the
computer shuts down, press the power button to restart the computer.
• If the computer does not respond to a keystroke or the mouse, press the power
button for at least 8 to 10 seconds until the computer turns off. Press the
power button again to restart the computer.
So l vi n g Pro b l em s
45
w w w. j p . d e l l . c o m | s u p p o r t . j p . d e l l . c o m
CHECK THE KEYBOARD CABLE
• Shut down the computer (see page 31), reconnect the keyboard cable as
shown on the setup diagram for your computer, and then restart the computer.
• Ensure that the keyboard cable is firmly connected to the computer.
• Check the cable connector for bent or broken pins and for damaged or frayed
cables. Straighten bent pins.
• Remove keyboard extension cables and connect the keyboard directly to the
computer.
TE S T T H E K E Y B O A R D — Connect a keyboard that works properly to the
computer, and try using the keyboard. If the new keyboard works, the original
keyboard is faulty.
C H E C K F O R I N T E R R U P T R E Q U E S T C O N F L I C T S — See page 64.
Mouse Problems
RE S T AR T T H E C O MP U T E R
1 Simultaneously press <Ctrl><Esc> to display the Start menu.
2 Type u, press the keyboard arrow keys to highlight Shut down or Turn Off, and
then press <Enter>.
3 After the computer turns off, press the power button to restart the computer.
IF YOU CONNECTED THE MOUSE BEFORE TURNING ON THE
C O M P U T E R, R E C O N N E C T T H E M O U S E C A B L E
1 Simultaneously press <Ctrl><Esc> to display the Start menu.
2 Type u, press the keyboard arrow keys to highlight Shut down or Turn Off, and
then press <Enter>.
3 After the computer turns off, reconnect the mouse cable as shown on the
setup diagram for your computer.
4 Start the computer.
46
So l vi n g Pro b l em s
I F Y O U C O N N E C T E D T H E M O U S E A F T E R T U R N I N G O N T H E C O M P U T E R,
REMOVE THE POWER CABLE, AND THEN RECONNECT THE MOUSE
C A B L E — If the mouse is connected after the power is turned on, the mouse
appears to be nonfunctional. To make the mouse function properly:
1 While your computer is on, remove the power cable from the back of the
computer.
2 Connect the mouse to the computer.
3 Reconnect the power cable.
4 Turn on your computer.
Pressing the power button does not clear the computer’s settings and does not
restore mouse functionality.
CHECK THE MOUSE CABLE
• Check the cable connector for bent or broken pins and for damaged or frayed
cables. Straighten bent pins.
• Ensure that the cable is firmly connected to the computer.
TE S T T H E M O U S E — Connect a mouse that works properly to the computer,
and try using the mouse. If the new mouse works, the original mouse was faulty.
CHECK THE MOUSE SETTINGS
1 Click the Start button, click Control Panel, and then click Printers and Other
Hardware.
2 Click Mouse.
3 Try adjusting the settings.
R E I N S T A L L T H E M O U S E D R I V E R — See page 61.
C H E C K F O R I N T E R R U P T R E Q U E S T C O N F L I C T S — See page 64.
So l vi n g Pro b l em s
47
w w w. j p . d e l l . c o m | s u p p o r t . j p . d e l l . c o m
Network Problems
C H E C K T H E N E T W O R K C A B L E C O N N E C T O R — Ensure that the network
cable is connected as shown on page 25.
CHECK THE NETWORK LIGHTS ON THE BACK OF THE COMPUTER —
No light indicates that there is no network communication. Try replacing the
network cable.
light
light
RE S T AR T T H E C O MP U T E R A ND T R Y T O L O G O N T O T H E N ET W O RK
AGAIN
C H E C K Y O U R N E T W O R K S E T T I N G S — Contact your network administrator
or the person who set up your network to verify that your network settings are
correct and that the network is functioning.
C H E C K F O R I N T E R R U P T R E Q U E S T C O N F L I C T S — See page 64.
48
So l vi n g Pro b l em s
PC Card Problems
C H E C K T H E P C C A R D — Ensure that the PC Card is properly inserted into
the connector.
HINT: Your computer is
designed for 16-bit
PCMCIA cards only. Do
not use a 32-bit CardBus.
E N S U R E T H A T T H E C A R D I S R E C O G N I Z E D B Y W I N D O W S ® — Doubleclick the Unplug or Eject Hardware icon in the Windows taskbar. Ensure that
the card is listed.
I F Y O U H A V E P R O B L E M S W I T H A PC C A R D N O T P R O V I D E D B Y
D E L L — Contact the PC card manufacturer.
Power Problems
CAUTION: Before you begin any of the procedures in this section,
follow the safety instructions on page 7.
A D J U S T T H E P O W E R P R O P E R T I E S — Your computer may be in standby or
hibernate mode. For information on power conservation modes, see the Tell Me
How help file, or search for the keyword standby or hibernate in Windows® Help.
To access help files, see page 36.
HINT: If the power light
on the front of the
computer is steady green
(see page 70), the
computer is operating
normally.
I F T H E P O W E R L I G H T I S B L I N K I N G G R E E N — The computer is in standby
mode. Press a key on the keyboard or move the mouse to resume normal
operation.
So l vi n g Pro b l em s
49
w w w. j p . d e l l . c o m | s u p p o r t . j p . d e l l . c o m
I F T H E P O W E R L I G H T I S O F F — The computer is either turned off or is not
receiving power.
• Ensure that the power cable is firmly inserted into both the power connector
on the back of the computer and the electrical outlet.
• If the computer is plugged into a power strip, ensure that the power strip is
plugged into an electrical outlet and that the power strip is turned on.
• Ensure that the electrical outlet is working by testing it with another device,
such as a lamp.
• Ensure that the voltage selection switch is set to match the AC power at your
location (see page 9).
• Bypass power protection devices, power strips, and power extension cables to
verify that the computer turns on.
• Swap the computer and monitor power cables to determine if the power cable
is defective.
• Ensure that the microprocessor power cable is securely connected to the
system board (see page 77).
• Ensure that the power supply cables are securely connected to the system
board (see page 77).
• If the problem persists, contact Dell (see page 95).
I F T H E P O W E R L I G H T I S S T E A D Y A M B E R — The computer is receiving
electrical power, but an internal power problem might exist.
• Ensure that the power cable is firmly inserted into both the power connector
on the back of the computer and the electrical outlet.
• Ensure that the voltage selection switch is set to match the AC power at your
location (see page 9).
• Ensure that the microprocessor power cable is securely connected to the
system board (see page 77).
• Ensure that the power supply cables are securely connected to the system
board (see page 77).
• If the problem persists, contact Dell (see page 95).
I F T H E P O W E R L I G H T I S B L I N K I N G A M B E R — A device might be
malfunctioning or incorrectly installed.
• Remove and then reinstall the memory modules (see page 82).
• Remove and then reinstall any cards (see page 80).
• Remove and then reinstall the video card, if applicable (see page 82).
• If the problem persists, contact Dell (see page 95).
50
So l vi n g Pro b l em s
E L I M I N A T E I N T E R F E R E N C E — Electrical appliances on the same circuit
or operating near the computer can cause interference. Other causes of
interference are:
• Power extension cables
• Keyboard and mouse extension cables
• Too many devices on a power strip
• Multiple power strips connected to the same electrical outlet
Printer Problems
C H E C K T H E P R I N T E R D O C U M E N T A T I O N — See the printer documentation
for setup and troubleshooting information.
E N S U R E T H A T T H E P R I N T E R I S T U R N E D O N — See the printer
documentation for power button information.
VE R I F Y T H E P R I N T E R C A B L E C O N N E C T I O N S
• See the printer documentation for cable connection information.
• Ensure that the printer cable is connected as described on page 21.
• Ensure that the printer cables are securely connected to the printer and the
computer.
HINT: Dell does not
cover the printer’s
warranty. If you need
technical assistance for
your printer, call the
printer’s manufacturer.
See the printer
documentation for the
correct phone number.
TE S T T H E E L E C T R I C A L O U T L E T — Ensure that the electrical outlet is
working by testing it with another device, such as a lamp.
VE R I F Y T H A T T H E P R I N T E R I S R E C O G N I Z E D B Y W I N D O W S ®
1 Click the Start button.
2 Click Control Panel.
3 Click Printers and Other Hardware.
4 Click View installed printers or fax printers. If the printer is listed, right-click
the printer icon.
5 Click Properties, and then select the Ports tab. For a parallel printer, ensure
that the Print to the following port(s): setting is LPT1 (Printer Port). For a
USB printer, ensure that the Print to the following port(s): setting is USB.
R E I N S T A L L T H E P R I N T E R D R I V E R — See page 61.
C H E C K F O R I N T E R R U P T R E Q U E S T C O N F L I C T S — See page 64.
So l vi n g Pro b l em s
51
w w w. j p . d e l l . c o m | s u p p o r t . j p . d e l l . c o m
Scanner Problems
HINT: Dell does not
cover the scanner’s
warranty. If you need
technical assistance for
your scanner, call the
scanner’s manufacturer.
See the scanner
documentation for the
correct phone number.
C H E C K T H E S C A N N E R D O C U M E N T A T I O N — See the scanner
documentation for setup and troubleshooting information.
U N L O C K T H E S C A N N E R — Ensure that your scanner is unlocked if it has a
locking tab or button.
RE S T AR T T H E C O MP U T E R A ND T R Y T H E S C A N N E R A G AI N
CHECK THE CABLE CONNECTIONS
• If your scanner has a power cable, ensure that the power cable is firmly
connected to a working electrical outlet and that the scanner is turned on.
• Ensure that the scanner cable is firmly connected to the computer and to the
scanner.
VE R I F Y T H A T T H E S C A N N E R I S R E C O G N I Z E D B Y M I C R O S O F T ®
WINDOWS®
1 Click the Start button.
2 Click Control Panel.
3 Click Printers and Other Hardware.
4 Click Scanners and Cameras. If your scanner is listed, Windows recognizes
the scanner.
R E I N S T A L L T H E S C A N N E R D R I V E R — See the scanner documentation for
instructions.
52
So l vi n g Pro b l em s
Sound and Speaker Problems
C H E C K T H E S P E A K E R C A B L E C O N N E C T I O N S — Ensure that the speakers
are connected as shown on the setup diagram supplied with the speakers.
ENSURE THAT THE SUBWOOFER AND THE SPEAKERS ARE TURNED
O N — See the setup diagram supplied with the speakers. If your speakers have
volume controls, adjust the volume, bass, or treble to eliminate distortion.
HINT: The volume
control in some MP3
players overrides the
Windows® volume
setting. If you have been
listening to MP3 songs,
ensure that you did not
turn the player volume
down or off.
A D J U S T T H E W I N D O W S V O L U M E C O N T R O L — Click or double-click the
speaker icon in the lower-right corner of your screen. Ensure that the volume is
turned up and that the sound is not muted.
DISCONNECT HEADPHONES FROM THE HEADPHONE CONNECTOR —
Sound from the speakers is automatically disabled when headphones are
connected to the computer’s front-panel headphone connector.
TE S T T H E E L E C T R I C A L O U T L E T — Ensure that the electrical outlet is
working by testing it with another device, such as a lamp.
E L I M I N A T E P O S S I B L E I N T E R F E R E N C E — Turn off nearby fans, fluorescent
lights, or halogen lamps to check for interference.
R U N T H E S P E A K E R D I A G N O S T I C S — Some speaker systems have selfdiagnostics. See the speaker documentation for diagnostics instructions.
R E I N S T A L L T H E A U D I O ( S O U N D ) D R I V E R — See page 61.
C H E C K F O R I N T E R R U P T R E Q U E S T C O N F L I C T S — See page 64.
So l vi n g Pro b l em s
53
w w w. j p . d e l l . c o m | s u p p o r t . j p . d e l l . c o m
Video and Monitor Problems
If the screen is blank
HINT: See the monitor
documentation for
troubleshooting
procedures.
C H E C K T H E M O N I T O R P O W E R L I G H T — If the power light is lit or blinking,
the monitor has power. If the power light is blinking, press a key on the keyboard
or move the mouse.
P R E S S T H E M O N I T O R P O W E R B U T T O N — Firmly press the button to
ensure that the monitor is turned on.
C H E C K T H E M O N I T O R C A B L E C O N N E C T I O N — Check the connector for
bent or broken pins. (It is normal for monitor cable connectors to have missing
pins.) Ensure that the video cable is connected as shown on the setup diagram for
your computer.
TE S T T H E E L E C T R I C A L O U T L E T — Ensure that the electrical outlet is
working by testing it with another device, such as a lamp.
S W A P T H E P O W E R C A B L E S — Swap the computer and monitor power
cables to determine if the power cable is defective.
TE S T T H E V I D E O E X T E N S I O N C A B L E ( I F U S E D ) — If you are using a
video extension cable and removing the cable solves the problem, the cable is
defective.
TE S T A N O T H E R M O N I T O R — If another monitor is available, connect it to
the computer.
C H E C K T H E D I A G N O S T I C L I G H T S — See page 58.
54
So l vi n g Pro b l em s
If the screen is difficult to read
C H E C K T H E M O N I T O R S E T T I N G S — See the monitor documentation for
instructions on adjusting the contrast and brightness, demagnetizing
(degaussing) the monitor, and running the monitor self-test.
M O V E T H E S U B W O O F E R A W A Y F R O M T H E M O N I T O R — If your speaker
system includes a subwoofer, ensure that the subwoofer is at least 60 cm (2 ft)
away from the monitor.
MOVE THE MONITOR AWAY FROM EXTERNAL POWER SOURCES —
Fans, fluorescent lights, halogen lamps, and other electrical devices can cause the
screen image to appear "shaky." Turn off nearby devices to check for interference.
R O T A T E T H E M O N I T O R T O F A C E A D I F F E R E N T D I R E C T I O N — Eliminate
sunlight glare, which can cause poor picture quality.
ADJUST THE WINDOWS® DISPLAY SETTINGS
1 Click the Start button, and then click Control Panel.
2 Click Appearance and Themes.
3 Click Display, and then click the Settings tab.
4 Try different settings for Screen resolution and Color quality.
R E S T O R E T H E R E C O M M E N D E D S E T T I N G S — Restore the original
resolution and refresh rate settings. See the Tell Me How help file for instructions.
To access help files, see page 36.
C H E C K F O R I N T E R R U P T R E Q U E S T C O N F L I C T S — See page 64.
So l vi n g Pro b l em s
55
56
So l vi n g Pro b l em s
w w w. j p . d e l l . c o m | s u p p o r t . j p . d e l l . c o m
3
SECTION 3
Advanced
Tr o u b l e s h o o t i n g
Diagnostic Lights
Drivers
Using System Restore
Resolving Software and Hardware Incompatibilities
Reinstalling Microsoft® Windows® XP
w w w. j p . d e l l . c o m | s u p p o r t . j p . d e l l . c o m
Diagnostic Lights
To help you troubleshoot a problem, your computer is equipped with four
lights on the back panel labeled "A," "B," "C," and "D" (see page 72). These
lights can be yellow or green. When the computer starts normally, the lights
flash. After the computer starts, the lights remain green. If the computer
malfunctions, the color and sequence of the lights identify the problem.
CAUTION: Before you begin any of the procedures in this section,
follow the safety instructions on page 9.
Diagnostic Code
58
Y
Y
G
G
A
B
C
D
G
Y
G
Y
A
B
C
D
Advanced Troubleshooting
Definition
Corrective Action
Memory modules
are detected, but a
memory failure has
occurred.
• If you have one memory module
installed, reinstall it (see page 82) and
restart the computer.
• If you have two or more memory
modules installed, remove the modules,
reinstall one module (see page 82), and
then restart the computer. If the
computer starts normally, reinstall an
additional module. Continue until you
have identified a faulty module or
reinstalled all modules without error.
• If available, install properly working
memory of the same type into your
computer (see page 87).
• If the problem persists, contact Dell
(see page 95).
Memory modules
are detected, but a
memory
configuration or
compatibility error
exists.
• Ensure that there are no special memory
module/memory connector placement
requirements (see page 82).
• Verify that the memory modules that
you are installing are compatible with
your computer (see page 87).
• If the problem persists, contact Dell
(see page 95).
Diagnostic Code
G
Y
Y
Y
A
B
C
D
Y
G
Y
Y
A
B
C
D
G
G
G
Y
A
B
C
D
Definition
Corrective Action
No memory
modules are
detected.
• Reinstall all memory modules (see
page 82) and restart the computer.
• To eliminate the possibility of a faulty
memory connector, remove all memory
modules, install one memory module
(see page 82), and then restart the
computer. If the computer starts
normally, move the memory module to
a different connector and restart the
computer. Continue until you have
identified a faulty connector or
reinstalled all modules without error.
• If the problem persists, contact Dell
(see page 95).
A PCI bus failure
has occurred.
1 Determine if a conflict exists by
Other failure has
occurred.
• Ensure that the cables are properly
connected from the hard drive, CD
drive, and DVD drive to the system
board (see page 77).
• If the problem persists, contact Dell
(see page 95).
removing a card and then restarting the
computer.
2 If the problem persists, reinstall the card
that you removed, remove a different
card (see page 80), and then restart the
computer.
3 Repeat this process for each card. If the
computer starts normally, troubleshoot
the last card removed from the
computer for resource conflicts (see
"Resolving Software and Hardware
Incompatibilities" on page 64).
4 If the problem persists, contact Dell
(see page 95).
Advanced Troubleshooting
59
w w w. j p . d e l l . c o m | s u p p o r t . j p . d e l l . c o m
Drivers
What Is a Driver?
A driver is a program that controls a device such as a printer, mouse, or
keyboard. All devices require a driver program.
A driver acts like a translator between the device and the programs that use
the device. Each device has its own set of specialized commands that only
its driver recognizes.
Many drivers such as the keyboard driver come with your Microsoft®
Windows® operating system. You may need to install drivers if you:
•
Upgrade your operating system
•
Reinstall your operating system
•
Connect or install a new device
If you experience a problem with any device, perform the steps in the
following sections to identify whether the driver is the source of your
problem and if necessary, to update the driver.
Identifying Drivers
1
Click the Start button and click Control Panel.
2
In the Control Panel window, under Pick a Category, click
Performance and Maintenance.
3
In the Performance and Maintenance window, click System.
4
In the System Properties screen, click the Hardware tab.
5
Click Device Manager.
6
In the Device Manager window, scroll down the list to see if any device
has an exclamation point (a yellow circle with a [!]) on the device icon.
If an exclamation point is next to the device name, you may need to
reinstall the driver or install a new driver.
60
Advanced Troubleshooting
Reinstalling Drivers
NOTICE: The Dell Support website and your Dell Dimension ResourceCD
provide approved drivers for Dell™ computers. If you install drivers obtained
from other sources, your computer might not work correctly.
Using Windows XP Device Driver Rollback
If a problem occurs on your computer after you install or update a driver,
use Windows XP Device Driver Rollback to replace the driver with the
previously installed version.
To use Device Driver Rollback:
1
Click the Start button and click Control Panel.
2
In the Control Panel window, under Pick a Category, click
Performance and Maintenance.
3
In the Performance and Maintenance window, click System.
4
In the System Properties screen, click the Hardware tab.
5
Click Device Manager.
6
In the Device Manager window, right-click the device for which the
new driver was installed and click Properties.
7
Click the Drivers tab.
8
Click Roll Back Driver.
If Device Driver Rollback does not resolve the problem, then use System
Restore (see page 62) to return your computer to the operating state that
existed before you installed the new driver.
Advanced Troubleshooting
61
w w w. j p . d e l l . c o m | s u p p o r t . j p . d e l l . c o m
Using the Dell Dimension ResourceCD
If using Device Driver Rollback or System Restore (see page 62) does not
resolve the problem, then reinstall the driver from the Dell Dimension
ResourceCD:
1
With the Windows desktop displayed, insert the ResourceCD into the
CD or DVD drive.
If this is your first time to use the ResourceCD, go to step 2. If not, go
to step 5.
HINT: The ResourceCD
displays drivers only for
hardware that came on
your computer. If you
installed additional
hardware, those drivers
might not be displayed by
the ResourceCD. If those
drivers are not displayed,
exit the ResourceCD
program. For drivers
information, see the
documentation that came
with that product.
2
When the ResourceCD installation program starts, follow the prompts
on the screen.
3
When the InstallShield Wizard Complete window appears, remove
the ResourceCD and click Finish to restart the computer.
4
When you see the Windows desktop, reinsert the ResourceCD into
the CD or DVD drive.
5
At the Welcome Dell System Owner screen, click Next.
A message stating that the ResourceCD is detecting hardware in your
computer appears.
The drivers that are used by your computer are automatically displayed
in the My Drivers—The ResourceCD has identified these
components in your system window.
6
Click the driver that you want to reinstall and follow the instructions
on the screen.
If a particular driver is not listed, then that driver is not required by
your operating system.
Using System Restore
The Microsoft® Windows® XP operating system provides System Restore
to allow you to return your computer to an earlier operating state (without
affecting data files) if changes to the hardware, software, or other system
settings have left the computer in an undesirable operating state. See
Windows Help for information on using System Restore. To access
Windows Help, see page 36.
NOTICE: Make regular backups of your data files. System Restore does not
monitor your data files or recover them.
62
Advanced Troubleshooting
Creating a Restore Point
1
Click the Start button and click Help and Support.
2
Click System Restore.
3
Follow the instructions on the screen.
Restoring the Computer to an Earlier Operating State
If problems occur after installing a device driver, first try using Device
Driver Rollback (see page 13) to resolve the problem. If that is unsuccessful,
then use System Restore.
NOTICE: Before you restore the computer to an earlier operating state, save
and close all open files and close all open programs. Do not alter, open, or
delete any files or programs until the system restoration is complete.
1
Click the Start button, point to All Programs—> Accessories—>
System Tools, and then click System Restore.
2
Ensure that Restore my computer to an earlier time is selected and
click Next.
3
Click a calendar date to which you want to restore your computer.
The Select a Restore Point screen provides a calendar that allows you
to see and select restore points. All calendar dates with available
restore points appear in bold.
4
Select a restore point and click Next.
If a calendar date has only one restore point, then that restore point is
automatically selected. If two or more restore points are available, click
the restore point that you prefer.
5
Click Next.
The Restoration Complete screen appears after System Restore
finishes collecting data and then the computer restarts.
6
After the computer restarts, click OK.
To change the restore point, you can either repeat the steps using a
different restore point, or you can undo the restoration.
Advanced Troubleshooting
63
w w w. j p . d e l l . c o m | s u p p o r t . j p . d e l l . c o m
Undoing the Last System Restore
NOTICE: Before you undo the last system restore, save and close all open
files and close all open programs. Do not alter, open, or delete any files or
programs until the system restoration is complete.
1
Click the Start button, point to All Programs—>
Accessories—> System Tools, and then click System Restore.
2
Select Undo my last restoration and click Next.
3
Click Next.
The System Restore screen appears and the computer restarts.
4
After the computer restarts, click OK.
Enabling System Restore
If you reinstall Windows XP with less than 200 MB of free hard-disk space
available, System Restore is automatically disabled. To see if System Restore
is enabled:
1
Click the Start button and click Control Panel.
2
Click Performance and Maintenance.
3
Click System.
4
Click the System Restore tab.
5
Make sure that Turn off System Restore is unchecked.
If a particular driver is not listed, then that driver is not required by your
operating system.
Resolving Software and Hardware
Incompatibilities
Microsoft® Windows® XP IRQ conflicts occur if a device either is not
detected during the operating system setup or is detected but incorrectly
configured.
To check for conflicts on a computer running Windows XP:
64
1
Click the Start button and click Control Panel.
2
Click Performance and Maintenance and click System.
Advanced Troubleshooting
3
Click the Hardware tab and click Device Manager.
4
In the Device Manager list, check for conflicts with the other devices.
Conflicts are indicated by a yellow exclamation point (!) beside the
conflicting device or a red X if the device has been disabled.
5
Double-click any conflict to display the Properties window.
If an IRQ conflict exists, the Device status area in the Properties
window reports the cards or devices that share the device's IRQ.
6
Resolve conflicts by reconfiguring the devices or removing the devices
from the Device Manager.
To use the Windows XP Hardware Troubleshooter:
1
Click the Start button and click Help and Support.
2
Type hardware troubleshooter in the Search field and click the
arrow to start the search.
3
Click Hardware Troubleshooter in the Search Results list.
4
In the Hardware Troubleshooter list, click I need to resolve a hardware
conflict on my computer, and click Next.
Reinstalling Microsoft® Windows® XP
Before You Reinstall
If you are reinstalling the Windows XP operating system to correct a
problem with a newly installed driver, use Windows XP Device Driver
Rollback (see page 61) to replace the device driver with the previously
installed version.
If Device Driver Rollback does not resolve the problem, then use System
Restore (see page 62) to return your operating system to the operating state
it was in before you installed the new device driver.
Reinstalling Windows XP
To reinstall Windows XP, perform the steps in the following sections in the
order in which they are listed.
Advanced Troubleshooting
65
w w w. j p . d e l l . c o m | s u p p o r t . j p . d e l l . c o m
The reinstallation process can take 1 to 2 hours to complete. After the
reinstallation is complete, you need to reinstall the device drivers, virus
protection program, and other software.
NOTICE: The Operating System CD provides options for reinstalling
Windows XP. The options can overwrite files and possibly affect programs
installed on your hard drive. Therefore, do not reinstall Windows XP unless
instructed to do so by a Dell technical support representative.
NOTICE: To prevent conflicts with Windows XP, disable any virus protection
software installed on your computer before you reinstall Windows XP. See the
documentation that came with the software for instructions.
Preparing to Boot From the Operating System CD
1
Insert the Operating System CD into the CD or DVD drive.
2
Exit any program or utility that might run after you insert the CD.
3
Shut down (see page 31) and restart the computer.
4
Press <F12> immediately after the DELL™ logo appears.
If the operating system logo appears, wait until you see the Windows
desktop, and then shut down the computer and try again.
5
Use the arrow keys to select CD-ROM, and then press <Enter>.
6
When the Press any key to boot from CD message appears on
the screen, press any key.
Starting Windows XP Setup
66
1
When the Windows XP Setup screen appears, press <Enter> to
select To set up Windows now.
2
Read the information in the Microsoft Windows Licensing
Agreement screen, and then press <F8> on your keyboard to accept
the license agreement.
3
If your computer already has Windows XP installed and you want to
recover your current Windows XP data, type r to select the repair
option, and then remove the CD from the drive.
4
If you want to install a new copy of Windows XP, press <Esc> to
select the fresh copy option.
Advanced Troubleshooting
5
Press <Enter> to select the highlighted partition (recommended),
and then follow the instructions on the screen.
The Windows XP Setup screen appears, and the operating system
begins to copy files and install the devices. The computer restarts
multiple times.
HINT: The time required
to complete the setup
depends on the size of the
hard drive and the speed
of your computer.
Completing the GUI Setup
NOTICE: When the computer restarts, the following message appears:
Press any key to boot from the CD. Do not press any key when this
message appears.
1
When the Regional and Language Options screen appears, select the
settings for your location and click Next.
2
Enter your name and organization (optional) in the Personalize Your
Software screen and click Next.
3
If you are reinstalling Windows XP Home Edition, at the What's your
computer's name window, enter a name for your computer (or accept
the name provided) and click Next.
If you are reinstalling Windows XP Professional, at the Computer
Name and Administrator Password window, enter a name for your
computer (or accept the one provided) and a password, and then click
Next.
4
If you have a modem installed, enter the requested information and
click Next when the Modem Dialing Information screen appears.
5
Enter the date, time, and time zone in the Date and Time Settings
window and click Next.
6
If your computer has a network adapter, click Typical in the Networking
Settings screen and click Next.
If your computer does not have a network adapter, this option does not
appear.
7
If you are reinstalling Windows XP Professional, you may be prompted
to provide further network information regarding your network
configuration, such as the domain name or workgroup name. If you are
unsure of your settings, accept the default selections.
Windows XP installs the operating system components, configures the
computer, and then restarts the computer.
Advanced Troubleshooting
67
w w w. j p . d e l l . c o m | s u p p o r t . j p . d e l l . c o m
Completing the Operating System Setup
NOTICE: When the computer restarts, the following message appears:
Press any key to boot from the CD. Do not press any key when this
message appears.
1
When the Welcome to Microsoft screen appears, click Next.
2
When the How will this computer connect to the
Internet? message appears, click Skip.
3
When the Ready to register with Microsoft? screen appears, select No,
not at this time and click Next.
4
When the Who will use this computer? screen appears, you can enter
up to five users.
5
Click Next.
6
Click Finish to complete the setup and remove the CD from the drive.
Reinstalling Drivers and Software
68
1
Reinstall the appropriate drivers (see page 61).
2
Reinstall your virus protection software. See the documentation that
came with the software for instructions.
3
Reinstall your other software programs. See the documentation that
came with the software for instructions.
Advanced Troubleshooting
4
SECTION 4
A d d i n g Pa r t s
Front and Back View of the Computer
Reattaching the Front Door
Opening the Computer Cover
Looking Inside Your Computer
Adding PC Cards (Optional)
Adding Other Cards
Adding Memory
Closing the Computer Cover
w w w. j p . d e l l . c o m | s u p p o r t . j p . d e l l . c o m
Front and Back View of the Computer
Front View
HINT: The front door
does not close when you
are using certain PC
Cards or the IEEE 1394,
USB, or headphone
connector(s).
1
9
8
7
2
3
4
5
6
1
breakaway hinges (2)
To prevent damage to your computer, the front door is designed to "break away" if it is
opened too far. To reattach the front door, see page 73.
2
IEEE 1394 connector
Use the IEEE 1394 connector (available on computers with an IEEE 1394 option) for
high-speed data transfer between your computer and a device, such as a digital camera.
3
CD or DVD drive light
The drive light is on when the computer reads data from or writes data to the CD or
DVD drive.
4
PC Card connectors(2)
Connect a PC Card into any of the PC Card connectors (available on computers with a
PC Card option). Use the PC Card connectors for 16-bit PCMCIA cards only. Do not
use a 32-bit CardBus.
70
A d d i n g Pa r ts
5
USB 2.0 connectors (2)
For quick connections, Dell recommends using the front USB connectors for USB
devices such as digital cameras, gaming controllers, and scanners. Use the back-panel
USB connectors for USB devices that are seldom disconnected, such as USB mouse
and keyboard devices.
NOTICE: This computer supports the use of a USB hub. However, do not
connect two or more USB hubs to a USB connector. Doing so may cause the
computer to unexpectedly restart.
HINT: If you attach a USB device that was not included in your original
computer order, you may need to install a specific driver to make the device work.
Check the documentation that came with the device or contact the USB device
manufacturer for more information.
6
headphone connector
Use the headphone connector to attach headphones and most speakers for listening to
all sounds from your computer, including your CD player and computer sounds such as
beeps.
7
hard-drive light
The hard-drive light is on when the computer reads data from or writes data to the
hard drive. The light might also be on when devices such as your CD player are
operating.
8
power button
Press this button to turn on the computer.
NOTICE: To avoid losing data, do not use the power button to turn off the
computer. Instead, perform a Windows shutdown.
9
front door
Open the door to use the front-panel connectors.
HINT: The front door is removable; if you remove it or accidentally knock it off
its hinges, it snaps back in place. For instructions on how to reattach the door, see
page 73.
Adding Pa rts
71
w w w. j p . d e l l . c o m | s u p p o r t . j p . d e l l . c o m
Back View
1
15
14
2
13
12
3
11
10
4
5
9
8
7
6
1
parallel connector
Connect a parallel device, such as a printer, to the parallel connector. If you have a USB
printer, plug it into a USB connector.
2
mouse connector
Plug a standard mouse into the green mouse connector. Turn off the computer and any
attached devices before you connect a mouse to the computer. If you have a USB
mouse, plug it into a USB connector.
3
network connector
Connect your computer to a network using this connector.
4
modem connectors (2)
Use the modem connector to connect your computer to the Internet.
72
A d d i n g Pa r ts
5
power connector
The connection for the power cable.
6
voltage selection switch
(may not be available on
all computers)
Your computer is equipped with either an auto-sensing voltage selector or a manual
voltage selection switch. See page 9 for more information.
7
IEEE 1394 connector
Use the IEEE 1394 connector (available on computers with an IEEE 1394 option) for
high-speed data transfer between your computer and a device, such as a digital camera.
8
line-in connector
Use the blue line-in connector to attach a record/playback device such as a cassette
player, CD player, or VCR.
9
line-out connector
Use the green line-out connector to attach headphones and most speakers with
integrated amplifiers.
10 microphone connector
Use the pink microphone connector to attach a personal computer microphone for
voice or musical input into a sound or telephony program.
11 USB 2.0 connectors (4)
For quick connections, Dell recommends using the front USB connectors for USB
devices such as digital cameras, gaming controllers, and scanners. Use the back-panel
USB connectors for USB devices that are seldom disconnected, such as USB mouse
and keyboard devices.
NOTICE: This computer supports the use of a USB hub. However, do not
connect two or more USB hubs to a USB connector. Doing so may cause the
computer to unexpectedly restart.
HINT: If you attach a USB device that was not included in your original
computer order, you may need to install a specific driver to make the device work.
Check the documentation that came with the device or contact the USB device
manufacturer for more information.
12 keyboard connector
If you have a standard keyboard, plug it into the purple keyboard connector. If you have
a USB keyboard, plug it into a USB connector.
13 diagnostic lights (4)
Use the lights to help you troubleshoot a computer problem based on the diagnostic
code. For more information, see page 58.
14 video connector
Plug the cable from your monitor into the blue connector.
15 serial connector
Connect a serial device to the serial connector.
Reattaching the Front Door
To prevent damage to your computer, the front door is designed to "break
away" if it is opened too far. To reattach the front door:
1
Shut down the computer (see page 31).
2
Disconnect the computer’s power cable from the electrical outlet.
Adding Pa rts
73
w w w. j p . d e l l . c o m | s u p p o r t . j p . d e l l . c o m
HINT: The top hinge arm
clicks when it is moved to
the closed position—the
bottom hinge arm
does not.
3
Move the hinge arms to the closed position.
4
Align the two clips on the inside of the front door with the two hinge
arms.
5
Press inward on the front door until it clips to both hinge arms.
hinge arms (2)
in closed position
front-door
clips (2)
front door
Opening the Computer Cover
CAUTION: Before you begin any of the procedures in this section,
follow the safety instructions on page 7.
CAUTION: To guard against electrical shock, always unplug your
computer from the electrical outlet before opening the cover.
1
Shut down the computer (see page 31).
NOTICE: To disconnect a network cable, first unplug the cable from your
computer and then unplug it from the network wall jack.
74
A d d i n g Pa r ts
2
Turn off any attached devices and disconnect them from their
electrical outlets.
3
Disconnect the computer power cable from the wall outlet, and then
press the power button to ground the system board.
4
Remove the computer stand (see page 19).
NOTICE: Ensure that there is sufficient space to support the open cover—at
least 30 cm (1 ft) of desk top space.
5
Press the two release buttons until the cover is free to swing up.
NOTICE: Open the cover slowly to ensure that you do not damage any cables.
6
Raise the back of the cover, and pivot it toward the front of the
computer.
HINT: Make sure that
the computer is oriented
with the cable security tab
on top, as shown in the
illustration.
cable security
tab
back of computer
release buttons
(one on each side)
Adding Pa rts
75
w w w. j p . d e l l . c o m | s u p p o r t . j p . d e l l . c o m
Looking Inside Your Computer
CAUTION: Before you begin any of the procedures in this section,
follow the safety instructions on page 7.
CAUTION: To guard against electrical shock, always unplug your
computer from the electrical outlet before opening the cover.
NOTICE: Be careful when opening the computer cover to ensure that you do
not inadvertently disconnect cables from the system board.
CD or DVD drive
hard drive
system board
heat sink and
blower assembly
card slots
76
A d d i n g Pa r ts
power supply
System Board
CD drive connector
(IDE2)
drive connector
(DSKT)
battery socket
(BATTERY) page 93
front panel switch connector
(FRONTPANEL)
hard drive
connector (IDE1)
standby power light
(AUX_PWR)
configuration jumper
(PSWD) page 92
main power connector
(POWER)
microprocessor fan
connector (FAN)
memory module
connectors
(DIMM A, DIMM B)
page 82
microprocessor
connector (CPU)
PCI2 card connector
(PCI2) page 80
PCI1 card connector
(PCI1) page 80
microprocessor
power connector
(12VPOWER)
CD audio connector
(CD IN)
front panel audio
cable connector
(FRONTAUDIO)
telephony voice modem
connector (MODEM)
back of computer
Adding Pa rts
77
w w w. j p . d e l l . c o m | s u p p o r t . j p . d e l l . c o m
Adding PC Cards (Optional)
You can add PC Cards to computers with integrated PC Card connectors.
PC Card Types
HINT: "Type" of card
refers to its thickness, not
its functionality.
HINT: Your computer is
designed for either 5-V or
3.3-V 16-bit PCMCIA
cards. Some cards are
keyed for 3.3 V only but
will not fit into the PC
slot. Cards are keyed to
prevent incorrect insertion
into the slot. If card
orientation is not clear,
see the documentation
supplied with the card.
HINT: The length of
some PC Cards may
prevent the front-panel
door from closing.
HINT: A PC Card is not a
bootable device.
78
A d d i n g Pa r ts
The PC Card slot has two connectors that support four combinations of
cards:
•
A single Type I or Type II card (using either the upper or lower PC
Card connector)
•
One Type I card and one Type II card (using either connector)
•
Two Type I cards or two Type II cards
•
One Type III card (using the lower connector)
Both PC Card connectors support extended PC Cards.
Installing a PC Card
PC Cards are generally marked with a symbol (such as a triangle or an
arrow) to indicate which end to insert into the slot, and the cards are keyed
to prevent incorrect insertion. If card orientation is not clear, see the
documentation supplied with the card.
1
Hold the card with its orientation symbol pointing into the slot and
the top side of the card facing up.
2
Insert the card into the slot, and press firmly until the card is
completely seated in the internal PC Card connector.
3
If you encounter too much resistance when you insert the card, do not
force the card. Check the card's orientation, and try again.
4
Your computer recognizes most PC Cards and automatically loads the
appropriate device driver for use with the computer. If the
configuration program tells you to load the manufacturer's drivers,
install them with the CD that accompanied the PC Card.
Removing a PC Card
NOTICE: Use the PC Card configuration utility on the taskbar to select and
stop a card from functioning before you remove it from the computer. If you do
not remove the card in the configuration utility, you could lose data from open
programs.
NOTICE: Do not attempt to eject a card by pulling its dongle, if one is
attached.
Press the eject button, and gently remove the card.
HINT: Press the button
with the upper dot to eject
the top card and the
button with the lower dot
to eject the bottom card.
Adding Pa rts
79
w w w. j p . d e l l . c o m | s u p p o r t . j p . d e l l . c o m
Adding Other Cards
CAUTION: Before you begin any of the procedures in this section,
follow the safety instructions on page 7.
CAUTION: To guard against electrical shock, always unplug your
computer from the electrical outlet before opening the cover.
NOTICE: You must use low-profile cards for your computer. A full-size card
can cause damage to the computer or the card.
The computer’s card connectors allow you to install different types of
devices such as modems and network adapters.
1
Shut down the computer (see page 31).
NOTICE: To disconnect a network cable, first unplug the cable from your
computer and then unplug it from the network wall jack.
80
A d d i n g Pa r ts
2
Turn off any attached devices and disconnect them from their
electrical outlets.
3
Disconnect the computer power cable from the wall outlet, and then
press the power button to ground the system board.
4
Remove the computer stand (see page 19).
5
Open the computer cover (see page 74).
6
Press the lever on the retention arm and raise the retention arm.
7
If you are installing a new card, remove the filler bracket to create an
empty card-slot opening.
If you are replacing a card that is already installed in the computer,
remove the card. If necessary, disconnect any cables connected to the
card. Grasp the card by its top corners, and ease it out of its connector.
8
Prepare the card for installation.
See the documentation that came with the card for information on
configuring the card, making internal connections, or otherwise
customizing it for your computer.
CAUTION: Some network adapters automatically start the
computer when they are connected to a network. To guard against
electrical shock, be sure to unplug your computer from its
electrical outlet before installing any cards.
9
Insert the card into the card connector.
10
Lower the retention arm and press it into place, securing the card(s) in
the computer.
11
Reconnect any cables that you previously removed.
12
Connect any cables that should be attached to the card.
See the documentation for the card for information about the card’s
cable connections.
NOTICE: Do not route card cables over or behind the cards. Cables routed
over the cards can prevent the computer cover from closing properly or cause
damage to the equipment.
13
Close the computer cover (see page 84).
14
Attach the computer stand (see page 19).
NOTICE: To connect a network cable, first plug the cable into the network
wall jack and then plug it into the computer.
15
Connect your computer and devices to electrical outlets, and turn
them on.
16
Install any drivers required for the card as described in the card
documentation.
Adding Pa rts
81
w w w. j p . d e l l . c o m | s u p p o r t . j p . d e l l . c o m
Adding Memory
CAUTION: Before you begin any of the procedures in this section,
follow the safety instructions on page 7.
CAUTION: To guard against electrical shock, always unplug your
computer from the electrical outlet before opening the cover.
You can increase your computer memory by installing memory modules on
the system board. For information on the type of memory supported by your
computer, look under "Memory" in "Technical Specifications" on page 86.
HINT: Memory
purchased from Dell is
covered under your
computer warranty.
1
Shut down the computer (see page 31).
NOTICE: To disconnect a network cable, first unplug the cable from your
computer and then unplug it from the network wall jack.
2
Turn off any attached devices and disconnect them from their
electrical outlets.
3
Disconnect the computer power cable from the wall outlet, and then
press the power button to ground the system board.
4
Remove the computer stand (see page 19).
5
Open the computer cover (see page 74).
6
If necessary, remove a memory module:
a
Press out the securing clip at each end of the memory module
connector.
b
Grasp the module and pull up.
If the module is difficult to remove, gently ease the module back
and forth to remove it from the connector.
7
82
A d d i n g Pa r ts
To insert a module, press out the securing clip at each end of the
memory module connector.
memory connector closest
to microprocessor
securing clips (2)
connector
8
Align the notch on the bottom of the module with the crossbar in the
connector.
notch
memory module
cutouts (2)
crossbar
NOTICE: To avoid damage to the memory module, press the module straight
down into the connector while you apply equal force to each end of the module.
9
Insert the module into the connector until the module snaps into
position.
If you insert the module correctly, the securing clips snap into the
cutouts at each end of the module.
Adding Pa rts
83
w w w. j p . d e l l . c o m | s u p p o r t . j p . d e l l . c o m
10
Close the computer cover (see page 84).
11
Attach the computer stand (see page 19).
NOTICE: To connect a network cable, first plug the cable into the network
wall jack and then plug it into the computer.
12
Connect your computer and devices to electrical outlets, and turn
them on.
13
Right-click the My Computer icon and then click Properties.
14
Click the General tab.
15
To verify that the memory is installed correctly, check the amount of
memory (RAM) listed.
Closing the Computer Cover
1
Ensure that all cables are connected, and fold cables out of the way.
Make sure that cables are not routed over the drive cage—they will
prevent the cover from closing properly.
2
Ensure that no tools or extra parts are left inside the computer.
3
Pivot the cover down and ensure that the release buttons click into
place.
4
Attach the computer stand (see page 19).
NOTICE: To connect a network cable, first plug the cable into the network
wall jack and then plug it into the computer.
5
84
A d d i n g Pa r ts
Connect your computer and devices to electrical outlets, and turn
them on.
5
SECTION 5
Appendix
Specifications
Standard Settings
Clearing Forgotten Passwords
Replacing the Battery
Dell Technical Support Policy
Contacting Dell
Regulatory Information
w w w. j p . d e l l . c o m | s u p p o r t . j p . d e l l . c o m
Specifications
Microprocessor
Microprocessor type
Intel® Celeron®
L1 cache
8-KB
L2 cache
128-KB
System Information
System chip set
Intel 845G
DMA channels
four
Interrupt levels
24 APIC mode
System BIOS chip
4 Mb (512 KB)
System clock
400-MHz data rate
Expansion Bus
86
Appendix
Bus types
PCI
Bus speed
33 MHz
PCI connectors
one low profile
PCI connector size
120 pins
PCI connector data width
(maximum)
32 bits
Memory
Architecture
DDR SDRAM
Memory connectors
two
Memory capacities
128-, 256-, and 512-MB non-ECC DDR
SDRAM
Minimum memory
128 MB
NOTE: Between 32 and 64 MB of system
memory may be allocated to support
graphics, depending on system memory size
and other factors.
Maximum memory
512 MB
Memory type
266-MHz DDR SDRAM (non-ECC)
Drives
Externally accessible
one slimline optical bay
Internally accessible
one bay for 1-inch–high IDE hard drive
Available devices
ATA-100 Ultra DMA hard drive, CD drive,
DVD drive, and CD-RW drive
Ports and Connectors
Externally accessible:
Serial
One 9-pin connector; 16550C-compatible
Parallel
25-hole connector (bidirectional)
IEEE 1394
Two 4-hole, unpowered connectors
Video
15-hole connector
Keyboard
6-pin mini-DIN connector or USB connector
Mouse
6-pin mini-DIN connector or USB connector
USB
two front-panel and four back-panel USB 2.0compliant connectors (compatible with 1.1)
Headphone
front-panel miniature connector
Audio
three miniature connectors for line-in, lineout, and microphone
Appendix
87
w w w. j p . d e l l . c o m | s u p p o r t . j p . d e l l . c o m
Ports and Connectors (continued)
Network
one 10/100 Ethernet network connector
Internally accessible:
Primary IDE channel
40-pin connector on PCI local bus
Secondary IDE channel
40-pin connector on PCI local bus
Audio
Audio controller
ADI 1981A
Controls and Lights
Power control
push button
Power light
green light on power button—blinking green
in sleep state; solid green for power-on state
Hard-drive access light
green
Diagnostic code lights
four bicolor (amber and green) located on
back panel
Power
DC power supply:
Wattage
160 W
Heat dissipation
500 BTU (fully-loaded computer without
monitor)
Voltage (see page 9 for
important voltage setting
information)
90 to 135 V at 50/60 Hz; 180 to 265 V at
50/60 Hz; 100 V at 50/60 Hz for Japanese
computers
Backup battery
88
Appendix
3-V CR2032 coin cell
Physical
Height x Width x Depth
32.3 x 9.5 x 35.6 cm (12.7 x 3.8 x 14.0 inches)
(With stand)
33.8 x 18.0 x 35.6 cm (13.3 x 7.1 x 14.0
inches)
Weight
7.43 kg (16.4 lbs)
Environmental
Temperature:
Operating
Storage
Relative humidity
10° to 35°C (50° to 95°F)
NOTE: At 35°C (95°F), the maximum
operating altitude is 914 m (3000 ft).
–40° to 65°C (–40° to 149°F)
20% to 80% (noncondensing)
Maximum vibration:
Operating
0.25 G at 3 to 200 Hz at 1/2 octave/min
Storage
0.5 G at 3 to 200 Hz at 1/2 octave/min
Maximum shock:
Operating
bottom half-sine pulse with a change in
velocity of 50.8 cm/sec (20 inches/sec)
Storage
23-G faired-square wave with a velocity
change of 508 cm/sec (200 inches/sec)
Altitude:
Operating
–15.2 to 3048 m (–50 to 10,000 ft)
Storage
–15.2 to 10,670 m (–50 to 35,000 ft)
Appendix
89
w w w. j p . d e l l . c o m | s u p p o r t . j p . d e l l . c o m
Standard Settings
The system setup program contains the standard settings for your
computer.
NOTICE: Unless you are an expert computer user, don’t change the settings
for this program. Certain changes might make your computer work incorrectly.
See the following figure for an example of the main program screen.
90
Appendix
Viewing Settings
1
Turn on (or restart) your computer.
2
When the blue DELL™ logo appears, press <F2> immediately.
If you wait too long and the operating system logo appears, continue to
wait until you see the Microsoft® Windows® desktop. Then shut
down your computer and try again.
System Setup Program Screens
The system setup program screens display the current configuration
information for your computer. Information on the screen is divided into
five areas:
•
Title – The area at the top of all system setup screens that displays
your computer’s model number.
•
Computer data – Two boxes below the title that display the system
processor, L2 cache, service tag, and the version number of the BIOS.
•
Options – A scrollable box listing options that define the configuration
of your computer (including installed hardware, power conservation,
and security features).
Fields to the right of the listed options contain settings or values. The
settings and values that you can change are brighter on the screen. All
other settings and values are set by the computer and cannot be
changed. When <Enter> appears to the right of an option, press
<Enter> to access a pop-up menu of additional options.
•
Key functions – A line of boxes across the bottom of all system setup
screens that lists keys and their functions within the system setup
program.
•
Help – Press <F1> for information on the option that is selected
(highlighted).
Appendix
91
w w w. j p . d e l l . c o m | s u p p o r t . j p . d e l l . c o m
Clearing Forgotten Passwords
CAUTION: Before you begin any of the procedures in this section,
follow the safety instructions on page 7.
If you forget your user or setup password, you cannot operate your computer
or change settings in the system setup program until you clear the forgotten
password(s).
NOTICE: This process erases both the system and setup passwords.
1
Shut down the computer (see page 31).
2
Turn off any attached devices and disconnect them from their
electrical outlets.
NOTICE: To disconnect a network cable, first unplug the cable from your
computer and then unplug it from the network wall jack.
3
Disconnect the computer power cable from the wall outlet, and then
press the power button to ground the system board.
4
Remove the computer stand (see page 19).
5
Open the computer cover (see page 74).
6
Locate jumper PSWD on the system board (see page 77) and remove
the jumper plug.
7
Close the computer cover (see page 84), plug your computer into an
electrical outlet, and turn on the computer.
The existing password(s) will be erased.
8
Shut down the computer (see page 31).
NOTICE: To disconnect a network cable, first unplug the cable from your
computer and then unplug it from the network wall jack.
9
92
Appendix
Turn off any attached devices and disconnect them from their
electrical outlets.
10
Disconnect the computer power cable from the wall outlet, and then
press the power button to ground the system board.
11
Open the computer cover (see page 74).
12
Reconnect the jumper plug to jumper PSWD (see page 77).
13
Close the computer cover (see page 84).
14
Attach the computer stand (see page 19).
NOTICE: To connect a network cable, first plug the cable into the network
wall jack and then plug it into the computer.
15
Connect your computer and devices to electrical outlets, and turn
them on.
Turning on your computer with the PSWD jumper installed reenables
the password feature.
Replacing the Battery
CAUTION: Before you begin any of the procedures in this section,
follow the safety instructions on page 7.
A coin-cell battery maintains computer configuration, date, and time
information. The battery can last several years.
If you have to repeatedly reset time and date information after turning on
the computer, replace the battery.
CAUTION: A new battery can explode if it is incorrectly installed.
Replace the 3-V CR2032 battery only with the same or equivalent
type recommended by the manufacturer. Discard used batteries
according to the manufacturer’s instructions.
1
Record all the screens in the system setup program (see page 90) so
that you can restore the correct settings in step 9.
2
Remove the computer stand (see page 19).
3
Open the computer cover (see page 74).
4
Locate the battery socket BATTERY (see page 77).
5
Remove the battery by carefully prying it out of its socket with your
fingers or with a blunt, nonconducting object such as a plastic
screwdriver.
Appendix
93
w w w. j p . d e l l . c o m | s u p p o r t . j p . d e l l . c o m
NOTICE: To avoid damage to the system board while you pry the battery
loose, be sure to insert the plastic screwdriver between the battery and the
socket (not the system board).
battery
battery socket
(BATTERY)
6
Insert the new battery into the socket with the side labeled "+" facing
up and snap it into place.
7
Attach the computer stand (see page 19).
NOTICE: To connect a network cable, first plug the cable into the network
wall jack and then plug it into the computer.
8
Connect your computer and devices to electrical outlets, and turn
them on.
9
Access the system setup program (see page 90) and restore the settings
you recorded in step 1.
10
Properly dispose of the old battery (see page 12).
Dell Technical Support Policy
See the Service and Support Guide supplied with your computer.
94
Appendix
Contacting Dell
When you need to contact Dell, use the telephone numbers, codes, and
electronic addresses provided in the following table. If you need assistance
in determining which codes to use, contact a local or an international
operator.
HINT: Toll-free numbers
are for use within the
country for which they are
listed.
See the Service and Support Guide supplied with your computer for a
description of the hardware and software support provided by Dell.
Country (City)
International Access Code
Country Code
City Code
Department Name or Service Area,
Website and E-Mail Address
Japan (Kawasaki)
Website: support.jp.dell.com
International Access Code: 001
Technical Support (servers)
Country Code: 81
Technical Support outside of Japan (servers)
City Code: 44
Technical Support (Dimension™ and Inspiron™)
Technical Support outside of Japan (Dimension and
Inspiron)
Technical Support (Dell Precision™, OptiPlex™,
and Latitude™)
Technical Support outside of Japan (Dell Precision,
OptiPlex, and Latitude)
Area Codes,
Local Numbers, and
Toll-Free Numbers
toll-free: 0120-1984-98
81-44-556-4162
toll-free: 0120-1982-26
81-44-520-1435
toll-free: 0120-1984-33
81-44-556-3894
24-Hour Automated Order Service
044 556-3801
Customer Care
044 556-4240
Business Sales Division (up to 400 employees)
044 556-1465
Preferred Accounts Division Sales (over 400
employees)
044 556-3433
Large Corporate Accounts Sales (over 3500
employees)
044 556-3430
Public Sales (government agencies, educational
institutions, and medical institutions)
044 556-1469
Global Segment Japan
044 556-3469
Individual User
044 556-1760
Faxbox Service
044 556-3490
Switchboard
044 556-4300
Appendix
95
w w w. j p . d e l l . c o m | s u p p o r t . j p . d e l l . c o m
Regulatory Information
Electromagnetic Interference (EMI) is any signal or emission, radiated in
free space or conducted along power or signal leads, that endangers the
functioning of a radio navigation or other safety service or seriously
degrades, obstructs, or repeatedly interrupts a licensed radio
communications service. Radio communications services include but are
not limited to AM/FM commercial broadcast, television, cellular services,
radar, air-traffic control, pager, and Personal Communication Services
(PCS). These licensed services, along with unintentional radiators such as
digital devices, including computer systems, contribute to the
electromagnetic environment.
Electromagnetic Compatibility (EMC) is the ability of items of electronic
equipment to function properly together in the electronic environment.
While this computer system has been designed and determined to be
compliant with regulatory agency limits for EMI, there is no guarantee that
interference will not occur in a particular installation. If this equipment
does cause interference with radio communications services, which can be
determined by turning the equipment off and on, you are encouraged to try
to correct the interference by one or more of the following measures:
•
Reorient the receiving antenna.
•
Relocate the computer with respect to the receiver.
•
Move the computer away from the receiver.
•
Plug the computer into a different outlet so that the computer and the
receiver are on different branch circuits.
If necessary, consult a Dell Technical Support representative or an
experienced radio/television technician for additional suggestions.
Dell computer systems are designed, tested, and classified for their
intended electromagnetic environment. These electromagnetic
environment classifications generally refer to the following harmonized
definitions:
•
Class A is typically for business or industrial environments.
•
Class B is typically for residential environments.
For additional regulatory information, see the Tell Me How help file that
accompanied your computer. To access the help file, see page 36.
96
Appendix
Index
A
internal parts, 76
opening cover, 74
specifications, 86
turning off, 31
audio. See sound
BIOS, 90
conflicts
drivers, 60
resolving software and
hardware
incompatibilities, 64
C
cover
closing, 84
opening, 74
cards
adding, 80
connectors, 77
D
B
battery
replacing, 93
E
electrostatic discharge. See
ESD
e-mail
fixing problems, 39
error messages
diagnostic lights, 58
startup, 41
ESD
protecting computer from, 11
F
CD drive
fixing problems, 37
Device Driver Rollback, 61
Files and Settings Transfer
Wizard, 24
diagnostic lights, 58
finding solutions, 34
CD-RW drive
fixing problems, 37
display. See monitor
fixing problems
1394, 45
drive, 37
e-mail, 39
IEEE 1394, 45
Internet connection, 39
modem, 39
network, 48
PC Cards, 49
power, 49
printer, 51
scanner, 52
sound and speakers, 53
CDs
copying, 27
Easy CD Creator Basic, 28
Check Disk, 38
computer
back view, 72
closing cover, 84
error messages, 41
front door, 70
front view, 70
drivers
definition, 60
reinstalling, 61
ResourceCD, 62
troubleshooting, 60
drives
fixing problems, 37
DVD drive
fixing problems, 38
Index
97
98
Index
start-up error messages, 41
video and monitor, 54
front door
reattaching, 73
M
memory
adding, 82
connectors, 77
messages
start-up, 41
H
hard drive
fixing problems, 38
hardware
drivers, 60
Hardware Troubleshooter, 64
help file
accessing, 36
I
IEEE 1394, 23, 45
Internet
fixing problems, 39
Internet connection
about, 26
options, 26
setting up, 26
modem
fixing problems, 39
monitor
fixing problems, 54
motherboard. See system
board
N
network
fixing problems, 48
setting up, 25
lights
back of computer, 58
diagnostic, 58
98
Index
printer
cable, 21
connecting, 21
fixing problems, 51
parallel, 21
setting up, 21
troubleshooting, 51
USB, 22
R
RAM. See memory
reinstalling
drivers, 61
Windows XP, 65
ResourceCD, 61-62
O
S
operating system
reinstallation
Windows XP, 65
safety instructions, 7
screen. See monitor
settings
system setup program, 90
IRQ conflicts, 64
L
power
fixing problems, 49
turning off, 31
P
shutdown, 31
password
clearing system setup, 92
software
reinstalling software, 61
PC Card
removing, 79
types, 78
sound
adjusting volume, 53
fixing problems, 53
PC Cards, 78
installing, 78
speaker
adjusting volume, 53
fixing problems, 53
specifications, 86
system board, 77
System Restore, 62
scanner, 52
shutdown, 31
System Restore, 62
system setup program, 90
T
Tell Me How help file
accessing, 36
troubleshooting, 34
conflicts, 64
Device Driver Rollback, 61
diagnostic lights, 58
drivers, 60
Hardware Troubleshooter, 64
reinstalling Windows XP, 65
System Restore, 62
turning off the computer, 31
V
video
fixing problems, 54
video memory
connector, 77
volume
adjusting, 53
W
Windows XP
Device Driver Rollback, 61
Hardware Troubleshooter, 64
Help, 36
reinstalling, 65
Index
99
100
Index
100
Index