1
OTA Module.book Page 0 Thursday, July 3, 2008 4:35 PM
IMPORTANT SAFETY INSTRUCTIONS
• Install the Over-the-Air Module with care. Be sure not to drop
any loose parts in the opening.
• Do not insert anything into the opening on the receiver other than
the Over-the-Air Module.
• Be aware that there may be parts or areas of the receiver inside
the opening that are warm.
• If the Over-the-Air Module is removed, be sure to replace the
port cover that came with the receiver. Do not leave the opening
uncovered at any time.
OTA Module.book Page 1 Thursday, July 3, 2008 4:35 PM
TABLE OF CONTENTS
INTRODUCTION .............................................2
INSTALLATION AND SETUP ...........................2
Installation Considerations........................... 2
Installing the MT2 Module............................. 3
Setting up the Receiver to Display OTA
Channels......................................................... 6
Viewing Your OTA Channels ........................ 7
CONNECTING TO A TV USING THE
CHANNEL 3-4 OUTPUT .................................7
REMOVING THE OTA MODULE .....................9
TROUBLESHOOTING ...................................10
ABOUT OVER-THE-AIR TV BROADCASTS ...12
Installation Considerations......................... 13
Digital Transition Consideration ................ 13
LIMITED WARRANTY ..................................14
DISH NETWORK’S EXCHANGE PROGRAMS .15
ADVANCE EXCHANGE PROGRAM ................15
POST RECEIPT EXCHANGE PROGRAM ........15
ACCESSORY WARRANTY ............................16
IF YOU NEED HELP ....................................16
Page 1
OTA Module.book Page 2 Thursday, July 3, 2008 4:35 PM
INTRODUCTION
The MT2 Over-the-Air (OTA) Module allows you to add two digital
over-the-air tuners to your satellite receiver. This provides the ability to
integrate over-the-air channels into the on-screen Program Guide of
compatible receivers for seamless viewing by both the TV1 and TV2
viewers. If your satellite receiver is a DVR (digital video recorder),
using this module will also allow you to record digital over-the-air
broadcasts.
In addition, the MT2 OTA Module adds a Channel 3-4 coax output, for
connection to standard-definition TVs.
INSTALLATION AND SETUP
Installation Considerations
• The OTA Module is compatible with only specific receiver
models. Refer to your receiver’s User Guide to determine if your
receiver model can use the module.
• The OTA Module is capable of receiving only digital over-the-air
broadcasts, not analog.
• These instructions assume that your satellite receiver is already
connected to a dish antenna, and has the most current software. If
not, you must connect the satellite receiver to your dish antenna
and download current software, using the instructions included
with those pieces of equipment.
• A DISH Network programming subscription is required to
receive over-the-air channels using the OTA Module.
• The OTA Module does not provide pass-through of analog OTA
signals.
Page 2
OTA Module.book Page 3 Thursday, July 3, 2008 4:35 PM
• These instructions assume you have an over-the-air antenna
suitable for your area already installed in your system. Refer to
www.antennaweb.org or a local retailer for assistance in choosing
and peaking an over-the-air antenna.
Installing the MT2 Module
1.
2.
Unplug the receiver’s power cord from the electrical outlet.
Unplug the receiver’s power cord from electricity anytime you
install or remove the OTA module. Doing so reduces the
danger of electrical shock, which could damage the module
and the receiver, and injure or kill you.
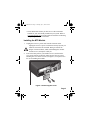
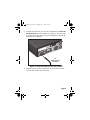
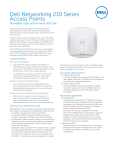
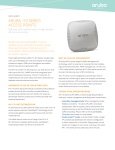
Look at the back panel of your satellite receiver, and locate the
cover on the left side of the back panel. Remove the two screws
attaching the cover to the receiver (see Figure 1). Keep the screws
for use in installing the module.
Figure 1. Removing the Cover
Page 3
OTA Module.book Page 4 Thursday, July 3, 2008 4:35 PM
3.
The module port on the back of the satellite receiver must be
covered if an OTA Module is not installed. Damage to an
uncovered module port is not covered by the receiver’s
Limited Warranty.
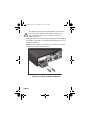
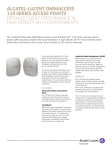
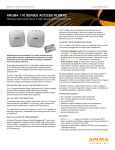
Install the module into the module port, making sure the labeling on
the module is right-side up. Attach the module using the two cover
screws (see Figure 2).
Note: Save the module port cover in case you need to remove the
module and cover the port in the future.
Figure 2. Installing the MT2 OTA Module
Page 4
OTA Module.book Page 5 Thursday, July 3, 2008 4:35 PM
4.
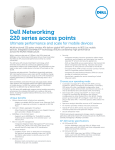
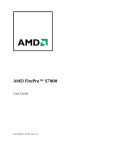
Connect the cable from your over-the-air antenna to the OVER-THEAIR ANTENNA IN port on the module (see Figure 3). Only one cable
is needed because the module has an internal splitter to provide the
dual-OTA tuner capability.
TO
OVER-THE-AIR
ANTENNA
5.
Figure 3. Connecting the Over-the-Air Antenna
Plug the receiver’s power cord into the electrical outlet. Turn the
receiver back on after it has reset itself.
Page 5
OTA Module.book Page 6 Thursday, July 3, 2008 4:35 PM
Setting up the Receiver to Display OTA Channels
1.
2.
3.
4.
5.
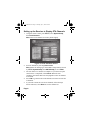
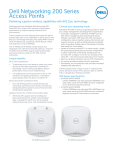
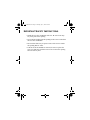
Using the remote control, press MENU, select System Setup,
then Local Channels.
Note: Your Local Channels screen may differ slightly.
Figure 2. Local Channels Screen
Scan for channels by selecting Scan Locals.
Note: Ensure the Analog Type on the HDTV Setup menu (accessed
by MENU, System Setup, then HDTV Setup) is set to Offair.
The scan takes a few minutes to complete. If you want to stop the
scan before it is completed, select Cancel. When the scan
completes, the results show how many digital over-the-air channels
were found.
Select OK to go back to the Local Channels screen and view the list
of channels.
If you want to name the over-the-air channels, follow the steps
below. Otherwise, select Done to save the channel list.
Page 6
OTA Module.book Page 7 Thursday, July 3, 2008 4:35 PM
6.
7.
8.
Select a channel and then select Edit Name to change the way the
channel name displays in the Program Guide and other channel
lists. You can rename only one channel at a time.
Use the on-screen keyboard to enter the channel name.
Select Done when you are finished making changes.
Viewing Your OTA Channels
The over-the-air channels that are scanned into the receiver using the
previous steps can be viewed in the on-screen Program Guide below
channel 100. The OTA channels are listed in yellow in the Program
Guide.
Note: You will need to have satellite signal and subscribe to DISH
Network programming to view channels received using the OTA
Module. Guide information for over-the-air channels displays only if
you are subscribed to DISH Network local channels.
CONNECTING TO A TV USING THE
CHANNEL 3-4 OUTPUT
Use the CH 3-4 OUT connection to connect to a nearby TV using coax
cable. The TV connected to the Channel 3-4 output views the same
programming as your TV1 viewing location. Refer to your receiver
User’s Guide for more details on the TV1 viewing location.
1. Install the module into the receiver using the instructions on page 3.
2. Connect one end of a coax cable to the CH 3-4 OUT connection of
the module.
3. Connect the other end of the coax cable to a coax connection on
your TV. This connect may be labeled ANTENNA IN, CABLE IN, or a
Page 7
OTA Module.book Page 8 Thursday, July 3, 2008 4:35 PM
4.
5.
6.
a similar name. Refer to your TV’s User Guide for help locating
this connection.
Using the satellite receiver’s remote control, press MENU, select
System Setup, Installation, then Modulator Setup.
Figure 3. Modulator Setup
Under TV1 Out, select Channel 3 or 4. Set the channel on the TV
connected to the CH 3-4 OUT output to match this setting.
Select Done to save your changes.
Page 8
OTA Module.book Page 9 Thursday, July 3, 2008 4:35 PM
REMOVING THE OTA MODULE
Do not remove the OTA Module unless necessary as you will no longer
be able to tune to your over-the-air channels if the module is removed.
1. Unplug the receiver’s power cord from the electrical outlet.
2. Disconnect any cables connected to the module’s OVER THE AIR
ANTENNA IN port and/or CH 3-4 OUT port.
3. Remove the screws connecting the module to the receiver’s back
panel. Gently remove the module.
4. Replace the module port cover and attach it to your receiver using
the screws that had connected the module.
5. Plug the receiver’s power cord into the electrical outlet, and turn it
back on.
6. Store the OTA Module in the original box when it is not installed in
the receiver.
Page 9
OTA Module.book Page 10 Thursday, July 3, 2008 4:35 PM
TROUBLESHOOTING
The receiver does not detect that the OTA Module is installed
1. The receiver will display that the OTA Module is detected on the
System Info Three screen. Using the DISH Network remote
control, press MENU, select System Setup, then Installation,
then System Info. Select Next until the System Info Three screen
displays, and verify the module is listed on this screen.
2. Ensure you have installed the module correctly using the
instructions on page 3.
3. Try resetting the receiver by pressing the RESET button on the
receiver’s front panel. The receiver will reset and should return to
programming in a few minutes.
4. Verify your receiver has the most current software version. Refer to
www.dishnetwork.com, select Customer Service, then Tech
Support to look up the current software version for your receiver.
5. Remove the module, using the instructions on page 9, then reinstall it using the instructions on page 3.
You are not receiving some or all of the over-the-air
channels you expect
Note: If you have questions about over-the-air channels, contact the
local broadcaster, not DISH Network.
1. Use www.antennaweb.org or contact a local retailer to verify the
over-the-air antenna you have installed is suitable for use in your
area and for the channels you want to receive.
2. Ensure the over-the-air antenna is connected to the OVER-THE-AIR
ANTENNA IN port on the OTA Module.
Page 10
OTA Module.book Page 11 Thursday, July 3, 2008 4:35 PM
3.
4.
Verify the module is installed correctly. Refer to the instructions on
page 3.
Verify that the antenna is installed correctly and peaked for the
desired channels.
Page 11
OTA Module.book Page 12 Thursday, July 3, 2008 4:35 PM
ABOUT OVER-THE-AIR TV BROADCASTS
Over-the-air TV signals are broadcast by local TV stations from a
transmitter tower, and are received using an indoor or outdoor antenna.
Digital over-the-air TV broadcasting uses advanced technology to
deliver superb picture quality and CD-quality sound. However, digital
over-the-air reception depends on several factors:
• The distance between the broadcast station and your home—the
farther away the station, the weaker the signal.
• The broadcast station’s power—the lower the power, the weaker
the signal.
• Obstacles between the station and your home, such as mountains,
buildings, trees, or other objects—these may block or reflect the
signal before it reaches you.
• Multiple broadcast stations—to receive good signals from several
stations, you may need to compromise how the antenna is
pointed, or you may need more than one antenna.
There is no guarantee of reception of digital over-the-air channels by
using the OTA Module; however, using the best over-the-air antenna for
your area will improve your chances of reception:
• You can typically receive a limited number of channels using a
rabbit ears-type antenna, or a much larger number using a UHF/
VHF outdoor antenna.
• The higher the quality of antenna you use, the greater its range
and the better its reception will be.
• Refer to www.antennaweb.org, a website run by the Consumer
Electronics Association, for recommendations for antenna types
and pointing directions.
Page 12
OTA Module.book Page 13 Thursday, July 3, 2008 4:35 PM
Installation Considerations
• Follow local, state, and National Electric Code requirements for
grounding the over-the-air antenna.
• RG-6 coaxial cable is preferred for the OVER THE AIR ANTENNA
IN connection. If you are diplexing the OVER THE AIR ANTENNA
IN and SATELLITE IN cables, RG-6 cable must be used.
• You cannot use a diplexer to combine the OVER THE AIR
ANTENNA IN and SATELLITE IN cables if using an amplified
antenna.
• Reception of digital over-the-air broadcasts is outside of the
control of DISH Network. If you have questions about over-theair broadcasts, contact the broadcaster, not DISH Network.
Digital Transition Consideration
Although all full-power over-the-air stations are transitioning to digitalonly broadcasts beginning February 17, 2009, there will be some
broadcasters who will continue using analog signals after this date.
Because the OTA Module includes digital-only tuners, stations that are
still broadcasting analog signals cannot be received using this module.
Page 13
OTA Module.book Page 14 Thursday, July 3, 2008 4:35 PM
Limited Warranty
This Limited Warranty is a legal document. Keep it in a safe place. Remember to keep
your Sales Receipt for warranty service. We will consider any items you return without a
copy of the Proof of Purchase to be out of warranty.
This warranty extends only to the original user ("you," "your") of the DISH Network
Over-the-Air Module and is limited to the purchase price of the module. DISH Network
Corporation and its affiliated companies ("we," "our," "us") warrant this module against
defects in materials or workmanship as follows. For one year from the original date of
purchase, if we find the module is defective subject to the limits of this warranty, we will
replace the module at no charge for parts or labor. We warrant any such work done against
defects in materials or workmanship for the remaining part of the original warranty period.
This warranty does not cover installation of the DISH Network System; consumer
instruction; physical set up or adjustment of any consumer electronic equipment; remote
control batteries; signal reception problems; loss of use of the equipment; unused
programming charges due to equipment malfunction; cosmetic damage; damage due to
lightning, electrical or telephone line surges, fire, flood, or other acts of Nature; accident;
misuse; abuse; repair or alteration by other than our factory service; negligence;
commercial or institutional use; improper or neglected maintenance; equipment sold AS
IS or WITH ALL FAULTS; equipment removal or reinstallation; shipping damage if the
equipment was not packed and shipped in the manner we prescribe; nor equipment
purchased, serviced, or operated outside the contiguous United States of America.
REPLACEMENT AS PROVIDED UNDER THIS WARRANTY IS YOUR
EXCLUSIVE REMEDY. WE SHALL NOT BE HELD LIABLE FOR ANY
INCIDENTAL OR CONSEQUENTIAL DAMAGES FOR BREACH OF ANY
EXPRESSED OR IMPLIED WARRANTY ON THIS DEVICE, NOR FOR ANY
INCIDENTAL OR CONSEQUENTIAL DAMAGE RESULTING FROM THE USE OF,
OR INABILITY TO USE, THIS DEVICE. UNDER NO CIRCUMSTANCES SHALL
OUR LIABILITY, IF ANY, EXCEED THE PURCHASE PRICE PAID FOR THIS
DEVICE. EXCEPT TO THE EXTENT PROHIBITED BY APPLICABLE LAW, ANY
IMPLIED WARRANTY OF MERCHANTABILITY OR FITNESS FOR A
PARTICULAR PURPOSE ON THIS DEVICE IS LIMITED IN DURATION TO THE
DURATION OF THIS WARRANTY. WE RESERVE THE RIGHT TO REFUSE TO
HONOR THIS WARRANTY IF WE DETERMINE ANY OF THE ABOVE
EXCEPTIONS TO HAVE CAUSED THIS DEVICE NOT TO HAVE PERFORMED
PROPERLY. THIS WARRANTY SHALL BE VOID IF ANY FACTORY-APPLIED
IDENTIFICATION MARK, INCLUDING BUT NOT LIMITED TO SERIAL OR
Page 14
OTA Module.book Page 15 Thursday, July 3, 2008 4:35 PM
CONDITIONAL ACCESS NUMBERS, HAS BEEN ALTERED OR REMOVED. THIS
WARRANTY SHALL ALSO BE VOID IF THE DEVICE HAS BEEN OPENED BY AN
UNAUTHORIZED PERSON.
This warranty gives you specific legal rights which may vary from state to state. Some
states do not allow the exclusion or limitations of incidental or consequential damages, or
allow limitations on the duration of an implied warranty, so those limitations may not
apply to you.
DISH Network’s Exchange Programs
DISH Network offers two options if you need to replace your accessories; the Advance
Exchange Program and the Post Receipt Exchange Program
Advance Exchange Program
The Advance Exchange Program allows you to have replacement equipment shipped
immediately to you (depending upon where you live, it could take three to five business
days). Along with replacement equipment, you will receive a prepaid shipping label and
instructions on how to return the defective equipment.The shipping charge, for receiving
replacement equipment and returning the defective equipment, is a one time fee based on
EchoStar's competitive bulk shipping rates (additional charges may apply outside of the
continental US). This fee will be charged to your billing account or your valid credit card.
If you do not ship the defective equipment to EchoStar within ten days after receiving the
replacement, your billing account or credit card will be charged the market price of the
replacement. If you return the defective equipment after ten days, you will receive a full
refund less an administrative fee.
If your equipment is out of warranty and can be repaired your billing account or credit
card will be charged the standard repair fee for the replacement. If damage to the defective
equipment is found, which EchoStar in its sole discretion determines has voided the
warranty, or makes the equipment unrepairable, your billing account or credit card will be
charged the market price of the replacement.
Post Receipt Exchange Program
You may choose to ship the equipment to us at your cost. To provide faster service, upon
receipt of your equipment you will be shipped a replacement. Your original equipment
will not be available for return. The equipment you return will be checked to verify
whether it is covered under this warranty. If the defective equipment is covered under this
warranty, it will be replaced and shipped back to you at no additional cost (additional
charges may apply outside of the continental US). If your equipment is out of warranty
and can be repaired your billing account or credit card will be charged the standard repair
fee for the replacement. If damage to the defective equipment is found, which EchoStar in
Page 15
OTA Module.book Page 16 Thursday, July 3, 2008 4:35 PM
its sole discretion determines has voided the warranty, or makes the equipment
unrepairable, your billing account or credit card will be charged the market price of the
replacement.
Accessory Warranty
An accessory is any DISH Network branded equipment, displaying the DISH Network
logo, excluding the receiver, Smart Card, cables and hookups, and non-mechanical
components. A one-year warranty becomes effective upon the activation of the DISH
system or date of purchase, if bought separately. A proof of purchase is required to verify
the purchase date. If an accessory has an expired warranty, no exchange will be issued.
You may purchase replacement accessories from DISH Network or your local retailer.
If You Need Help
1. Review this User Guide.
2. See the Troubleshooting section of these Installation Instructions.
3. Visit us online at http://tech.dishnetwork.com or call the Customer Service Center at 1800-333-DISH (3474). Have the date of purchase and your customer account number
ready.
a. If the representative finds you should return the module, you'll get a telephone
number to call for a Return Authorization (RA) number. Before shipping any
equipment to us, you must get a Return Authorization number.
b. You must package returned equipment the right way. Follow the instructions the
representative gives you.
c. Write the RA number in large, clearly visible characters on the outside of the
shipping box used to return the equipment. To avoid confusion and
misunderstandings, we will return shipments without an RA number clearly visible
on the outside of the box to you at your cost.
d. We will:
• Check the module, including whether it is covered under the warranty.
• Replace any module we find is defective with a new or refurbished module.
• If the defective module is covered under the warranty, we will ship the replacement module at our expense. If a defective module is not covered under the warranty, we will tell you. We may assess you a flat rate charge for a replacement
module, including shipping and insurance.
Page 16
OTA Module.book Page 17 Thursday, July 3, 2008 4:35 PM
Copyright © 2008. EchoStar Technologies L.L.C., Englewood,
Colorado 80112. All rights reserved.
The information in these Installation Instructions may change without
notice. We may issue revisions to tell you about such changes.
Send any comments or questions about these Installation Instructions to:
[email protected] or Technical Publications, EchoStar
Technologies L.L.C., 94 Inverness Terrace East Englewood, Colorado
80112
Part Number: 162512
Printed in
We acknowledge all product names, trade names, or corporate names
we mention in these Installation Instructions to be the proprietary
property of the registered owners.
DISH Network is a registered trademark of DISH Network Corporation.
For information about DISH Network, visit our website at
www.dishnetwork.com.
Page 17