1
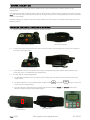
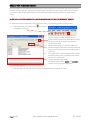
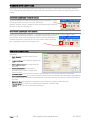
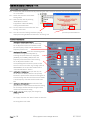
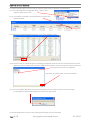
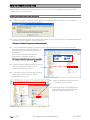
Entel Programmer Radio Programming Software User Guide R1.1 Page: 1 / 22 © Copyright Entel UK 2012 All Rights Reserved REF: ED005 TABLE OF CONTENTS: GENERAL DESCRIPTION: .......................................................................................................................................... 3 PREPARING THE RADIO – PROGRAMMING MODE: ......................................................................................... 3 PUT THE RADIO INTO FLASH MODE:...................................................................................................................... 4 FOR FIRMWARE BEFORE 2.0.3.0 USE THE 4,3,2,1 METHOD:.............................................................................. 4 FOR FIRMWARE VERSION 2.0.3.0 OR GREATER USE UPGRADE MODE: ....................................................... 5 CONNECTION ERROR MESSAGE:...................................................................................................................... 5 UPGRADING THE RADIO’S BOOTLOADER: ......................................................................................................... 6 UPGRADING FIRMWARE:......................................................................................................................................... 7 UPDATE THE FUNCTION IMAGE:............................................................................................................................. 8 UPDATING THE PROGRAMMING DATA OF THE RADIO: .................................................................................. 9 USING ENTEL PROGRAMMER: .............................................................................................................................. 10 HOW TO USE ENTEL PROGRAMMER: .............................................................................................................. 10 WRITING DATA BACK TO THE RADIO:............................................................................................................. 10 WORKING WITH CODEPLUGS: ............................................................................................................................. 11 SAVING A CODEPLUG FROM A RADIO: ................................................................................................... 11 WRITING A CODEPLUG TO A RADIO: ........................................................................................................ 11 RADIO INFORMATION:........................................................................................................................................... 11 GENERAL AND SETTINGS - BUTTON FUNCTIONS: ............................................................................................. 12 CHANNEL MENU:..................................................................................................................................................... 13 TUNING A RADIO’S TRANSMITTER:....................................................................................................................... 14 PREPARING FOR TUNING: ................................................................................................................................. 14 TUNING THE RADIO: ............................................................................................................................................ 14 TUNING A RADIO’S RECEIVER:............................................................................................................................. 15 SET THE RECEIVER FILTERS: ................................................................................................................................. 15 SET THE MASTER SQUELCH: ............................................................................................................................... 15 APPLY AND WRITE: .............................................................................................................................................. 15 TESTING A TUNED RADIO:...................................................................................................................................... 16 TESTING THE RADIO TRANSMITS CORRECTLY: .............................................................................................. 16 TESTING THE RADIO RECEIVES CORRECTLY: ................................................................................................. 16 MANAGING ENTEL PROGRAMMER MODELS:.................................................................................................. 17 HOW TO ADD AND REMOVE MODELS IN ENTEL PROGRAMMER: .......................................................... 17 HOW TO UPDATE MODELS:............................................................................................................................... 19 HOW TO IMPORT MODELS INTO ENTEL PROGRAMMER:........................................................................... 20 HOW TO UPDATE SYSTEM FILES ............................................................................................................................ 21 UPDATE SYSTEM FILES VIA AUTOUPDATE ....................................................................................................... 21 Page: 2 / 22 © Copyright Entel UK 2012 All Rights Reserved REF: ED005 GENERAL DESCRIPTION: Entel Programmer is a ‘shell’ that requires model specific .dll(s) installed before a specific radio’s can be programmed. This guide outlines how to add and remove .dll and .fw (firmware), update firmware, program, and tune the radios. Note: The .dll must match the firmware installed in the target radio (an error message with advice will be displayed if there is a mismatch). The Entel Programmer supports auto and manual updates over the internet or manually by importing files from a USB drive, CD etc. PREPARING THE RADIO – PROGRAMMING MODE: 1.1 1.2 Remove the accessory cover to reveal the accessory socket. HX Accessory Socket HT Accessory Socket Connect the programming lead to the radio’s accessory socket, attaching the other end to your computer’s serial port (only finger tight). 1.3 HT Programming Lead HX Programming Lead If your PC does not have a serial port we strongly recommend using Entel’s USB‐to‐Serial converter and driver (the driver is included with Entel programmer). 1.4 Put the radio in ‘Programming Mode’: For Non‐Marine Models: Turn the radio on while holding the lower button on the side of the radio (see image below). and DOWN buttons on the front For Marine Models: Turn the radio on while holding the UP of the radio (see image below). This will cause the radio to beep once and the LED to flash between GREEN and ORANGE and on LCD Models to display ‘Programming mode Progress…’ HT Side Button Page: 3 / 22 HX Side Button © Copyright Entel UK 2012 All Rights Reserved Marine Radios REF: ED005 PUT THE RADIO INTO FLASH MODE: The following steps are not necessary if the radio is known to have the latest software. If this is the case, please go to step 9 for a programming guide. 2.1 Put the radio in "Programming Mode" by turning the radio on while holding the lower button on the side of the radio. This will cause the radio to beep once and the LED to flash between GREEN and ORANGE. 2.2 2.3 2.4 2.5 HT Side Button HX Side Button In Entel Programmer, read the radio by selecting "Radio\Read" on the menu bar OR click on the Read button. Whilst the radio is being read you will see a progress bar. If you experience any connection problems, please download the "How To Resolve A Connection Problem" document, available from the Entel Website. Check the Firmware Version No (FW VER) of the radio on Entel Programmer’s infobar. E.g. 2.0.3.8. If the firmware version number is prior to 2.0.3.0 move to Step 3, if the version is 2.0.3.0 or greater follow Step 4. FOR FIRMWARE BEFORE 2.0.3.0 USE THE 4,3,2,1 METHOD: 3.1 3.2 3.3 3.4 3.5 Special instructions for non‐display radios only: Ensure the radio’s first 7 channels are programmed with channel data. Change the channel to channel 3. Turn the radio on and wait for the radio to boot fully, this will be signalled by 1 sharp beeps followed by several quick beeps. Swiftly but accurately turn the volume encoder / channel selector 4 positions clockwise, 3 positions anti‐ clockwise, 2 positions clockwise, 1 position anti‐clockwise and then for: The HX series press the PTT button (the large transmit button on the left side of the radio) and the radio should beep twice. The HT series momentarily press the Power Button. Turn the radio off, wait a couple of seconds and turn the radio on again. On LCD models you should see 'Entel Upgrade System' and version number (normally v1.6). The LED should constantly glow GREEN, except on older versions (before v1.6) where the radios LED will extinguish. To test if the radio is in flash update mode press the PTT, if the LED goes RED the radio is not in flash update mode. This process can sometimes be a little difficult and may take several tries. Now go to Step 6. Page: 4 / 22 © Copyright Entel UK 2012 All Rights Reserved REF: ED005 FOR FIRMWARE VERSION 2.0.3.0 OR GREATER USE UPGRADE MODE: 4.1 4.2 4.3 4.4 4.5 4.6 4.7 Open Flash Writer by clicking on the Programmer’s menu bar. icon in the Entel In Flash Writer select the firmware for the radio by pressing the open source "…" button and then selecting the firmware file for the model of radio e.g. the HT783 In Flash Writer press the "Upgrade mode" button. This will display a "Goto Upgrade Mode" window, press the proceed button. Next Flash Writer will display an "Information" window asking you to turn the Radio Off and On. Press the OK Button. Radios with an LCD will now display "To upgrade. RESET POWER". Turn the radio off, wait a couple of seconds and turn the radio on again. On LCD models you should see 'Entel Upgrade System' and bootloader version number. The LED should constantly glow GREEN, except on older versions (before v1.6) where the radios LED will extinguish. To test if the radio is in flash update mode press the PTT, if the LED is RED the radio is not in flash update mode. Proceed to Step 6. CONNECTION ERROR MESSAGE: If you get the connection error message below, please check: If the radio is in programming mode, the radio’s LED should flash between GREEN and ORANGE. If the radio is in Flash Upgrade mode the radio’s LED should be solid GREEN. The radio programming lead is properly connected to the radio and the computer’s serial port. The version of firmware in the radio is after version 2.0.3.0. Page: 5 / 22 © Copyright Entel UK 2012 All Rights Reserved REF: ED005 UPGRADING THE RADIO’S BOOTLOADER: This section is only relevant for HX models that have had the LCD upgraded to a type 2 unit and the screen is now displaying just a black box. The LCD software pack is available from the Entel Website at: http://www.entel.co.uk/updates/LCDSoftwareUpgrade.zip To upgrade the radio’s bootloader when in flash update mode: 5.1 Open the Flash Writer application by selecting the Flash Writer icon on the Start Menu or by pressing the Flash 5.2 5.3 5.4 5.5 Writer icon in Entel Programmer’s toolbar. In Flash Writer select the source file for the radio by pressing the "…" button and then select the latest version of the bootloader. Next press the "Program" button, a list of installation operations should then be displayed with a status bar. The installation of the bootloader will be complete when the status bar has reached the end and operation list should state: "Program ending…, connection Closed." and the radio’s LED will glow orange. Turn the radio off. Now go to Step 6. Page: 6 / 22 © Copyright Entel UK 2012 All Rights Reserved REF: ED005 UPGRADING FIRMWARE: Using the Flash Writer application, the radio must be turned on and in Flash update mode (See step 2). 6.1 Press the "Program" button to update the firmware, the operation and status fields will display a list of installation operations along with a status bar. 6.2 The update of the firmware will be complete when the status bar has reached the end and a new Flash Writer information window is displayed and the radio’s LED will glow ORANGE. 6.3 Click “OK”. 6.4 Click “Exit”. 6.5 Turn the radio off and go to Step 8. Page: 7 / 22 © Copyright Entel UK 2012 All Rights Reserved REF: ED005 UPDATE THE FUNCTION IMAGE: Function Images are NOT downloaded automatically by Entel Programmer’s auto update tool and they are NOT available via Entel’s website. Instead if you need to update the function image of your radio contact Entel with your radio’s model number and firmware version and they will supply you with the function image that you require. DO NOT LOAD A FUNCTION IMAGE INTO A RADIO UNLESS YOU ARE CERTAIN IT IS THE CORRECT VERSION. To update the function image of the radio, ensure the radio is in programming mode (see step 1) then: 7.1 Open Flash Writer by clicking on the Programmer’s menu bar. icon in Entel 7.2 7.3 7.4 7.5 Using the Flash Writer application select the Function Image to update using the source "…" button and then select the suitable Function Image (.FI) file for your model number and firmware version of your radio. Next press the "Program" button to update the Function Image, the operation and status fields will display a list of installation operations along with a status bar. The update of the Function Image will be complete when the status bar has reached the end, and the operation list should state: "Complete downloading FI data…" the LED will flash between GREEN and ORANGE to indicate it is still in programming mode. Turn the radio off. Once you power up the radio it will now use the updated function image for the radio. Page: 8 / 22 © Copyright Entel UK 2012 All Rights Reserved REF: ED005 UPDATING THE PROGRAMMING DATA OF THE RADIO: If Flash Writer displays a message like the one below please follow these steps: 8.1 8.2 8.3 8.4 The radio must be in programming mode, see Step 1. Open Entel Programmer and read the radio by selecting "Radio\Read" in Entel Programmer’s Menu Bar or click on the Read button. This will display a progress bar, while the the radio is being read. Now write the updated program data to the radio by selecting "Radio\Write" on Entel Programmer’s menu bar or click on the Write button, while the data is being written you will see a progress bar. You have now upgraded your radio’s programming data. Page: 9 / 22 © Copyright Entel UK 2012 All Rights Reserved REF: ED005 USING ENTEL PROGRAMMER: HOW TO USE ENTEL PROGRAMMER: To display a radio’s configuration with Entel Programmer: 9.1 9.2 9.3 9.4 Put the radio into programming mode, see Step 1. Open Entel Programmer and read the radio by selecting "Radio\Read" in Entel Programmer’s Menu Bar or click on the Read button. This will display a progress bar, while the the radio is being read. Once you have read the radio, a tree menu contains the radio’s configuration settings will be displayed with the following menu Items: Radio Information: Contains the radios general information including its serial number, the radios band, battery options, logo and radio name. General and Settings: This window has 2 main tabs: General: This contains the main settings and configuration for the radio including: VOX options, Volume controls, Key Lock and other settings. Button: This feature allows you to assign button functions to the menu. Channel: This contains the channel data for the radio including the frequencies, alias, and the other channel options. Scan: The scan window allows you to create scans that can be used to scan the channels in different ways or with different options. Selcall: Selcall radios will display a folder containing 5 menu items: System Table: The system table window contains the configuration for the selcall sequences, including their format and timings. Encode Table: This table contains a list of the selcall encode sequences. Decode Table: This table contains a list of the selcall decode sequences. Contacts Table: This table contains the radio ID for the radio being configured and a list of the radios names and IDs for the radios it will communicate with. Safety Config: The safety window contains controls for the emergency, lone worker and man down functions. TRX Tuning: Selecting this menu item will display the TX and RX Tuning Screens for tuning the transmitter and receiver. For more information see: TUNING A RADIO’S TRANSMITTER: section 14 and TUNING A RADIO’S RECEIVER: section 15. WRITING DATA BACK TO THE RADIO: Once you have finished modifying the configuration of the radio write the configuration back to the radio by: 9.5 Selecting "Radio\Write" in the Entel Programmer’s menu bar or click on the Write button, while the data is being written you will see a progress bar. Page: 10 / 22 © Copyright Entel UK 2012 All Rights Reserved REF: ED005 WORKING WITH CODEPLUGS: Code plugs contain all the channel data and configuration settings for a radio and are an easy way to transfer a radio’s settings from one‐to‐another to ensure they will communicate to each other or just back‐up your radios settings. SAVING A CODEPLUG FROM A RADIO: To save the settings of a radio into a Code plug, select “File\Save As…" in the Entel Programmer’s menu bar or click the Save button and then using the “Save As” window to select the filename and location that you want to save the code plug too. WRITING A CODEPLUG TO A RADIO: To write a code plug select “File\Open…" in the Entel Programmer’s menu bar or press the “Open” button, then using the open window select the code plug file that you want to write into the radio. Write the Code plug to the radio by selecting "Radio\Write" in the Entel Programmer’s menu bar or click on the “Write” button, while the data is being written you will see a progress bar. RADIO INFORMATION: The Radio Information contains the following information: Serial Number: The serial number for the radio. Frequency Range: The frequency range for the radio. Battery Charge Count: The charge count for the radio. Replace Battery Text: The text that is displayed once the battery charge count reaches its limit. Customer Name: The name of the customer, this information is stored in the radio but not displayed. Read Protect Password: This is a security measure that prevents current data in the radio being viewed without the correct password. New data can still be written to the radio, however, this will erase the previous data on the radio. Switch On Msg: A message that is displayed in place of the start‐up logo on radios with LCD. Turn On Image: This allows you to replace Entel’s logo with a customer logo. Update: This is a shortcut to open Entel Flashwriter. Page: 11 / 22 © Copyright Entel UK 2012 All Rights Reserved REF: ED005 GENERAL AND SETTINGS ‐ BUTTON FUNCTIONS: The button tab of the general window allows you to assign button functions to the short and long presses of the radio’s buttons. Not all button functions will be applicable to all models. The button functions are: H/M/L Power: This function allows you to toggle the power of the radios transmit from high, medium to low. This function also needs to be enabled in the channel window. VOX: VOX (voice operated transmit) is used to enable transmission on detection of speech (hands free mode). Monitor On / Off (tone defeat): The monitor function removes the filters for the radio allowing the user to hear all transmissions and the tone defeat also means the radio will receive all signals regardless of the subtone. Monitor On / Off (Squelch and Tone Defeat): The monitor function removes the filters for the radio allowing the user to hear all transmissions and the tone defeat also means the radio will receive all signals regardless of the subtone and the squelch means the squelch threshold has been removed. Beep Mute (On / Off): This function mutes or un‐mutes the radio’s key and button beeps. Talkaround On / Off: Talkaround allows a half‐duplex channel to be used as a simplex channel by making the transmit parameters identical to receive parameters. Nuisance Delete: Nuisance delete enables the user to temporarily delete a nuisance channel (one that is constantly receiving interference for example) from the scan list. Scrambler On / Off: Enabling the scrambler distorts any transmission so that only another radio with the same scrambler inversion point can understand the transmission. Voice annunciation On / Off: If fitted the voice annunciation board will “speak” the channel number selected. Panic Alarm Siren: The panic alarm siren emits a high pitched, full volume siren tone through the radios loudspeaker on press. Fixed Call: A call sequence that can be initiated with a press of a Fixed Call button. Call sequences can be allocated to the fixed calls option in the System Table. Each system table has 6 fixed calls that can be allocated to call sequences in the Encode Table. Lone Worker On / Off: This enabled or disabled the lone worker function. Man Down On / Off: This enabled or disabled the man down function. Emergency: Setting a button to emergency will manually trigger an emergency alarm upon press similar to lone work or the man down functions. These require Selcall/5‐Tone programming to function correctly. Key Lock: Toggling this features locks and unlocks all of the buttons to stop buttons from accidentally being pressed. Squelch Level: This function allows the user to change the current squelch level via the controls. Selcall Mute/Unmute: Upon pressing the button, the channel will unmute and become an open channel allowing all received signals to be heard. Fixed Channel: This feature allows the user to access to a particular channel instantly at a press of a button without navigating through a large numbers of channels. It will revert to the previous channel when the button is pressed again. Contact List: This button displays the Contact List menu. Audio Mute: This function will put the radio in complete silent mode. The speaker and key beep will be disabled until the audio mute is turned off. The audio mute can also be turned off on channel or volume change. PTT Button: This function converts a function button to a Push‐To‐Talk (PTT) button. PTT + Fixed CH: Similar to PTT, this feature utilises a ‘Fixed Channel’ specified in the Channel table, switches to that channel and transmits, for as long as the button remains held. Shunting: When assigned as shunting is held down two audible tones will be emitted locally and transmitted on the current channel’s frequency. Page: 12 / 22 © Copyright Entel UK 2012 All Rights Reserved REF: ED005 CHANNEL MENU: To enter the channel data of the radio first select "Channel" to display the channel window. Not all features listed below are applicable to all models. Channel Name The name of the channel, which is displayed on the LCD. RX Frequency The frequency that the radio will receive on. RX Subtone The subtone that is required for the radio to receive the transmission. TX Frequency The frequency that the radio will transmit on. TX Subtone The subtone that is transmitted with the radios transmissions to ensure privacy. 12.5/20/25kHz This field states the channels spacing for the field, whether it will be 12.5, 20 or 25 kHz. This field controls the power level the radio will transmit on, H for high power, M for PWR or Power medium power and L for low power only. A radio’s power can be changed during use using the ‘H/M/L Power’ button function. Power Inhibit This field controls if the power will be fixed to the power level set in the PWR field. If a squelch tail eliminator is set, the radio will transmit this after the PTT is release to notify Squelch Tail the receiving radio that the speaker needs to be closed. This removes the ‘psht’ squelch tail Eliminator noise from the receiving radio. Controls how the radio will behave if it tries to transmit when it is already receiving a signal. OFF – The radio will allow transmission if the PTT is pressed when the channel is busy. (Default setting) Carrier – the radio won't allow transmission if the PTT is pressed when the channel is busy with or without CTCSS/DCS tone. TX Lock Out Own tone – the radio won't allow transmission if the PTT is pressed when the channel is busy with a matching CTCSS/DCS tone. Incorrect tone – the radio won't allow transmission if the PTT is pressed when the channel is busy but without a matching CTCSS/DCS tone. The radio will not lockout if the busy channel is without CTCSS/DCS tone. Scrambles a transmission or received audio with a set frequency scramble code. There are Scramble two preset codes and two custom codes available. Scramble can be assigned via a button or set to be always enabled on a per channel basis. Talkaround enables a half‐duplex channel to be used as a simplex channel by making the transmit parameters identical to receive parameters. Select 'On' to allow toggling Talk Around Talkaround on this channel. Talkaround must be assigned to a programmable button. Hide This field states whether the channel will be available on the channel list. Assigns a scan sequence to a channel. These sequences need to be defined in the ‘Scan’ Scan List window. The ‘Fixed channel’ option links to the button window and requires a corresponding fixed FxCH channel button to be assigned. When the button is pressed the radio will snap to this channel. 5‐Tone radios will have a ‘system table’ field that allows a selcall (Selective Calling) setup to System Table be applied to a channel. Please refer to the help files for specific model features and functions. Help files may be accessed by pressing the ‘Help’ button on the programming windows. Page: 13 / 22 © Copyright Entel UK 2012 All Rights Reserved REF: ED005 TUNING A RADIO’S TRANSMITTER: PREPARING FOR TUNING: 14.1 Connect the radio to the test set by connecting the radio‘s antenna socket to your test set’s RF IN\OUT port via a coax cable. 14.2 Switch the test set to Transmitter testing mode. 14.3 Now read the radio by selecting "Radio\Read" on Entel Programmer’s Menu Bar OR by clicking the Read button. 14.4 On the radios tree menu select the "TRx Tuning" menu item. 14.5 This will cause the "Dialog" window to pop‐up, press the proceed button to display the tuning window and select the "TX tuning" tab. TUNING THE RADIO: 14.6 Setting the frequency oscillation: Select the "Freq. oscillation" option button and use the tuning bar to adjust the value in the textbox so that the TX frequency of the Test Set matches the frequency value in red. 14.7 Setting the TX power: Tune the transmitting power of the radio on high and low power by selecting the option button for the power (POWER_HI or POWER_LOW) and for the frequency of the band then use the tuning bar to adjust the number in the corresponding text box until the power on the test set is the correct value. E.g. the high value of 399.950000 is set to 101. Most models offer a “Calculate Mid Power” button. 14.8 Setting the PL deviation: On your test set, set the AF filters to 300 Hz, select the "PL (CTCSS) Deviation" option button and use the tuning bar to tune the change the value until the Test Set shows a mod frequency of 67.0 Hz and the Level to 0.7 kHz. 14.9 Setting the DPL deviation: Next select the "DPL (DCS) Deviation" option button and use the tuning bar to change the DCS deviation using the same method as PL deviation tuning. 14.10 Apply and write: Finally apply the changes by pressing the "Apply" and then the "Write" button to write the TX tuning data to the radio. Page: 14 / 22 © Copyright Entel UK 2012 All Rights Reserved REF: ED005 TUNING A RADIO’S RECEIVER: On the Tuning Window select the "RX tuning" tab of the window and on your test set select the RX mode so that the screen displays "RECEIVER TEST". SET THE RECEIVER FILTERS: 15.1 Set the level on your test set to ‐120.0 dBm 15.2 Select the option button of the filter that you are going to tune. 15.3 Next set the "Gen Frequency" of the test set to the value of the filter (e.g. 399.925000). 15.4 Then use the tuning bar to change the value until your can hear the clearest signal. 15.5 Press the "Set Squelch" button. 15.6 This should enter squelch data into the 2 columns next to the window. SET THE MASTER SQUELCH: 15.7 Select the squelch level drop‐down list and set it to "Custom", this will select an RX filter option button. 15.8 Next on the Test Set, set the level to ‐ 120dBm and on Entel Programmer press the "Set Master Squelch" button to generate the squelch data. 15.9 Then set the squelch level bar to ‐120dBm. APPLY AND WRITE: Once you have tuned the Radio’s Receiver write the RX tuning data to the radio by pressing the "Apply" button and then the "Write" button. Page: 15 / 22 © Copyright Entel UK 2012 All Rights Reserved REF: ED005 TESTING A TUNED RADIO: TESTING THE RADIO TRANSMITS CORRECTLY: On your Test Set select the TX mode so the Test Set displays "TRANSMITTER TEST" and select a channel to test, which you the channel data of. Now transmit by holding down the PTT button. 16.1 Frequency: Verify the "TX FREQ" displayed is the same as the transmitting frequency of the channel. 16.2 Power: Verify the "POWER" displayed is the correct High Power for the channel. 16.3 Subtones: If you are using subtones on the channel lower the AF filters on the test set until the "FILTER" is 300 Hz, then while transmitting check the "MOD FREQ" of the Test Set, which will state the CTCSS subtone the radio is transmitting on. If the frequency or subtones are incorrect, put the radio back into programming mode, read the radio again and check the channel data to ensure you have entered the correct data and that it has been written to the radio. If the power is incorrect put the radio into programming mode, read it, select TRX tuning and check the power values of all the 4 frequencies within the band. TESTING THE RADIO RECEIVES CORRECTLY: To test if the radio receives clearly on your test set select the RX Mode so that its screen displays "RECEIVER TEST". Next set the parameters for the channel: 16.4 Frequency: Press the Test Set’s "FREQ" button and enter the general frequency as the RX frequency of the channel you are testing and press the MHz button. 16.5 Level: Press the Test Set’s “LEVEL” button and set the level as ‐100 dBm. 16.6 Subtones: If the channel has subtones, you will need to enter them, the method will depend on the model of your test set, you should consult the manual for the test set, but most will either have a "Tones" button that activates a menu with a sub‐ audible tone option. Once you have set‐up the test set should generate a test signal, which you should hear clearly through the speaker of your radio, if you hear interference you should retune your radio (See step 15 TUNING A RADIO’S RECEIVER: ). Page: 16 / 22 © Copyright Entel UK 2012 All Rights Reserved REF: ED005 MANAGING ENTEL PROGRAMMER MODELS: Outlined below are descriptions on how to add and remove .dll, .fw (firmware) and update system program files. Note: The .dll must match the firmware installed in the target radio (an error message with advice will be displayed if there is a mismatch). HOW TO ADD AND REMOVE MODELS IN ENTEL PROGRAMMER: How to add and remove models from Entel Programmer via an internet connection: 17.1 On Entel Programmer’s Menu Bar select "About" then "Update/Show Version Info". 17.2 The Update Window will appear, click on the "Add/Remove Models" button. 17.3 This will display the "Add/Remove Models" window, which shows the channels that are available to be added on the left and those already installed on the right field. 17.4 To Add a model click on the model in the "Available Models" field to highlight it and then press the ">>" button to transfer it to the "Installed Models" list, new models will be highlighted red E.g. HT446E and HT446L will be added. 17.5 To Remove a model click on the model on the "Installed Models" field to highlight it and then press the "<<" button to transfer it to the "Available Models" field, models that will be removed will be highlighted red on the Available Models field E.g. HT716 and HT716T. 17.6 Once you have made the changes that you want press the "Next" button. Page: 17 / 22 © Copyright Entel UK 2012 All Rights Reserved REF: ED005 17.7 This will cause an "Update Progress" window to be displayed, which will list the new models that have been added and the models that have been removed. Once the processes are completed it will state "Files updated". 17.8 Now press the "Next" button to close the window. 17.9 Once any updates have been performed Entel Programmer will need to restart so that the changes can be applied, to restart Entel Programmer click on the "OK" button. 17.10 Entel Programmer will now restart applying the changes you have requested. Page: 18 / 22 © Copyright Entel UK 2012 All Rights Reserved REF: ED005 HOW TO UPDATE MODELS: To update existing models to ensure that you have the latest version of firmware and model DLLs: 17.11 On Entel Programmer’s Menu Bar select: "About” then “Update / Show Version Info". 17.12 If an update is available it will be indicated in red text in the 'Update' window. 17.13 Next on the Update Window will appear, click on the "Update" button. 17.14 This will cause an "Update Progress" window to be displayed, which will list the new models that have been updated as well any models that have been added and the models that will be removed. Once the processes are completed it will state "File Updated". Now press the "Next" button to close the window. 17.15 Once any updates have been performed Entel Programmer will need to restart so that the changes can be applied, to restart Entel Programmer click on the "OK" button. 17.16 Entel Programmer will now restart applying the changes you have requested. Page: 19 / 22 © Copyright Entel UK 2012 All Rights Reserved REF: ED005 HOW TO IMPORT MODELS INTO ENTEL PROGRAMMER: 17.17 You should only need to use this procedure if you do not have an internet connection on your programming PC. 17.18 You will need the update files available on your hard drive, portable media (USB stick etc), or over a network. 17.19 The update files may either be requested from Entel or downloaded directly from our website at: www.entel.co.uk\updates additional files section where there is an option to download: All Model Updates OR Individual Model DLLs and Firmware (.fw). 17.20 To import these updates into Entel Programmer: On Entel Programmers Menu Bar select: "File\Import Model Files". Next using the "Open File" window, browse to the location of the Firmware or Model DLLs to be added to Entel Programmer, select them and click ok. If you already have a DLL\Firmware for this model you may be asked to overwrite the existing file, select "YES" or "YES FOR ALL". Once the updates have been performed Entel Programmer will need to restart so that the changes can be applied, to restart Entel Programmer click "OK". Page: 20 / 22 © Copyright Entel UK 2012 All Rights Reserved REF: ED005 HOW TO UPDATE SYSTEM FILES When an update to Entel Programmer, Flashwriter, or other system files is released by Entel it will be made available via the Live Update system. UPDATE SYSTEM FILES VIA AUTOUPDATE 18.1 In Entel Programmer’s Menu Bar select "About” then “Update/ Show version Info". If a system update is available the following message will be displayed: 18.2 Select yes, Entel Programmer will download the updates. The new system files have been downloaded to the installation location’s update’s folder, by default at: C:\Program Files\Entel Programmer autoupdate\update 18.3 If the v3.2.0.0 skeleton package or higher was your originally installed version a notepad file and your installation location for Entel Programmer and a notepad instruction file will now be opened automatically. If not, manually open the location Entel Programmer is installed to. By default: C:\Program Files\Entel Programmer autoupdate\ This is known as the programmer’s Root folder. 18.4 Open the updates folder and select all the files within, then right click and select ‘Cut’ or use the keyboard shortcut ‘Ctrl + X’. 18.5 Then return to the root folder, right click in an empty space and select ‘Paste’ or use the keyboard shortcut ‘Ctrl + V’. 18.6 When prompted to overwrite files in the root folder, select ‘Yes to All’. 18.7 Entel Programmer is now updated. The programmer can be re‐opened by double clicking on Entel_Programmer.exe Page: 21 / 22 © Copyright Entel UK 2012 All Rights Reserved REF: ED005 Disclaimer Information in this document is subject to change without notice. The manufacturer does not make any representations or warranties (implied or otherwise) regarding the accuracy and completeness of this document and shall in no circumstance be liable for any loss of profit or any other commercial damage including but not limited to special, incidental, consequential or other damage resulting from the use of this document. Page: 22 / 22 © Copyright Entel UK 2012 All Rights Reserved REF: ED005