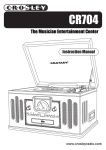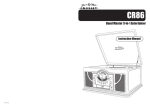
1
CR6004A
Instruction Manual
R
AI
S
E
LO
W
ER
USB
TURNTABLE
www.crosleyradio.com
Unpacking
• Remove the record player and rubber mat from the packaging and remove all packing
material.
Setting up and preparing the device
• Place the device on an even and stable surface.
• Turn the white transport braces on the turntable
until you can remove them. Store them carefully.
• Place the rubber mat on the turntable so that the spindle on the turntable pokes through the
opening in the mat.
• Remove the protective cap from the pick-up system by pulling it downwards.
Connecting the device
Audio connection
The record player has an inbuilt preamplifier and can therefore be connected directly to the
Line In / Aux input on a hi-fi system.
• Connect the audio cable to the Line In / Aux input on your hi-fi system (red plug = right
channel; white plug = left channel).
USB port
You will find information on connecting the record player to a PC in the section "Converting
records to digital files".
Mains connection
• Connect the device by means of the mains plug to an easily accessible wall socket.
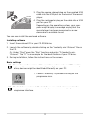
Repositioning the driving belt
Severe jolts (during transport, for example) may cause the record player’s driving belt to slip
off. To put it back into position, do as follows:
1. Remove the mains plug from the wall socket.
2. Take the rubber mat off the turntable.
3. Turn the turntable to the position illustrated.
4. Pull the driving belt out slightly and place it on the drive wheel as shown in the illustration.
Playing records
To achieve the best quality when playing or converting your records to digital files you should
observe the following information:
• Check the stylus regularly. You can brush off fluff and small bits of dirt with a soft brush,
brushing from the back to the front. For more stubborn dirt, add a little cleaning spirit to the
brush.
For information on how to change the stylus refer to "Changing the stylus".
• Secure the tone arm and turntable when transporting the device.
• The adapter must always be used when playing singles.
• Check the connection to your hi-fi system before playing a record.
• Clean your records with an antistatic cloth before playing them.
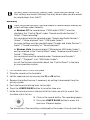
1. Lift the cover until it clicks into place.
2. Place the record on the turntable.
3. Set the required rpm by pressing the 33 or 45 button.
4. Remove the protective cap from the pick-up
system, if necessary, by pulling it downwards.
5. Push the tone arm locking lever to the right.
6. Press the LOWER RAISE button to raise the tone
arm.
7. Guide the tone arm across the record to the track you wish to play. The turntable starts to
turn.
8. Press the LOWER RAISE button to lower the tone arm. Playback begins. After the last track
on the record, the tone arm returns automatically to the tone arm rest. The turntable stops.
9. Push the tone arm locking lever to the left.
10. Close the cover.
Pausing playback
• Press the LOWER RAISE button to raise the tone arm and pause playback.
• Press the LOWER RAISE button again to lower the tone arm and continue
playing the record.
Stopping playback
• Press the STOP button to end playback. The tone arm automatically returns
to the tone arm rest. The turntable stops.
.
Your record player can work together with all audio recording programmes that support
USB audio devices. The “Audacity” programme is included with the record player. This
programme is free of charge and distributed under the GNU General Public License (GPL).
• Information about enclosed software (Version 1.2.6) may be found in the (English)
programme help function and in the manual on the enclosed CD.
• Further information concerning software, new versions, manuals and a forum for users'
questions is available on the Internet at http://audacity.sourceforge.net.
• As "Audacity" is continuously updated, versions available on the Internet may differ not only
in appearance, but also in the menu structure and in individual functions.
System requirements
• Windows XP or Vista
• Pentium 300 MHz or higher (XP) or 1 GHz or higher (Vista)
• At least 128 MB RAM (XP) or at least 512 MB RAM (Vista)
• USB port
• 500 MB free memory on the hard disk (for programme and data)
• CD-ROM drive
• Sound card
Connecting to a PC
1. Connect the record player to an easily accessible wall socket by means of the mains plug.
2. Boot your PC.
3. Plug the square-shaped plug on the supplied USB
cable into the USB port on the back of the record
player.
4. Plug the rectangular plug on the cable into a USB
port on your PC.
Depending on the operating system, your computer might display a message saying that the
record player has been recognised as a new
device and is available to use.
You can now install the enclosed software.
Installing software
1. Insert the enclosed CD in your CD-ROM drive.
2. Launch the software by double clicking on the “audacity-win-1.2.6.exe” file on
the CD.
Or: Under “Start”open the “Run” function and enter “D:\audacity-win1.2.6.exe”. The “D” is an example for the identification of your CD drive.
3. During installation, follow the instructions on the screen.
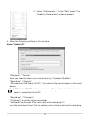
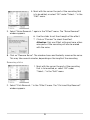
Basic settings
E
Depending on the version of the operating system and your PC's configuration, devices might be identified differently on your PC.
1. Launch "Audacity" by double clicking on the
programme icon.
E
The first time you launch "Audacity" you can select a language for the
programme interface.
12
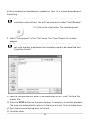
2. Select "Preferences..." in the "Edit" menu. The
"Audacity Preferences" window appears.
3. Make the following settings in this window:
Under "Audio I/O"
"Playback" / "Device":
Here you need to select your sound card, e.g. "Speaker (Realtek)".
"Recording" / "Device":
"Microphone (USB Audio CODEC)“; this selects the record player as the input
device.
E
"USB Audio CODEC" only appears as a setting option when the record
player is connected to the PC.
"Recording" / "Channels":
"2 (Stereo)"; to obtain stereo recordings.
"Software Playthrough (Play new track while recording it)":
must be activated (insert tick) to enable you to listen in during the recording.
13
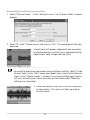
Under "Quality"
"Default Sample Rate“:
"44100 Hz"; the sample frequency used for CDs.
"Default Sample Format":
"16 bit"; the sample format used for CDs.
Under "File Formats“
"Uncompressed Export Format“:
"WAV (Microsoft 16bit PCM)"; the format with which audio CDs can be created
later.
4. Click on "OK" to save the settings.
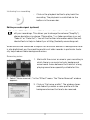
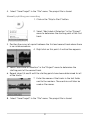
Listening to Monitor input via PC speakers
5. In the main Audacity window you will find a microphone icon beneath the output level indicators and
next to it a button with a black arrow pointing downwards.
Click on the arrow and select "Monitor input“ in the
dropdown menu.
Green or red bars appear in the display above.
You can now start recording.
14
E
You must select the setting "Monitor input“ each time you record. The
other settings are stored, although they may be lost when you disconnect
the record player from the PC.
Recording
E
Check the system settings if you are unable to record despite making the
correct settings under Audacity:
For Windows XP the record player ("USB Audio CODEC") must be
selected in the "Control Panel" under "Sounds and Audio Devices" /
"Voice" /"Voice recording".
Your sound card must be selected under "Sounds and Audio Devices" /
"Voices" / "Voice playback" (not: "USB Audio Codec").
The same settings must be selected under "Sounds and Audio Devices" /
"Audio" / "Sound recording" or "Sound playback".
For Windows Vista the record player ("Microphone USB Audio Codec“)
must be selected in the "Control Panel“ under "Hardware and Sounds“ /
"Sound“ / "Recording".
Your sound card must be selected under "Hardware and Sounds" /
"Sound" / "Playback" (not: "USB Audio Codec").
You will find further information about the "Control Panel" in the Help
for your operating system.
1. Lift the cover until it clicks into place.
2. Place the record on the turntable.
3. Set the required rpm by pressing the 33 or 45 button.
4. Remove the protective cap, if necessary, by pulling it downwards from the
pick-up system.
5. Push the tone arm locking lever to the right.
6. Press the LOWER RAISE button to raise the tone arm.
7. Guide the tone arm across the record to the track you wish to record. The
turntable starts to turn.
8. Click on the record button. The recording begins.
9. Press the LOWER RAISE button to lower the
tone arm. Playback begins.
The waveform of the recording is displayed on the screen. You can also listen
15
to the recording over headphones, speakers or your hi-fi system, depending on
the setting.
E
If the recording is not displayed or you cannot hear it, check the cable
connections and settings. You will find some hints under "Fault/Remedy“.
10. Click on the stop button. The recording ends.
11. Select "Save project" in the "File" menu. The "Save Project As" window
appears.
E
The project file can only be read by Audacity. For further editing or playback with another programme the recordings need to be converted (see
"Exporting tracks").
12. Select a storage location, enter a file name and click on "Save" to store the
project file.
13. Press the STOP button on the record player, if necessary, to end the playback.
The tone arm automatically returns to the tone arm rest. The turntable stops.
14. Push the tone arm locking lever to the left.
15. Close the cover.
16
Listening to a recording
•
Click on the playback button to play back the
recording. The playback is controlled via the
buttons in the menu bar.
Editing an audio signal (optional)
E
In the "Effect" menu you will find a series of functions with which you can
edit your recordings. This allows you to change the volume ("Amplify"),
balance deviations in volume ("Normalize...") or fade recordings in or out
("Fade In" or "Fade Out"). You will find further information about the individual effects in Help in Audacity or at http://audacity.sourceforge.net.
When records are converted to digital files a certain amount of background noise
is also digitalised, e.g. the crackling and hiss of older records in particular. Audacity helps reduce these background noises.
Removing noise
1. Mark with the cursor an area in your recording in
which there is no music but only background
noise heard. Areas between the tracks of a long
playing record are especially suitable for this.
2. Select "Noise removal..." in the "Effect" menu. The "Noise Removal" window
appears.
3. Click on "Get noise profile". The window closes
and Audacity creates a noise profile with the
background noises that are to be removed.
17
4. Mark with the cursor the part of the recording that
is to be edited, or select "All" under "Select..." in the
"Edit" menu.
5. Select "Noise Removal..." again in the "Effect" menu. The "Noise Removal"
window appears.
6. Use the slider to set the strength of the effect.
7. Click on "Preview“ to check the effect.
Attention: Only use Effect with great care, otherwise parts of the recording will also be erased
with the noise.
8. Click on "Remove Noise". The window closes and Audacity removes the noise.
This may take several minutes, depending on the length of the recording.
Removing clicks
1. Mark with the cursor the part of the recording
that is to be edited, or select "All" under
"Select..." in the "Edit" menu.
2. Select "Click Removal..." in the "Effect" menu. The "Click and Pop Removal"
window appears.
18
3. Use the slider under "Select threshold" to set the
sensitivity of the filter.
4. Use the slide control under "Max. spike width" to
set the maximum length of the click that is to be
removed.
5. Click on "Preview“ to check the effect.
Attention: Only use Effect with great care, otherwise parts of the recording will also be erased
with the click.
6. Click on "Remove clicks". The window closes and Audacity removes the clicks.
This may take several minutes, depending on the length of the recording.
Splitting a recording into separate tracks
If you wish to convert all the tracks on a record into digital files it is worth recording each side of the record "in one piece" first and then splitting it into separate
tracks.
1. Click on the "Fit project in window" tool. The
whole recording is now shown in the editing
window.
If there are still unwanted gaps before, in or after your recording you should
remove them before splitting the recording.
2. Mark unwanted gaps, if applicable, with the
cursor and click on the "Cut" tool.
3. Then again mark with the cursor the whole recording that is to be edited, or
select "All" under "Select..." in the "Edit" menu.
You can split the recording manually or do it automatically.
19
Automatically splitting your recording
1. Select "Silence Finder..." in the "Analyze" menu. The "Silence Finder" window
appears.
2. Enter "15" after "Silence Level" and click on "OK". The recording will then be
analysed.
A label track will appear underneath the recording
containing markers (vertical lines) representing the
beginning of each recognised new track.
E
If the "Silence Finder" inserts too few, too many or wrong markers, you
can undo the operation and repeat using a different setting. Select "Undo
Silence Finder" in the "Edit" menu and repeat steps 1 and 2 with different
values in the "Silence Finder..." window. If you cannot obtain good results,
split your recording into tracks manually, as described under "Manually
splitting your recording".
3. Enter the name of the track in the text field next
to the markers. This entry will later be used as
the file name.
20
4. Select "Save Project" in the "File" menu. The project file is stored.
Manually splitting your recording
1. Click on the "Skip to Start" button.
2. Select "Add Label at Selection" in the "Project"
menu to determine the starting point of the first
track.
3. Position the cursor at a point between the first and second track where there
is no visible waveform.
4. Right click on this point. A vertical line appears.
5. Select "Add Label at Selection" in the "Project" menu to determine the
starting point of the second track.
6. Repeat steps 3,4 and 5 until the starting points have been determined for all
of the tracks.
7. Enter the names of the tracks in the text fields
next to the markers. These entries will later be
used as file names.
8. Select "Save Project" in the "File" menu. The project file is stored.
21
Exporting tracks
E
Audacity can export the files in different formats, e.g. as a WAV, OGG or
MP3 file.
WAV is a standard Windows format played by the Windows Media Player
and many MP3 players. WAV files are needed to create audio CDs. The
music quality is very good, but the files do become very big.
OGG and MP3 are compressed and so they use less memory. Compression
may detract from the sound quality.
To export MP3 files you need a separately available encoder (see "Exporting as an MP3 file").
Exporting as WAV files
As soon as you have split your recording into tracks (and named them) you can
export the tracks as separate files.
1. Select "Export Multiple...“ in the "File" menu. The “Export Multiple“ window
appears.
2. Select the following options in the “Export Multiple" window:
"Export format": "WAV",
"Export location":
the storage location for your file, e.g. a folder with the title of the converted
record,
"Split files based on" :
"Labels", to import your split tracks,
"Name files":
22
"Using Label/Track Name" to import the names you gave them as file names.
3. Click on "Export". The files are created and stored in the selected directory.
Exporting as an MP3 file
If you wish to export your recordings as MP3 files you will need a separately
available MP3 encoder. Audacity uses the freely available LAME MP3 library. You
will find details on how to download the file and how to install it on the Internet
at http://audacity.sourceforge.net.
Burning WAV files to a CD / Copying MP3 files to your player
You will find details on burning an audio CD and copying files to an MP3 player in
the instructions accompanying your burn programme or your MP3 player.
Cleaning
B
DANGER - risk of fatal electric shock
• Remove the mains plug from the wall socket before cleaning the
appliance.
• The appliance must not be exposed to moisture. Also protect it from
water drops or splash water
CAUTION - material damage
• Do not use any caustic, aggressive or abrasive cleaning products for
cleaning.
•
Whenever necessary, use a soft, slightly dampened cloth to clean the housing.
•
Clean the stylus regularly. You can brush off fluff and small bits of dirt with a
soft brush, brushing from the back to the front. For more stubborn dirt, add a
little cleaning spirit to the brush.
23
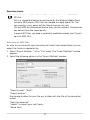
LIMITED MANUFACTURERS WARRANTY
Crosley Radio, Inc. warrants the product to be free from defects in material and
workmanship under normal use for a period of one year from the original date of
purchase. This warranty is not transferable. If the product is determined to be defective
during the warranty period, the unit will be repaired or replaced at Crosley Radios sole
discretion. This warranty covers manufacturing defects and normal consumer use and
does NOT cover damage or failure as a result of abuse, accident, alterations, misuse,
neglect, abnormal wear and tear, inadequate maintenance, commercial or unreasonable
use, damage caused by power surges, mishandling, accident, acts of God or attempted
repair by an unauthorized service agent. Also not covered are cosmetic damages,
cords and antennas.
Should this product fail to function in a satisfactory manner, it is best to first return it
to the store or retailer where it was originally purchased. If additional service is still
needed, the original purchaser must FIRST contact our offices to obtain an RA (Return
Authorization) Number.
TO OBTAIN AN RA NUMBER
CALL: 1.888.CROSLEY
(1.888.276.7539)
Send the unit prepaid to the address below in the original packaging (or reasonable
substitute to prevent damage). Clearly mark your RA number on the outside packaging
and include the original sales receipt (or a copy) indicating date of purchase, amount
paid, and place of purchase. You must also include your full name, shipping address
and daytime contact number. Please include a check or money order in the amount
of $19.95, made payable to Crosley Radio, to cover handling and return shipping
charges. Returned products will not be shipped to PO Boxes. Crosley Radio will not
be responsible for delays or unprocessed claims resulting from a purchasers failure
to provide any or all of the necessary information.
CROSLEY RADIO
ATTN: RETURNS DEPT
2001 PRODUCTION DRIVE
Louisville, KY 40299
For additional support: Crosley Radio Consumer Service Department
24 hours a day / 7 days a week
Telephone: 1.888.CROSLEY (1.888.276.7539)
There are no express warranties except as listed above.
The purchasers bill of sale is the only proof of warranty entitlement.
This warranty gives the purchaser specified legal rights in addition to any rights which
may vary from state to state.
In accordance with the Moss-Magnuson Warranty Act of July 10, 1975, this is termed
a limited warranty which in no way compromises Crosley Radios high standards of
quality and workmanship.