1
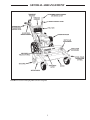
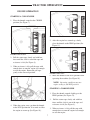
COPYRIGHT 2005 by
ATI Corporation
New Holland, PA 17557 U.S.A.
All rights reserved. No part of this publication may be reproduced, stored in a retrieval system, or
transmitted in any form or by any means, electronic, mechanical, photocopying, recording, or otherwise, without prior written permission of ATI Corporation.
DISCLAIMER
THE INFORMATION IN THIS MANUAL IS PROVIDED TO PROMOTE THE SAFE USE OF, AND ASSIST THE
OPERATOR IN ACHIEVING THE BEST PERFORMANCE FROM, MODEL 365 Preseeder® Landscaping Tillers
DESCRIBED HEREIN, FOR THEIR INTENDED APPLICATIONS.
Preseeder® is a registered trademark of ATI Corporation.
i
LIST OF ILLUSTRATIONS
FIGURE NUMBER
1
2
3
4
5
6
7
8
9
10
11
12
13
14
15
16
17
18
19
20
21
22
23
24
25
26
27
28
29
30
31
32
33
34
35
PAGE NO.
Decals . . . . . . . . . . . . . . . . . . . . . . . . . . . . . . . . . . . . . . . . . . . . . . . . . . . . . . . . . . . . .3
Tractor Serial Number Location . . . . . . . . . . . . . . . . . . . . . . . . . . . . . . . . . . . . . . . .4
Preseeder Serial Number Location . . . . . . . . . . . . . . . . . . . . . . . . . . . . . . . . . . . . . .4
Preseeder Landscaping Tiller General Arrangement . . . . . . . . . . . . . . . . . . . . . . . . .5
Check Engine Oil Level . . . . . . . . . . . . . . . . . . . . . . . . . . . . . . . . . . . . . . . . . . . . . .6
Check Fuel Level . . . . . . . . . . . . . . . . . . . . . . . . . . . . . . . . . . . . . . . . . . . . . . . . . . . .6
Check All Shields . . . . . . . . . . . . . . . . . . . . . . . . . . . . . . . . . . . . . . . . . . . . . . . . . . . .6
Choke Position . . . . . . . . . . . . . . . . . . . . . . . . . . . . . . . . . . . . . . . . . . . . . . . . . . . . . .7
Pull Start . . . . . . . . . . . . . . . . . . . . . . . . . . . . . . . . . . . . . . . . . . . . . . . . . . . . . . . . . .7
Run Position . . . . . . . . . . . . . . . . . . . . . . . . . . . . . . . . . . . . . . . . . . . . . . . . . . . . . . . .7
Idle Position . . . . . . . . . . . . . . . . . . . . . . . . . . . . . . . . . . . . . . . . . . . . . . . . . . . . . . . .7
Stop Position . . . . . . . . . . . . . . . . . . . . . . . . . . . . . . . . . . . . . . . . . . . . . . . . . . . . . . .8
Tow Valve On . . . . . . . . . . . . . . . . . . . . . . . . . . . . . . . . . . . . . . . . . . . . . . . . . . . . . .8
Tow Valve Off . . . . . . . . . . . . . . . . . . . . . . . . . . . . . . . . . . . . . . . . . . . . . . . . . . . . . .9
Stopping Movement . . . . . . . . . . . . . . . . . . . . . . . . . . . . . . . . . . . . . . . . . . . . . . . . . .9
Variable Speed Control Setting . . . . . . . . . . . . . . . . . . . . . . . . . . . . . . . . . . . . . . . . .9
Variable Speed Control Knob . . . . . . . . . . . . . . . . . . . . . . . . . . . . . . . . . . . . . . . . .10
Forward Direction . . . . . . . . . . . . . . . . . . . . . . . . . . . . . . . . . . . . . . . . . . . . . . . . . .10
Reverse Direction . . . . . . . . . . . . . . . . . . . . . . . . . . . . . . . . . . . . . . . . . . . . . . . . . .10
Swing Control Lever Disengaged . . . . . . . . . . . . . . . . . . . . . . . . . . . . . . . . . . . . . .11
Stop Position . . . . . . . . . . . . . . . . . . . . . . . . . . . . . . . . . . . . . . . . . . . . . . . . . . . . . .11
Swing Control Lever Engaged . . . . . . . . . . . . . . . . . . . . . . . . . . . . . . . . . . . . . . . . .11
Attachment Drive Control and Brake Lever . . . . . . . . . . . . . . . . . . . . . . . . . . . . . .13
Transport Release Lever . . . . . . . . . . . . . . . . . . . . . . . . . . . . . . . . . . . . . . . . . . . . .13
Depth Cam Adjustment . . . . . . . . . . . . . . . . . . . . . . . . . . . . . . . . . . . . . . . . . . . . . .13
Working Angles of the Preseeder Tiller . . . . . . . . . . . . . . . . . . . . . . . . . . . . . . . . . .14
Transport Tie Downs . . . . . . . . . . . . . . . . . . . . . . . . . . . . . . . . . . . . . . . . . . . . . . . .16
Attaching Bolts Preseeder to Tractor . . . . . . . . . . . . . . . . . . . . . . . . . . . . . . . . . . . .16
Preseeder Tiller Lubrication Points – Typical . . . . . . . . . . . . . . . . . . . . . . . . . . . . .17
Main Drive Belt Shield . . . . . . . . . . . . . . . . . . . . . . . . . . . . . . . . . . . . . . . . . . . . . .18
Main Drive Belt Release Handle . . . . . . . . . . . . . . . . . . . . . . . . . . . . . . . . . . . . . . .18
Main Drive Belt Removal - Pulley Locations . . . . . . . . . . . . . . . . . . . . . . . . . . . . .18
Drive Chain Adjustment . . . . . . . . . . . . . . . . . . . . . . . . . . . . . . . . . . . . . . . . . . . . .19
Welding Replacement Standard Rotor Tooth – Typical . . . . . . . . . . . . . . . . . . . . .21
Rotor With Carbide Tooth – Typical . . . . . . . . . . . . . . . . . . . . . . . . . . . . . . . . . . . .21
ii
TABLE OF CONTENTS
SUBJECT
PAGE NO.
INTRODUCTION . . . . . . . . . . . . . . . . . . . . . . . . . . . . . . . . . . . . . . . . . . . . . . . . . . . . . . . . . . . . . . . . . . . . . .iv
WARRANTY . . . . . . . . . . . . . . . . . . . . . . . . . . . . . . . . . . . . . . . . . . . . . . . . . . . . . . . . . . . . . . . . . . . . . . . . . .iv
SAFETY PRECAUTIONS . . . . . . . . . . . . . . . . . . . . . . . . . . . . . . . . . . . . . . . . . . . . . . . . . . . . . . . . . . . . . . . .1
Safety Precaution Definitions . . . . . . . . . . . . . . . . . . . . . . . . . . . . . . . . . . . . . . . . . . . . . . . . . . . . . . . . . . . .1
The Preseeder Tiller . . . . . . . . . . . . . . . . . . . . . . . . . . . . . . . . . . . . . . . . . . . . . . . . . . . . . . . . . . . . . . . . . . .1
Operating The Preseeder Tiller . . . . . . . . . . . . . . . . . . . . . . . . . . . . . . . . . . . . . . . . . . . . . . . . . . . . . . . . . . .2
Safety Decals . . . . . . . . . . . . . . . . . . . . . . . . . . . . . . . . . . . . . . . . . . . . . . . . . . . . . . . . . . . . . . . . . . . . . . . .3
SERIAL NUMBER LOCATIONS . . . . . . . . . . . . . . . . . . . . . . . . . . . . . . . . . . . . . . . . . . . . . . . . . . . . . . . . . .4
GENERAL ARRANGEMENT . . . . . . . . . . . . . . . . . . . . . . . . . . . . . . . . . . . . . . . . . . . . . . . . . . . . . . . . . . . . .5
TRACTOR OPERATION . . . . . . . . . . . . . . . . . . . . . . . . . . . . . . . . . . . . . . . . . . . . . . . . . . . . . . . . . . . . . . . . .6
Daily Checks To Perform Before Starting The Engine . . . . . . . . . . . . . . . . . . . . . . . . . . . . . . . . . . . . . . . .6
Check Engine Oil Level . . . . . . . . . . . . . . . . . . . . . . . . . . . . . . . . . . . . . . . . . . . . . . . . . . . . . . . . . . . . . .6
Check Fuel Level . . . . . . . . . . . . . . . . . . . . . . . . . . . . . . . . . . . . . . . . . . . . . . . . . . . . . . . . . . . . . . . . . . .6
Check That All Shields Are Installed and Attaching Hardware is Tight . . . . . . . . . . . . . . . . . . . . . . . . . . .6
Check Tire Pressure . . . . . . . . . . . . . . . . . . . . . . . . . . . . . . . . . . . . . . . . . . . . . . . . . . . . . . . . . . . . . . . . .6
Engine Operation . . . . . . . . . . . . . . . . . . . . . . . . . . . . . . . . . . . . . . . . . . . . . . . . . . . . . . . . . . . . . . . . . . . . .7
Starting a Cold Engine . . . . . . . . . . . . . . . . . . . . . . . . . . . . . . . . . . . . . . . . . . . . . . . . . . . . . . . . . . . . . . .7
Starting a Warm Engine . . . . . . . . . . . . . . . . . . . . . . . . . . . . . . . . . . . . . . . . . . . . . . . . . . . . . . . . . . . . . .7
Stopping The Engine . . . . . . . . . . . . . . . . . . . . . . . . . . . . . . . . . . . . . . . . . . . . . . . . . . . . . . . . . . . . . . . .8
Parking The Machine . . . . . . . . . . . . . . . . . . . . . . . . . . . . . . . . . . . . . . . . . . . . . . . . . . . . . . . . . . . . . . . . . .8
Operating The Tow Valve . . . . . . . . . . . . . . . . . . . . . . . . . . . . . . . . . . . . . . . . . . . . . . . . . . . . . . . . . . . . . .8
Tow Valve On . . . . . . . . . . . . . . . . . . . . . . . . . . . . . . . . . . . . . . . . . . . . . . . . . . . . . . . . . . . . . . . . . . . . . .8
Tow Valve Off . . . . . . . . . . . . . . . . . . . . . . . . . . . . . . . . . . . . . . . . . . . . . . . . . . . . . . . . . . . . . . . . . . . . . .8
Operating The Directional Controls . . . . . . . . . . . . . . . . . . . . . . . . . . . . . . . . . . . . . . . . . . . . . . . . . . . . . . .9
Stopping Movement with Engine Running . . . . . . . . . . . . . . . . . . . . . . . . . . . . . . . . . . . . . . . . . . . . . . .9
Variable Speed Control Adjustment . . . . . . . . . . . . . . . . . . . . . . . . . . . . . . . . . . . . . . . . . . . . . . . . . . . . .9
Adjusting The Variable Speed Control . . . . . . . . . . . . . . . . . . . . . . . . . . . . . . . . . . . . . . . . . . . . . . . . . . .9
Forward Direction . . . . . . . . . . . . . . . . . . . . . . . . . . . . . . . . . . . . . . . . . . . . . . . . . . . . . . . . . . . . . . . . . .10
Reverse Direction . . . . . . . . . . . . . . . . . . . . . . . . . . . . . . . . . . . . . . . . . . . . . . . . . . . . . . . . . . . . . . . . . .10
Tractor Swing Control Lever . . . . . . . . . . . . . . . . . . . . . . . . . . . . . . . . . . . . . . . . . . . . . . . . . . . . . . . . .11
Angling The Attachment Using Swing Control Lever . . . . . . . . . . . . . . . . . . . . . . . . . . . . . . . . . . . . . .11
End of Season Storage Service . . . . . . . . . . . . . . . . . . . . . . . . . . . . . . . . . . . . . . . . . . . . . . . . . . . . . . . . . .12
Clean The Entire Machine and Engine . . . . . . . . . . . . . . . . . . . . . . . . . . . . . . . . . . . . . . . . . . . . . . . . .12
Engine Service . . . . . . . . . . . . . . . . . . . . . . . . . . . . . . . . . . . . . . . . . . . . . . . . . . . . . . . . . . . . . . . . . . . .12
Machine Service . . . . . . . . . . . . . . . . . . . . . . . . . . . . . . . . . . . . . . . . . . . . . . . . . . . . . . . . . . . . . . . . . . .12
Specification . . . . . . . . . . . . . . . . . . . . . . . . . . . . . . . . . . . . . . . . . . . . . . . . . . . . . . . . . . . . . . . . . . . . . . . .12
PRESEEDER OPERATION . . . . . . . . . . . . . . . . . . . . . . . . . . . . . . . . . . . . . . . . . . . . . . . . . . . . . . . . . . . . . .13
General Safety . . . . . . . . . . . . . . . . . . . . . . . . . . . . . . . . . . . . . . . . . . . . . . . . . . . . . . . . . . . . . . . . . . . . . . .13
Operating The Attachment . . . . . . . . . . . . . . . . . . . . . . . . . . . . . . . . . . . . . . . . . . . . . . . . . . . . . . . . . . . . .13
Starting The Attachment . . . . . . . . . . . . . . . . . . . . . . . . . . . . . . . . . . . . . . . . . . . . . . . . . . . . . . . . . . . . .13
Adjusting Depth Control . . . . . . . . . . . . . . . . . . . . . . . . . . . . . . . . . . . . . . . . . . . . . . . . . . . . . . . . . . . .13
Stopping The Attachment . . . . . . . . . . . . . . . . . . . . . . . . . . . . . . . . . . . . . . . . . . . . . . . . . . . . . . . . . . . .14
Operation . . . . . . . . . . . . . . . . . . . . . . . . . . . . . . . . . . . . . . . . . . . . . . . . . . . . . . . . . . . . . . . . . . . . . . . . . . .14
Suggestions for Efficient Seedbed Preparation . . . . . . . . . . . . . . . . . . . . . . . . . . . . . . . . . . . . . . . . . . .14
Securing The Machine For Transport . . . . . . . . . . . . . . . . . . . . . . . . . . . . . . . . . . . . . . . . . . . . . . . . . . . . .16
Detaching Preseeder Tiller from Tractor. . . . . . . . . . . . . . . . . . . . . . . . . . . . . . . . . . . . . . . . . . . . . . . . . . .16
LUBRICATION . . . . . . . . . . . . . . . . . . . . . . . . . . . . . . . . . . . . . . . . . . . . . . . . . . . . . . . . . . . . . . . . . . . . . . .17
MAINTENANCE . . . . . . . . . . . . . . . . . . . . . . . . . . . . . . . . . . . . . . . . . . . . . . . . . . . . . . . . . . . . . . . . . . . . . .18
TROUBLESHOOTING GUIDE . . . . . . . . . . . . . . . . . . . . . . . . . . . . . . . . . . . . . . . . . . . . . . . . . . . . . . . . . . .22
STORAGE . . . . . . . . . . . . . . . . . . . . . . . . . . . . . . . . . . . . . . . . . . . . . . . . . . . . . . . . . . . . . . . . . . . . . . . . . . . .22
ORDERING PARTS . . . . . . . . . . . . . . . . . . . . . . . . . . . . . . . . . . . . . . . . . . . . . . . . . . . . . . . . . . . . . . . . . . . .22
iii
INTRODUCTION
This manual is furnished to you, the
owner/operator, as a guide to get the greatest
benefit from your Preseeder tiller. ATI
Corporation wants you to be able to get the
most use out of your tiller through safe and efficient operation.
NOTE: References made to left, right,
front, and rear are those directions viewed
when facing the unit from the rear.
NOTE: Some equipment depicted in illustrations may not reflect exact production
model configurations.
Before attempting to operate the tiller,
carefully read all sections of this manual. Be
sure that you thoroughly understand all of the
safety information and operating procedures.
NOTE: All safety, operating, and
servicing information reflects current production models at the time of publication of
this manual.
Pay special attention to the Safety
Precautions and particularly all DANGER,
WARNING, and CAUTION notices included
in this manual. These items combined form the
guidelines for promoting a safe and efficient
operating environment, along with continuous,
reliable service and minimum down time.
NOTE: ATI Corporation reserves the right
to discontinue models at any time, change
specifications, and improve design without
notice and without incurring obligation on
goods previously purchased and to discontinue supplying any part listed, when the
demand does not warrant production.
WARRANTY
This Preseeder tiller is designed and manufactured to high quality standards. ATI
Corporation, therefore, guarantees this tiller to be
free from defect in workmanship and materials
for one year from purchase date. If the machine
is used for rental purposes, the warranty is
limited to ninety (90) days.
Rotor teeth and normal wear are not covered by this warranty.
Misuse, abuse, misapplication, and unauthorized alterations will void this warranty.
iv
SAFETY PRECAUTIONS
THE BEST OPERATOR IS A
CAREFUL OPERATOR.
The tiller must only be operated by qualified persons who are familiar with all information in the operator’s manual. Do not attempt to
operate the tiller in areas with steep inclines,
ditches, large rocks, stumps, or holes which
may endanger the operator by upsetting the tractor or cause damage to the tiller.
By using common sense, observing general
safety rules, and adhering to the precautions
specific to the Preseeder tiller, you, the operator,
can promote safe equipment operation. Read
and be sure you understand all precautions in
this section before operating your tiller. The
machine must only be operated by properly
trained and authorized operators.
THE PRESEEDER TILLER
1. Read this manual carefully to become
familiar with your tiller. Lack of operating knowledge can be dangerous and lead
to accidents.
SAFETY PRECAUTION DEFINITIONS
2. Keep all shields in place and properly
tighten all mounting hardware.
Dangers, Warnings, Cautions, and Notes
are strategically placed throughout this manual
to further emphasize the importance of personal
safety, qualifications of operating personnel, and
proper use of the tiller in its intended application. These precautions supplement and/or complement the safety information decals affixed to
the unit and include headings that are defined as
follows:
Stay clear of drive belt and
chain. Do not operate without drive chain cover and drive belt shield in
place and in good condition. Failure to heed
these warnings can result in personal injury or
death.
3. Periodically inspect all parts for wear and
replace with factory-authorized parts if
excessive wear is present.
Indicates an imminently hazardous situation which, if not
avoided, will result in death or serious injury.
4. Keep safety decals clean and readable.
Replace if missing, damaged, or illegible.
Indicates a potentially hazardous situation or practice
which, if not avoided, could result in death or
serious injury.
5. Do not modify, alter or permit anyone to
modify or alter this equipment or any of its
components without written approval from
ATI Corporation.
Indicates a potentially hazardous situation or practice
which, if not avoided, will result in damage to
equipment and/or minor injury.
OPERATING THE PRESEEDER TILLER
1. Do not stand or allow others to stand near
the tiller while it is operating.
NOTE: Indicates an operating procedure,
practice. etc., or portion thereof, which is
essential to highlight.
2. Never wear loose clothing when operating
rotating equipment.
3. Never clean, adjust, or repair the tiller with
the tractor engine running.
Keep hands and feet from
under Preseeder tiller at all
times. Make certain everyone is clear of the
machine before operating.
1
SAFETY PRECAUTIONS
SAFETY DECALS
The safety decals appearing in Figure 1 are
a sampling of those affixed to the tiller. These
examples are not meant to represent all decals,
but do illustrate typical precautionary and informational signage relating to tiller operation and
use.
IMPORTANT: It is the responsibility of
the operator to locate, read, and adhere to all
information provided on all decals affixed to
the unit being operated.
2
SAFETY PRECAUTIONS
FIGURE 1 Decals
3
SERIAL NUMBER LOCATIONS
TRACTOR SERIAL NUMBER LOCATION
PRESEEDER SERIAL NUMBER LOCATION
The serial number is located below the fuel tank
as shown (See Figure 2).
The serial number is located on the right side of
the attachment channel as shown (See Figure 3).
The serial number will be require when ordering
parts.
The serial number will be require when ordering
parts.
For easy reference, enter Model and serial number on these lines:
For easy reference, enter serial number on this
line:
Model_________________________________
Serial Number___________________________
Serial Number___________________________
FIGURE 3 Preseeder Serial Number Location
FIGURE 2 Tractor Serial Number Location
ENGINE SERIAL NUMBER LOCATION
Located the serial number plate on your engine.
The serial number will be require when ordering
parts.
For easy reference, enter the engine manufacturer and the serial number on these line:
Manufacturer____________________________
Serial Number___________________________
4
GENERAL ARRANGEMENT
FIGURE 4 Preseeder Landscaping Tiller General Arrangement
5
TRACTOR OPERATION
DAILY CHECKS TO PERFORM
BEFORE STARTING THE ENGINE
3. Check the dust shield, C.
NOTE: Do not operate the machine with
loose or missing shields. Replace missing
shields immediately (See Figure 7).
CHECK ENGINE OIL LEVEL
1. Place the machine on a level surface then
remove the oil dipstick.
2. Check the oil level as indicated in the
engine owner’s manual and fill with the recommended motor oil.(See Figure 5).
FIGURE 6 Check Fuel Level
FIGURE 5 Check Engine Oil Level
CHECK FUEL LEVEL
1. Remove the fuel tank cap (See Figure 6).
2. Fill tank to the bottom of the fuel tank neck.
3. Use minimum of 86 octane gasoline.
4. Wipe any spilled fuel before starting the
engine.
NOTE: Do not overfill the fuel tank.
Observe all safety statements listed in the
safety information section.
FIGURE 7 Check All Shields
CHECK TIRE PRESSURES
CHECK THAT ALL SHIELDS ARE
INSTALLED AND ATTACHING HARDWARE IS TIGHT
Check tire pressures in the tractor tires and
inflate to 14 psi.
1. Check the main drive belt shield, A.
2. Check the drive chain cover, B.
6
TRACTOR OPERATION
ENGINE OPERATION
STARTING A COLD ENGINE
1. Place the throttle control to the CHOKE
position (See Figure 7).
FIGURE 10 Run Position
5. After the engine has warmed up, slowly
place the throttle to the IDLE position (See
Figure 11).
FIGURE 8 Choke Position
2. Pull the starter rope slowly and with low
force until the slack is out of the rope and
resistance is felt (See Figure 9).
3. When resistance is felt, pull the rope with
enough force to turn the engine fast enough
to start the engine. Return the pull rope
gently to the retracted position.
FIGURE 11 Idle Position
6. Move the throttle to the RUN position when
operating the machine (See Figure 10).
NOTE: Operating conditions may not
require setting to full RUN position.
STARTING A WARM ENGINE
1. Place the throttle control slightly past the
IDLE position (See Figure 11).
2.
FIGURE 9 Pull Start
4. When the engine starts, position the throttle
to the RUN position for 30 seconds to allow
the engine to warm up (See Figure 10).
Pull the starter rope slowly and with low
force until the slack is out of the rope and
resistance is felt (See Figure 9).
3. When resistance is felt, pull the rope with
enough force to turn the engine fast enough
to start the engine.
7
TRACTOR OPERATION
OPERATING THE TOW VALVE
STARTING A WARM ENGINE (Cont’d)
4. Move the throttle to the RUN position when
operating the machine (See Figure 10 on
Page 7).
The TOW VALVE disengages the transmission
so the machine can be moved when the engine
is not running. This feature makes it easy to
move the machine without starting the engine.
NOTE: Operating conditions may not
require setting to full RUN position.
TOW VALVE ON
STOPPING THE ENGINE
When the TOW VALVE, A, is in the ON position as shown, the machine can be pushed or
pulled without the engine running (See Figure
13).
1. Place the throttle to the IDLE position and
allow the engine to idle for 30 seconds (See
Figure 11 on Page 7).
NOTE: When the TOW VALVE is in the
ON position, the transmission will not propel the machine in forward or reverse
when the engine is running and the hydrostatic control lever is activated.
2. Place the throttle in the STOP position and
the engine should stop running (See Figure
12).
NOTE: Engine components get very hot
during operation. Stop the engine and
allow it to cool before doing any work on
the engine.
FIGURE 13 Tow Valve On
TOW VALVE OFF
FIGURE 12 Stop Position
PARKING THE MACHINE
When the TOW VALVE, A, is in the OFF position as shown, the machine will be very hard to
push or pull with the engine is not running (See
Figure 14).
When parking the tractor for any period of time,
use the following procedure.
1. Stop the engine by placing the throttle control to the STOP position (See Figure 12).
NOTE: When the TOW VALVE is in the
OFF position, the transmission will propel
the machine forward or reverse when the
engine is running and the hydrostatic control lever is activated.
8
TRACTOR OPERATION
VARIABLE SPEED CONTROL
ADJUSTMENT
1. Adjust to slowest speed.
The maximum forward and reverse speeds can
be adjusted to meet specific operating conditions by moving the Control Knob, A, in the
adjustment slot (See Figure 16).
Adjust to slowest speed setting, B, while learning to
operate the machine and when operating in
confined spaces.
FIGURE 14 Tow Valve Off
DO NOT Engage the
Attachment when TOW
VALVE is in the ON position.
NOTE: Only adjust the variable speed
control when the engine is stopped.
OPERATING THE DIRECTIONAL
CONTROLS
STOPPING MOVEMENT WITH ENGINE
RUNNING
1. RELEASE the HYDROSTATIC CONTROL
LEVER, A. The lever will automatically go
the neutral position as shown (See Figure
15).
2. When the hydrostatic lever is in the neutral
position the machine will not move.
FIGURE 16 Variable Speed Control Setting
ADJUSTING THE VARIABLE SPEED
CONTROL
1.
Loosen the control knob, A.
2.
Move the VARIABLE SPEED CONTROL
KNOB forward to the FAST position to
increase maximum speed. (Knob shown in
fastest position.)
3. Move the VARIABLE SPEED CONTROL
KNOB rearward to the SLOW position to
decrease maximum speed.
FIGURE 15 Stopping Movement
9
TRACTOR OPERATION
ADJUSTING THE VARIABLE SPEED
CONTROL (Cont’d)
4. Tighten control knob, A (See Figure 17).
NOTE: The optimum location of the
VARIABLE SPEED CONTROL KNOB
allows you to fully engage the hydrostatic
control lever to achieve a comfortable
operating speed for the ground conditions.
NOTE: Moving the VARIABLE SPEED
CONTROL KNOB toward the FAST position increase hydrostatic control lever
effort.
FIGURE 18 Forward Direction
REVERSE DIRECTION
1. SLOWLY apply pressure and PULL BACK
on the HYDROSTATIC CONTROL
LEVER as shown (See Figure 19).
Moving the VARIABLE SPEED CONTROL
KNOB toward the SLOW position decreases
hydrostatic control lever effort.
2. Reverse speed is directly proportional to the
amount the hydrostatic control lever is
moved.
3. The more the lever is pulled back, the faster
the reverse ground speed will be.
NOTE: Do not back up with the attachment on the ground.
FIGURE 17 Variable Speed Control Knob
FORWARD DIRECTION
1. SLOWLY apply pressure and PULL UP on
the HYDROSTATIC CONTROL LEVER,
A, as shown (See Figure 18).
2. Forward speed is directly proportional to the
amount the hydrostatic control lever is
moved.
FIGURE 19 Reverse Direction
3. The more the lever is pulled up, the faster
the forward ground speed will be,
When stopping release the
control lever slowly.
10
TRACTOR OPERATION
TRACTOR SWING CONTROL LEVER
The swing control lever is shown at A (See
Figure 20).
FIGURE 22 Swing Control Lever Engaged
4. Release the SWING CONTROL LEVER, A,
and it will lock the arm in position (See
Figure 20). If SWING CONTROL does not
lock, rock the handlebars side to side until it
locks.
FIGURE 20 Swing Control Lever Disengaged
ANGLING THE ATTACHMENT USING
THE SWING CONTROL LEVER
1. Stop the engine by positioning the throttle to
the STOP position (See Figure 21).
FIGURE 21 Stop Position
2. Lift up and hold the SWING CONTROL
LEVER (See Figure 22).
3. Push forward on the left handlebar while
simultaneously pulling rearward on the right
handlebar until the desired attachment angle
is achieved.
11
TRACTOR OPERATION
END OF SEASON STORAGE
SERVICE
SPECIFICATIONS
ENGINE
Honda - GXV390K1 13.0 HP
CLEAN THE ENTIRE MACHINE AND
ENGINE
FUEL TANK
1.0 US Gallon
Thoroughly clean the machine and engine then
blow dry with 50 PSI compressed air.
TRANSMISSION
Tuff Torq Model K62
Hydrostatic
Infinite variable control
Oil - 2.5 liters of 10W30 Class CD motor oil
ENGINE SERVICE
1. Refer to the engine manufactures manuals
for specific recommendations and procedures.
MACHINE SERVICE
GROUND SPEED
0 - 4.2 mph
1. Lubricate all grease point as shown in the
Lubrication Section.
WEIGHT
440 Lbs.
2. Lubricate all linkage pivot points.
DIMENSIONS
42" W x 45" H x 76" L
36" Maximum working width
3. Spray exposed cabled with a fluid lubricant
to prevent binding and rust.
DRIVES
Engine mounted clutch/brake
Heavy duty bevel gearbox with sealed bearings
B76 main drive belt
#50 o-ring final drive chain
4. Examine drive belt and chain for damage
and replace as required.
5. Check the condition of all shields and
replace as required.
TIRES
Rear = 18 x 6.5 heavy 4-Ply lugged
6. Check safety decals and replace as required.
7. Check all bearings and gear box for bearing
condition. Replace any loose bearings.
CONTROLS
Variable speed control lever
Swing control lever
Transport release lever
FRAME
Heavy formed tube mainframe, Tractor
12 gauge fabricated mainframe, Tiller
12
PRESEEDER OPERATION
GENERAL SAFETY
The Preseeder tiller is a machine designed
to quickly prepare a level, fine-textured bed,
ready for seeding turfgrass. It is intended for
conditioning and leveling the top layer of soil; it
is not designed to be used as a deep tiller. If
hard, unbroken soil is encountered, it is recommended that a chisel be used first for two reasons:
FIGURE 23 Attachment Drive Control and Brake Lever
1. To break up the soil for more efficient
operation.
2. To allow more water to be absorbed,
thereby reducing surface erosion.
To prevent personal injury,
make certain all tractor and
Preseeder tiller safety shields are in place and
secure before operating.
OPERATING THE ATTACHMENT
FIGURE 24 Transport Release Lever
ADJUSTING THE DEPTH CONTROL
STARTING THE ATTACHMENT
1. Raise the tiller to transport position.
1. Raise attachment to transport position.
2. Stop the engine.
2. Adjust the depth adjustment cam to the
desired working depth.
3. Remove the Lock Pin and rotate the Depth
Adjustment Cam to the desired depth (See
Figure 25).
3. Start the engine and place the throttle in
the run position as described in the
STARTING THE ENGINE SECTION.
4. Reinsert the lock pin to set the depth.
4. Depress the ATTACHMENT DRIVE
CONTROL AND BRAKE LEVER, A, as
shown. This releases the brake and engages
the drive (See Figure 23).
NOTE: Engage attachment before lowering onto the ground.
5. Push down on the handle bars and pull the
TRANSPORT RELEASE LEVER A to
lower the tiller to working depth (See
Figure 24).
FIGURE 25 Depth Cam Adjustment
13
PRESEEDER OPERATION
STOPPING THE ATTACHMENT
SUGGESTIONS FOR EFFICIENT
SEEDBED PREPARATION
1. Release the ATTACHMENT DRIVE CONTROL AND BRAKE LEVER. This will disengage the drive and apply the brake to stop
the attachment from turning.
The following suggestions are to be understood as general in nature, since each operator
will develop their own style of operation, specific to the plot and terrain that is being prepared.
OPERATION
A. Lubricate the machine as necessary. Refer
to LUBRICATION section of this manual.
Soil type and conditions vary considerably
and must be addressed individually, as they are
encountered.
B. Start tractor according to tractor operator’s
manual.
There are three basic operations that a
Preseeder tiller performs: CLEARING, TILLING, and LEVELING.
Rotation of the rotor may
cause tractor to move backwards, under certain soil conditions, if tractor
is not moving forward under power, or Tow
Valve is in ON position.
1. CLEARING involves removing rocks
from the soil surface. This is generally
the final operation, but in extremely
rocky conditions it is advisable to clear
the area of excessive rocks for more efficient operation.
C. Lower the tiller to ground carefully.
Operating at excessive speeds
can cause excessive wear or
damage to the machine.
Do not attempt to operate the
Preseeder tiller in areas with
heavy weeds, rope, wire, package strapping, or
anything that can wrap around the end of the
rotor. Steel strapping is extremely abrasive and
causes excessive and premature wear when
caught in the tiller.
FIGURE 26 Working Angles of the Preseeder Tiller
14
PRESEEDER OPERATION
NOTE: When clearing an area with excessive rocks, adjust rotor depth so it just
touches soil surface, then proceed to work
and windrow rocks.
not to overload the tiller when the rotor is
in this position.
Learning to operate your tiller properly will
allow you to get the most efficient use from it
with minimal downtime. By keeping the following points in mind, you will be able to work
more effectively and efficiently.
NOTE: Rock windrows should be picked
up before they become too large. Large
windrows affect performance and cause
premature wear of the Preseeder tiller.
Survey the area: Take a few minutes to
walk around the jobsite. These few minutes
are time well-spent because you can:
The adjustable angling feature of the tiller
provides added efficiency when clearing an
area. By reversing the angle, it is possible to
continue moving rocks toward the collection
area, while traveling in either direction.
1. Plan a strategy. Ask yourself some
questions about doing the job most efficiently. Where are the highest points on
this job? Where are the lowest? Where
should I start? Where should I deposit
the rocks? These are the types of questions that you should ask yourself before
starting each job.
2. TILLING is the main operation the
machine performs. Experience will give
the operator a feel for the best setting to
use. Excessive depth can cause rock
jamming.
In rocky conditions the tiller should be set
at a shallow working depth for more efficiency. When there is a build-up of soil in
front of the rotor, the soil build-up prevents
rocks from being discharged away from the
rotor and thus the machine jams much
more readily. It is more efficient to make
an extra pass at a shallower setting.
2. Look for obstructions. Walk around the
jobsite to spot the enemies of your tiller.
These enemies include: roots, steel
strapping, rope, wire, plastic wrapping,
or anything that may hinder or damage
your machine. Remove these enemies
before you start operating. Also, look
for permanent objects that may often be
buried or hidden on jobsites. These
include: drainage pipe, electrical wiring,
sewer vents, well covers, concrete slabs,
etc.
Overloading can be caused by an object
such as a rock or root caught in the
machine or by tilling too deeply in heavy,
wet soil. Release clutch immediately when
belt slippage occurs.
Be aware of electrical wires
or pipes which may have a
shallow cover of earth.
3. LEVELING occurs during the tilling
process. Deeper rotor depth produces the
best leveling. More shallow settings produce the smoothest seedbed.
3. Prepare for final clean-up. Clean-up is
made easier when you choose an area
beforehand that is better for gathering
and cleaning up rocks. Areas that are
close to your trucks, on solid ground,
along a street or grass-covered are ideal
for depositing rocks and debris. Work
the final windrows towards this area.
When possible, it is best to work along contours rather than across them. The leveling
function will cut off ridges and fill in valleys.
The operator may choose to angle the rotor
parallel to the tractor axle to gain maximum
leveling. However, when the rotor is straight
(See Figure 26), rocks will not discharge to
the side. All dirt and rocks gather in front of
the rotor. The operator should be careful
SECURING THE MACHINE
15
PRESEEDER OPERATION
FOR TRANSPORT
5. Secure the rear of the tractor using the tie
down loops as shown
1. Position the machine on a trailer or other
vehicle (See Figure 27).
NOTE: Do not over tighten the tie down
straps or the frame or tires may be damaged.
2. Stop the engine.
3. Lower the Preseeder until the rotor rests
on the deck.
DETACHING PRESEEDER TILLER
FROM TRACTOR
1. Turn off Tractor engine and lower rotor to
ground.
NOTE: The attachment must be fully lowered during transport or the frame may be
damaged.
2. Remove Main Drive Belt Shield by
removing 2(two) mounting bolts (See
Figure 30 on Page 18 ).
4. Use the front tie down loops on the bottom of the wheel frame to secure the front
of the machine.
3. Move Drive Belt Release Handle to the
disengaged position, and remove belt from
Drive Pulley (D) on engine (See Figures
31 & 32 on Page 18).
4. Remove 2(two) 1/2 inch attaching bolts
(See Figure 28).
FIGURE 28 Attaching Bolts Preseeder to Tractor
REVERSE ORDER FOR ATTACHING PRESEEDER TILLER TO
TRACTOR
FIGURE 27 Transport Tie Downs
16
LUBRICATION
The lubrication points in the accompanying
illustration reflect standard production models.
Quantities and locations of lube fittings, fill
plugs, drain plugs, etc. could vary, as improvements in design and/or changes in machine configuration warrant.
2. Caster Wheel Bearings (2)
NOTE: Do not over-grease lube points.
One to two pumps of grease should offer
the sufficient quantity of lubricant if the
lube schedule is followed. Excessive grease
only provides a passage for dirt to enter
the bearing races. Be sure to wipe off any
remaining grease from around the bearings.
Worn grease fittings that will
not hold the gun, and fittings
with a stuck check ball, must be replaced.
FILL POINT
Items not equipped with grease fittings
(linkages, cables, pins, levers, etc.) should be
lubricated with SAE 30 oil before the start of
each operating day, or more frequently as conditions require. (See Figure 29 for locations.)
Gearbox must be removed and set on its
side to check the oil level.
1. Remove Main Drive Belt and Chain
Drive.
EVERY 10 HOURS
2. Remove gearbox mounting bolts (4) and
remove gearbox from tiller.
Lubricate the Drive Chain with a spray-on
motorcycle chain lube.
3. Remove oil check plug from back of gearbox. Correct oil level is at the bottom of
the check plug. Add oil if necessary.
Gearbox capacity is 13 oz. Use anti-foam
SAE 90W oil.
NOTE: Lubricating the chain when it is
warm after being used will allow the lubricant to work best.
Apply grease to fittings using grease gun to
the following.
1. Rotor Bearings (2)
FIGURE 29 Preseeder Tiller Lubrication Points – Typical
17
MAINTENANCE
MAIN DRIVE BELT REMOVAL
2. Remove Main Drive Belt Shield (See
Figure 30).
1. Turn off tractor engine and lower tiller
onto level ground.
3. Move the Drive Belt Release Handle to
the disengaged position.
2. Remove Main Drive Belt Shield (See
Figure 30).
FIGURE 30 Main Drive Belt Shield
3. Move the Drive Belt Release Handle to
the disengaged position (See Figure 31).
4. Remove the belt from the pulleys in the
following order (See Figure 32).
A. Adjustable Idler Pulley
B. Gearbox Pulley
C. Tension Idler Pulley
D. Drive Pulley
FIGURE 31 Main Drive Belt Release Handle
Reverse order to reinstall the belt.
MAIN DRIVE BELT ADJUSTMENT
When the Drive Belt Release Handle is in the
engaged position the spring should be approximately 1" longer the in the released position. If
due to belt wear or replacement, the spring
length varies by more then 1/2" adjustment is
required.
FIGURE 32 Main Drive Belt Removal - Pulley Locations
1. Turn off tractor engine and lower tiller
onto level ground.
4. Loosen the bolt in the center of the
Adjustable Idler Pulley (A).
18
MAINTENANCE
5.Move the Adjustable Idler Pulley (A)
toward the Gearbox Pulley (B) (to shorten
the spring) or away from the Gearbox
Pulley (to lengthen the spring) as required.
1. QD hub and Driven Sprocket mating surfaces must be clean and free of burrs.
2. Push the QD hub on until there is no side
play in the rotor.
6. Tighten the bolt in the center of the
Adjustable Idler Pulley (A).
3. Insert the bolts through the unthreaded
holes in the QD hub and into the threaded
holes in the Driven Sprocket. Tighten the
bolts evenly 1/2 turn at a time to 9 ft. - lbs.
torque
7. Check belt tension by moving the Drive
Belt Release Handle to the engaged position and measuring the spring length.
DRIVE CHAIN REMOVAL
DRIVE CHAIN ADJUSTMENT
1. Turn off tractor engine and lower tiller
onto level ground.
Check chain tension after the first 40 hours
of operation. Then check/adjust chain every 100
hours following initial adjustment. (See Figure
33.)
2. Remove the three bolts (3), and access
cover.
1. Turn off tractor engine and lower tiller
onto level ground.
3. Remove the QD hub from the Driven
Sprocket by removing the bolts in the hub
and putting them in the threaded holes in
the hub. Turn each bolt 1/2 turn until the
hub is loose and can be removed.
2. Remove the three bolts (3), and access
closure.
3. Check slack of the chain. Measure [A]
midway between the sprockets on the top
side of the chain. If there is more than 3/4"
of slack adjust the chain. Release the main
drive belt. Loosen the mounting bolts (5)
for gear box, push the gear box mounting
assembly toward the Tractor [A], tighten
the mounting bolts. Then recheck slack.
4. Remove the Drive Chain from the Drive
Sprocket and remove the Driven Sprocket
and Drive Chain together.
Reverse order with the following notes to reinstall the chain.
FIGURE 33 Drive Chain Adjustment
19
MAINTENANCE
DRIVE CHAIN ADJUSTMENT (Cont’d)
BEFORE EACH USE
1. Check tiller daily for loose, bent, broken,
or missing parts.
4. Replace the access cover and bolts.
2. Observe tiller’s general condition, noting
points that may need attention.
NOTE: Failure to adjust tension will
result in premature failure and could void
your warranty.
ROTOR TOOTH WEAR
3. Check rotor to be sure no foreign objects
such as wire or weeds are wrapped around
them.
Before performing maintenance as outlined
below be sure to:
4. Make certain drive line shields are in place
and in good condition.
5. During operation, listen for abnormal
sounds which might indicate loose parts,
damaged bearings or other damage.
Correct any problem immediately.
1. Lower tiller to ground.
2. Turn off tractor.
AFTER EACH USE
If tiller must be raised off
the ground, block securely.
1. Clean all debris from tiller especially on
the rotor.
STANDARD TEETH
2. To prevent rusting, touch up any spots
where paint may have worn off.
Rotor tooth length is critical to the efficient
operation of the tiller. Length of the tooth
should be no less than 1/2 inch. To keep your
tiller performing effectively, we recommend that
replacement teeth (Part no. 200-337-002) be
welded onto the front of the original teeth when
tooth length approaches the 1/2 inch minimum
length. (See Figure 34.)
3. Store in a clean, dry place.
CARBIDE TEETH
Carbide teeth offer dramatically longer life.
Due to tooth spacing, and rotor tubing material,
carbide teeth cannot be welded onto an existing
rotor. A new rotor with carbide teeth can be
ordered for your tiller. Check with your authorized dealer for specific pricing. (See Figure 35.)
When welding rotor teeth,
welder ground clamp must be
attached to rotor to prevent current from flowing through bearings.
20
MAINTENANCE
FIGURE 34 Welding Replacement Standard Rotor Tooth – Typical
FIGURE 35 Rotor With Carbide Tooth – Typical
21
TROUBLESHOOTING GUIDE
SYMPTOM
Rotor does not turn.
Rotor stalls too easily.
POTENTIAL CAUSE
REMEDY
Tractor attachment drive is not engaged.
Engage tractor Attachment Drive.
Control and Brake Lever
Obstruction jammed between the rotor
and frame.
Clear obstruction from the rotor.
Main Drive Belt not adjusted correctly.
Adjust Main Drive Belt. (See
Main Drive Belt adjusting).
Main Drive Belt is worn out.
See dealer for appropriate
service.
Working depth too deep.
Reduce working depth.
Ground speed too fast.
Reduce ground speed.
Main Drive Belt not adjusted correctly.
Adjust Main Drive Belt. (See
Main Drive Belt adjusting).
STORAGE
When the seeding season is over, the
Preseeder tiller should be thoroughly checked so
a minimum amount of work will be required to
put it back in operation for the next season. The
following recommendations are offered to aid in
storing the tiller correctly.
3. Replace badly worn or damaged parts
obtained from your authorized dealer.
4. Touch-up paint to prevent rust and maintain the tiller’s appearance.
5. Store in a clean, dry place.
1. Clean the tiller thoroughly.
2. Lubricate the tiller. Check the fluid levels;
fill to proper level if necessary.
ORDERING PARTS
If ordering parts becomes necessary for
your Preseeder tiller, call your authorized dealer to obtain correct parts replacement information. Please have model number, serial number,
part number, and other necessary information
ready when ordering parts.
IMPORTANT: Always order parts using part
numbers from the Preseeder
Parts Manual supplied with
your unit. Replacement manuals may be obtained at
www.preseeder.com/service.
22
NOTES
23