1
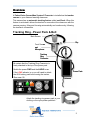
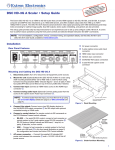
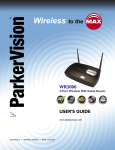
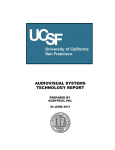
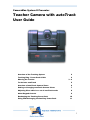
CameraMan System II Presenter
Teacher Camera with autoTrack
User Guide
Overview of the Tracking System
2
Tracking Ring - Power Pack & Belt
2
Wearing the Tracker
3-4
To Activate autoTrack
5
Overview of autoTrack Camera Views
6
Setting or Changing autoTrack Camera Views
7
Adjusting View while in or out of autoTrack mode
8
Other Keypad Controls
9
Recharging the Tracking Power Pack
10
Using and Recharging the Auxiliary Power Pack
11
1
Overview
A ParkerVision CameraMan System II Presenter is installed as the teacher
camera in your distance learning classroom.
This camera has an automatic tracking feature called autoTrack. When this
feature is activated it allows the teacher to move about the classroom with the
camera panning, tilting and focusing automatically and continuously, following
the teacher’s movements.
Tracking Ring - Power Pack & Belt
Back Sensor
Clip
Front Sensor
sor
and
Microphone
Tracking
Ring
Connector
Be certain that the Tracking Ring Connector is
firmly attached to the top of the power pack.
Switch the power PWR and the AUDIO to on.
If the LOW indicator is on you will need to attach
the AUX battery pack before using the tracker.
(See page 10.)
Power Pack
Antenna
Attach the tracking ring power pack to your
clothing or the nylon power pack belt.
2
Wearing the Tracker
Using the clip on the back of the power pack’s
nylon pouch, attach the Tracking Ring Power
Pack either directly to your clothing or to the
nylon Power Pack Belt.
Do not place the Power Pack in your pocket.
This interferes with the RF signal and may
affect the audio and tracking capability.
The Tracking Ring Power Pack must be worn
so that the antenna hangs loosely.
Be sure
that the
tracking
sensors lie
flat in front
and in
back.
3
Wearing the Tracker cont.
The Back Sensor should lie
flat against the back of the
collar or neck.
The Front Sensor should be
lying flat and centered on the
body, just above chest level.
When the teacher turns around to point to a map, for example, the back sensor
continues to receive the infrared tracking signal from the camera and the
camera will continue to automatically track the teacher’s movement.
The Tracking Sensors require a
direct line-of-sight link with the
camera.
You should be careful not to have
hair or clothing covering the
sensors.
4
To Activate autoTrack
There are two options.
1. Touch the appropriate button on the Teacher Camera Control screen
of your Touch Panel.
(See the Teacher Camera Control
instructions in the Touch Panel User
Guide section of this manual.)
2. Activate one of the autoTrack Views
on the CameraMan wireless remote control keypad.
It is possible to control the many of
the functions of the autoTrack
system using the Touch Screen
system, However, the wireless
keypad offers a number of features
that are not included on the touch
panels.
With the keypad, you can choose to
have the camera track you while
keeping you framed in the center of
a tight or wide shot.
(See following page.)
You can also choose to have the
camera track you while keeping you
to the right or left in the frame.
This feature can be very helpful when
referring to maps or charts or when
conversing with an individual.
The keypad will not function with weak or dead batteries. It does not
come equipped with rechargeable batteries. Check inside the rear of
your keypad for battery type. Although most keypads use two (2) AA
batteries, some use 9-volt batteries.
5
Overview of autoTrack Camera Views
You can choose from four autoTRACK Views.
You can store and recall these views from the Tracking System Keypad by
pressing one of the autoTRACKView buttons shown on page 5.
To emphasize facial expressions,
you can change to a close head shot with the
TIGHT autoTRACK View button.
You can select to a full-body shot by pressing the
WIDE autoTRACK View button.
Teachers can also share the video screen
with a map, chart, student or group of students
by pressing the LEFT or RIGHT autoTRACK View
buttons.
6
Setting or Changing autoTrack
Camera Views
You may want to zoom-in slightly closer on the WIDE autoTRACK View
or adjust your position in the video frame more to the left or right.
You have the flexibility to customize each autoTRACK View to suit your needs.
While the procedure below is for changing the Right autoTrack view, the
procedure is the same for customizing Left, Tight, and Wide views as well.
To SET or CHANGE the right autoTRACK VIEW:
1. After pressing the RIGHT View button, use the SUBJECT
POSITION arrow buttons to position yourself to the desired
location in the video frame.
2. If you want to change the view, use the manual ZOOM buttons to set the
needed zoom perspective.
3. Press and hold the RIGHT button until you hear two beeps, indicating the new
setting has been stored.
To RECALL the right autoTRACK VIEW:
Press and release the RIGHT View button. The CameraMan then recalls the
information that you stored in the RIGHT button.
7
Adjusting Camera View
When you are In or Out of autoTrack mode
SUBJECT POSITION arrows
Adjustments to your position in the frame can be
made while you are in autoTrack.
Press any of the four directional Subject Position
arrows to adjust your position in the current
autoTRACK View. The up, down, right, or left
arrows will change your position in the video frame
without disengaging the autoTrack.
Manual PAN / TILT arrows
Press the up, down, right, or left PAN / TILT arrows
to pan or tilt the camera in that
direction.
If you use manual PAN / TILT controls while
in autoTrack, the camera will stop tracking
you.
Manual ZOOM
Press the IN or OUT button to zoom the camera in
tighter or out further. ZOOM adjustments will not
deactivate tracking if you are in autoTrack mode.
8
Other Keypad Controls
Location Preset Select
Used to set and recall
preset positions.
Indicator LED
Indicates keypad is in
operation.
autoTrack Views
See page 5.
Subject Position
Controls
See page 8.
Focus
Used to manually adjust
the visual clarity of the
teacher camera video.
auto Focus
Used to automatically
adjust the visual clarity of
the teacher camera
video.
Zoom In / Out
Used to tighten and
widen the camera’s view.
Pan / Tilt
Used to manually adjust
the camera’s view.
Tracking Freeze
Used to disengage
autoTrack and freeze the
camera’s movement.
Image Controls
Used to manually open
and close the iris on the
teacher camera.
autoImage
Used to automatically
adjust the brightness and
darkness of the teacher
camera video.
Using the manual
Pan / Tilt will
disengage the
autoTrack mode.
Fresh batteries for the keypad should be kept on hand and installed
regularly. Check inside the rear of your keypad for battery type. Although
most keypads use two (2) AA batteries, some use 9-volt batteries.
9
Recharging the Power Packs
The Tracking Ring Power Pack comes with a built-in 4-hour Rechargeable Battery.
When the battery is running low, the Battery LOW LED on the top of the Tracking
Ring Power Pack will glow red. At this time, the Tracking Ring Power Pack should
be recharged or the Auxiliary Battery Pack should be
attached to the Tracking Ring Power Pack.
To recharge the battery:
1. Turn OFF the Tracking Ring Power Pack.
2. Set the switch on the front of the battery
….charger to TRACKING POWER PACK.
Top view of Power Pack
showing orange LOW LED
and green Power On LED.
3. Plug the Battery Charger into an electrical
…outlet and connect the Power Pack to the
…charger, as shown in the diagram to the right.
The Battery Charger takes 2 to 3 hours to
recharge the Tracking Ring Power Pack.
The LED on the Battery Charger indicates when the
battery is fully-charged.
If a battery is very low, then the LED on the charger
flashes slowly.
While the battery is charging, the LED on the charger
remains solid.
When the battery is fully-charged,
the LED on the charger flashes faster.
10
Using and Recharging the Auxiliary battery Pack
A Rechargeable Auxiliary Battery Pack is available to connect with the Tracking
Ring Power Pack for extra long use.
When attached to the Tracking Ring Power Pack, the Auxiliary Battery Pack
overrides the built-in battery.
If more than 4 hours of use is required, connect the Auxiliary Battery Pack to the
Tracking Ring Power Pack.
To recharge the Auxiliary Battery Pack:
1. Turn OFF the Tracking Ring Power Pack.
2. Set the switch on the front of the Battery Charger
to AUXILIARY BATTERY PACK.
3. Plug the Battery Charger into an electrical
outlet and connect the Auxiliary
Battery Pack to the charger.
To get the maximum usage from the batteries, use
the built-in battery first until the Battery LOW LED illuminates,
then attach the Auxiliary Battery Pack.
The Battery Charger takes 4 – 6 hours to recharge the Auxiliary Battery
Pack.
As a matter of regular practice, when you are done with a session,
you should plug the tracking power pack into the charger. Be sure
that the charger is plugged into the wall outlet and that the switch on
the front of the charger is in the proper position.
When the tracking power pack is fully charged (indicated by the light
on the charger flashing fast), you should then charge the auxiliary
power pack. Again, be sure to move the switch on the front of the
charger to the proper position.
11