1
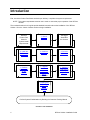
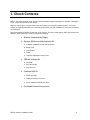
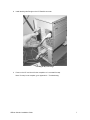
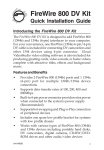
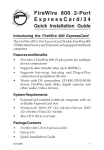
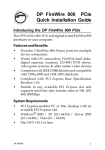
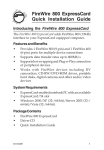
XEScan Solution
Installation Guide
701P38349
April 2002
Trademark Acknowledgments
Windows 98, Windows ME, Windows NT 4.0, Windows 2000, and Internet Explorer are registered
trademarks of Microsoft Corporation.
FireBoard is a trademark of UniBrain Incorporated.
XEROX®, XES™, and The Document Company are trademarks of XEROX CORPORATION.
Table of Contents
Trademark Acknowledgments..................................................................................................... 2
Introduction ................................................................................................................................... 4
1. Check Contents ........................................................................................................................ 5
2. Install the FireBoard 400 and Dongle .................................................................................... 6
3. Install the Software................................................................................................................... 8
4. Connect to the Synergix Scan System................................................................................ 10
5. Perform Maintenance on the Scanner................................................................................. 11
6. Update the Firmware.............................................................................................................. 12
7. Perform a Test Scan............................................................................................................... 13
8. Adding and Calibrating a Printer .......................................................................................... 13
Appendix A - Troubleshooting .................................................................................................. 15
The PC won't start after installation of the FireBoard 400 card. ......................................................... 15
The Scanner LED won't light......................................................................................................... 15
The LED does not proceed to display "P" or "E" after being powered on for three minutes. ................. 15
The LED dot does not light after the Scanner and the PC are powered on. ........................................ 15
Other errors: ............................................................................................................................... 16
Appendix B - Opening Your PC ................................................................................................ 17
Tools........................................................................................................................................... 17
Other Fasteners......................................................................................................................... 17
Board Installation........................................................................................................................ 18
XEScan Solution Installation Guide
3
Introduction
First, check the Product Fact Sheet received upon delivery. It explains the system requirements.
NOTE: The system requirements must be met in order to assure the proper operation of the XEScan
Solution.
The numbered sections in this guide provide detailed instructions about the installation of the XEScan
Solution. Go to the Check Contents section to begin installation.
Read the
Product Fact
Sheet for
System Install
Requirements
1. Check
Contents
The Rigger
Assembles
the Scanner
2. Install the
FireBoard 400
and Dongle
3. Install the
Software
4. Connect
the Scanner
5. Perform
Maintenance
on the
Scanner
6. Upgrade
Firmware on
Scanner and
Install Feature
Keys
Purchased
7. Perform a
Test Scan to
Verify System
Operation
8. Adding and
Calibrating a
Printer
(Reflection
only)
Perform System Familiarization by Reading the Customer Training Manual
Flowchart of the Installation
4
XEScan Solution Installation Guide
1. Check Contents
NOTE: Check the contents of the Synergix Scanning System shipping packages for damage. If damage is
found, call the XES Customer Call Center.
Begin by unpacking the contents of the boxes and making sure everything listed is present. The boxes
contain the materials listed. Be sure to read this guide before you start installation to ensure the procedures
are understood.
Remove all packing material from the body of the scanner. This may include tape or foam used to keep nonstationary parts of the scanner from moving during shipping
•
Scanner (assembled by Rigger)
•
Synergix SAScanner Nationalization Kit
•
•
•
♦
Customer Installation Guide (this document)
♦
Power Cord
♦
Lens Cleaner
♦
Towel
♦
Customer Satisfaction Survey Card
XEScan Software Kit
♦
CD-ROM
♦
Keycode Dongle
♦
Keycode Print
FireBoard 400 Kit
♦
IEEE1394 cable
♦
FireBoard 400Lynx PCI Card
♦
Driver Software CD-ROM (not used)
Purchased Feature Kits (optional)
XEScan Solution Installation Guide
5
2. Install the FireBoard 400 and Dongle
WARNING
Before removing the cover, disconnect any power cord connected to the computer.
CAUTION: When working with the electronic components in the computer, always wear an electrostatic
discharge wristband that is attached to an exposed metal section of the computer.
Note: If the operating system is Windows NT 4.0, disable the Plug-and-Play setting in the PC BIOS. In
addition, for Windows NT and 2000, the installer must have Administrator privileges.
1.
Power off the PC to which the scanner will be connected.
2.
Remove all external cables and place the PC on a sturdy level surface.
3.
Remove the PC cover.
Note:
Refer to Appendix B: Opening Your PC if there are questions about how to open the cover
or locating a PCI slot.
4.
Remove a slot cover corresponding to an empty PCI bus slot.
5.
Insert the FireBoard into the empty PCI bus slot.
Inserting the FireBoard into the PC.
6.
Fasten the FireBoard with the screw used to secure the slot cover.
7.
Reinstall the PC cover and re-connect the existing cables for the PC.
Caution: Take care that no cables are pinched or unplugged when installing the cover.
6
XEScan Solution Installation Guide
8.
Install the Keycode Dongle on the PC Parallel connector.
Installing the Keycode Dongle
9.
Power on the PC and check for the completion of a successful bootup.
Note: If bootup is not complete, go to Appendix A - Troubleshooting.
XEScan Solution Installation Guide
7
3. Install the Software
Caution: If the software was previously installed on the computer, it must be removed before installing the
latest version. Perform the following removal procedure to uninstall the software.
A. Click Start > Settings > Control Panel. Double click on Add/Remove Programs.
B. On the Install/Uninstall tab, scroll down the list of programs to XES XEScan. Click on it and click
the Remove button.
C. After the removal of the program completes, click on the Synergix Diagnostics program and click
the Remove button.
D. After the removal of the program completes, click on Finish.
E. Close the control panel. Right click on the Start button and select Explore.
F. Navigate to the folder /Program Files and delete the XESystems folder.
G. Close the Explorer.
H. Restart the system.
Perform the following procedure to install the software.
1.
Insert the CD-ROM into the PC CD-ROM Drive. The installation program automatically runs if Autorun is
enabled. If it is not enabled, click the Start button. Then click Run… and Browse to the CD drive.
Select the SETUP.EXE file and click Open. Then click OK.
2.
Click on the pulldown menu and select the desired language. Click OK.
3.
The welcome screen displays. Click Next.
4.
Follow the instructions on the screen to install the Hardlock driver software.
5.
A screen appears and displays the status of the driver installing. If the screen displays an error and
states that it cannot install the driver, go to Appendix A - Troubleshooting.
6.
After the driver software is installed, the XEScan application software is installed.
7.
The license screen is displayed. Read it thoroughly. If you agree to the terms, click Yes. If you do not
agree, click No and the installation terminates.
8.
The application displays a screen offering the opportunity to change the folder where the XEScan
application is installed. Choose the default by clicking Next.
9.
The application displays a screen requesting the selection of the type of installation. Select Typical.
Then click Next.
10. The Completion Status Bar screen appears and displays the status of the installation.
11. A screen appears and displays the status of the installation of the 'Hardlock' software. This software is
the parallel port dongle driver. If a message indicates an error during the 'Hardlock' installation, go to
Appendix A -Troubleshooting.
12. A Setup Complete screen appears.
13. The Diagnostics installation begins automatically. The Welcome Screen displays. Click on Next to
continue.
14. Fill in the User Name and Organization fields. Leave the radio button checked for Install this
application for: Anyone who uses this computer (all users). Click on Next.
15. Leave the Setup Type selected as Complete. Click Next.
16. Confirm that you wish to install the Diagnostics by clicking Next.
8
XEScan Solution Installation Guide
17. The Completion Status Bar screen appears and displays the status of the installation. Click on Next
when the installation is completed.
18. A screen displays confirming the installation of the Diagnostics. Click on Finish.
19. Install the UniBrain Firewire drivers (ubCore). From the Windows Start menu select:
Start->Programs->XES Programs->Install UniBrain Firewire Drivers
20. The License Agreement screen displays. Click Yes to agree to the license.
21. The Customer Information screen displays. Enter the User Name and Company Name in the data
fields. Click on Next.
22. The destination screen displays. Choose the default location by clicking on Next.
23. Setup Type screen displays. Click on Next to accept the Typical installation.
24. The Program Folder screen displays. Accept the default name by clicking on Next.
25. The Setup Status screen displays. When the installation of the UniBrain Drivers is complete, click on
Next.
26. The Completion screen displays. Click on Finish.
27. The Restart screen displays. The PC must be shutdown to make connections to the scanner. Change
the selection from Yes, I want to restart my computer now to No, I will restart my computer
later radio button highlighted and click Finish.
28. Shutdown the PC.
•
XEScan Solution Installation Guide
9
4. Connect to the Synergix Scan System
1.
Power off the PC and the Scanner.
2.
Connect one end of the IEEE1394 cable to one of the IEEE1394 connectors on the FireBoard in the PC.
Which IEEE1394 connector selected on the PC does not matter.
Connecting the IEEE1394 Cable to the PC
Caution:
Be careful to connect the wire so the tapered side of the plug matches the tapered
side of the jack.
Carefully align connectors
10
XEScan Solution Installation Guide
3.
Connect the other end of the IEEE1394 cable to either one of the IEEE1394 connectors on the scanner.
4.
Attach the IEEE1394 cable to the strain relief on the back of the scanner.
IEEE1394
Connecting the IEEE1394 Cable to the Scanner
5.
Connect the power cable to the rear of the scanner and connect the power cable to a dedicated Power
Receptacle.
5. Perform Maintenance on the Scanner
1.
Clean the platen glass:
A. Raise the scanner top cover.
B. Dampen a clean, lint-free towel (Xerox Part Number 600S4372) with glass cleaning fluid (Xerox Part
Number 43P81).
C. Wipe the glass with the towel.
D. Visually inspect for dirt or other residue.
2.
Remove any obstructions in the paper path of the scanner.
XEScan Solution Installation Guide
11
6. Update the Firmware
This procedure updates the scanner firmware. New firmware is occasionally posted on the XES website
(http://www.XES.com) to correct problems and improve performance of the scanner.
1.
Power on the scanner and observe the LED display (on the back of the scanner) for the completion of
the POST tests. After three minutes, a “P” or "E" will be displayed on the LED.
2.
Power on the PC and observe the system for proper start up.
Note:
Verify that the LED on the rear of the scanner has a dot lit next to the displayed 'P' or 'E' after
Windows starts. The dot means the PC and scanner are communicating.
The Dot
must be
lit!
Location of the LED
3.
Download the latest version of firmware for the Synergix Scanner from the XES website.
4.
Right mouse click on the Start button and select Explorer to open the Desktop Explorer.
5.
Browse to the downloaded firmware file.
6.
Double click on the firmware file.
Note: If the Firmware Update screen displays, go to Step 12. If not, continue with the following
steps.
7.
Double-click on Synergix Diagnostics icon on the PC desktop.
8.
Click on the Utilities button at the bottom of the screen. Wait for the Utilities screen to appear.
9.
Click the Browse button below the Firmware Update entry field.
10. Browse to the downloaded firmware file location on your hard drive.
11. Click Open.
12. Click the Begin Firmware Update button on the screen. Diagnostics displays the Firmware Update
screen.
13. Click the Start button. The file downloads to the scanner.
14. When a new screen displays Please, power scanner OFF to enable new firmware, click OK.
12
XEScan Solution Installation Guide
15. Close the Diagnostic application if it is still open.
16. Power off and power on the scanner.
17. If purchased, redeem and install the Feature Keys. Refer to the XES Feature Key Instructions included
in the Feature Key Kit
7. Perform a Test Scan
To scan a document, perform the following steps.
1.
Double mouse click on the XEScan icon. The Keycode Entry window appears.
2.
Click the Scan Target button and load the Keycode Print into the scanner, printed side down and printed
arrow toward the scanner. Alternatively, enter the Keycode printed on the Keycode Print into the dialog.
Click OK.
3.
The XEScan application starts.
Note: If you click Cancel at the Keycode Entry Screen, the keycode may be entered later in the
XEScan application by clicking on the Info pulldown menu. Select Keycode Entry. Click the Scan
Target button and insert the Keycode Print into the scanner. Or enter the Keycode printed on the
Keycode Print. Click OK.
4.
The Hardware Configuration window opens. Select the Synergix Scanner.
5.
Insert the Keycode Print face down into the scanner.
6.
Select Preview. The scanner transports the print and the page appears in the XEScan preview window.
This verifies that the system operates correctly.
7.
Go to the Synergix XEScan Customer Training Guide to learn more about scanning documents.
8. Adding and Calibrating a Printer
The XEScan Reflection and Reflection Plus software packages add Scan-to-Print functionality to the
XEScan Solution system. In order to copy documents or print files, the target printer or printers must be
installed in the XEScan software. The software package and number of licenses purchased by the customer
determine the number of printers you can install.
As a prerequisite to these steps, the target printer(s) must be installed and functioning. If necessary, the
printer(s) should be calibrated to produce the best possible output.
1.
Double-click the XEScan icon to open the application.
2.
Select [File:Copy Mode] to enter the Reflection copy interface screen.
3.
Select [Configuration:Hardware] to enter the Hardware dialog screen.
4.
Select the printer to be installed from the list of Available Printers on the left side column.
5.
Click the arrow button between the columns to move the printer into the Installed Printers column.
6.
Click the hardware dialog button at the bottom of the Installed Printers list. This will invoke the printer
configuration dialog.
XEScan Solution Installation Guide
13
7.
The first screen is used to set the printer name and connection type. Ensure that you select the correct
interface connection, or output folder. Click the Next button.
8.
Place a checkmark next to all the media the customer wants available for the printer. The media that
are selected represents all the possible media the customer could install in the printer. Click the Next
button.
9.
Use the pull-down menus to enter the settings for the actual media installed in the printer. The settings
must match the media installed media or printing may no take place, or the output will be
unsatisfactory. Click the Next button.
10. Enter the settings that will serve as the default print job settings. Click the Next button.
11. Perform the media calibration for (2) of the customers most frequently used media and mode settings:
a) Place a checkmark next to (2) of the customer’s most frequently used media and mode settings.
The media selected will most likely match the media loaded in the printer.
b) Click the Print Target button. When a target has finished printing, allow it to sit for 1 hour before
scanning.
c) Click the Scan Target button. When prompted, insert the target into the scanner and click the OK
button.
d) When the target has been scanned and the calibration completed, repeat the above step for any
other media targets.
12. When the calibration phase is complete, click the Finish button. Click the OK button to close the
Hardware dialog, or repeat steps 4-11 to install another printer.
14
XEScan Solution Installation Guide
Appendix A - Troubleshooting
The PC won't start after installation of the FireBoard 400 card.
1.
Remove the card and start the computer to verify the card is the problem.
•
If you remove the card and the PC won't start. Look for loose cables or loose parts.
2.
If the operating system is Windows NT 4.0, check that the Plug-and-Play setting is disabled in
the PC BIOS.
3.
If the PC starts with the card removed. Call the XES Customer Call Center.
The Scanner LED won't light.
1.
Make sure the power cable is plugged into the scanner and into a live power outlet.
2.
Make sure the scanner power switch is in the powered position.
The LED does not proceed to display "P" or "E" after being powered on
for three minutes.
1.
Confirm there are no obstructions in the scanner paper path.
2.
Call the XES Customer Call Center for service. Please have your scanner serial number ready.
To find your scanner serial number, look for the sticker on the front of your scanner under the
feed shelf.
The LED dot does not light after the Scanner and the PC are powered on.
•
Make sure the IEEE1394 cable is connected to one of the IEEE1394 ports on the back of your
computer and to the scanner.
•
Confirm that the scanner displays a "P" or "E" on the LED.
•
Confirm that the PC displays Windows.
•
Check the UniCore Driver FireBoard tool.
Start > Programs > XES Programs > UniCore Tool
If the tool does not display two blocks with a number in each box, reload the driver:
Start >Programs >XES Programs >Install UniBrain Firewire Drivers
•
Perhaps the IEEE1394 software driver has become corrupted. Check the status of your software
driver on your computer and reload the software if it the driver does not appear as indicated:
Window 98
Windows NT
1. Click the Start button on the taskbar.
1. Click the Start button on the taskbar.
2. Choose Settings.
2. Choose Settings.
3. Double-click the System icon.
3. Choose Control Panel.
4. Choose the Device Manager tab.
4. Double-click the Devices icon.
5. Make sure IEEE1394 device is shown.
5. Make sure UniBrain devices (4) are running.
6. Choose OK.
6. Choose OK.
If you have tried these suggestions and your scanner still doesn't work, call the XES Customer Call Center.
Please have your scanner serial number ready. To find your scanner serial number, look for the sticker on
the front of your scanner under the feed shelf.
XEScan Solution Installation Guide
15
Other errors:
Refer to the Help file for the problem application:
For XEScan:
Start >Programs >XES Programs >XEScan Help
For Diagnostics:
Start >Programs >XES Programs >Diagnostics Help
For Hardlock:
16
1.
Confirm that the Dongle is installed properly on the PC.
2.
Call the XES Customer Call Center.
XEScan Solution Installation Guide
Appendix B - Opening Your PC
Note: Refer to the documentation that came with the PC to determine how to open the case. The
following Tools and Other Fasteners sections are provided as general information.
CAUTION: Follow these electrostatic discharge (ESD) guidelines when working with the electronic
components in the computer:
Before removing the cover, unplug any power cord that is connected to the computer.
Always wear an ESD wristband that is attached to an exposed metal section of the
computer.
Tools
The answer to the question, "Which tools are required to open my PC?" depends on the fasteners on the
PC. Common fasteners are Philips-head screws. Use a Philips-head screwdriver on those fasteners
Rear view showing Philips-head screws
Other Fasteners
Some case covers may have thumbscrews that can be unfastened by hand.
XEScan Solution Installation Guide
17
Other case covers may have latches that require only pushing on a protrusion to release the cover.
Latches
When the cover is unfastened, the case must be slid off, lifted off, or swung off depending on the case.
Board Installation
1.
Once the cover is removed, locate an open PCI in which to install the IEEE1394 board on the PC
motherboard. The PCI slots are usually colored white and sandwiched between any ISA slots and AGP
slots.
Identifying the PCI slots on the PC Motherboard.
18
XEScan Solution Installation Guide
2.
Remove the PCI slot cover on the back of the PC by unfastening it.
3.
Insert the IEEE1394 board onto the motherboard by firmly pressing down on the board and using a
rocking motion.
Inserting the IEEE1394 Board into the PC.
4.
Secure the board to the PC by fastening the board to the back of the case.
Securing the board to the PC.
5.
Reverse the cover removal procedure to fasten the cover on the PC.
Caution:
Take care that no cables are pinched or unplugged when installing the cover.
XEScan Solution Installation Guide
19
Notes:
Prepared by:
Xerox Corporation
Global Knowledge & Language Services
800 Phillips Road
Building 845-17S
Webster, New York 14580-9791
USA
©Xerox Engineering Systems Inc. 2001 All rights reserved.
Printed in the United States of America
XEROX®, The Document Company, the digital box icon, Synergix Scan System, XEScan, and the acronym
XES are trademarks of XEROX CORPORATION.
701P?????
4/2002