1
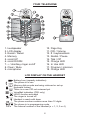
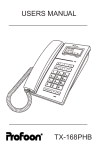
USERS MANUAL
PDX-1100
serie
2
This telephone is not designed for making emergency telephone calls
when the power fails. Make alternative arrangements for access to
emergency services.
SAFETY INFORMATION
Read the safety instructions before first use of this phone.
· Use only the batteries supplied with this telephone.
· Do not use any mains adapter(s) other than the one(s) provided
otherwise you may permanently damage your phone.
· Do not use the phone in damp humid conditions such as a
bathroom. Do not expose the phone or batteries to water or fire.
· Do not dispose of used batteries with household waste or by
burning.
· Do not use the handset(s) in an explosive hazard area.
· To prevent electric shock, never try to open the base or handset(s)
enclosure.
· Avoid metallic contact (e.g. metal clips, keys) between the battery
contacts and charging conductors.
· There is a slight chance that your phone could be damaged by an
electrical storm. It is recommended that you unplug your phone
from the mains supply and telephone socket during a storm.
Because the phone works by sending radio signals between base station and handset, wearers of hearing aids may experience interference
in the form of a humming noise.
We advise that this phone should not be used near intensive care
medical equipment or by persons with pacemakers.
Your phone can interfere with electrical equipment such as answering
machines, TV and radio sets, clock radios and computers if placed too
close. It is recommended that you position the base unit at least one
meter from such appliances.
3
INTRODUCTION
The PROFOON PDX-1100 series DECT telephones are cordless telecommunication systems, based on the DECT (Digital Enhanced Cordless Telephone) technology.
The PDX-1100 comes with one handset only. The PDX-11xx models
come with multiple handsets. The PDX-1100 series DECT telephones
can only operate with the handset(s) supplied. It is not possible to
extend your PDX-1100 series with more handsets.
DECLARATION OF NETWORKCOMPATIBILITY
The Profoon PDX-1100 series is designed for use on the ‘public
switched telephone networks (analogue single-line)’ of telephone- and
cable-companies inside the European Union.
Each country and/or provider might require a different telephoneplug.
The function Caller-ID is based on both the DTMF and the FSK system (automatic detection). It might be possible that you have to subscribe to this feature.
The Profoon PDX-1100 series complies with the essential requirements and provisions as described in the European Directive
1999/5/EC.
DECLARATION OF CONFORMITY
The declaration of conformity is available
on the website WWW.PROFOON.COM
4
TABLE OF CONTENTS
YOUR TELEPHONE . . . . . . . . . . . . . . . . . . . . . . . . . . . . . . . 6
LCD DISPLAY ON THE HANDSET . . . . . . . . . . . . . . . . . . . . 6
INSTALLATION
Charge the handset . . . . . . . . . . . . . . . . . . . . . . . . . . . . . . 7
Caution . . . . . . . . . . . . . . . . . . . . . . . . . . . . . . . . . . . . . . . . 7
handsetnumber . . . . . . . . . . . . . . . . . . . . . . . . . . . . . . . . . . 7
USAGE
Incoming . . . . . . . . . . . . . . . . . . . . . . . . . . . . . . . . . . . . . . 8
Outgoing . . . . . . . . . . . . . . . . . . . . . . . . . . . . . . . . . . . . . . . 8
On hook . . . . . . . . . . . . . . . . . . . . . . . . . . . . . . . . . . . . . . . 8
Receiving volume . . . . . . . . . . . . . . . . . . . . . . . . . . . . . . . . 8
Mute . . . . . . . . . . . . . . . . . . . . . . . . . . . . . . . . . . . . . . . . . . 8
Call timer . . . . . . . . . . . . . . . . . . . . . . . . . . . . . . . . . . . . . . 8
Caller-ID . . . . . . . . . . . . . . . . . . . . . . . . . . . . . . . . . . . . . . . 9
Memory . . . . . . . . . . . . . . . . . . . . . . . . . . . . . . . . . . . . . . . . 10
Intercom . . . . . . . . . . . . . . . . . . . . . . . . . . . . . . . . . . . . . . . 10
Call transfer / toggle / consultation . . . . . . . . . . . . . . . . . . . 11
Call transfer and network-services . . . . . . . . . . . . . . . . . . . 11
Paging the handset(s) . . . . . . . . . . . . . . . . . . . . . . . . . . . . 11
Out of range . . . . . . . . . . . . . . . . . . . . . . . . . . . . . . . . . . . . 12
SETTINGS
Key beep . . . . . . . . . . . . . . . . . . . . . . . . . . . . . . . . . . . . . .
Key lock . . . . . . . . . . . . . . . . . . . . . . . . . . . . . . . . . . . . . . .
Flashtime . . . . . . . . . . . . . . . . . . . . . . . . . . . . . . . . . . . . . .
Ringer . . . . . . . . . . . . . . . . . . . . . . . . . . . . . . . . . . . . . . . . .
Default setting . . . . . . . . . . . . . . . . . . . . . . . . . . . . . . . . . .
12
12
12
13
13
MAINTENANCE . . . . . . . . . . . . . . . . . . . . . . . . . . . . . . . . . . . 14
SYSTEM FAILURE . . . . . . . . . . . . . . . . . . . . . . . . . . . . . . . . . 14
GUARANTEE CARD . . . . . . . . . . . . . . . . . . . . . . . . . . . . . . . 15
5
YOUR TELEPHONE
1.
2.
3.
4.
5.
6.
7.
8.
9.
loudspeaker
LCD display
Recall / Reset
Memory
scroll UP
scroll DOWN
∗ / shortkey ringer on/off
Clear / Mute
microphone
10. Page Key
11. CID / Volume
12. # / keyboardlock
13. Redial / Pause
14. Talk / Off
15. Charge LED
16. In Use LED
17. Program / intercom
18. Charge LED
LCD DISPLAY ON THE HANDSET
HS-x
Battery-Icon (capacity indication)
The phone is in use
Memory dial records are being retrieved or set up
Keyboard locked
There is a new CID not reviewed yet
VoiceMail indication (FSK only)
HOLD-function activated
The ringer is turned off
Handset in reach with base
The phone number contains more than 12 digits
The phone is in programming mode
The internal number of the handset (x = 1, 2, 3 or 4)
6
INSTALLATION
1. Connect the output plug of the mains adapter to the socket on the
bottom of the base unit and the mains adapter to the wall mains
supply.
2. Plug the mains adapter of the charger(s) (if supplied) into the wall
mains supply.
3. Install 2 AAA batteries, observing their polarities, into the battery
compartment on the (each) handset.
4. Slide the battery door(s) firmly into place.
5. Connect the telephone lead to the telephone socket on the bottom
of the base unit and to the wall phone socket.
6. Place the handset(s) on the base unit (or on the charger(s)) and let
the batteries charge for a full 14 hours before using.
CHARGE THE HANDSET:
When an empty battery icon is displayed, the batteries need recharging. When you are talking on the phone, you'll also hear a series of
short beeps as warning.
CAUTION:
Use only the mains adapter(s) supplied with this telephone. Incorrect
adapter polarity or voltage can seriously damage the unit.
Use only the charger(s) supplied with this telephone. Incorrect charger
type can cause damage to the handset(s).
RISK OF EXPLOSION IF BATTERY IS REPLACED BY AN INCORRECT TYPE. Refer to the original type supplied with this telephone.
HANDSETNUMBER:
In idle state the handset LCD display’s “HS-x” were x represents the
handsetnumber “1”, “2”, “3” or “4”.
7
USAGE
INCOMING:
1. lift the handset and press
to answer the call
Refer to page 13 in case you want to change the ringersignal.
OUTGOING:
standard:
1. press
and wait for the dialtone
2. key in the telephonenumber through the keyboard
blockdialing:
1. key in the number (use button
2. press
3. the number will be dialed
to correct)
last number redial:
1. press
2. press
, the last dialed number will be redialed (or press
over one second to return to the idle state)
The capacity of the last dialed number is 20 digits.
for
ON HOOK:
1. press button
or put the handset into the base or into the
charger pod to go on hook.
RECEIVING VOLUME:
Press
during the conversation to increase or decrease the receiving volume. This setting will be kept in memory.
MUTE:
1. Press button
to mute the call. Symbol
is turned on. The
caller is not be able to hear you but you are still able to hear the
caller.
2. Press button
again to unmute the call.
CALL TIMER:
After about 10 seconds and till about 5 seconds after the call is ended,
the display shows the call duration.
8
CALLER-ID:
During an incoming call, the number of the calling party comes on the
display of your handset(s). Each handset has a memory-capacity of 20
numbers.
Attention: It might be possible that you have to subscribe to this feature.
Caller record review:
If there is a new call (not yet reviewed), the Message Icon
will
light.
1. In standby mode, press
.
2. Press
(button 5) of
(button 8) to review the caller record.
3. Press
to exit.
Once the caller-list is reviewed, the Message Icon (on that particular
handset) will turn off.
Call back from caller record:
Once you have found the desired name/number, press
that number.
to dial out
Store the number in memory:
1. press
and use
and
to look for the required number
2. press
and keep it pressed until after about 2 seconds the
symbol
lights
3. press one of the 10 key’s (0-9) of the keyboard
CLIP on Call Waiting (only FSK based systems)
If you have subscribed to this service, the telephone will show the
phone number of another incoming call while you are talking on the
phone.
If you press
, the current call will be put on hold and you could talk
with this second caller. Subsequent presses of button
will toggle
you between these 2 callers.
9
MEMORY:
The memory of each handset of the PDX-1100 series has a capacity
of 10 telephonenumbers of maximum 20 digits each.
Programming:
1. key in the number through the keyboard
2. press
and keep it pressed until after about 2 seconds the
icon
lights
3. press one of the 10 key’s (0-9) of the keyboard
Dialing:
1. press
and press the key under which the number is stored (0-9)
2. press
3. the number will be dialed
Pause:
In case you are connected through a PABX, a waiting time must be
inserted direct after the prefix number. Press
and keep it pressed
until after one second a “P” comes in the display.
MESSAGE WAITING INDICATION: (FSK only)
The icon
turns on when you have a new message in your mailbox.
After you've listened to all the new messages, the icon
will turn off.
You can also turn off the icon by pressing
for 2 seconds when the
phone is in standby.
(You need to subscribe to voice mail service in order to utilize this feature. Contact your local telephone company.)
INTERCOM:
This feature is only available when you purchased a PDX-11xx telephone with multiple handsets.
1. press button
2. dial the number of the other handset (1, 2 3 or 4)
3. as soon as the other handset answers the call, you can have your
intercom-conversation
4. press
to disconnect
- in case the other handset does not answers the call, press
to
disconnect
10
CALL TRANSFER / TOGGLE / CONSULTATION:
This feature is only available when you purchased a PDX-11xx telephone with multiple handsets.
1. during the conversation press , the internal dialtone is heard and
the CO line will be put on hold
2. dial the internal number of the other handset (1, 2, 3 or 4)
3. as soon as the other handset answers the call, you have the
following options:
Call transfer:
press
to transfer the CO line to the other handset
Toggle:
by pressing button , you can toggle between the other handset and
the CO line
Consulting:
after you have consulted the other handset, press
CO line
to return to the
In case the other handset does not answer your call, press
to the CO line.
to return
CALL TRANSFER AND NETWORK-SERVICES:
Use the
key to activate special services from your telephone-company or to transfer a call in case you are connected through a PABX.
The FLASH time is adjustable. (see page 12)
PAGING THE HANDSET(S):
You can page or locate the handset(s) by pressing
on the base.
The handset(s) will produce the paging tone (same as ringer melody)
for 30 seconds and LCD display shows "OOOO".
You could stop the paging by pressing any key on the handset.
Paging is not available when one handset is accessing the telephone
line.
This feature is affected by the ringer melody, ringer volume and ringer
on/off that you've programmed.
11
OUT OF RANGE:
You will be alerted when the handset is too far away from the base.
The symbol will turn off. Bring the handset nearer the base to move
it back in range.
If you are talking on the phone, you'll hear an alert tone through the
earpiece. If you fail to bring the handset back in range with the base,
your call would be disconnected.
SETTINGS
KEY BEEP:
When the key beep is turned on, you will hear a tone whenever you
press a key on the handset. You have the option of turning on or off
the key beep.
1. Press
and keep it pressed until after about one second the
symbols
and
come in the display
2. Press button 2 to select the key-beep setting.
3. - press button 1 to turn off the key beep
- press button 2 to turn it on
4. Press
to confirm and return the phone to standby.
KEY LOCK:
Press and hold
(= button #) during Standby to lock or unlock the
keypad on the individual handsets.
turns on whenever the keypad is
locked. When the keypad is locked, pressing any key will have no
effect during standby (except holding
.)
When there is an incoming call, you can still answer the call by
pressing
. During the call, the keypad functions as normal. When
the call is ended, the keypad will be locked again.
FLASHTIME:
1. press
and keep it pressed until after about one second the
symbols
and
come in the display
2. - press button 3, and button 1 to select a flashtime of 100mS (this
is the default setting)
- press button 3, and button 2 to select a flashtime of 300mS
3. press
to store the selected flashtime
12
RINGER:
Handset Ringer Melody and Ringer Volume:
1. Press
and keep it pressed until after about one second the
symbols
and
come in the display
2. Press button 1, the phone plays the current ringer melody at the
current volume level.
3. Press button 1 … 5 to choose the melody. The melody will be
played once.
4. Press
repeatedly to adjust the ringer volume. The icon turns
on if the volume is set to OFF.
5. Press
to confirm and return the phone to standby.
Shortcut to Turn Ringer On/Off:
You can turn on/off the ringer by pressing and holding button
standby mode. when the ringer is off, the icon
will turn on.
in
Base Ringer Volume:
Pressing and holding
on the base adjusts the base ringer volume.
The ringer will be played once at the new volume level. If the ringer is
turned off, you will hear two short beeps.
You cannot change the base ringer setting when you are talking on the
phone.
DEFAULT SETTING:
If you default a handset, all the settings on that handset will be reset
as that of a newly manufactured one.
1. Press
and keep it pressed until after about one second the
symbols
and
come in the display
2. Press and hold
until you hear the confirmation tone.
3. The handset is reset and the phone returns to standby.
- this action clears all the numbers in the redial, phonebook and CID
records.
- repeat this action for all handsets (if so required)
13
MAINTENANCE
* Before cleaning the product, disconnect it from the telephone jack
and power source.
* Do not clean any part of your telephone with benzene, thinner or
other solvent chemicals - this may cause permanent damage that is
not covered by the guarantee. When necessary, clean it with a
damp cloth.
* Keep your telephone away from hot, humid conditions or strong
sunlight.
* Every effort has been made to ensure the highest standards of
reliability for your PDX-1000 series telephone. However, if
something does go wrong, please do not try to repair it yourself consult your supplier.
* Do not use your telephone outdoors in the rain, or handle it with wet
hands - water can damage electrical equipment.
SYSTEM FAILURE
In case of a possible system failure, please remove the battery-pack
from the handset(s) and disconnect the power adapter and telephone
connectioncord from the corresponding wall outlets. Wait several
minutes and reconnect all. If this does not help, than please consult
your dealer.
14
GUARANTEE CARD
CUSTOMER:
Name:
Address:
Zip-code:
City:
Telephone:
Model & serialnumber:
attach here your
purchase ticket
You have a guarantee of 24 MONTHS after the date of purchase of
this Telephone. We guarantee during this period the free repair of
defects caused by material- and construction faults. This at the importers discretion. It is only possible to claim to the guarantee when you
enclose your purchase ticket with the telephone.
HOW TO ACT:
If you notice a defect, consult the manual first. If this manual gives you
no definite answer, consult your dealer with a clear description of your
complaint. He will collect the device together with this guarantee card
and the dated purchase ticket and he will take care of a prompt repair,
respectively free sending to the importer.
THE GUARANTEE EXPIRES:
When used inexpert, faulty connections, leaking and faulty placed batteries, use of unoriginal parts or accessories, negligence and defects
caused by fire, flood, stroke of lightning and natural disasters. With
unqualified modifications or repairs by third persons. With incorrect
transport without a suitable packing. If the device is not handed in with
the correct filled in guarantee card and the purchase ticket.
NOT UNDER THIS GUARANTEE: cords, plugs and batteries.
All further responsibilities, in particular subsequent damages, are
excluded.
15
ver2.0 Oct.2003
0681